Archive for the ‘Crafts & Celebrations’ Category

All Knitted Up: Dovetail Cowl

Sunday, September 22nd, 2013

All Knitted Up: Dovetail Cowl

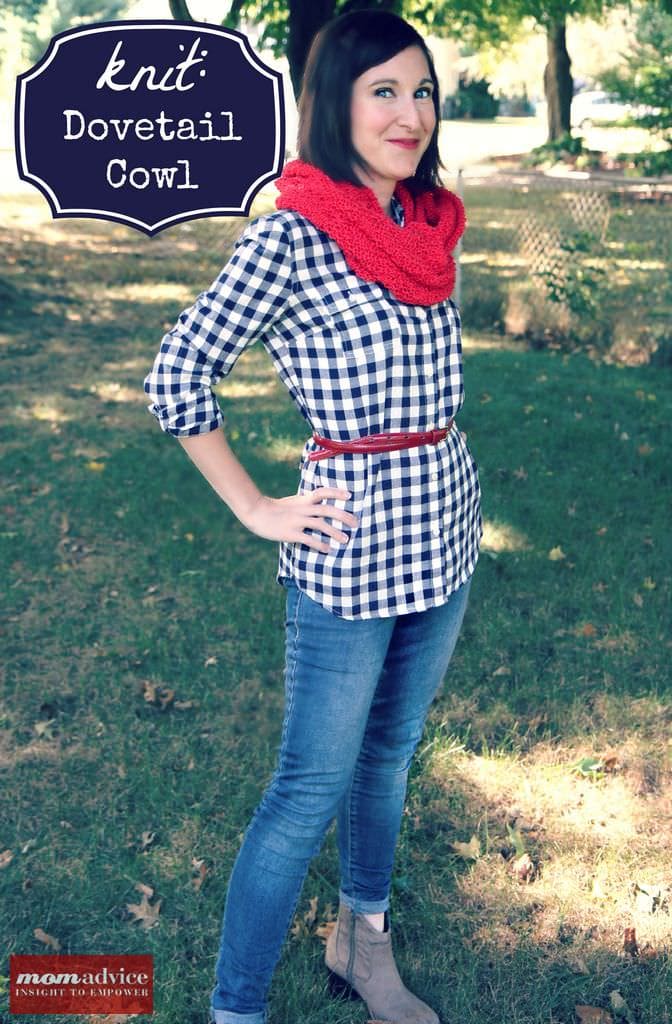
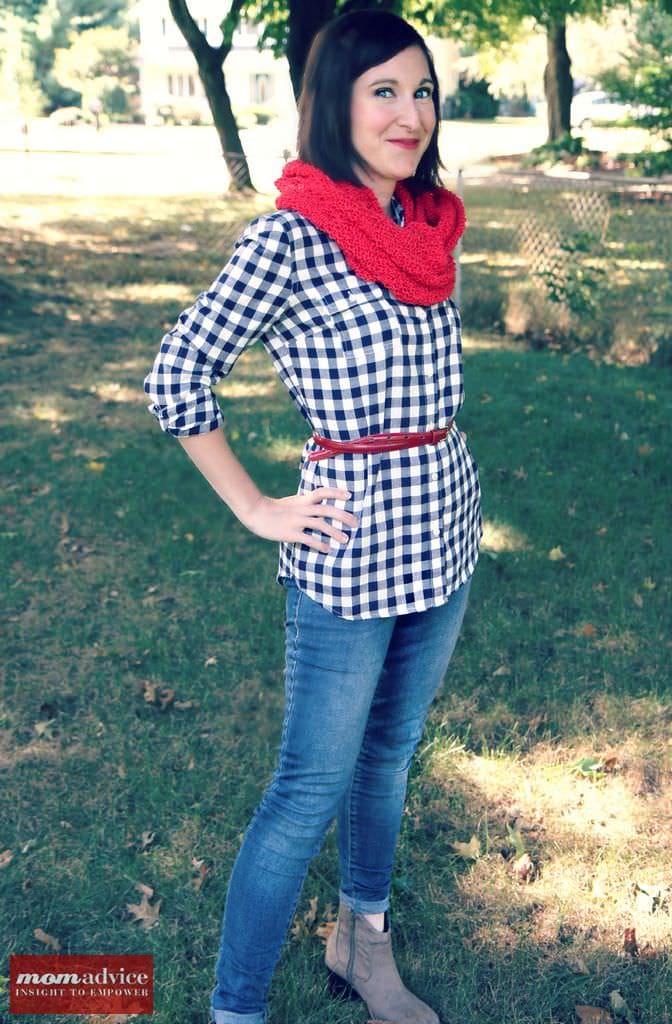
When Fall comes along, I love to be prepared for those cool temperatures with a fresh new scarf or cowl for the season. Today I am sharing my Dovetail Cowl that I knitted up for this season’s cooler temperatures.

The Dovetail Cowl pattern by Carina Spencer is a beautifully written pattern that breaks down a complex-looking pattern into smaller sections thanks to stitch markers. The pattern is only knits and purls, making it a perfect pattern for a beginning knitter who is looking for something a little more complex to tackle.

All Knitted Up: Dovetail Cowl All Knitted Up: Dovetail Cowl

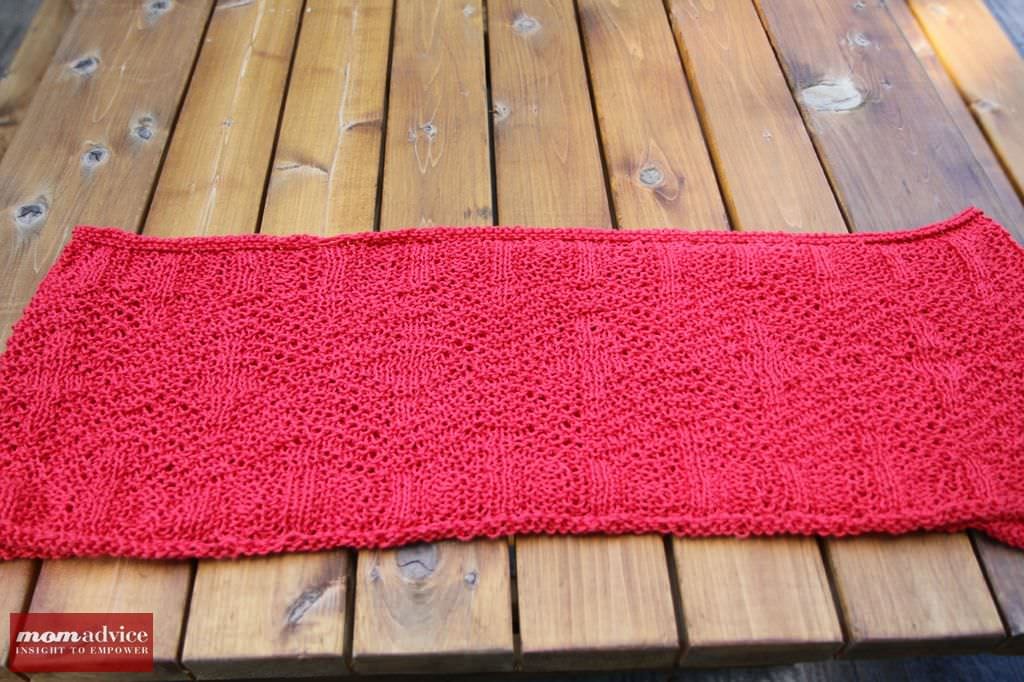
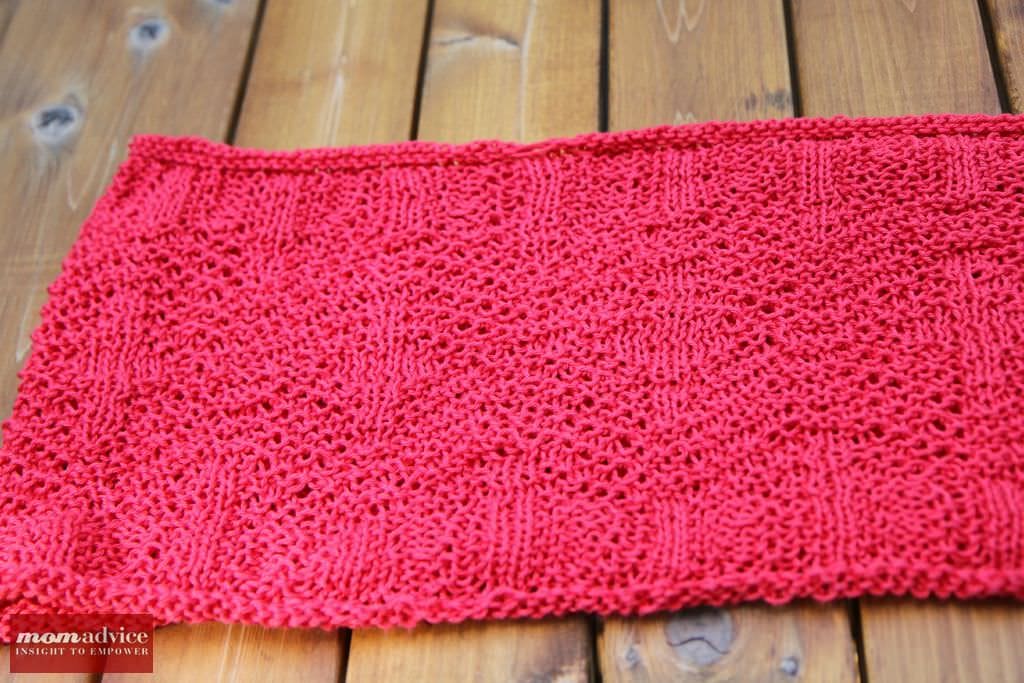
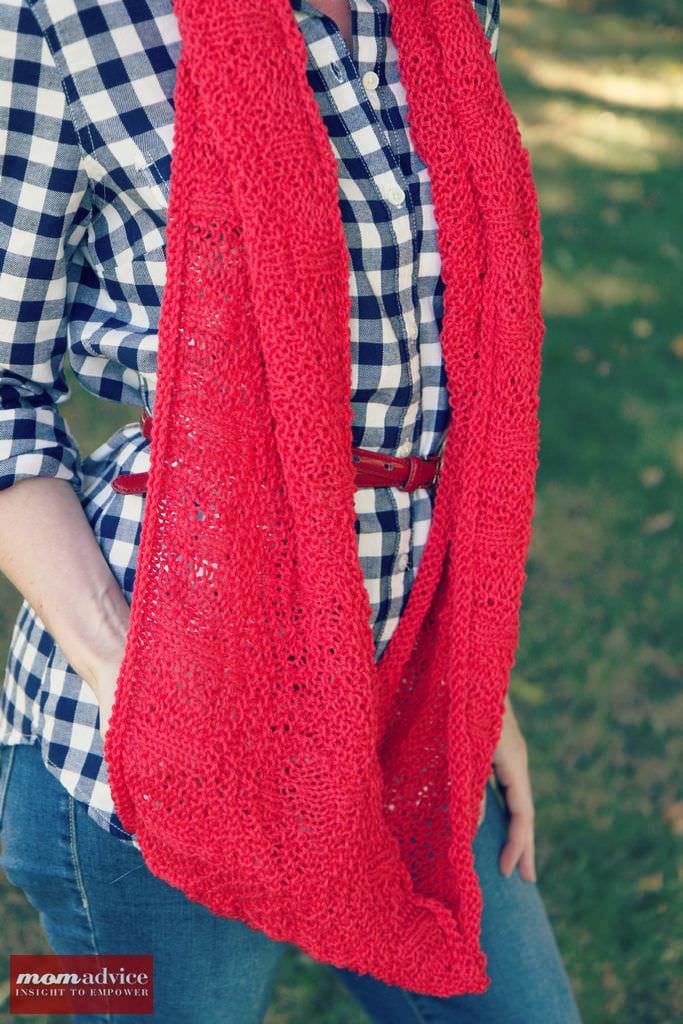
The stitching on this cowl is completely reversible and is textured. The pattern is written in a smaller version (not pictured here) and the larger version (shown above) and can be worn several ways thanks to it being completely reversible.
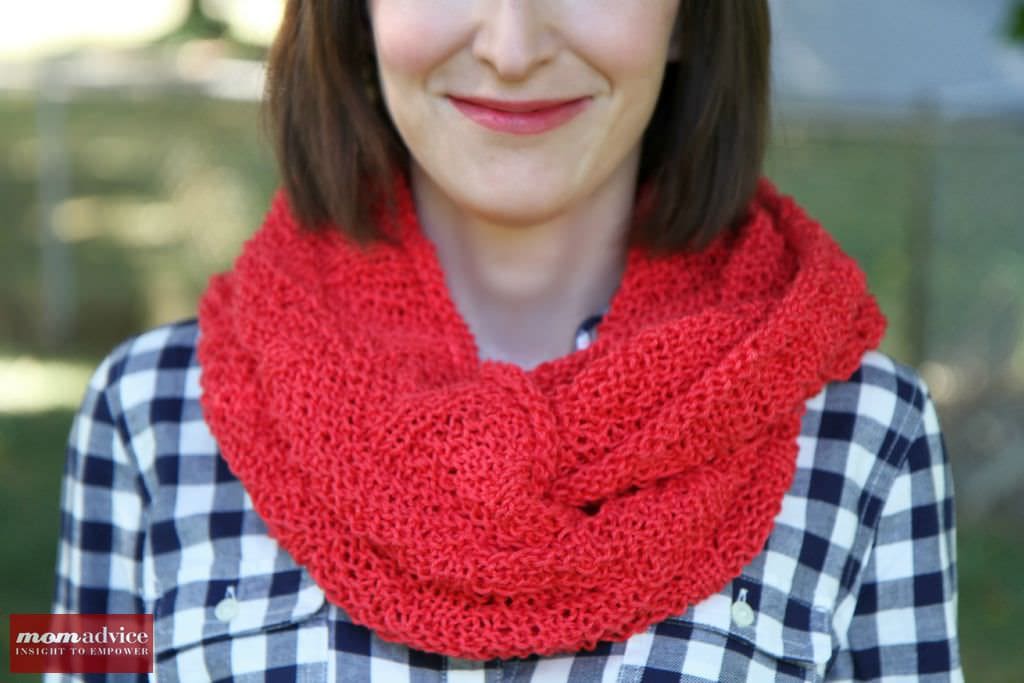
All Knitted Up: Dovetail Cowl All Knitted Up: Dovetail Cowl All Knitted Up: Dovetail Cowl

Poppy Dovetail Cowl

Pattern: Dovetail Cowl

Needle Size: US  7 (40″ circulars work well for this project so you can spread your knitting out and keep an eye on your stitches)

Yarn: Cascade Ultra Pima Cotton in Poppy Red (2 skeins)

Notes: 

I was excited to create a cozy cowl for Fall. I purchased this Dovetail Cowl pattern and paired it with the Cascade Pima yarn for a beautifully textured cowl that would not be too itchy.

This pattern is beautifully written. Using the guidance from the pattern for marking each section off with stitch markers, it makes it very easy to follow and to stay on track with your knitting.

I did the Large size pattern which took me about six weeks to complete in the evenings. Although the pattern is easy to do with just knits and purls, it does require some attention to it to stay on track with your pattern.

I am awfully pleased how this turned out. Two skeins was just enough yarn for me to complete the project, even doing the rolled edge!

If you do the advised yarn on this one, I would just do the shorter version otherwise it might be too much bulk to wrap this scarf twice, unless you are looking to leave the scarf unwrapped. Thanks to the scrunchy cotton yarn I used, I am able to wrap this two or three times around my neck.

You definitely want the longest circulars you have for this one because of the amount of stitches and having enough space to knit this in the round. I used my 40” bamboo circulars, which worked perfectly for this type of yarn and project.

I am in love with this cowl and would highly recommend this cute pattern for a fun holiday gift or for a gift to yourself. I look forward to wearing this a lot this Fall!

*******************

Disclosure: The links to the knitting supplies are affiliate links and are provided so you can locate what you need quickly and easily. Feel free to order your supplies elsewhere, but we always try to highlight the best deals when we see them.


What craft projects have you been working on? Feel free to share any links to what you are working on and be sure to friend me on Ravelry if you happen to be a knitter too! Access all of our craft fun on MomAdvice by visiting our Craft Section. Happy crafting, friends!

Pin It

Fabulous Fall Drinks Round-Up

Thursday, September 5th, 2013

I am SO excited for one of my favorite times of the year, fall! While I enjoy every season and the special things we like to do in each, there’s something about the falling leaves and the cooling temperatures – and the fun holidays we get to celebrate – that makes the autumn months some of my absolute favorites.

Fabulous Fall Drinks  MomAdvice.com

And I’m here to admit that one of the reasons I look forward to the fall is all the fabulous flavored hot drinks I can enjoy again during the cold weather! You know I’m a coffee girl, and adding flavor to coffee is probably one of the greatest inventions ever in my book! I’ve rounded up some of my favorite hot drinks I’ve created as well as a few others I’ve found that I can’t wait to try.

The only thing I have to decide: which one first?

Mom Advice Classics:

Homemade_Pumpkin_Spice_Latte

Homemade Pumpkin Spice Latte

homemade_salted_caramel_mocha

Homemade Salted Caramel Mocha

DIY_Starbucks_Peppermint_Mocha

Homemade Peppermint Mocha

Homemade_Vanilla_Chai

Homemade Vanilla Chai Mix or Cocoa Mix

(these make great gifts for anyone who needs a warm weather pick-me-up!)

DIY_Gingerbread_Latte

Homemade Gingerbread Latte

Homemade_Mint_Truffle_Creamer

DIY Flavored Coffee Creamers

Here are more fabulous drinks I found for you to try – including a couple for adults-only!

peanut-butter-caramel-mocha

Peanut Butter Cup Caramel Latte @ Lunch Box Bunch

crockpot-coconut-hot-chocolate

Crockpot Coconut Hot Chocolate @ How Sweet It Is

SprinkleBakes Whiteout Cocoa

Whiteout Cocoa @ Sprinkle Bakes

Irish Coffee

Irish Coffe @ iVillage

tiramisu tippers

Tiramisu Tippers @ Better Homes & Gardens

And here’s a fun bonus – one of my favorite ways to keep warm on-the-go drinks from being uncomfortable to hold: easy handmade knitted coffee cozies!

Knitted_Coffee_Cozies

You can find even more great drink ideas on our Drinks Pinterest board and if you’d like a few more cooler-weather ideas, be sure to check out our Pinterest boards: Soups & Stews, Slow Cooker Dishes, and my favorite, Knitting!

Well, are you ready for the cooler fall weather now? I know I am!


Pin It

7 Easy Chalkboard Paint Crafts

Thursday, August 29th, 2013

Chalkboard_Paint_Crafts


The back-to-school season is in full swing and to honor that oh-so-wonderful time of year, I thought we could talk about fun chalkboard paint crafts today.

What could be more fun than chalkboard paint projects and what better time to tackle a project like this then when the kids return to school?


Before I begin, I must disclose that I am absolutely obsessed with chalkboard paint and chalkboard paint projects.

Don’t believe me?

Check out our outdoor chalkboard door, our chalkboard lunchbox station, our chalkboard pumpkin people,  our chalkboard cookie jars, even our homework stations are adorned with chalkboards.

I, basically, have chalkboard paint under my nails almost every day and I have even accidentally spray painted my feet a time or two with chalkboard spray paint.

Whoops!

It just goes to show that the possibilities are absolutely ENDLESS with chalkboard paint and how much fun these projects are.

Today I wanted to show you all of the fun DIY chalkboard paint projects you could try in your home with items that are cheap and easy to find.

Just doing this gathering of ideas is quite dangerous for me because I am already planning my next trip out there to do these fun projects!

You won’t believe how fun or how easy the projects are that we are featuring today!


Personalize a Mug

Plain white mugs can often be found inexpensively just about everywhere, but I am particularly in love with this chalkboard paint mug because it can also be a great way to cover up a mug that has a company logo on it.

I am madly in love with this adorable mug from Craft-Werk because it can be personalized to its recipient or even personalized just for yourself.

Check out the tutorial to find out how to create & cut your silhouette for your very own “moi mug.”  (@ Craft-Werk)


Organize Your Family

‘Tis the season for getting organized so why not do it with a magnetic chalkboard calendar that can be personalized just for your family.

To create this craft, head to your favorite second-hand store to find the perfect frame in the size you need for your wall.

Spray paint the frame a color to match your home and then, utilizing some cut-to-order sheet metal, create a surface to jot down all of your families activities.

Visit PSA Stamp Camp to find the tutorial for this magnetic chalkboard calendar. (@ PSA Stamp Camp)


Organize a Junk Drawer

One trip down the housewares aisle and I am sure you will spot many a jar that could use a good home.
Open one drawer in my home and you will quickly see that creating a chalkboard jar organization system would be a lot better than the exploding drawers that are currently residing in my office.
I love this fun and easy chalkboard mason jar storage from It All Started With Paint.
Have no fear if you only find yourself with jars and no lids.
Lids and bands can be purchased separately at just about any superstore that sells canning supplies  (@ It All Started With Paint)

Create a Chalkboard Labeled Cabinet

There are so many places that are a wonderful resource for gently-loved furniture and just about any piece could be transformed into useful and organized storage with the addition of a little chalkboard paint.

I love the functionality of this beautiful chalkboard-painted piece featured on homelife for one clear reason…it showcases the beauty of chalkboard paint in other colors.
Don’t feel like you have to be limited to just the black chalkboard paint.
This piece is not only eye-catching, but it also offers smart functionality for kitchen storage.

Personalize Your Stemware

Anything to prevent ending up with the wrong glass at parties is a win for me and I have fallen in love with this idea to add a chalkboard stem to a wine glass from Always Order Dessert.
If you head to your local thrift store you will find a lot of beautiful stemware that just might not match together.
Adding a chalkboard stem to each wine glass adds a little cohesiveness to a mismatched set and makes for a fun addition to your entertaining supplies. (@ Always Order Dessert)

Make Dining Fun Again

Do you have a worn table in need of a face-lift?

Maybe you have spotted a table at a garage sales or Goodwill that could use a little personal touch to it?
Look no further than this amazing chalkboard table transformation for making dining as a family, fun again.
I love the idea of adding this touch to both dining tables or to craft tables.
Consider adding a thought-starter question to the table, adding the evening’s menu, or simply labeling the food that is laid out for the meal.
Check out this fun table makeover from design sponge for some inspiration for your thrift store purchase (@ design sponge)

Add Food Labels to the Buffet

Is a chalkboard table too big of a commitment?

No worries!
Consider visiting the housewares section for simple small frames instead and give them a new look with chalkboard paint.
Did you know that chalkboard paint can be applied to glass?
Using a little chalkboard spray paint, you can transform any frame at Goodwill into a mini chalkboard to add a label to your dishes at holiday or large gathering meals.
To make mismatched frames feel part of a set, spray paint them all in one color like this cheery yellow! (@ MomAdvice)

Have you tried any chalkboard paint projects in your home? Share your success stories here!


This post contains affiliate links


Don’t miss these other great ideas from MomAdvice.com:


DIY Chalkboard Cookie Jars


No-Sew Chair Cushions


How to Spray Paint Furniture


Meal Prep Ideas


Sign up for the MomAdvice newsletter


Pin It

21 Back To School Organizing Ideas

Monday, August 19th, 2013

Can you believe that school has started for many already, and will be starting for everyone else within the next couple of weeks? It’s crazy how fast the summer goes, yet I always look forward to a brand new school year and that great fresh feeling of fall!  Dealing with all the busy schedules, paperwork, homework, and meals during the school week is part of the fun, but also can lead to feeling overwhelmed if not tackled in the beginning.

Now that my kids are a bit older, I’ve found that if I start out on the right track with simple, doable organizing strategies, then the rest of the year goes much better than when I put off setting up simple systems or decide to just wing it.

21 School Organizing Ideas

With this in mind, I’ve put together 21 Back To School Organizing ideas to inspire you and help you get the year off to a good start for you and your kids. I’ve picked some classic tried-and-true Mom Advice systems that work for us and gathered a few other amazing ideas in three main categories:

  • Making School Memories/Showing Love
  • Life Organization Tips for The School Year
  • Organizing Dinners, Lunches, and Snacks

Teacher School Supplies Cake :: MomAdvice.com

Making School Memories/Showing Love


Teacher’s School Supplies Cake (use the sales!)

Creating Back to School Traditions

First Day of School Pin/Barrette

19 Teacher Appreciation Ideas

Mason Jar With Chalkboard Printable Tags @ The Crafted Sparrow

First Day of School Journal @ Happy Clippings

School Year Time Capsule @ Family Volley

DIY Command Center :: MomAdvice.com

Life Organization Tips for The School Year


DIY Command Center

DIY Homework Station

The Top 7 Apps to Organize Your Life

Simplifying Your To-Do List

Organizing School Papers @ One Creative Housewife

Simplifying the Morning Routine @ Homey Home Design

After School Routine with Free Printable @ Living Locurto

Clothing Organization @ The Idea Room

DIY Lunchbox Creation Station :: MomAdvice.com

Organizing Dinners, Lunches, and Snacks


DIY Lunchbox Creation Station

Dorm Mini-Fridge Healthy Makeover

Free Weekly Menu Planner Sheet

15 Back to School Treats @ Rainbows & Honeysuckle

Quick Tips for Packing Lunches @ House of Hepworths

Pantry Organization for Easy Weeknight Meals @ BHG

I hope this helps you all get off to a successful school year start. And I hope you share with us some of your favorite back-to-school organizing tips!


Pin It

DIY Homework Study Station

Thursday, August 15th, 2013

DIY Homework Study Station from MomAdvice.com.

Back-to-School time is almost here for my crew and today I wanted to show you an easy DIY Homework Station you can create for a fun, focused, and quiet little spot you can create for your homework time. This Tri-Fold Homework Station idea was something that I came up with to do for the back-to-school season with Walmart. Each month they give me a fun craft challenge and I couldn’t wait to create these for my kids.

DIY Homework Study Station from MomAdvice.com.
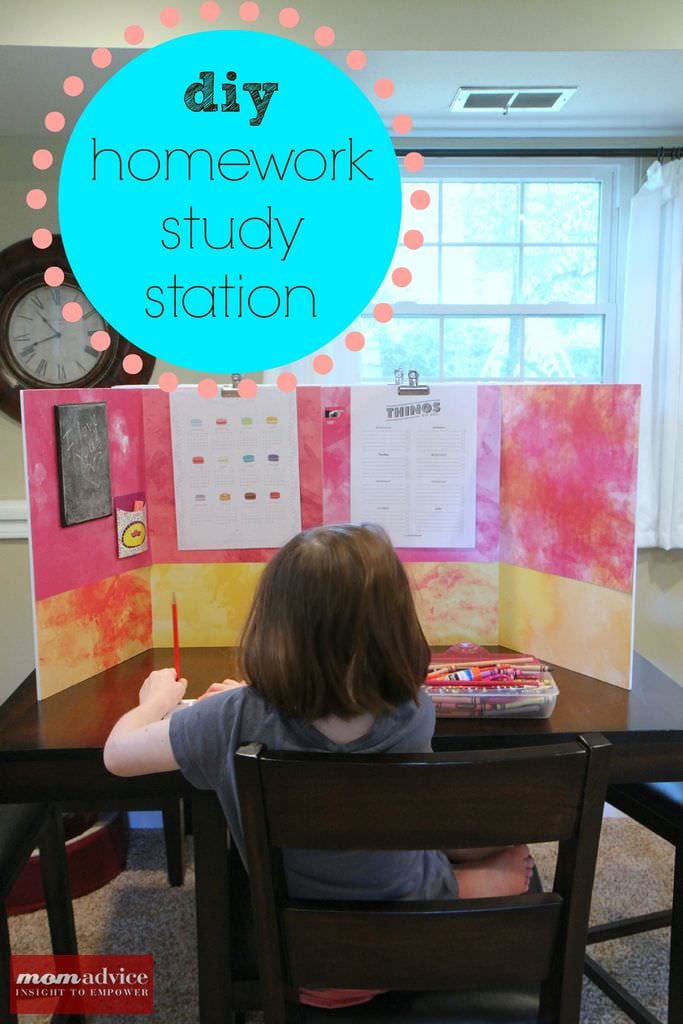
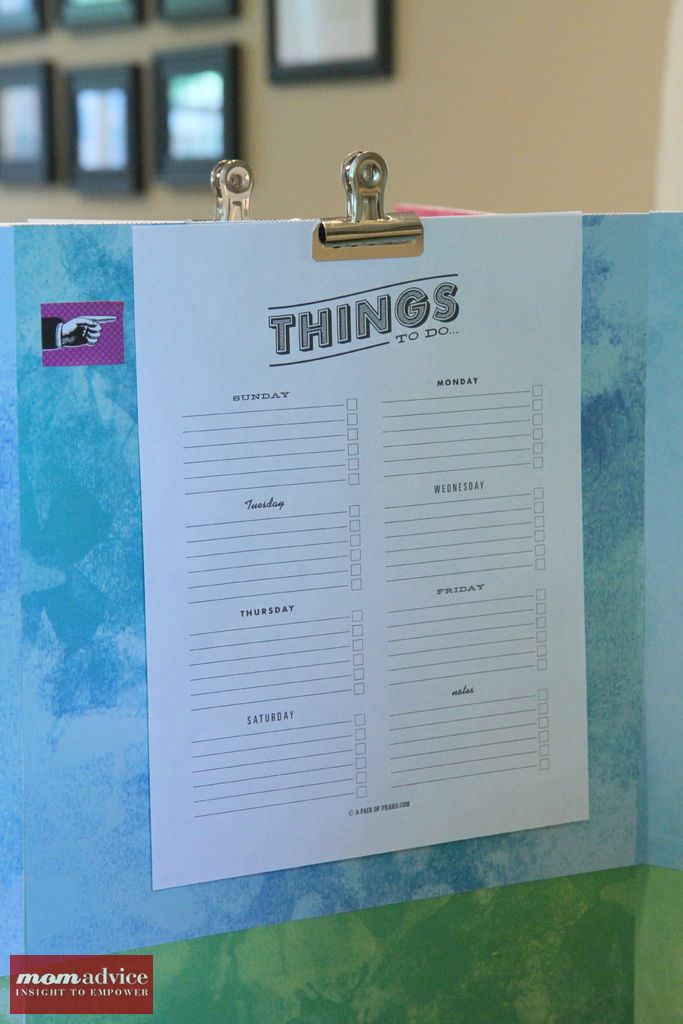
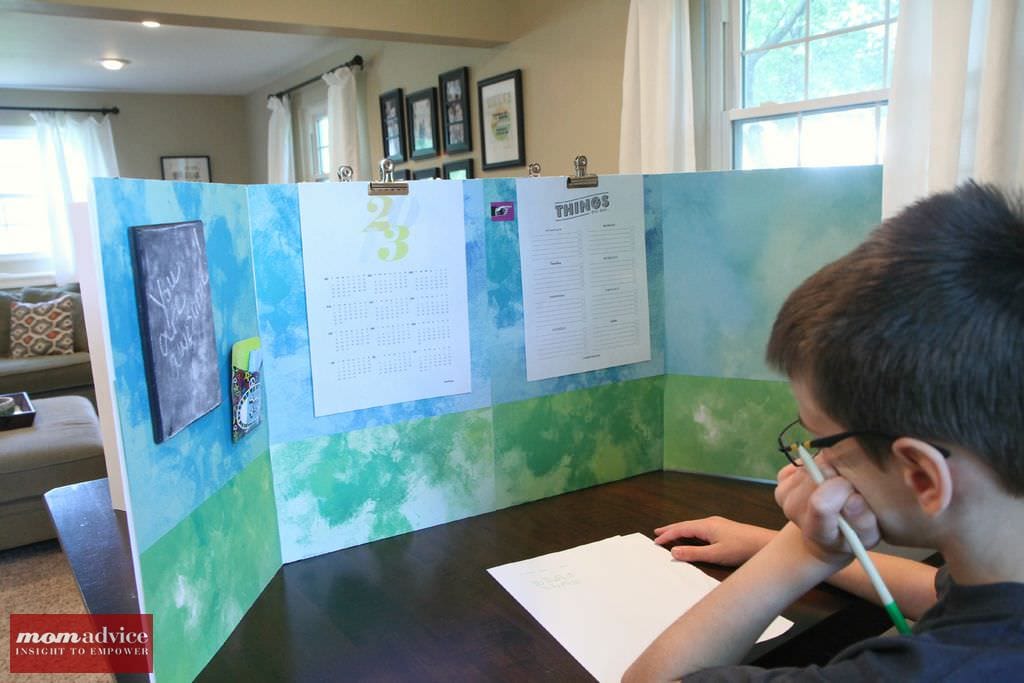
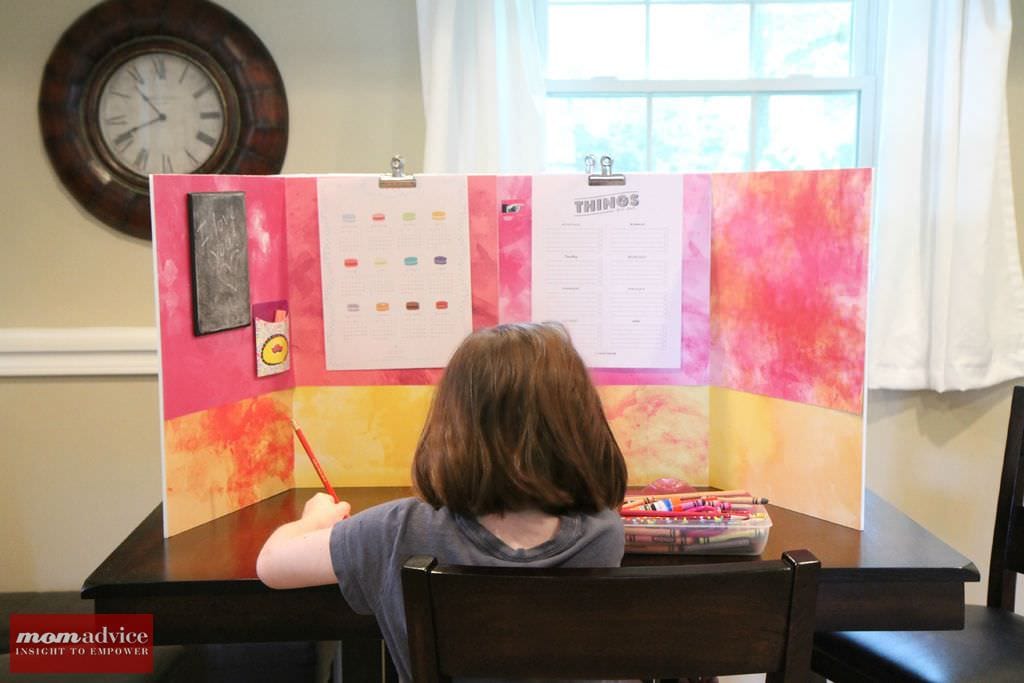
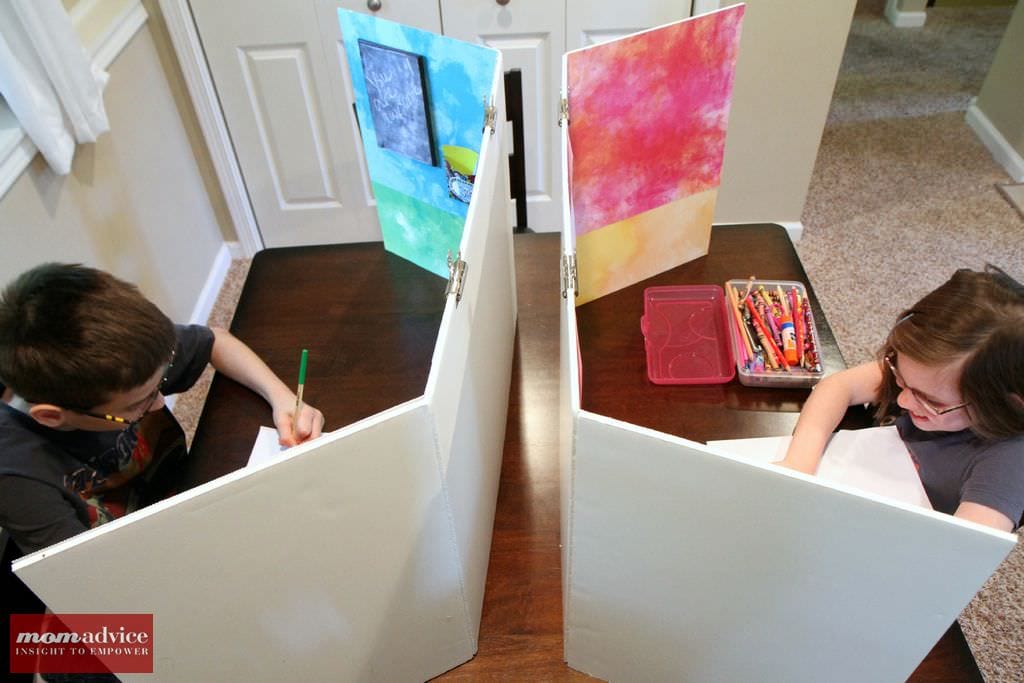
These homework stations are perfect for small space living. Two kids at one table, but each having a place to call their own, so they can focus on their own coursework.  The best part is that these can fold flat and be stored elsewhere when not in use! I can’t wait to show you just how easy it is to create these for your kids!
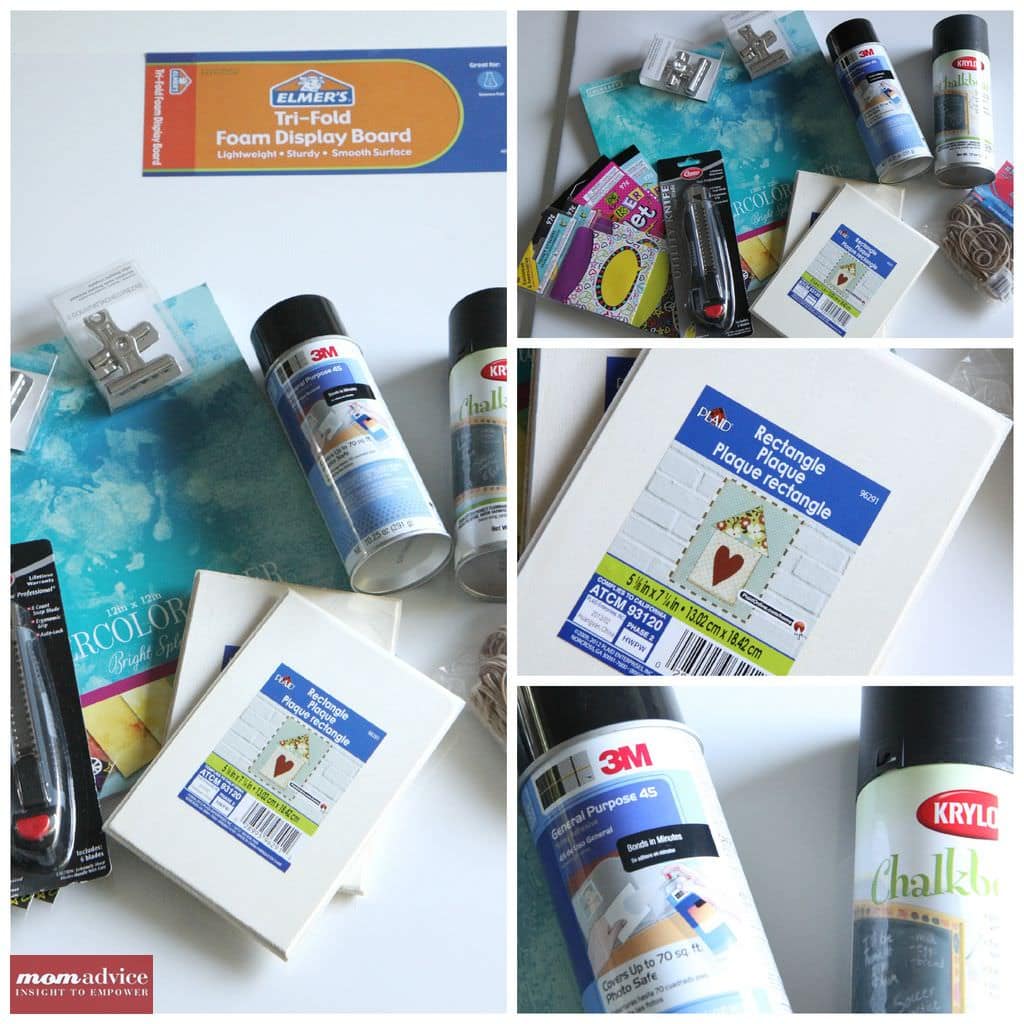
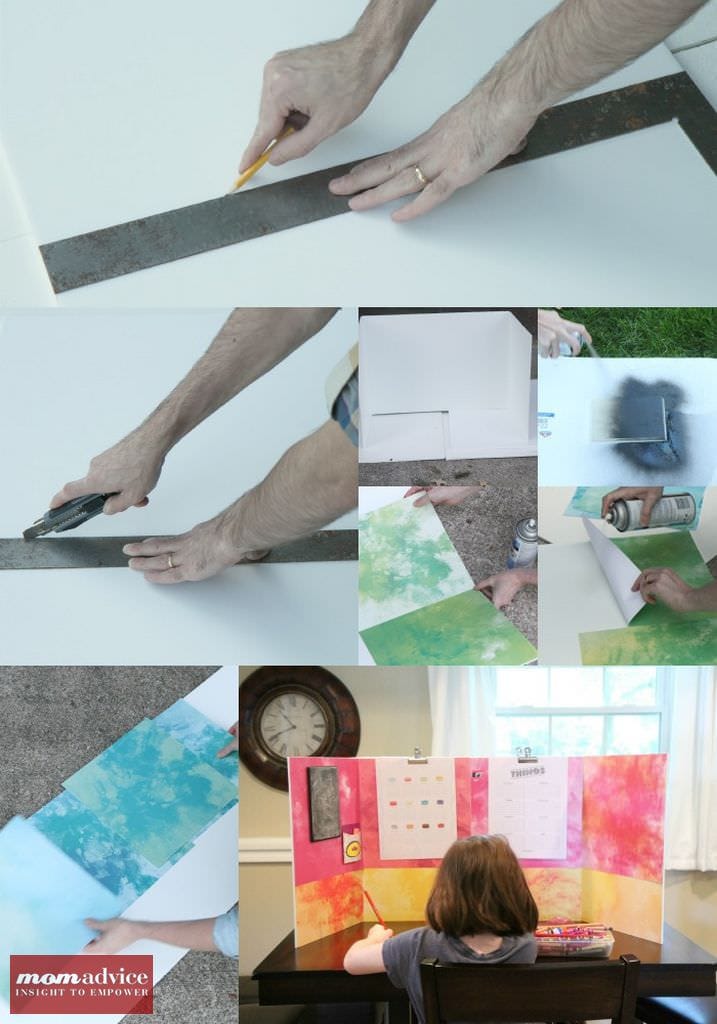
DIY Homework Study Station from MomAdvice.com.

Supplies List

1- tri-fold foam display board (this will make two homework stations for you)

Razor Blade

General  Purpose Spray Adhesive

Chalkboard Spray Paint (over in the paint aisle)

Rectangle Wooden Plaques (one or two depending on how many stations you are creating)

Decorative envelope(s) and stickers

Binder Clips (we did two for each one)

Scrapbook Paper in coordinating colors (8 sheets total per homework station. The type of paper we are using is their Watercolor Paper that they offer for $5 for the pack)

Hot glue & glue gun

DIY Homework Study Station from MomAdvice.com.Directions

1. Begin by measuring and marking the halfway point for your tri-fold display board. The display board is 48″ total, so you will want to cut it so that each side is 24″ long.

2. Cut the display board with a utility knife, making sure to cut carefully through all of the layers.

3. Spray paint your wooden plaques to create your chalkboards for your homework station.  Make sure to shake the can really well, as instructed on the back of the can. Hold your can 8 inches away from your surface and spray in a sweeping motion side to side with a slight overlap. It has always been my experience to go thin with the paint, allow it to dry, and then to add another layer for the best results and minimal drip. Allow the paint to dry for one hour.

DIY Homework Study Station from MomAdvice.com.

5. While the frames are drying, pick out eight sheets of scrapbook paper and set them up for where you would like to display them. Set them aside and, beginning with one side, line the bottom sheets up and, holding them in place with your hands, flip them up to add a little spray adhesive to the underside. Do this all along the bottom of your display board.

6.  Now do the same process again on the top, making sure that they line up with each other and with the top edge of the display board.

7. Once your chalkboards have dried, use your hot glue gun to mount it to your display. Attach an envelope next to it with chalk. Make sure to give your chalkboard 24 hours to cure before writing on it and prepare your chalkboards as I have show in this handy tutorial.

8. Add any stickers or decorations you might like to your homework station or let your kids decorate it themselves.

DIY_Homework_Study_Station_8 9. Clip your binder clips to the top of your display and then add any printables, thoughtful motivational quotes, calendars, etc… to the homework station.

Here are some free printables that I found that I really love:

Weekly To-Do List (A Pair of Pears)

Macaron Calendar (from Jolie Jolie Designs)

Modern Calendar (from LAUs NOTEbook)

If you are looking for more, be sure to check my Printable Goodness Pinterest Board for more ideas.

DIY Homework Study Station from MomAdvice.com.

DIY Homework Study Station from MomAdvice.com.

Good luck to everyone heading back to school! I hope this homework station inspires a fun new homework hangout for your kiddos!  I look forward to showcasing more fun back-to-school ideas to inspire your life this year!

walmart_mom_disclaimer

Pin It

Crafting With Vinyl: The Best in Record Crafts

Monday, July 29th, 2013

Crafting_With_Vinyl_Records

I am so excited to share with you these fun ideas to try when crafting with vinyl records.

Today is all about the best in record crafts and things you can do with old or scratched records.

Did you know records are a mere quarter at our local Goodwill? Record crafts are a fun and frugal craft hobby to try!


Crafting With Vinyl: The Best in Record Crafts from MomAdvice.com. Crafting With Vinyl: The Best in Record Crafts from MomAdvice.com.

This winter to celebrate my birthday and the launch of my book, my amazing friends all pitched in for a record player and my first stack of vinyl for my birthday.

Since then, it has been my little weekly hobby while the kids are in school to head to the stacks of records at my store and spend an hour flipping through records to bring home to listen to over our evening meal.

At a mere quarter, it is easy to get a little carried away with my record collecting, but it has proven to be the perfect thrifty hobby for me.

There is nothing more fun than settling in with some of my favorite albums from my youth and hearing them on record, just like when I was a kid.

Records that are scratched can still get a great deal of love in your home and today I wanted to showcase some fun record craft ideas you could create for your home with these budget-friendly wonders!


Make a Wall Decal

Did you know that you can create, cut, and mold shapes with records to make a wall decal?
Me either, but I am so excited to try this amazing idea for decorating a wall as demonstrated in this easy DIY butterfly craft from Threadsence.
I am already imagining all the possibilities with this craft and think it would be a fun way to dress up a craft room wall or a fun addition to a teen/tween bedroom.

Decorate a Corner With Records

Records come in different sizes and I often see the smaller 7″ records available for purchase at our store.
Don’t overlook the overabundance of these tiny little powerhouses of music because they make the perfect size for tackling smaller crafts.
These tiny records are the perfect size for creating a cute hanging fixture to decorate a room.
I can picture this as a fun mobile in a trendy nursery or as a fun addition to a family game room.(Source Unknown)

Create a Side Table

If there is one thing I love, it is easy crafts and you can’t get any easier than grabbing your hot glue gun and attaching a record to a plant stand for a side table.
This little table would be adorable in any room or the perfect gift for the music lover in your life.
Scratched records make the perfect little resting place for your morning coffee and breathe new life into a tired piece of vinyl.

Craft a Cake Stand

I am all about turning anything that I can find from Goodwill into a cake stand. Remember these adorable board game cake stands I created for a party?
You can attach an inverted candlestick holder or martini glass for an easy stand for these.
These would be adorable at themed parties you are hosting or just a fun way to serve up retro food for an evening with friends.
Check out cake for the full scoop on this fun addition to a party.

Make a Clock

Wall clocks can be expensive, but a necessary addition to many rooms in your home.
That is why I love this easy DIY Vinyl Record Clock idea featured on Apartment Therapy.
Simply choose a record with a label that compliments the color of the room and use a few clock hardware pieces to create your own version for your wall.
Can’t you picture one of these adorable clocks in a dorm or teen/tween bedroom too?
I love it!

Make a Record Bowl

Looking to add a fun fluted bowl to your party table?
Just as was showcased in the wall decal craft that I talked about here, you can also shape and mold records into bowls to adorn your tables at parties.
This easy DIY requires no cutting of records, but simply a heating and shaping of them to create these adorable bowls.
I can picture popcorn, candy, or nuts as fun appetizers for a party.
Check out Prudent Baby for this easy record bowl tutorial.
Don’t forget that you will need a spot to store your new-to-you record collection!
I have fallen in love with this DIY Industrial Storage Cabinet on A Beautiful Mess for an adorable stand and place to display your favorite records.
It looks like the cabinets I have been eyeing online, but is made at a fraction of the price.

My collection has grown so much that I had to find a way to store all of my treasured vinyl in my house.

I found a storage ottoman at Target was the absolute perfect size for my collection and brought it home with me to store all of my new (to me) finds.

It makes hunting for a record much easier than sorting through the stacks in my cabinet and it also is fun for my friends to flip through when they want to grab a record they love.


Happy record crafting & hunting, friends!


This post contains affiliate links.


Don’t miss these other great ideas from MomAdvice.com:


DIY Roll-Up Puzzle Mat


DIY Bar Cart Tutorial


No-Sew DIY Blanket Scarves


DIY Slow Cooker Pumpkin Spice Candles


Sign up for the MomAdvice newsletter


Pin It

DIY Outdoor Chalkboard Door

Wednesday, July 17th, 2013

DIY Outdoor Chalkboard Door
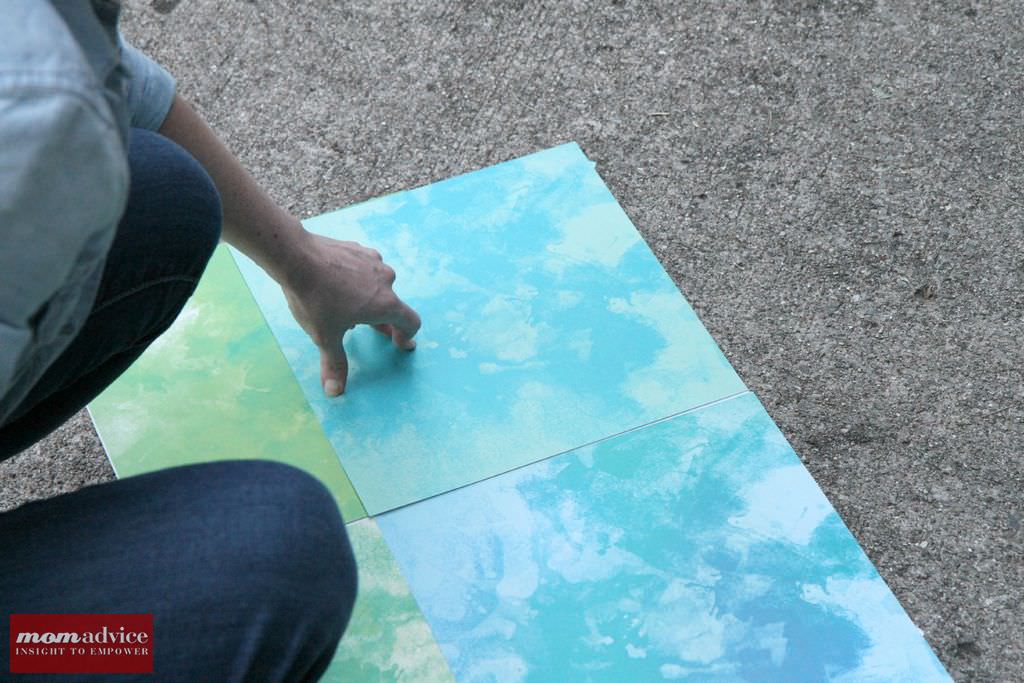
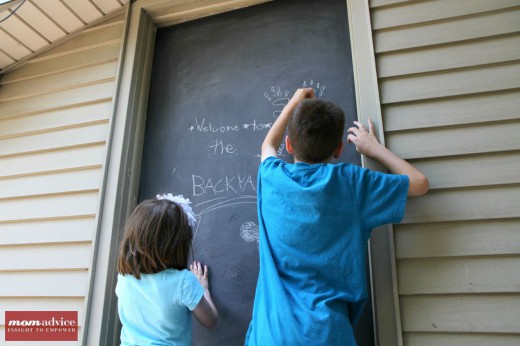
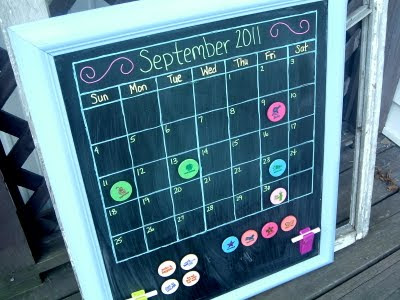
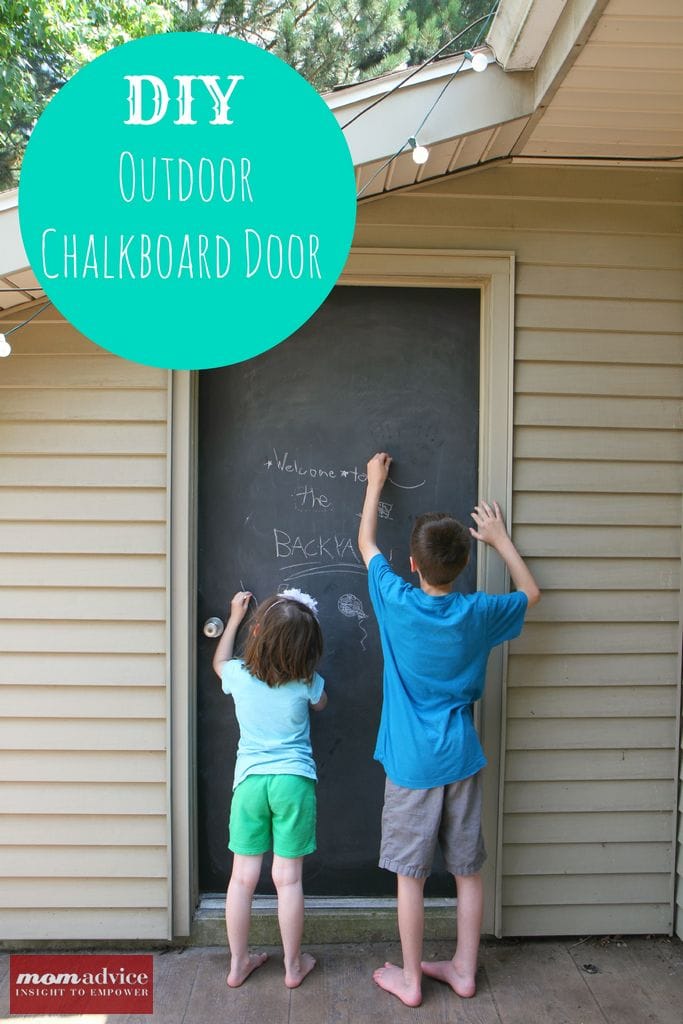
What could be better than a fun summertime outdoor project? Today I want to showcase an easy DIY Outdoor Chalkboard Door that I created to entertain my kids in the summer months. This DIY chalkboard project that we created is one of my new favorite things in our backyard.  This project featured is in conjunction with my job as a Walmart Mom and all of the supplies can be found at your local Walmart store.

DIY Outdoor Chalkboard Door

Here is a picture of what our tired old door looked like on our outdoor shed. The neutral paint showed all of the dirt, debris, and water drip marks all over it. It was becoming an eye sore in our backyard. Instead of painting it with regular paint, I decided to transform this spot into a new backyard activity area and give the kids a spot to do their drawing outside.

For adult entertaining, this can double as a place to jot down a menu, create a welcome sign for your guests, or keep tally of game scores in a wild game of badminton.

We are crazy like that.

DIY Outdoor Chalkboard Door
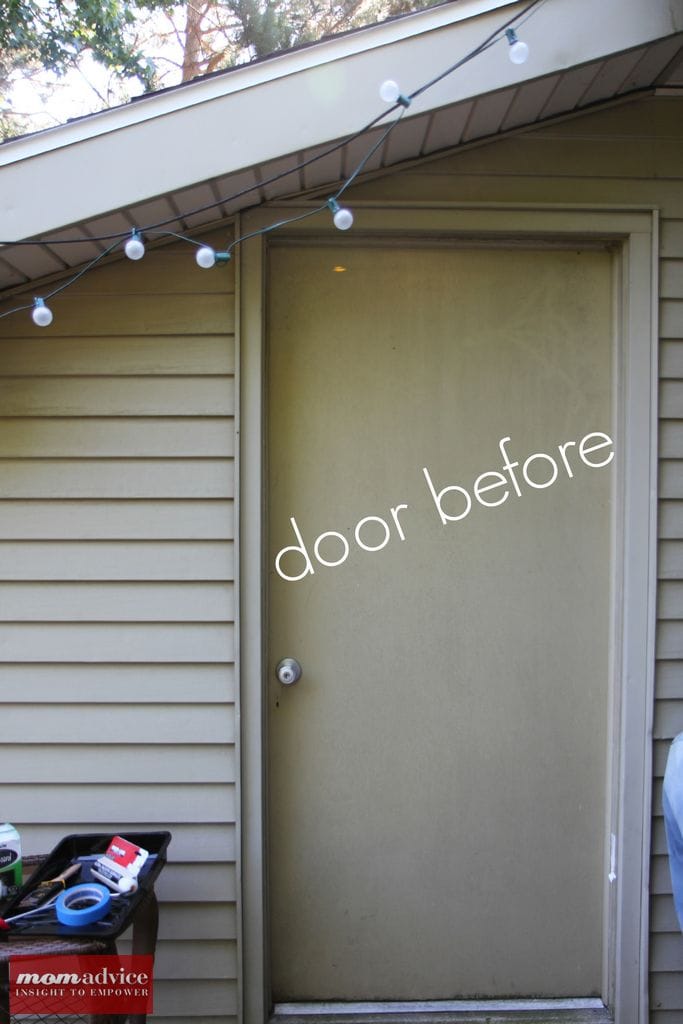
Supplies List (if you buy everything it will be less than $25 in supplies!)

1- 30 ounce container of Rust-Oleum Chalkboard Paint in Black Finish (over in the painting supplies)

Soapy Water & Rag (for wiping down your door)

Painters Tape

Paint Roller

Paint Brush

Paint Tray/Liners

Directions

1. Clean your surface and let it dry. I wiped my door down with a grout brush and a pail of sudsy water and then rinsed it with our hose.

2. Tape off around your door handle to protect it from getting paint on it.

3. Pour your paint into your paint tray and begin applying your first coat with your paint roller. The paint will be dry to the touch within thirty minutes, but give it a full four hours before applying your second coat.

4. Add a second coat of paint and repeat with the same timing above, if you desire, to add a third coat.

5. Allow the door to dry for three whole days before beginning  your conditioning or writing on it.

6. Before writing on it, after three days time, condition the surface by rubbing the side of a piece of chalk on the surface and then erase.  I like to rub my chalk in one direction and then rub it in the opposite direction for good coverage. This  will leave a coat of chalk dust that will provide erasability. Your chalkboard can be wiped clean with a damp towel, but wait seven days after painting before wiping it down. Repeat the conditioning step after cleaning.

DIY Outdoor Chalkboard Door

DIY Outdoor Chalkboard Door

Give your kids some chalk and the chance to create their own welcome sign for your guests outdoors!  I hope your family loves this project as much as we do! The best part is the hours of enjoyment they get and the lack of dirt showing on my outdoor door in the backyard.

A win-win for both kids and parents!

If you loved this project, I just know that you will love these ideas for Chalkboard Fun & Outdoor Entertaining!

S’More Toppings Bar Party

DIY Chalkboard Conversation Bubble Cookie Jars

Dollar Store DIY Chalkboard Food Label Frames

DIY Lunchbox Creation Station

walmart_mom_disclaimer

Pin It

Rainy Day Summertime Activities

Wednesday, July 10th, 2013

Since we’ve been having a run of rainy weather where we live, I thought it would be a great idea to pull together some fun rainy day summertime activities (and even one outdoor project that uses rain!) to help get you through those inevitable wet, summer days.

Rainy Day Activities: MomAdvice.com

You’ll find a few kid-friendly recipes, some projects to give to others, and fun classic indoor games and activities to inspire you to take advantage of summer’s rainy days.

The best part? This is only the tip of the iceberg of summertime activities – both indoor and outdoor! You’ll find oh, so much more on our 100 Days of Summer Pinterest Board – 2013 edition. And if that weren’t enough, there’s the 2012 and the 2011 editions of 100 Days of Summer boards, too. So, no excuses – take some time to have fun with your kids and make some memories!

Here are some MomAdvice classics:

kid_made_cookbook

Create a Kid’s Cookbook

whole wheat toaster tart

Make Whole Wheat Toaster Tarts

homeless_care_package

Create a Homeless Care Package and give it away.

Glow_In_The_Dark_Jello

Wow the kids with our famous diy Glow in the Dark Jello.

Spaghetti_Cupcakes

Cook up some cute Spaghetti Cupcakes.

And here are some more way cool activities to help beat the wet weather boredom (please be sure to pin from the original source I’ve provided- thanks!).

Rain-Painting

Paint in the Rain @Housing a Forest

coloured-butterflies

Paper Butterfly Garland @ My Poppet

balloon-powered-lego-car

Balloon Powered Lego Car @ The Crafty Mummy

draw-build-and-play-zoo

Build an Indoor Zoo @ No Time for Flash Cards

duct tape bag

Duct Tape Tote Bag @ Little Birdie Secrets

glowing rainbow rice sensory play 08

Glowing Rice Sensory Play @ Growing a Jeweled Rose

DIY bath paint

DIY Bath Paint @ Kristan Lynn

Recycled necklaces

Colorful Recycled Necklaces @ Captain Crafty

spoon puppets

Spoon Puppet Theater @ Creative Jewish Mom

washitape car track

Washi Tape Car Track @ Le jardin de Juliette

indoor hopscotch

Indoor Hopscotch @ Giver’s Log

indoor obstacle

Indoor Obstacle Course @ Crumb Bums

indoor car wash

Indoor Car Wash @ What Do We Do All Day?

Kid easy embroidery

Easy kid-friendly embroidery idea @ Anna Maria Horner

Remember to visit our 100 Days of Summer Pinterest Boards for tons more ideas for your summer fun!

Pin It

Chocolate Snickerdoodle Cake

Tuesday, July 9th, 2013

Chocolate Snickerdoodle Cake
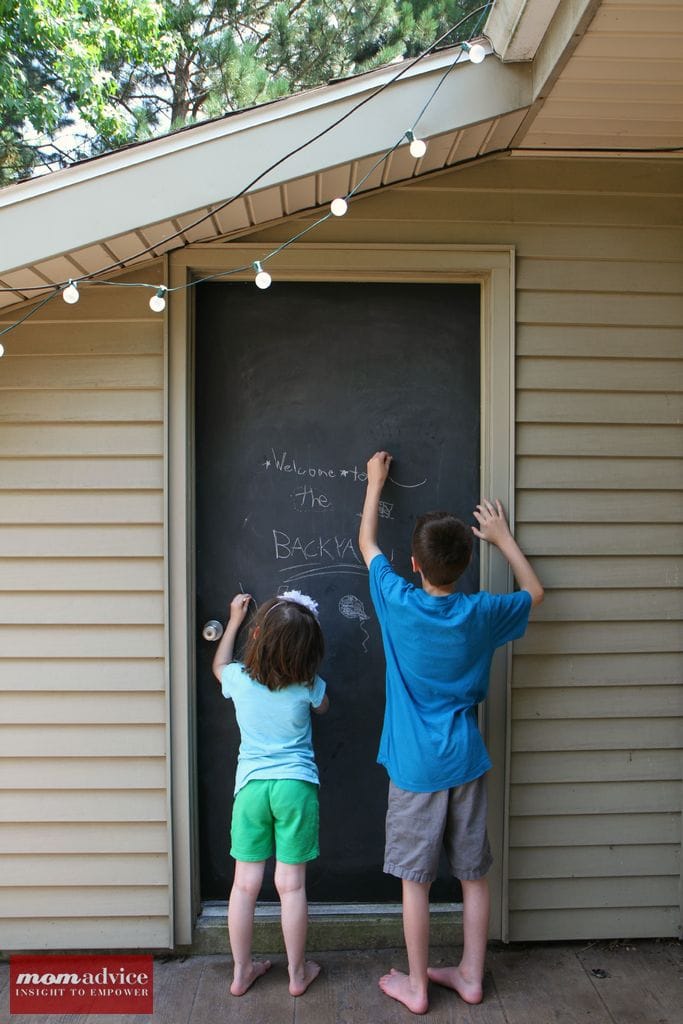
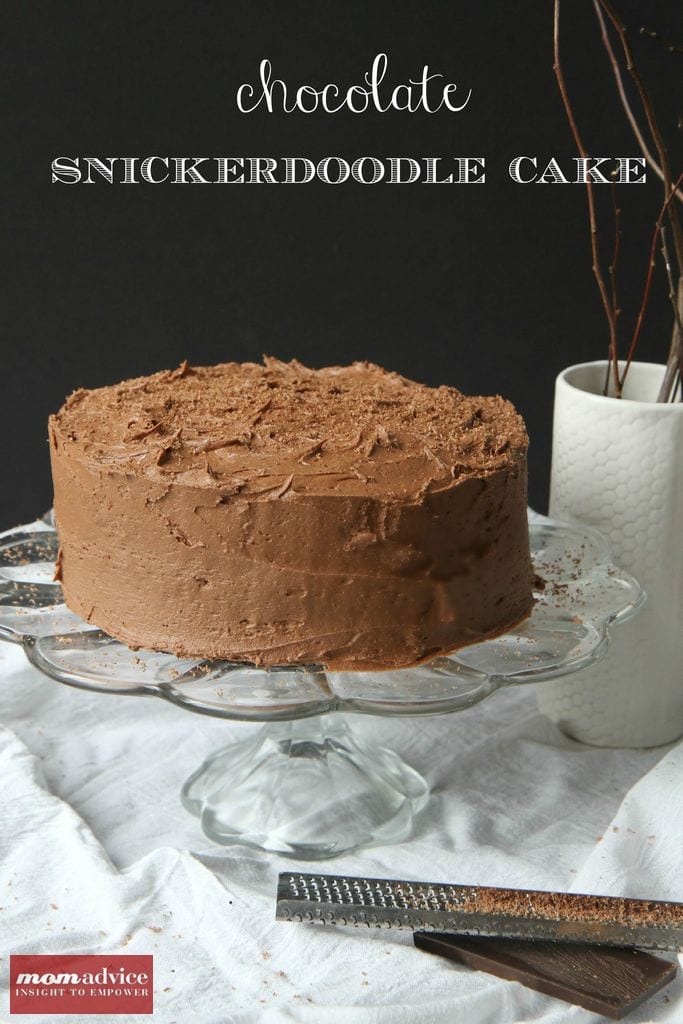
If there is one flavor we love around here it is snickerdoodle. Today I wanted to share an easy recipe for a chocolate snickerdoodle cake that you will flip for. This chocolate snickerdoodle cake is coated in a delicious chocolate cream cheese frosting and adorned in a dusting of dark chocolate candy that adds that perfect finishing touch.

Chocolate Snickerdoodle Cake
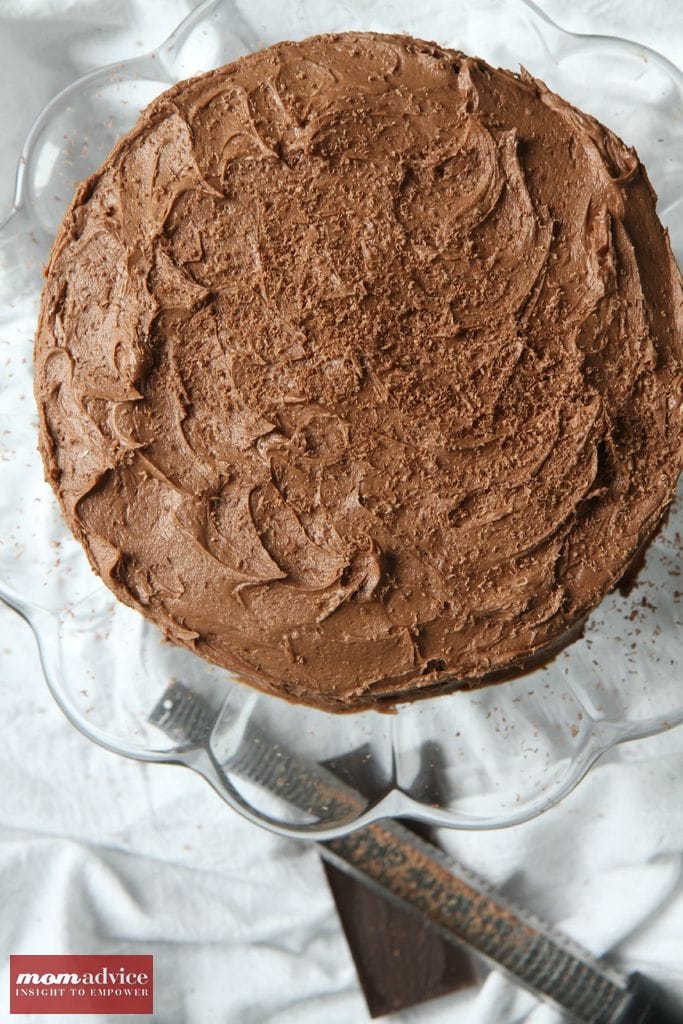
This week we celebrated my son’s 11th birthday. In lieu of an elaborate themed dinner and event, he had a sleepover with his best friend and we invited our family over for this cake and for a red, white, & blue trifle to celebrate.

I am the worst cake decorator known to man and produce some of the ugliest, most lopsided, and crumbiest looking cakes ever. I finally found the trick for me was to buy two 8″ Wilton pans (affiliate)  (instead of those 9″ pans that produced flat layers for me) and a good spatula (affiliate). This cake was put together in an hour and the prettiest cake I’ve ever made (if I do say so myself!). It is amazing what a little investment in tools can produce.

Chocolate Snickerdoodle Cake
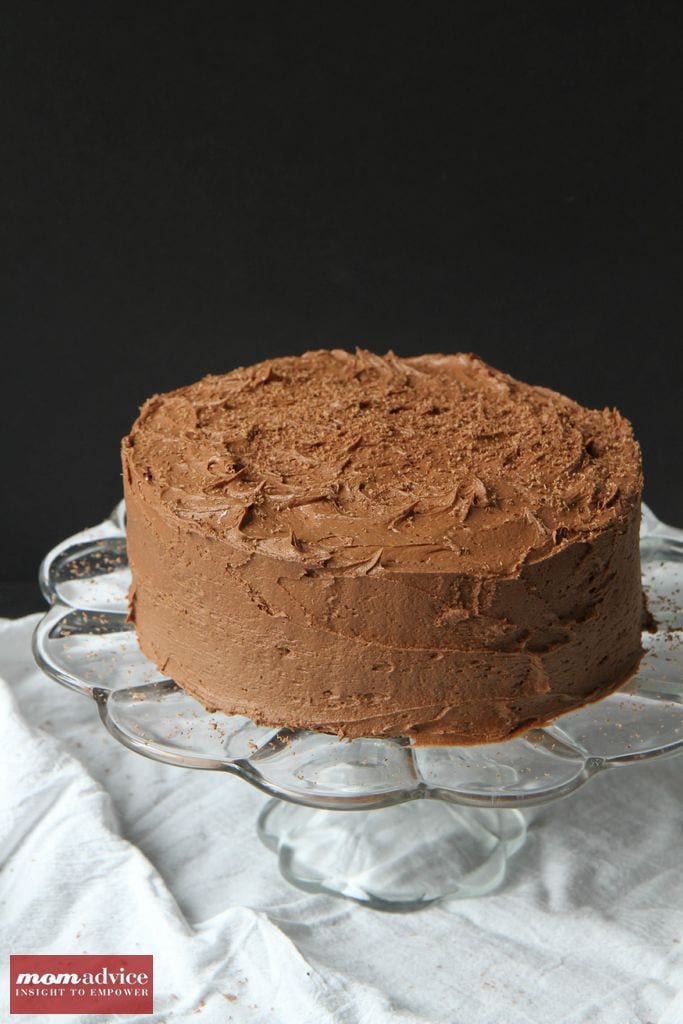
As is tradition, the birthday kid gets to pick their cake from my cookbooks every year. When Ethan selected this cake, I just knew it would be a hit. This cake is moist, rich, and laced in cinnamon. What makes the cake really taste delightful though is the light cream cheese frosting that it is coated in.

Chocolate Snickerdoodle Cake

Chocolate Snickerdoodle Cake
Recipe Type: Dessert
Author: Adapted from Chocolate from Cake Mix Doctor
Prep time:
Cook time:
Total time:
A rich chocolate cake laced with that snickerdoodle cinnamon flavor that our family loves!
Ingredients
  • 1 package (18.25 ounces) plain dark chocolate fudge cake mix
  • 3/4 cup skim milk
  • 3/4 cup canola oil
  • 3 large eggs
  • 2 teaspoons ground cinnamon
  • 1 teaspoon vanilla extract
  • For frosting: 1 package low-fat cream cheese (8 ounces), at room temperature
  • 8 tablespoons (1 stick) butter, at room temperature
  • 1/2 cup unsweetened cocoa powder
  • 2 teaspoon ground cinnamon
  • 1 teaspoon vanilla extract
  • 3 1/2 cups confectioners’s sugar
  • Dark chocolate candy bar for grating on top (optional)
Instructions
  1. Preheat oven to 350 degrees. Grease two 8″ pans and set aside.
  2. Place the cake mix, oil, eggs, cinnamon, and vanilla in a large mixing bowl and blend for three minutes, or until well-blended.
  3. Pour evenly into two pans, smoothing with spatula.
  4. Bake for 28-32 minutes or until the cake springs back when lightly pressed with your finger. Remove and allow to cool for ten minutes. Remove from pans & then cool for another 30 minutes.
  5. Place the cream cheese & butter in a mix bowl. Blend until combined. Add sifted cocoa powder, cinnamon, and confectioners sugar, and finally vanilla. Blend until combined and icing looks fluffy. Add an additional 1/4-1/2 cup confectioners’ sugar if needed.
  6. Ice cake and dust with dark chocolate candy bar shavings to finish.

Adapted from Chocolate from the Cake Mix Doctor (affiliate)

Pin It

Summer Party Fun: How to Host a S’more Toppings Bar Party

Wednesday, July 3rd, 2013

How to Host a S'more Toppings Bar Party from MomAdvice.com.

If there is one thing we love about summer, it is our s’mores. Today I wanted to showcase a s’more toppings bar that you can create for a summer party and share some unexpected s’more flavor combinations you can try on your s’more toppings bar.

Walmart challenged me to create a summer party that anyone could replicate with just $25 in supplies. I wanted to host an evening for my girlfriends with a s’more toppings bar.

I love that this idea is easy, requires no cooking, and you can even encourage each of your friends to bring their own favorite topping or a drink to share. I displayed my toppings in inexpensive ice cream bowls that you can find over in the seasonal section of the store for a buck each!

S’more Toppings Bar Ideas & Combinations


Marshmallow, Strawberries, & Nutella

Marshmallow, Strawberries, & Dark Chocolate

Marshmallow, Strawberries, With Dark Chocolate & Sea Salt Bars

Marshmallow, Bananas, & Nutella

Marshmallow, Strawberry, Banana, & Nutella

Marshmallow & Reese’s Cups

Flavored Marshmallows (Butterscotch, Vanilla & Chocolate Swirl, or Key Lime)

Andes Mints With Marshmallow

Lemon Curd & Marshmallows (hellooo, lemon meringue pie!!)

Marshmallow, Apple Slices, & Cinnamon

Marshmallow, Biscoff Spread, & Apples

Marshmallow & Biscoff Spread

Chocolate Graham Crackers, Marshmallow, & Strawberries

How to Host a S'more Toppings Bar Party from MomAdvice.com.

It was such a fun night and everyone walked away with a new favorite s’more combination.  If you have a load of toppings, you can write titles next to them or give your guests a helpful cheat sheet of suggestions to put together after roasting their marshmallows. Kraft paper can be found over in the shipping & home office supplies section of the store along with Sharpie pens for writing your own cheat sheet of notes.

How to Host a S'more Toppings Bar Party from MomAdvice.com.

How to Host a S'more Toppings Bar Party from MomAdvice.com.

How to Host a S'more Toppings Bar Party from MomAdvice.com.
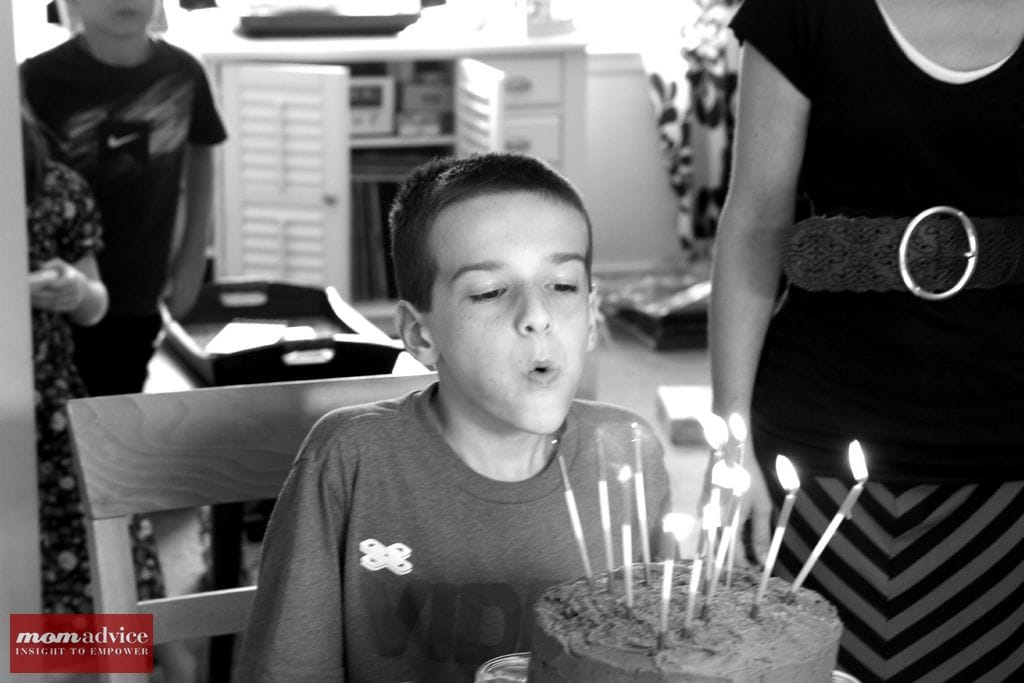
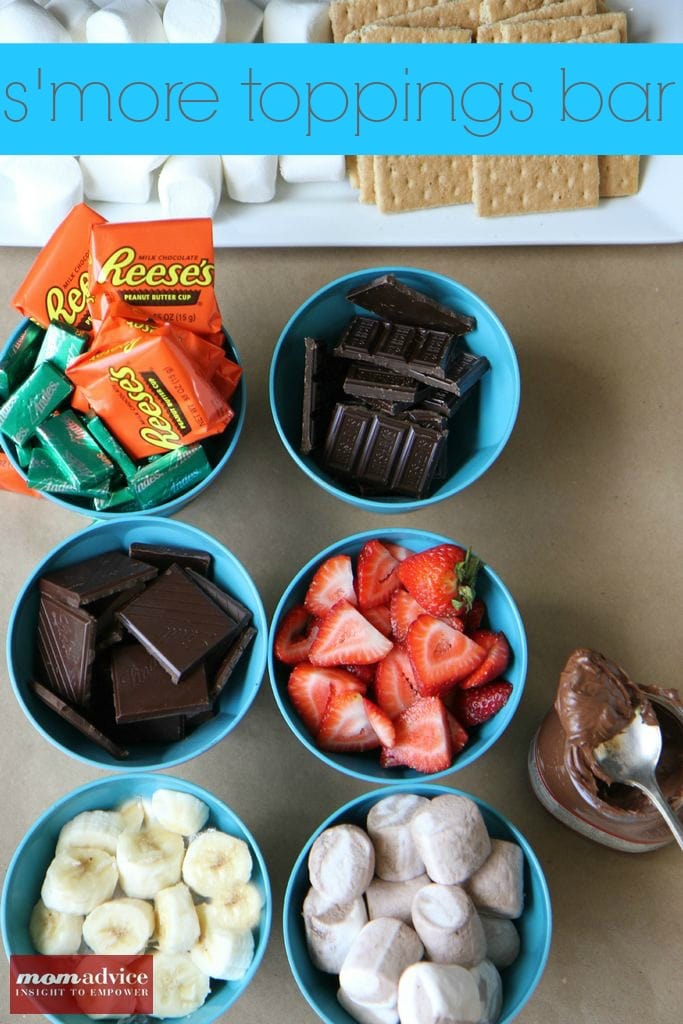
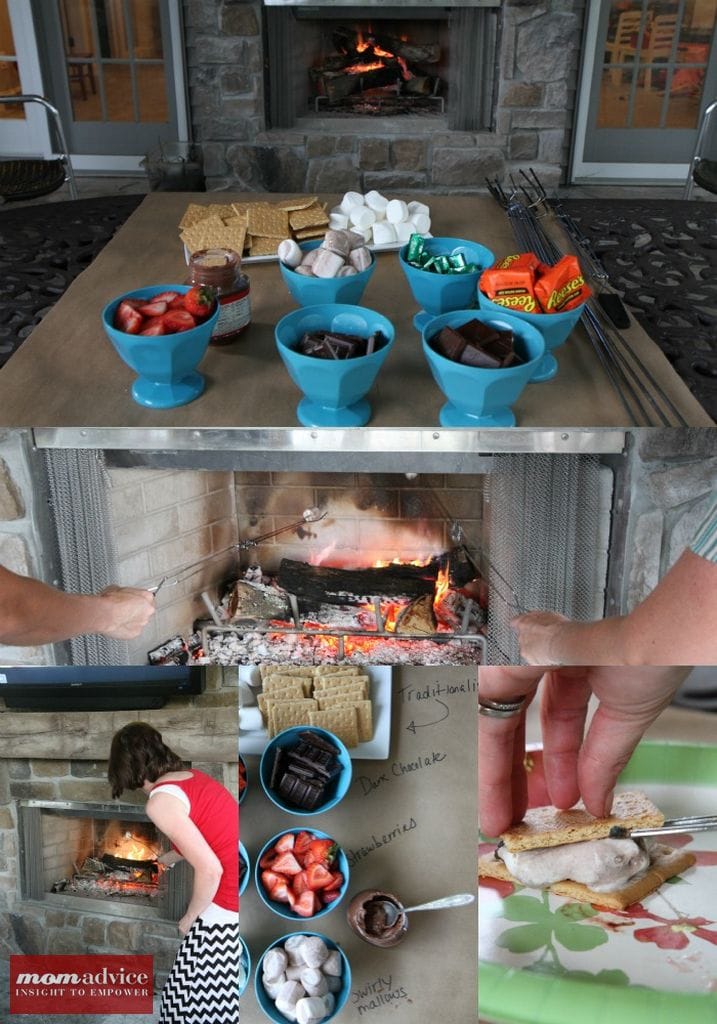
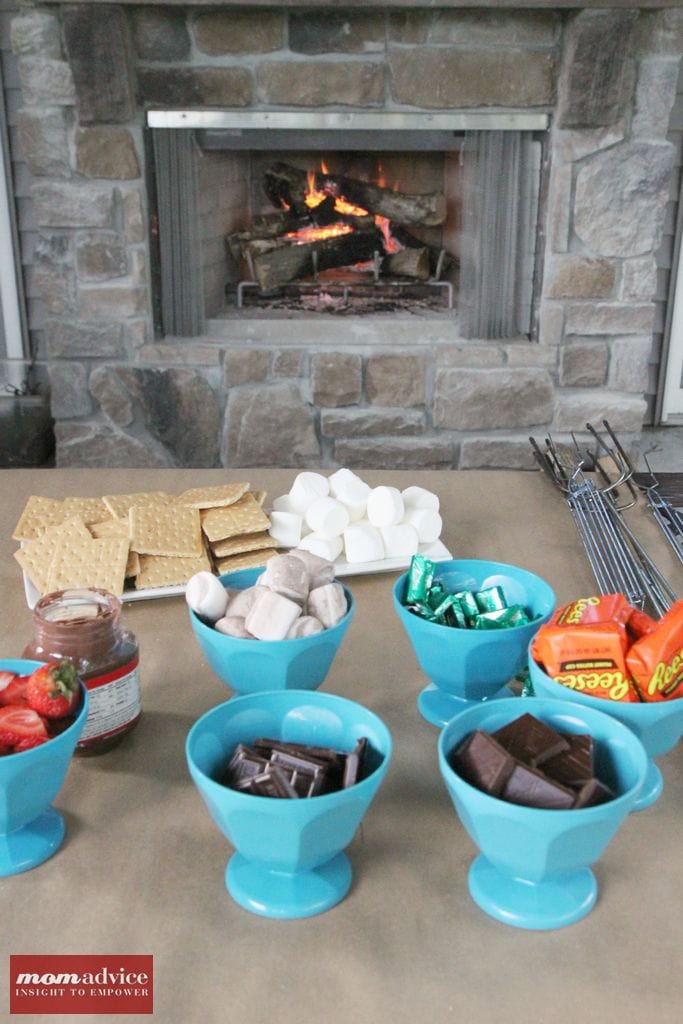
I had planned to host this at my own home, but a powerful gust of storms moved in and left us without power for several days. My dear friend graciously stepped up to the plate to host the evening and allowed me to setup my s’more topping bar at her house.

How awesome is this setup? I know, SO awesome!

I am so thankful for great friends, great times, and great food! I hope this inspires you for a get together with your own friends this summer or even a fun birthday party idea in the summer months!

This s’mores party was such a hit and I can’t wait to do it again and to do something this fantastic for less than $25? Absolutely priceless!

walmart_mom_disclaimer

What is your favorite s’more combination?

Pin It