Archive for February, 2007

Product Review: FruitaBu Twirls

Wednesday, February 28th, 2007

We recently got the opportunity to review the new FruitaBu Twirls. As my son loves anything that tastes like a fruit snack, he was more than happy to oblige and do his own personal taste test.

The FruitaBu Twirls look exactly like a fruit roll-up. Miles of smooshed fruit in various flavors are available. What kid could resist this kind of product?

Ethan was not disappointed and has been enjoying the Grape flavor most of all. As the smooshed fruits before, these contain minimal sugar, no artificial flavor, and no preservatives. Because the fruit is in a format that kids love, this product is ideal for those picky eaters who aren’t getting enough from the food groups. These make a great snack or can be part of any lunchtime meal.

Much thanks to FruitaBu for giving us the opportunity to sample their new products. We have become big fans of this company and their endeavors to enable us to eat more healthy. The best part about this company is that they do not sacrifice the taste factor in the process.

Stepping Outside of the Bread Box

Wednesday, February 28th, 2007


Remember when I shared with you how nervous I was about working with dough? Well, I put that behind me when I began making the Buttery Bread Machine Rolls. I have been cranking out rolls, pizza, and loaves of bread over here many times since that post. I am no longer inhibited when it comes to dough and have been having a lot of fun working with it.

For bread novices, Smitten Kitchen has an excellent post on eight tips for making great bread. She goes through a picture tutorial on working with dough, the perfect temperature of the loaf, how to tell if your dough has doubled and much more! It is a great post full of information for those of you who are like me and still learning the whole bread making process.

Stephanie, over at Stop the Ride!, has also started a “Make It From Scratch” contest where everyone attempts making something from scratch that they have never done before. As she says, everyone’s take on scratch-cooking is different. For example, if making a boxed cake mix is from scratch for you…by all means, break out that Betty Crocker mix! It has been interesting to see everyone’s entries.

For my entry, I found this great bread recipe from Recipezaar.com and we had this several nights last month. For me, free forming dough was a new thing and so was making French bread. This recipe said that it was foolproof. Well, I am a fool when it came to bread and this recipe did not fail me at all! It makes two loaves of delicious French bread and they have turned out perfect every single time. We use the first loaf for dipping in olive oil with our dinner and the second loaf can get chopped up for homemade croutons, made into French toast, or it can be used for paninis. The possibilities with these loaves are endless.

I have not bought a loaf of French bread since using this recipe. It is that good…really! Enjoy!

Failproof French Bread

3 1/2 cups bread flour
1 teaspoon salt
1 package dry yeast (or 2. 25 teaspoons of yeast if purchased in bulk)
1 1/4 cup warm water


Place ingredients in bread machine according to manufacturers directions.
Start machine on dough setting. When dough cycle is complete, remove dough with floured hands and cut in half on floured surface. Take each half of dough and roll to make a loaf about 12 inches long in the shape of French bread. Place on greased baking sheet and cover with a towel. Let rise until doubled, about 1 hour. Preheat oven to 450°. Bake for 15 to 20 minutes or until golden brown, turning pan around once halfway during baking. Remove baked loaves to wire racks to cool.

Caring for Your Table Linens

Wednesday, February 28th, 2007
I love having a tablecloth on our table. We have three tablecloths that I can rotate throughout the week- a red, burgundy, & white tablecloth. Of all of the colors I have, the white tablecloth is my most favorite of all. Although spills show on it more initially, I can toss it in the wash with bleach and the stains come right out. There is just something about a clean tablecloth & napkins that makes everything look fresh.
Despite loving the look of linens, I do not enjoy ironing. The rarity with which I iron is, at times, a little embarrassing.
Frankly, there are not enough hours in the day for me to be spending them standing over an ironing board.
Since the word ironing is not in my vocabulary, caring for my linens promptly is important when laundering them. I run them through a normal warm cycle (check the tags on your tablecloths to see what is best for your fabric type) and then I dry them until they are just barely dry. They are then folded into thirds inside out and hung on a hanger. I hang these down in our laundry area until it is time to use them.
If you do iron your linens, the best time to iron them is right before you use them. Spray the linens with starch or a spray bottle of water and press away on the reverse side of the tablecloth on the recommended setting.
If linens only make a rare performance on your table, there is one other storage solution that might work better for you. Take an empty wrapping paper roll and line it with acid free tissue paper. Fold the tablecloth in half and then wrap it around the roll. Line the top again with the tissue paper and then store the tablecloth horizontally.
While on the discussion of table linens, I did want to share a few links for folding cloth napkins. I am going to attempt a few of these and see if they improve the look of my table.

Cloth napkins are not only used to wipe faces, but they can also highlight something in the center of your table. This vintage napkin was the perfect place to rest an arrangement of flowers on our table.
Do you have any storage tricks for linens in your home? Do you use linens on your table?

And for those of you that are curious just what it is I am serving at my table, please visit the new “Aldi Queen” blog where I share my recipes and menu plans with everyone!

Be sure to visit Rocks in My Dryer for more tips & tricks from some of the best mommy experts on the net!

Chicken Tacos

Wednesday, February 28th, 2007

Chicken Tacos

Chicken Tacos
Serves Six

1 package taco seasoning mix
1 cup chicken broth (I prefer the Fit & Active brand because it is lower in salt)
1 pound chicken breasts – boneless & skinless (in the Frozen section of the store)

Dissolve taco seasoning into chicken broth. Place chicken breasts in slow cooker and pour broth over them. With two forks, shred the chicken meat into bite-size pieces. To freeze, place shredded meat into freezer bag with juices. Press out all the air & seal.Serve with tortillas, taco shells, lettuce, cheese, & sour cream.

I served these with a side of carrot sticks.

Nutritional facts per serving (daily value): Calories 99kcal; Protein 18g (36%); Total Fat 2g (2%)(Sat. 0g (2%)); Chol. 44mg (15%); Carb. 2g (1%); Fiber 0g (0%); Sugars 0g; Calcium 12mg (1%); Iron 1mg (4%)

Before & After: Dining Room Chairs

Tuesday, February 27th, 2007

Awe-inspiring Meredith, from Like Merchant Ships, is a source of great inspiration when it comes to home decorating. In my opinion, you either can decorate or you can’t. It has nothing to do with money, but has everything to do with being creative with what you have. She is one of those bloggers where I shake my head constantly and say, “Now that is a great idea! Why didn’t I think of that?”

One of Meredith’s claims to fame, in my opinion, is what a whiz she is at making furniture look new again. She has shown the tops and bottoms of pieces she does and with a piece of fabric and a few tucks here and there, she is able to recreate pieces in her home without spending a bunch of money.

In our house, our dining room set had seen far better days. When we bought it, we had no children and never gave a thought to whether plush cushions with ivory fabric would be a good selection for our furniture. After all, we knew how to eat without making a mess.

Countless playdates, hundreds of dinners on those chairs, a Kool-Aid spill here and there… then suddenly these cushions were beginning to show their age. With another child soon to be sitting in those chairs too, I knew that the situation was only going to get worse.

I ran over to the fabric store and did end up spending a mint on a little fabric to recover our chairs. Yes, I could have bought cheaper materials, but as this was my dining set, I really wanted to do this right.

The fabric is vinyl, but it is a nice faux brushed leather. The chocolate color and the wipeable fabric was just what I had envisioned with these chairs.

Spills on my chair? No problem! Greasy fingers? Easy Peasy! The difference in my attitude is night and day. Now food on our carpet is another story….but I am feeling much better about the chairs.

I hope I did you proud, Meredith!

Old Nasty Chair:

Freshly Covered Chair:

That’s Hot!

Tuesday, February 27th, 2007


Apparently, my post about frugality fueling my creativity struck a cord with someone out there. I received notification that this post was nominated for a Hot Stuff award. Thanks to whoever nominated me. I am very flattered!

Voting can be submitted by visiting GNM Parents and leaving a comment about which post you enjoyed most.

As I have never really been nominated for anything, I thank whoever out there thought it was noteworthy. It means a lot to me!

Dressing Your Kid Like a Celebrity…Or Die Trying

Tuesday, February 27th, 2007


I love to look at pictures of celebrity babies and see what stylish ensembles they are wearing. It provides inspiration to a small-town girl who wants her kid to look cute. I wish I had the money they had to spend on those cute clothes, but I am a woman working on a Goodwill budget so those items have to come second-hand or have to be invented by me.

Here are a few ideas for dressing your kids like stylish stars.. or at least getting them to the fashionable point where they don’t stand out.

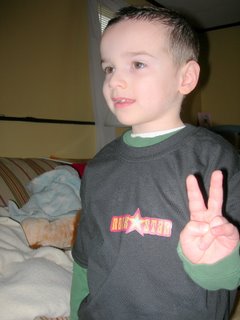
– I love iron-on transfers. I scored a great deal at Michael’s where I got some really cute iron-on transfers for my son to be placed on t-shirts. The black t-shirt was $2.50 at the craft store and the iron-on was $1.00. Super cool, “Rock Star” t-shirt cost me $3.50. If you have a knack for design, you could actually design the transfer yourself and then get the transfer paper from the craft store. Same idea, except an “original” that no celebrity baby will ever have.

The t-shirt pictured here was a hit with my son and his mom & dad. He said he can’t be a rock star until he is ten or a hundred though. At least he can look like one in the meantime.

– Check your thrift stores and try and buy when they run sales on specific items. I keep a closet of clothes that actually don’t fit our son…just yet. Look for basic items that will never go out of style and start stocking up for the years ahead. Make sure to thoroughly check the items before purchasing them though. Items that are donated could be donated for a reason. Check under the arms of shirts, the seams on the item, the knees of the pants, the bottoms of the pants, make sure the zippers zip, and buttons and clasps are intact. Nothing is more disappointing than bringing home a “deal” and then finding out is, in fact, a dud.

– Make old items new again by embellishing them. Boys jeans can be quickly converted into a little girl pair with a cute heart applique or a little beading or pink buttons sewn on the pockets. A little boys shirt can be made into a girls shirt with a sweet pink shirt underneath it. Try to think outside of the box.

– Work out a deal with friends. I have a great friend who shares her bounty of clothes with me before taking them to resale. I am able to get quality name-brand clothing without having to hunt for it. She sells it to me dirt-cheap and she avoids the consignment shops while I avoid the hassle of running from store to store. Don’t hesitate to ask if one of your girlfriends has children that are bigger than yours what they do with their clothing. You might be surprised that they just donate the items and would be willing to pass them off to you or could sell them to you.

– Outlet shop, but make sure it really is an outlet. Have you ever been to an outlet store that had the same or higher prices than the regular store? I have and what a disappointment that is. Know what regular pricing is versus the factory store before doing your shopping.

– Shop the end of seasons, but hold out until the bitter end for the really good deals. At the end of the season, I purchase winter coats for the following year. I never fail to have an amazing jacket for our son, but rarely do I pay more than twenty dollars for it. Check stores that you don’t normally shop and hit the clearance section to get a quality jacket for a fraction of the price.

– Garage sales are great for scoring cute clothes for your children. We hit the garage sales all summer and stock up on clothing for our kids. No one knows that the Baby Gap shirt my daughter wore once was purchased in a garage.

How do you make your kid look like a star? Any tips to share with our readers?

Pan Grilled Salmon

Tuesday, February 27th, 2007

Pan Grilled Salmon

Pan Grilled Salmon
Serves Four 

1 package of frozen salmon breasts (there should be four fillets in the Aldi packages), dethawed overnight in the freezer

2 tablespoons olive oil

Salt & peper

Juice from one lemon

Bring a large skillet to medium heat. Pour in two tablespoons of olive oil. Season fillets on each side and place them in the pan (I used a cast iron skillet with grill marks). Cook for four minutes on each side, or until the fish is cooked through and flakes easily with a fork. Squeeze the juice from a lemon on top. Plate and serve immediately.

This dish was served with a package of chicken-flavored rice and a can of French Style Green Beans (I cooked these in a can of chicken broth for added flavor)

*Nutritional Data not available*

Organizing Ribbon

Monday, February 26th, 2007

I have always envied people like Martha Stewart who have rooms dedicated solely to crafting. I think it would be so nice to have a special place where I could do things like this, but our house seems to be missing a room.
When I decided that I really needed a place to dedicate towards doing my hobbies, my husband suggested an area downstairs in our basement.
The former owners had mounted a door onto the wall and used that as a desk. The door knob opening was the perfect place to feed my hot glue cords through and a folding chair pulled up perfectly to my new location.
My crafting collections have seemed to really grow though and the ribbon situation was out of hand. Everywhere you walked, you would step on a roll of ribbon. I couldn’t find anything in the mess and things that should have taken minutes turned into hours when having to hunt for the perfect color.
I went online to see if they had any ribbon organizers that I could buy. Ah, there were many solutions, but not any that fit my price tag.
A trip to Michael’s was equally disappointing as they only had one ribbon organizer. This organizer would have held a fourth of my ribbon collection and at $19.99 the price was way too high for my taste.
In front of our craft table, I had a giant bulletin board so after much thought, I figured out a way that I could mount my ribbon onto the board and still be able to easily access it.
I took dowel rods and fed my ribbon spools through them. Then I took wide ribbon and stapled a loop on each side to rest the dowel rods into them. By leaving plenty of room on each side, I am able to slide ribbon in and out as needed or just pull on a spool to get the ribbon that I need.
If you have a large ribbon collection, this might be a good solution for you. If your ribbon collection is smaller or you just need a place to store ribbon that you use for wrapping gifts or for scrapbooking, this idea from Real Simple Magazine is also a great & thrifty solution. They also offer up a great idea for using a paper towel holder as a place to store your ribbon.
While we are on the subject of creative storage, be sure to read our new article on Frugal Storage Solutions as spring cleaning & organizing time is upon us!
What are some creative ways you have organized your home?

Amy’s French Toast

Monday, February 26th, 2007

Amy’s French Toast

Note- Whole grain bread can be substituted for the white bread, although white bread is the less expensive option if money is tight! You can also freeze the leftovers for another day. Simply place the pieces between wax paper and layer inside a freezer bag. These can then be microwaved or they can be placed in the toaster oven for a fast breakfast.

Amy’s French Toast
Serves Six to Eight

1 loaf of white bread
6 eggs
1 teaspoon vanilla extract
2 tablespoons sugar
2 teaspoons of cinnamon
1/4 cup milk
1/4 cup butter

Beat together the eggs, milk, vanilla extract, sugar, & cinnamon. Melt a little butter in a nonstick skillet on a medium heat. Dip bread in the egg mixture (on both sides) and drop the bread into the skillet. Cook until golden brown on each side.


Nutritional facts per serving (daily value): Calories 168kcal; Protein 7g (13%); Total Fat 13g (20%)(Sat. 7g (33%)); Chol. 233mg (78%); Carb. 6g (2%); Fiber 0g (2%); Sugars 5g; Calcium 50mg (5%); Iron 1mg (7%)