Archive for September, 2012

Amy’s Notebook 09.26.12

Wednesday, September 26th, 2012

Welcome to my little notebook of ideas to help improve your life. This is a collection of gathered links to DIY crafts, food projects, and thrifty ways to spruce up your home. Nothing brings me more joy then to highlight other fabulous bloggers. I hope you will enjoy this weekly does of loveliness with beautiful links that are individually handpicked just for you!

This idea for paint organization in your craft supplies is simply genius! (@ Mad in Crafts)

This cloth napkin storage container is absolutely adorable! (I Am Momma Hear Me Roar)

These jack o’ lantern shade covers are such a cute way to decorate for Halloween (@ Easier Than I Thought)

I love this idea for creating a paint references chart (@ i heart organizing)

I absolutely love these ideas for fall decorating (@ eighteen25)

I love these tips for creating a vignette in your home (@ Home Stores A2Z)

These healthy whole grain freezer waffles look so good (@ Mary Jolley)

I am madly in love with this house and ideas for decorating with kids (@ Design Mom)

I adore this beautifully decorated fall mantle (@ The Lettered Cottage)

I love these monster cookies with a real monster spin (@ The Idea Room)

This Dollar Store Halloween village is such a cute way to decorate for the holiday (@ The 36th Avenue)

My kids would flip for these JELL-O jack o’lanterns (@ zakka life)

This pumpkin garland is too cute for words (@ tatertots & jello)

I am madly in love with these vintage camera bookends (@ Smile and Wave)


Spaghetti Cupcakes

Tuesday, September 25th, 2012

Tired of the same old weeknight food routines?  I have the perfect kid-friendly and fun recipe that your kids will absolutely love and so will you. Today I am sharing a recipe for Spaghetti Cupcakes that will put those taco and potato bars to shame. This dinner idea is one the whole family will love and can be ready in about fifteen minutes.

Gather up all of your favorite spaghetti toppings to top each of your noodle cupcakes. For my cupcake toppers I have shredded carrots, baby peas, ricotta cheese, turkey meatballs, and Ragu Old World Style tomato sauce.

Cook your pasta as directed on the package and drain the pasta in a colander. Do not rinse your pasta because it will help the pasta hold its shape better in the cupcake liner.

Twist your pasta noodles around a fork until you have a good forkful of noodles. Gently place the noodles in a foil-lined cupcake liner. I would say that three to four of these spaghetti cupcakes would feed one person once it has been topped with its toppings.

Top each spaghetti cupcake with Ragu sauce. Once it has been topped on these cupcakes, it will ooze into the crevices of the noodles with ease. Repeat this step on each of your cupcakes.

Top each cupcake with your favorite toppings and finish each cupcake with a turkey meatball. This is a fun food activity to let your kids do and is also a creative way to get your kids to eat their vegetables.

I can’t take the credit for the fun food that was featured today. These Spaghetti Cupcakes are featured on a great site that offers inspirational ideas for meals to share with your family.

You can visit the Meal Inspirations site to find loads of great ideas for meals, demos on how to create the recipes, and even print out coupons for your favorite products. For example, this week you can grab a coupon for $1 off of Hellman’s mayonnaise!

I hope you love these fun Spaghetti Cupcakes and I hope you can take a moment to head over to the Meal Inspirations site to get even more great ideas to enjoy around the dinner table with your family!

If you love this idea, I am betting you will love my Mac & Cheese Bites too! Happy cooking, friends!

Spaghetti Cupcakes
Recipe Type: Main
Prep time: 5 mins
Cook time: 10 mins
Total time: 15 mins
Serves: 4
Spaghetti cupcakes are a fun way to get your kids to eat their veggies and to be master of their own creations. I guarantee your kids will love this one!
Ingredients
  • Ragu® Old World Style® Spaghetti, cooked and drained
  • Ragu® Pasta Sauce, heated
  • Whole kernel corn, drained
  • Green peas
  • Shredded carrots
  • Part-skim ricotta cheese
  • Grated Parmesan cheese
  • Frozen fully-cooked low fat cocktail-size meatballs, heated
  • Foil cupcake liners
Instructions
  1. Arrange sturdy foiled cupcake liners on serving plates.
  2. Fill each with fork-twirled hot spaghetti and top with heated Ragú® Pasta Sauce. For best results, do not rinse the pasta after draining.
  3. Decorate with your kid’s favorites like corn, peas, shredded carrots, part-skim ricotta cheese, grated parmesan, or hot cooked mini meatballs.


 This is a sponsored post as a part of my role in the Walmart Moms program. I am a part of the Walmart Moms program, and Walmart has provided me with compensation for these posts. My participation is voluntary and opinions are always my own.


Pin It

An Apron Full of Giveaways 09.25.12

Tuesday, September 25th, 2012
Able And Free, $31

Welcome to our Apron Full of Giveaways! I hope everyone is having a great week this week! As we do each week, here is our round-up of giveaways for our readers. We hope that this is beneficial to you and your family! Please let us know if you guys win anything- I love to hear the success stories!

Below are the contest links-if you are hosting a contest please link it up below. Sorry, we aren’t giving away the aprons just showcasing them! Please put your site name and then what type of contest you are hosting. For example, “MomAdvice (Kid’s Movies).”

Please let me know if you have any questions and good luck to each of you!

Pin It

Painted Address Pumpkin Topiary

Tuesday, September 25th, 2012

One of my favorite things about Fall is the fun crafts that I get to do with all of those beautiful Fall pumpkins! Today I wanted to showcase an easy painted address pumpkin topiary that you an create with just a few supplies from your local Walmart store. This painted address pumpkin topiary would the be the perfect way to dress up your porch, porch step, or a little corner in your room.

Craft Supplies Needed

2- 75 inch pumpkins (any color)- $4.87 each

8″ pumpkins (how ever many you need to complete you house number)- $4.87 each

Black Plaid FolkArt acrylic paint (I chose the shiny variety)- $1.77

4″ Plaid letter stencils ($3.77)

Stencil Brushes ($5.47)

Clear tape (in supplies)

Hot glue gun & glue sticks (in supplies)

8″ pot (I found mine in the clearance section of the store for $11.96)

1. Begin by twisting off the stems on all of the pumpkins that will be going on the bottom of your topiary. You will want to leave your top pumpkin (the 75″ one) with the stem intact. All the other stems can come off.

2. Center your stencil on your pumpkin and attach it with clear tape. Make sure when positioning your numbers that when you stack the pumpkins, you will be able to see the number clearly in the center. You will especially want to do this for your bottom pumpkin since it will be wedged in your pot.

3. Trace your number with a pencil. Remove your stencil.

4. Pour your acrylic paint in a disposable cup or bowl. Using a small paintbrush, carefully paint your number on your pumpkin. If you make an error, use a cloth or a damp Q-tip to remove any painting errors. Set your pumpkin aside, and repeat the process on each of the other pumpkins until you have stenciled your address number.

5. Wedge your 75″ pumpkin into the pot. This should be a tight fit so you will not need to glue or attach your pumpkin into the base. Stack your next pumpkin and carefully hot glue in each spot where the pumpkins are joined together. Hold the pumpkins together to secure for a minute or two. Repeat this process until you reach the top of your pumpkin stack!

Stand back and behold your pumpkin glory! Isn’t this just the cutest thing ever? I know all of my neighbors are going to be so jealous!

I hope they are half as impressed as my cat.

Seriously.

Looking for more Fall crafts? Be sure to check out my round-up of the Best Fall Crafts on MomAdvice. I hope you will find it inspiring, friends!


Pin It

Slow Cooker Stuffed Green Pepper Soup

Monday, September 24th, 2012

Slow Cooker Stuffed Green Pepper Soup from MomAdvice.com


When I was a child, one of my absolute favorite foods was stuffed green peppers.

Stuffed green pepper soup is the next best thing to stuffed green peppers and offers all the flavors you love in a stuffed pepper, but in a rich tomato broth.

Once you make a batch of this stuffed green pepper soup in your slow cooker, you will want to make it and eat it over and over again.

I wanted to create this soup for my slow cooker and fill it with my favorite stuffed green pepper ingredients- diced tomatoes, garlic, lean ground beef, and a hearty addition of brown rice.

I prefer a combination of broths in this (beef and chicken broth) because it helps lighten this hearty soup.  

I also wanted this soup to cook itself since we have busy days with extracurricular activities in the evenings.

This soup is a one pot wonder and can be served with a loaf of crusty bread for a busy weeknight.

The leftovers offer a filling and satisfying lunch as well!

I hope you will love this soup as much as I do! It will be a recipe repeat for me and is a great soup to be doubled and shared with friends!


Slow Cooker Stuffed Green Pepper Soup
 
Author: Amy Allen Clark
Prep time:
Cook time:
Total time:
Serves: 8
Everything you love about a stuffed pepper in an easy slow cooker soup!
Ingredients
  • 1 tablespoon olive oil
  • 3 cloves of garlic, minced
  • 1 pound lean ground beef or sirloin
  • 3 green peppers, diced
  • 4 cups beef broth
  • 2 cups chicken broth
  • 28 ounce can petite diced tomatoes
  • 3- 8 ounce cans tomato sauce
  • 1 cup brown rice (NOT INSTANT)- HIGHLY recommend Uncle Ben’s Brown Rice for this recipe.
  • 3 teaspoons basil
  • 3 teaspoons oregano
  • Salt & Pepper to taste
Instructions
  1. In a skillet, add your olive oil and saute your garlic for one minute.
  2. Add your ground beef to the skillet and season well with pepper and salt.
  3. Once cooked, drain your ground beef & garlic mixture, and add this to your slow cooker.
  4. Next add your diced green peppers, beef broth, chicken broth, diced tomatoes, tomato sauce, seasoning, and brown rice. Give it all a stir.
  5. Set your slow cooker to LOW for 4-6 hours.
  6. Serve with crusty bread.
  7. Side note- if your slow cooker sets itself to WARM after it is done cooking, you only need to cook this for four hours. If your slow cooker does not set itself to WARM, it will need to cook for six hours.
 

Slow Cooker Stuffed Pepper Soup from MomAdvice.com

Love your slow cooker as much as I do? Be sure to check out these easy and delicious recipes:


Overnight Slow Cooker Apple Cinnamon Steel Cut Oatmeal from MomAdvice.com

Overnight Slow Cooker Apple Cinnamon Steel Cut Oatmeal


Gluten Free Carnitas in the Slow Cooker from MomAdvice.com

Gluten Free Carnitas


21_Easy_Slow_Cooker_Meals

21 Easy Slow Cooked Meal Ideas


Slow Cooker Recipes for Breakfast, Lunch, and Dinner

Slow Cooker Recipes for Breakfast, Lunch & Dinner


Pin It

Amy’s Notebook 09.19.12

Wednesday, September 19th, 2012

Welcome to my little notebook of ideas to help improve your life. This is a collection of gathered links to DIY crafts, food projects, and thrifty ways to spruce up your home. Nothing brings me more joy then to highlight other fabulous bloggers. I hope you will enjoy this weekly does of loveliness with beautiful links that are individually handpicked just for you!


I adore this creative display for a doughnut party (@ How Does She?)

I want to try making one of these DIY Anthro inspired mugs (@ Morena’s Corner)

I love these washi tape file labels (@ i heart organizing)

I love these simple triangle print napkins (@ Terra Savvy)

This ruffled belly band would have been so handy when I was expecting (@ see kate sew)

I want to try these salted caramel apple bars (@ Two Peas & Their Pod)

These are great tips on how to oil and clean your sewing machine (@ make it & love it)

I adore this cute chore board to keep the family organized (@ The Daily Five)

These pumpkin blossom cookies look like a delicious fall treat (@ Inspired by Charm)

I am going to have to bookmark these tips for the perfect pie crust (@ Completely Delicious)

An Apron Full of Giveaways 09.18.12

Tuesday, September 18th, 2012

Sew Mamma Sew, $52

Welcome to our Apron Full of Giveaways! I hope everyone is having a great week this week! As we do each week, here is our round-up of giveaways for our readers. We hope that this is beneficial to you and your family! Please let us know if you guys win anything- I love to hear the success stories!

Below are the contest links-if you are hosting a contest please link it up below. Sorry, we aren’t giving away the aprons just showcasing them! Please put your site name and then what type of contest you are hosting. For example, “MomAdvice (Kid’s Movies).”

Please let me know if you have any questions and good luck to each of you!

Pin It

Fall Into Fall CRAFTS with MomAdvice.com

Tuesday, September 18th, 2012

With Fall upon us, I suddenly get the urge to start tackling some crafts that have been on my to-do list for the year. Fall is also a great time to get a jump start on holiday crafts that you might want to tackle this year for our family and friends.

Today I wanted to highlight a few of my favorite crafts and DIY projects for the Fall season that have appeared on MomAdvice.com!

The GAP-Tastic Cowl

Cowls are still highly fashionable this year, especially the warm and bulky variety. I love this easy cowl that can be created with inexpensive yarn in your favorite fall color to add a little spice to a tired fall jacket you might have in your closet. If this cowl doesn’t get you excited to start knitting, be sure to check out these seven easy scarf and cowl patterns to knit this year!

Easy Felt Fabric Brooch

You are going to fall in love with this beautiful felt fabric brooch and it would be the perfect addition to your fall jacket this year or as an embellishment to last year’s winter hat. Check out this tutorial for these easy brooches!

Anthropologie DIY Ruffled Lampshade

Perhaps one of my most favorite projects in our house was this burlap ruffled lampshade made from inexpensive burlap. If you are wanting to dress up a tired lamp for fall, be sure to check out this tutorial! This project was so easy to create and would be so cute on a side table, in your office, or a cute way to spruce up a craft room.

DIY Chalkboard Food Label Frames

All you need is a dollar store frame to get started with this easy craft. These food label frames would be a great addition to your fall entertaining and tailigating this year. The best part is that this craft can be done in fifteen minutes, making it a great fast to create

Knitted Dishcloths 

If you are new to knitting, dishcloths are the perfect project because they are like swatches of pattern rather than tackling a larger project piece. On top of that, it can make you feel braver doing patterns with more complexity and learning new knitting techniques. For the first few months after I learned how to knit, I knit a lot of dishcloths. I happen to think these are one of the best projects for Fall, and they also happen to be a fabulous little hostess gift for the holidays!

Yarn Wreath (for all seasons)

It’s time to dress up your front door for Fall! Yarn wreaths are easy to create with a mere ten-fifteen dollars  in supplies and a whole lot of your own individual creativity. Find out how to create this easy yarn wreath that can be dressed up for all of the seasons with this simple yarn base!

Painted Tabletops & Reupholstered Chairs

If your kitchen table and chairs are looking a little tired, Fall is a great time of year to spruce them up!  Last Fall, I painted my kitchen tabletop and reupholstered my kitchen chairs and one year later, they are still going strong!

Oatmeal Cookies & Milk Bath

There is nothing I love more than a good long soak in the tub in the evenings when the weather is chilly. I highly recommend this easy oatmeal bath soak you can create in your kitchen. I call it Oatmeal Cookies & Milk because it blends together the ingredients of an oatmeal cookie with powdered milk to make a soft & soothing bath for anyone who has sensitive skin.

Coffee Filter Posies

Looking for a cute addition to a side table for Fall? I highly recommend making these cute coffee filter posies for a fun Fall decoration. Dyed in yellows and oranges, they would look beautiful in a jar on your kitchen table or a cute way to dress up a dresser in your bedroom.

Decoupaged Pumpkins

I love to create inexpensive decorations for fall and these easy decoupaged pumpkins are a craft that I have been wanting to try for awhile after spotting this technique in an old issue of Better Homes &  Gardens Magazine. You won’t believe how easy it is to decoupage a pumpkin and since they were so easy to create, I made two to adorn each side of my console table.  This pumpkin is made with paper napkins, if you can believe it, and some other inexpensive craft materials you can pick up at your local craft store!

Charity Knitting Craft Projects

This is going to be the season when my friends that knit & crochet really spring into action for hat drives for those in need! One things I am proud and humbled to do is to knit for those in need. You will find loads of fun projects to knit for those in need in the Knitting section of our site. While you are enjoying the latest season of Fall shows on the television, add a little something for someone in need to your knitting needles this year!

What is your favorite Fall craft project you have tried from our site? I would love to hear from you!

Pin It

Throw a Board Game Party with Goodwill

Monday, September 17th, 2012

I am so excited to share with you today some easy craft projects you can do to create a beautiful board game party theme for a fun game night with your friends.

I recently hosted a board game party and created all of my fun decorations from supplies I found at our local thrift store and the dollar store.

The total cost spent on all of these decorations was a mere $30 and I am so proud of how this theme turned out.


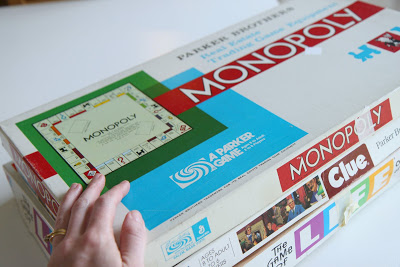
I hit our local thrift on a half off sale day to score these three vintage board games for a total of $2.44 (for all three)!

What a steal!


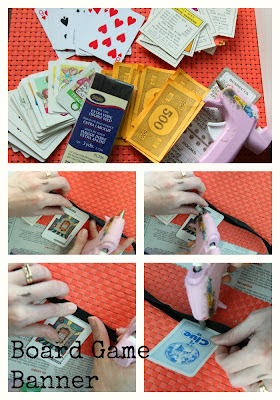
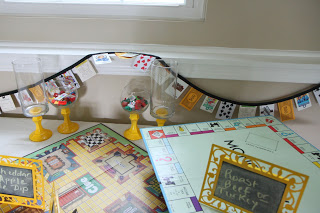
The first thing I did with my supplies was to create a board game banner to edge my party table.

For this you will need board game paper cards, a deck of cards (optional), play money, extra wide bias tape, and a hot glue gun with glue sticks.

Using your hot glue gun, add two drops of glue on each side of the front of your board game piece and secure it to the inside front of the bias tape.

For the reverse, add one drop of glue and then secure again to the opposite inside of the bias tape.

Repeat this in a sequencing pattern all down your banner.


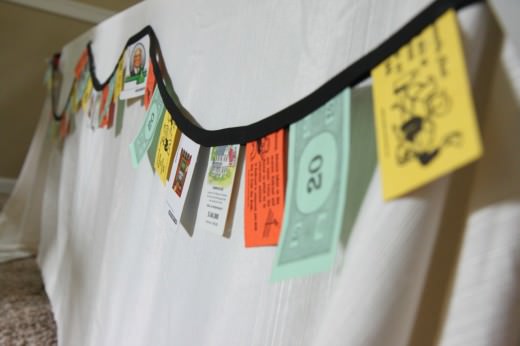
I decided to create two of these, one to edge my table and one above my table on my ledge.

To secure it to your table, just use safety pins or straight pins to pin it to your tablecloth.

Isn’t that the cutest?


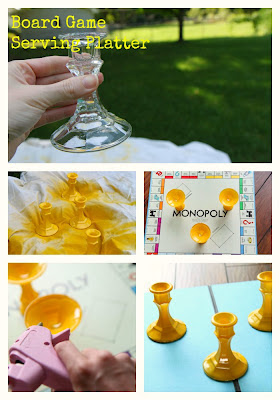
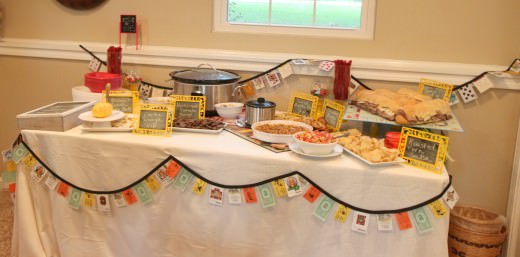
I had a lot of food to serve and not a lot of platters to use.

Good thing we have those board games, right?

Pick up three clear glass candlesticks in the same size. If you can’t find them there, you can grab them at the dollar store.

Using a primary spray paint color, spray paint these with your favorite color.

Let them dry for an hour.

Clean off your board game with a Clorox wipe (we will be serving food on it).

Invert your candlesticks upside down because we want the wide side of the candlestick to secure to the board game to create a more stable surface.

On that side, apply your hot glue all along the edge and secure it to your board game on the bottom to create a base for your serving platter.

Hold it secure for a couple of minutes.

Repeat this process with the two other candlesticks, creating a triangle base on the bottom of your board.


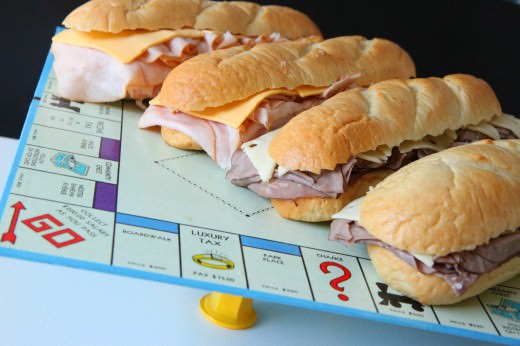
Isn’t this the cutest serving platter?

By raising your food up, you will have more room to add platters below and create interesting levels to your food.


You can also use other board games without a stand to place your food on lower levels.

Doesn’t that look awesome?


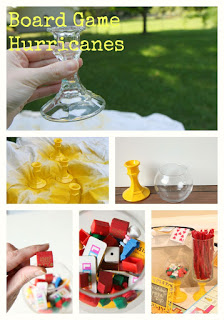
To add some more interest to my table, I also created hurricanes to display the smaller board game pieces.

Again, you just need clear glass candlesticks or even brass ones, that are often in abundance at Goodwill.

Spray paint these your favorite color and then add glass bowls or containers on top to finish them off.

If you can’t find these at your store, you can also check the dollar store for small glass fishbowls and vases that can be used.

Using an epoxy glue intended for glass (I used an Elmer’s epoxy glue that I picked up from my hardware store), secure the glass bowl to the top of your candlestick (just as shown above using a hot glue gun).

Fill it with you favorite vintage board game pieces from the board games you bought.


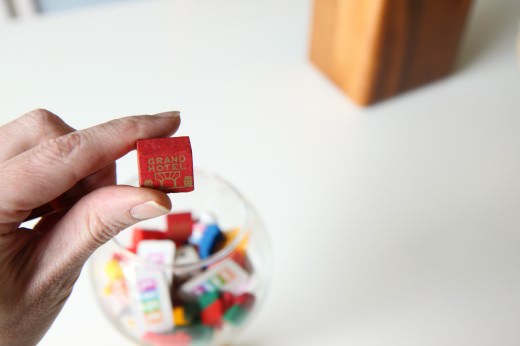
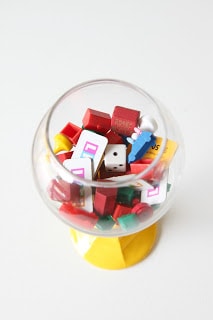
I absolutely love the vintage pieces that you can find in old board games.

Just remember, these hurricanes can be reused for other parties and spray painted again in whatever your party theme colors might be.


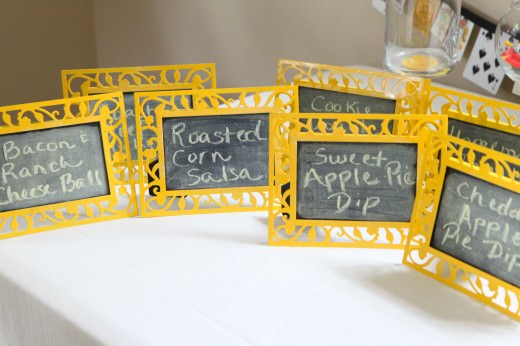
Since I was on a spray painting frenzy and I had so many great dishes to share for this party, I also created these DIY chalkboard food label frames.

You can grab the tutorial for this project as well as the recipes for all of the dishes I created for this party to replicate what was created here.


Now grab your best girlfriends, have everyone bring their favorite beverage and board game (check out this list for great games to grab at your favorite thrift store), and have a fun board game party evening that your friends will always remember!

What happens to be your favorite board game?

This post contains affiliate links.


Don’t miss these other great posts from MomAdvice.com:


How to Organize Your Family’s Game Collection


DIY Roll-Up Puzzle Mat


DIY Outdoor Movie


7 Tips for Hosting a Successful Book Club


Sign up for the MomAdvice newsletter

Pin It

Fall Into Fall DRINKS with MomAdvice.com

Monday, September 17th, 2012

If there is one thing I happen to be famous for around here, it is my ability to make a delicious Fall drink for myself and my friends. Last year I was on a quest to recreate all of my favorite Starbucks drinks and I manged to recreate all of my favorites and keep a little extra money in the bank this year.

Here are a few of my favorite Fall drinks that have been on MomAdvice over the years!

Homemade Pumpkin Spice Latte

There was a whole lot of latte loving last year on the blog. I hope you didn’t miss it! The latte loving all began with this drink and recreating my favorite pumpkin treat at Starbucks. I can happily say that I rarely ordered one of these this fall thanks to this handy little recipe. It’s nice to know when Starbucks pulls a drink off of their menu, I can still get my midday fix.

Homemade Salted Caramel Mocha Latte


My new favorite drink at Starbucks is their Salted Caramel Mocha Latte. One sip of this delicious goodness had me daydreaming about how I could replicate this delicious salty caramel goodness at home. Coffee drinking is, after all, one of my favorite hobbies, but a girl has to do it on a budget.  A DIY version of this Salted Caramel Mocha Latte was definitely in order.

Homemade Gingerbread Latte

Although not a Fall drink, I feel gingerbread flavors are still so fabulous anytime the weather gets chilly! This drink tastes like gingerbread itself and is filled with ginger, molasses, and cinnamon within the gingerbread syrup you create for your latte.

Homemade Peppermint Mocha

Truth be told, the Peppermint Mocha is still one of my all-time favorite drinks at Starbucks…but… once I started making these at home,  I am not loving the Starbucks version as much as my homemade version. This post offers a recipe for a simple peppermint syrup that you can add to your drinks and keep on hand in your fridge whenever the Peppermint Mocha Latte urge hits you.  These are so delicious and one of my favorite recipes on our site.

Creamy Hot Cocoa Mix

A good cocoa mix is harder to make than it might seem. I like my hot chocolate to be the right balance of creamy and chocolate goodness. It needs to be yummy enough on it’s own, but also be able to endure loads and loads of whipped cream and marshmallows.

After trying and testing many variations in our house, we have determined that this is the best cocoa mix of all. It is the perfect ratio of everything and can make a fabulous gift to give to someone special in your life.

Homemade Vanilla Chai Tea Mix

My favorite warm drink is chai tea. The drink mixes are expensive, but mixing up a batch of this yourself can help to keep your pockets nice and warm with a little extra money. Most of the spices, dry creamer, and dry milk are already stocked in my pantry. Once you try this, you will never buy those expensive mixes again!

Butterbeer Lattes

Looking for a warm Fall drink that you can enjoy with a great movie? We decided to give a butterbeer latte a spin in our kitchen ad we absolutely love them. These lattes taste a little like  cocoa, a little like a cookie, and a whole lot like butterscotch. My kids couldn’t get enough of these and it was a fun one to have them help me in the kitchen with.

 What is your favorite Fall drink recipe you have tried from our site? Have any of these recipes become a yearly tradition for your families? I would love to hear from you!

Pin It