Archive for the ‘Gifts’ Category

Great Gifts to Give Teachers From Goodwill

Friday, May 18th, 2012

The end of the school year is upon us and if you missed showering your teacher with gifts for Teacher Appreciation Week, I have some fun gift options for a final thank you for all the hard work your teacher has put in this year.

You may not think of Goodwill as a spot for accessorizing your teacher gifts, but I am showing you how to dress up thrift store items to create beautiful gifts for your teachers.

What is one gift you love to create with thrifty supplies for your teachers?

We would love to hear your ideas!


Frame a Fun Printable

Frame a fun free printable for your teacher.

I love to hunt for these inexpensive frames and then give them a fresh new look with a coat of spray paint.

I made these, “Raise Your Hand if You Mustache a Question,” printables for our teachers for the holidays and they loved them with spray painted red frames.

They coordinate perfectly with a white mug adorned with a painted mustache.


I also really love this fabulous printable and clipboard from eighteen25 that reminds the class to listen to their teachers.

What teacher would not love that?

Create a Pretty Pin

This year I have become obsessed with making cute pins and have found a way to incorporate these pins on everything from bags to belts to jewelry.

Teachers will love these fun accessories and it is an easy way to say thank you without spending a lot.

Pins can be created from recycled t-shirts

or you can create elegant roses from a felted sweater

or use fabric from a cute shirt you can snag on their sale rack.


Bake a Treat

One gift that I think says I truly appreciate you is spending time in the kitchen baking something special for someone you love.

Find cute tins, plates, or even give them right in the baking pans.

The best part about packaging these delicious treats with thrifty packaging is that you don’t have to worry about getting your dishes returned back to you.

I highly recommend these Dark Chocolate & Sea Salt Brownies for a treat that will knock your teacher’s socks off!

Just be prepared to have to share the recipe once they have tried them.


Give a Gift of Pampering

If there is one thing that you can find at Goodwill, it is a plethora of mason jars that can be used for all of your craft projects.

Consider giving your teacher a gift to pamper herself and packaging it in a mason jar and attach a spoon.

Mix up some easy bath salts or a hand scrub that she can use to treat herself.


Teacher School Supplies Cake :: MomAdvice.com


Give Them Something They Can Use

This year I decided to give our teachers a fun teacher supplies cake that I made with school materials I knew they might be missing in their classrooms.

Check the office supplies at your local thrift to see if you can find items you can weave into a school supplies cake for your teacher.

You will often find great folders, binders, and new office supplies that could easily create tiers for a cute school supplies cake to replenish their supplies for next year.

Simply configure your supplies and stack them on top of each other, securing with a little packing tape to hold everything together.

Half of the fun in this craft is in the creating of your cake.

Adorn it with a little ribbon and a picture of your child with a thoughtful message of thanks.


What is one gift you love to create with Goodwill supplies for your teachers?

We would love to hear your ideas!

This post contains affiliate links


Don’t miss these other great ideas from MomAdvice.com:


Teacher Gift Ideas


Oreo Biscotti Gifts


Mojito Bath Salts


Quick & Easy DIY Mother's Day gift ideas

Quick & Easy Mother’s Day Gift Ideas


3 Ways to Take the Hassle our of School Lunches

3 Ways to Take the Hassle Out of Packing School Lunch


Sign up for the MomAdvice newsletter

SaveSave

SaveSave

SaveSave

SaveSave

SaveSave

Pin It

Creative Mother’s Day Gifts on a Budget

Tuesday, May 8th, 2012

Mother’s Day is just around the corner and it’s time to honor our moms! Each year we try to do something special for my mom and mother-in-law. I have found that often the simplest of gifts are the most treasured, especially if they are hand delivered by my children.

Today I am over at the Kenmore blog sharing a few of my favorite Mother’s Day gifts that are not only creative gifts to create, but they are also very easy on the wallet. Head on over there to get the scoop on my top gifts to give.

Enough about the giving though, let’s talk about the receiving. After all, it is your day too! What is your dream Mother’s Day gift this year?

Pin It

Teacher School Supplies Cake

Tuesday, April 17th, 2012

Hip, Hip, Hooray for amazing teachers! Teacher Appreciation Week is fast approaching (May 7-11), and it is time to begin thinking of some fun ways to shower your favorite teachers with some appreciation. What says I appreciate you more than a school supplies cake to replenish their school supplies?

Every single day, I count my blessings for the amazing school and the teachers that are in my kid’s lives. We wanted to show our teachers just how much we appreciate them with a special gift this year. Today I wanted to show you how to make a school supplies cake for your favorite teacher. The best part about this is that this project can be accommodated to your own budget. You can stock up on cute fillers at the dollars store, you can add tiers to the ceiling OR you can keep it simple with just a couple of layers. Whatever you budget, this project can fit with this easy craft.

Supplies Needed (if you are replicating my cake):

1 square of sturdy cardboard (I used an old box)
Wrapping Paper
Sterlite 5.5 Quart Clear Storage Container
4 White Glues
2 boxes of 48 count crayons
6 glue sticks
48 No. 2 Pencils (two boxes)
1 package of ballpoint pens (any variety)
1 Ruler
1 square box of tissues
50 count tub of markers (I got the Crayola Pip-Squeaks Telescoping Tower)
Packing Tape
Regular Tape
A picture of your child
A Skewer
Rubber Bands
3 yards of ribbon (I used the Offray Polka Dot Red Ribbon)
Scissors

To begin, we are going to cover our recycled cardboard base with your favorite color of gift wrap.

In the center of your base, securing with tape as you go, stack two glues on each side of your Kleenex square. (Side note: if you see the glue standing up in subsequent pictures, just know that I quickly realized that they needed to be flat for the base to be flush with the cardboard base. This is the right way to do it.)

Slide your plastic container over your glue and tissue paper. This should all fit together really tightly. You can secure your storage container to the cardboard base with more packing tape.

Next, using more packing tape, add your tube of markers on top. I taped the lid on the markers to make sure that everything stayed secure.

Next up, we will add our two boxes of crayons. I secured these on top of the markers with more packing tape.

On each side of your crayon layer, add three glue sticks. I stuck these on with a little regular tape or you can use double-stick tape for this one.

Bundle your pencils up into two bundles of 24 pencils. Wrap each bundle with rubber bands. Slip your ruler between the two boxes of crayons and secure the ruler with tape on the inside of the two boxes. Add each bundle of crayons on each side of the ruler and then secure with masking tape.

With a little tape, add a little package of ballpoint pens to the front of your storage container.

Wrap your layer of pencils, your layer of crayons, and your storage container base in ribbon, with a simple double knot.

For the final touch, add a cute picture of your child with a message to their teacher. I did this in Picnik and it breaks my heart to hear that they will be closing their doors for photo editing. I found that PicMonkey is a great place to upload your photo and add text very quickly and easily. You can choose from a variety of fonts and colors.

Save your image once you have finished it. If you have a photo printer, you can print these out at home. I printed mine on 4×6 Kodak paper with my photo printer. If you don’t have a photo printer, Walmart offers one hour prints (for a 4×6) for $.09.  With a little tape on the back of your image, secure it to a simple skewer and then tuck it in and tape it to your ruler.

I couldn’t resist adding a sweet treat just for our teachers. I am working on making these Easy Felt Fabric Brooches for each of them as a fun little surprise. I can’t wait to make these in a few other colors and I know they will be the perfect accessory to their jackets this year!

Looking for more great teacher gift ideas? Look no further! Here is a round-up of my favorite gifts to give to the amazing teachers in our lives.

1. Raise Your Hand If You Mustache a Question Printable & Mustache Mug

2. Rolled Rosette Pins

3. Light & Fluffy Baked Cake Donuts

4. No-Slip Bookmarks

5. Oatmeal Cookies & Milk Bath Soak

6. Dark Chocolate & Sea Salt Brownies

7. Easy Felt Fabric Brooches

8. Light Snickerdoodle Biscotti

9. Rolled Rosette Ribbon Rings

10. Fabric Flower Pins

11. Oreo Cookie Biscotti

12. Honey Nut Granola

What gifts do you have up your sleeve for you teachers this year? What gift has been the biggest hit? I would love to hear your ideas!

I am a part of the Walmart Moms program, and Walmart has provided me with compensation for these posts. My participation is voluntary and opinions are always my own.

Pin It

10 Unique Ideas for Projects To Do With Goodwill T-Shirts

Friday, April 13th, 2012

If there is one craft material I love, it is t-shirt material.

If you have ever been in a Goodwill store, one thing you will notice is that there is an abundance and plethora of donated t-shirts in every size, style, variety, and color.
The next time you visit your local thrift store, don’t just visit the t-shirts in your own size for ideas.
Look in the Men’s section and in the larger sizes to find t-shirts that will offer you extra and a generous amount of craft material for the same amount of money as your smaller t-shirts.
Try to select t-shirts that are not as faded or that have fabric pills on them for optimal material for your projects.
Today I wanted to share with you ten of my favorite projects that I have found to do with old t-shirts from some very amazing bloggers.
I love that all of these ideas are extremely unique and that most require no sewing skills at all.

T-Shirt Scarves

I have seen lots of varieties of t-shirt scarves on many different blogs, but I absolutely love this DIY Dish episode you can watch to discover three different varieties of scarves you can make from an old t-shirt.
My favorite is the one, pictured above, with a bright pom-pom trim.

T-Shirt Bibs

If you are looking for a fast sewing project that would make a fun baby gift, then these t-shirt bibs are the project for you.
For little boys, you could look for their dad’s favorite sports teams and for little girls you could look for a fun t-shirt with sparkly letters or flowers.
Don’t forget that these could also be embellished with rick-rack, ribbon trim, or an easy t-shirt rolled rosette flower.

T-Shirt Bracelets

There are many varieties of cute bracelets that I have seen using t-shirt materials, but this one has to be one of my favorites.
This twisted knot bracelet can be made from just a single t-shirt or it could be made with a mix of prints or a mix of solid colors.
I can’t wait to make some of these for myself and my daughter this summer.
Nothing could be cozier than a gently worn t-shirt bracelet on your arm!

T-Shirt Produce Bag

Nothing could be greener than carrying your groceries in a cloth grocery bag…until you start using recycled materials for your bag.
Even if you are a beginning sewer, this simple produce bag can easily be created for a visit to the grocery store of your local farmer’s market.
I think these would be fun to make in a variety of pastel colors or to give as a gift to someone special in your life.

T-Shirt Pom Poms

Looking for a fun way to dress up your home for the warmer months?
I absolutely love these adorable t-shirt pom poms for a fun way to add a pop of color to your mantle, as a fun adornment to a wreath, or hung in a gathering on a door handle or front door.
The best part about this project is that no sewing skills are required for this one!

Petal Tees

I have seen many, many refashions of old t-shirts, but I think this Petal Tee is simply genius because the petal trim on this t-shirt is made from a variety of t-shirts, adding a cute pop of color for the Spring.
Visit your favorite thrift shop on their half off days and stock-up on a fun mixture of colors for a fun addition of color to your wardrobe.
If you are looking to add a little of the fluorescent color trend to your wardrobe, this would be a great way to do it without having to commit to an entire fluorescent piece!

T-Shirt Yarn

My favorite craft in the world is knitting and I love the idea of using t-shirts to create fun yarn for my projects.
This would be a fun gift to give to a friend that knits or crochets.
If you can use a pair of scissors and cut in a relatively straight line, then you can do this craft and use this yarn for a variety of projects!

T-Shirt Aprons

I have a true affection for aprons and have a little collection of my own thrifted aprons that I have acquired from Goodwill and antique shops.
I had never thought to use t-shirts to create aprons, but I think this t-shirt apron is the cutest thing I have ever seen.
This would be a cute craft to make for yourself or for your helpers in the kitchen.
The best part?
No ironing required and it can handle the messes that you might make in the kitchen.

T-Shirt Necklaces

I love t-shirt necklaces for adding a splash of color to your neckline.
This rolled rosette t-shirt necklace is a fun way to add some feminine details to your outfit very inexpensively.
I think it would be cute to make the t-shirt bracelet in a coordinating color and one t-shirt should more than cover both of these cute projects.

T-Shirt Flower Pin

Our tenth project is actually a fun t-shirt project we did here on the MomAdvice blog.
Be sure to visit my tutorial on creating a cute t-shirt flower pin made from an old t-shirt and spray painted clip-on earrings.
This is so cute and would be a fun addition to a Spring top or jacket.

What are your favorite craft projects to do with old t-shirt?

Don’t miss these craft ideas from MomAdvice.com:


8 Fun Sweater Crafts


Easy DIY Fabric Flower Wreath


Easy Paint-Dipped Spoon Sets


DIY No-Sew Reversible Cloth Napkins


Sign up for the MomAdvice newsletter


Pin It

Easy Felt Fabric Brooch

Monday, April 9th, 2012

If there is one thing I love to do it is spend a little time with my glue gun and create something sweet for someone I love. I wanted to share with you a super cute and fun Spring craft you could create with just a few simple materials. This is a fantastic little craft to have in your back pocket for a sweet teacher gift or a fun Mother’s Day gift for a special mama in your life.

I am sharing this fun craft-a-long for our readers and all supplies can be found at your local Walmart store or can be ordered directly through the suppliers. Let’s get started!

Supplies Needed (Available at Walmart or online)

Dimensions Wool Felt- any color
Cutter Bee Scissors (or any scissors you might have on hand)
Laliberi Pins and Clips Multi-pack
Hot Glue Gun & Glue Sticks
Jolee’s Bumble Bees Cabochons
Cardstock (to print our FREE flower template- see below)
To begin, print out our free flower template to create this felt rose. Our template should be printed on heavy-duty card stock to help make it easy for tracing. We have put the numbers of how many to print in the center of each circle, but here is another picture of what you are doing. One piece of the Dimensions Wool Felt (12×12) will create one of these flowers. Save the scraps to create a center for your rose after you are done cutting all of your circles.

You will find the link for our flower template at the end of this post.


 Set your largest circle aside- this will be the base for your flower.  Now grab your other circles and your glue gun and let’s get gluing. Add a big dab of glue in the center of each of these circles and hold it steady for a minute. Repeat with every single circle, fifteen times in total, until your hands feel crampy and you are feeling the hot glue gun burn from trigger-holding forever. Feel the burn, baby!
If I was an octopus I could have posted better pictures, but I hope that this picture will give you the visual you need for now. Begin placing your five large circles on top of your largest circle, attaching with a strip of hot glue on the back. Repeat this process with another layer on top. Repeat this process again with your baby circles. You will have a small hole in the center of the circle once everything is stacked.

If you use the Dimension Wool, this wool is very thick and you may be able to get away with just three circles on the two smaller circles so you can fit everything nicely on your flower. I would just use your best judgement, depending on the thickness of your felt and how big you like your flower.
Taking a small scrap of felt and wrap it into a circle to create the center of your flower. Secure with a dab of hot glue. Position it in the center of your flower and cut it down (if needed) until it fits nicely in the center of your flower.

Grab your pin and secure it to the back of your felt flower brooch with more…you guessed it… hot glue!

Add a little whimsy to it and glue a little bumblebee to your flower to make it even more Spring-y.

Grab your FREE Easy Felt Flower Brooch Template here!

I am a part of the Walmart Moms program, and Walmart has provided me with compensation for these posts. My participation is voluntary and opinions are always my own.

Pin It

How to Knit Great Chemo Caps For Charity

Tuesday, March 13th, 2012


“Balance, peace, and joy are the fruit of a successful life. It starts with recognizing your talents and finding ways to serve others by using them.”~ Thomas Kinkade

A couple of years ago I began focusing my knitting efforts on knitting chemo caps. I was inspired by my wonderful mother-in-law and my husband’s grandmother who devoted hours and hours into charitable knitting for hat drives and creating prayer shawls to be given to others. It is inspiring to see the power that knitting needles can hold for others. Since then, you will rarely find a pair of knitting needles that isn’t going to work for others in our home. It makes television watching feel noble and endless wait times for my kid’s activities feel useful

Over the years I have learned a lot about knitting great chemo caps and how to construct a cap that will truly be used and loved.

Select the Right Pattern

While you don’t need to necessarily select a hat that specifically is called a, “chemo cap,” in the pattern, you do want to be thoughtful about picking a pattern that the recipient will feel confident and beautiful in. Lacey hats, for example, may look beautiful, but imagine having tiny holes all over your hat when you have no hair? No fun!

Look for patterns that offer lace trim or details on the edge of the hat. Patterns that are closely knit and have details created from purl and knit stitches rather than large yarn overs will help your recipient keep his/her head warmly covered.

Seams can also be irritating to the scalp. If you are not able to do circular knitting, seaming will be involved, and that is especially why you will want to select a super soft yarn to help with that.

Select the Right Yarn

When I am selecting yarn for a chemo cap, I gravitate towards the same skeins of yarn that I would select for a newborn baby. You don’t want yarn that is itchy, scratchy, or that will further irritate the recipient’s sensitive head. It doesn’t mean that the yarn can’t be inexpensive, it just means that you need to be thoughtful about the yarns that you choose.

Caron Simply Soft, Naturally Caron Spa, & Hobby Lobby’s Bamboospun yarn are all great budget-friendly options that will also feel soft and wonderful against a bald head. Cotton can feel soft, but is a very stretchy yarn and if the hat is worn often, it is better to find a cotton blend that will retain it’s shape than a basic cotton yarn.

If you are not confident about a yarn choice, rub it against your own skin and see what reaction your skin has to it. If it feels itchy to you, it won’t be a good option for your chemo cap.

Make Her Feel Beautiful

To me, it is all in the details of the hat that really add that sparkle and will help your recipient feel truly confident. If you are knitting the hat specifically for someone, ask about their personal style. Do they love elegant buttons? Do they have a favorite color? Do they like a fitted hat or a more slouchy hat? Do they want a fabric flower on their hat?

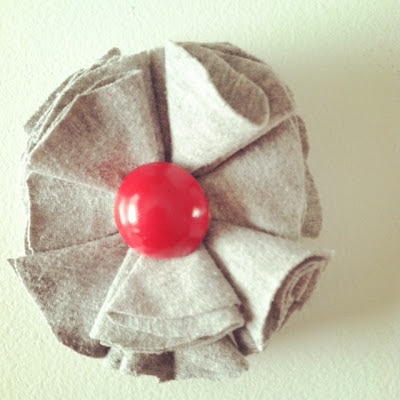
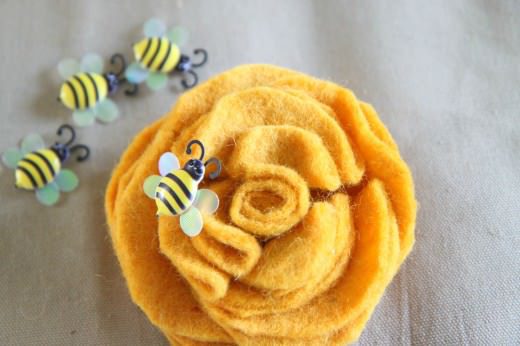
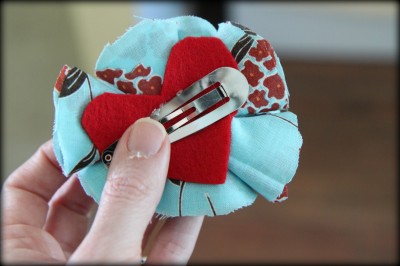
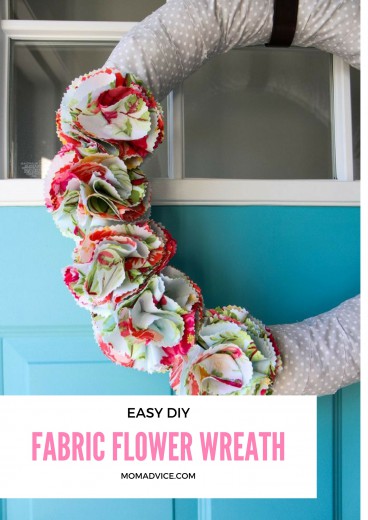
I recently started adding my Fabric Flowers to my chemo caps because they are so cute and inexpensive to create. I also love to visit Hobby Lobby for sweet embelishments that can add a little sparkle to your hat.

Wrap It With Love

Half the joy for me is in wrapping the gifts with love for their recipient. Imagine that you are struggling through your treatment and someone unexpectedly gives you a beautiful gift filled with something that will help you feel beautiful and confident. I love to wrap my hats in pretty tissue filled boxes or in simple newspaper tied with yarn with fabric flower toppers that they can use to accessorize their hats.

I finish all my chemo caps with homemade gift tags.  As a  treat to myself, I bought myself a personalized stamp from Babyjewels (an Etsy seller) and I have to say, it really adds that professional touch to my gifts!  They have one for knitters and one for crocheters too. Sometimes I cut the gift tags with my Silhouette craft cutter and other times I keep it simple by just using my circle punch that I have in my craft supplies. These are tied with yarn to each hat.

Find a Home for Your Hats

If you don’t know anyone personally going through cancer, they are many people out there who could benefit from your donation. Check your local hospital’s oncology department to find out if they could use your donations. Usually baskets of these hats are made available to patients when they are undergoing treatment.

If you can’t find a place for you hats locally, you can mail them in to Head Huggers where your hat will find a good home through their organization.

Chemo Caps Come in All Shapes & Sizes

Sadly, I have had to knit wee chemo caps for tiny patients that shouldn’t even know what the word cancer means.  It breaks my heart to make these tiny caps and it serves as a constant reminder to me just how fragile our lives really are.

Keep your smaller chemo patients in mind as well as men who are undergoing chemo and might need a nice fitted cap to keep their heads warm in the winter time.

When making chemo caps, try making a variety of sizes and for both males and females so that donations are on hand for a variety of patients.


 Great Chemo Cap Patterns for Beginning Knitters

Pinch Hat

Pattern: Pinch Hat by Cecily Glowik MacDonald (available for purchase for $5.50)

Needle Size: US 8 Straight Needles

Yarn: Hobby Lobby Bamboospun in Purple

Notes: For knitters that want to make charitable hat contributions but don’t know how to knit in the round, this pattern is for you. It is an easy garter stitch pattern, knitted on straight needles, and then cinched to create a cute gathering on the side where you can add a fun pin or brooch. No crazy stitches, no knitting on circulars, and an easy & fast to knit.

Lace Trim Chemo Cap

Pattern: Lace Trim Chemo Cap by Maureen Keenan (available for free download)

Needle Size: US 5 (16″ circulars)

Yarn: Naturally Caron Spa (in Driftwood & Stormy Blue)

Notes:  This lace trimmed hat is the perfect chemo cap because the lace just hits on the edge of the hat. Great one to do while catching up on your latest shows since you only need to concentrate in the first eight rows of pattern.

I added a fabric flower to this hat to add a little splash of color. You can find that easy tutorial over here. These fabric flowers are a fun way to adorn a chemo cap and make the hat a little more fun.


Republic Hats

Pattern: Toddler Republic Hat or Adult Republic Hat (you can find the pattern in the side bar available for free download) with Lydia Flowers (Size Medium & Small)- The Lydia Flower is currently unavailable, but should be available for purchase soon!

Needle Size: US 5 Needles (circular) & US 8 (straight) for the hat embellishment

Yarn: Malabrigo Yarn Merino Worsted (for hat) &  I Love This Cotton! in Ivory for the flowers

Notes: If you are looking for a perfect hat pattern for a novice beginner who is learning how to knit in the round, then these patterns are the perfect patterns for you. In the pictures above, I actually used the Toddler Republic Hat pattern for myself since I have a smaller head than most normal adults. I adjusted the length to 5 1/2 inches long. Linked above is also the adult-sized version that would be a perfect holiday gift for just about any girlfriend or sister to wrap underneath your tree this year!

The embellishment is the Lydia Flower in both the medium & small sizes, stacked using size eight straight needles. If you don’t feel ambitious enough to knit a flower, you can finish it with a simple button and skip that step altogether!

These hats pictured here were knitted for my friend’s sister, Megan. Isn’t she just so beautiful? I understand that she is both beautiful inside and out.  Although I have never met Megan, when I heard about her I knew that I needed to put my knitting needles to work for this amazing girl.

Megan has a rare cancer called Leiomyosarcoma that aggressively forms tumors in the tissues and organs of her body. She has already completed 6 rounds of chemotherapy, and is determined to beat this. Megan has been on our prayer list and I hope she can be on yours too.

Megan’s family will be throwing a Benefit for her in town at Villa Macri in Toscana Park on Sunday June 24, 2012 from 12pm to 7pm. I can’t wait to be there to support Megan and her family and I would love for you to support them too. You can learn more about the benefit on Megan’s blog, “Miracles for Megan.”

We pray for you every day, Megan!


Sadly, cancer has now impacted our family personally. Our family is LIVING STRONG right now for a very special man in our own life. Ryan’s grandfather has been diagnosed with cancer and we ask that you add him to your prayer list and all of our family.

We couldn’t love our Pops more if we tried.

We sent our  sweet grandpa these pictures of our family to cheer him up and so he knew we were Living Strong for him every day. There is little that we feel like we can do except pray, but we do it fervently every single day.

We are thankful for high tech blessings like Caring Bridge (a free website host that families can use to create a page for their loved one) and Skype where we can see our Grandpa & Grandma since he lives so darn far away.

If you are looking for more pattern ideas, I would love to be your friend on Ravelry.com. My profile is over here.  It is a fun and free place to hunt for patterns and document your projects. I update my page often with chemo caps & knitted prayer shawls. Let’s be friends! You can also find other fun knitting projects in our Knitting section of the site.

I leave you with this final quote about my little hobby…

“Sometimes, people come up to me when I am knitting and they say things like, “Oh, I wish I could knit, but I’m just not the kind of person who can sit and waste time like that.” How can knitting be wasting time? First, I never just knit; I knit and think, knit and listen, knit and watch. Second, you aren’t wasting time if you get a useful or beautiful object at the end of it.

I will remember that not everyone understands. I will resist the urge to ask others what they do when they watch TV.”

― Stephanie Pearl-McPhee, At Knit’s End: Meditations for Women Who Knit Too Much

Make your television time (how ever you watch that TV) useful and make something beautiful that will brighten someone’s day more than you can know.

Feeling charitable today? Here are 10 Painless Ways to Give Back to Charities.

Pin It

Homemade Peppermint Marshmallows

Tuesday, December 13th, 2011
Photographed by– Kristen at Dine & Dish

 
Homemade marshmallows have been on my cooking bucket list for three years now. Making peppermint flavored marshmallows sounded far more intimidating that the process actually was and after making my first batch with great success, I can’t wait to try a few other flavors in my kitchen.

This year I vowed I would not talk myself out of  marshmallow making. With my big girl set to celebrate her sixth birthday, I thought I would make these for cocoa fun for her birthday party. Once I bought all the supplies, there was no turning back.

I was so nervous that I didn’t take a single picture while I made them.

What if I messed the whole thing up?

What if my marshmallows reached 241 degrees and the whole batch failed?

I followed the God of Cooking (also known as Alton Brown) and did everything exactly as instructed. Surprisingly, my stand mixer did the brunt of the work while I tidied the kitchen. Who knew that marshmallow making was so darn easy?  The taste? Better than any marshmallow I have ever tasted.

Photographed by– Kristen at Dine & Dish

 
I did pretty pink swirls through the marshmallows and added my peppermint extract to the batch to add a fun pink peppermint touch to our marshmallows.

The hardest part was waiting the four hours before I could cut them. With cornstarch and powdered sugar mixed together in a bowl next to my board, I just used my pizza cutter (dusted with the sugar mixture) and cut my marshmallows in squares. Each one was lightly dusted with  more of the sugar mixture and I stored them in a plastic container. You know…for storing….or for eating.

And eating.

And eating.

And eating.

I confess, I think I have a new food addiction.

These are fabulous, easy, and delicious.  They would make a fantastic gift to give this holiday season with a little of my favorite cocoa mix or served up with a fancy little hot cocoa bar like I did for my daughter’s birthday party.


Homemade Peppermint Marshmallows
Recipe Type: Dessert
Author: Alton Brown
Prep time: 10 mins
Cook time: 8 mins
Total time: 18 mins
Serves: 9 dozen
One of the easiest and most impressive gifts to give this holiday season.
Ingredients
  • 3 packages unflavored gelatin
  • 1 cup ice cold water, divided
  • 12 ounces granulated sugar, approximately 1 1/2 cups
  • 1 cup light corn syrup
  • 1/4 tsp kosher salt
  • 3/4 tsp peppermint extract
  • 1/4 cup powdered sugar
  • 1/4 cup cornstarch
  • Nonstick spray
  • 4 drops red food coloring
Instructions
  1. Place the gelatin into the bowl of a stand mixer along with 1/2 cup of the water. Have the whisk attachment standing by.
  2. In a small saucepan combine the remaining 1/2 cup water, granulated sugar, corn syrup and salt. Place over medium high heat, cover and allow to cook for 3 to 4 minutes. Uncover, clip a candy thermometer onto the side of the pan and continue to cook until the mixture reaches 240 degrees F, approximately 7 to 8 minutes. Once the mixture reaches this temperature, immediately remove from the heat.
  3. Turn the mixer on low speed and, while running, slowly pour the sugar syrup down the side of the bowl into the gelatin mixture. Once you have added all of the syrup, increase the speed to high. Continue to whip until the mixture becomes very thick and is lukewarm, approximately 12 to 15 minutes. Add the peppermint extract during the last minute of whipping. While the mixture is whipping prepare the pans as follows.
  4. Combine the confectioners’ sugar and cornstarch in a small bowl. Lightly spray a 13 by 9-inch metal baking pan with nonstick cooking spray. Add the sugar and cornstarch mixture and move around to completely coat the bottom and sides of the pan. Return the remaining mixture to the bowl for later use.
  5. When ready, pour the mixture into the prepared pan, using a lightly oiled spatula for spreading evenly into the pan. Drop red food coloring onto marshmallows and use a toothpick to swirl the food coloring into the marshmallows. Dust the top with enough of the remaining sugar and cornstarch mixture to lightly cover. Reserve the rest for later. Allow the marshmallows to sit uncovered for at least 4 hours and up to overnight.
  6. Turn the marshmallows out onto a cutting board and cut into 1-inch squares using a pizza wheel dusted with the confectioners’ sugar mixture. Once cut, lightly dust all sides of each marshmallow with the remaining mixture, using additional if necessary. Store in an airtight container for up to 3 weeks.

Source: Alton Brown, Good Eats

Special thanks to Kristen at Dine & Dish for sharing her photographs of these marshmallows with MomAdvice! What a wonderful friend!


What is something that you discovered was surprisingly easy to create in the kitchen that you always thought was intimidating? Feel free to share your kitchen adventures!

Pin It

Mustache Mugs & Free Mustache Printables

Tuesday, November 22nd, 2011

Mustache Mugs & Free Mustache Printables from MomAdvice.com

I am so excited to begin sharing some new gift ideas for all the people in your life. Of course, if there is one trend that is hot right now it is mustaches. We wanted to jump on the mustache-loving trend and share with you some free mustache templates that can be used to adorn any mug and a free mustache printable for your favorite teachers.

Mustaches can adorn anything from a fun glass beer mug for a great guy gift, to a cute little shaving set for your favorite dad, to a fun mug for your best friend.

Mustache Mugs & Free Mustache Printables from MomAdvice.com

Mustache Mugs & Free Mustache Printables from MomAdvice.com

To begin, there are many ideas for paint that you can use with your mug. You can buy a fine tipped painter’s marker at the craft store and outline and paint your mustache with this and/or you can buy a porcelain paint set (that requires not heat setting), or a porcelain paint that needs to be baked.

With the type of paints that don’t require heat, you are looking for one that has a conditioner, the black paint, and then the gloss. These do not need to be heat set, but do require ten days to set up.

I used a combination of the two. I applied the conditioner, used the paint marker and filled a bit with the black paint, and then applied the glaze to set the paint. I have had great success with the non-heat setting variety, but you can choose whichever type works best for your budget, is already in your craft supplies, or whichever is on sale.

You will also need a beautiful mug for your project. I found these large white mugs for a little over $2 at Walmart. Feel free to visit the dollar store or thrift shop for an inexpensive mug of your choice!

Mustache Mugs & Free Mustache Printables from MomAdvice.com

Begin by applying the conditioner to your mugs and let them dry. This should only take about ten or fifteen minutes.

Mustache Mugs & Free Mustache Printables from MomAdvice.com

Mustache Mugs & Free Mustache Printables from MomAdvice.com

Mustache Mugs & Free Mustache Printables from MomAdvice.com

Mustache Mugs & Free Mustache Printables from MomAdvice.com

Cut, secure with a little tape underneath, trace with your painter’s pen, and fill in your mustache of choice. We have three different options available so you can choose your favorite for your mug.

Let it dry overnight and then apply the glaze over your piece.

Mustache Mugs & Free Mustache Printables from MomAdvice.com

Of course, what fun is a mustache mug without a great printable go along with it? This mustache printable is the perfect sign to adorn any teachers desk.

“Raise Your Hand If You Must Ask (Mustache) a Question,” is a great motto for class. I placed this fun printable in an inexpensive frame that I spray painted red. The mug is filled with a small denominator Starbucks gift card to round out this budget-friendly gift for your favorite teacher.

Get Printing:

Raise Your Hand if You Moustache a Question Free Printable

Printable Dimensions: 8 1/2 x 11″ (can be trimmed for an 8×10 frame)

Print on Heavy-Duty White Cardstock


Three Free Mustache Templates

Printable Dimensions: These mustaches are 3″ long

Print On Standard Computer Paper for Tracing


Mustache Mugs & Free Mustache Printables from MomAdvice.com

Happy mustache mug making!

What holiday craft projects have you been working on?  Feel free to share any links to what you are working on! Access all of our craft fun on MomAdvice by visiting our Craft Section. Happy crafting, friends!

Pin It

Father’s Day Gift Basket: A Fun Movie Gift Basket

Thursday, June 16th, 2011

It’s no secret that I love my dad like crazy! This week we got the opportunity to celebrate him at a dinner in honor of his 35 years of employment with Bayer. This picture of my sister & I with him is one of my favorites from that evening together.  Sadly,  for us, our brother hit the road to start a fresh new life in New Orleans so one piece of our puzzle was missing in this picture. We are missing him a lot already.

Regardless, this gave me an opportunity to give him his dad’s day gift a little early and shower him with love for all of his hard work our entire lives. I shared with you this week, a power-packed punch of a gift to give your favorite superhero dad. I hope that gave a few of you a fun idea for a quick gift to pull together. Now I wanted to showcase one other cute idea I have for a Father’s Day gift basket that I thought you guys might like.

For your basket, look for a popcorn bucket or tub that you can use to fill it with your movie supplies.  I found this tub at our local dollar store, but you can check near the popcorn aisle or over by the popcorn poppers for another fun tub that you can use for the base for your gift.

Next fill the bottom of your popcorn tub or bucket with a little shredded paper or tissue paper. Someone shipped something to me in a million pounds of this shredded paper so that is why I am such a fan of it for a free filler in our house. Whatever you might have in your wrapping supplies will work beautifully for this project.

Fill your popcorn tub with your dad’s favorite snacks. My dad loves black licorice and movie theater popcorn so we filled his up with those snacks to enjoy while he watches his favorite movies. I spent roughly $5 on snacks, but you can spend however much your own budget allows on the snack portion of this present!

Now comes the fun part. Grab your kids and take a few pictures of them pretending to watch a movie. Use your movie bucket for a prop and snap a few pictures that you can use for your gift.

Upload your photo to Picnik. Under the CREATE tab,  select EFFECTS, then select the BLACK & WHITE option to change your picture to a a black and white image. While still under the CREATE tab, select the option for TEXT. Once you are in text, put in your message for your dad. Make sure not to put your text all of the way to the edge of the photo because it may cut it off when you print it. It is better to get it a little further in to assure that you don’t waste ink, paper, or your time!

You can choose from a variety of fonts and colors. The font I choose for these images was Budmo Jiggler. I loved this font because it looked a little like a movie theater sign with one’s name in lights. Add a fun movie message, as we did here. You can do all of this with a free membership to Picnik.

Save your image once you have finished it. If you have a photo printer, you can print these out at home. I printed mine on 4×6 Kodak paper with my photo printer. Attach this image to the front of your movie tub.

To include in our movie tub, we added a gift card for two month’s of Netflix for only $15.98. With our five dollars in snacks, this gift is just a little  over twenty dollars, but is worth two month’s of fun! We tied the gift card with this photo that we also printed on 4×6 paper and finished it all with a little red ribbon.

This quick and easy gift is ready to go and can be pulled together in just a few minutes!  I hope this gift will offer a little more inspiration to your Father’s Day gift ideas and we wish all of our dads out there a very Happy Father’s Day from us!

We happen to have a pretty amazing dad in our midst that we are looking forward to showering with love this year! I feel so incredibly blessed that our children have such an awesome father and am a lucky girl myself!

Happy Father’s Day, Dads!

Father’s Day Gift Basket: A Power Pack for Your Super-Dad!

Monday, June 13th, 2011

Where would we be without wonderful fathers in our life?  Father’s Day gifts are always a challenge for me because I want something that shows our dads how special they are to us, but I can’t always think of the best way to show how much we love them.  This year I decided to make two gift baskets for our dads that are a breeze to pull together, are personalized to each of our dads, and happen to be awfully affordable.

This month’s DIY challenge for Walmart was to create a Father’s Day gift using items purchased from the store.  Head on over to your store to pick up the supplies for these fun gift baskets for your dads. I promise you that these gifts will be a big hit.

For our first Father’s Day gift, we have a sporty dad in our life. Ryan’s dad is passionate about biking and spends a lot of time clocking the miles on his bike. We thought we would make a power pack for our favorite superhero dad with snacks and drinks that he can take on the road with him.

Start with a basket or tub. I found this party tub over with the outdoor supplies for $4.57. This is a deep tub and  will be perfect for on the patio after dad is done using it for his gift.

On the bottom of the tub, put a layer of newspaper to fill out the tub. We don’t want to waste our budget on fillers for the basket and this is a great way to make the basket look fuller for less.

Now that we have filled out the bottom, you can add cute shredded paper, tissue paper, or anything else you might have in your wrapping supplies. Fill it out just enough that it looks full and hides the newspaper bottom.

Now it is time to fill it with power foods. I got Powerade and power protein bars for our dad. Feel free to add your own spin on the power foods. In my opinion, coffee and chocolate are power foods that would fit very nicely into this theme. Explore the grocery aisles for your own dad’s favorite power foods.

Next I had my kids pose for pictures in their superhero capes. Feel free to make your own spin on this though. You could also have your children do strong man poses or lift weights, put on a sweatband and leg warmers, whatever you think says power. Your dads will really get a kick out of this.

Upload your photo to Picnik. Under the CREATE tab,  select EFFECTS, then select the LOCOMO-ISH option to change your picture to a a brighter image. Use the scale to slide down the color on it so it looks bright and fun, but not flourescent. While still under the CREATE tab, select the option for TEXT. Once you are in text, put in your message for your dad. Make sure not to put your text all of the way to the edge of the photo because it may cut it off when you print it. It is better to get it a little further in to assure that you don’t waste ink, paper, or your time!

You can choose from a variety of fonts and colors. The font I choose for these images was Lexographer. You can do all of this with a free membership to Picnik.

Save your image once you have finished it. If you have a photo printer, you can print these out at home. I printed mine on 4×6 Kodak paper with my photo printer. If you don’t have a photo printer, Walmart offers one hour prints. The cards themselves are almost as awesome as what is inside your baskets.

Tape this image to the front of your party tub. I also stuck another picture on the other side of the tub of my daughter with her extremely scary power pose.

If you would like, you can include a small denominator gift card in your basket for some power tunes for the iPod or even a powerful book that dad could read.  I tied this with ribbon and attached it with this superhero card to let him know that this gift was for additional power.

This is a gift that I know your dad would love and the kids will have a blast creating it with you! I will be back tomorrow with one more quick gift basket idea and I hope that this will give a few of you a little last minute inspiration!

What gifts do you have up your sleeve for you dads this year? What gift has been the biggest hit? I would love to hear your ideas!

I am a part of the Walmart Moms program, and Walmart has provided me with compensation for these posts. My participation is voluntary and opinions are always my own.