Archive for the ‘DIY’ Category

Easy Tips for Making Over Patio Furniture

Thursday, June 20th, 2013

Easy Tips for Making Over Patio Furniture

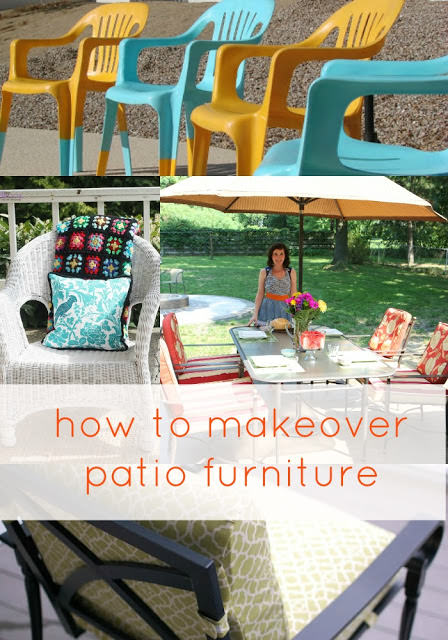
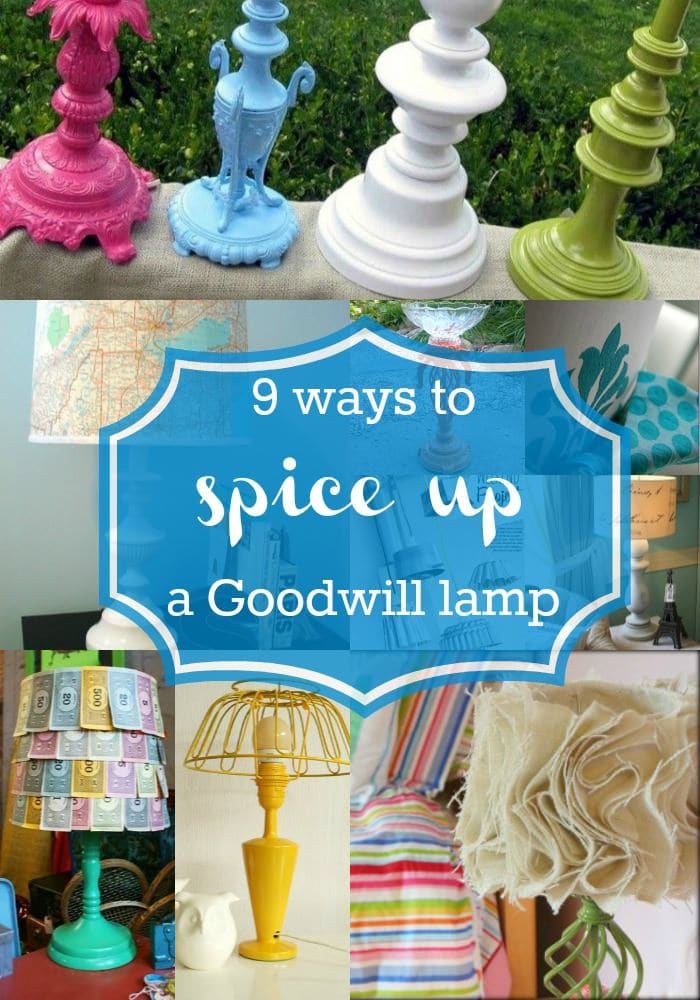
The season for outdoor entertaining and eating is upon us and if you are looking to upgrade your patio set, you just might want to check your local thrift store.
Today I wanted to share with you easy ways to update, refinish, and refresh an outdoor patio set into a set that is uniquely you with a few easy tools and strategies to help get you started.
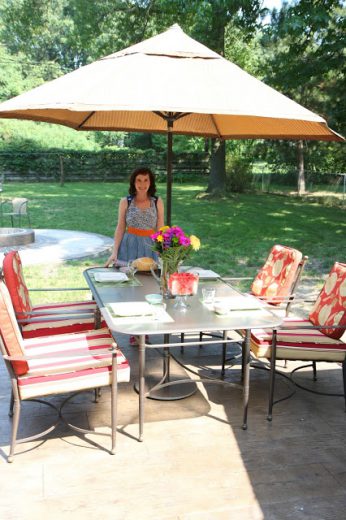
I, in fact, recently refinished my old set (pictured above) and have fallen back in love with it again, thanks to an easy afternoon of spray painting.
 
Here are a few strategies for making over an old set.

Refinishing Metal Furniture

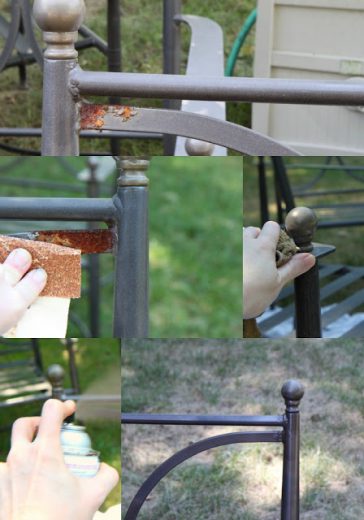
Rusting on metal furniture happens and if you spot a set that looks a little worn in spots, a makeover transformation is easy to do and requires only an old cloth to wipe down the furniture, sandpaper, and spray paint (in any color you desire).
Give your furniture a good wipe down to remove any dirt or debris that may be lingering from summers past.
Use a medium-grit sandpaper to rub down any rust spots or imperfections on the furniture until they are level and no longer flaking off on the piece.
Once the all of the areas have been sanded, spray paint the furniture and allow it to dry fully.
I recently discovered a spray paint nozzle for recovering my furniture pieces and it really helps to coat the furniture evenly.
If you plan to do a lot of spray painting to refinish your pieces, I highly recommend the small $6 investment to get a more even finish on your pieces.

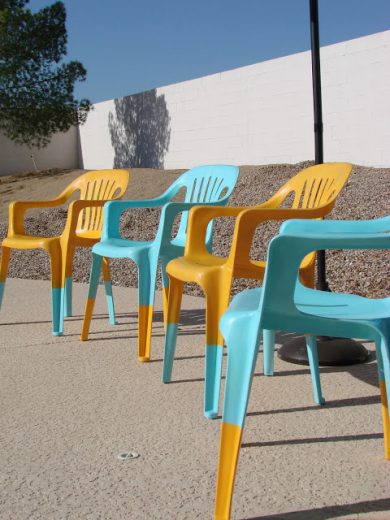
Refinish Plastic Furniture

Plastic furniture is one of the easiest types of furniture to update.
There is no need to rough up the plastic with sanding, in fact, all you need to do is purchase spray paint that is made specifically for plastic (I recommend Krylon Fusion for Plastic) because it specifically bonds to plastic and requires no priming or sanding.
I’m dying to score a few gently used garage sale chairs to makeover for our back patio.
You see, even plastic furniture can look trendy with the right colors and painting techniques.
Stay up-to-date on fun trends, like paint-dipped furniture as pictured above from The Homemade Diva, for a fun splash of color on your patio.

Refinish Wicker Furniture

Perhaps one of the most intimidating types of furniture to many DIY’ers is wicker furniture.
There is no need to be intimidated though because it is easy to spruce up and to even make minor repairs to.
Look for a waterproof glue to fix any minor repairs and make sure that the glue has plenty of time to set (read the back of the glue bottle for specific times) before beginning your painting.
After thoroughly giving the wicker a good scrubbing and air drying, spray paint your piece in several sessions of very thin coats of spray paint in your desired color.
Try these spray painting wicker furniture tips from Rust-Oleum for refinishing your wicker pieces using their Rust-Oleum Universal spray paint line, that allows you to skip the step of priming.

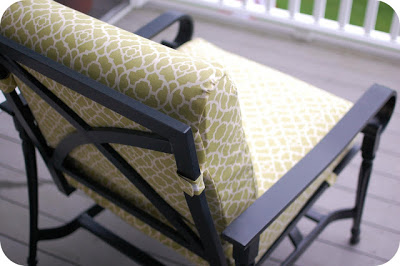
Recover Old Patio Cushions

Old patio cushions can get a new lease on life with fresh fabrics.
If you have ever priced out new cushions at stores, you quickly realize that it would cost hundreds of dollars to get new cushions for all of your outdoor furniture.
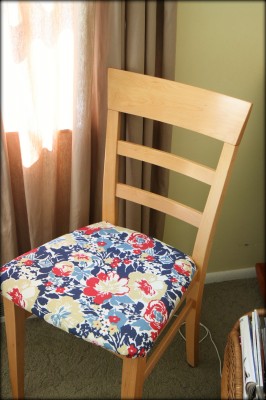
Did you know that you can actually buy weatherproof outdoor fabric at the fabric store? It’s a handy tip to have in your DIY arsenal for a couple of different reasons.
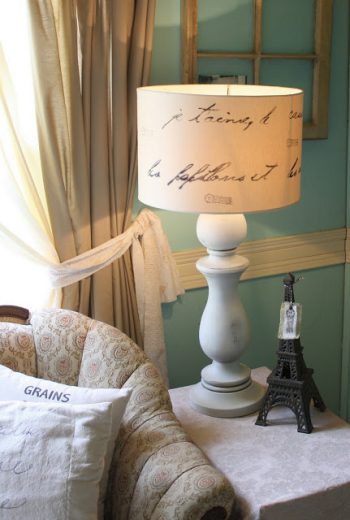
I actually used this material on my dining chair indoors to help with easy clean-up from spills and stains with two small kids.
This same material can be used to freshen up your old patio cushions.
Although I am no seamstress, this tutorial from 33 Shades looks like a great one for how to recover old patio cushions.
Next time you see these at your local Goodwill, consider trying this DIY to get new cushions at a fraction of the retail price.

Have you ever made over patio furniture? What are your tips and techniques for this DIY project?


This post contains affiliate links.


Don’t miss these other great ideas from MomAdvice:
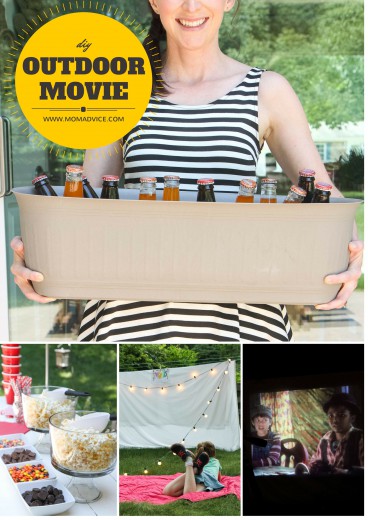
 

DIY Outdoor Movie


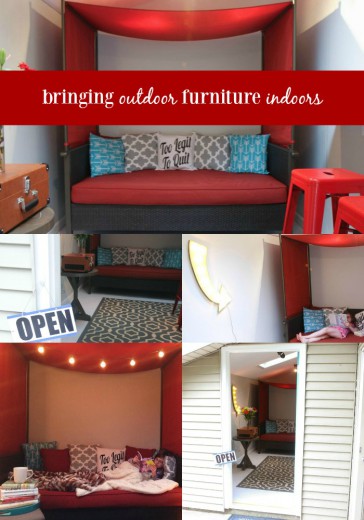
Bringing Outdoor Furniture Indoors


She Shed Makeover

New Spins on Outdoor Entertaining 


Sign up for the MomAdvice newsletter

Pin It

4th of July Flag Cupcake Pick Wreath & Easy Flag Bunting

Tuesday, June 18th, 2013

4th of July Cupcake Pick Wreath from MomAdvice.com.

4th of July happens to be one of my favorite decorating seasons and today I want to show you how to make an easy 4th of July wreath from flag cupcake picks.

This 4th of July wreath idea and easy flag bunting were inspired by a picture from a magazine that I found.


Good Housekeeping Magazine

This picture from Good Housekeeping magazine caught my eye and I knew I wanted to decorate my front door just like it.

Unfortunately, there were no directions on how to create this wreath, what supplies to buy, or how to execute this project.

When Walmart challenged me to come up with a 4th of July project for their customers, I just knew that I had to recreate this door.

My husband said I couldn’t do it.

His doubt fueled this wreath into its amazing flag glory…even when a little voice in my head wasn’t too sure it would look like the picture. If I can make a wreath out of yarn, out of coffee filters, out of Peeps for goodness sake, how could I fail at  a simple cupcake pick wreath?

If you are not crafty this is the project for you.

It requires no sewing, gluing, cutting, or any other crafty-type behavior.

I think that is why I am most excited about it because it is just so easy to do! 

Let’s get started with what you need to tackle this fun patriotic project!


Easy 4th of July Wreath - MomAdvice


4th of July Cupcake Pick Wreath from MomAdvice.com. 4th of July Cupcake Pick Wreath from MomAdvice.com. 4th of July Cupcake Pick Wreath from MomAdvice.com. 4th of July Cupcake Pick Wreath from MomAdvice.com.


Supplies List

Above are some pictures of the supplies you will need (for visual learners, like myself!) Prices listed are what they are listed at currently at the store!

  • 1- 16″ foam wreath form (that is flat on the back)- $6.99
  • 6 packages of 120 count flag cupcake picks (Note: These are NOT available at Walmart stores. You can find these, however, at your local party supply store)- $2.99 per box (approximately)
  • Jute Rope- $3.24
  • 12- 4×6 US Flags (found on the ends of the aisles in the office supplies)- $.68 each
  • 2- 20 count packages of mini clothespins (over in the office supplies)- $2.48 each

4th of July Cupcake Pick Wreath from MomAdvice.com.

  1. Take your flag cupcakes and insert them on a slight angle into your foam wreath form. These will not slide in and out easily so you will have to put a little oomph behind it.
  2. Continue filling them in, around and around until you can no longer see your wreath form peeking through. About a box of the flag cupcake picks (120 of them) filled one quarter of my wreath. 
  3. Once the front is filled, build up the behind it, but with a thinner layer, just to camouflage the back of the wreath a bit. Make sure not to stack these too deep so that the wreath can still lay flush against your door.
  4. You can fill in the center of the wreath as well with flags, again adding a thinner layer just to hide any of your wreath form, until all you can see is a sea of little flags. It took 720 flags to fill this wreath form. Yes, your fingers will hurt, but you will be so happy about your wreath, you will forget all about the pain!

4th of July Cupcake Pick Wreath from MomAdvice.com.


Easy Flag Bunting from MomAdvice.com.

Now that you have your wreath done, we can create our adorable flag bunting to go around the outside of your door, to frame your wreath!


Easy Flag Bunting from MomAdvice.com.


  1. Disassemble your flags from their mini poles. These are stapled on so I just pulled them off, or you can use a staple remover to remove the staples from the flags.
  2. Take two mini clothespins and clip the flags to the jute twine, spacing them evenly, until all twelve have been attached.
  3. Leaving a little bit of length, clip the end of the twine to finish your bunting.

Easy Flag Bunting from MomAdvice.com. This easy bunting could be added to a doorway, dress up a mantle, to frame out your patio doors, or to decorate a ledge for the holiday. I love that it is so sweet and so simple to create.

4th of July Cupcake Pick Wreath from MomAdvice.com.

Here is a side-by-side comparison of my door and the door I spotted in the magazine.

I am so proud how this turned out and I love that these decorations can be used year after year for the holiday!

I look forward to sharing more fun patriotic projects in the next few weeks with you!

I hope you enjoyed today’s easy 4th of July craft projects!


How to Make a Flag Wreath - MomAdvice.com


walmart_mom_disclaimer


How to Make A Flag Wreath - MomAdvice.com

Pin It

Cool DIY Father’s Day Gifts

Thursday, June 6th, 2013

Cool-DIY-Father's-Day-Gifts

Father’s Day is only a couple weeks away and whether celebrating my awesome Dad or my husband who is an incredible dad to our kids, I think it’s so meaningful to give handmade gifts, especially if they can be made by kids – or at least with their help. Those seem to be the gifts that are saved and cherished through the years (though hopefully any edible parts of the gift won’t be saved for years!).

Like I did for Mother’s Day (turnabout is fair play!), I’ve combed the Mom Advice archives to bring you some fun and easy gifts for dad that don’t take a lot of money or time and I’m also including two new projects from this year because, well, I love them!

To round out our list of gift ideas, I found a few more sweet and memorable projects from other creative bloggers that you might want to make – just please be sure to pin from the original source I’ve provided if you’d like to add one to a Pinterest board. Thanks!

How_To_Make_A_Candy_Bouquet

Our newest Father’s Day idea: a sweet Candy Bouquet!

Monster_Printables

Fun Mom Advice Monster Printables & Monster Bars

microwave_peanut_brittle

Mom Advice’s Easy Microwave Peanut Brittle

DIY_Chalkboard_Cookie_Jars

Our DIY Chalkboard Conversation Bubble Cookie Jars

Dad's movie-basket

A favorite gift for dad: a Movie Basket complete with photo card

sugar_and_spice_nuts

How about Mom Advice’s Sugar and Spice Nut Mix for a sweet dad?

Power-dad-gift-basket

And this Mom Advice classic Power Pack for Super Dad Gift Basket would be a terrific tie-in combined with tickets to see the new superman movie!

scrabble frame

Scrabble Tile Frame @ Zitzman Fam

fathers' day photo collage

Chalkboard Thought Bubbles Photo Collage @ Positively Splendid

instagram photo coasters

Instagram Photo Coasters @ White House Black Shutters

pat-on-the-back-shirt

‘Pat On The Back’ Father’s Day Shirt @ Sugar Bee Crafts

painted golf tees

Painted Golf Tees + Packaging @ Reading Confetti

Father's Day apron

‘Caution’ Man’s Apron @ I Heart Naptime

DIY Tool_Tub_Tote

DIY Too Tub Tote @ Sew 4 Home

Kids handprint craft

Kids Handprint Tracing Craft @ Mom Always Finds Out

fathers_day_footprint

Walk In Your Shoes Art @ JDaniel4sMom

A-Nuts-Bolts-Frame

Nuts-and-Bolts Frame @ B-Inspired Mama

Here’s to a fun Father’s Day!

Pin It

How to Make a Candy Bouquet Gift for Father’s Day

Tuesday, June 4th, 2013

How to Make a Candy Bouquet

I don’t mean to brag, but my kids are so blessed to have such an incredible Dad. He is the ultimate go-to guy from helping the kids with their homework, to kicking around the soccer ball, to indulging my daughter in her fancy tea parties, to the ultimate bedtime storyteller.

This Father’s Day we wanted to make a gift that we just knew he would love to show just how special he is to us. Our Dad happens to have a sweet tooth so we decided to make him a candy bouquet that he could place on his desk at work when those sweet tooth cravings strike!

The best part about this gift though is that it only takes fifteen minutes to create, costs about $20 in supplies, and can be created with your kids in honor of their favorite Dad.

To find out how to make this easy craft, head on over to the Kenmore Blog to get the supplies list and directions for making these sweet candy bouquet gift for Father’s Day.

Pin It

A Monster of a Father’s Day Gift: Monster Cookie Bars & Monster Printable Cards For Dad

Monday, June 3rd, 2013

Monster Cookie Bars & Printables from MomAdvice.com.Father’s Day is just around the corner & today we wanted to share a monster of a Father’s Day gift with a cute spin on the monster theme with easy monster cookie bars and printable monster cards for a special Dad in your life.

Monster Cookie Bars & Printables from MomAdvice.com.

This week’s challenge from Walmart was to create an inexpensive Father’s Day gift that would wow your Dad. Well, if your dad is anything like our Dad, he is certainly wowed with homemade treats and funny cards with a great sense of humor. Our idea was to mix up a batch of thick and delicious Monster Cookie Bars made with rolled oats, peanut butter, mini M&M’s (found over in their candy aisle), and chocolate chips.

Monster Cookies can be a bit of a monster to create as a drop cookie because of their monster size. I choose to echo the words of an amazing woman I once heard speak these wise words…

“Ain’t nobody got time for that.”

Wise, right?

Bar cookies get a big fist pump from this busy mom and if a celebration requires a cookie, I often rely on these chocolate chip cookie bars to get us through whatever baking requirements are made for those occasions. These Monster Cookie Bars are equally delicious and offer that crusty exterior with that soft interior that makes, in my humble opinion, the perfect cookie.

Monster Cookie Bars & Printables from MomAdvice.com.

Monster Cookie Bars & Printables from MomAdvice.com.Monster Cookie Bars & Printables from MomAdvice.com.

What Father’s Day would be complete without a card to accompany your sweet gift? We are so excited to debut these adorable Monster cards that you can print out to attach with your Monster Cookie Bars for your favorite Dad. We have included three fun printable cards for Father’s Day and then 1 that could be used for any occasion to accompany your sweet treat. Print these printables out on white card stock  and you will be all set for this Father’s Day!

Monster Cookie Bars & Printables from MomAdvice.com.Monster Cookie Bars & Printables from MomAdvice.com.


Printable Monster Cards from MomAdvice.com.

Download Your FREE Monster Card Printables HERE:

Happy Father’s Day From Your Monster FREE printable card

Your Gift is a Monster! FREE printable card

Eat All the Cookies FREE printable card

We Are Your Spawn FREE printable card

Monster Cookie Bars & Printables from MomAdvice.com.

I can admit that this family has had Monsters on our brain after getting a sneak peek at the Monsters University movie that is set to hit theaters on June 21st. While our family was at the Disney Social Media Moms conference, we got an exclusive sneak peek at the film. It is FANTASTIC, and dare I say it, even funnier than the first one. I have no doubt that your family will love it!

Our Monster Cookie Bars would really pull together a fun family night out to see this fantastic film and you can find loads of fun Monsters supplies in the party favors aisle of your Walmart store including fun cups, plates, and other party favors for an inexpensive night to enjoy while tackling your summer bucket list or our 100 Days of Summer Pinterest Board.

Now that you have the printables, here is the deliciously easy and tasty recipe for these Monster Cookie Bars. We recommend preparing these in a metal 9×13 pan for best results!

Monster Cookie Bars & Printables from MomAdvice.com.

Monster Cookie Bars
Recipe Type: Dessert
Author: Adapted from The BakerMama
Prep time:
Cook time:
Total time:
Serves: 15
Monster cookies made easy in a bar cookie. Be sure to pair these easy cookies with our free Monster printables.
Ingredients
  • 1-1/2 cups all-purpose flour
  • 1 teaspoon baking soda
  • 1 teaspoon salt
  • 1/2 cup (1 stick) unsalted butter, softened
  • 1-1/2 cups creamy peanut buter
  • 1 cup brown sugar
  • 1 cup granulated sugar
  • 2 teaspoons vanilla extract
  • 2 eggs
  • 1 cup rolled oats
  • 1 cup semi-sweet chocolate chips
  • 1 cup mini M&M’s (approximately half a bag)
Instructions
  1. Preheat oven to 350°F. Grease a 9×13 pan with nonstick spray.
  2. In a medium bowl, whisk together the flour, baking soda, and salt. Set aside.
  3. In a separate bowl, beat together the butter and peanut butter until smooth. Add the sugars and beat until blended. Add the vanilla and eggs and mix until light and fluffy.
  4. Gradually add the flour mixture until just combined.
  5. Mix in oats until well combined.
  6. Stir in chocolate chips and mini M&M’s
  7. Press dough evenly into prepared baking dish. Bake for 30-35 minutes or until lightly golden brown and set in the middle. Let cool completely in baking dish then cut into bars. Store in an airtight container.

 Happy Father’s Day to all of our Dad readers (I know you’re out there!) and here’s hoping you get spoiled by a few of your favorite monsters!

Be sure to check back this week for more great Father’s Day gifts on a budget!


walmart_mom_disclaimer

Pin It

100 Days of Summer Pinterest Board- 2013 Edition!

Wednesday, May 22nd, 2013

100 Days of Summer 2013

Summer is just around the corner and I am so excited to share with you that I have gathered another 100 Days of Summer activities for you to do with your kids in the summer months. These are 100 activities that are all low to no cost, screen-free, and a fun way to build truly memorable moments with your kids in the summer months.

I had the best time creating our very first 100 days of summer activities board for our family to do and share with you and then last year’s 100 Days of Summer was another huge hit. It was so huge that I just knew I had to repeat it all again this year for you.

100 Days of Summer 2013

I am looking forward to tackling our own summer list and will be documenting our projects through mobile pictures.You can catch me on Instagram, where I am documenting our summer. Just search for the username momadvice and you will find me there. Just as a side note, I try to always answer all the comments on my pictures if I can. If you have questions about projects we are doing or just want to say hello, I will do my best to respond!

If you are on Instagram, you can join in on the fun by taking pictures and sharing all of your summer adventures through there. Let’s use the hashtag #100summerdays again like we did last year.

By tagging your photos, it will make it easy to find each other in the group and share the projects we are tackling together. You can add the tags to your caption or you can add them as a comment later. In either scenario, the tag will pull it into our summer group.

I still will be sharing our apron full of giveaways and our notebook of inspiration each week. I will also have fresh content through my freelance writing jobs this summer with Kenmore, Goodwill, Jack’s Pizza, & Walmart that will keep our site fully loaded with great ideas for your summer.

For the rest of my entries, I will be sharing what we are working on from our summer list through mobile pictures and quick notes on what fun activities we are doing at our house. I am hoping it will be an inspiration to you to get out and enjoy the summer with your children. I can’t say we will tackle a hundred activities, but I will be awfully proud if we do one cool activity a week.

100 Days of Summer 2013

This year’s list is AMAZING and my favorite so far from making chevron friendship bracelets, to building race tracks, to painting techniques on rain days, to creating popsicle light sabers. There really is something for EVERY age group this year.

Be sure to follow me on Pinterest for inspiration for your meal planning, home, reading, wardrobe and more! I am one happy little pinner!

Happy summer to each of you!

xo,
Amy


Pin It

9 Ways to Spice Up a Goodwill Lamp

Tuesday, May 21st, 2013

goodwill_lamp_makeovers

One walk through the aisles of Goodwill and I guarantee you will find a handful of great lamp choices just begging for a fun DIY lamp makeover that can dress up a corner in your home.

To inspire you, I have gathered 9 of my favorite ways to spice up an old lamp.

These lamp makeover ideas are so inspiring, in fact, that I can’t wait to snag a lamp for myself!


Be Bold With Paint

There is no need to go overboard if you lack the craft skills to tackle a more complex craft project and one way that you can easily spice up an old lamp is just to add a bright pop of color to it with spray paint.

With all of the fun colors in the spray paint aisles, the only hard part will be choosing your favorite color.

Be sure to browse around the Housewares section for other fun additions you can add to a table in your home and can spray paint in the same hue.

One bottle of spray paint will go far with a fun project like this. (Source: Mr. Kate)


 Make It Into a Bird Bath (Say What?)

Sometimes one has to rethink the original purpose of a thrift store item, that is why I am IN LOVE with this idea to turn a lamp into a birdbath for the backyard.

With this DIY, you simply spray paint your base in a fun color to match the colors in your patio set, and then add a bowl on top to create the perfect little birdbath for the backyard.

Why spend a fortune at the garden center, when a birdbath can be made for a fraction of the price? (Source: Thrifty Rebel)


 Add A Whimsical Accent to Your Game Room

Do you remember all of the fun I had with board games over the Fall?

If you remember how much fun I had with that, I am sure you will understand my enthusiasm for this adorable lamp for a family’s game room.

The best part about this one is that not only can you pick up the lamp from Goodwill, but you can even pick up the board games there too.

This is a lamp that you could definitely make together as a family and would be absolutely adorable in your game room, family room, or kids playroom. (Source: Apartment Therapy)


Make it Sentimental

Map crafts are just as popular as the book crafts we highlighted last month and I absolutely love this DIY lampshade makeover made from a map.

Select a map from a location that is special to you, perhaps where you honeymooned, where you grew up, your favorite family vacation, or where you live right now, and make an homage to that location with this sweet lamp.

Finish it with a grosgrain ribbon or an embellished edge ribbon trim from the craft store. (Source: Silver Boxes)


Rethink Your Fixture

Who says you need a lampshade to even create a light.

Have you ever thought of using a cake or jelly mold for a fun industrial fixture.

It is rare that I stop in a thrift store and don’t spy a cake mold with pretty fluted edges and they are often priced at a dollar or less.

Add a spray paint that adds a hammered metal appearance to them or go vintage with a pretty aqua blue.

These light fixtures are not only unique, but they utilized an item that is frequently donated. (Source: Poppytalk)


Add a Stenciled Accent

Stencils are all the rage in home decor whether it is a stenciled accent to a wall, to stenciled window treatments, to stenciled accessories in your room.

You can find beautiful stencils to choose from at your local hardware store in the paint aisle or you can create your own if you have a craft cutter, like a Cricut or Silhouette.

This stencil adds texture to the fabric, thanks to the Tulip Soft Fabric paint.

I love the fun bow and cute additions made to this lamp from a scrap of burlap and fabric.

I am sure you will love this one too! (@ Tatertots & Jello)


Add a Ruffle

Don’t sew?
No problem!
There are so many fun ways to add fabric to a tired lampshade that you might just be overwhelmed with the choices and few of them involve more than fabric and a glue gun.
This lamp that I created replicated a lamp spotted in Anthropologie, but was made at a fraction of the price with a little burlap and a hot glue gun.
This lamp redo is a great one to add to a craft room or to a little girl’s room for a feminine touch.
Spray paint the base any color to match the room and add a burlap ruffle in whatever shade you can find on sale at your craft store. (@ MomAdvice)

Add Some Script

I love when bloggers are inspired by expensive lamps they see in store catalogs and find  a way to replicate that beauty in their homes.

A $159 lamp might not be in your budget, but one created for less than $10 just might be.
Who wouldn’t love a love letter written right on a lampshade?
I am all about sentimental decor in my home and I have a feeling that this lamp makeover is as sweet as it gets (@ The Shabby Creek)


Rethink Your Shade

Industrial lighting is very in right now and one way that you can incorporate that industrial feel to your lighting is by simply creating a different lampshade from other items you might find lurking at your Goodwill store.
A metal basket is the perfect way to add that industrial touch to a lamp and when they are both spray painted in the same shade, it is a match made in heaven. (@ DIY Wilma)

Have you ever spiced up a lamp? Let us know in the comments what you have done with this frequently donated item!


This post contains affiliate links.


Don’t miss these other crafty ideas from MomAdvice.com:


DIY Lampshade Ideas


How to Reupholster a Chair


DIY Ottoman Serving Tray


DIY Bulletin Board


Sign up for the MomAdvice newsletter

Pin It

Homemade Sidewalk Chalk Paint Recipe

Monday, May 20th, 2013

Homemade Sidewalk Chalk Paint Recipe

Summer is just around the corner and before it gets here I wanted to share my favorite homemade sidewalk chalk paint recipe. Making DIY sidewalk chalk paint couldn’t be easier and many of the supplies are likely lurking right in your cupboard.

Today’s project is sponsored by Walmart and you can find all of the supplies you need to create this easy recipe, right at your local store, from the brushes to the food coloring to the paint storage containers.

Homemade Sidewalk Chalk Paint Recipe
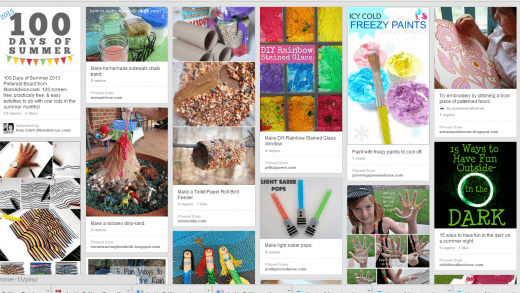
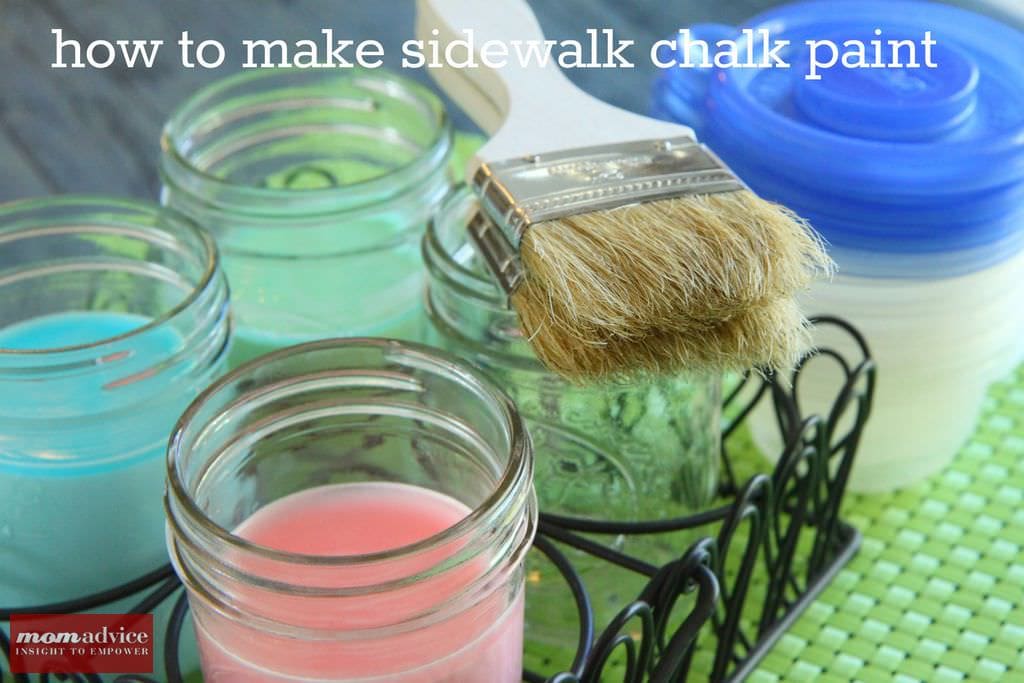
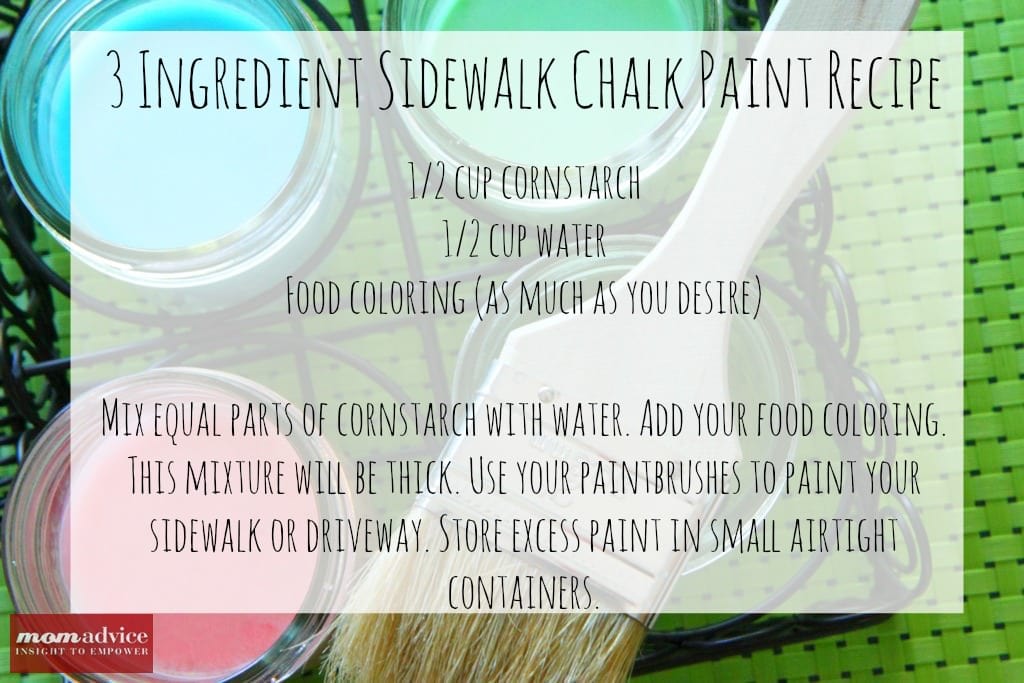
Did you know that you can make sidewalk chalk paint from three simple ingredients? Homemade sidewalk chalk paint is made from a mixture of cornstarch, water, and food coloring. When visiting the baking aisle to get your food coloring, be sure to pick up the brightest and most vivid colors you can find to really make the colors pop on your sidewalk.
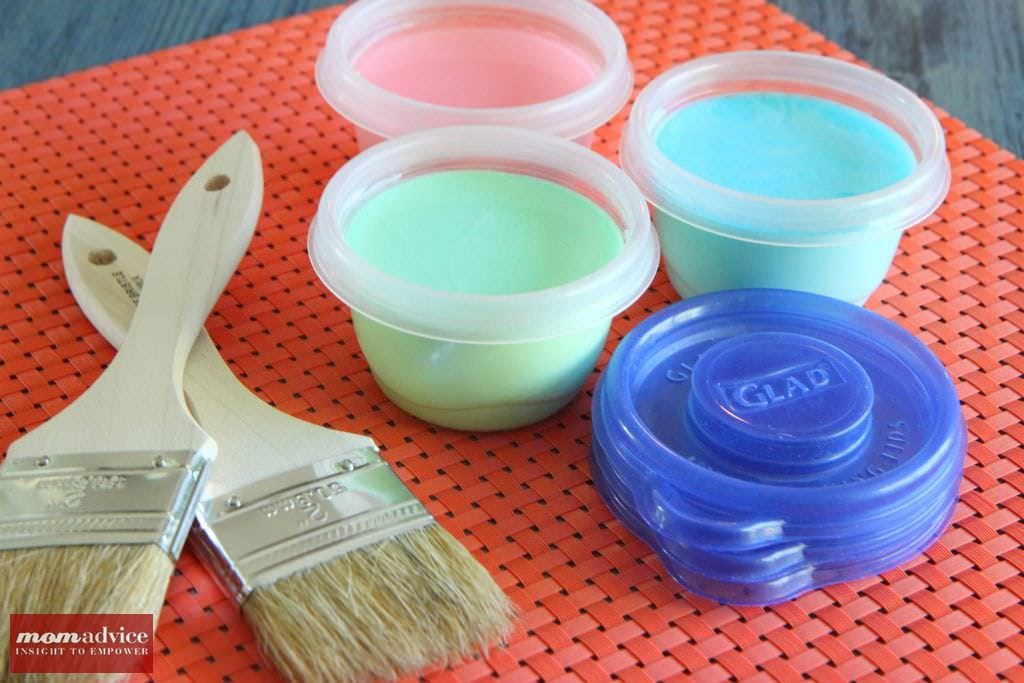
Homemade_Sidewalk_Chalk_Paint_Recipe_4 Proper storage of your paints will help them go farther. I love to grab lidded disposable containers to store the extra paint in and with a quick rinse of your brushes, your supplies are ready for the next day of painting.

Summer Bucket List

Of course, this isn’t the only recipe we have to keep your kids entertained in the summer! I am so excited to share with you that I will be doing another 100 Days of Summer AGAIN (third year running!) on Pinterest and will be sharing 100 SCREEN-FREE, FREE or PRACTICALLY FREE activities to keep your kids entertained this summer. Be sure to start following on Pinterest so you don’t miss the big reveal and so you can begin adding a few of these ideas to your summer bucket list! 

I think this year’s list will be the best one yet, but in the meantime, here are a few of our favorite activities we did this past year to get you inspired!

Summer Fun Inspiration

Glow-In-The-Dark JELL-O

The World’s Greatest Homemade Bubbles

Homemade Butterbeer Lattes

Easy Coffee Filter Posies

Easy Homemade Playdough

How to Make Car S’mores

Homemade Sidewalk Chalk Paint Recipe
Recipe Type: Kid Recipes
Author: Amy Clark
Prep time:
Total time:
Serves: 2
Skip buying sidewalk chalk paint and make your own with this easy DIY recipe!
Ingredients
  • ½ cup cornstarch
  • ½ cup water
  • Food coloring (as much as you desire)
Instructions
  1. Mix equal parts of cornstarch with water. Add your food coloring. This mixture will be thick. Use your paintbrushes to paint your sidewalk or driveway. Store excess paint in airtight containers.
I can’t wait to share more fun summer ideas with you and in the meantime, I hope you can give this easy sidewalk chalk paint recipe a spin in your kitchen!
walmart_mom_disclaimer


Pin It

Quick & Easy Mother’s Day Gift Ideas

Tuesday, May 7th, 2013

Quick & Easy DIY Mother's Day gift ideas

Mother’s day is coming up – are you all set or are you still looking for some special, and more importantly – meaningful, gifts for your moms and grandmas? You probably know that around here we think that gifts we make ourselves are the most meaningful, as they truly have a little bit of us in every gift we give.

Along these lines, I’ve searched the archives of Mom Adivce to bring you some of our quickest and easiest DIY projects that would be perfect for the women in your life! I’ve grouped them into four categories that moms are guaranteed to love:

DIY Flowers – who says you need to buy traditional flowers that last only a little while? Try crafting a bouquet or floral jewelry that will last much longer…maybe forever!

Fun Breakfasts – whether for a special breakfast-in-bed or a family brunch, any of these favorite recipes will help celebrate mom.

Pampering Gifts – these easy to make projects will make mom feel special – just make sure she gets the time to use them!

Special Confections – not your everyday sweets, these are certain to show mom your the extra care you took to shower her with love…and sugar!

Finally, these tips on how to use Goodwill items for your gift wrapping may spark some ideas to make even the presentation special:
Creative_Gift_Giving

I hope you have a wonderful Mother’s Day – either giving or receiving!

Pin It

19 Awesome Ways to Show Teacher Appreciation

Wednesday, May 1st, 2013

19 Teacher Appreciation Ideas
As you may have guessed by now, we love our teachers and we love letting them know how thankful we are for all the time, energy, and love they put into educating our children! I look forward to Teacher Appreciation Week each year (May 6-10 this year) as a time I can really let them know how we feel (though of course telling them all through the school year is allowed, too!).

Today I’m excited to share with you 19 of our best teacher appreciation ideas – all pulled from the archives of MomAdvice! Some years I have more time and some years less, so there are ideas for gifts that can be created in minutes like Oreo Cookie Biscotti:

oreo biscotti

Or if you have more time there are some super special ideas that are guaranteed to knock their socks off like a Rosette Bib Necklace:

Rosette_Bib_Necklace

Need a few more ideas…how about 17 more? These are some of the best projects I’ve come up with over the years – and I found them to be a great way to show love to the awesome teachers in our lives!

1. DIY Book Page Flower Bouquet (this year’s teacher appreciation idea!)

2.  Teacher School Supplies Cake

3.  Raise Your Hand If You Mustache a Question Printable & Mustache Mug

4.  Rolled Rosette Pins

5. Light & Fluffy Baked Cake Donuts

6.  No-Slip Bookmarks (3rd project in the post)

7.  Oatmeal Cookies & Milk Bath Soak

8.  Dark Chocolate & Sea Salt Brownies

9.  Easy Felt Fabric Brooches

10. Light Snickerdoodle Biscotti

11. Rolled Rosette Ribbon Rings

12. Fabric Flower Pins

13. Honey Nut Granola

14. Knitted Coffee Cozies

15 DIY Monogrammed Wine Glasses

16. Six Stitch Knitted Ruffled Scarf

17. Easy Microwave Peanut Brittle

What are some ways you’ve found to say thanks to teachers?

Pin It