Archive for the ‘Blogging’ Category

Simplifying the Holiday Parade of Activities

Wednesday, December 18th, 2013

*This post is sponsored by Ritz Crackers

Each year, I find myself coming to the topic of simplifying the holidays.  Don’t we just all wish this time of year was a little easier?  Despite my best efforts to simplify, it can feel impossible in the midst of the kid’s holiday programs, get togethers, shopping, wrapping, sending of cards, gift-giving, & holiday baking.

I don’t want to brag, but this year we really did achieve that simple holiday we have been longing for and I am partnering with Ritz to share how you can avoid the parade of endless holiday to-do’s and instead embrace a simpler holiday.

 Simplifying the Holiday Parade of Activities

Simplify the Giving of Holiday Cards


I love, love, love having pictures that I am in and having someone else take them for me, but we lost track of time and weren’t able to book our usual family session. Instead of not sending cards, I set my camera up on a tripod and we took our family shot by setting the timer on our camera and having me jump into the family picture.   By getting everything set up in advance before my family came outside, we were able to get our picture in a mere five minutes.  Before everyone had their coats off, I had our photos edited and cards in the mail. The best part is that we have moved our family session to the Spring, a time of year we decided was much less chaotic, and will really enjoy it all a little bit more.

I will admit that I was also was more laid back about how we did our cards this year and enlisted one of my favorite helpers to assist me in this year’s mailing. Not only was she excellent at adding our stamps and sealing the envelopes, but she also kept me on track because she was waiting for me to get those addresses on so she could do her part with them.  It gave us time to chat while we were doing them and ended up being fun instead of a holiday chore this year.

 Easy No-Bake Mint Thin Recipe from MomAdvice.com.

Simplify the Holiday Baking


This year we decided to skip the big baking day and make easy treats instead. Although I usually love holiday baking, this year I focused more on creating knitted gifts than my typical holiday treat box. Fortunately, we found a fun holiday treat that we could make that didn’t require a bit of baking, but was just as delicious. On the Ritz Holiday Parade site, we found an easy recipe for Mint Thins to create together that tasted just like one of our favorite cookie treats, but were made with Ritz Crackers, chocolate, and crushed candy canes.

 Easy No-Bake Mint Thin Recipe from MomAdvice.com.

Easy No-Bake Mint Thin Recipe from MomAdvice.com.

It just goes to show that making holiday treats doesn’t have to be an elaborate baking day. My kids loved helping to crush (and eat!) the candy canes for our cookies and we enjoyed eating these while watching, “A Christmas Story,” this year. Yet another simple and easy tradition is born!

 Simplifying the Holiday Parade of Activities

Simplify the Gift Giving


I often talk about our commitment to do the Four Gift Rule, but this year we took it a step further and asked the kids if they would like to skip the presents and just take a family adventure together. We gave them lots of options for places we could take a mini-vacation to and they chose a trip to Grand Rapids, Michigan for our holiday getaway. We are so excited to take in all of the museums, holiday lights, ice skating, and see the sites of the city.

If your kids are struggling to come up with gifts this year or your home is overrun with just too much stuff, consider creating your very own, “Choose Your Own Adventure,” vacation in lieu of gifts. Not only did I have a lot less to buy this year, but I also get to spend four days with my family making incredible memories that I hope they will remember forever.

Start planning and dreaming ahead for next year though because those vacation rentals do go quickly!

 Ritz Parade Float

Focus On the Fun


Ritz wants to bring back the fun for the holidays and this year they have created a fun interactive Ritz Parade where you can visit the site and build your very own float. You can add up to twelve items on your float from toys, characters, celebrations, and banners. The pieces can be scaled to your desired size and placed anywhere on your float. Once it is complete, you can share your holiday float with others. It’s a fun little interactive tool that you can use to keep the kids busy while you are putting those last minute touches on those holiday festivities. Since we adopted a cat this year, we loved making a float of her for our holiday parade. I am sure this illustrates just how special she has become to all of us!

In addition, the Ritz parade allows consumers to unlock deals to help decrease the stress of gift buying! You can check out all the deals here!

For a little added holiday fun, check out how Ritz surprised shoppers with a fun rap. Get it? Rapping Wrappers!!


Happy Holidays, friends!

 Easy No-Bake Mint Thin Recipe from MomAdvice.com.

Easy Mint Thin Cookies
Recipe Type: Dessert
Author: Amy Clark
Prep time:
Total time:
Serves: 12
Looking for a quick holiday treat to share that doesn’t require any baking? You must try these delicious Mint Thin “Cookies.” You won’t believe how good or easy these are to make (and eat!)
Ingredients
  • 2 pkg. (4 oz. each) semi-sweet baking chocolate, melted, slightly cooled
  • 1/4 tsp. peppermint extract
  • 36 RITZ Crackers
  • 1 candy cane (6 inch), crushed
Instructions
  1. Mix chocolate and extract.
  2. Dip crackers in chocolate mixture, turning to completely coat each cracker. Carefully scrape off excess chocolate.
  3. Place crackers in single layer on waxed paper-covered baking sheets; sprinkle with crushed candy.
  4. Refrigerate thirty minutes or until chocolate is firm.


This post is sponsored by Ritz Crackers. I’ve received compensation for my time and effort in creating this post. All thoughts and opinions are my own.

Pin It

Knitted Wine Bottle Hat and Scarf

Monday, December 16th, 2013

Knitted Wine Bottle Hat and Scarf from MomAdvice.com

I love sharing ideas for cute hostess gifts and today’s gift idea is a free pattern for a wine hat and scarf that you can use to adorn bottles of wine or champagne for your favorite hostess over the holiday season.

Walmart challenged me to create a New Year’s Eve craft and I immediately thought of a fun way to decorate a bottle of bubbly or wine for the holidays. I love this project so much because these are so fun to create and can be decorated in any combination of yarn colors and you can even experiment with stitches and hat toppers.

Knitted Wine Bottle Hat and Scarf from MomAdvice.com

Knitted Wine Bottle Hat and Scarf from MomAdvice.com Knitted Wine Bottle Hat and Scarf from MomAdvice.com

You may recall that I made knitted sweater coffee cozies for our teacher & bus driver gifts this year? I used the Red Heart Super Savers yarn and I still had some left despite wrapping all my holiday gifts in the yarn, knitting hair bows for gifts (coming soon!) and even making my yarn ball ornaments. I can’t believe how many projects you can create with just $2.47 of yarn!

I wanted to create a festive gift I could share with others when I attend our holiday gatherings this year. What is more festive than tiny hats and scarves for your wine bottles?

Knitted Wine Bottle Hat and Scarf from MomAdvice.com

Modifications Were Made to The Featured Pattern. Please Read Carefully!

I tried a few different needle sizes since the pattern said you could use a few different sizes, I recommend going with the largest size (US 8) recommended because it created the fullest scarf (the red one in the back was done on US 8 needles). There were also some interesting stitches in the pattern for the scarf and I tried it three different ways (recommended, my own way, and then a simple stockinette). I loved just simply doing a simple stockinette (knit one row, purl one row- repeating) with the US 8 needles. The scarf will curl in a bit, but I think it added more texture to the top of the bottle. You can, of course, experiment with what you think looks best though.

These tiny hats are knitted on double-pointed needles. If you haven’t tried using double-pointed needles before, this is a perfect project to try them on. You can find a few tips from me over here on needle recommendations and getting started! Don’t be scared, it is easier than you think!

Knitted Wine Bottle Hat and Scarf from MomAdvice.com Knitted Wine Bottle Hat and Scarf from MomAdvice.com

I know I keep talking about my pom-pom makers, but they seriously have made me so happy this year. I bought them when we made pom-pom bouquets for our grandma (you can read my tutorial on how to use them there)  and then I completed a pom-pom marathon when I made my DIY Pom Pom Trees. I used the smallest Clover Pom-Pom maker for these tiny hats.

While you are buying it, you might as well as buy the larger size because you will be just as addicted to me as pom-pom making!

Knitted Wine Bottle Hat and Scarf from MomAdvice.com Knitted Wine Bottle Hat and Scarf from MomAdvice.com

I hope you all have the best holiday season and that a few of the projects I have shared on MomAdvice have helped with your gift-giving this year! Cheers to you, friends!

Grab the Pattern HERE on Ravelry (FREE!).  Don’t forget to friend me while you are there! I love new knitting buddies! Oh, and here are 54 MORE Handmade Gift Ideas to get you thinking about crafting this holiday season!

walmart_mom_disclaimer

Pin It

$500 Cash Giveaway

Friday, December 6th, 2013

500_Dollar_Cash_Giveaway

I am so excited to be offering up a very special surprise giveaway opportunity to one lucky reader. Today we are sharing a $500 cash giveaway (made in the form of a Visa Gift Card) to help with all of those holiday gifts you might be shopping for.

Here are all of the fantastic bloggers that are sponsoring this special giveaway: 

A Cowboy’s Wife

A Family Feast

Barbara Bakes

Bless This Mess

Crumbs and Chaos

Eat at Home Cooks

Frugal Upstate

Hoosier Homemade

Let’s Dish

Kitchen Meets Girl

Mom Advice (that’s me!)

Pocket Change Gourmet

Roxana’s Home Baking

Sophistishe

Sweet Sugarbelle

Sweet Treats and More

The Pennington Point

Unsophisticook

Wholesome Mommy

Your Homebased Mom


Below is the Rafflecopter widget where you can enter to win this $500 cash giveaway. You will have the opportunity to check out all the fun ways you can enter for additional entries! This giveaway will end on 12/13 (Friday) so be sure to get your entries in today!

Good luck and Happiest of Holidays!!

a Rafflecopter giveaway

DIY Thanksgiving Centerpiece

Tuesday, November 19th, 2013

DIY Thanksgiving Centerpiece from MomAdvice.com.If there is one holiday I love it is Thanksgiving. Any holiday that focuses on all of the blessings of the year around a dinner table filled with those I love is definitely a holiday that I love to celebrate. Oftentimes though, the details of holiday preparation and decorating can interfere with the things that really should matter the most.
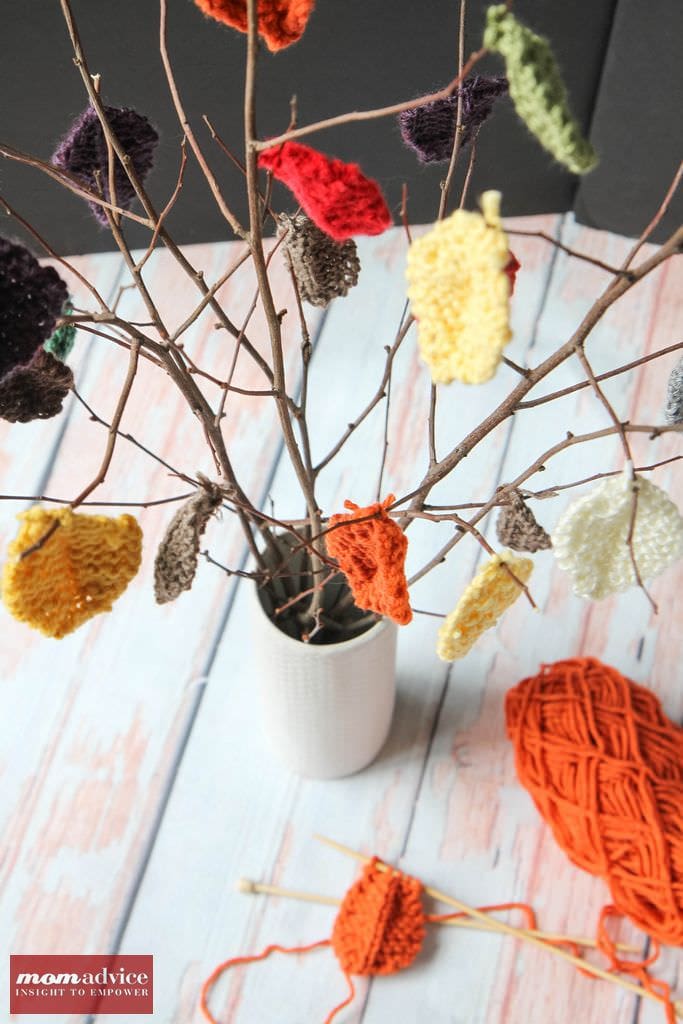
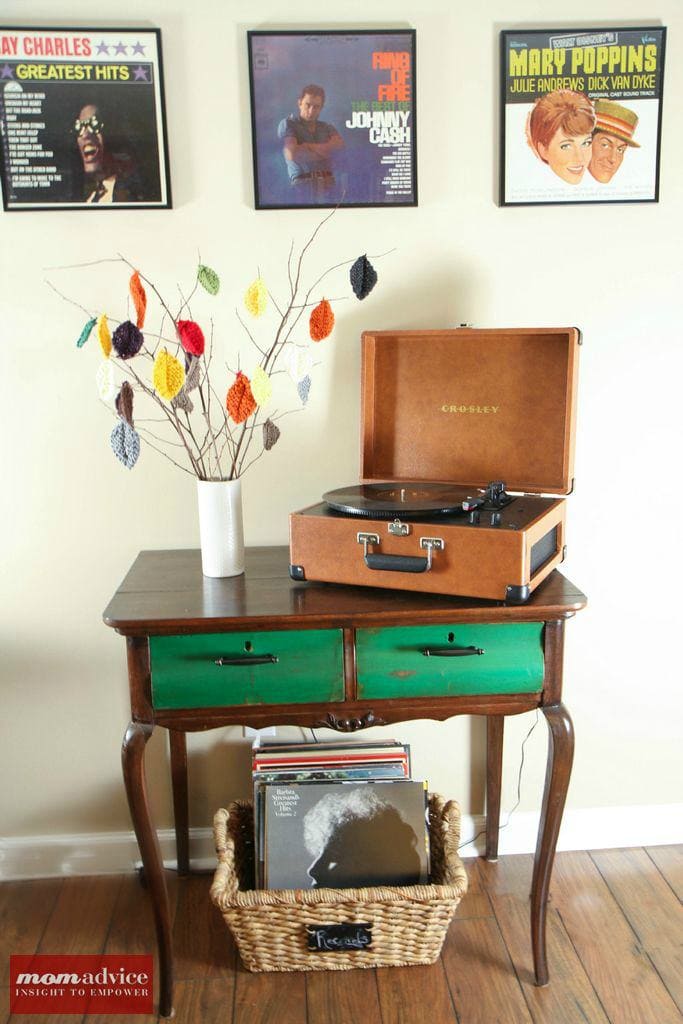
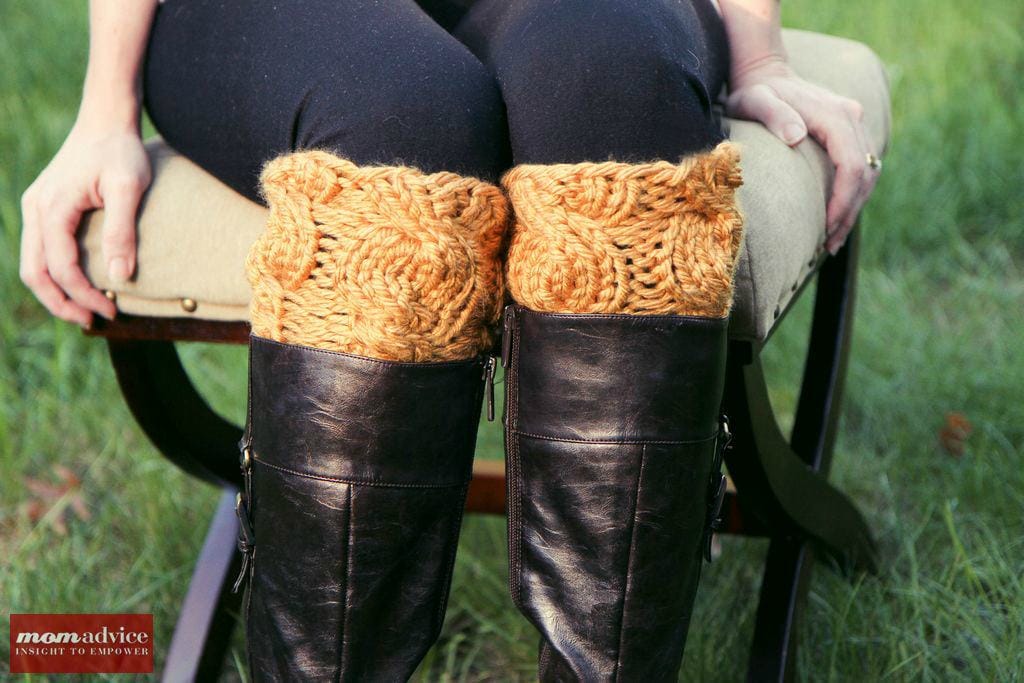
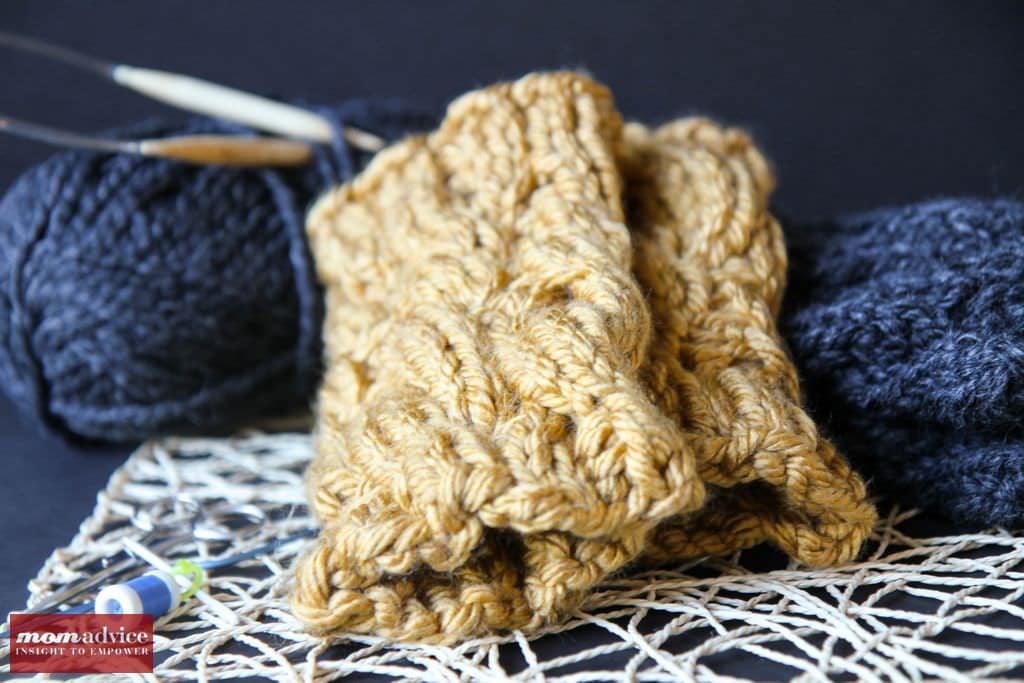
Today I wanted to share with you a beautiful and effortless centerpiece you can create for your table with some items you have on hand combined with a few items from your local grocer. To find out how to make this fast and easy DIY Thanksgiving centerpiece, head on over to the Kenmore Blog to grab the supplies list and read my easy tutorial for creating this for your own home!

See you there!


Fall Decorating With Goodwill Store Items

Monday, November 18th, 2013

Fall Decorating With Goodwill Store Items from MomAdvice.com.


This time of year is among my favorites because I just love decorating for the Fall season and for Thanksgiving with my family.

Thankfully, decorating for Fall doesn’t need to be expensive at all!

With a few inexpensive tools and some items from your favorite thrift shop, you will have all you need to start decorating your home for Fall.

Here are six fun ways to decorate your home for Fall using some easy to find items! 


Make a Sweater Vase

Vases are readily available at Goodwill and there happen to be dozens upon dozens of sweaters just waiting to adorn those vases.

Select a color scheme that goes along with your home and simply glue the sweater fabric to your inexpensive vase.

Fill your vase with bare branches from your yard and you have a beautiful and cozy vase to decorate your mantle!

As someone who lacks the sewing gene, I totally love that this craft is a no-sew project!

Check out Made From Pinterest for the scoop on this adorable craft.


Add a Fall Touch To Your Door

Making a wreath can be time-consuming and buying a wreath can be expensive.

Why not decorate your door beautifully and simply with the top of a rake?

I love this adorable rake adornment for the front door dressed simply with a little sprig of Fall branches that you could pick up from the craft shop.

You could even spray paint this to match your front step decor.

This would also be such a fun way to decorate a shed door!

Visit Eclectically Vintage for some beautifully thrifted inspiration!


Make a Cozy Pumpkin Centerpiece

Sweater crafts are all the rage for Fall and I love the idea of creating a centerpiece of pumpkins that have been covered in cozy sweaters for the Fall season.
On the StoneGable blog, you can find some fabulous instructions for creating a few cozy pumpkins of your own.
I love that they chose this white color scheme for the pumpkins because these could remain out for Winter decor too!
Be sure to look for sweaters with interesting cabling schemes and chose sweaters with different textures to really make your pumpkin centerpiece stand out!

Give Branches a New Lease On Life

While bare branches can be beautiful, it can be fun to spruce them up and adorn them for the Fall season.

Yarn is a commonly donated Goodwill item and this year I made my very own little Knitted Leaf centerpiece out of scrap yarns that I had.
Leaves can be made out of just about anything though, consider cutting leaves from sweaters or book pages to create your own unique centerpiece and place them in a pretty vase from your favorite thrift store.

Make a Pumpkin From Book Pages

Are you hosting a Thanksgiving dinner this year?

Consider making a unique centerpiece out of a book from Goodwill.
These book page pumpkins make a beautiful place setting that could later sit on a side table, ledge, or mantle after your dinner is done.
Check out Upcycled Treasures for a great tutorial on how to make these for your own Thanksgiving table.
Of course, regular readers know that we are BIG fans of book page crafts over here so be sure to check out our fantastic round-up of things to do with old books!

Take a Stand with Your Decorating

Cake stands are so easy to make with just a candlestick holder and a plate.

Spray paint them to create a cohesive collection and place these on your buffet table or mantle.
Head to the local farmer’s market or grocer to find interesting pumpkins to adorn the top of these stands.
Check out this easy tutorial from Dwellings by Devore to get the scoop on how to make these for your own home!
I am wishing you the happiest of Thanksgivings this year!
I hope these ideas will help you with decorating your own home for the holidays!
Don’t miss these other Fall Ideas from MomAdvice.com:

DIY Painted Address Pumpkin Topiary

The Best of Fall, Halloween & Thanksgiving-49 Ideas for Decor, Crafts, Recipes, Costumes & More

The Best of Fall, Halloween & Thanksgiving

DIY Thumbtack Pumpkins


Tips to Enjoy Autumn at MomAdvice.com

Enjoy Autumn to the Fullest


SaveSave

SaveSave

SaveSave

Pin It

Knitted Sweater Coffee Cozies

Monday, November 11th, 2013

Knitted Sweater Coffee Cozies from MomAdvice.com.

It is officially holiday crafting season and I am so excited to show off these adorable knitted coffee cozie sweaters that I created for our teacher & bus driver gifts this year. These coffee cozie sweaters are so inexpensive to create, but have that “wow” factor that you look for in an inexpensive gift.

This month’s craft project was created for Walmart utilizing some inexpensive materials you can find at your store. I have a feeling that you are really going to love this project and here are some of the materials that I used to create these adorable sweaters!

Knitted Sweater Coffee Cozies from MomAdvice.com. Knitted Sweater Coffee Cozies from MomAdvice.com. Knitted Sweater Coffee Cozies from MomAdvice.com.Knitted Sweater Coffee Cozies from MomAdvice.com.

Since I wanted to keep the cost factor low on these, I used the inexpensive Red Heart Super Saver yarns. As you can see from the photo I snapped in the store, these are priced right in my budget at $2.47 and come in a variety of colors. I took a picture of the labels if you would like to replicate the colors that I used for your own creations.

I happen to love acrylic yarn for projects like these because they really hold their shape well and you can create a lot of adorable cozies for a very small price. You are looking for a medium weight yarn on this project (#4- as shown in the label above) to replicate how I made these.

Knitted_Sweater_Coffee_Cozies-3

I wanted to pair these with a sweet treat and found these yummy Starbucks Hot Cocoa packets over in the Coffee/Tea aisle of the grocery section. Eight come in a package and they run $5.38 a box. The reusable coffee mugs were priced at just $4.98 each and are located over in the Housewares section of the store. You may recall, I did a similar gift last year with these super easy coffee cozies with a rosette!

I tied up my cocoa packets with some chunky yarn I had leftover from the boot cuffs I knitted last month!

Knitted_Sweater_Coffee_Cozies-2

Modifications Were Made to The Featured Pattern. Please Read Carefully!

The pattern is available on Ravelry for $1.99. You will need to purchase this pattern to make these cozies. Instead of making them for a mug with a handle, I knitted these in the round for a travel mug.

To make this size, you need to size up those needles and add stitches! Instead of casting on 28 stitches, cast on 36 stitches. I used my 12″ circular needles in Size 10! The other pieces were knitted with Size 5 straight needles to create the mittens, sweater arms, and pockets! 

Knitted Sweater Coffee Cozies from MomAdvice.com.

Knitted Sweater Coffee Cozies from MomAdvice.com.Grab the Pattern HERE on Ravelry (for purchase for $1.99).  Don’t forget to friend me while you are there! I love new knitting buddies! Oh, and here are 54 MORE Handmade Gift Ideas to get you thinking about crafting this holiday season!

walmart_mom_disclaimer

Pin It

Knitted Leaf Centerpiece

Monday, October 28th, 2013

Knitted Leaf Centerpiece from MomAdvice.com.

I have been thinking about creating a knitted leaf centerpiece for so long and I can’t wait to show off my knitted leaf centerpiece that you can create to adorn your Thanksgiving table or as a fun addition to your holiday decorations. This thrifty knitted leaf centerpiece takes less time than you might think and is so much fun to knit up.

I am teaming up with Walmart for this fun project and being a DIY blogger for them is truly one of my favorite jobs. Over the years I have working with them, their knitting & crochet section of their store has grown significantly and they now offer every color in the rainbow for yarn and fun notions to organize and tackle all of your knitting & crochet projects.

Walmart Yarn Display 
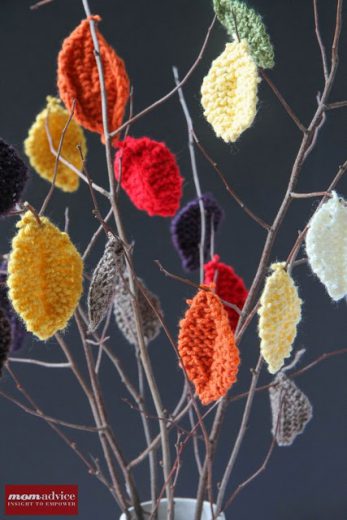
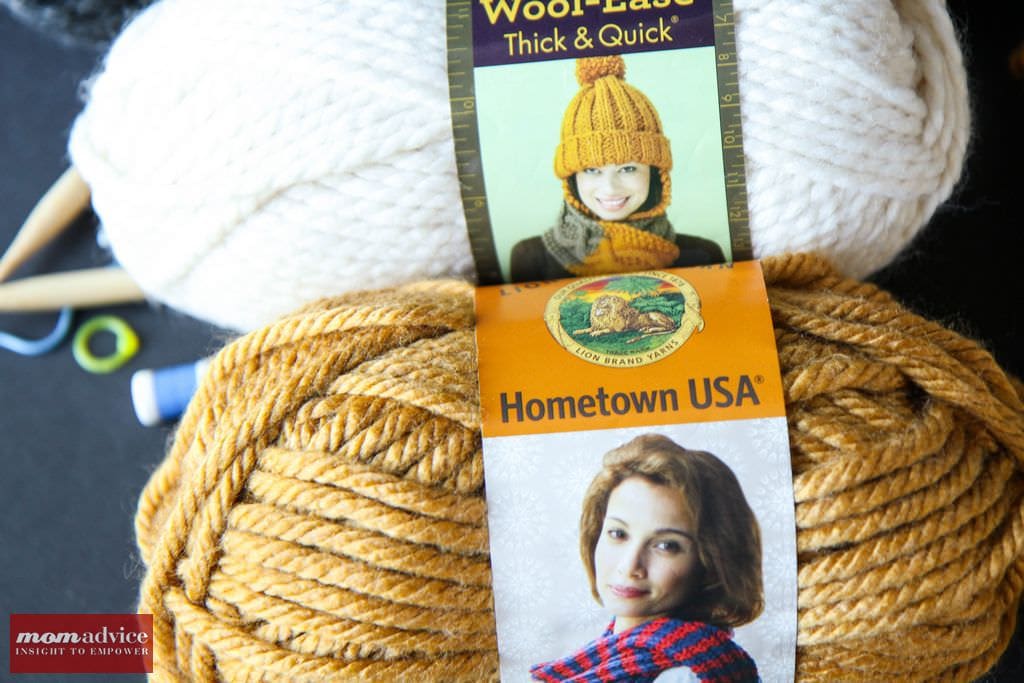
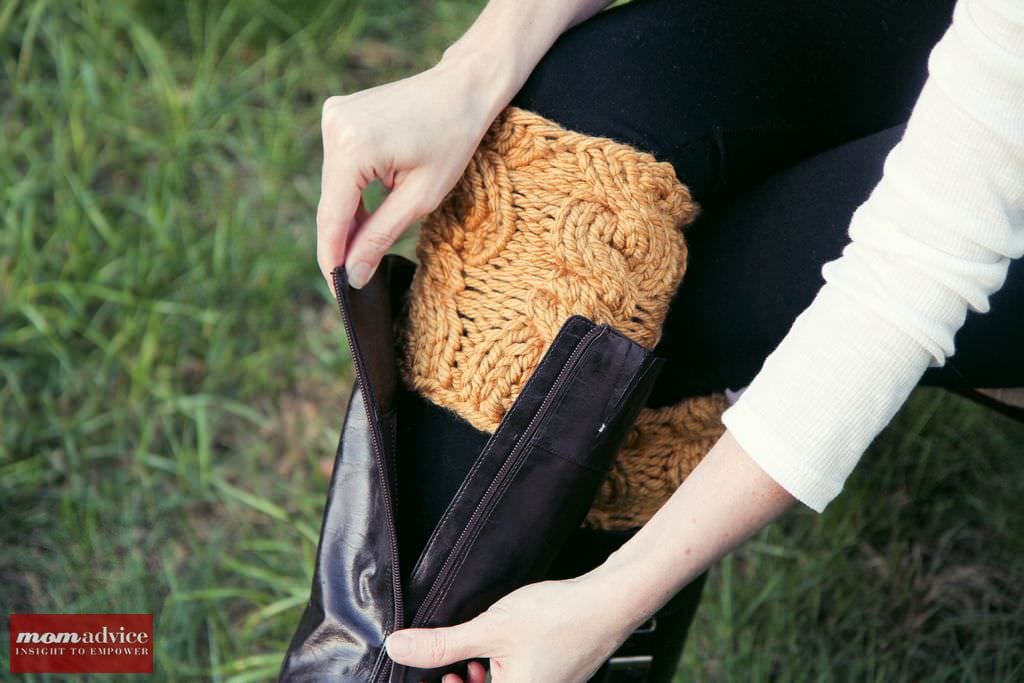
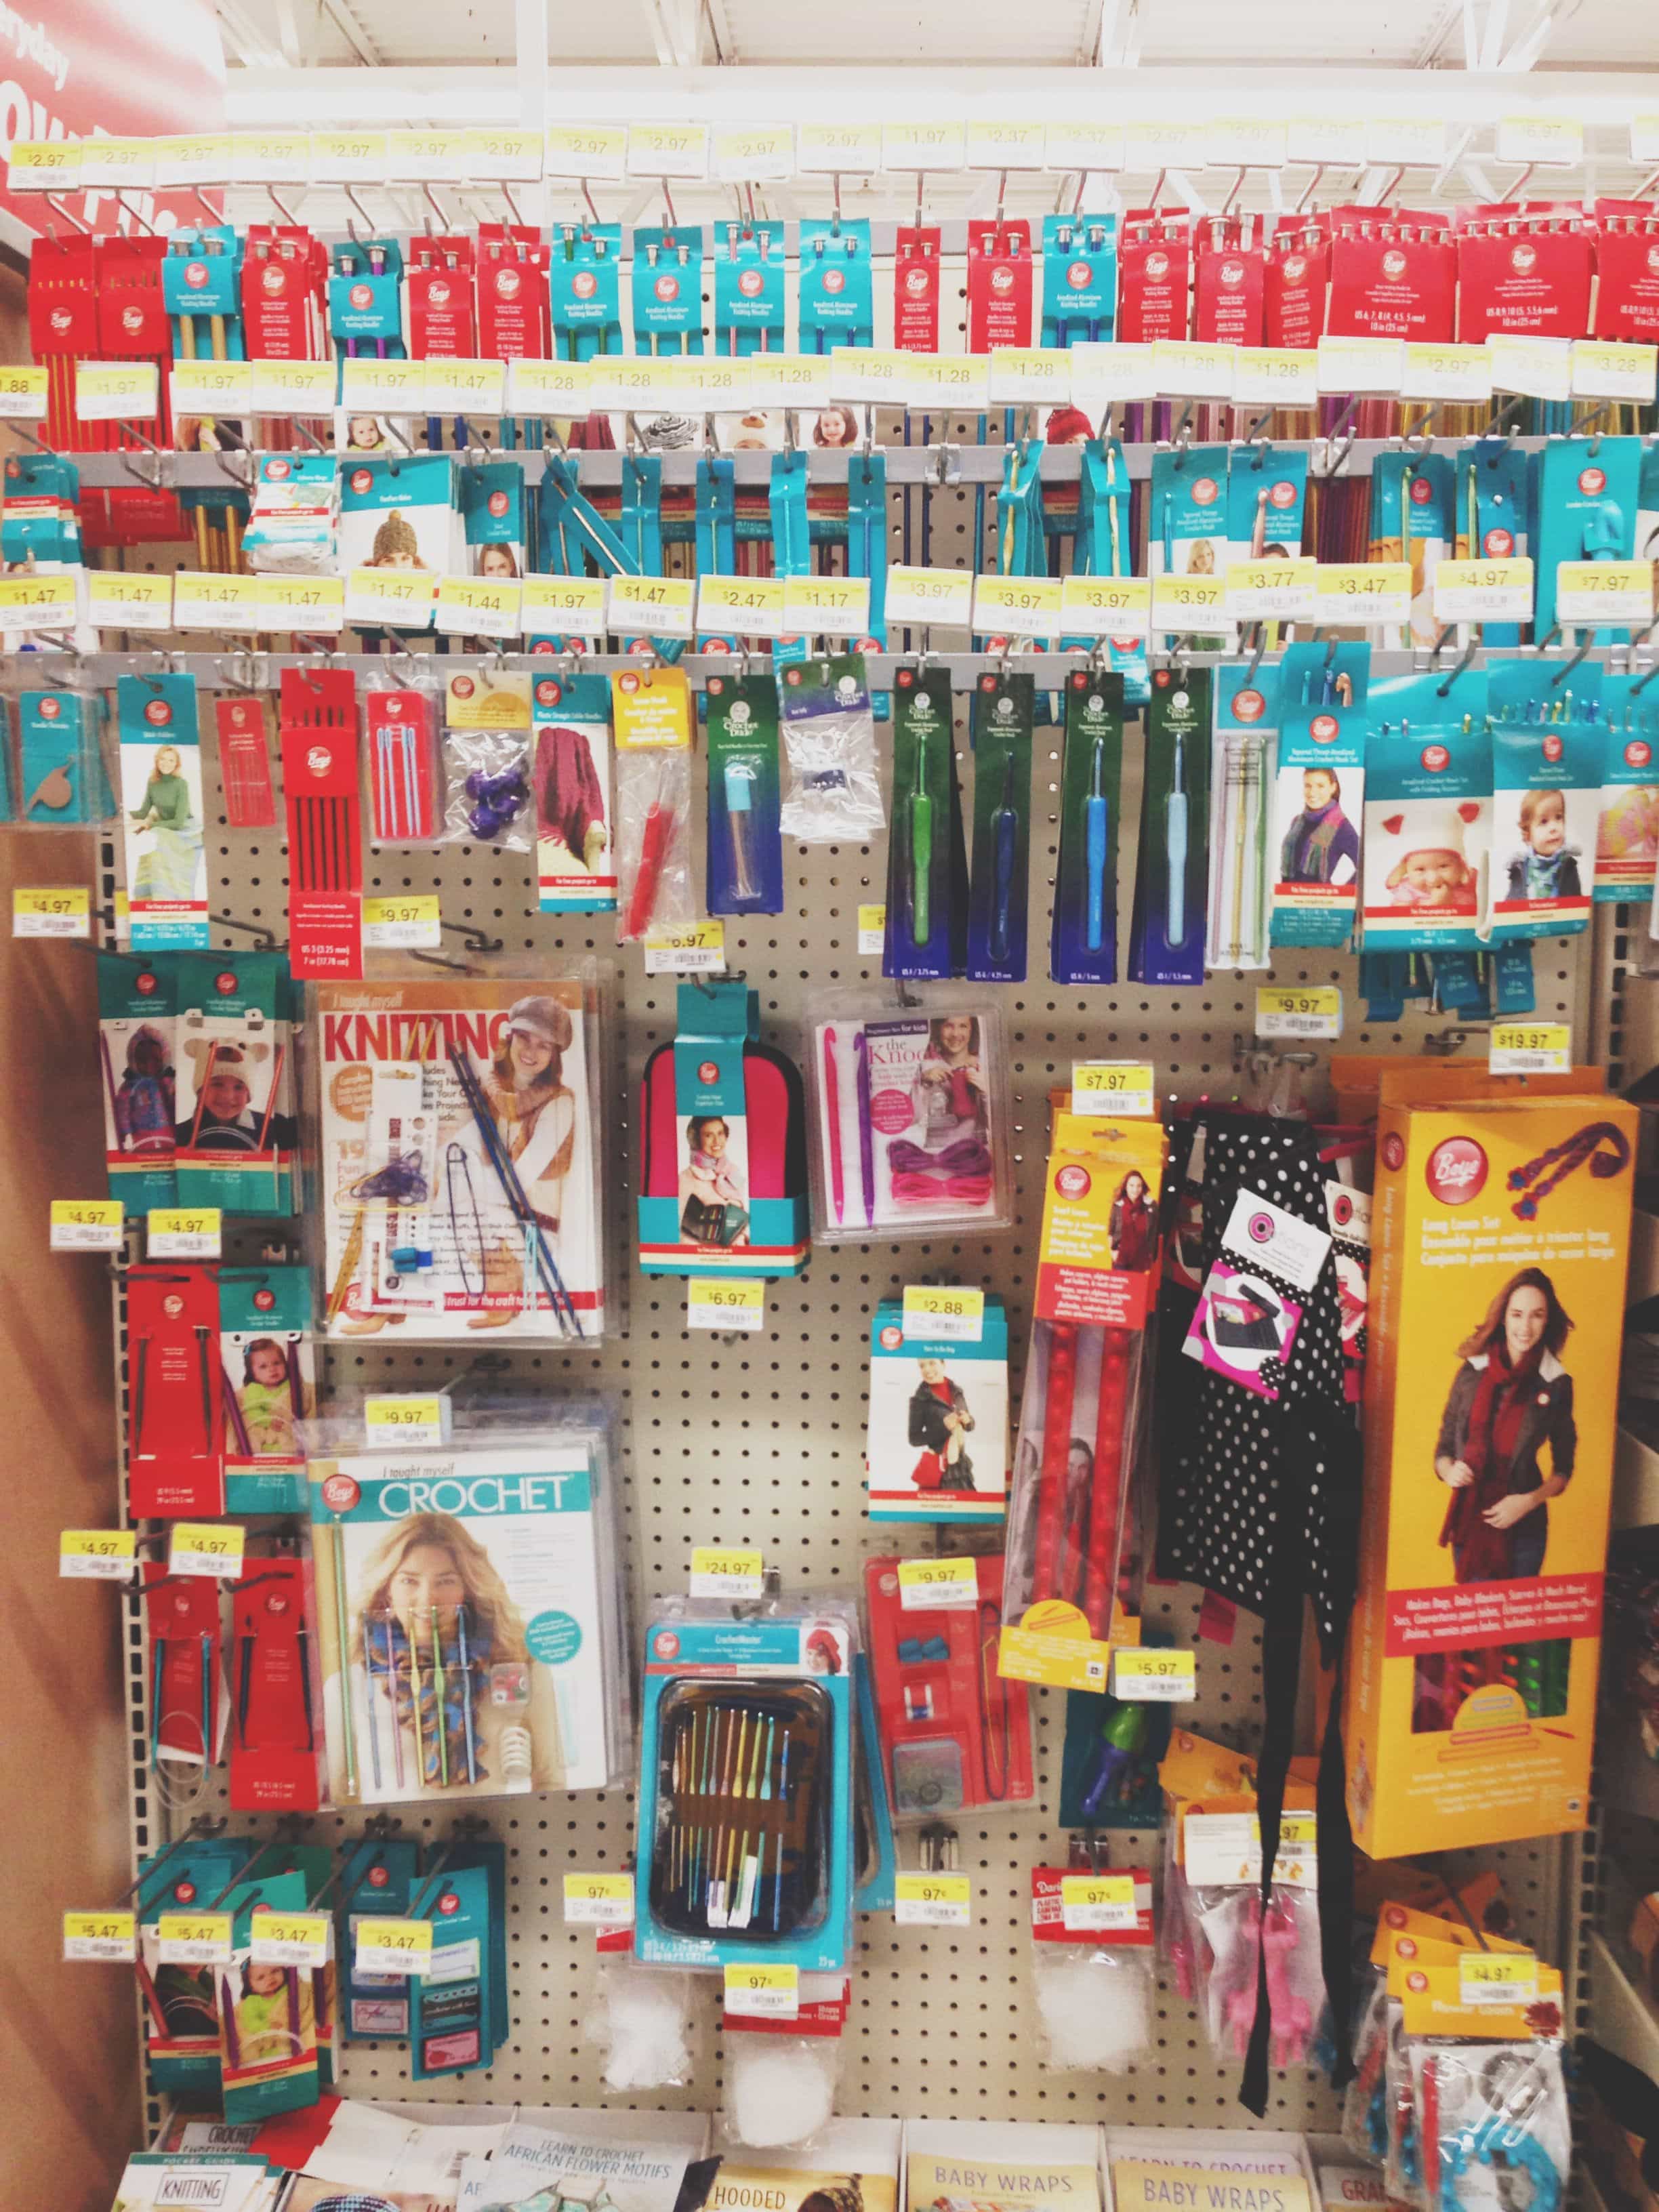
From the knitting/crochet accessories section, you will need size 5 straight needles. If you want to vary the sizes though of your leaves, you can select anything between 2-5 to play around with different sizes. This might be fun especially if knitting the leaves in just one color.

Knitted Leaf Centerpiece from MomAdvice.com.

For this project, you can select any yarn except the super bulky yarns to work with. After working with several different types of yarn I would highly recommend the Lion Brand Vanna’s Choice in either solid or patterned finishes for this project or the Red Heart Soft Yarn for a soft & smooth finish on your leaves. Of course, this project is also a fantastic little stash buster and a great way to use up those odds & ends from other projects too.

Knitted Leaf Centerpiece from MomAdvice.com.

Knitted_Leaves-4

I gathered some branches from our backyard for the branches of this centerpiece and then would knit and add a leaf to the branches as I went along until I felt the entire piece was full enough. You could make this piece smaller or larger depending on your own centerpiece needs. Each leaf was secured to the branches using a small scrap of yarn and double knotting it to the ends of each of the branches. I then trimmed the edges with a pair of scissors.

No need to knit the leaf stick on these, a huge time-saver when creating this many leaves, just leave them as they are without the leaf stick attachment.

The vase I already owned, but you could certainly buy a new vase for your centerpiece or repurpose a tall glass jar from your cupboard. I found this vase when pulling together my tips and tablescape last year for setting the perfect Thanksgiving table!

Knitted Leaf Centerpiece from MomAdvice.com.

I have fallen so in love with this centerpiece that I doubt I will ever put it away. As we await Thanksgiving, it has been a nice addition to my new-to-me stained & painted thrift store table I worked on last month.

Want to make a Knitted Thanksgiving Centerpiece of your own? Grab this FREE knitted leaf pattern from Natural Suburbia. Oh, and let’s be friends on Ravelry! It’s where I get all my best knitting ideas!

walmart_mom_disclaimer


Pin It

Quick & Easy Knitted Boot Cuffs

Monday, October 14th, 2013

Easy Knitted Boot Cuffs (a 2 hour knit project)  featured on MomAdvice.com.
I love a quick & gratifying quick knitting project and these knitted boot cuffs are so lovely to wear and add to knit. Knitted boot cuffs can be created in any pattern that your heart desires and can be knitted oh-so-quickly thanks to beautifully bulky yarn. I can’t wait to share this fun and easy to create boot topper.

Easy Knitted Boot Cuffs (a 2 hour knit project)  featured on MomAdvice.com.

Walmart asked me to share a fun Fall project that you can tackle using supplies from their store and I instantly thought of knitted boot cuffs to add a beautiful touch to my Fall wardrobe. I discovered after knitting my 6-stitch ruffled scarf project with them this past Spring that their yarn selection and knitting/crochet accessories has really grown.

For bulky yarn choices, I knitted with both the Lion Brand Thick & Quick Wool Ease and the Lion Brand Hometown USA yarn.

After knitting with both, I loved the Lion Brand Thick & Quick for how much sturdier it was and how it held its shape. What I didn’t love was the scratchy feel of the wool through my leggings so these will be just for topping my boots with jeans.

The Hometown USA yarn feels so soft and luxurious, but the fibers can be easier to separate and it won’t have the longevity that the wool does. It’s up to you which one will fit your needs best, however, they are both affordable options.

You need only one ball of yarn to make a set of boot cuffs.

Easy Knitted Boot Cuffs (a 2 hour knit project)  featured on MomAdvice.com. Easy Knitted Boot Cuffs (a 2 hour knit project)  featured on MomAdvice.com. Easy Knitted Boot Cuffs (a 2 hour knit project)  featured on MomAdvice.com. Easy Knitted Boot Cuffs (a 2 hour knit project)  featured on MomAdvice.com.

For those new to cabling, this is a great pattern to practice your cabling on since it is a small and easy to follow cable pattern. I am linking to a great video tutorial that you can watch to see just how easy it is to knit these.

I did knit these in the round (I have some tips over here if you would like to try it), but it was really hard to do because of the small size of these and the cabling you need to do with this bulky yarn. You can just knit them flat and then seam them if you don’t want to attempt the difficulty of knitting these in the round.

Please note, to get the pattern to look like my picture that I have on here, I repeated Row 13-15 two extra times to add a little more length to tuck into the boot. The colors pictured above are the Hometown USA in Las Vegas Yellow & the Wool-Ease in Charcoal.

Scroll to the bottom of this post for a link to the pattern and don’t forget to friend me on Ravelry.

Easy Knitted Boot Cuffs (a 2 hour knit project)  featured on MomAdvice.com.

If you are loving the outfit or boots in this picture, be sure to check out my site sponsor, Flourish Boutique. I am loving my cozy fleece leggings ($16), this adorable rouched top  ($29.50) and even these two-toned boots ($59.50)  for the Fall months. Remember to use my discount code WEB25 for 25% off your shopping!

Easy Knitted Boot Cuffs (a 2 hour knit project)  featured on MomAdvice.com.

As for my beautiful cowl, that one is a Sue Clark exclusive. My mother-in-law is one of my biggest knitting inspirations and she made this for me for my birthday.  I am one lucky girl, I tell you!

Looking for more fun knitting inspiration, be sure to visit the Knitting section of my site! 

Grab the free Boot Cuff Pattern by Joan De Lurio HERE (you need a Ravelry account to access). Please also swing by her beautiful Etsy shop!

walmart_mom_disclaimer

Pin It

How to Make a Minecraft Steve Costume for Halloween

Thursday, October 10th, 2013

How to Make a Minecraft Steve Costume from MomAdvice.com

Halloween is just around the corner and today I wanted to share a fun Minecraft Costume you can create for your very own little Minecraft-addict. DIY Minecraft costumes are fun to make with your kids and give you a chance to spend time together.

Do you have a Minecraft fan on your hands? Trick or treating in this easy diy Steve costume couldn’t be easier (or more fun). Snag the pdf files to transform a cardboard box into a fun mask.

DIY Minecraft Costume Ideas

My son and I made this Steve Halloween costume way back in 2013 together. This adorable little boy, in these pictures, is now in his junior year of high school and supporting a mustache.

My, how time flies!

When I look back on these pictures, they fill me with a lot of joy because we did this together. While my daughter is ALWAYS game for a diy project, my son is far less interested in crafting with his old mom.

Luckily, his Halloween costume request was just what we needed to enjoy a day of crafting together.

If you are looking for an affordable minecraft costume, this post is just your ticket. Not only am I sharing our homemade Steve costume with you, I’m also sharing several other costume ideas for your Minecraft obsessed kid.

How to Make a Minecraft Steve Costume for Halloween

DIY Minecraft Costume Ideas

Supplies Needed:

1- 11x11x11 box (This size is NOT available at Walmart. We got ours at FedEx, but you can try Kinkos or the UPS store)

Minecraft Steve Printables– PDF’s printed on 11×17 paper (either print at home or have them printed at the same shipping/printing supplies stores that I have listed above)

Glue Stick and/or glue gun & glue sticks

Paper Trimmer or Scissors

Box Cutter

Packing tape

Aqua Blue Shirt


DIY Minecraft Costume Ideas

DIY Minecraft Costume Ideas

Directions:

1. Print out your Minecraft Steve Head printables. I put these files on a jump drive and brought them to Kinkos with me and asked them to print the files on 11×17 paper.

Read through this comment thread for printing options. It appears that UPS Store is the most affordable of the options.

You can also print at home or try printing the files on smaller paper and piecing them together to save on costs. Feel free to also share your own experience with printing these by leaving a comment below!

2. Begin by taping together the bottom of you box. Once the bottom of your box is taped, you can begin folding in the flaps of the box on the other end, to create a hole for your child’s head.

3. Using a paper trimmer or scissors begin trimming off any of the white portions on the printables.

4. Cover the backside of the first printable with glue. We found the glue stick provided a great start and then I reinforced it, using my glue gun, with little dabs of hot glue along the seam underneath.

5. Repeat the above process and finish with Steve’s hair on top, carefully gluing the edges of the hair down around the top of the box with a little hot glue to secure.

6. Have an adult cut the holes out for Steve’s eyes and wear your new Steve head proudly. Pair it with an aqua t-shirt and blue jeans to complete the look.

DIY Minecraft Costume Ideas

DIY Minecraft Costume Ideas

If you think that Halloween is just for kids, you aren’t doing it right. 

Here was our couple’s costume from 2013

Glee Costume Ideas

Glee Costume Ideas Glee Costume Ideas

Glee Costume Ideas Glee Costume Ideas

We sure do love Halloween around here! You can check out our favorite couples costume ideas over here. My husband sure does make a dashing Sue Sylvester! Yes, we get into it just as much as the kids do. And why shouldn’t we?

Looking for more fun DIY Minecraft Costume Ideas? Check out these fun ideas!

Easy Painted Steve Head

Iron Sword & Diamond Pickaxe Printables

DIY Minecraft Wither Skeleton Costume

DIY Minecraft Zombie Costume

Telescoping Minecraft Creeper Costume

DIY Minecraft Costume Printable

20 Amazing Minecraft Costume Ideas (for some extra Minecraft-y inspiration)

And why shouldn’t YOU?

here are a few other halloween diy ideas you might like to try this year!

How to Make Glow in the Dark Jell-O how to make glow-in-the-dark jell-o

Doughnut Hole Ghost Cake doughnut hole ghost cake

How to Paint Pumpkins with Acrylic Paints from MomAdvice.com how to paint pumpkins with acrylic paints (a fun halloween craft idea!)


If you are still looking for fun Halloween ideas, you must visit this DIY Halloween Costume Ideas article and this list of 7 More DIY Halloween Costumes to try creating. Happy Halloween, friends!

How to Make a Minecraft Steve Costume from MomAdvice.com


A Happy & Healthy Halloween Night Feast

Tuesday, October 8th, 2013

Googly Eyed Apples for Halloween from MomAdvice.com.

Googly Eyed Apples for Halloween from MomAdvice.com.Who is ready for a happy & healthy Halloween feast? Halloween is just around the corner and this year Kenmore has you covered with an easy Halloween dish and treat that you can enjoy with your family before or after your trick-or-treating has begun. That’s right, there is no need to order a pizza or stress out about festive snacks, at least not this year!  This year I am sharing an easy slow cooker recipe idea and a treat that is not only healthy, but also a festive addition to your dinner offerings!

Head on over to the Kenmore blog to find a recipe and tips for throwing a happy and healthy Halloween feast this year!

Pin It