Author Archive

What I Earned From One Month Using the Rakuten App

Wednesday, October 23rd, 2019


Real Rakuten Results Cash Back Earnings Report from MomAdvice.com

Are you looking for an easy way to earn cash back or even double cash back on your purchases? Today I’m sharing what I really earned through the Rakuten app as we explore passive income money making opportunities for moms. Be sure to visit our Passive Income Ideas for Moms Series all year long as I challenge myself to find new ways to earn money for our family.

I can’t believe all of the enthusiasm and excitement for this new Passive Income Ideas for Moms series that I have started. It has meant so much to me to have your support and have you join me in these challenges. It’s also such a joy to have some of our older readers back now that I’m exploring another frugality series. 

I am so happy to have you here and helping you explore new ways to make money for your family.

If you are new to the series, I am challenging myself to find new ways to make money for our family and taking you on the journey with me. I started with learning about the Rakuten app and shared how you could use this too as you were shopping.

Now that I have the first month under my belt, I’m sharing what I thought about my month with this app.

What I Earned From One Month Using the Rakuten App

Real Rakuten Cash Back Results

What is Rakuten?

Rakuten (formerly Ebates) is a site (and app) that gives you cash back on on qualifying purchases. If you didn’t join me last month, simply use this referral link to receive your first $10 to shop with and to get began earning your own cash back rewards.

Rakuten is headquartered in Tokyo and is a a Japanese electronic commerce and online retailing company. The company handles a lot of different types of services like Rakuten Kobo Ebooks, Rakuten Credit Cards, Rakuten Super Points (which include member rewards), Rakuten Viber, and so much more.

Oh, and in case you didn’t know how to say the name of this service company, the Rakuten marketing team handled that with this clever commercial.

Spoiler alert: I was saying it the WRONG WAY all month long.

Was It Easy to Earn Money Through Rakuten?

Although I had been with Ebates (years ago!), I had completely forgotten to use this for my purchases. Downloading the app was super easy and it was also very easy to install the extension that allowed me to see what the cash back rewards were as well as any coupons that might be available for my purchases.

What Was the Outcome of the Cash Back Rewards?

Although I had planned to make a few purchases for the exterior of our home, we ended up doing some unexpected travel and that meant that no one was here to purchase or install these items. I have a feeling these next few months will be much more rewarding because of these home purchases as well as our upcoming holiday gifts we will be buying.

I am not a big spender so the results on the cash back rewards matched my spending habits.

Here are some creative cash back rewards though that I did receive:

Rakuten Real Results

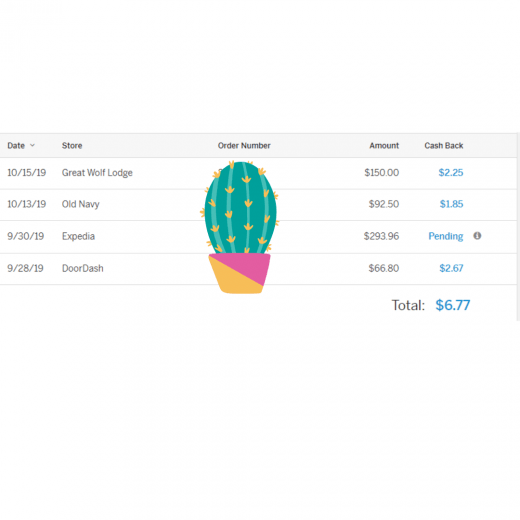
We Got Cash Back on Our Food Delivery– Rakuten gives you cash rewards for shopping through DoorDash so I used the app for our family’s sushi delivery. Since I was a new customer, I was able to have the delivery fee waived, had a great coupon code, and also got $2.67 back on our dinner delivery.

I Got Cash Back on Our Day Pass to Great Wolf Lodge– $2.25 was deposited in my Rakuten account after snagging day passes for us to hit the water park over our fall break.

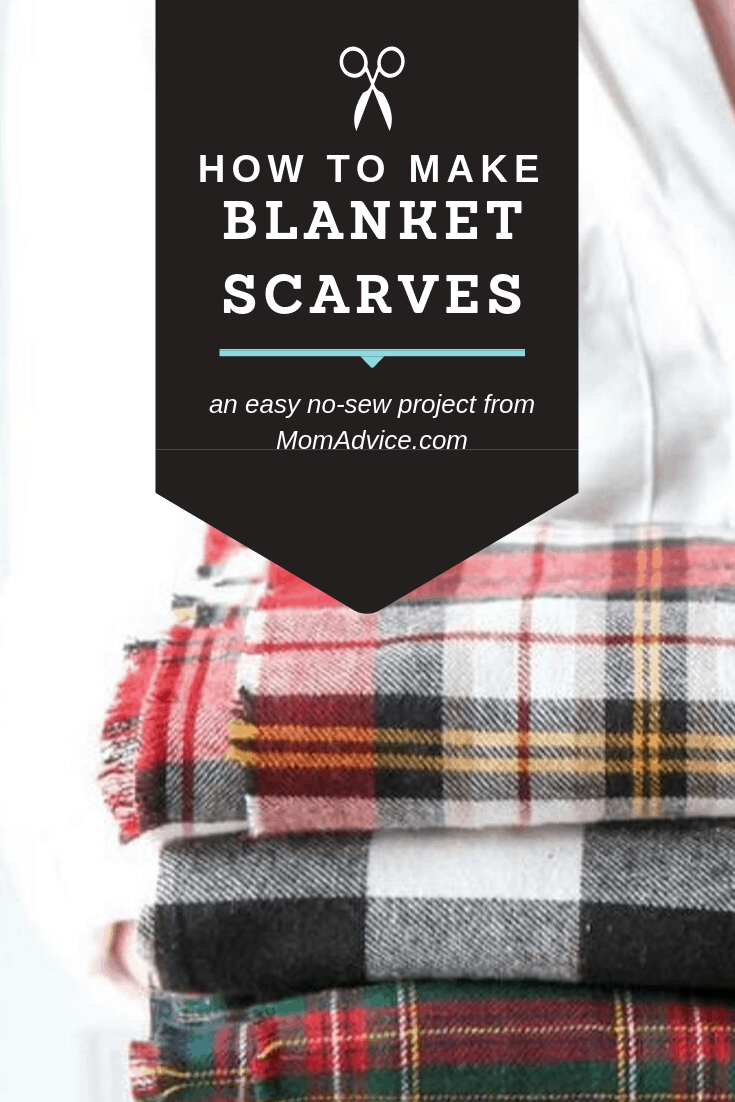
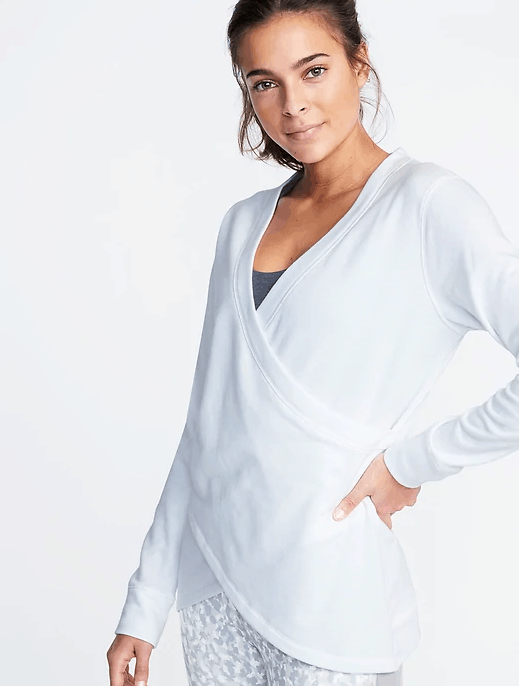
I Got Cash Back on my Old Navy Purchase– I ordered a few sweaters, for fall, and ended up getting $1.85 back on my purchase.

I Also Have Cash Back Pending on Travel Expenses- Since Rakuten was affiliated with Expedia, I booked my airline ticket through them so I could get the cash rewards. I also secured a Groupon, that is in processing, so I’m waiting for those pending charges to go through.

Airline tickets, for example, take six weeks to process so you don’t see immediate results.

As you can see, it was not an exciting month of purchases, BUT the point was to earn money on things I was already buying and not buy things just to buy things.

Overall, the total earned through my shopping was a mere $6.77.

If you are a big shopper, the potential for rewards would be much greater.

I have now trained myself to do targeted shopping and to check for double cash back rewards. 

It only takes a minute, but it is more money back in my pocket by being strategic with this app.

Rakuten Affiliate Results

Did You *REALLY* Earn Money on Referrals Through Rakuten?

I am really surprised that Rakuten does not have a cap on how many referrals you can cash in on. I know most of you were already signed up with this company so I didn’t think this was going to be a big earner.

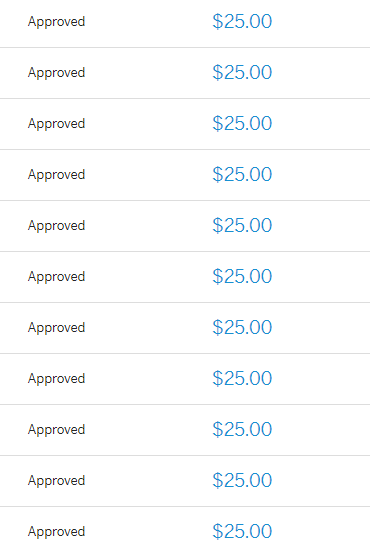
It’s important to know that you don’t actually earn the referral cash unless the person spends $25 using the app. I had a lot of people sign up, but many who have not made their first purchase (21 pending referrals are still not activated). These just stay in a holding pattern until they make their first $25 purchase.

I still ended up referring 11 new people to the shopping app who actually made their qualifying $25 purchase. This yielded a $275 profit in my account that will be applied to my next big fat check.

I did share that I understand that I have an unfair advantage with this because of the website referrals. Even if I didn’t though, I can see how sharing your referral link, especially as people begin holiday shopping, can yield holiday cash for anyone. They offer easy ways to share on Facebook, text, and email. 

While many affiliate programs are limited to bloggers, I love that this one is open to anyone who wants to share and that is a very high return on sharing a link on social media.

Rakuten App Screen

Will You Continue Using Rakuten For Shopping?

These are one month explorations because I may or may not feel like these efforts are worth it.

With this one, I actually do plan to make this a regular part of my spending routines. It was so darn easy to use and I loved their easy way of finding additional coupons for my purchases.

It wasn’t completely seamless because two of my purchases didn’t go through and I thought I wouldn’t receive my cash back credit.

I emailed the help desk a copy of my receipts and the deposit was quickly processed.

Overall, I’m really impressed with the customer service and the ease of the app.

I also realized that I had pending cash (from 2008!!!) that they still had in their system to credit me. That means that my actual check is $321.77, but isn’t actually reflective of my October earnings.

Grand Total Earnings for October: $281.77

NOT. TOO. SHABBY.

I will continue to keep you updated on totals as we go through this year.

Tomorrow I will be sharing with you a bigger November challenge that might get you thinking about how you are investing in yourself. I’m a month ahead of you, this time, so I can make sure that I could fully check out this next passive income builder for you and make sure it is worth your time.

See you on the blog tomorrow for our November Passive Income For Moms Challenge!!

Don’t forget to follow along on our Passive Income Challenge series. You can head here to see all the posts in one place. Did you sign up for Rakuten or start using it again for cash back rewards? What was your experience with this passive income money maker for October?

This post contains affiliate links. 

Pin It

How to Make Glow in the Dark JELL-O

Tuesday, October 22nd, 2019

Glow in the Dark Jello from MomAdvice.com

This easy recipe for Glow-in-the-Dark Jell-O is perfect for kids to make for Halloween! Mix science and spookiness for an edible experiment any budding (mad) scientist will love!


Halloween is just around the corner and today we wanted to showcase a fun and easy craft you could do with your kids.

Today’s recipe offering is how to make glow in the dark JELL-O in jars for a spooktacular Halloween dessert.

Glow in the Dark JELL-O is a recipe that your kids can easily mix up and gives you a fun opportunity to talk a little bit about the science behind it in the process.


Glow in the Dark Jello from MomAdvice.com


How Does it Glow?

Did you know that tonic water can glow under a black light?

My kids were in awe of this bubbly drink and how it could glow under the black light.

The glowing comes from the fluorescence of the quinine in the tonic water.

Quinine also gives tonic water a distinctive bitter flavor which is why it is best mixed with other sweeter ingredients.

As you can see, the quinine glows blue-white when placed under a black light which makes it the perfect ingredient for a spooky JELL-O treat.


Glow in the Dark Jello from MomAdvice.com


Do All Colors of JELL-O Glow the Same?

Hypothesis…yes.

Answer…no!

All of the colors of JELL-O will definitely not glow the same.

We tested two colors (green and orange) and found brilliant results with the green JELL-O and dull results with the orange JELL-O.

Although our tutorial below shows the orange, we recommend the green variety for a truly great glow!

Here is the light we used to achieve our glow with great success (affiliate link).  

Other readers have stated that a black bulb does not achieve the glowing results so please keep that in mind when purchasing your bulb. 


Glow in the Dark Jello from MomAdvice.com


So It Glows…How Does it Taste?

As we mentioned before, the quinine in the tonic water makes the tonic water glow, but it also yields a bitter taste.

We tried to cut the bitterness by using half water and half tonic water.

I also topped each jar of JELL-O with whipped cream and sprinkles which would add another layer of sweetness.

Try adding more sugar to the concoction to help cut some of the bitterness.

The kids loved the glow, but said they were, “spicy,” which is what they say about all sodas and bubbly drinks.

If your kids have a sensitive palate like mine, they might not love them, but they still ate the whipped cream and loved doing the experiment.

I still call this experiment a win for creativity, cool science factoids, and fun.


Glow in the Dark Jello from MomAdvice.com


I had a great helper in the kitchen for this project.

Emily was excited to show you all just how easy it is to make this JELL-O and you can find the recipe below along with her picture tutorial on how to recreate this fun experiment in your kitchen.

You can totally steal the experiment, but I am keeping my sous chef for myself!

  Glow in the Dark Jello from MomAdvice.com

Glow in the Dark JELL-O
 
Author: Inspired by American Girl Magazine
Prep time:
Cook time:
Total time:
Serves: 4
Glow in the dark JELL-O is not only a fun science project, but a super fun Halloween treat. Pick up a black light at your local Halloween shop to show off it’s glow!
Ingredients
  • 1 cup boiling water
  • 1 cup tonic water
  • 1 package of JELL-O
  • Whipped Cream and Sprinkles for topping (optional)
  • Additional Sugar (to help cut the bitterness)
  • Jars
  • Black Light
Instructions
  1. Bring one cup of water to a boil.
  2. Pour JELL-O packet into a large bowl.
  3. Have a grown-up help you add your boiling water.
  4. Stir for two minutes with a wire whisk.
  5. Have a grown-up pour one cup of tonic water into a measuring cup.
  6. Slowly whisk while adding the tonic water. The mixture will be very bubbly. Give it a couple of minutes to rest.
  7. Pour it into four clean jars.
  8. Place in the refrigerator for two to three hours to set.
  9. Top with whipped cream and sprinkles.
  10. Place under a black light and watch it glow. Happy Halloween! EDITORS NOTE: See notes above for taste and ideas for improving flavor.


Glow in the Dark Jello from MomAdvice.com


Glow in the Dark Jello from MomAdvice.com


Glow in the Dark Jello from MomAdvice.com


Love this idea for Halloween? Can I make a few other fun fall recommendations?


doughnut hole ghost cake (no baking necessary!!)


pumpkin chili (perfect for Halloween night)


diy blanket scarf (perfect for bundling up on Halloween night)


dollar store thumbtack pumpkins


diy minecraft costume ideas


DIY_Halloween_Costumes diy halloween costume ideas


autumn burlap wreath tutorial


candy apple martini recipe


caramel apple sangria recipe


painted pumpkins tutorial


This post contains affiliate links


Sign up for our free newsletter!

Pin It

Amy’s Notebook 10.18.19

Friday, October 18th, 2019

source

These monogrammed pumpkins are adorable for the holidays.

I could not relate to this more. Hahaha!

This is pretty genius.

I caved and bought two more colors

It’s so much more than cooking.

Have you heard of this? AMAZING!!

Why you never see your friends anymore.

source

I love the minimalist touch on Halloween decorating.

Looking forward to reporting my results with you this month.

21 book favorites of the year (so far).

4 daily routines that will get you closer to your goals.

These are such fun Halloween decorating ideas. I’m a big fan of the house exterior.

I couldn’t love her more.

10 one pot meals for your family that cost under $10. You are speaking my love language!

Have a wonderful weekend!

I hope you enjoyed our notebook, a collection of gathered links to DIY crafts, food projects, thrifty ways to spruce up your home, and thoughtful reads. Nothing brings me more joy than to highlight other fabulous bloggers. Follow me on Pinterest for daily inspiration!

Please note, there are affiliate links in this post- thank you! xoxo

Small-Budget Crushes 10.17.19

Thursday, October 17th, 2019


Don’t forget to download the Rakuten app before making any purchases on today’s list. You can find all the current coupons AND get cash back on all your purchases! Learn more about it over here!

Pioneer Woman Luggage vintage floral luggage (so many cute prints!)

satin pillowcases satin pillowcases (so many colors! 2 for $9.99!!)

bookish tee

Scream and Sugar Mug scream and sugar coffee mug (only $5)

drawstring crossbody drawstring crossbody (three colors)

cabin sherpa blankets

house mugs

wrapping organizer gift wrap organizer (how perfect is this for cold weather accessories??)

goal tracker

3D Skull Ice Mold 3D Skull Ice Mold


puff sleeve crewneck pullover

books are my world enamel pin

geometric print dress (half price!!)

acrylic resin earrings acrylic resin earrings (so many gorgeous colors)

cozy cowl sweater

Prison Mike Air Freshener prison mike air freshener (hahaha! omg. best stocking stuff ever)

oversized sweater oversized sweater (three colors)

the watch print the watch print (gah- I love Janet Hill so much!)

oversized cardigan

oversized flannel scarf oversized flannel scarf (so many gorgeous prints)

hand lettering 101 book hand lettering 101 book (what a great holiday gift!)

turn back time flats (so many gorgeous colors!)

long sleeve button front shirt long sleeve button front shirt (so many cute patterns)

rainbow purse

Keep on window shopping by visiting all of my Small-Budget Crushes. This post contains affiliate links!! 

The Best Instant Pot Risotto (Step By Step)

Wednesday, October 16th, 2019

Instant Pot Risotto Step By Step from MomAdvice.com

Risotto can be a very labor-intensive dish, but it doesn’t have to be with a pressure cooker. Today I’m sharing my step-by-step tutorial for creamy gluten-free risotto, made in your Instant Pot. Ditch the boxed mac and cheese for this easy weeknight dish.

Have you ever made risotto before? After our trip to Italy, I was so inspired to replicate this dish when we got home. Of course, I had no idea what a gift of love a bowl of risotto is.

Stovetop risotto (you can see my recipe over here) requires constant stirring to achieve that creamy consistency.

One pot holds your warmed broth and the other is where you stand and stir until your arm falls off.

Maybe I’m being dramatic?

It’s not the first time.

This dish really does need a lot of babysitting so that’s why I was thrilled to discover that risotto could be made in your pressure cooker with very little effort and all the reward.

Honestly, I have made this dish almost weekly since we got our pressure cooker. If I am stumped for a good dinner this dish always comes in for the dinner save.

Risotto recipes are a great way to use up produce items, put shellfish to work, add any leftover chicken, or just load it up with parmesan cheese.

After making this for YEARS at our house, it’s time to share my electric pressure cooker secrets.

No more standing over a stove top, friends!

You can present this dish with all the love and almost none of the stirring.

As Ina would say, “How bad could that be?”

Let’s start with a few frequently asked questions on pressure cooking risotto!


Arborio Rice
The Best Instant Pot Risotto Step-by-Step from MomAdvice.com

What Type of Rice Is Risotto Rice?

Risotto is made from Arborio rice and can be found, typically, in the same section as the other rice varieties or in the international foods section of your grocery store.

The appearance of arborio is different because it has a shorter, fatter, and more oval-shaped appearance.

Long-grained rice has to go through a lot of milling, but arborio rice isn’t as processed and that’s how it is able to retain its natural starch content.

When this starchy rice is agitated with stirring, it releases those starches and adds to the creamy consistency.

It also draws in liquid, like a sponge, and a pound of this can soak in as much as eight cups of liquid as it is cooking.

Can This Pressure Cooker Risotto Recipe Be Made Without Meat?

Today’s tutorial does have chicken in it, but it is definitely not required.

Personally, I love to roast medium shrimp in my oven (just toss them with a little olive oil, salt, pepper, and Old Bay) and roast them on a baking sheet at 450 for 6-8 minutes. Once they are done, they are perfect for risotto topping.

If you want to keep this dish vegetarian, substitute the chicken stock with vegetable broth and omit the meat.

Can I Leave the Wine Out of This Risotto Recipe?

I am loving that they now carry mini bottle or mini boxes of white wine, if you want to save money (and not have to throw out wine).

This has been a great cooking option for a lot of people in my life.

Don’t feel like you have to add this step in, although I do think it makes the flavors more rich and complex.

Personally, if you skip the wine,  I would balance it with a little acidity. Hit the broth with a squeeze of lemon or a little red wine vinegar from the pantry.

I also love to add an additional acidic component, to my risotto, with a diced tomato finish.

What Kind of Wine Should I Use for My Instant Pot Risotto?

I am not snobby about wine so I usually rely on a very fine box of Black Box Chardonnay. I love a sauvignon blanc, pinot grigio, or chardonnay in my risotto.

Just steer of any wines that are super sweet. You are looking for one with a dry finish.

How Can I Save Money on Wine for My Dishes?

I’m a huge ALDI wine fan so I *do* recommend you check that out. I can usually find some pretty incredible wine for under $10.

Recently, we placed an order with Wine Insider and used the wine from one of their white wine packages. Here’s a $25 off of a $50 wine order coupon if you want to shop there. I found the price to be more than fair for the value.

What if I Don’t Like Onions?

I hate, hate, hate onions so I completely understand. I am showing you how to prepare this dish with shallots, a very mild onion. 

Personally, I skip the onions. I just add the rice to the olive oil and move right on to the next step, once the rice is translucent.

The Best Instant Pot Risotto Step-by-Step from MomAdvice.com

The Best Instant Pot Risotto Tutorial Step-by-Step

Chop your chicken into bite sized pieces.

Toss with a little olive oil, salt, pepper, and any of your favorite seasonings.

I swear by this Mrs. Dash Tomato Basil Garlic Seasoning, if you on the hunt for perfect spice blend.

Finely chop your shallots (I rely heavily on this tool for finely chopping) and set these aside.

The Best Instant Pot Risotto Step By Step from MomAdvice.com

Turn on your pressure cooker and select the SAUTE setting and adjust it to HIGH.

Add your olive oil and brown your chicken on each side (you are not cooking this through). Remove the chicken with a slotted spoon and set it aside.

Add a little more oil and saute your onions for a few minutes. Be careful to not let them burn.

The Best Instant Pot Risotto Step By Step from MomAdvice.com

Now, add your rice and stir constantly to help agitate out the starches. It will go from a bright white to a translucent shade. When you see it is starting to look translucent, you can add your wine.

The Best Instant Pot Risotto Step By Step from MomAdvice.com

Add the wine and keep stirring like a crazy lady to get it to absorb all of the wine into the rice. Once all of the liquid has been absorbed, turn OFF the pressure cooker.

The Best Instant Pot Risotto Step By Step from MomAdvice.com

The Best Instant Pot Risotto Step By Step from MomAdvice.com

The Best Instant Pot Risotto Step By Step from MomAdvice.com

Add four cups of chicken stock, a 1/2 cup of water, salt, and pepper, to the Instant Pot.

Finish by adding the chicken and stir.

The Best Instant Pot Risotto Step By Step from MomAdvice.com

Cover with your lid and lock it into position.

Have I mentioned the importance of replacing your seal?

If you have issues with your pressure cooker coming to pressure, this is a must replace item. Also, be sure to check that your vent is in the sealed position before setting it.

Press the MANUAL button and set it to 7 minutes high pressure.

The Best Instant Pot Risotto Step By Step from MomAdvice.com

The Best Instant Pot Risotto Step By Step from MomAdvice.com

The Best Instant Pot Risotto Step-by-Step

Once it is finished, do a QUICK RELEASE and open the lid. You should see that this is not fully absorbed and will look soupy.

This is good.

I promise.

You will just stir in your parmesan cheese and give it a few minutes to set up.

After a few minutes, you should have just the consistency you are after. 

Some people love to put a pat of butter in with the cheese.

I haven’t found it to be that necessary after the pressure cooker has done its work.

The Best Instant Pot Risotto Step By Step from MomAdvice.com

I would also highly recommend having one of these lids for easy serving out of your pot. I love, love, love this lid for the refrigerator so I don’t have to find a storage container to put this away in.

I hope you love this recipe as much as our family.

Remember, this is just the start of a beautiful risotto relationship.

You can make this your own by switching out the protein, add mushrooms or peas, and try different cheeses.

The Best Instant Pot Risotto Step-by-Step

The Best Instant Pot Risotto Step-by-Step from MomAdvice.com

The Best Instant Pot Risotto (Step By Step)
 
Recipe Type: Main Dish
Cuisine: Italian
Author: MomAdvice.com
Prep time:
Cook time:
Total time:
Serves: 6 servings
Risotto can be a very labor-intensive dish, but it doesn’t have to be with a pressure cooker. Today I’m sharing my step-by-step tutorial for creamy risotto, made in your Instant Pot. Ditch the boxed mac and cheese for this easy weeknight dish.
Ingredients
  • 4 tablespoons olive oil (divided)
  • 1/2 cup finely chopped shallots (I omit)
  • 1 pound chicken breast (diced and seasoned)
  • 2 cups risotto rice
  • 1/2 cup dry white wine
  • 4 cups chicken stock
  • 1/2 cup water
  • 1/2 cup grated parmesan cheese
  • salt and pepper to taste
  • Parsley & Diced Tomatoes (optional- for topping)
Instructions
  1. Finely chop your shallots.
  2. Dice and season your chicken.
  3. Turn on your Instant Pot to the SAUTE function. Adjust to high.
  4. Add two tablespoons of olive oil to the pot (once it is hot) and brown your chicken (do not cook through). Remove the chicken with a slotted spoon.
  5. Add two more tablespoons olive oil to the pot. Toss in your shallots and let them cook for a couple of minutes.
  6. Add your rice, stirring frequently and letting it cook until it is translucent.
  7. Once the rice is translucent, add your white wine and stir vigorously to agitate the rice. Once the wine is fully absorbed, turn off your pressure cooker.
  8. Add 4 cups chicken broth, 1/2 cup water, salt and pepper to taste (don’t get too aggressive with the salt since we are adding cheese).
  9. Cover with lid and lock into position. Press the MANUAL button and do this high pressure cook for seven minutes.
  10. Once it beeps, do a QUICK RELEASE. Give the rice a stir and add in your cheese. Let the rice set for a few minutes to absorb the liquid.
  11. Serve in bowls and enjoy every dang week.


Looking for more great pressure cooker recipes? Here are a few of our most popular recipes on the site!

Instant Pot Shredded Chicken from MomAdvice.com meal prep shredded chicken in in your pressure cooker

Best Instant Pot Wings Recipe from MomAdvice.com make pressure cooked chicken wings with just three ingredients

3 Ingredient Instant Pot Ribs from MomAdvice.com the most loved recipe on our site are these 3-ingredient ribs

Pressure Cooker Italian Beef Roast from MomAdvice.com pressure cooked italian beef roast is my favorite dish to entertain with

3-Ingredient Instant Pot Pulled Pork from MomAdvice.com if you haven’t tried pulled pork in the pressure cooker, you are in for a treat

this instant pot indian vegetable rice is the perfect meat-free pressure cooker dish to prepare

I hope this gives you loads of ideas for new ways to use your Instant Pot. Be sure to sign up for my newsletter for great ideas!

Pin It

Best No-Bake Ghost Cake Idea (Fast and Easy)

Monday, October 14th, 2019
Best No-Bake Ghost Cake Idea (Fast and Easy)

This ghost cake is a fun and spooky Halloween cake that even your kids can make it!  Using store-bought ingredients, you can have a Halloween treat in minutes.

If you are anything like me, you are already on the hunt for easy Halloween ideas!

Today’s easy food craft is for a festive Halloween cake that you can whip up quickly to celebrate with your kids, fellow trick-or-treaters or to add to your Halloween party spread.

This can be made for under $20 and NO COOKING is required!

Can I get an AMEN?

What if I Don’t Want to Spend $20 on Halloween Cake?

As you know, I’m pretty darn frugal, so I want to share a tip that might help you at your store.

Be sure to check the rear of your store (over by the dairy section usually) to see if there are any reduced to sell bakery items on a rolling cart.

It is there where I often spy prepared cakes and doughnuts that are perfect for sharing with guests or for rounding out a meal together with friends.

If you check there first, it is possible you might be able to score these treats for a fraction of the price that I paid.

I promise to not be jealous.

How Can I Make This Treat Gluten-free?

Welp, you know that gluten-free cake isn’t going to be an affordable treat.

Oh, the price ding on removing wheat!

Ouch.

Did you know that you can purchase gluten-free donut holes in the freezer section of many supermarkets.

Is it just me or are you scared to pay a million dollars for gluten-free snacks because you got burned on a past purchase?

I am learning that the best move is to check the reviews before making anymore snack purchases. Here’s the page on gluten-free doughnut reviews to help you make your best decision.

Best No-Bake Ghost Cake Idea (Fast and Easy)

How Can I Save Money at My Local Gluten-free Bakery?

If you aren’t using Groupons, you are missing out on some free money. Anytime that we eat or do anything local, we check to see if there are any deals on things like this. You just never know when the new up and coming bakery might be looking for a fresh way to promote their business.

What Can I Substitute for Cake if I’m Gluten-Free?

I found this useful gluten-free directory to help you find a gluten-free bakery near you.

Gluten-free cakes can be expensive though so I recommend you bake a cake yourself. I have some super easy gluten-free cake recipes to share with you that might just make the most perfect cakes.

I promise, these gluten-free cakes are as easy to put together as any other cake because I rely upon cake mixes for their creation.

Here are a few that our family has loved!

Best No-Bake Ghost Cake Idea (Fast and Easy)

Doughnut Hole Ghost Cake from MomAdvice.com

Supplies Needed

Pro Crafter Tip: Don’t forget to download the Rakuten app to save some money through their links to retailer sites!

1 prepared cake

1 container of powdered sugar doughnut holes (I had enough in an assortment pack)

Roll of white tulle (over by the party/wedding favor supplies)

Black Decorating Icing small pieces cut off a stripe of candy corn, candy eyes, or small Halloween candy (like Mini M&M’s) for your eyes.

1 prepared cake

1 container of powdered sugar donut holes (I had enough in an assortment pack)

Roll of white tulle (over by the party/wedding favor supplies)

Black Decorating Icing (over by the cake decorating supplies/crafts), small pieces cut off a stripe of candy corn, candy eyes, or small Halloween candy (like Mini M&M’s) for your eyes.

Cookie Sticks(over by the cake decorating supplies/crafts)

White Twine

Scissors

Best No-Bake Ghost Cake Idea (Fast and Easy)


Instructions

1. On a rimmed cookie sheet, insert the cookie stick into your doughnut hole.

2. Cut out two squares of tulle, approximately the same size, and angle them slightly. Fold them over your doughnut hole. Secure with a little white twine, making sure to bring the tulle down snugly over the top of the doughnut hole to make a level surface for your piping.

3. Pipe two eyes and a mouth on your doughnut hole. I found that getting the icing a little warm helped make the piping easier so keep that in mind!

4. Stick your ghosts on top of your cake.

Done.

How easy is that?

Best No-Bake Ghost Cake Idea (Fast and Easy)

This cake was such a hit and I loved that it adds a homemade touch to a store-bought treat!

As you know, I’m pretty darn frugal, so I want to share a tip that might help you at your store.

Be sure to check the rear of your store (over by the dairy section usually) to see if there are any reduced to sell bakery items on a rolling cart.

It is there where I often spy prepared cakes and doughnuts that are perfect for sharing with guests or for rounding out a meal together with friends.

If you check there first, it is possible you might be able to score these treats for a fraction of the price that I paid.

I promise to not be jealous.

I look forward to sharing more fun Halloween ideas with you in the upcoming month and hope you love this festive (and easy) treat idea!

Don’t miss these other great ideas from MomAdvice.com:

DIY Thumbtack Pumpkins from MomAdvice.com

DIY Thumbtack Pumpkins

How to Make Pumpkin Hand Pies

How to Paint Pumpkins With Acrylic Paints from MomAdvice.com

Painting Pumpkin with Acrylic Paints

//www.momadvice.com/post/easy-burlap-wreath-tutorial

Autumn Burlap Wreath

Easy Homemade Gluten-Free Pumpkin Bread


This post contains affiliate links

Pin It

How to Make a DIY No-Sew Blanket Scarf (Plus How to Wear a Blanket Scarf)

Saturday, October 12th, 2019

Blanket scarves are so trendy and an easy no-sew DIY to make for cold weather. Check out this diy blanket scarf tutorial and how to style your plaid blanket scarf with this easy tutorial. One trip to the fabric store for flannel plaid fabric and you will have everything you need to make a blanket scarf of your own…no sewing machine required!

I am madly in love with blanket scarves.

My obsession started as all good obsessions do.

It began on Pinterest, of course.

All of these fabulously fashionable women were rocking these gorgeous oversized scarves, but they were out of my price range or lacked the fullness & beauty that was captured online.

I mean, who couldn’t get behind the idea of wearing a blanket and calling it an oversized scarf?

Count Me In!

I decided I wanted to make some for my minimalist wardrobe because it would add so much. Did you know you can make a blanket scarf with no sewing skills required?

Let’s begin by taking a peek at the coveted $44 Zara scarf (that sells out in minutes, not kidding).

I want to zoom on in it so we can take a closer look.

Zara Blanket Scarf

Source: Style for the Seasons

The thing I want you to see is that the edges are frayed on their version too.

Guess what?

You can achieve that with a little flannel and pulling.

The best part is that this version will cost you quite a bit less than $44. I am going to make a big stack of them to show you and then I am going to show you some fun ways to tie them.

How to Make a Blanket Scarf from MomAdvice.com

The first thing you will need to do is shop for your fabric which is so much fun. I went to a few shops to check out fabric and ended up finding it at Jo-Ann Fabrics.  

Head over here to grab a coupon for your flannel fabric.

Want to know a pro-crafter shopping tip? Check out this app that I’m using to get a percentage back on my craft purchases.

If not, that same link will provide you a 40% off coupon. You will DEFINITELY want to use this because it makes these scarves budget-friendly. Don’t forget your coupons.

Head over the Fashion Flannel…at least that’s what they call it in Mishawaka (oh-la-la!).

Select your favorite patterns, tell them the amount you need, have them tell you they don’t have that much on a bolt, go grab another one, try again… Be annoyed.

Decide to do two sizes because you want you what you want, that’s why you brought it up there.

Got it?

I am going to show you what a 2 yard scarf looks like and then I am going to show you what a 2.5 yard scarf looks like below.

I love them both for different reasons and what you can do with them. The price (with no sales or coupons) is $8.99 per yard. That’s why it is great to see the two version (for cost-savings) and also really great to bring a coupon to save a bit on the fabric.

I wouldn’t recommend anything more than that or your scarf will choke you and you will die from scarf blanket suffocation.

It will be all over the headlines.

They will be laughing at you in those ridiculous segments on the radio where they try to shock you at the stupidity of Americans.  Your family will miss you. It would all be very tragic.


If you would prefer to shop online, I love to check over here for flannel by the yard. SO MANY great choices!! 


How to Make a Blanket Scarf from MomAdvice.com

How to Make a Blanket Scarf

1. Purchase 2-2.5 yards of flannel fabric (make sure the flannel printing is on both sides).

2. Using the patterned flannel edge as a guide (on the edges of the fabric), trim the edges of each side of your scarf with a pair of sewing scissors (these are what I have)  to expose the cut edges.

3. Pulling out the vertical threads, on the cut side of the fabric, begin fraying the edges of the scarf.

You will discover that pulling out threads really creates a beautiful finished edge

If you are struggling to grab a thread, don’t be afraid to use a seam ripper.

Keep doing this until there are no loose threads and you have a beautifully frayed edge. Repeat on each side of the scarf. DONE!

How to Make a Blanket Scarf from MomAdvice.com

This is what TWO YARDS of fabric looks like.

You can see that it has a lot of fullness, but is not as long or as much to tie or knot around.

Do you want to see how to tie it to look like this?

Okay then.

How to Wear a Blanket Scarf

How to Style a Blanket Scarf

How to Tie a Blanket Scarf from MomAdvice.com

How to Tie Your Two Yard Blanket Scarf

1. Fold the scarf in half, lining the edges up evenly. This creates more of a square blanket scarf versus doing it on an angle.

2. Make sure one end is shorter than the other and tuck it up over your shoulder.

3. Loop around once with the long end (or possibly twice depending on your neck size!).

4. Fluff and puff. Fluff and puff.

how-to-make-a-blanket-scarf-9

How to Make a Blanket Scarf from MomAdvice.com

Here is the same size, just not puffed up so much. Seriously, cute stuff!

How to Make a Blanket Scarf from MomAdvice.com

How to Tie Your 2.5 Yard Blanket Scarf

No need to reinvent the wheel to tie a blanket scarf…I just headed online to figure out a couple of fun ways to tie these longer blanket scarves.

I tried this braided technique on Classy Sassy and really loved it.

It is a little more complex than the one above, but it adds a beautiful detail to the styling.

How to Make a Blanket Scarf from MomAdvice.com

This half-tied technique couldn’t be easier and was a cinch to pull together and added just the right amount of fullness to the neckline.

How to Make a Blanket Scarf from MomAdvice.com

Here are a few other blanket scarf tying techniques I am looking forward to trying!

This one is similar to the half-tied technique, but no tying, just tucking. I can do that!

This chunky scarf technique would work really well with a 2-yard scarf so you could let the ends hang.

The 2.5-yard one would look great as a poncho or even pulled together with a belt.

This poncho style leaves the scarf folded making a smaller poncho version.

I also love draping this scarf just around my shoulders during the cold winter months. It makes the perfect shawl!

Regardless of the way you tie it, I love pairing these scarves with puffy vests, long sleeve shirts, and my favorite fall boots. Flannel blanket scarves are the perfect addition to your fall wardrobe. 

How to Make a Blanket Scarf from MomAdvice.com

I’m Petite & Want to Make a Smaller Version- What Can I Do?

I’m pretty petite, but I know big scarves aren’t for everyone!

Shave 6-7 inches off the width on a 2 yard version to make a more petite version of this scarf with a little less bulk or experiment with your own sizing by creating your own custom version.

Just cut, try on, adjust.

There are no wrong or right lengths- it is what fits YOU or your recipient best!

Wear it a scarf or wear it as a blanket. The possibilities for this cozy project are endless.

Love this scarf tutorial? Here are a few other DIY projects I’m proud of!

No-Sew Scarf With Hidden Pocket no sew scarf with hidden pocket

Fall Burlap Wreath fall burlap wreath

Slow Cooker Pumpkin Spice Candles slow cooker pumpkin spice candles

How to make a Yarn Pom Pom Wreath yarn pom-pom wreath

DIY Roll-up Puzzle Mat roll-up jigsaw puzzle mat

DIY No-Sew Hand Warmers no-sew hand warmers

Yarn Pom Pom Trees yarn pom pom trees

How to Make a Succulent Terrarium succulent terrariums

I hope you have a blast making these quick scarves for yourself or for holiday gift-giving. Check out this list of 54 handmade gifts you can make for the holiday season to inspire you even more! Happy crafting!

This post contains affiliate links. 

How to Make a No Sew Blanket Scarf from MomAdvice.com

Pin It

Amy’s Notebook 10.11.19

Friday, October 11th, 2019


source

This red pepper and tomato meatball soup looks like comfort food in a bowl.

7 fun fall things to do on a weekend– love these creative ideas.

6 new pumpkin-flavored items to love at ALDI. YASSSS!

This is one of the personal finance tasks I’ve been working on this month. Excited to share more with you!

10 things you need to know about this year’s most controversial film.

Rainbow Pumpkin Arch source

Holy heck! This pumpkin arch is AH-MAZING.

Here is what I’m reading this week. It has more layers than I was expecting, honestly.

This new character has made me cringe through the last couple of episodes. I see why they are weaving this in right now though!

A few good tips for getting stuff done.

This was your favorite purchase this week. Honestly, I can’t start my day without it now.

source

I bought yarn to try to tackle this knitting project. I can’t believe how pretty that is!

This mindful habit will put a stop to overspending.

OMG. This is NOT Tom Cruise. I am so confused.

5 ways to bring hygge to your home.

Speaking of hygge, I hope you didn’t miss this!

How to hit unfollow on anxiety.

I love this piece on the 5AM club. I’m a big participant in this too!

I hope you enjoyed our notebook, a collection of gathered links to DIY crafts, food projects, thrifty ways to spruce up your home, and thoughtful reads. Nothing brings me more joy than to highlight other fabulous bloggers. Follow me on Pinterest for daily inspiration!

Please note, there are affiliate links in this post- thank you! xoxo

Small-Budget Crushes 10.11.19

Friday, October 11th, 2019

Small Budget Crushes from MomAdvice.com

Don’t forget to download the Rakuten app before making any purchases on today’s list. You can find all the current coupons AND get cash back on all your purchases! Learn more about it over here!


french terry sweatshirt wrap french terry sweatshirt wrap

layering sweater with side slit layering sweater with side slits

low heel booties- so many great colors and such a steal!

vintage halloween lantern sets vintage halloween lantern sets

leopard print slip on shoes

star patch lace-up sneakers star patch lace-up sneakers

closed my book to be here tee

silicone baking mat sets (so affordable!)

cheerleader pet costume cheerleader pet costume (I can’t stop laughing)

homeschooled tee

faux leather high waist leggings faux leather high waist leggings (soooo much cheaper than the spanx version!)

last name sign

pullover poncho (several gorgeous colors)

Cold Brew Iced Coffee Maker cold brew iced coffee maker

printed drop shoulder sweatshirt printed drop shoulder sweatshirt (so many fun prints!)

the giving plate the giving plate

bookshelf bullet journal

brown thumb plant markers

portable usb blender (would make such a great holiday gift!)

personalized bookend personalized bookend

leopard print bag

ostrich men's costume ostrich men’s costume

Keep on window shopping by visiting all of my Small-Budget Crushes. This post contains affiliate links!! 

Instant Pot Shredded Chicken (meal prep)

Thursday, October 10th, 2019

Instant Pot Shredded Chicken from MomAdvice.com


Did you know that you can make enough shredded chicken for a week of recipes with your pressure cooker? This Instant Pot Shredded Chicken recipe can be meal prepped for your week or frozen for future meals. Don’t miss this post filled with ideas for ways to put pressure cooked chicken to work in your kitchen!

I hope you all are as in love with your Instant Pot as much as me. Our pressure cooker continues to be my favorite gadget and I’m excited to share more family recipes with you.

Today I wanted to show you how to meal prep shredded chicken in your Instant Pot.

This technique is super simple and straightforward.

In your pressure cooker, you will add one cup of chicken stock to the bottom of your pressure cooker. Add your chicken breasts and season well with salt and pepper.

Cook your chicken on High Pressure for 10 minutes (for small chicken breasts) or 12 minutes (for large chicken breasts).

These chicken breasts, for example, required fifteen minutes to fully cook.

Allow your pressure to release naturally (instead of quick releasing the valve). A good amount of time is ten minutes!

Instant Pot Shredded Chicken from MomAdvice.com

Instant Pot Shredded Chicken from MomAdvice.com

Once the chicken is cooked, you can shred it with two forks. If you are feeling fancy, break out your hand mixer to make quick work of this task.

Reserve half the liquid in the pot for storage and to reduce the chances of your chicken drying out.

I looked up some frequently asked questions, on pressure cooked chicken, and thought I would share more about my technique here.

Instant Pot Shredded Chicken from MomAdvice.com

Do I need to add more chicken broth (or stock) if I decide to cook more than four chicken breasts?

If I’m meal prepping for my family, I always double our recipes. I have doubled this successfully by doubling the chicken stock and keeping everything else, like cooking time, the same. It will take a bit longer to come to pressure, but the duration you set will remain the same.

Can I use this pressure cooker shredded chicken technique with frozen chicken breasts?

Cooking frozen chicken in the Instant Pot can be a real budget-saver and help you avoid ordering takeout.

Once again, cooking time on frozen chicken varies, based on the size of the breast. If the chicken breasts are small, 12 minutes of high pressure works great. Average size chicken breasts will take about 14 minutes. Large pieces are best at 16 minutes.

Can I Use this Shredded Chicken Recipe for Chicken Thighs Instead of Chicken Breasts?

Personally, I prefer thigh meat over chicken breasts because they don’t easily dry out and get overcooked.

I’ve had great success with cooking chicken thighs for 15 minutes on high pressure.

I love to toss my thigh meat with salsa and a little chicken broth for taco night or burrito bowls.

My Shredded Chicken Didn’t Fully Cook, Can I Restart My Instant Pot?

Do you find that your dishes seem inconsistent with cooking times? I discovered a really important solution…getting a new Instant Pot seal. If the seal is stretched out, it will take much longer to come to pressure.

For chicken to be fully cooked, you want to make sure it has come to 165 degrees. Since the size of the breasts is so different, it is hard to always nail the length of time.

If you find that your chicken is not fully cooked, simply cook it for 2 more minutes of High Pressure.

Since the liquid is already hot, it won’t take that long to come to pressure again.

What Other Seasoning Can I Use on My Shredded Chicken?

I try to really map out what I’m making with it before deciding on seasoning. This basic idea of just salt & pepper is always appealing to me though because it can be used in any recipe.

Free Spice Label Printables

That said, you can always make your own flavor combo! This Mrs. Dash seasoning, for example, is a family favorite. I also love to season my chicken with oregano, garlic powder, onion powder, or dried rosemary.

Feeling inspired to get your pantry organized? Here are some free printable pantry labels to get you started.

I Don’t Have a Pressure Cooker. How Do I Make This Shredded Chicken In My Slow Cooker Instead?

For many years, I just did the shredded chicken in my slow cooker. You will follow the exact same recipe, but you will cook the chicken in your slow cooker for six hours instead.

I hate dry chicken though so I usually do the six hours of cooking time with frozen breasts instead.

I find today’s slow cookers are so much faster than they used to be.

For me, six hours is as long as I’m willing to let my chicken cook in one of those.

If you are on the hunt for a new slow cooker, I can’t recommend this model enough. I use it weekly and love that I can brown our meat before slow cooking it.

Are There Any Other Ways to Prepare Chicken For My Week?

I can’t recommend this roasted chicken technique enough.

In fact, I got stopped three times at a family cookout to ask how I prepared my meat.

It is perfectly seasoned, tastes like it has been grilled, and is perfectly tender.

Instant Pot Shredded Chicken Meal Prep From MomAdvice.com

What Recipes Can I Make With Shredded Chicken?

Shredded chicken can be stuffed into wraps with spinach, tomatoes, and ranch.

Shredded chicken can be tossed with salsa, and reserved liquid, to make chicken tacos.

Shredded chicken can be added to a delicious frittata, like this one.

Shredded chicken can be made into chicken salad. I love to skip the mayo and toss it with pesto and a little creamy Greek Yogurt.

Shredded chicken makes the perfect pizza topper with a pesto base, spinach, and tomatoes.

Shredded chicken is a great addition to any salad (here is one of my faves!).

Shredded chicken can be tossed with barbecue sauce and stuffed in sweet potatoes or in buns.

Shredded chicken can be added to soup or chili.

Shredded chicken be made into delicious enchiladas (this is our family’s favorite recipe).

Shredded chicken is great in homemade lo mein, fried rice, or stir fry.

You get the idea.

There is SO much you can do with this. Just think of how you can use shredded chicken in your favorite casseroles, pasta dishes, or rice bowls.

What if I Can’t Eat All This Shredded Chicken?

One of the best things about having this prepared is that you can freeze it. Freeze your pressure cooked chicken in freezer bags, with a little of the reserved broth. Make sure to take out as much air as possible and label. This should keep for 3-6 months in your freezer.

Instant Pot Shredded Chicken (meal prep)


Instant Pot Shredded Chicken (meal prep)

Instant Pot Shredded Chicken (meal prep)

Yield: 4-6 servings
Prep Time: 5 minutes
Cook Time: 12 minutes
Additional Time: 10 minutes
Total Time: 27 minutes

Did you know that you can make enough shredded chicken for a week of recipes with your pressure cooker? This Instant Pot Shredded Chicken recipe can be meal prepped for your week or frozen for future meals. Don’t miss this post filled with ideas for ways to put pressure cooked chicken to work in your kitchen!

Ingredients

  • 4 Chicken Breasts
  • 1 cup chicken broth or stock
  • Salt and pepper

Instructions

  1. Pour one cup of chicken broth or stock in the bottom of your Instant Pot.
  2. Add fresh chicken breasts to Instant Pot, seasoned with salt and pepper.
  3. Put the lid on your Instant Pot and cook your chicken on High Pressure for 10 minutes (for small chicken breasts) or 12 minutes (for large chicken breasts).  
  4. Once the Instant Pot beeps, make sure your instant pot turns off (and doesn't start the, "keep warm," setting. Allow it to naturally release for ten minutes.
  5. Remove the chicken from the pressure cooker and shred with two forks or a hand mixer.
  6. Add half the liquid from the pot to your shredded chicken and toss to make sure it is fully incorporated.
  7. Use the chicken right away for your recipes (see post for fun ways to put this to work in your kitchen) or freeze for 3-6 months in an airtight freezer bag with a little additional liquid.Instant Pot Shredded Chicken from MomAdvice.com

Notes

Doubling the chicken? I have doubled this successfully by doubling the chicken stock and keeping everything else, like cooking time, the same. It will take a bit longer to come to pressure, but the duration you set will remain the same. 

Using frozen chicken breasts? Cooking time on frozen chicken varies, based on the size of the breast. If the chicken breasts are small, 12 minutes of high pressure works great. Average size chicken breasts will take about 14 minutes. Large pieces are best at 16 minutes. Still follow the steps above for natural releasing the pressure. 

This post contains affiliate links


Love this recipe? Here are three other great pressure cooker recipes to check out!

3 Ingredient Instant Pot Ribs from MomAdvice.com 3 ingredient instant pot ribs

3-Ingredient Instant Pot Pulled Pork from MomAdvice.com 3-ingredient instant pot pulled pork

Best Instant Pot Wings Recipe from MomAdvice.com 3 ingredient instant pot wings

Let us know what you think about today’s recipe in the comments below!

Instant Pot Shredded Chicken Pin It