Archive for the ‘Crafts & Celebrations’ Category

Creating a Weekly Cleaning Routine (Free Printable Charts)

Tuesday, March 31st, 2020

Creating a Weekly Cleaning Routine (Free Printable Charts) Header

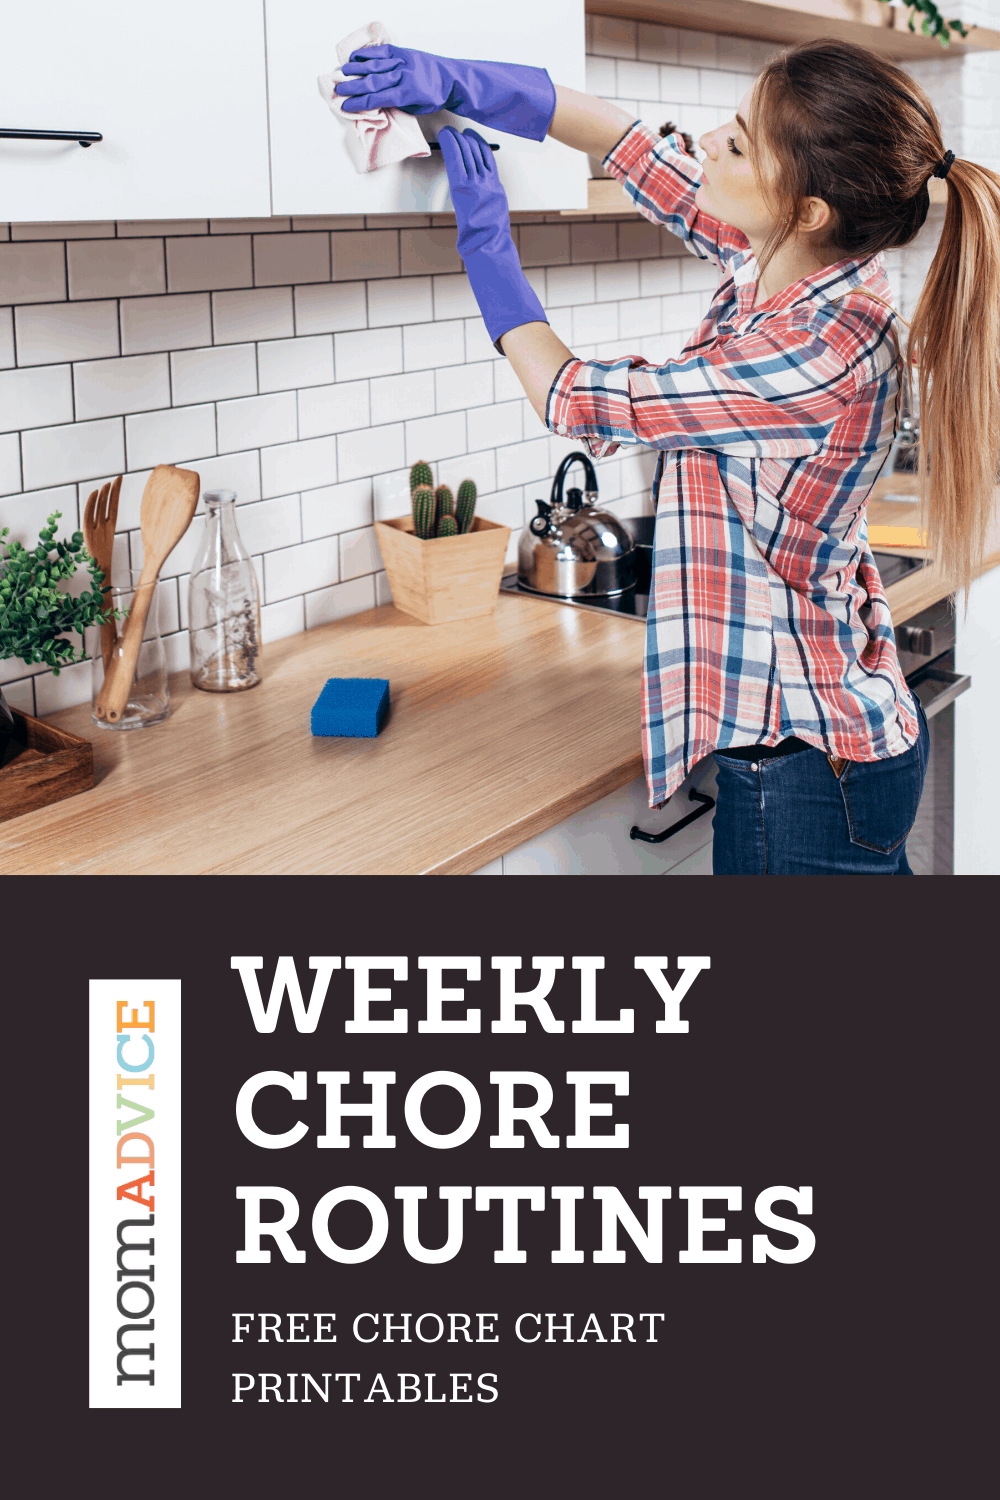
Are you looking for some new ways to divide the daily chores and house cleaning? This weekly cleaning schedule teaches kids to participate in household chores and helps them learn valuable life skills. Use these free printable chore charts to motivate your kids to participate in achieving a clean home and learn how we have taught our kids to help at all ages of life.

Before I launch into our household routines, I just want to acknowledge that we are all in VERY different places, both mentally and physically, since this pandemic has descended up on our world.

For me, I have been very consumed by worry for our family’s health, a growing concern for my sister who works in healthcare, and about our extended family members.

This pandemic, in fact, became so all-consuming that I reached out to my physician for some anxiety medication and have found a heightened sense of insecurity with my own safety being out in our world.

Although this week is better, I do find myself hitting big waves of grief, anger over others not doing what they are supposed to, and frustration with communication from politicians.

I do believe these waves will continue, especially as more and more people around me have been diagnosed or as jobs are lost and financial struggles have increased.

What I do know is that, FOR ME, I was also feeling really unprepared with everyone being here all day, the endless food preparation, and our home feeling more and more chaotic.

Can you relate?

My husband said it would be incredibly helpful if I would start making a list of all the things that need to be done around our house and begin to split these duties.

Chore Tickets download my chore and tech tickets for younger kids

When the kids were young, I was big on the weekly chore chart and even made these punchable tickets for tackling chores and reducing screen time.

When I started to have health problems, we decided to hire a cleaning service to help me with our weekly cleaning tasks.

Anyone who has had the privilege of hiring a cleaning service knows that a lot of preparation is required before the cleaning.

I would, honestly, spend an entire day prepping for their arrival and welcomed this as part of our bi-weekly routine. #whiteladyproblems

Hiring them was more about the accountability than just the help with the harder physical tasks of cleaning.

I fully acknowledged, without this visit, our house would start falling apart.

Now that we are all home together (and practicing social distancing), I needed to figure out chore lists that would give my kids responsibilities and divide up tasks evenly so that all the chores did not fall on me.

Family

For the record, my kids are 17 and 14 so they are more than capable of pitching in to assist. I don’t have to worry as much about kid chore charts or making sure they are age appropriate chores, they really are becoming mini-adults.

What I DID have to do though was teach them how to do these tasks so that we could all enjoy our space.

If anything comes out of this awful time it is that my kids are learning some very valuable life lessons about caring for a home, preparing food, and working more as a family unit.

I am sure these are all things that we could have been doing before, but having the space to do them has really helped our family a lot.

Creating a Weekly Cleaning Routine (Free Printable Charts) Printable Example 
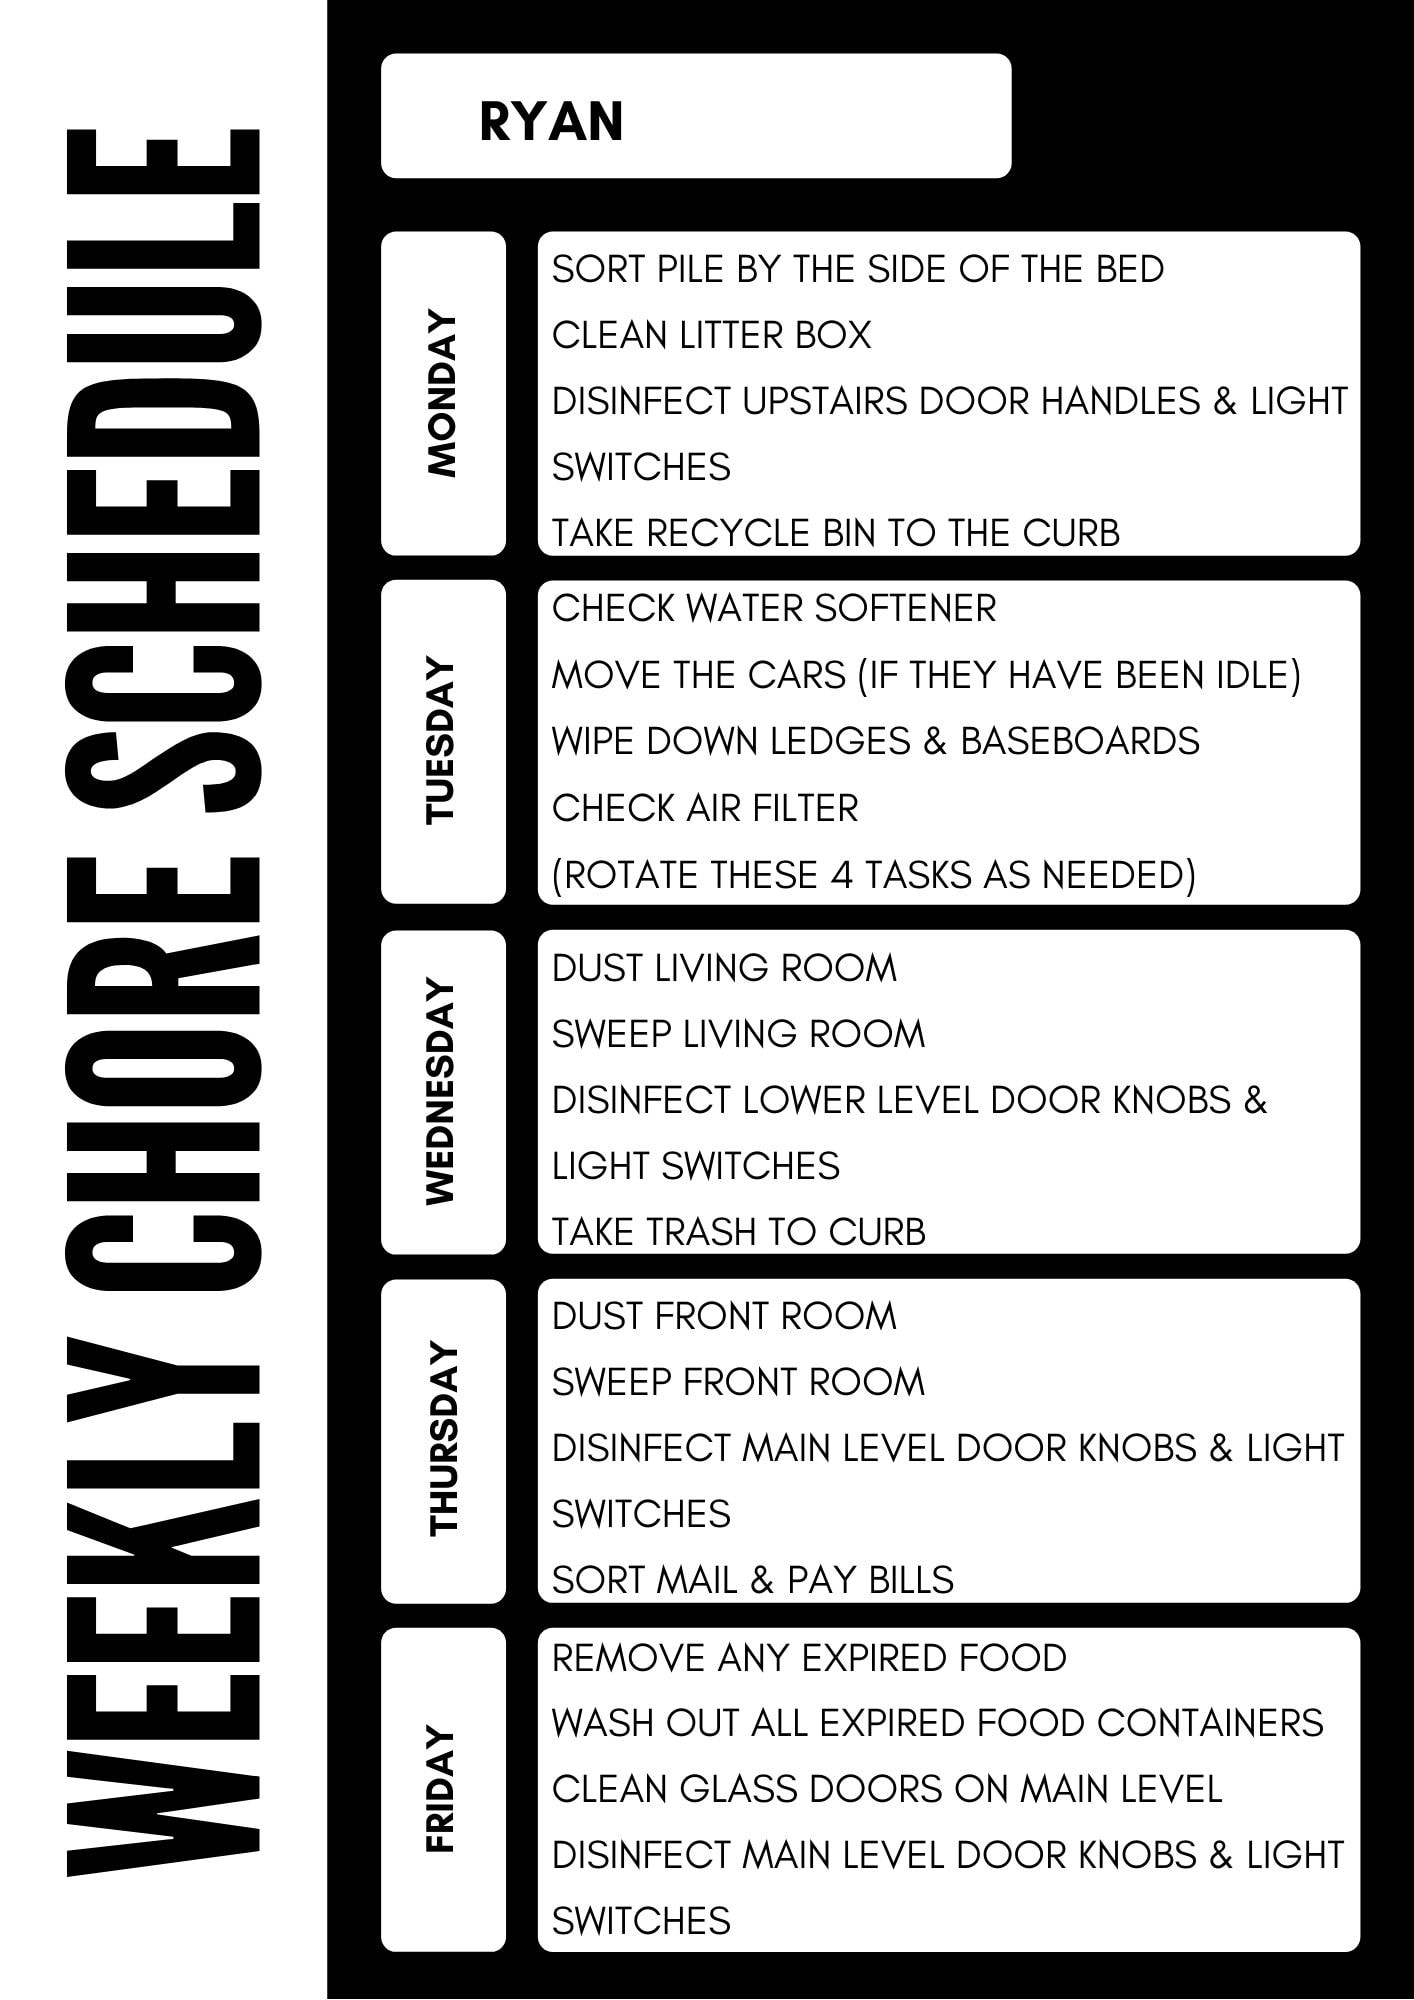
examples of tasks for my 17 year-old

Creating a Weekly Cleaning Routine (Free Printable Charts) Chore Chart 
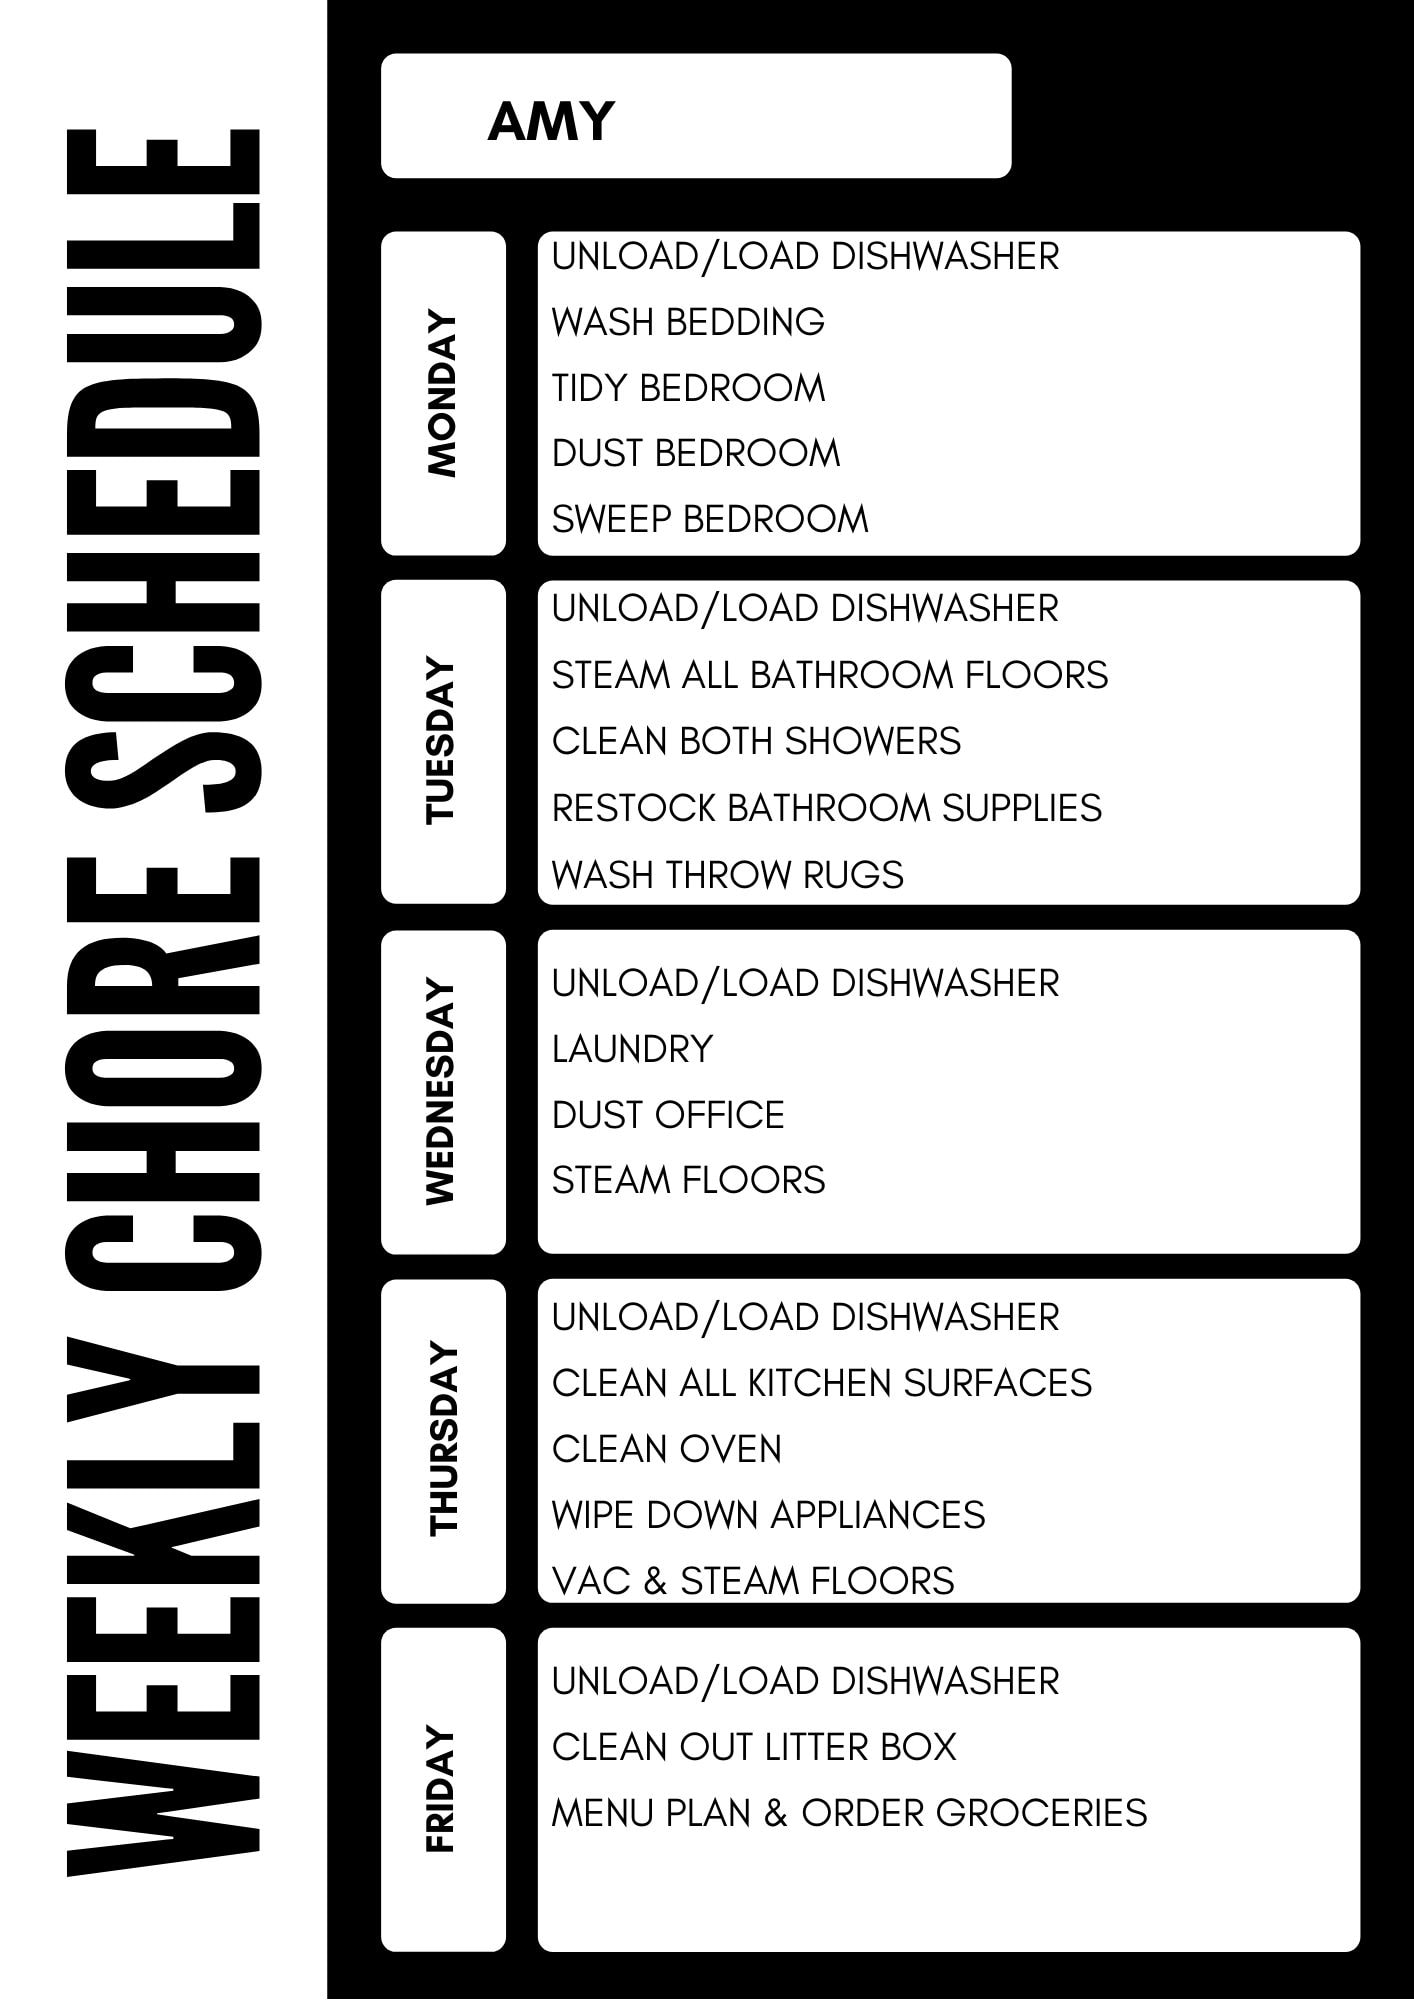
examples of tasks for my 14 year-old

Creating a Weekly Cleaning Routine (Free Printable Charts) Example Chart examples of tasks my husband is assisting me with

Creating a Weekly Cleaning Routine (Free Printable Charts) examples of tasks I’m doing each week

Creating a Weekly Cleaning Routine (Free Printable Charts)

Make a List of Tasks That Need to Be Done

I started with a lined sheet of paper and wrote down every chore that I would like to see happen throughout the week.

Chores around the house were jotted down, as well as more general tasks like laundry, menu planning, changing the air filters, checking our water softener, moving the cars around, and grocery shopping.

Divide Routine Tasks So They Don’t Fall on One Family Member

Instead of telling one kid that they need to clean out the kitty litter box, for example, each family member is rotating a day on that single task.

This means that we all get a turn cleaning up our cat’s poo-poo.

How fun is that? Hahaha!

Figure Out How You Can Do These Tasks In Tandem Together

The idea of working as a family unit is that no one person is responsible for everything.

Instead of just one person working in the living room, for example, each person is assigned a task in that room or a task that is on that level in the home.

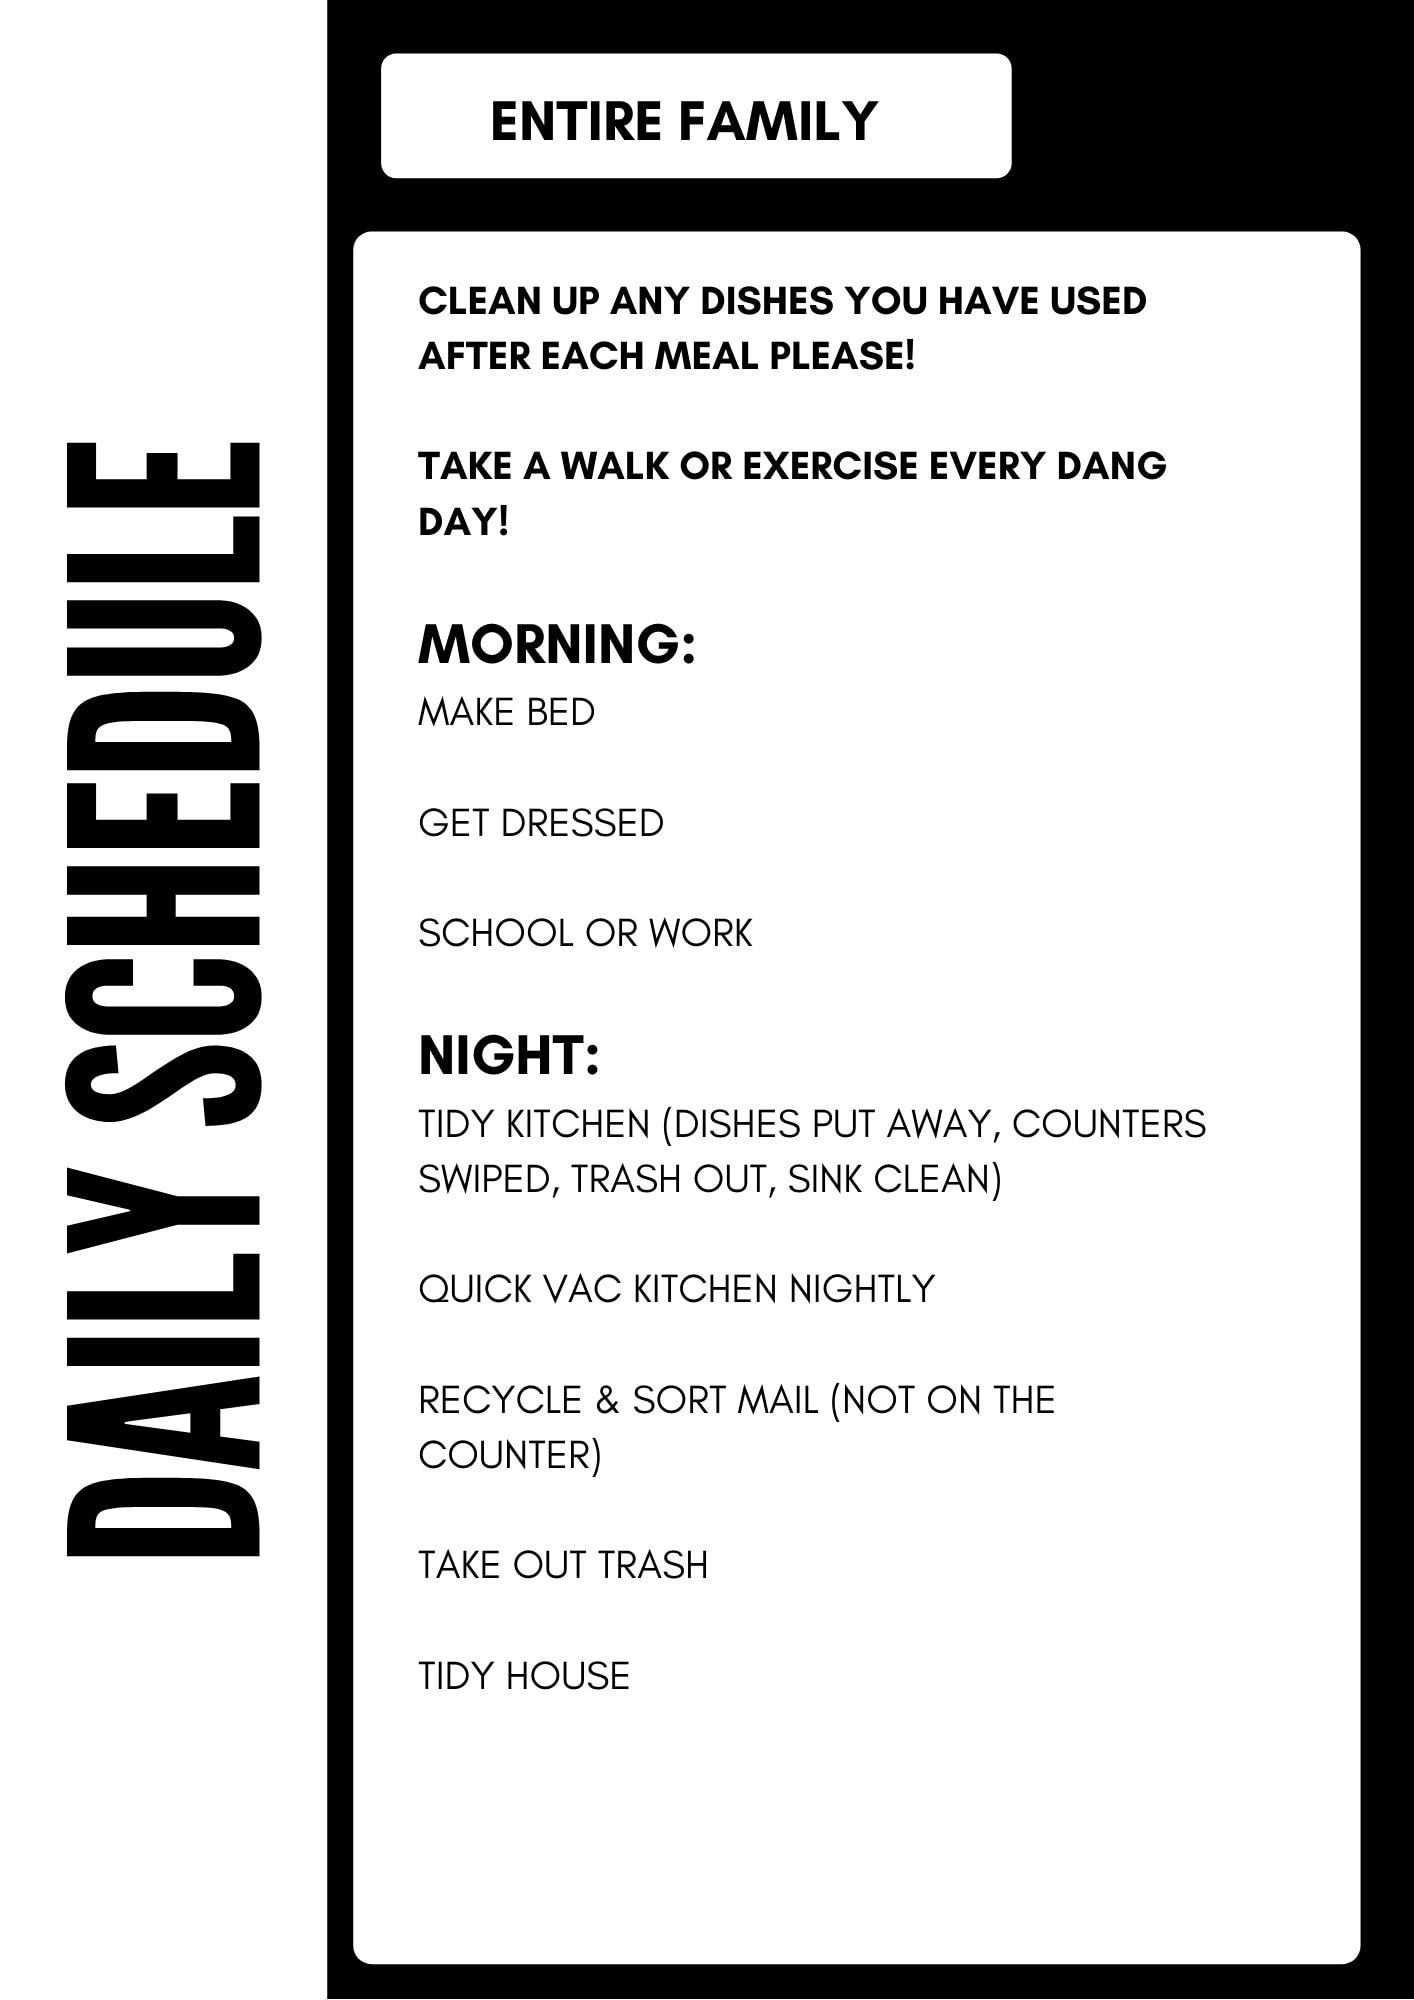
To tackle cleaned bathrooms, for example, we have the family divided working in our two bathrooms and doing one or two elements of that routine.

One person is quick vacuuming the floors, swiping sinks, and emptying trash.

Another person is cleaning the tubs, washing the throw rugs, and restocking bathroom supplies.

We do have to work together to nail the order down of task completion, but this system is already proving to be really effective in not weighing one person down.

To make this happen, I also did have to purchase some more cleaning equipment (welcome to your new cleaning caddy, kids!)  so that we all had the tools that we needed. 

If you are looking for a good online source, this is the site that I would recommend for doorstep delivery. (affiliate link, but should give you a free 5-piece cleaning set to get started!)

Daily Tasks During Quarantine

Try to Make Daily Standing Routines

While practicing our social distancing, I’m trying not to fall into a complete slump with personal hygiene, getting dressed, and moving. We made a list of things that are important to us (like, a daily walk!) that help keep us moving and help us manage our day better.

This was inspired by this incredible guidance on how to reduce anxiety while we are quarantined.

It really is incredible how much this helps.

I also will say that limiting myself to a coffee hour and a virtual New York Time subscription has allowed me to feel informed and not consumed.

These don’t have to be productive routines, just routines that you know will work well for your mental and physical health right now.

Don’t Be Afraid to Rotate Tasks

Even though I have tried to make things as evenly as possible, in our home, I have offered that the kids can switch roles monthly so that they don’t get stuck doing the same tasks over and over again.

If your kids are liking their habits though, don’t switch it up unless it is necessary.

Allow Room for Rest

I don’t want to clean on the weekends and feel like we ALL deserve to put our feet up on the weekend. That means that our routines are just outlined for Monday-Friday. This gives us Saturday and Sunday with the freedom to allow for rest and relaxation.

Once again, you do NOT need to be doing chore charts if you don’t care about this right now.

YOU DO YOU.

For me, establishing routines (even if it is just 15 minutes a day) makes me feel normal and helps give flow and purpose to this time.

I hope this helps inspire you to create your own routines that help you feel a little more like yourself too.

Sending loads of love and protection over each of your families. 

Click here to download my blank chore chart

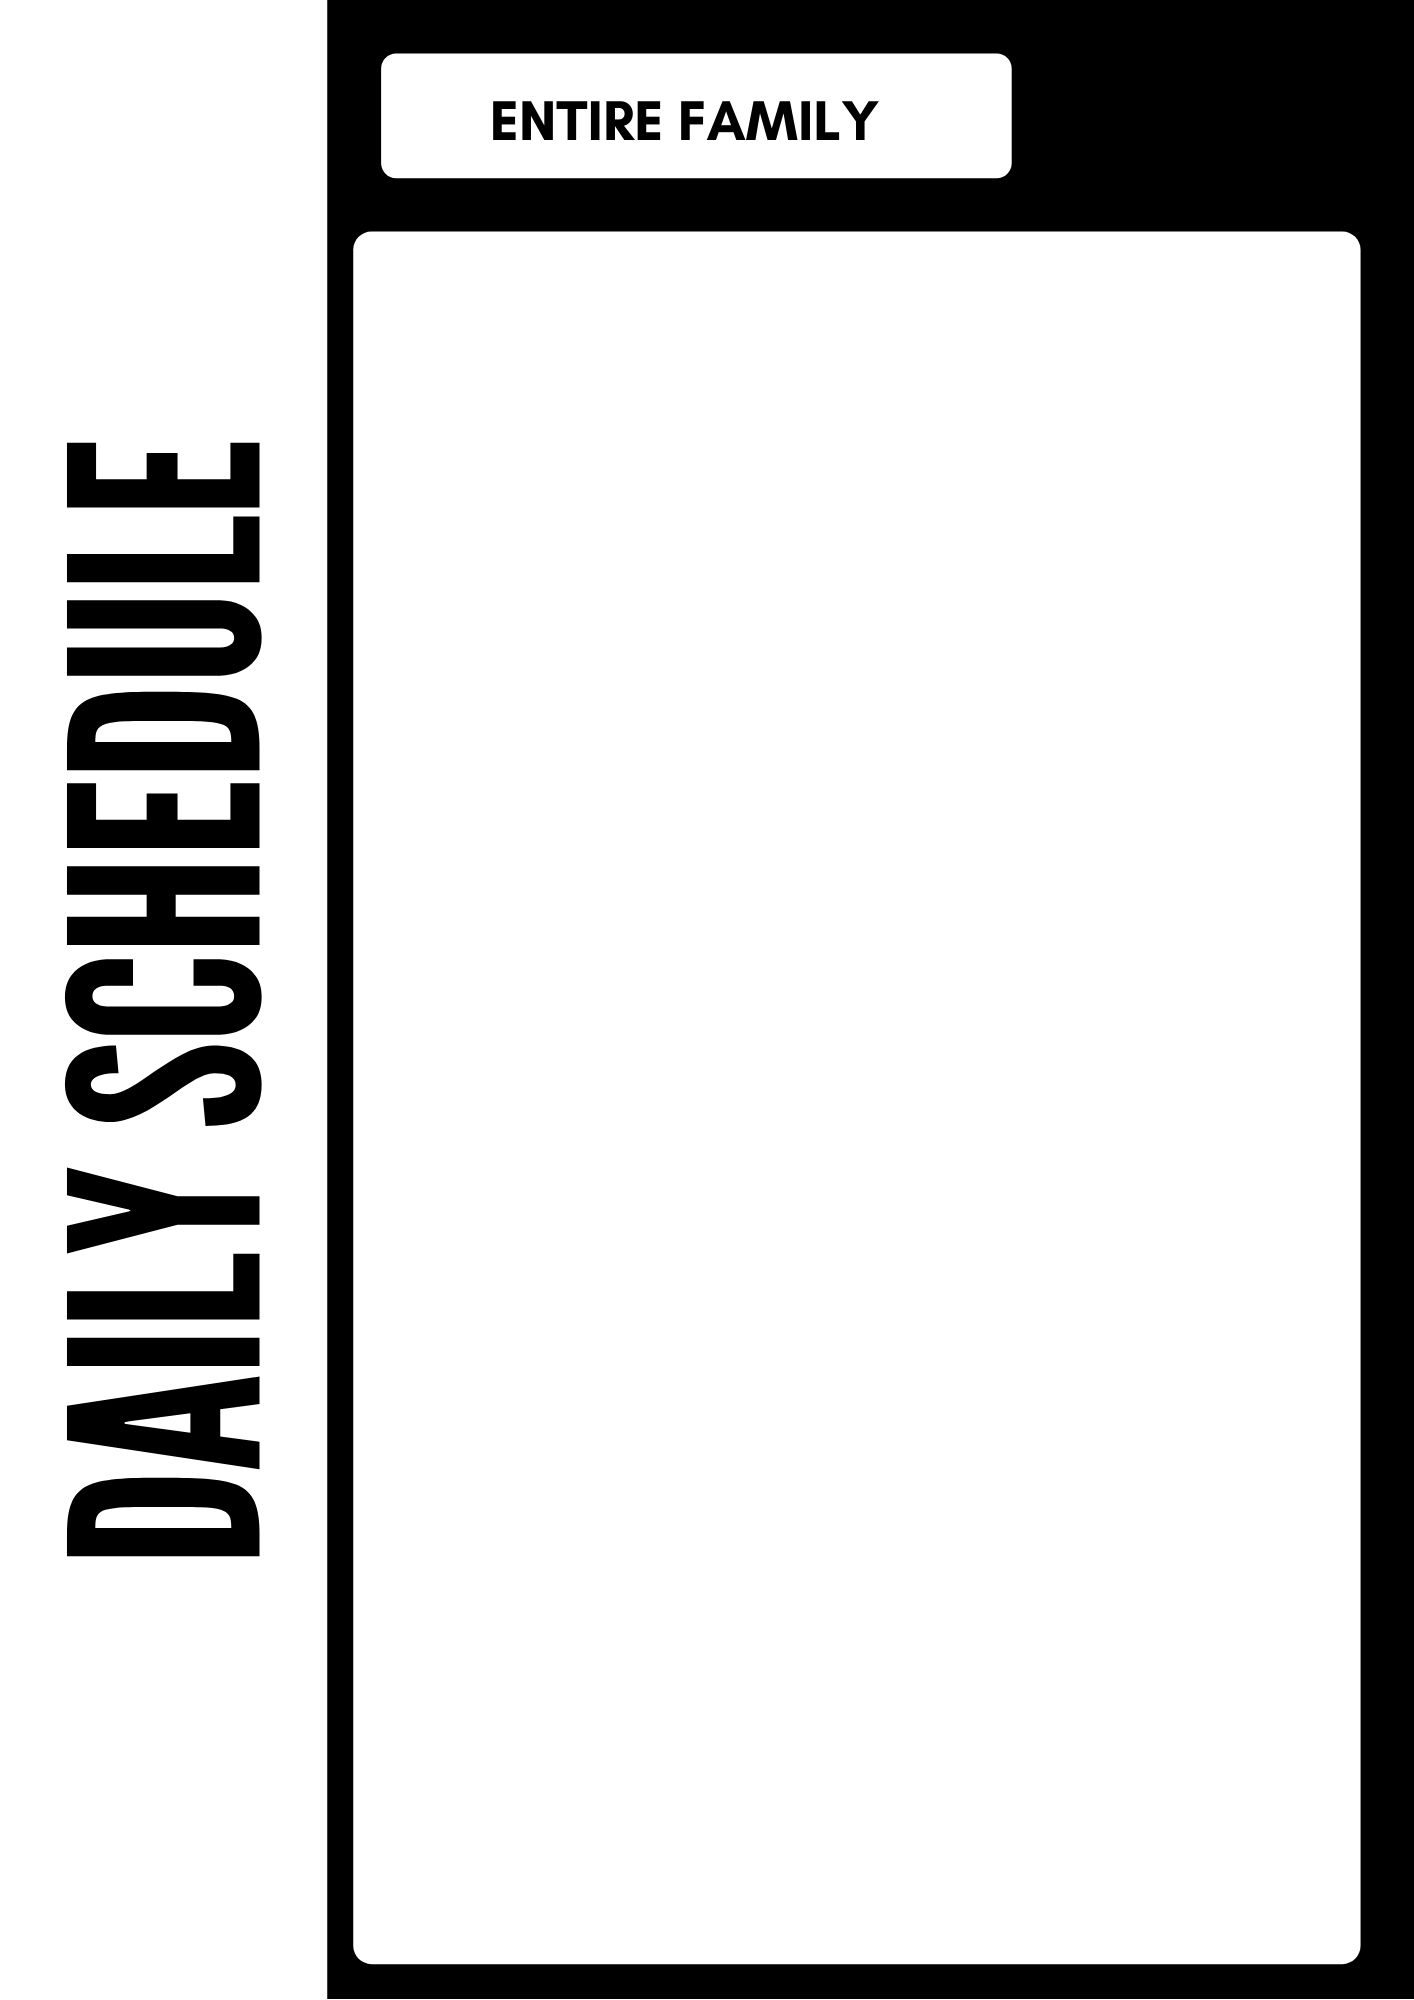
Click here to download a blank daily schedule chart

Tech-Chore Tickets Free Printable Click here to download our printable chore or tech time tickets

Click here to read how we did our chore charts when our kids were small

Looking for more help around the house? Check out these articles!

how to successfully menu plan

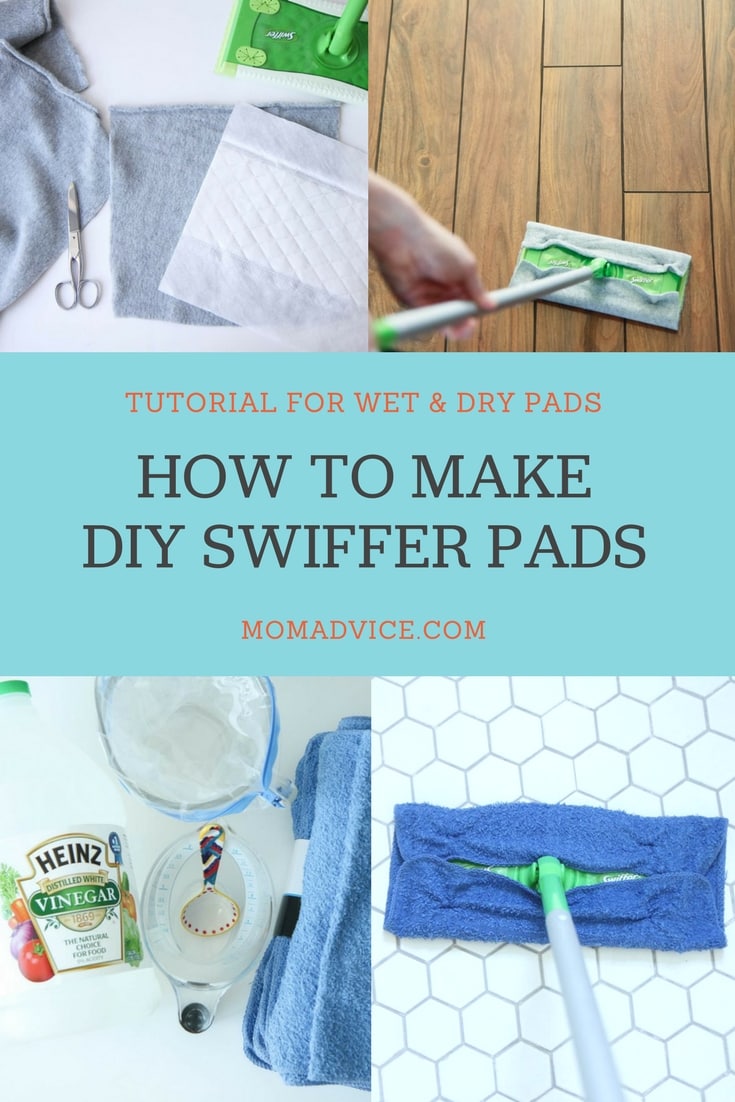
how to make diy swiffer pads

how to clean and stock your refrigerator

How have your cleaning routines changed now that you are all home together? 

Pan Seared Oven Roasted Steak Recipe

Wednesday, February 26th, 2020

Pan Seared Oven Roasted Steak Recipe Header

Tired of paying premium prices for a filet mignon at your local steakhouse? Learn how easy it is to make a steak that tastes just as good at home. Once you master this cast iron skillet method, you can enjoy a weekly steak without the guilt. Try my pan seared oven roasted steak method.

If there is one thing I love, it is creating a restaurant experience in the comfort of my own home with a price tag that fits our budget. 

Today’s post is less recipe and more about a quick and easy way to prepare a sirloin filet (or rib eye steak) at home.

Raw Steak in Skillet

The truth is, if you have a beautiful cut of meat, the last thing you want to do is mask that delicious flavor.

A beautiful steak needs only to be dressed simply with a little oil, salt, pepper, and a butter finish to be more than worthy of your taste buds. This filet mignon recipe is perfect for two and ideal for a small dinner party or date night at home.

I had hoped to have a beautiful picture tutorial for you, but this steak cooks so quickly that I am going to type out my tips instead.

Even with the tomatoes and roasted asparagus as our sides, we still will have dinner ready in about fifteen minutes! 

Pan Seared Oven Roasted Steak Recipe Header

Pan Seared Oven Roasted Steak Recipe

That will be even less time than it would take to haul everyone in the car for a meal out, not to mention the incredible savings you will experience by dining at home in your very own dining room!

Here are my recommendations for that “steak house” experience at home!

Please note, these are directions for cooking a filet mignon.

The same technique can be applied to other cuts

Cooked Filet in Cast Iron Skillet

Pick the Right Type of Pan

Since we are need to sear the steak and then finish it in the oven, you want to make sure that you have a pan that can do this task well.

I love a good heavy-bottom skillet that does not have a plastic handle or a cast iron skillet for this job.

My cast iron skillet has been SO good to me over the years.  

This is definitely a work horse in my kitchen and it is also a great tool to use when outdoor grilling for delicate meats or when mixing up a big batch of fresh veggies so you don’t have to cook in a hot kitchen in the summer.

It has truly been the best $20 I have ever spent and I know that you will feel the same way especially after cooking your steaks on it.

Let Your Meat Rest At Room Temperature

It is really important that you don’t put cold meat into your hot pan. 

I like to pull my steaks out about 30 minutes before I plan to cook them and leave them on my counter.

This helps to heat your steak more evenly and helps prevent the risk of your meat drying out before you have finished cooking it.

Get Your Pan Screaming Hot…Even Hotter Than You Think

If you want a beautiful sear on your meat, you need to be sure that your skillet is hot enough to add that beautiful caramelization on your meat.

Make sure to turn your oven up to high heat and let the skillet warm for five minutes before you begin cooking your meat.

When you place your meat in the pan it should stick and you should hear a nice sizzle on the outside. That’s exactly what you want to hear and see happening to your meat.

Dry & Season Your Meat Well

One of the best tools in your arsenal for creating the perfect steak is a paper towel.

If you want a beautiful sear on your meat, you need the meat to be dry and not wet, otherwise you risk just having your meat steam in its own juices rather than sear.

Dry the meat with a heavy-duty paper towel and then brush the steak with oil.

I love to use canola oil (although you can use olive oil in a pinch) and then season your meat simply with salt and pepper.

Once your pan has to come to that screaming hot phase, drop your seasoned meat into the pan and let it sear for two minutes on each side.

Don’t Move Your Steak

Once you have dropped it in, the first thing I know I want to do is to shift the meat and take a peek at it.

Just don’t.

Let the meat get the golden sear it needs for two minutes on each side, giving it a beautiful crust on the outside, and keeping your meat perfectly pink on the inside.

Butter Makes Everything Better

A butter finish makes all dishes a little more beautiful, don’t you think?

A dab of butter is a beautiful finishing touch to the steak before sliding it into the oven to finish cooking.

Craving a garlic flavor? After you brush your steaks with oil, take a clove of garlic and rub it against the raw steak to add that garlic flavor (without burning Consider making this simple garlic butter compound for your recipes.

Pan Seared Oven Roasted Steak Recipe Finished

Avoid Overcooking

A meat thermometer is your best friend. I still rely on mine for my steaks.

I love my steak to be medium rare, but cook it to the consistency that you love the most.

Keep in mind that Rare is 120 degrees, Medium is 125 degrees, and Medium Well is 130 degrees.

Always Let Your Meat Rest

If you cut into your meat right when you take it off the pan, chances are that all the juiciness will just pour out on your cutting board or plate.

Cover your steak with a little tin foil and let it rest for ten minutes before diving in. 

I promise you will have a much more flavorful bite if you just wait the recommended amount of time.

Another Steak Recipe Option

Prefer to grill steaks? Try this easy steak marinade made with soy sauce, worcestershire sauce, oil, and lemon juice. This is the best steak marinade and perfect for inexpensive cuts like marinated flank steak, strip steak, or a flat iron steak.

Make steak nights quicker by making these freezer mashed potatoes and portion in small portions for reheating in your slow cooker

Pan Seared Oven Roasted Steak Recipe Plated


As an Amazon Associate I earn from qualifying purchases.

Looking for more fun date night meal ideas? Check out these recipes!

Restaurant Style Steak Recipe
 
Recipe Type: Main Dish
Author: MomAdvice.com
Prep time:
Cook time:
Total time:
Serves: 2 servings
Tired of paying premium prices at your local steakhouse? Learn how easy it is to make a taste that tastes just as good at home. Once you master this cast iron skillet method, you can enjoy a weekly steak without the guilt. Once you master this cast iron skillet method, you can enjoy a weekly steak without the guilt. Try my pan seared oven roasted steak method.
Ingredients
  • 2 (10-ounce) filet mignon (you can double this recipe, just make sure you have a large skillet so all the steaks have room)2 tablespoons canola oil
  • Salt & Pepper
  • 2 tablespoons unsalted butter, at room temperature, optional
Instructions
  1. Preheat the oven to 300 degrees F.
  2. Heat a large, well-seasoned cast iron skillet over high heat until very hot, 5 to 7 minutes.
  3. Meanwhile, pat the steaks dry with a paper towel and brush them lightly with canola oil.
  4. Combine the salt and pepper on a plate and roll the steaks in the mixture, pressing lightly to evenly coat all sides.
  5. When the skillet is ready, add the steaks and sear them evenly on all sides for about 2 minutes per side, for a total of 10 minutes.
  6. Top each steak with a tablespoon of butter and place the skillet in the oven.
  7. Cook the steaks until they reach 120 degrees F for rare or 125 degrees F for medium-rare on an instant-read thermometer. (To test the steaks, insert the thermometer sideways to be sure you’re actually testing the middle of the steak. Mine took 4-5 minutes to come to medium rare)Remove the steaks to a serving platter, cover tightly with aluminum foil and allow to rest at room temperature for 10 minutes.


The Best Instant Pot Risotto Step By Step this instant pot risotto recipe couldn’t be easier

Pad Thai Recipe make this pad thai recipe at home


5-ingredient salmon sheet pan meal you only need 5 ingredients to make this salmon sheet pan meal

butter chicken recipe skip the indian takeout and make this butter chicken at home

Happy cooking, friends!

Pan Seared Oven Roasted Steak Recipe Header


10 Minute Fish Tacos

Friday, February 21st, 2020

10 Minute Fish Tacos Recipe header

This quick fish taco recipe is the perfect recipe to get dinner on the table in under 15 minutes. Customize these baked fish tacos with my list of fun toppings. This is a quick and easy dinner that your whole family will love.

Looking for a recipe that you can prepare in ten minutes ? Today I’m sharing one of my tried-and-true weeknight dishes that has become a regular part of our menu rotation.

Are you a big fan of fish tacos?

After having some delicious fish tacos, in California, I wanted to enjoy this fish taco treat at home.

These tacos can be created from any white fish, depending on your family’s preference.

Personally, we are a big fans of tilapia that can be found over in the frozen foods aisle.

Not only is tilapia a mild white fish, it also comes with an affordable price tag.

You can also find some additional white fish ideas in the frequently asked questions below.

This weeknight meal is one that I regularly rely on for a meat-free taco night that our whole family loves.

10 Minute Fish Tacos Recipe

10 Minute Fish Tacos Recipe

To prepare the fish quickly and easily, dice up the fish and put it in a medium bowl.

Toss the fish with your favorite spice blend with olive oil.

Spread the fish on a parchment-lined cookie sheet and then cook it at the suggested temperature for 4-6 minutes.

While the fish is cooking, you can prepare a variety of fun toppings.

10 Minute Fish Tacos Topping Ideas

Fun Taco Toppings To Try

Traditional toppings for tacos are fun, but sometimes the taco night needs a little switch up. Try these topping suggestions to make taco nights more fun!

  • Salsa- Add a combination of black beans, tomato, corn, chopped jalapeno chile peppers, and cilantro.
  • Traditional- Toss shredded cabbage with a little olive oil and lime juice.
  • Asian-  Add broccoli slaw, toasted sliced almonds, and bottled Asian vinaigrette.
  • Fruity- Add fresh fruit salsa made with kiwi, red onion, strawberries, and mango.
  • BLT- Add shredded lettuce, bacon, tomato, and mayo.
  • Caprese- Add basil, cubed tomato, cubed mozzarella cheese, and balsamic vinaigrette.
  • Other Fun Toppings- Add Greek yogurt, jarred salsa, guacamole, limes, hot sauce, freshly cracked black pepper, cheese, thinly sliced radishes, fresh cilantro, and shredded lettuce to your taco condiment bar.
  • Fish Taco Sauce Recipe- Looking for a sauce to add to your tacos? Mix together a 1/2 cup sour cream 1/3 cup Mayo, juice from one lime, and a teaspoon of garlic powder. To spice it up, add a little Sriracha sauce or a generous shake of Old Bay seasoning in your sauce.

Here a few other commonly asked questions about this recipe!

10 Minute Fish Tacos With Lettuce

10 Minute Fish Tacos With Lettuce and Tomatoes

If my family doesn’t like tilapia, what are some other mild white fish options for my tacos?

Flounder, hake and tilapia are all white fish with mild taste.

Looking for other options? Snapper, mahi mahi, grouper, flounder, halibut, or cod are also excellent inexpensive options.

If you want to skip the white fish altogether, salmon can also be a great option. I recommend this easy method for broiling salmon for tacos.

I don’t want to bake my fish. Can you tell me how to prepare fish tacos on the stove top?

You can prepare fish tacos in a skillet, if this works better for your family. Spice up your fish, just as you would for the baked version. Make sure that you pat your fish, with a paper towel, before cooking so that it gets a nice crust. Over medium high heat, cook for 4-5 minutes on each side.

Homemade Tilapia Nuggets for Fish Tacos on Sheet Pan

Can I substitute with frozen fish sticks for my tacos?

Baking the fish, as prepared in this recipe, is healthier and takes a lot less time than preparing fish sticks.

If you prefer to use these, preheat your oven to 475ºF.

Line a baking sheet with foil and arrange the fish sticks on baking sheet.

Sprinkle with the seasonings recommended below and bake for 11-13 minutes.

You can also make your own fish nuggets for taco stuffing. This is our family’s favorite panko crusted tilapia nuggets recipe.

How do I remove the fish odor from my home after baking?

Simmer a small pot of water with a few cut lemons to cut the smell.

I’m also a huge fan of this citrus oil for my diffuser

I use it for kitchen scents AND diffuse it in my office in the mornings to wake me up!

Roasted Corn Salsa

What sides are good with fish tacos?

Personally, we are fans of tortilla chips with salsa and guacamole.

Looking for a fresh spin for dipping?

Try my roasted corn salsa as a chip dip or as a topping for your fish tacos.

If you are looking for other fish taco sides, check out this list of 20 quick and easy sides for fish tacos.


10 Minute Fish Tacos
 
Recipe Type: Main Dish
Cuisine: Mexican
Author: Adapted from Better Homes & Gardens Cookbook
Prep time:
Cook time:
Total time:
Serves: 4
This quick fish taco recipe is the perfect recipe to get dinner on the table in under 15 minutes. Customize these baked fish tacos with my list of fun toppings. This is a quick and easy dinner that your whole family will love.
Ingredients
  • 1- 16 ounce bag of frozen tilapia (or your favorite white fish), thawed
  • 2 tablespoons olive oil
  • ½ teaspoon salt
  • ½ teaspoon ground cumin
  • ½ teaspoon garlic powder
  • 1 teaspoon Old Bay seasoning (found over by the seafood counter)
  • Salt and pepper
  • 1½ cups shredded lettuce, shredded cabbage, tomatoes, lime, or salsa (optional)
  • Taco shell, flour tortillas, or corn tortillas (warmed)
Instructions
  1. Preheat oven to 450 degrees.
  2. Rinse fish, pat dry with paper towels.
  3. Cut fish crosswise into ¾ inch slices and place them in a mixing bowl.
  4. Combine the fish with the olive oil and seasonings, tossing gently. Make sure the fish is throughly coated with the spices and oil.
  5. Dump the prepared fish on a parchment-lined cookie sheet, adjusting the pieces of fish so that none are overlapping. 6. Bake for 4-6 minutes or until fish begins to flake when tested with a fork.
  6. To serve, spoon lettuce and tomato into each taco shell, add fish slices, and top with salsa or your favorite toppings.
 

As an Amazon Associate I earn from qualifying purchases.

I am a RewardStyle affiliate and I earn from qualifying purchases.

Love this recipe? Check out our other favorite meat-free and seafood dinner ideas!

Shrimp Scampi Recipe Header shrimp scampi recipe (can be made gluten-free)

5-ingredient salmon sheet pan meal 5-ingredient salmon sheet pan meal

Mexican Quinoa Stuffed Bell Peppers from MomAdvice.com mexican quinoa stuffed bell peppers (dairy-free and gluten-free)

Herb Baked Tilapia Sheet Pan Meal from MomAdvice.com herb baked tilapia sheet pan meal

Happy cooking!

10 Minute Fish Tacos Recipe Header

The Grace Year Book Club Questions and Reading Guide

Sunday, February 2nd, 2020

  The Grace Year Bookmark Printable

Are you looking for great book club questions for The Grace Year? Look no further than this FREE reading guide that has everything you need to host a great book chat with a thoughtful discussion. We have linked to all of the materials you need to host a book club of your own! 

It was an incredible honor to host our first book chat of 2020 to discuss, The Grace Year. 

We had our highest attendance and participation and even got a surprise appearance by Kim Liggett who raffled off signed copies of her book to our participants. 

The best part about hosting these online is that you can pick up and join in on the chat whenever it is convenient for you. I also leave all events open so even if you read this book months from now, you can still participate and read the book club questions and responses from our members. 

I also wanted to provide our local readers with a reading guide that they can use that has everything they need to host a Grace Year Book Club.

You can print our free reading guide, free bookmarks for attendees, read our author interview, and learn more about this incredible book with all of the resources I have gathered for you.

A big thank you to all of our attendees and to Kim for her generosity and participation in our discussion.

The Grace Year Book Club Questions and Reading Guide

Download The Grace Year Reading Guide


Hosting a Book Club? Check out these other posts for supplemental materials!

The Grace Year Book Club Free Printable Bookmark download our free bookmarks

The Grace Year Book Club Interview With Kim Liggett read my interview with kim liggett about the grace year

January Book Club Pick; The Grace Year by Kim Liggett learn more about the grace year and why it is the perfect 2020 book club selection

MomAdvice 2020 Book Club Selections join our free online book club today

Happy Reading!

The Grace Year Book Club Free Printable Bookmark

DIY Burlap Pom-Pom Wreath

Tuesday, January 28th, 2020

DIY Burlap Pom Pom Wreath Header

A painted wreath form becomes the base to this modern wreath. Burlap ribbon and wired ribbon are gathered into ruffled pom-pom flowers for the festive accents. Throw in an ostrich feather and you have everything you need for this inside out burlap wreath.

The self-proclaimed queen of wreath making is back and I can’t wait to share another wreath tutorial for a modern wire wreath for your front door.

This slimmed down wreath is particularly awesome if you have a glass door and your wreaths get smashed between the two doors.

While I have adorned this for wreath for Valentine’s Day, the metal base can be used over and over again with fresh floral picks, different colors of burlap, or different ribbons.

The possibilities are endless.

The best part about this wreath?

The accessories take just five minutes and don’t require any special pom pom maker to pull of this diy project.

DIY Burlap Pom-Pom Wreath

(don’t forget to download the Rakuten app to save on craft supplies- read all about it or just sign up here and get $10 of your first purchase)

DIY Burlap Pom Pom Wreath Supplies List

DIY Burlap Pom Pom Wreath Supplies List

DIY Burlap Pom Pom Wreath Supplies

Supplies Needed:

18″ Wire Wreath Frame

Metallic Acrylic Paint– pick your favorite shade or use my exact match

Foam Brush

Paper Plate or disposable cup for paint

Ostrich Feather

2 ⅜” Wide Burlap Ribbon (this is linked to exactly what I bought or search for your own favorite colors) NOTE: you will need 9 yards of burlap ribbon to replicate this project

2 ½” Wired Buffalo Plaid Ribbon (this is linked to exactly what I bought or search for your own favorite pattern) NOTE: you will need 8 yards of ribbon to replicate this project

Tape Measure

Cotton Twine (embroidery thread is pictured here, but I found it too fragile)

Embroidery Needle

Hot Glue Gun

Glue Sticks

Vintage Buttons or Vintage Jewelry for Flower Centers

Scissors

Floral Wire (this is the kind I love)

Directions:

Painting a Floral Wreath Frame

Paint your metal wreath with metallic acrylic paint.

You can just brush it on or you can try to create a bit of texture by sponging and then lifting your foam brush to give it a little more texture.

Set aside to allow plenty of dry time for your wreath base. It should take approximately an hour.

Burlap Pom Poms & Ribbon Pom Poms

While your wreath is drying, make 3 burlap pom poms and two ribbon pom poms for your accessories. You will find this step-by-step 5 minute craft tutorial over here.

After your wreath has dried, add another coat (if necessary) or touch up the paint as needed.

Allow to fully dry before proceeding to the next step.

Attaching the Ostrich Feather to Wreath

Once the wreath is dry, we can begin assembling everything for the wreath. 

My wreath form was still drying, but this picture should show you exactly how to do it.

Add your ostrich feather to hug around the wreath and secure it, about 3/4’s of the way down, and then at the base of the feather.

Mapping Out Placement of Burlap Pom Pom Flowers

Once you have your burlap pom poms and ribbon pom poms done, lay them out to figure out the perfect placement.

Remember, odd numbers of accessories are pleasing to the eye.

This wreath has 5 flowers, but you could add 7 or even 9, depending on how large you want the accessories to be.

Using the ends of the twine, on the back of the pom poms, tie your accessories to the wreath form. If necessary, add a dab of hot glue to secure it in place for your wreath.

DIY Burlap Pom Pom Wreath

Painted Wreath Form

DIY Burlap Pom Pom Wreath

DIY Burlap Pom Pom Wreath

That’s it! It is super easy to hang since the wreath form is exposed!

I can’t wait to see your wreaths and I hope this inspires you to create a special wreath for your front door this year!

As an Amazon Associate I earn from qualifying purchases.

As a RewardStyle affiliate I earn from affiliate links.

Looking for more wreath ideas for every season? Check out my favorites below.

fabric floral wreath make a floral fabric wreath out of scrap fabrics

fabric rag wreath make a fabric rag wreath out of scrap fabrics

diy peep wreath turn peeps into a wreath with toothpicks (this lasted FOR YEARS- not kidding!)

How to Make a Yarn Pom Pom Wreath from MomAdvice.com  diy yarn pom pom wreath

(don’t feel like neutral? try this craft with colored pom poms. The multi colored would be so fun for your home and you can use different size pom poms)

burlap wreath tutorial make a burlap wreath for your front door

Happy crafting, friends!

DIY Burlap Pom Pom Wreath


5 Minute Craft: Burlap Pom Pom Tutorial

Monday, January 27th, 2020

5 Minute Craft: Burlap Pom Pom Tutorial Header


This fast burlap craft couldn’t be easier. With just five minutes, you can make these pom pom flowers for wreaths, gifts, or to make into a burlap pom pom garland. Use this tutorial to make your own with burlap or your favorite wired ribbon. This is a perfect kids craft idea or for the beginner crafter in you!

This is that weird time of year, after Christmas, when I’m looking for craft ideas to fill those empty spots in our home.  I decided that it would be wonderful to have a little nod to Valentine’s Day with a new wreath for our front door.

I wanted to create something unique this year so I went to my button jar to see if I had anything to incorporate into a piece for our home.

Vintage Jewelry for Burlap Pom Poms

Vintage Jewelry for Burlap Pom Pom Flowers

Years ago, my grandmother had shared some of my great-grandma’s costume jewelry with me because she thought I might enjoy crafting with it.

In that stash, were numerous gorgeous clip-on earrings that would make the perfect centers for flowers.

Crafting is so much more special with a little history blended in, isn’t it?

Today I’m showing off this easy 5 minute craft to make burlap and ribbon pom pom flowers to adorn a wreath in your house.

I’ll share my full burlap wreath tutorial for you tomorrow, but to get started, you will need to whip up a few of these easy burlap flowers.

5 Minute Craft: Burlap Pom Poms Tutorial

(don’t forget to download the Rakuten app to save on craft supplies- read all about it or just sign up here and get $10 of your first purchase)

Supplies Needed:

2 ⅜” Wide Burlap Ribbon (this is linked to exactly what I bought or search for your own favorite colors)

2 ½” Wired Buffalo Plaid Ribbon (this is linked to exactly what I bought or search for your own favorite pattern)

Tape Measure

Cotton Twine

Embroidery Needle

Hot Glue Gun

Glue Sticks

Vintage Buttons or Vintage Jewelry for Flower Centers

Scissors

Directions for Burlap Pom Poms (or Ribbon Pom Poms):

Cutting Burlap for Pom Pom

Measure 3 feet of burlap ribbon and cut with your scissors.

Cotton Twine for Burlap Pom Pom Flower

Cut a foot of cotton twine. Knot one end, leaving a generous tail, and thread your embroidery needle on the other end of the twine.

Starting the Twine for Burlap Pom Pom Flower

Threading the Twine for Burlap Pom Pom Flower

Fold the rough edge down and then start your running stitch just a little past the tail of the burlap. The reason we are doing this is because it has a tendency to fray and we want to start with a clean line.

Stitching a Burlap Pom Pom Flower

Now we will be doing stitches down the length of the edge.

Gathering Stitches for Burlap Pom Pom Flower

You can feed these individually, or make it quicker by threading back-and-forth and grabbing multiple stitches at a time.

Once you get to the end, remove your embroidery needle.

Threading Twine Through Burlap Pom Pom

Bunching Up Stitches for Burlap Pom Pom

Bunching Up Stitches for Burlap Pom Pom

Now comes the fun part.

Grab the end of the twine (that once held your embroidery needle) and start pulling so the burlap bunches up and starts creating the pom-pom look we are after.

I also like to pull the opposite end to really bring these two sides together into shape.

5 Minute Craft: Burlap Pom Pom Tutorial

5 Minute Craft: Burlap Pom Pom Tutorial

Finishing Burlap Pom Pom With Vintage Jewelry

Now you can see exactly where your center will go to your burlap flower.

Apply your button or jewelry piece to the center of the burlap with a little hot glue.

Finished Back of Burlap Pom Pom

Finish by cleaning up the tails on the back of your pom pom.

For tomorrow’s wreath, we will leave these tails so we can secure these to our wreath.

If you are tying these to something, for example, you’ll just want to leave these tails on.

Prefer to make a pom pom flower out of ribbon? This same technique works with your favorite ribbon.

Starting a Ribbon Pom Pom

For this one, I used 4 feet of ribbon instead.

You can play around with the lengths too. There is no wrong way to do this fun craft.

I picked this buffalo plaid and found the pattern also helped me with spacing out those stitches evenly.

Ribbon Pom Pom Flower

You will do everything the exact same way, but it yields two different texture textures for your pieces.

I will say that I do prefer a wired ribbon because it gives you the ability to fan it out and allow it to really hold its shape.

Finished Ribbon Pom Pom

5 Minute Craft: Burlap Pom Pom Finished

How fun are these?

I hope you love this tutorial as much as me!

Tomorrow I will share how I used these beauties in my wreath for Valentine’s Day!

As an Amazon Associate I earn from qualifying purchases.

As a RewardStyle affiliate I earn from qualifying purchases.

Looking for more burlap or pom-pom crafts? I’ve got you covered!

how to make an autumn burlap wreath from momadvice.com learn to make a ruffled burlap wreath

The Easiest Burlap Wreath You Will Ever Make from MomAdvice.com learn how to make a burlap wreath that you can switch out for the seasons

pom pom flower bouquets learn how to make a yarn pom pom with this pom pom bouquet tutorial

How to Make a Yarn Pom Pom Wreath from MomAdvice.com craft up pom poms for this viral anthropologie inspired pom pom wreath

Happy crafting, friends!

5 Minute Craft: Burlap Pom Pom Tutorial Header


The Grace Year Book Club: Free Printable Bookmark

Friday, January 24th, 2020

The Grace Year Book Club Free Printable Bookmark

Join us for our MomAdvice Book Club as we dig into, The Grace Year by Kim Liggett. Download your free printable bookmark and tie it off with a little red ribbon. This dystopian young adult thriller explores the topic of girls on the edge of womanhood with themes that hit all the right Handmaid’s Tale notes.

The MomAdvice Book Club has started with a bang and the 2020 Book Club announcement yielded over three hundred additional members who have joined the free club.

Our January selection is, “The Grace Year,” by Kim Liggett and I have heard from so many of you how much you have enjoyed this month’s pick. 

For many, I have heard that it has been a long time until a book kept you up until way past your bedtime.  The conversations of exhausted women, who just couldn’t stop flipping those pages, has been just the kind of exhausting story that this bookworm loves hearing about.

The Grace Year Book Club Free Printable Bookmark

Here are some of my favorite comments that were posted in our book club group this month! 

“This book took me back to my early childhood experiences with reading; it took me back to the magic of why I fell in love with books; it completely swept me away, had me staying up to read just one more chapter—just one more chapter; it had me sitting outside of Starbucks flipping page after page, because I just couldn’t wait to see what would happen next. It was an amazing experience, powerful, dark, thought-provoking, and I loved every minute of it! So much ‘meat’ to pull off the bone with this one. I am really looking forward to the January 31st book talk. Thank you for making this the January read.”

“I’m normally in bed by 10, but Oh. My. Goodness. The Grace Year had me up till 3:30! The best book I’ve read since The Nightingale ❤❤. Can’t wait till our discussion!”

“I have read several good and some really good books recently but none that kept me up past bedtime or had me grabbing my Kindle on the way out the door just in case I had any waiting time where I could be reading. Besides that this was a page turner, I loved so many of the messages and things that got me thinking. A real plus when an entertaining story has substance too and isn’t just a fun read for the sake of fun! Thanks, Amy, for this pick!”

“I just finished The Grace Year last night and highly recommend for anyone who loved The Hunger Games!”

“I was up until 2am! Which is not me at all…but I just couldn’t stop reading!”

This is just a snippet of the commentary that was happening around this book. 

Was it everyone’s cup of tea?

Of course not! 

We all have such different tastes in books and that is why I picked so many different genres and books with very different pacing. Some are more character driven, some more plot driven, some slow burns, some fast page-turners…honestly, there is something for everyone this year.

Coming fresh off the holidays, I wanted something that you could devour quickly and that I thought would spur a delicious conversation.

Also in record numbers are the RSVP’s to this month’s book discussion.

137, to be exact, and still counting! 

I am thrilled to see that so many of you have connected with this month’s book and I can’t wait to talk with you about it.

On top of our book club discussion, I will be revealing the responses from a Q&A with Kim Liggett about her book and why she wanted to bring this story to life.

Following the conversation, her answers will be posted here and the Q&A that I’ve developed so you can replicate this one in your own local book clubs.

The Grace Year Book Club Free Printable Bookmark

What is The Grace Year About?

In case you didn’t catch my announcement about our January pick, I’ll give you a quick synopsis (with no spoilers). 

No one actually speaks of the grace year, but this is a rite of passage for all the girls in Garner County.

In this dystopian environment, the men believe that women are able to drive them mad with jealousy because of a powerful aphrodisiac that is emitted from their skin.

Their power to lure grown men,  is why they must be sent to the forest to release their magic into the wild.

To save the men of the county, teenage girls are sent to the forest, to release this, so they can return to their town purified and ready for marriage.

When does their skin emit a powerful aphrodisiac with this potent essence?

Well, unfortunately their sixteenth year releases it and they then must become the grace year girls.

Most girls are resigned to their fate, but there is one girl who thinks this ritual takes her away from a better life.

Sixteen-year-old Tierney James quickly realizes though that these girls aren’t just resigned to their coming-of-age duties…they are out to stop anyone who gets in their way.

The Grace Year Book Club Free Printable Bookmark

The Grace Year Book Club Free Printable Bookmark

As a gift to you, I wanted to share a printable bookmark that was designed just for you by a very talented designer (designer- M.J. from Pars Caeli).

We used the quote, “Your eyes are wide open, but you see nothing,” which was a sentence that stood out to me. Not only is it thoughtful for the plot of this book, but I believe it is  something that we are dealing with in the reality of these modern days.

Please print out this free download, cut it to your desired size, hole punch it, and loop some scarlet ribbon through it. 

I hope you love these freebie as much as I love sharing it.

My goal is to make the book club even more interactive this year and I hope this is just one way I can show my appreciation for your participation.

Click HERE to Download The Grace Year Bookmark 

Love this post? Here are a few others you might love!

January Book Club Pick: The Grace Year by Kim Liggett learn more about our january book club selection (and why you should read it)

MomAdvice 2020 Book Club Selections get the full list of titles for this year’s book club discussions

The Best Books of 2019 from MomAdvice.com not enough books? don’t miss my list of the 20 best books of 2019 for your stack!

Happy reading, friends!

The Grace Year Book Club Free Printable Bookmark


Pin It

Easy Cupcake Liner Holiday Trees

Tuesday, January 21st, 2020

Try this easy DIY with simple styrofoam floral cones and your favorite patterned cupcake liner for ruffles. While this craft is showcasing a Valentine’s Day tree, you can make these for ANY holiday!

Valentine’s Day is one of those tricky holidays that can quickly become awfully cheesy. Although we don’t do a lot of decorating, these cupcake liner trees have a way of making it into our decorating every year.

I thought it would be fun to share this craft with you today because it is such an affordable one that would be perfect to do with your family to celebrate the season.

If you have a mantle or coffee table that could use some festive décor, then you will love this easy and inexpensive project.

What I love about projects like this is that it is such an easy template to follow with so many other holidays. Decorate these foam tree trunks and turn them into Christmas trees, St. Patrick’s Day trees, Easter trees, birthday trees, or whatever else your heart desires.

Can I get a Mom’s Day Off tree to put out so I can get a break?

All you need are $10 in materials and you will have two festive trees in less than thirty minutes. Now that is a craft that I can get behind.

Best of all?

This one is SO EASY that it is a fun one to do with your kids each year. Whether you are on the hunt for Valentine’s Day or a Christmas craft, this one checks all the boxes.

Let’s get started!

Cupcake Liner Holiday Trees

Easy Cupcake Liner Holiday Trees Supplies


Supplies List:

2- 3-7/8 x 8-7/8 inch Styrofoam floral cones

2- 3-7/8 x 11-7/8 inch Styrofoam floral cones

Printed Cupcake Liners (holiday cupcake liners in one color or you can do layers of alternating colors and patterns)

Straight Pins

Scissors

Festive floral pick (I split one between two trees)

Directions for Holiday Cupcake Liner Trees:

Easy Cupcake Liner Holiday Trees Supplies

Cutting Edges Off Cupcake Liners

Cupcake Liner Edges Cut for Tree Remove one cupcake liner from your package and cut off the ruffled edge. For the small trees, you will need 12 ruffled edges and for the larger trees you will need 14-16 ruffled edges.

Attaching Cupcake Liners

Attaching Cupcake Liners Starting from the bottom of your tree, attach a ruffle and pin into place. For the base of the tree, you will be overlapping two ruffled edges to cover the base. Make sure that you secure the pins right at the top of the ruffle so they do not show.

Ruffling the Cupcake Liner Trees

cupcake liners to the top of tree

Repeat the ruffling until you have reached almost the top of the base, leaving just the tip of the base exposed.

attaching top cupcake liner to tree

finishing the top of a cupcake liner tree

scrunching cupcake liner down on tree

Now it is time to finish the top of your tree. Using a full cupcake liner, place it on top and press down to shape it on the top of the tree.

final ruffle on cupcake liner tree

Add an additional ruffle (with no top) around the outside and then pin into place with a pink or red pin.

valentine's day floral picks for top

Finish with a Valentine’s Day floral pick (or a holiday floral pick of your choosing to match your theme). You can now display these on your mantle or place on a cake stand or tray for a unique addition to a coffee table.

Easy Cupcake Liner Holiday Trees

Easy Cupcake Liner Holiday Trees

Easy Cupcake Liner Holiday Trees

I hope you can diy this easy craft and add a little Valentine’s Day festivity to your home. I plan to get these out every Valentine’s Day, they are just that cute!

As an Amazon Associate I earn from qualifying purchases.

Love these holiday cupcake liner trees? Here are a few other great craft projects we think you will like!

DIY String Art Pattern Free Heart Template Header diy string art with free heart template

The Easiest Burlap Wreath You Will Ever Make from MomAdvice.com the easiest burlap wreath you’ll ever make

7 Easy Scarves and Cowls to Knit from MomAdvice.com 7 scarves and cowls to knit (free patterns)

DIY Chunky Knit Blanket from MomAdvice.com diy an affordable chunky knit hygge blanket

Happy crafting, friends!

Easy Cupcake Liner Holiday Trees

Pin It

DIY String Art Pattern (FREE Heart Template)

Monday, January 20th, 2020

DIY String Art Pattern Free Heart Template Header


Looking for a fun craft project that is perfect for Valentine’s Day? With tiny nails, embroidery floss, and our free heart pattern, you have everything you need for your first string art project. Learn how to make your own heart shapes with this easy diy project for yourself (or for your kids).

From our contributor, Sarah Milne

I LOVE gallery walls.

We have a few areas of our home that are littered with frames filled with art and photos, kid art, faux taxidermy and monograms.

I enjoy crafting items to include on the wall to add texture and uniqueness.

We had a vacant angled wall on our landing that I’ve always wanted to do something with since we moved in.

As I collected items, frames, and art for the gallery, I also crafted a few small projects to display. 

On this gallery wall, I crafted the dream catcher (check out this dream catcher tutorial), chalkboard tag, and heart string art on wood.

DIY heart string nail art with free printable template

DIY heart string nail art with free printable template

This simple DIY heart string art on wood project is perfect for a crafternoon while baby sleeps, or an evening of indulging in creative me-time.

And, the end result is beautiful and gratifying, considering it’s quite an inexpensive project.

DIY String Art Pattern (Free Heart Template)

nailart-1

DIY heart string nail art with free printable template

DIY heart string nail art with free printable template

Supplies:

(don’t forget to use your Rakuten app to get cash back on your purchases!)


How To Make Your Heart String Art:

  1. Begin your project by printing this free printable heart template. The heart is already conveniently marked for the positioning of your nails.
  2. Place your heart template on your wood log slice. You can tape the template down for security. 
  3. On a solid surface, hammer the top and bottom nails in to keep your template from shifting. Hammer each nail into the log slice, about halfway, leaving enough space for you to wrap your thread.
  4. Hammer all of your nails along the heart’s border. Remove paper template.
  5. Tie a knot of your thread at the bottom nail head. Begin to randomly strand your tread to the nail heads, looping the thread around once. It’s important to keep tension on your thread the entire time to avoid the thread slipping or unraveling from your nails.
  6. Once you have your thread stranded over the entire heart, try to loop the end of your design at the same beginning point. Tie a knot to secure. Trim thread. I added a simple picture hanger to the back of my wood log slice for hanging.

download the free heart string art template 

DIY heart string nail art with free printable template

nailart4

nailart5

nailart6

nailart8

nailart9

DIY heart string nail art with free printable template

As an Amazon Associate I earn from qualifying purchases.

Love this string art tutorial? Here are a few other great craft projects we think you will like!

DIY Roll-Up Puzzle Mat from MomAdvice.com diy a roll-up puzzle mat to keep your tables clear

DIY Thumbtack Pumpkins from MomAdvice.com turn dollar store pumpkins into a decorative piece with thumbtacks

diy a chunky knit blanket with this free pattern

Happy crafting, friends!

Pin It

DIY Roll-Up Jigsaw Puzzle Mat (Video)

Wednesday, January 15th, 2020

DIY Roll-Up Puzzle Mat from MomAdvice.com


This no-sew felt puzzle mat is the perfect foundation to build your puzzles on, allowing you to relocate your puzzle when you need to. Check out this fun DIY in honor of National Puzzle Day! 

This post was created in partnership with Waverly Inspirations. Thank you for supporting the companies that support our site! 

What shows your love for someone more than something handmade by you?

Today I am sharing a tutorial for an easy no-sew DIY Roll-Up Jigsaw Puzzle Mat that I created for my family.

This mat makes it easy to relocate your puzzle projects when you need to use your table and it’s made with just a few inexpensive materials!

Are you addicted to jigsaw puzzles like us?

My kids are at a fun age right now where we are really enjoying playing board games and assembling puzzles together.

Right now we are tackling 1,000 piece puzzles which feels so ADULT. We haven’t had the courage to go beyond that size yet, but I’m sure we will get there.

Even after our kids have headed to bed, the hubby and I spend time together listening to podcasts or good music, while piecing together puzzles. I find it be quite therapeutic after sitting in front of a screen all day. It helps me decompress in the evening while giving my brain a break from my to-do lists.

To maximize our jigsaw puzzle collection, a couple friends and I trade puzzles after we finish them which has been great because we always have something to work on, while keeping it rather frugal in the process.

Trading puzzles has been a great way to keep our collection fresh and continue to keep our kids interested in putting these together with us.

My only gripe with puzzles is where to relocate them when we need to eat at the table.

We also happen to have a, “helper,” in our house who likes to flip puzzle pieces when her mother is ignoring her (we love you, Lulu the Cat!). I thought a mat might be a great way to discourage our helper and could be a quick way to clear the table for the dinner hour!

Let’s create this easy no-sew roll-up jigsaw puzzle mat!

DIY Puzzle Mat from MomAdvice.com

DIY Roll-Up Jigsaw Puzzle Mat Tutorial


DIY Roll-Up Jigsaw Puzzle Mat from MomAdvice.com

Supplies Needed (all of these supplies can be found at Walmart!)

1 yard of Waverly Inspirations Fabric  (check out the fresh new Valentine’s Day prints,  I picked a classic pink gingham!)

1 yard of felt fabric (any coordinating color)

1 package of Waverly Inspirations Ribbon (any coordinating color)

Cardboard tube (you can use a durable mailing tube, gift wrap roll, or even use plastic PVC pipe)

Razor blade (if cutting to size)

Hemming Tape or fabric glue

Scissors

Waverly Chalk Paint in a coordinating color  and paint brush (optional, but you can paint the cardboard roll to coordinate- I decided to leave mine in its natural state!)

PUZZLES!! (check out my suggestions below for a few of our faves!)


How to Make a DIY Jigsaw Puzzle Mat

DIY Roll-Up Jigsaw Puzzle Mat from MomAdvice.com

1. Much like our reversible seat cushion project, we are going to begin by lining up the two fabrics with the right-side of the fabric facing INSIDE towards each other. That means the wrong sides will be facing out!

Trim your fabric and felt to the same size.

Remember, this mat can be ANY size that you want.

If you want it be the size of your kitchen table, for example, measure that first and use this as your guide for creating your mat. I created a generous mat for our large puzzles!

DIY Roll-Up Jigsaw Puzzle Mat from MomAdvice.com

2. Once your fabric has been trimmed, use your fabric tape and line all the sides , making sure to leave an opening so that you can turn the mat out once you have sealed all the seams.

Using a very hot iron, carefully and slowly, begin ironing to seal the seam (you can see another example of what sealing this seam looks like over here!).

Typically doing this requires pinning, but I did find that the felt held the tape in place and made it an easy project to do without pinning.

Do this along all the sides (make sure you left that opening to turn it out!!) until the two pieces are fused together.

Carefully, turn the right sides out and then finish by sealing that last opening with fabric tape or a little fabric glue.

DIY Roll-Up Jigsaw Puzzle Mat from MomAdvice.com

3. Trim your cardboard tube to the length of your finished mat.

If you want to paint this, you can! I finished each end with a little tied ribbon that can be used to tie the entire mat up when we are storing it.

DIY Roll-Up Jigsaw Puzzle Mat from MomAdvice.com

DIY Roll-Up Jigsaw Puzzle Mat from MomAdvice.com

DIY Roll-Up Jigsaw Puzzle Mat from MomAdvice.com

DIY Roll-Up Jigsaw Puzzle Mat from MomAdvice.com DIY Roll-Up Jigsaw Puzzle Mat from MomAdvice.com

DIY Roll-Up Jigsaw Puzzle Mat from MomAdvice.com

As you can see, you can roll up those puzzles (take your time and roll carefully!) when not in use.

Please keep in mind, it is not recommended for  long-term storage since it can damage your puzzle pieces, but it is recommended for a quick relocation so you can use your table when you need it.

I am so excited to break this in and I’m guessing it is going to be a smart item to take when we rent our summer cottages too!

Looking for a few great jigsaw puzzles? Here are a few of my favorites!

I had one of those puzzle

great classic books puzzle

story time puzzle

nancy drew puzzle

harry potter puzzle

nevertheless she persisted puzzle

harry potter puzzle


video games collection puzzle

old bookstore puzzle

color me puzzle


PS- Seriously, start a puzzle exchange with your friends. You won’t regret it!

Looking for ways to store those jigsaw puzzles? This strategy works so well at our house!

Happy crafting!!

diy-jigsaw-puzzle-mat-9

Do you want more craft inspiration from Waverly? Try these!

DIY No-Sew Reversible Chair Cushions

Fabric Wreath & Matching Garland

Fabric Bulletin Board Tutorial

Painting Pumpkins With Acrylic Paints

DIY No-Sew Hand Warmers

DIY Ottoman Serving Tray

15-Minute Scrappy Fabric Trees

Kid Craft: Easy Technique for Painting Gift Wrap

DIY Phone Charging Station

This post was created in partnership with Waverly Inspirations. Thank you for supporting the companies that support our site! 

DIY Roll-up Puzzle Mat

Pin It