Archive for the ‘Sides’ Category

Slow Cooker Mexican Black Beans

Tuesday, April 29th, 2014

Slow Cooker Mexican Black Beans from MomAdvice.com.

For years I have been wanting to make beans in the slow cooker, but was intimidated with the process. Beans in the slow cooker though are surprisingly easy and frugal to create in large batches for your family. Today I wanted to show you a foolproof and delicious recipe for Slow Cooker Mexican Black Beans for all of your Cinco de Mayo fun, or as a frugal side dish for your next taco night. Today’s cooking tutorial is going to take you through the in’s and out’s of how to cook beans, how to freeze them, and then in the comments below you can share your views on bean preparation. Everyone has a theory, a trick, and a recipe. Let’s share what we know works best for us!

Bean Cooking 101

How to Cook Dried Beans

Why Should You Trouble Yourself With Dried Beans?

There is true convenience in grabbing a quick can of beans for your dishes out of your pantry. Although it is still a frugal staple, dried beans are oh-so-much cheaper and they have much more flavor than the canned variety. Dried beans typically cost two to three times less than canned beans and they have the added benefit of less sodium, more flavor, and can save you a lot of room in a small pantry. Did I mention that they can be made while you are sleeping in your slow cooker? Now that’s a beautiful thing.

When I posted that I was working on this on Instagram, many people commented on their techniques as well as their failures in cooking beans. I guess I am not the only one a little intimidated by the process. Now that I have made them though, I will be making this a regular habit because it saves me a lot of money and is a very filling protein for someone who is on a gluten-free diet and always hungry.

A Little Sorting Never Hurt Nobody

Once you purchase your beans, make sure you sort them out. Arrange dried beans on a sheet pan or clean kitchen towel and sort through them to pick out any shriveled or broken beans, stones or debris. This is not an all-day affair, just a quickly peek and move on to the next steps.

Rinse It, Rinse It Good

Always make sure you rinse your beans really well before beginning. Make sure you also rinse them well after our salt brine (below).

Slow Cooker Mexican Black Beans from MomAdvice.com.

To Soak or Not to Soak

Sounds like a great Shakespeare line, doesn’t it? I know that many people skip the soaking process and opt to just throw them right into the slow cooker after a rinse.  I always consult the experts when it comes to cooking and according to Cook’s Illustrated, quick soaking can be effective, but their proven method of soaking beans in a brine, yields a bean that a girl can really be proud of.  Just as a brine on a bird can yield tasty results, beans can benefit from salt too. The salt soak prevents magnesium and calcium from binding to — and, subsequently hardening — the cell walls on your beans. When people  complain that they can never get the beans to soften, you can be assured that a brine can help with that, while maintaining the shape of your beans.

Cook’s Illustrated recommends, for 1 pound of dried beans (about 2 cups) dissolve 3 tablespoons of salt in 4 quarts of water. Add the rinsed beans and let them soak at room temperature for at least 8 hours or up to 24 hours. (If you’re short on time, quick-soak the beans: Place the beans in a large heatproof bowl. Bring 2 quarts of water and 3 tablespoons of salt to a boil. Pour the water over the beans and let them soak for 1 hour before draining and rinsing.)

As far as salting goes for your beans for seasoning though, it is advised to wait until the end and salt once they are cooked and season to taste. You also want to be sure that you are rinsing that brine off before you get started with your recipe.

Slow Cooker Mexican Black Beans from MomAdvice.com.  Cook Them Low & Slow

Since beans need to be cooked low and slow, the slow cooker is ideal for cooking your beans. Once you have rinsed these after the salt brine, add them to your slow cooker along with liquid and seasonings of choice and turn your slow cooker on Low and head to bed.  Skip the addition of anything acidic though because the acid can prevent those beans from breaking down and it’s all about getting these beans to break down.

I cooked mine in my Ninja Cooker and set it for six hours and it set’s itself to warm after that.  The beans should take roughly six to eight hours to cook and slow cookers can be the ideal tool for cooking them. According to The Kitchn, it’s adviseable to pick a slow cooker that fits best with the amount of beans you are cooking. They advise that for small batches of beans, a pound or less, to rely on a 3 1/2-quart or smaller slow cooker. If cooking 2 pounds or more, you can use your 7-quart slow cooker.

Slow Cooker Mexican Black Beans from MomAdvice.com. Freeze Those Beans

Once the beans are done, divide them up into two cup portions in freezer bags and put them in the freezer.  You can now enjoy the savings all month long and enjoy these beans as a side or accompaniment to any of your favorite Mexican dishes.

I hope this tutorial helps and I can’t wait to read your own tips for cooking beans in the comments below! These would be delicious paired with my favorite 10-minute fish tacos, our chicken enchiladas (made with homemade enchilada sauce), my roasted corn salsa, and a tall margarita or mojito…just in case you are looking for a few great dishes for Cinco de Mayo!

Slow Cooker Mexican Black Beans from MomAdvice.com.

SAFETY NOTE: If you are cooking kidney beans, boil them for 10 minutes before cooking. This neutralizes a toxin called phytohemagglutinin that can cause acute digestive distress.

Slow Cooker Mexican Black Beans
Author: Amy Clark
Prep time:
Cook time:
Total time:
Serves: 6
Be sure to read our Bean Cooking Tutorial before you begin! These beans make the perfect side dish for any meal!
Ingredients
  • 1 pound dried black beans
  • 6 cups chicken or vegetable broth
  • 6 cloves garlic, smashed and chopped
  • 1 tablespoon cumin
  • 1 tablespoon chili powder
  • 1 (14.5-ounce) can diced tomatoes, or 2 cups fresh chopped tomatoes (ADD AT THE END)
Instructions
  1. Follow the instructions for sorting, rinsing, brining, and then rinsing again as I have outlined above.
  2. Put the drained beans into your slow cooker, then add the chopped garlic, broth, cumin, and chili powder. Stir well to combine.
  3. Set on LOW for six to eight hours in your slow cooker (see above for recommended slow cooker sizes based on pounds).
  4. Once they are done, stir in diced tomatoes and season.
This post contains affiliate links.

What’s your favorite way to cook beans? Any tips, tricks, or techniques that work well for you?

Pin It

Mama Francesca Cheese & Cheese Dusted Olives

Thursday, April 17th, 2014

Mama Francesca Cheese Review


*This post is sponsored by Mama Francesca

Last month I mentioned my partnership with Mama Francesca Grated Cheese. I am excited to share another fun recipe idea that you can create in your kitchen and this one happens to require very little cooking, but is an impressive appetizer to add to your next get together or antipasto platter.

Mama Francesca  is a delicious grated cheese that comes in six different flavor varieties including Aromatico (Parmesan, Basil & Oregano), Fiero (Parmesan & Red Pepper), & Pungente (Parmesan & Garlic), Audace (Parmesan & Romano), and Perfetto (Classic Parmesan).

Mama Francesca Terzetto Cheese

You can also find the Terzetto (Parmesan, Asiago & Romano).  The best part is that these can all be found on the shelves of your local Walmart stores, including the new Terzetto which will be available at Walmart on April 21st!

Did you catch last month’s delicious Gluten-Free Pasta & Meatball recipe? I hope you didn’t miss it because I have already made it a few times since I shared it!

For inspiration for this month’s recipe, I looked on the Mama Francesca website to create a dish to share with you. The site offers a variety of recipes and when I happened upon a recipe for Cheese Dusted Olives…well, be still my beating heart, because I am already in love just from the title alone.

 Cheese Dusted Olive Recipe

Have you ever infused oils before? It truly makes any dish a showstopper and it is just a simple technique of adding herbs and any desire of flavoring to heated oil and allowing it to infuse into it. I do this with my husband’s favorite roasted shrimp, but had never thought to do this with olives. It changes the taste of the olives completely and adds that special wow factor to your antipasto platters.

The oil is infused with lemon and thyme and then poured over your olives on a platter (or a martini glass like me!)  and finished with your favorite cheese blend. I wanted these to have a little garlic bite to them so I used the Pungente (Parmesan & Garlic) to add that cheesy garlic flavor that I love.

I rounded out my antipasto platter with salami, prosciutto, and fresh grapes- all delicious and all, happily, gluten-free snack options.

 Cheese Dusted Olive Recipe

Since getting a babysitter is expensive, I am always looking for date night experiences at home. In the summer months, we enjoy an antipasto platter outside and chat after the kids head to bed. In the winter months, this is best served with a great Netflix documentary or board game for a fun evening in.  To round out the evening, this gluten-free meatball recipe I shared last month would also be a beautiful accompaniment as your evening appetizer!

I have stopped thinking of these things as special occasion foods, but an investment into our relationship and time together.

I hope these posts about Mama Francesca have inspired you to pick up a few varieties of cheeses to try and I hope you can give these delicious Cheese-Dusted Olives a spin for a fun date night in!

 Cheese Dusted Olive Recipe

Cheese Dusted Olives
Recipe Type: Appetizer
Author: Mama Francesca Premium Cheese Website
Prep time:
Cook time:
Total time:
Serves: 8
An effortless & easy appetizer for lemon & thyme infused olives dusted with cheese.
Ingredients
  • ¼ cup Mama Francesca Parmesan Audace (or your favorite Mama Francesca cheese variety)
  • 2 cups Favorite Olives, rinsed
  • ½ cup Extra Virgin Olive Oil
  • 2 sprigs Thyme
  • 1 Lemon, strips of peel only
Instructions
  1. In a small sauce pan, heat oil over medium for 3 minutes, until warm, remove from heat.
  2. Place thyme and lemon peel in oil, let stand 1 hour.
  3. Once cooled, pour infused oil over olives on a platter.
  4. Sprinkle with Mama Francesca cheese.


 *This post is sponsored by Mama Francesca


Pin It!

Tracking Pixel

Pin It

Pulled Pork Stuffed Sweet Potatoes

Monday, January 27th, 2014

Pulled Pork Stuffed Sweet Potatoes

As Super Bowl Sunday quickly approaches, I wanted to share with you a gluten-free Super Bowl dish you can share for your game day eating.

This month Walmart asked me to share a fun Super Bowl dish that you can create from items in their grocery section. I will admit, that coming up with a dish that was both dairy-free AND gluten-free for my game day feast was a challenge to me. I am the girl that hovers over the creamy dips and loves a sub sandwich for my game day feasting.

When I thought about recipes I could share (and eat!) though, I settled upon my favorite pulled pork recipe that can be created in your slow cooker. This pulled pork is so easy to make because you simply put your pork butt or shoulder in your slow cooker with a little root beer and let it cook all day. And that is pretty much it!

I told you it was easy!

Gluten-Free Sweet Baby Ray's

My favorite sauce has (and always will be) the super delicious Sweet Baby Ray’s. Since going gluten-free, I have become insane about label reading especially when it comes to my condiments. I was so happy to discover that all of the Sweet Baby Ray’s sauces are gluten-free and you can, of course, find them at Walmart in the condiment aisle.

One of the things people warned me about when I started this journey was to always label-read especially when it comes to my condiments. I have found I don’t need to go to my specialty markets if I do the proper research on the items I need before I leave. For example, here are 7 condiments you may be surprised to find are gluten-free!

As we discovered when Emily baked my birthday cake, the offerings for gluten-free items are becoming more mainstream at our Walmart store!

Pulled Pork Stuffed Sweet Potatoes

I don’t know why I had not thought to pair pulled pork and a sweet potato together before, but it is the absolute best flavor combination EVER. Using my technique for perfect baked potatoes, I like to coat mine in olive oil and to sprinkle them liberally with kosher salt.

Once they have cooked, I split them and pile in sweetly seasoned pulled pork. You can hollow out a bit of the potato, if you need to, but I just stack the meat as high as it will go. Stick a fork in it, and you are ready to enjoy the game with your favorite beverage and a filling dinner!

If you are entertaining, pile these on a long platter with forks as a fun game day dish! I promise this will be a dish that is loved by ALL, not just your gluten-free friends!

Pulled Pork Stuffed Sweet Potatoes

Pulled Pork Stuffed Sweet Potatoes
 
Recipe Type: Main Dish
Author: Amy Clark
Prep time:
Cook time:
Total time:
Serves: 8
An easy gluten-free & dairy-free game day dish you can share with friends, made easily in your slow cooker.
Ingredients
  • 6-8 sweet potatoes, scrubbed & pricked with a fork
  • Olive Oil
  • Kosher Salt
  • 1 (4 pound) Boston butt (or pork shoulder)
  • 1 (12 fluid ounce) can or bottle root beer
  • 1 (18 ounce) bottle your favorite barbecue sauce (we love Sweet Baby Ray’s)
Instructions
  1. Place the pork meat in a slow cooker; pour the root beer over the meat. Cover and cook on low until well cooked and the pork shreds easily (approximately 8-10 hours).
  2. Shred the meat and drain the root beer from the slow cooker. Stir in barbecue sauce and toss gently.
  3. Preheat your oven for 400 degrees.
  4. Rub your cleaned sweet potatoes with olive oil and sprinkle liberally with kosher salt. Do not wrap in foil, so you can get a crisp skin.
  5. Bake for 45 minutes to 1 hour, depending upon the size of your potatoes.
  6. Let potatoes rest for five minutes. Cut a slit in the top and stuff with the pulled pork.


Looking for more great game day food, check out these Slow Cooker Honey Bourbon Chicken Wings & these 12 Great Tailgating Recipes for your game day feasting!


walmart_mom_disclaimer

Pin It

Sausage & Vegetable Frittata

Sunday, December 29th, 2013

Easy Sausage & Vegetable Frittata from MomAdvice.com.

Happy holidays, everyone! I can’t believe another new year is upon us!  Today I want to share with you an easy sausage & vegetable frittata recipe that just so happens to be both dairy-free & gluten free. This easy frittata has become my go-to dish this week as I transition into some new healthy eating habits.

First, I just want to thank you all for the kind & supportive words you shared on yesterday’s post. It helped me to reaffirm that the direction we are headed in is a good one. Change is hard, both as someone who has always had creative control and as a reader, but I am hoping these changes will bring in a whole new audience and give me some time to focus on growing our website.

I will admit that one the hardest switches for me, since giving up gluten, has been figuring out what to eat for breakfast. I am not much of a breakfast eater and every morning I would have a slice of bread smeared with peanut butter and then head to the gym. Although I picked up a loaf or two of gluten-free bread (and am considering testing out some recipes for my own),  I am still acquiring a taste for bread that tastes like cardboard. It just does to me, but I understand that I will adapt at some point!  I also have to admit that I find it a lot less filling than the whole grain toast I used to eat so I have been looking for alternatives that would jumpstart my morning without being hungry an hour later.

Easy Sausage & Vegetable Frittata-4

This frittata recipe fits the bill perfectly and I am able to use up whatever we have in our vegetable crisper to make a unique combination so I don’t get bored. The best part about this frittata though is that it reheats beautifully for those days when I am struggling to figure out what to eat in the afternoon or for a quick weeknight dinner paired with a salad. I will admit, I ate an entire one in the span of 24 hours. I feel nourished, full, and it is so easy to make.

This was the first time I used shredded sweet potatoes in a frittata. Have you ever tried that? Using the same technique as my laundry detergent recipe, you just use the cheese grater on your food processor to create shredded sweet potato hash. Although the flavor is mild, I found that it acted well as a binder with the absence of cheese in this one.

If you are cooking in a cast iron skillet (this is the inexpensive one I use- affiliate link!), you may need to cook it a tad longer. That being said, the cast iron skillet is my new best friend for fast frittatas and using it reminds me of many a morning of bacon & eggs in my Southern great-grandmother’s kitchen.

This is my new favorite dish and I am planning to make another one today- I really love it that much! I hope you love this one too!

amy_signature Easy Sausage & Vegetable Frittata

Sausage & Vegetable Frittata
Recipe Type: Breakfast
Author: Amy Clark
Prep time:
Cook time:
Total time:
Serves: 4
I love this easy one pan frittata for a delicious brunch or for lunch paired with a salad. The best part is that it is a gluten-free & dairy-free treat that can be enjoyed by all! Don’t be limited to these ingredients though. Check your vegetable crisper and incorporate any types of veggies (or meats) that you need to use up for a unique combination of your own.
Ingredients
  • 2 tablespoons coconut oil
  • 1/2 pound Italian sausage, uncooked
  • 1 small sweet potato, scrubbed and shredded (1 cup). I use my food processor for shredding these.
  • 1 red bell pepper, diced
  • 8 eggs
  • 1 teaspoon milk (or milk alternative like coconut, rice, or almond milk)
  • 1/2 teaspoon salt
  • 2 Roma tomatoes sliced
  • Handful of fresh Italian Parsley, chopped
Instructions
  1. Preheat the oven to 350 degrees.
  2. Heat the oil in an oven-safe skillet over medium heat.
  3. Add the sausage, sweet potato, and red pepper and cook these four 4 minutes.
  4. Beat the eggs with the milk. Season with salt. Pour these into the skillet and cook for three minutes, stirring when first adding to combine all the ingredients.
  5. Sprinkle the frittata with fresh parsley and then arrange the tomato slices in a circular pattern on top of the eggs.
  6. Place the frittata in the oven and bake for 12-15 minutes.

Adapted from Against All Grain (affiliate)


gluten-free-125

Participating for the first time in this week’s gluten-free recipe round-up on Musings of a Housewife!

Pin It

2 Ingredient Cranberry Pancake Syrup

Monday, November 25th, 2013

2 Ingredient Cranberry Pancake Syrup

Continuing with our Thanksgiving theme this week, today I wanted to share an easy recipe for Cranberry Pancake Syrup made from your leftover cranberry sauce. This cranberry pancake syrup recipe is made from two simple ingredients; your leftover cranberry sauce and maple syrup.

Walmart challenged me to create a recipe using some of our Thanksgiving leftovers and I immediately thought of this idea that I had for our leftover cranberry sauce.

Brandied Orange & Cranberry Sauce

This was the first year that I made my own cranberry syrup for Thanksgiving and I loved it so much that I wanted to use it as an ingredient in another dish that we could share after the holidays were over. This Brandied Orange & Cranberry Sauce was so heavenly that I knew it would be the perfect accompaniment with a big stack of pancakes.

2 Ingredient Cranberry Pancake Syrup

I couldn’t put this sauce on just any pancakes though, it had to be our family favorite- the Fluffy & Light Pumpkin Pancakes that we share (almost) weekly on Sundays in the autumn months.

When the pumpkin and cranberry are combined together, it is like experiencing Thanksgiving Day all over again! I hope you can give these a try with your own leftover cranberry sauce. I promise, it is a recipe that will not disappoint!

2 Ingredient Cranberry Pancake Syrup

Cranberry Pancake Syrup
Recipe Type: Condiment
Author: Amy Clark
Cook time:
Total time:
Serves: 4
An easy two ingredient pancake syrup that can be created from leftover cranberry sauce. Add this delicious syrup on top of a stack of Pumpkin Pancakes for a festive spin!
Ingredients
  • 2/3 cup cranberry sauce
  • 1 cup maple syrup
Instructions
  1. In a saucepan mix together cranberry sauce and maple syrup and heat until warm.
  2. Serve on top of your favorite pancakes.

What is your favorite dish to create with Thanksgiving leftovers?

walmart_mom_disclaimer

Pin It

Lemony Spinach & Tomato Quinoa Salad

Monday, October 14th, 2013

Lemony Spinach & Tomato Quinoa Salad

If there is one ingredient I love it is lemons. There is something about that citrus addition that brightens flavors so much. Today I am sharing my favorite Lemony Spinach & Tomato Quinoa Salad that is one of my favorite ways to use lemons in my house.

Lemony Spinach & Tomato Quinoa Salad

More importantly though, we are celebrating this citrus ingredient today in honor of a very special blogger that I have truly grown to love and her beautiful blog, “The Lemon Bowl.”  I am so excited to be celebrating Liz in a virtual baby shower today with so many amazing bloggers to share in this celebration.

If you haven’t visited The Lemon Bowl before, you are in for a treat. Liz creates the most delicious dishes and finds new ways to make healthy dishes seem absolutely sinful. She is one of my favorite food bloggers to follow on Instagram and you will often find her in recipe development or shopping at the local farmer’s market through her photo stream.

Everyone that is participating will be using lemons in some way whether it is a delicious side, a soup, an appetizer, or a dessert. Lemon is one of the most versatile ingredients and the zest and juice from lemons are often my secret weapon in making the dishes I create stand out.

Lemony Spinach & Tomato Quinoa Salad

Today I wanted to share my favorite lemon recipe that I love to create and share at potlucks, cookouts, and just as a quick and healthy lunch for myself. As you know, I am quinoa-obsessed these days. With the ease of preparing quinoa in the rice cooker, I love to make big batches of it to use in my dishes throughout the week.

This Lemon Spinach & Tomato Quinoa Salad gets all of its flavor from the zest and juice of a lemon. Tossing the quinoa with my favorite combination of spinach and tomatoes, a drizzle of olive oil, and just a little salt and pepper makes this dish both easy and very budget-friendly.

If you want to add even more protein to this, consider adding a little roasted chicken breast (I love this method of preparation)  or dice a little chicken using a prepared rotisserie chicken. Thanks to using quinoa in this, rather than pasta, you already have a protein-filled dish that doesn’t even need the meat.

If you are looking for more ideas to create with quinoa check out my Mexican Quinoa Stuffed Bell Peppers, my Greek Quinoa Salad, these Quinoa- Berry Breakfast Bowls, and the super delicious Pumpkin Nut Quinoa Breakfast that is just perfect for Fall. Don’t you just love how versatile this ingredient is?


Lemony Spinach & Tomato Quinoa Salad

 Want to join in on the virtual baby shower? Here is a list of all of the amazing participants and their delicious dishes that they created in honor of Liz and her new baby:

Appetizers

Beverages

Salads

Main Dish

Desserts

Lemony Spinach & Tomato Quinoa Salad
Author: Amy Clark
Prep time:
Cook time:
Total time:
Serves: 6
An easy gluten-free salad that is always a crowd-pleaser!
Ingredients
  • 1 pound spinach, washed, dried, stems removed
  • 1 pint grape or cherry tomatoes, halved
  • 2 lemons, zested (reserve the lemons for juicing over the pasta)
  • 2 cups cooked quinoa (use the technique I shared above)
  • 1 tablespoon extra-virgin olive oil, 1 turn of the bowl
  • Salt and pepper
Instructions
  1. Prepare quinoa in your rice cooker or as directed on packaging.
  2. Pile spinach leaves in stacks 1 on top of the other. Thinly slice stacks of leaves to make spinach confetti. Pile shredded spinach into the bottom of a medium sized mixing bowl.
  3. Halve grape or cherry tomatoes with a paring knife and add them to the mixing bowl.
  4. Add the zest of 2 lemons to the bowl reserve the lemons for adding juice to the sauce later.
  5. Add hot cooked quinoa to the mixing bowl. The heat of the quinoa will wilt the spinach and warm the tomatoes at the bottom of the bowl and get the juices flowing from veggies. The heat of the quinoa will also release the flavor and oils in the lemon zest.
  6. Drizzle 1 tablespoon extra-virgin olive oil and the juice of two lemons over the quinoa and toss to combine the veggies and quinoa.
  7. Add a generous amount of salt and pepper to taste. Toss the ingredients together to combine.
  8. Serve with grated parmesan cheese or leave plain if you are taking the salad on the go.
Pin It

A Happy & Healthy Halloween Night Feast

Tuesday, October 8th, 2013

Googly Eyed Apples for Halloween from MomAdvice.com.

Googly Eyed Apples for Halloween from MomAdvice.com.Who is ready for a happy & healthy Halloween feast? Halloween is just around the corner and this year Kenmore has you covered with an easy Halloween dish and treat that you can enjoy with your family before or after your trick-or-treating has begun. That’s right, there is no need to order a pizza or stress out about festive snacks, at least not this year!  This year I am sharing an easy slow cooker recipe idea and a treat that is not only healthy, but also a festive addition to your dinner offerings!

Head on over to the Kenmore blog to find a recipe and tips for throwing a happy and healthy Halloween feast this year!

Pin It

Slow Cooker Pumpkin Chili

Monday, September 23rd, 2013

Slow Cooker Pumpkin Chili

Chili weather makes me oh-so-happy and today I am featuring a Pumpkin Chili recipe that you just have to try this year in your slow cooker. Yes, you heard me right, Pumpkin Chili is my new favorite chili and once you try this pumpkin chili recipe, you will be singing its praises too.

I am one of those people that gets settled into her old routines when it comes to recipes especially recipes that I just don’t think they should be fooled with. Chili is one of those types of recipes, yet, I have found myself on the hunt for fresh new pumpkin recipes and just knew that I had to try out this idea for Pumpkin Chili.

After stumbling upon a recipe, trying to take it completely apart, playing with spices, and then switching out the ingredients until they pleased me, I now have a version of Pumpkin Chili that is all my own.

Don’t be scared of the pumpkin because chances are that you won’t even notice the pumpkin flavor. No, all the flavor for this one comes from the pumpkin pie spices that are incorporated within in it. Much like my Creamy Pumpkin Pasta recipe (you MUST try that!), it just leaves everyone going, “Hmmmm…What is that?!”

Basically, when you lean in to smell the chili in your slow cooker, it will smell like pumpkin pie, but you will see chili in there and get super confused. And then it will all work itself out when you taste it, and then might be a tiny bit confusing, but then you will realize that it is perfectly genius together.

And all will be right with the world again.

I hope you enjoy this recipe as much as I have. In fact, I am making my second batch of that this week along with another batch of Slow Cooker Stuffed Green Pepper Soup, another slow cooked wonder that I highly recommend.

If you are looking for another great chili recipe, be sure to check out my White Chicken Chili for another fun variation!

Happy slow cooking, friends!

Slow Cooker Pumpkin Chili

Slow Cooker Pumpkin Chili
Recipe Type: Slow Cooker
Author: MomAdvice.com
Prep time:
Cook time:
Total time:
Serves: 6
Once you try this chili, you will never make any other type of chili again. Pumpkin and pumpkin pie spice are the secret ingredients that make this chili a standout recipe and make your guests go, “Hmmm…What is that?”
Ingredients
  • 1 pound lean ground beef
  • 1 pound lean ground turkey
  • 1 large onion, diced
  • 1 red bell pepper, diced
  • 2 (15 ounce) cans kidney beans, drained
  • 1 (46 fluid ounce) can tomato juice
  • 1 (28 ounce) can peeled and diced tomatoes with juice
  • 1 (15 ounce) can pumpkin puree
  • 1 tablespoon pumpkin pie spice
  • 1 tablespoon chili powder (or adjusted to your own level of heat)
  • 2 tablespoons brown sugar
Instructions
  1. In a large pot over medium heat, cook beef and ground turkey until brown; drain.
  2. Stir in onion and bell pepper and cook 5 minutes. Transfer ingredients to your slow cooker.
  3. Add in beans, tomato juice, diced tomatoes and pumpkin puree.
  4. Season with pumpkin pie spice, chili powder and sugar.
  5. Put lid on slow cooker and cook on low for 4-6 hours.
  6. Serve in bowls with a variety of your favorite toppings.


Pin It

Big Batch Toasted Cheese Sandwiches

Monday, September 9th, 2013

Big Batch Toasted Cheese SandwichesDid you know that it is possible to make big batches of toasted cheese sandwiches in no time flat? Today I want to share with you my secret for making a big batch of toasted cheese sandwiches in your oven which is one of my best little hostess party trick for entertaining a crowd.  You can also refer to it as your lunch lady trick. I am a little bit of both of those around here.

One of our favorite ways to entertain in the Fall months is with a big pot of soup or chili and a loaf of crusty bread or grilled cheese sandwiches. If you are entertaining a crowd, manning the griddle for a big group can take you away from really enjoying your guests and honoring a million different types of cheese or sandwich filler requests can also be overwhelming. Instead of doing that, try this strategy for toasting up your sandwiches

It is so easy that it is embarrassing to provide a recipe for you. Simply butter both slices of bread, stick your favorite cheese or add-in’s into the sandwich, cook at 450 for 6-8 minutes, flip and then cook for 6-8 more minutes. The end.

What you will get it is super HOT toasted cheese sandwiches, evenly toasted bread on the outside, and the gooey cheese inside you are after.

I hope you can give this trick a try in your kitchen!

Big Batch Toasted Cheese Sandwiches

Big Batch Toasted Cheese Sandwiches
Author: MomAdvice.com
Prep time:
Cook time:
Total time:
Serves: 6
An easy way to make toasted cheese sandwiches for a crowd
Ingredients
  • 12 slices of bread
  • 6 slices cheese (choose your favorite)
  • 8 tablespoons butter
Instructions
  1. Butter each side of the bread slices with butter and place on a baking sheet.
  2. Place cheese on each slice of bread.
  3. Top with remaining bread.
  4. Bake in preheated oven for 6 to 8 minutes at 450.
  5. Flip the sandwiches, and bake an additional 6 to 8 minutes, or until golden brown.
  6. Side Note- You can double this recipe if needed!


Pin It

Slow Cooker Honey Bourbon Chicken Wings

Tuesday, August 27th, 2013

Slow Cooker Honey Bourbon Chicken Wings from MomAdvice.com.With the Fall comes all of the game time festivities and today I wanted to share a slow cooker chicken wing recipe that you can enjoy at your next game day festivity. These Slow Cooker Honey Bourbon Chicken Wings are the perfect balance of sweet and spicy and are one of my favorite game time recipes I love to share with my family.

Walmart asked me to share a fun game time recipe with you and also would love to remind you that they are a one-stop-shop for all of your game time needs. The best part, of course, is that the will price match those competitor ads for you so you can get everything you need and the best deal on it while you are there. While you are there, I wanted to showcase one of my favorite game day recipes that I love to make for our family!

Slow Cooker Honey Bourbon Chicken Wings from MomAdvice.com.
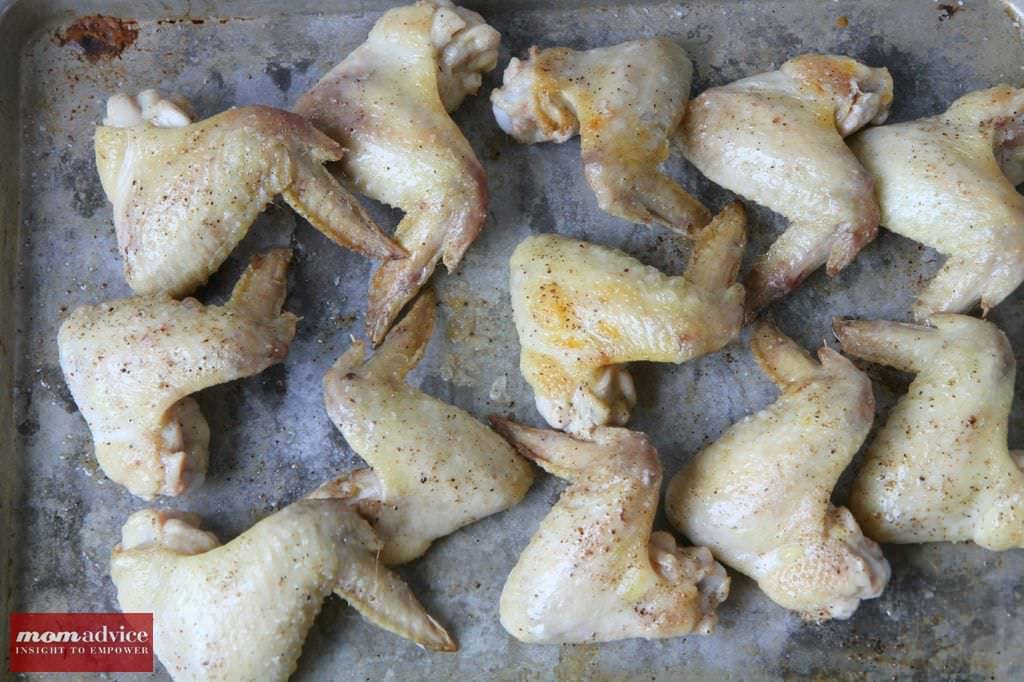
Making wings taste delicious in a slow cooker can be a challenge, but my trick is to season and broil my wings for ten minutes on each side to give it that beautiful color on the skin and to make sure that the wings start out well-seasoned before being slid into your slow cooker. I love that a lot of the fat renders out of the wings too while being broiled so it is a much healthier option than frying them.

Slow Cooker Honey Bourbon Chicken Wings from MomAdvice.com.
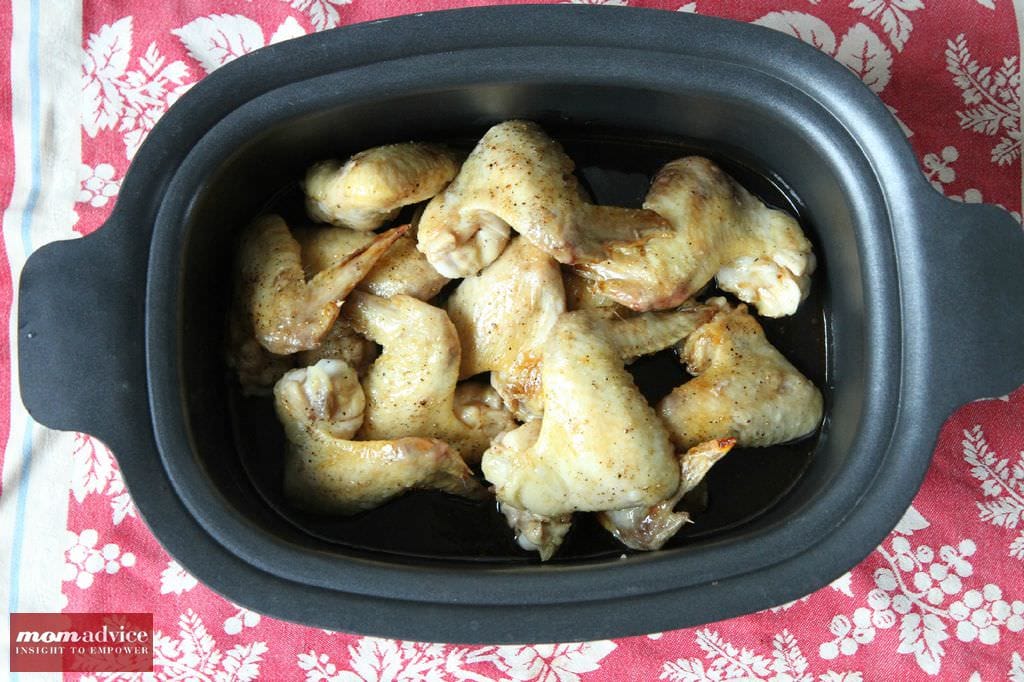
The secret is, of course, in the sauce that they are glazed in. My sauce has a mixture of soy sauce, teriyaki sauce, honey, garlic, and that bold and spicy Bourbon flavor comes from a new Sweet Baby Ray’s Kickin’ Bourbon Chicken Wing Glaze that you can find over in the condiment aisle of your store. The more of this you add to your sauce, the spicier it will be. This glaze will be thin, but will coat your wings beautifully.

Slow Cooker Honey Bourbon Chicken Wings from MomAdvice.com.
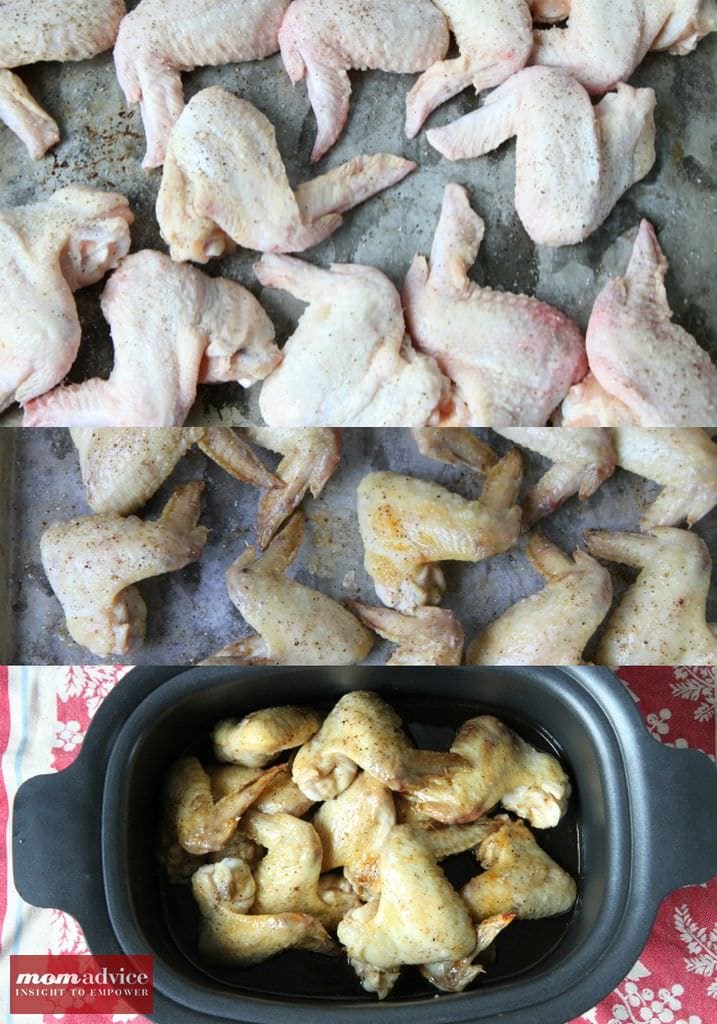
The slow cooker gets a little crowded with this many wings in there so I do the ultimate slow cooker no-no and open that lid up and shift them periodically. Thanks to broiling them beforehand though, these wings will be done in two hours on high or four hours on low!
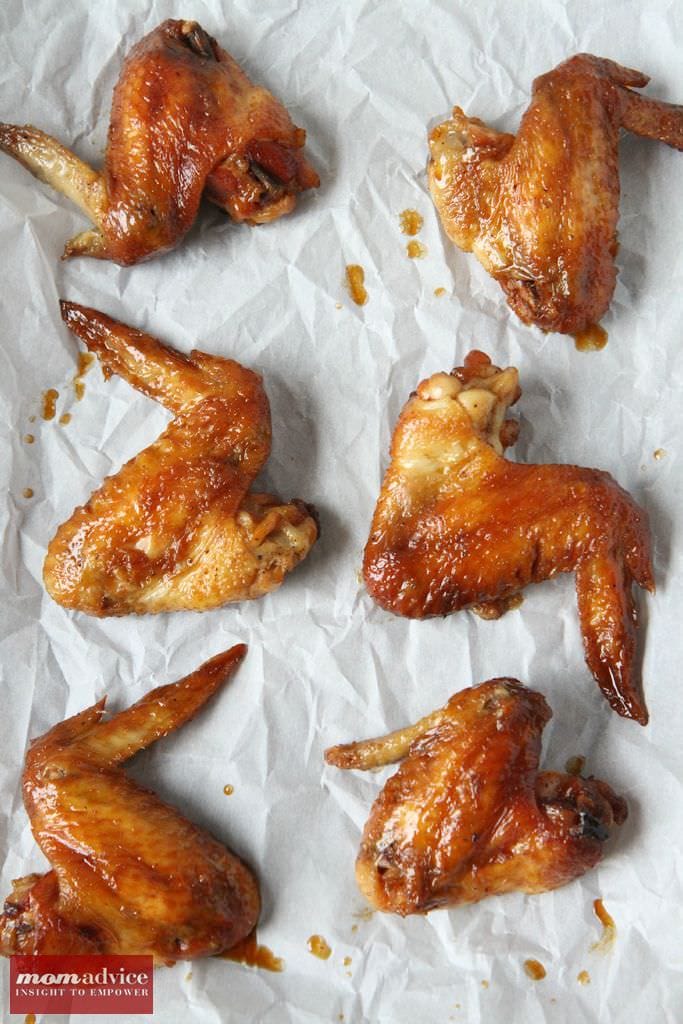
Slow Cooker Honey Bourbon Chicken Wings from MomAdvice.com.

Slow Cooker Honey Bourbon Chicken Wings
Recipe Type: Appetizer
Author: Amy Allen Clark
Prep time:
Cook time:
Total time:
Serves: 6
These wings are the perfect balance of sweet and spicy. The best part though, is that they can be created right in your slow cooker for game day entertaining!
Ingredients
  • 4 pounds chicken wings
  • 1 cup honey
  • 1/4 cup soy sauce
  • 1/4 cup Teriyaki sauce
  • 1/4 cup Sweet Baby Ray’s Kickin’ Bourbon Wing Glaze
  • 1/8 cup olive oil
  • 1 clove garlic, minced
Instructions
  1. Season wings with salt & pepper. Place wings on a cookie sheet and broil for 10 minutes on each side.
  2. Transfer wings to the slow cooker.
  3. Combine all of the ingredients in a bowl or mason jar and mix well.
  4. Pour the sauce wings.
  5. Cook on high two hours or low for four hours.

Looking for more game day recipes? Check out this list of 12 Great Tailgating Delights! Looking for more slow cooker recipes? Don’t miss this One Month of Slow Cooking article with 30 recipe ideas for your family!

walmart_mom_disclaimer


Pin It