Archive for the ‘Food & Recipes’ Category

Chocolate Chip Cookie Bars

Tuesday, September 22nd, 2009

Chocolate Chip Cookie Bars

2 1/4 cups all-purpose flour
1 teaspoon baking soda
1 teaspoon salt
1 cup butter, softened
3/4 cup granulated sugar
3/4 cup packed brown sugar
1 teaspoon vanilla extract
2 eggs
1 (12 ounce) package semi-sweet chocolate chips
1 cup chopped nuts (optional)

Preheat oven to 375 degrees. Grease a 9×13″ pan. Combine flour, baking soda and salt in small bowl. Beat butter, both sugars and vanilla in large mixer bowl. Add eggs one at a time, beating well after each. Gradually beat flour mixture into butter mixture. Stir in chocolate chips and nuts. Spread into prepared pan. Bake 30-35 minutes or until golden brown.

Bread Machine Monkey Bread

Tuesday, September 22nd, 2009

Bread Machine Monkey Bread

1/4 cup water, warm (100-110F)
2 tbsp butter, melted
3/4 cup milk, warm (100-110F)
1/2 tsp vanilla extract
1 large egg (beaten)
3 – 3 1/2 cups all purpose flour
1 tsp salt
3 tbsp sugar
2 1/2 tsp active dry yeast (.25-oz)

Sugar Mixture:
2 cups brown sugar
1 1/2 tbsp ground cinnamon
1/2 tsp ground allspice
1/2 cup butter, melted

Lightly grease a standard 10-in bundt pan with vegetable oil or any cake-shaped pan. Set aside.
In a microwavable bowl, combine the water, milk, and butter and microwave it for one minute (or just until warm). Pour this into the bottom of your bread machine. Add the egg and vanilla next. Add the flour, salt, sugar, and then finally the yeast. Run the Dough cycle on your bread machine and let it run through the entire cycle until it beeps.

Turn dough out onto a very lightly floured surface and gently deflate so that dough is relatively flat (maybe 1/2-3/4 inch thick) Using a knife or a bench scraper, cut off small pieces of dough to form 1/2 to 1-inch balls. As you cut each piece of dough, roll it into a ball in the palms of your hands. Dunk each ball in butter, use the fork to remove it and transfer it to the sugar mixture to be thoroughly coated. Place all coated dough balls into prepared bundt pan.

Once all balls have been coated and places in the pan, cover the pan lightly with plastic wrap and let bread rise for 60 minutes, until almost doubled in size. I covered this with plastic wrap and then popped it in the fridge overnight.

Preheat the oven to 350F when you are ready to bake it. If it is in the refrigerator, pull it out a half hour before and let it rise on the kitchen counter before baking. Bake for 30-35 minutes. Bread will spring back when lightly pressed. Let bread cool in pan for 10 minutes, then turn out onto a serving platter. Eat immediately (or reheat leftovers), as the bread is best served warm and gooey.

5 Quick Dinners for Busy Weeknights

Monday, September 21st, 2009

Between running children to school and activities, weeknight meals can be a challenge. It is hard to resist the urge to run to the fast food restaurants on many of the crazy nights during the week. Slow cooker dishes can be key in planning meals on those nights. The other key? Having just a few dinners that can be pulled together easily with ingredients already on hand.

I wanted to share with you 5 of my favorite dishes for busy weeknight meals. These dishes are fast, simple, and delicious. These are always in rotation in my menu plans and are just a few of my family’s favorites!

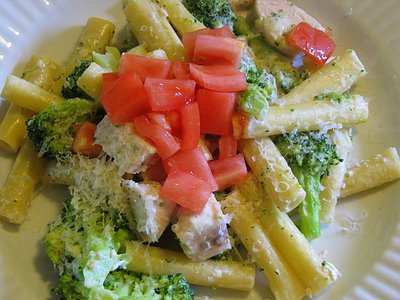
Skillet Ziti With Chicken & Broccoli

1 pound boneless, skinless chicken breast, sliced into 1″ pieces
Salt and pepper
3 Tablespoons unsalted butter
1 onion, minced (we omitted this due to personal tastes)
1/4 teaspoon red pepper flakes
1/4 teaspoon dried oregano
3 garlic cloves, minced
8 ounces ziti (2 1/2 cups)
2 1/2 cups low-sodium chicken broth
1/2 cup heavy cream (I substituted this with half & half)
1 bunch broccoli (1 1/2 pounds)
1 cup jarred roasted red peppers, rinsed and sliced 1/4″ thick (we omitted these due to personal taste)
1 ounce Parmesan cheese, grated (1/2 cup)
2 tablespoons fresh lemon juice (optional)

Pat the chicken dry, then season with salt and pepper. Melt 1 tablespoon of the butter in a 12″ skillet over medium heat. Add the chicken and cook until it is lightly browned, but not fully cooked, about four minutes. Transfer chicken to a bowl. Add 1 more tablespoon of the butter, onion, red pepper flakes, oregano, & 1/2 teaspoon salt to the skillet. Cook until the onion is softened, about five minutes. Stir in the garlic and cook until fragrant, about 15 seconds. Sprinkle the ziti evenly into the skillet. Pour the broth and cream over the ziti. Cover and bring to a boil, about five minutes. Reduce the heat to medium-low and stir in the broccoli and roasted red peppers. Cover and continue to simmer, stirring occasionally, until the pasta begins to soften and the broccoli turns bright green (approximately eight minutes). Stir in the chicken and any accumulated juice. Cover and simmer until the chicken is cooked through, about three minutes longer. Stir in the remaining 1 tablespoon butter, the Parmesan, and lemon juice (if using). Season with salt and pepper to taste.

Yummy Sloppy Joes

1 lb ground beef
1 cup chopped onions (I omitted these because I don’t like onions)
1 cup ketchup
1 tablespoon mustard
2 tablespoons red wine vinegar
1 teaspoon salt
2 teaspoons Worcestershire sauce

In a large skillet, brown beef with onions (make sure to drain or rinse your meat after this step). Mix the rest of the ingredients together. Add to beef and onions. Cook for 1 hour over medium heat, stirring occasionally. Serve on warm hamburger buns.

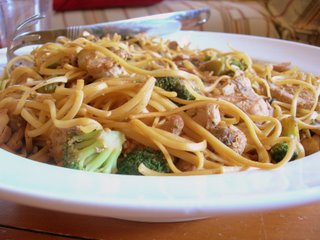
Chicken Broccoli Lo Mein

8 ounces thin spaghetti (if linguine is available, I prefer this over the spaghetti)
2/3 pound skinless, boneless chicken (3 chicken breasts, thawed overnight)
1 cup fresh button mushrooms
1 tablespoon vegetable oil
1 bag frozen broccoli pieces
3 tablespoons soy sauce
1 tablespoon white vinegar
1 tablespoon ketchup

Cook pasta as directed. Clean & chop mushrooms. Heat oil. Cut chicken in bite size pieces. When all the chicken is cut, add it to the skillet. Add mushrooms and broccoli to the skillet. Cook for five to six minutes or until mushrooms have released their liquid and chicken is cooked through. Add soy sauce, vinegar, and ketchup. Stir to combine. Add cooked pasta and serve immediately.

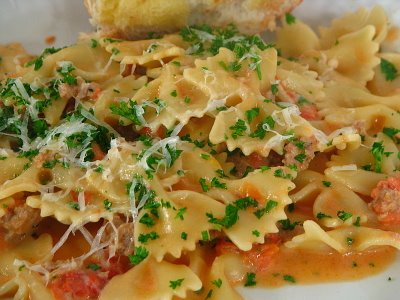
Bow Ties With Sausage, Tomato, & Cream

1 (12 ounce) package bow tie pasta
1 tablespoon olive oil
1 lb Sweet Italian Turkey Sausage (removed from the casing)
1/2 teaspoon red pepper flakes (can omit/decrease if your family doesn’t like spicy dishes)
1/2 cup diced onion
3 garlic cloves, minced
1 (28 ounce) can Italian-style plum tomatoes, coarsely chopped
1 1/2 cups heavy cream (or half & half to save on calories)
1/2 teaspoon salt
3 tablespoons minced fresh parsley

Bring a large pot of lightly salted water to a boil. Cook pasta in boiling water for 8 to 10 minutes, or until al dente; drain. Heat oil in a large, deep skillet over medium heat. Cook sausage. Stir in onion and garlic, and cook until onion is tender. Stir in tomatoes, cream, and salt. Simmer until mixture thickens, 8 to 10 minutes. Stir cooked pasta into sauce, and heat through. Sprinkle with parsley.


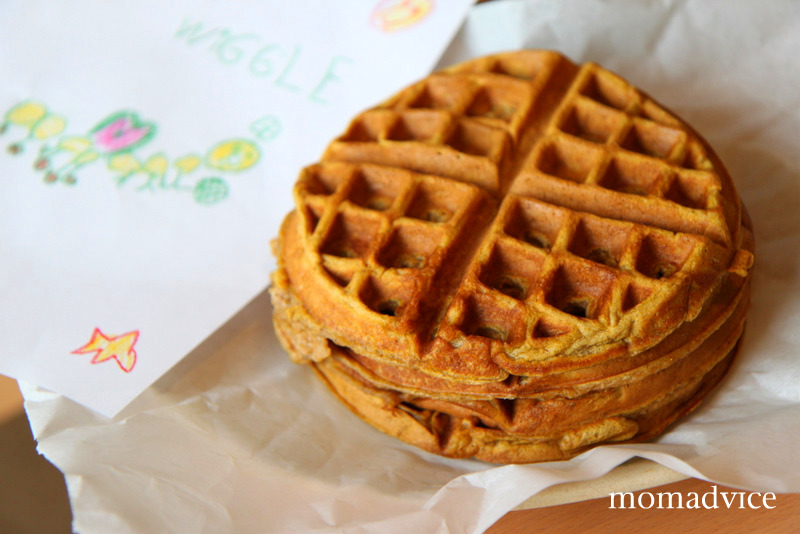
Whole Wheat Cinnamon Waffles

1 cup whole wheat flour
3/4 cup unbleached flour
1/4 cup toasted wheat germ (I substituted this with 1/4 cup rolled oats)
1/3 cup instant nonfat dry milk powder
1 tablespoon ground cinnamon
1 tablespoon baking powder
1/2 teaspoon baking soda
1/2 teaspoon salt
2 eggs (separate the egg whites from the egg yolks)
3 tablespoons canola oil
2 teaspoons vanilla extract
2 cups buttermilk (I used regular milk and then added 2 tablespoons of vinegar & let it stand for five minutes)

In a large bowl, combine the whole-wheat flour, unbleached flour, dry milk, cinnamon, baking powder, baking soda, wheat germ, and salt; mix well. Separate the egg yolks from the egg whites. In a medium bowl, mix the yolks, oil, buttermilk, and vanilla. Pour over the dry ingredients. In a small bowl beat egg whites until stiff peaks form (tips stand straight up). Gently fold egg whites into flour and egg yolk mixture, leaving a few fluffs of egg white, Do not overmix. Coat your waffle iron with vegetable cooking spray and preheat. Pour 1/2 cup
of the batter into the center of the hot waffle iron and cook until the batter stops steaming, about 6 minutes. Cooking time varies according to the they type of waffle iron you have. Repeat with remainder of the dough, applying the cooking spray between waffles. Serve warm with your favorite syrup.


Do you have a favorite busy weeknight meal to share? What meals do you rely on to get dinner on the table quickly?

Notebook Experiments: Will We Like a Chicken Cooked in Milk?

Wednesday, September 16th, 2009


I had to bring this experiment back one more time because it has been my new favorite Sunday tradition. There is rarely a bite of meat left when I make this chicken and my family looks forward to this dish more than I can say. I highly recommend giving this recipe a try- you won’t be disappointed!

Experiment: Will my family love a chicken cooked in milk?

Experiment Taken From: Notebook Entry 04.02.09

Materials Needed: Please see The Kitchn for specific directions on how to make Jamie Oliver’s chicken cooked in milk & lemon. I followed the instructions outlined by The Kitchn and left the lid on for the first hour of the cooking time, versus the chicken uncovered as Jamie outlines in his recipe. I also omitted the cinnamon stick to go with a more traditional flavor, but might give that a try next time.

Results: I love roasted chicken and it is the ultimate Sunday dinner for our family. When I saw this recipe, I knew I would have to try it. I happened to be out at Target so I picked up all the ingredients there including an organic bird since they had them on sale.

The main difficulty I had with the recipe was frying the bird in the butter. I think the butter could have been easily reduced to half the amount and still brought out a lot of flavor. I had a hard time flipping the bird without splattering myself, but got a good start on the skin before it went into the oven.

I added all the ingredients to the pot and then put the lid on it. It cooked for the first hour with the lid on and then I basted it and removed the lid for the last half hour.

Here is what you need to know about this recipe that makes it worth the little bit of effort. First, it made the whole house smell amazing and I literally wanted to eat it within the first fifteen minutes of cooking because the house smelled that good. Second, the meat literally falls off of the bone. There is no carving, it literally falls off. Third, the sauce is delicious and the “curdled” appearance was barely noticeable at all in the sauce.

All of that being said, the breast meat was drier than I would have liked so I am not sure if that could be remedied with a shorter cooking time or cooking it with the lid on the entire time. I am going to try a few different scenarios until I perfect this one because it is truly that good.

Make sure to have lots of bread for mopping up all that great sauce. If you pair this with a good white wine, a pile of mashed potatoes, and a great Etta James CD (like our family did), you will love every minute and bite that happens during that dinner!

Update: We tried this chicken again. This time I did not brown it, omitted the butter entirely, and cut the lemons in half and added two halves around the chicken and two halves stuffed in the chicken. I sprinkled the outside of the chicken with cinnamon instead of the cinnamon stick (which costs quite a bit more at our supermarket). I cooked it covered and then gave it twenty minutes with the lid off. The second time…absolutely perfect and lower calorie to boot!

Conclusion: This recipe will be repeated again and again! I thank The Kitchn for highlighting it and I can’t wait to try some different variations to make this chicken the ultimate chicken in our house!
**********************

I am so excited to open our Notebook Experiments up to everyone and I hope that you will be able to participate this week or in weeks to come! I will be posting this each Wednesday so please mark your calendars if you plan to participate. You can post your entries at any time throughout the week and then leave your entry in the links below.

We have this handy banner that you are more than welcome to use, but it is not a requirement! It is just something you can add to add a little sparkle to your entry.

Rules for Participation:

1. Choose anything from any of our notebook entries (past or present) to do with your family. We have hundreds of bookmarked links of crafts, ways to save money, and organizing ideas.
2. Complete an experiment from the notebook and share about it on your blog or website. We would love to see pictures of what you accomplished or a detailed description of how your projects turned out. Please include a link to this entry, a link to the original posting of the entry (at the original craftster’s blog), and (to help us relocate the project) the date or link of the notebook entry where you found it. You can use the same formatting as our entries or you can just include that information in your post in your own unique way!
3. Post a link below. Please include your name or blog name & a fast description of your project. Example- MomAdvice (WHO bread)

I can’t wait to see what you create and what you find inspiring!

Cloudy With a Chance of Meatballs Movie Review

Tuesday, September 15th, 2009


I had the unique experience of attending a fantastic movie premiere of a great family film that I know you are going to want to see! I was given the opportunity to have a round table discussion with the stars and directors of “Cloudy With a Chance of Meatballs,” and earned a small place of honor on the red carpet to interview and photograph the stars.

Sony hosted a wonderful event for bloggers to learn more about their products and offer in-depth photography tutorials from the amazing Me Ra Koh. For someone who is still figuring out the world of photography, I was more than willing to participate in such a fun event. We got to take our cameras out on the Sony Studio Lot and even gained a little behind-the-scenes access on sets that were being built for future movies.

All that being said, I really want to focus on what a wonderful movie this was for children and adults alike.

Cloudy With a Chance of Meatballs is about an aspiring inventor, Flint Lockwood, who is the socially awkward genius behind some pretty bizarre contraptions. His inventions include everything from a pair of spray-on shoes to a monkey thought translator. Flint is determined though to create something that will make people happy.

When Flint’s latest machine, designed to turn water into food, accidentally destroys the town square and rockets up into the clouds, he thinks his inventing career is over. Until something amazing happens… cheeseburgers begin raining from the sky.

Unfortunately, the people in the town become increasingly more greedy and the mayor decides to change what the town was once famous for (sardines) to a town that is famous for raining food. The greed and demands from the people force the machine to begin making more and more food and the town is threatened to become buried in a food avalanche. To save his town and reputation, Flint has to figure out a way to stop it and save them from certain disaster.

The movie is a delight for the eyes and will make you hungry just watching it. The animation is superb and food highlights include the raining cheeseburgers and a fantastic animation sequence with orange Jell-O. In other words, be sure to have lots of popcorn to feed your children or suffer through the whining for food through the entire show!

Anna Faris
Mr. T
Neil Patrick Harris

The film features the voices of Bill Hader, Anna Faris, James Caan, Andy Samberg, Bruce Campbell, Mr. T, Bobb’e J. Thompson, Benjamin Bratt, Neil Patrick Harris, Al Roker, Lauren Graham, and Will Forte. The film is written for the screen and directed by Phil Lord & Christopher Miller.

The directors were fantastic and truly kid’s at heart. Sitting down with them and hearing the excitement in their voices was contagious. It was truly a delight to see the pride that they felt about this project and see their favorite childhood book in animation form.

What Parents Need to Know:

The character of Sam Sparks will be a winner for your daughters. Sam Sparks, played by Anna Faris, is the local weather girl who is hiding just how intelligent she is. This movie will show your little girls that it is totally cool to embrace your inner geek and that you should never hide how smart you are for anyone.

There are no death scenes. Many children’s movies have death scenes which frighten my small children. The mother is in a scene in the beginning of the movie and then it is later said that she has passed away, but no heart wrenching scenes that you wish had to fast forward through. Of course, no death is ideal, but Flint’s sequence with his mother is an important one and shapes the character of Flint.

This movie is timeless. The directors purposefully decided to create a movie that could be enjoyed years and years down the road so they omitted pop culture and anything that would not be enjoyed for years to come.

Your whole family will love this movie. I appreciated the funny sense of humor and comedic timing in the scenes. I know that my hubby will appreciate the fantastic graphics that can truly be appreciated with those 3-D glasses, and I know my kids will love just how cool it is to be smart!

Catch this flick with your entire family when it premieres on September 18th! In the meantime, be watching for some great reviews and information from the other participants at this event:

Alli Worthington @ Blissfully Domestic (Represented by Cassie Boorn)
Beth Blecherman @ Techmamas
Darcy Cruwys @ Mommy Pie
Karen Bodkin @ Karen Sugarpants
Kimberley Blaine @ The Go-To Mom
Kristina Sauerwein @ MOMformation
Melinda Roberts @ The Mommy Blog
Monica Villa @ The Online Mom

I give this two mommy thumbs up for fun entertainment and a thoughtful discussion about how cool it is to be smart and believing in yourself!

HOT TIP: Get a FREE movie ticket to watch Cloudy with a Chance of Meatballs when you purchase any Spot Shot product! Great deal, there’s even a $1 printable coupon you can use on your purcha
se. (Courtesy of Heather at Freebies 4 Mom!

(Disclosure– My travel and airfare were covered by the Sony team. To read more about how things are handled by MomAdvice.com, be sure to read our full disclosure.)

Classic Slow Cooker Entertaining: Pot Roast Italiano

Monday, September 14th, 2009

Sometimes a girl needs a fantastic dish that she can whip up in no time and look like a superstar in the kitchen. I dusted off some old recipes and remembered this delicious pot roast I had for just such an occasion. My grandparents were visiting from Florida and my husband was out of town for the day so I knew I would need to come up with some that would be easy and impressive enough to showcase my cooking skills.

My Pot Roast Italiano is guaranteed to knock your socks off! At the end of the cooking, you whisk in a can of tomato paste, which finishes off the delicious gravy. I served the roast with my favorite cheesy orzo pasta, my lemony roasted green beans, and my fast peanut butter cookies.

Instead of spending the day in the kitchen, the kids & I decided to spend the day at our dollar movie theater and caught a movie together instead. I love when I can spend more time with my kids and less time in the kitchen! This dish will do just that for your family- I promise!

Pot Roast Italiano

3 pounds beef chuck roast
1 can diced tomatoes – drained
1 can tomato sauce – 12 oz
2 tablespoons red wine vinegar
2 medium onions- sliced (I omitted these because of personal taste)
1 teaspoon oregano
1 teaspoon garlic powder
1 teaspoon basil
6 oz. can tomato paste
Grated parmesan cheese
Salt and pepper

Place sliced onions on bottom of crock pot. Place roast in crock pot. Season with salt and pepper. Pour diced tomatoes, tomato sauce, vinegar, and spices over roast. Cook on high for 1 hour, and then low for 8 hours. Transfer meat to cutting board and cut into chunks. Meanwhile, whisk tomato paste into the gravy in the pot roast and add parmesan cheese to taste. Gravy will get thicker after a minute or two. Add meat back to gravy and serve.

Leftover Tip– If you have any meat leftover (which will be highly unlikely), shred it for sandwiches. Serve the shredded meat on hoagie rolls with chips and fresh veggies. Yum!

Deliciously Spiced Pumpkin Waffles

Monday, September 7th, 2009

It is that time of year again- hurray! Pumpkin eating is in the air as soon as my calendar flips to September. If there is a better fall ingredient in the world, I don’t know what it is! I couldn’t wait to whip out the waffle iron so I could make a yummy batch of my Spiced Pumpkin Waffles.


The kids were all smiles and hovered around my waffle iron the entire time, impatiently waiting for their waffles to be cooked. The house smelled of cinnamon, nutmeg, and ginger. As each waffle hit the hot iron, our house smelled like pumpkin pie.

No waffle house would be complete without a fresh batch of orange juice. These are our favorite juice glasses and come from my grocery store indulgence. The bottles are those little frappe coffees that you can get in the cooler. These little drinks are my treat to myself if I stay under budget on the groceries. After I drink them, I peel the labels off and put them in the dishwasher after my little treat. If one should break, it just gives me an excuse to indulge the next time I am at the grocery store. Aren’t they just perfect for little hands?

These waffles were not just for us though. They were too delicious to not share. My grandfather has been very ill and had an operation last week. He just came home from the hospital and I knew that a stack of these waffles and a heartfelt card from each of the kids would really brighten his day.

I love how anything can become a present… even a stack of pumpkin waffles. These were wrapped in parchment paper on top of an antique platter and tied with a masculine bow. I tucked in some magazines that would have made it into our recycle bin, for reading material for my grandma. The days can be so long when you have to be home so I know she appreciated this small gesture.

If you are the praying type, please say a prayer for a swift recovery for him! It would mean the world to me! In exchange, I will share with you our pumpkin waffle recipe!

Deliciously Spiced Pumpkin Waffles

1 3/4 cups all-purpose flour
3 teaspoons baking powder
1/2 teaspoon baking soda
1 teaspoon cinnamon
1 teaspoon nutmeg
1 teaspoon ground ginger
1 pinch salt
2 eggs
1/4 cup firmly packed brown sugar
1 cup canned pumpkin puree
1 2/3 cups milk
4 tablespoons butter, melted and cooled

Mix together flour, baking powder, baking soda, cinnamon, nutmeg, ginger, and salt in large bowl. In a second bowl, add eggs, sugar, pumpkin, milk, and butter; beat well. Gently fold in the flour mixture. Spoon in about 3/4 cup of batter into the waffle iron. Cook each waffle for 4-5 minutes. This recipe makes approximately 5 waffles on my waffle iron.

Additional Notes- I double this recipe to make an extra batch to freeze or when entertaining. Make sure to spray your waffle iron well with nonstick spray or these will stick to the waffle iron and make a big mess. Also, be sure to leave these on at least four to five minutes. If you try to take them off sooner than that, they will not taste as good or set up as nicely.

What is your favorite fall food? Feel free to share your recipes or a link to one of your family favorites!

Soft Pretzels with Sweet Mustard Dipping Sauce

Monday, August 31st, 2009

Both of my children love to help me in the kitchen and when I found this fun little recipe for a snack, I had to try it with them. Longtime readers may remember my failed attempts at pretzel-making. While I was discouraged by that experience, I haven’t given up on it. I will say though that when I found a quick and easy way to achieve the pretzel goodness without the mess, I had to give these a try.

Store-bought bread stick dough is what makes this recipe so quick and easy. The dough is easy to roll, without any flouring of your surface, and little hands can help roll out the pretzels for you. Within fifteen minutes, we were able to eat some delicious pretzels and everyone enjoyed helping with this project in the kitchen.

This would make the perfect snack for after school or serve when tailgating with friends. I can’t wait to make another batch of these fun little treats again and neither can my kids!

Soft Pretzels with Sweet Mustard Dipping Sauce
1 (11 ounce) can refrigerated bread sticks
1 egg white, lightly beaten
coarse salt
1/2 cup Dijon mustard
1/4 cup maple syrup
1 tablespoon brown sugar

Roll out each breadstick into a 20-in. rope; twist into a pretzel shape. Place 2 in. apart on ungreased baking sheets. Brush with egg white and sprinkle with salt. Bake at 375 degrees F for 10-13 minutes or until lightly browned. Remove to a wire rack. For mustard dip, combine the remaining ingredients in a small bowl. Serve with pretzels.

Thrifty Breakfast: Banana Cream Pie Smoothies

Monday, August 24th, 2009


If you have a big eater like me, making a breakfast that will fill your child up in the morning can be a real challenge. Although my little guy looks like a lightweight, he has been known to put away three to four bowls of cereal in the morning. This makes breakfast one of those meals that can really add up in our grocery budget.

Since his school year started, I am getting up early with him and have been making affordable breakfasts a priority in our house. Eggs, bread, oatmeal, and milk are inexpensive ingredients that I am trying to work into our morning meals.

One thing that I know my children really love is milkshakes. When I happened upon this recipe for banana cream pie smoothies, I knew that this would be a thrifty solution to get my kids fueled in the morning… in a really fun way.

When I got home from the grocery store, I sliced bananas and put them in this little dish in our freezer for our smoothies in the morning. I can get a whole bag of bananas at Aldi for $.99. I also bought the large tubs of low fat vanilla yogurt to add to the smoothie mixture. This is also an affordable steal compared to those small containers of yogurt. One tub equals approximately four batches of smoothies (eight smoothies in all).


To round out the meal, I make one or two slices of whole grain toast with a little smear of peanut butter on it. The kids love the combination and feel like they are getting a special treat in the mornings. I love to have one of these myself because they fill me up in the morning and have been a nice addition to my “only coffee” routine.

Just as one more fun idea to add to your morning routine, my son gets to choose his favorite breakfast on Fridays. They have a, “Fun Friday” at school where they get to wear their school t-shirt instead of a uniform. To go along with that theme, I make a “Fun Friday Breakfast.” He gets to choose what the breakfast will be that morning and all other days, I get to choose based on our time constraints. Can you guess what he chose this week?

I highly recommend adding this fun and thrifty smoothie to your morning routine!


Banana Cream Pie Smoothie (Courtesy of Cooking Light Magazine, makes 2 servings or 4 smaller servings)

1 cup sliced ripe banana (about 1 large)
1 cup vanilla low-fat yogurt
1/2 cup 1% low-fat milk
2 tablespoons whole wheat graham cracker crumbs (about 1/2 cookie sheet- we have been omitting this ingredient)
1 tablespoon nonfat dry milk
1/2 teaspoon vanilla extract
3 ice cubes (about 1/4 cup)
Graham cracker crumbs (optional)

Arrange banana slices in a single layer on a baking sheet, and freeze until firm (about 1 hour). Place frozen banana and remaining ingredients in a blender. Process until smooth. Sprinkle with graham cracker crumbs. Serve immediately.

Nutritional Information

Calories: 216 (12% from fat)
Fat: 2.8g (sat 1.5g,mono 0.8g,poly 0.3g)
Protein: 9.8g
Carbohydrate: 39.3g
Fiber: 1.9g
Cholesterol: 9mg
Iron: 0.4mg
Sodium: 145mg
Calcium: 315mg

Ideas for Making Lunch Fun & Healthy

Tuesday, August 18th, 2009


My son will be attending school all day now and this means that he will be eating lunch at school. I have been gathering supplies and ideas over this last month on ways to make his lunch fun and healthy and wanted to share with you some of the information I gathered.

One idea that I am excited to start with him is adding Knock-Knock jokes each day to his lunch. My girlfriend told me about someone doing this at her school and I thought it was such a cute idea to do with my children. I used our free lunchbox notes printable and found this website for ideas on knock-knock jokes to write to him.

I stocked up on small plastic containers that I plan to fill with batches of boxed pudding, applesauce, trail mixes, or raisins to cut down on the cost of the individual serving cups. We also bought stainless steel water bottles that can be filled with juice instead of the juice boxes. Sundays will be spent filling mini-containers and bagging up veggies for the week so that the mornings will be easier on everyone.

He used to eat lunch at preschool each week and the only thing he would ever eat was peanut butter sandwiches. To save on time, I would make five peanut butter sandwiches, put them in baggies, and then I would put them the freezer for the week. In the mornings, I would pull one out and it would be thawed by the time lunchtime rolled around. It was a time-saving strategy that worked really well for us. Unfortunately, he has moved on from peanut butter jelly so I can no longer implement that!

Last month I was hired by Sara Lee to act as a consultant for the company to help them plan a nutritional summit to share with moms ideas for creating a healthy and nutritious school lunch. It was such a unique opportunity for me to help in the planning stages of a blogger event and it is one that I hope I can repeat again with future companies.

Their emphasis was on creating balanced lunches and educating consumers in the bread aisle. I have to say that I have already added many of the ideas that were shared as well as implementing many of the shopping tips and I wanted to share with you some of the best information I got at this summit.

  • Instead of juice, which can add a lot of calories to a child’s diet, try making fruit-flavored waters. I loved this idea for infusing water with mint, strawberries, or oranges for a fun way to make inexpensive flavored water.
  • Get your children to eat the rainbow of fruits and vegetables by hanging a rainbow on the refrigerator. As they eat from each color, they can add a star to it. This helps them see what colors they need to eat and what colors they are doing really well on.
  • Trail mixes are a healthy and satisfying snack in lunches or before/after athletic events. An easy formula to remember for making trail mix is 1/2 cup of dried fruit, 1/4 cup of nuts, and 1/8 cup of chocolate.
  • One of the easiest ways to incorporate whole grain into your child’s diets is to to pack a fun whole grain snack like popcorn!
  • When examining nutritional labels on bread, make sure that the first ingredient listed is, “whole wheat flour.” If the first ingredient listed is, “enriched flour,” look and see whether whole wheat flour is listed and where it is listed on the ingredient list.

If you have any nutritional questions or if you are needing guidance on packing a school lunch, you can contact Sara Lee through their Facebook page. They have added all of the great recipes that they shared with us while we visited the facility and they have Chef Jill checking the site and sharing ideas daily so it is definitely a page worth peeking at.

I think that the main message that I walked away with, is to do the best you can with nutrition, but don’t beat yourself up if you can’t do it perfectly. Lunch is supposed to be fun and not a chore. Educate yourself about nutritional labels, do your best sharing fruits and vegetables in their lunch, try to incorporate whole grains into your child’s diet, and pat yourself on the back for trying… and don’t forget that cookie cutters, knock-knock jokes, or a sweet little note can be a fun way to make lunchtime fun for your children.

(Full Blogger Disclosure– This was an all-expenses paid trip to their Chicago headquarters which included air travel, a one-night hotel stay, and a gift bag. All thoughts and opinions on this trip are my own.)

What are some of your favorite ideas for making lunches fun & healthy? This is our first year packing lunches and I would love your ideas!