Archive for the ‘Food & Recipes’ Category

Pulled Pork Stuffed Sweet Potatoes

Monday, January 27th, 2014

Pulled Pork Stuffed Sweet Potatoes

As Super Bowl Sunday quickly approaches, I wanted to share with you a gluten-free Super Bowl dish you can share for your game day eating.

This month Walmart asked me to share a fun Super Bowl dish that you can create from items in their grocery section. I will admit, that coming up with a dish that was both dairy-free AND gluten-free for my game day feast was a challenge to me. I am the girl that hovers over the creamy dips and loves a sub sandwich for my game day feasting.

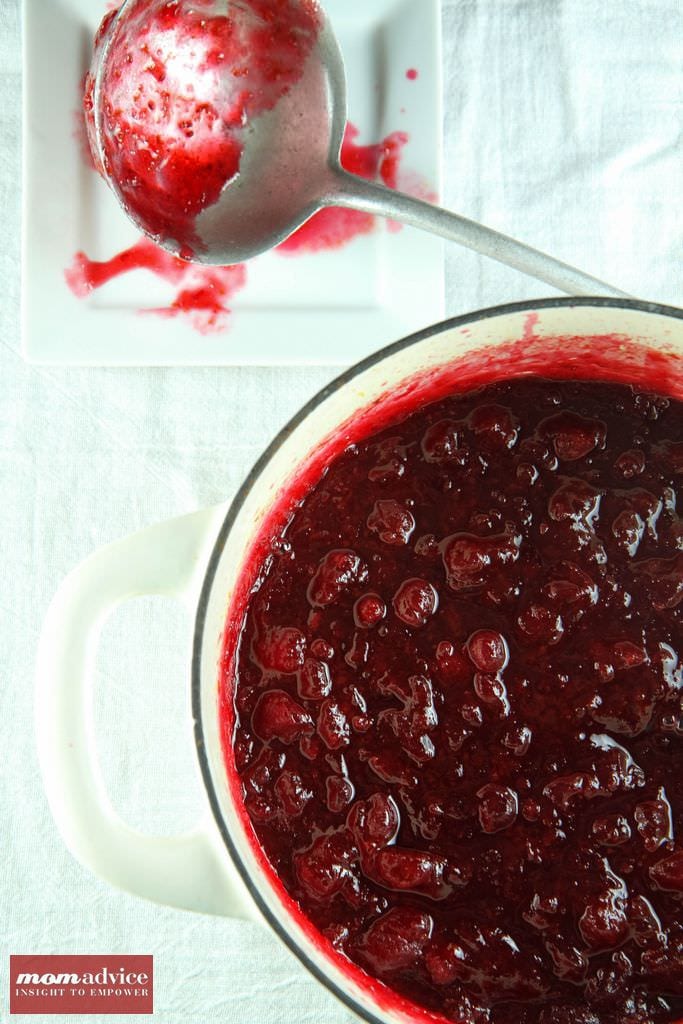
When I thought about recipes I could share (and eat!) though, I settled upon my favorite pulled pork recipe that can be created in your slow cooker. This pulled pork is so easy to make because you simply put your pork butt or shoulder in your slow cooker with a little root beer and let it cook all day. And that is pretty much it!

I told you it was easy!

Gluten-Free Sweet Baby Ray's

My favorite sauce has (and always will be) the super delicious Sweet Baby Ray’s. Since going gluten-free, I have become insane about label reading especially when it comes to my condiments. I was so happy to discover that all of the Sweet Baby Ray’s sauces are gluten-free and you can, of course, find them at Walmart in the condiment aisle.

One of the things people warned me about when I started this journey was to always label-read especially when it comes to my condiments. I have found I don’t need to go to my specialty markets if I do the proper research on the items I need before I leave. For example, here are 7 condiments you may be surprised to find are gluten-free!

As we discovered when Emily baked my birthday cake, the offerings for gluten-free items are becoming more mainstream at our Walmart store!

Pulled Pork Stuffed Sweet Potatoes

I don’t know why I had not thought to pair pulled pork and a sweet potato together before, but it is the absolute best flavor combination EVER. Using my technique for perfect baked potatoes, I like to coat mine in olive oil and to sprinkle them liberally with kosher salt.

Once they have cooked, I split them and pile in sweetly seasoned pulled pork. You can hollow out a bit of the potato, if you need to, but I just stack the meat as high as it will go. Stick a fork in it, and you are ready to enjoy the game with your favorite beverage and a filling dinner!

If you are entertaining, pile these on a long platter with forks as a fun game day dish! I promise this will be a dish that is loved by ALL, not just your gluten-free friends!

Pulled Pork Stuffed Sweet Potatoes

Pulled Pork Stuffed Sweet Potatoes
 
Recipe Type: Main Dish
Author: Amy Clark
Prep time:
Cook time:
Total time:
Serves: 8
An easy gluten-free & dairy-free game day dish you can share with friends, made easily in your slow cooker.
Ingredients
  • 6-8 sweet potatoes, scrubbed & pricked with a fork
  • Olive Oil
  • Kosher Salt
  • 1 (4 pound) Boston butt (or pork shoulder)
  • 1 (12 fluid ounce) can or bottle root beer
  • 1 (18 ounce) bottle your favorite barbecue sauce (we love Sweet Baby Ray’s)
Instructions
  1. Place the pork meat in a slow cooker; pour the root beer over the meat. Cover and cook on low until well cooked and the pork shreds easily (approximately 8-10 hours).
  2. Shred the meat and drain the root beer from the slow cooker. Stir in barbecue sauce and toss gently.
  3. Preheat your oven for 400 degrees.
  4. Rub your cleaned sweet potatoes with olive oil and sprinkle liberally with kosher salt. Do not wrap in foil, so you can get a crisp skin.
  5. Bake for 45 minutes to 1 hour, depending upon the size of your potatoes.
  6. Let potatoes rest for five minutes. Cut a slit in the top and stuff with the pulled pork.


Looking for more great game day food, check out these Slow Cooker Honey Bourbon Chicken Wings & these 12 Great Tailgating Recipes for your game day feasting!


walmart_mom_disclaimer

Pin It

Make The Best Orange Chicken Recipe At Home

Monday, January 20th, 2014

Gluten-Free Orange Chicken from MomAdvice.com.

Today’s recipe is for a gluten-free orange chicken that will rival anything you get at your favorite Chinese restaurant, but can be prepared for your gluten-free lifestyle, made with less fat, and can be served over brown rice.

The best part is how inexpensive it is to prepare and how beautifully this dish reheats.

Gluten-Free Orange Chicken from MomAdvice.com. Gluten-Free Orange Chicken from MomAdvice.com.

Each month I am challenged to use produce in a new way by a food client.

You may recall some of our past produce products: Blueberry Sangria Lemonade, my baked Strawberry Doughnuts, my easy dairy-free Peach Sorbet and our Slow Cooked Honey Crisp Apple Oatmeal…just to name a few!

Gluten-Free Orange Chicken from MomAdvice.com.

Gluten-Free Orange Chicken from MomAdvice.com.

I am finding gluten-free flours to be expensive.

While browsing the baking aisle though, I noticed that they did have a Betty Crocker Rice Flour that was just $3.38 for a pound.

I went ahead and got that to try for my chicken and it worked beautifully! You would have never noticed the difference in regular flour versus this flour.

I am excited to have that in our pantry now for these types of recipes.

Another fantastic budget-friendly substitute is cornstarch!

Of course, if you aren’t gluten-free (lucky ducks!), your standard all-purpose flour will work beautifully in this dish.

Gluten-Free Orange Chicken from MomAdvice.com.

Made with freshly squeezed orange juice (approximately 3-4 oranges), this sauce is a burst of citrus that is balanced with the flavor of a little balsamic vinegar and sweetened with brown sugar.

You can use chicken tenderloins or chicken breasts to cube into 1″ cubes for your meat.

I browned these in batches and then added them all back into my cast iron skillet and poured the sauce on top, just cooking until the sauce was thickened and the chicken was cooked through.

Did I mention that this was a one pot dish? Winning!

If you have a rice cooker, you can enjoy some delicious brown rice on the side, for an easy and effortless side dish.

I doubled the recipe and my family could not stop eating it.

It is truly the best thing I have eaten since going gluten-free and it is a dish that will be repeated over and over in our house!

Be sure to add this to your menu planners this month- it won’t disappoint!

Make The Best Orange Chicken Recipe At Home

Gluten-Free Orange Chicken
Recipe Type: Main Dish
Cuisine: Chinese
Author: Amy Clark
Prep time:
Cook time:
Total time:
Serves: 6
An easy gluten-free orange chicken recipe that you can prepare at home and that can be easily doubled for a quick weeknight meal!
Ingredients
  • 2 pounds boneless chicken breasts or tenderloins, cut into 1″ cubes
  • 4 tablespoons olive oil
  • 1 cup gluten-free flour (I used rice flour)
  • 1 tsp salt
  • ½ tsp pepper
  • 1 cup freshly squeezed orange juice (the juice from 3-4 navel oranges)
  • 2 tablespoons balsamic vinegar
  • 4 tablespoons ketchup
  • 4 tablespoons brown sugar
Instructions
  1. Cut the chicken into 1” cubes. Mix together flour, salt, pepper, and seasoning (if desired), then toss the chicken in the flour mixture. Cook in oil in a large frying pan over medium heat for 3-4 minutes on each side.
  2. Meanwhile, mix together orange juice, vinegar, ketchup and brown sugar in a small bowl. Pour over cooked chicken and simmer on low for five minutes. Serve over brown rice.
Pin It

Winter Activity Idea: Baking With Kids

Thursday, January 16th, 2014

Tips & Tricks for Cooking With Your Kids

Today is my 36th birthday and someone special wanted to bake me cupcakes for my special day. We decided to test-drive the new Betty Crocker Gluten-Free Cake Mixes and wanted to offer some pointers for getting your kids in the kitchen… so they can bake your birthday cake.

Aren’t I a smart mom?

Walmart asked me to share a beloved winter activity with you that we do with our kids. Of course, one of my favorite activities in the winter is baking. What I appreciate most about my kids is their enthusiasm for learning and helping in my kitchen.

Cooking together can teach your kids so much. Here are just a few lessons we worked on while baking a cake together.

Tips & Tricks for Cooking With Your Kids

Cooking Together Builds Reading Skills

One of the best parts about having your kids help you in the kitchen is that they can practice their reading skills. With picture tutorials on the back of many box mixes, it can help beginning readers navigate the ingredient list and list of supplies needed to cook.

Tips & Tricks for Cooking With Your Kids

Cooking Together Builds Math Skills

Cooking with your kids isn’t only helpful in just the reading department.  In fact, the biggest challenge for me as a chef involves all that math that goes into recipes. For young kids, understanding fractions and measurements of the ingredients can be tricky, but can offer an important lesson.

Don’t just have them do the measuring, but explain all those different spoon sizes or read the packaging of the butter to have them figure out how much a 1/2 cup equals.

Tips & Tricks for Cooking With Your Kids

Tips & Tricks for Cooking With Your Kids

Cooking Together Can Lead to Independence

One of the hardest things I have found about being a parent is having the patience to let them do it themselves. It is the same patience that I needed when teaching them to tie their shoes, to clean up after themselves, and to help in the kitchen. Yes, it is so much faster for me to just do it myself, BUT when they become adults, how will they ever know how to do anything if their mama always did it for them?

Instead of using things like stand mixers and big appliances to get the jobs done in the kitchen, invest in the time of having them mix and beat things by hand or with hand mixers. Allow extra time when cooking with your children to give them time to figure things out themselves and to create it on their own.


Tips & Tricks for Cooking With Your Kids Tips & Tricks for Cooking With Your Kids

Cooking Together Can Build Confidence

When we eat the food our  kids make we do a lot of oohing and ahhing over it. Really take in the details of their work and compliment them on their presentation and flavors of their dish.

We have always tried to do this with our kids and I get such a kick out of them when I hear them mimicking back to me what a great job I have done on dishes or on the flavors of the foods I put together for them.

 Betty Crocker Gluten-Free Cake Mix Betty Crocker Gluten-Free Cake Mix Betty Crocker Gluten-Free Cake Mix

For those that asked about this Betty Crocker gluten-free cake mix, I will be honest, and say that it really hit the spot. We baked these at 325 degrees for about 20 minutes and the cake was surprisingly light and resembled a sponge cake texture. The cake mix yielded 12 cupcakes and the cost on the mix was just $4.58.

When I shared about it on Facebook, friends chimed in with recommendations like adding a pudding mix to the cake or even a little extra vanilla, to boost the flavor. I am definitely going to have to try these additions! Layered with a thick layer of chocolate frosting though, and my daughter’s signature sprinkles, this cake was truly delicious.

If you are hosting a birthday party or need to bring in a gluten-free treat to school, I would highly recommend this cake mix for a fast and easy treat. The only difference  between making this and traditional boxed cake mixes is adding softened butter versus the oil.

Burkina Faso Fundraiser

On a personal note, I also wanted to thank you all for helping me celebrate my birthday this year by funding our wells for Burkina Faso. At this point, I am the proud owner of ONE WELL of clean water, which will give water to ONE THOUSAND people, through your donations. I am also almost halfway to my SECOND WELL. Can you believe that? In just three short days, we have collected almost $3,000 dollars! 

burkina_faso_collage_2

We still need to collect $1,000 for our second well. You can donate as little as $2 towards our cause. Here are four things you could “give up,” this week to help me give clean water to women & children. Just think of the lives you can help me save this week!

Thank you for celebrating my birthday with me!! It has been the best year yet!


walmart_mom_disclaimer


Pin It

Chocolate Chiffon Cake with Peppermint Frosting

Monday, January 13th, 2014

Chocolate Chiffon Cake with Peppermint Frosting

In honor of MomAdvice.com’s tenth birthday, I wanted to share this recipe for an easy chocolate chiffon cake made with peppermint buttercream frosting, perfect for celebrating our special day with you. This chocolate chiffon cake is made from a cake mix and the homemade peppermint buttercream frosting is the perfect use of any leftover holiday candy canes you might have in your home.

10 Year Celebration

Since this is my own birthday week, we decided to devote this week towards celebrating this incredible milestone. Tomorrow I will be revealing our best giveaway yet and I will be calling upon you to help me fulfill our site’s birthday wish. I can’t even believe that the site has now been around a decade! Someone pinch me please!

In the meantime, let’s talk about making a birthday cake for our celebration.

Chocolate Chiffon Cake with Peppermint Frosting

Truth be told, this is my sweet little girl’s birthday pick this year. It is a family tradition that the birthday child gets to pick their birthday cake each year from my big stack of cookbooks. She had her heart set on a chocolate chiffon cake, but the one that was featured in the cookbook was a bundt cake and I knew she was looking for that traditional layered cake that makes all parties special.

I did some web searching and figured out how to make this into a layered cake and then frosted it with a beautiful peppermint buttercream frosting to finish it off. We had to tint it pink though…this is after all, Emily’s birthday.

Chocolate Chiffon Cake with Peppermint Frosting

I am a very humble cake decorator so I relied upon a few yarn pom poms on skewers to create a little cake banner over her cake. Peppermint candies crushed on top also act as a great eye distractor from my sad frosting skills.

Hey, a mom can’t be great at everything


Chocolate Chiffon Cake with Peppermint Frosting Chocolate Chiffon Cake with Peppermint Frosting Chocolate Chiffon Cake with Peppermint Frosting Chocolate Chiffon Cake with Peppermint Frosting

We popped our cake in a cake carrier and transported it to Grand Rapids, Michigan where we took a family holiday in lieu of gifts this year. We got to celebrate Emily (just the four of us) and enjoyed several days of seeing the sites while enjoying a cozy cabin away from it all. I made my daughter’s birthday dinner request (a giant helping of Weeknight Chicken Lo Mein) and a  delicious slice of birthday cake was enjoyed by all. And I do mean ALL.

My husband, who seems to hate cake for some reason, wanted a second slice and the whole family agreed that this was the perfect birthday cake. The cake tastes so light and airy and the buttercream had just a hint of mint that added a creamy finish to the top of the slice.  It was the perfect ending to a perfect evening celebrating.

Now that we have covered the cake, tomorrow we will be covering the GIFTS.

Please come back tomorrow to see our big surprise!

Here’s a hint… this gift will help a thousand people! ONE THOUSAND PEOPLE.  Have I grabbed your interest yet?

See you tomorrow for the big reveal! 

Chocolate Chiffon Cake with Peppermint Frosting
Recipe Type: Dessert
Author: Adapted from Chocolate from the Cake Mix Doctor
Prep time:
Cook time:
Total time:
Serves: 16
A beautiful chiffon cake made from a boxed cake mix and laced with peppermint icing for the perfect duo of chocolate & mint.
Ingredients
  • 5 large egg whites
  • 1/2 teaspoon cream of tartar
  • 1 package (18.25 ounces) devil’s food cake mix
  • 3/4 cup water
  • 1/2 cup canola oil
  • 3 large egg yolks
  • 2 teaspoons pure vanilla extract
  • 8 tablespoons (1 stick) butter, at room temperature
  • 1/2 teaspoon pure peppermint extract
  • 3 1/2 cups sifted confectioner’s sugar
  • 3-4 tablespoons milk
  • 1/2 cup crushed peppermint candies
Instructions
  1. Preheat oven to 325 degrees. Set aside two greased 8″ cake pans.
  2. Place the egg whites & cream of tartar in a mixing bowl. Beat with your mixer on high speed until stiff peaks form (approximately 2-3 minutes). Set aside.
  3. Place the cake mix, water, oil, egg yolks, and vanilla in a large mixing bowl. Beat these until incorporated.
  4. Turn the egg whites out on top of the batter and fold it in until the mixture is light, but well combined.
  5. Bake the cakes until they spring back when lightly touched with your fingers, approximately 45-50 minutes.
  6. Invert them immediately and allow the cakes to cool for one hour upside down.
  7. Remove them from the cake pan and place them right side up again.
  8. Place the butter, peppermint extract, and 1 cup of the confectioners’ sugar in a large mixing bowl.
  9. Blend to incorporate and slowly add in the remaining sugar and remaining milk. If the frosting seems too stiff, add in an additional tablespoon of milk.
  10. Decorate with crushed peppermint candies on top.


Pin It

Sausage & Vegetable Frittata

Sunday, December 29th, 2013

Easy Sausage & Vegetable Frittata from MomAdvice.com.

Happy holidays, everyone! I can’t believe another new year is upon us!  Today I want to share with you an easy sausage & vegetable frittata recipe that just so happens to be both dairy-free & gluten free. This easy frittata has become my go-to dish this week as I transition into some new healthy eating habits.

First, I just want to thank you all for the kind & supportive words you shared on yesterday’s post. It helped me to reaffirm that the direction we are headed in is a good one. Change is hard, both as someone who has always had creative control and as a reader, but I am hoping these changes will bring in a whole new audience and give me some time to focus on growing our website.

I will admit that one the hardest switches for me, since giving up gluten, has been figuring out what to eat for breakfast. I am not much of a breakfast eater and every morning I would have a slice of bread smeared with peanut butter and then head to the gym. Although I picked up a loaf or two of gluten-free bread (and am considering testing out some recipes for my own),  I am still acquiring a taste for bread that tastes like cardboard. It just does to me, but I understand that I will adapt at some point!  I also have to admit that I find it a lot less filling than the whole grain toast I used to eat so I have been looking for alternatives that would jumpstart my morning without being hungry an hour later.

Easy Sausage & Vegetable Frittata-4

This frittata recipe fits the bill perfectly and I am able to use up whatever we have in our vegetable crisper to make a unique combination so I don’t get bored. The best part about this frittata though is that it reheats beautifully for those days when I am struggling to figure out what to eat in the afternoon or for a quick weeknight dinner paired with a salad. I will admit, I ate an entire one in the span of 24 hours. I feel nourished, full, and it is so easy to make.

This was the first time I used shredded sweet potatoes in a frittata. Have you ever tried that? Using the same technique as my laundry detergent recipe, you just use the cheese grater on your food processor to create shredded sweet potato hash. Although the flavor is mild, I found that it acted well as a binder with the absence of cheese in this one.

If you are cooking in a cast iron skillet (this is the inexpensive one I use- affiliate link!), you may need to cook it a tad longer. That being said, the cast iron skillet is my new best friend for fast frittatas and using it reminds me of many a morning of bacon & eggs in my Southern great-grandmother’s kitchen.

This is my new favorite dish and I am planning to make another one today- I really love it that much! I hope you love this one too!

amy_signature Easy Sausage & Vegetable Frittata

Sausage & Vegetable Frittata
Recipe Type: Breakfast
Author: Amy Clark
Prep time:
Cook time:
Total time:
Serves: 4
I love this easy one pan frittata for a delicious brunch or for lunch paired with a salad. The best part is that it is a gluten-free & dairy-free treat that can be enjoyed by all! Don’t be limited to these ingredients though. Check your vegetable crisper and incorporate any types of veggies (or meats) that you need to use up for a unique combination of your own.
Ingredients
  • 2 tablespoons coconut oil
  • 1/2 pound Italian sausage, uncooked
  • 1 small sweet potato, scrubbed and shredded (1 cup). I use my food processor for shredding these.
  • 1 red bell pepper, diced
  • 8 eggs
  • 1 teaspoon milk (or milk alternative like coconut, rice, or almond milk)
  • 1/2 teaspoon salt
  • 2 Roma tomatoes sliced
  • Handful of fresh Italian Parsley, chopped
Instructions
  1. Preheat the oven to 350 degrees.
  2. Heat the oil in an oven-safe skillet over medium heat.
  3. Add the sausage, sweet potato, and red pepper and cook these four 4 minutes.
  4. Beat the eggs with the milk. Season with salt. Pour these into the skillet and cook for three minutes, stirring when first adding to combine all the ingredients.
  5. Sprinkle the frittata with fresh parsley and then arrange the tomato slices in a circular pattern on top of the eggs.
  6. Place the frittata in the oven and bake for 12-15 minutes.

Adapted from Against All Grain (affiliate)


gluten-free-125

Participating for the first time in this week’s gluten-free recipe round-up on Musings of a Housewife!

Pin It

Simplifying the Holiday Parade of Activities

Wednesday, December 18th, 2013

*This post is sponsored by Ritz Crackers

Each year, I find myself coming to the topic of simplifying the holidays.  Don’t we just all wish this time of year was a little easier?  Despite my best efforts to simplify, it can feel impossible in the midst of the kid’s holiday programs, get togethers, shopping, wrapping, sending of cards, gift-giving, & holiday baking.

I don’t want to brag, but this year we really did achieve that simple holiday we have been longing for and I am partnering with Ritz to share how you can avoid the parade of endless holiday to-do’s and instead embrace a simpler holiday.

 Simplifying the Holiday Parade of Activities

Simplify the Giving of Holiday Cards


I love, love, love having pictures that I am in and having someone else take them for me, but we lost track of time and weren’t able to book our usual family session. Instead of not sending cards, I set my camera up on a tripod and we took our family shot by setting the timer on our camera and having me jump into the family picture.   By getting everything set up in advance before my family came outside, we were able to get our picture in a mere five minutes.  Before everyone had their coats off, I had our photos edited and cards in the mail. The best part is that we have moved our family session to the Spring, a time of year we decided was much less chaotic, and will really enjoy it all a little bit more.

I will admit that I was also was more laid back about how we did our cards this year and enlisted one of my favorite helpers to assist me in this year’s mailing. Not only was she excellent at adding our stamps and sealing the envelopes, but she also kept me on track because she was waiting for me to get those addresses on so she could do her part with them.  It gave us time to chat while we were doing them and ended up being fun instead of a holiday chore this year.

 Easy No-Bake Mint Thin Recipe from MomAdvice.com.

Simplify the Holiday Baking


This year we decided to skip the big baking day and make easy treats instead. Although I usually love holiday baking, this year I focused more on creating knitted gifts than my typical holiday treat box. Fortunately, we found a fun holiday treat that we could make that didn’t require a bit of baking, but was just as delicious. On the Ritz Holiday Parade site, we found an easy recipe for Mint Thins to create together that tasted just like one of our favorite cookie treats, but were made with Ritz Crackers, chocolate, and crushed candy canes.

 Easy No-Bake Mint Thin Recipe from MomAdvice.com.

Easy No-Bake Mint Thin Recipe from MomAdvice.com.

It just goes to show that making holiday treats doesn’t have to be an elaborate baking day. My kids loved helping to crush (and eat!) the candy canes for our cookies and we enjoyed eating these while watching, “A Christmas Story,” this year. Yet another simple and easy tradition is born!

 Simplifying the Holiday Parade of Activities

Simplify the Gift Giving


I often talk about our commitment to do the Four Gift Rule, but this year we took it a step further and asked the kids if they would like to skip the presents and just take a family adventure together. We gave them lots of options for places we could take a mini-vacation to and they chose a trip to Grand Rapids, Michigan for our holiday getaway. We are so excited to take in all of the museums, holiday lights, ice skating, and see the sites of the city.

If your kids are struggling to come up with gifts this year or your home is overrun with just too much stuff, consider creating your very own, “Choose Your Own Adventure,” vacation in lieu of gifts. Not only did I have a lot less to buy this year, but I also get to spend four days with my family making incredible memories that I hope they will remember forever.

Start planning and dreaming ahead for next year though because those vacation rentals do go quickly!

 Ritz Parade Float

Focus On the Fun


Ritz wants to bring back the fun for the holidays and this year they have created a fun interactive Ritz Parade where you can visit the site and build your very own float. You can add up to twelve items on your float from toys, characters, celebrations, and banners. The pieces can be scaled to your desired size and placed anywhere on your float. Once it is complete, you can share your holiday float with others. It’s a fun little interactive tool that you can use to keep the kids busy while you are putting those last minute touches on those holiday festivities. Since we adopted a cat this year, we loved making a float of her for our holiday parade. I am sure this illustrates just how special she has become to all of us!

In addition, the Ritz parade allows consumers to unlock deals to help decrease the stress of gift buying! You can check out all the deals here!

For a little added holiday fun, check out how Ritz surprised shoppers with a fun rap. Get it? Rapping Wrappers!!


Happy Holidays, friends!

 Easy No-Bake Mint Thin Recipe from MomAdvice.com.

Easy Mint Thin Cookies
Recipe Type: Dessert
Author: Amy Clark
Prep time:
Total time:
Serves: 12
Looking for a quick holiday treat to share that doesn’t require any baking? You must try these delicious Mint Thin “Cookies.” You won’t believe how good or easy these are to make (and eat!)
Ingredients
  • 2 pkg. (4 oz. each) semi-sweet baking chocolate, melted, slightly cooled
  • 1/4 tsp. peppermint extract
  • 36 RITZ Crackers
  • 1 candy cane (6 inch), crushed
Instructions
  1. Mix chocolate and extract.
  2. Dip crackers in chocolate mixture, turning to completely coat each cracker. Carefully scrape off excess chocolate.
  3. Place crackers in single layer on waxed paper-covered baking sheets; sprinkle with crushed candy.
  4. Refrigerate thirty minutes or until chocolate is firm.


This post is sponsored by Ritz Crackers. I’ve received compensation for my time and effort in creating this post. All thoughts and opinions are my own.

Pin It

Easy Christmas Tree Cinnamon Rolls

Tuesday, December 3rd, 2013

Easy Christmas Tree Cinnamon Rolls from MomAdvice.com.

Ever since my children were small we have had a tradition of making a Cinnamon Roll Christmas Tree. The best part about this tradition is that it is fast to create, can be decorated by your kids, and it is something they will look forward to every year.

Easy Christmas Tree Cinnamon Rolls from MomAdvice.com. Easy Christmas Tree Cinnamon Rolls from MomAdvice.com.

There is no recipe to this one unless you are feeling ambitious and want to create some easy bread machine cinnamon rolls to make this with, which is something I love to do on Christmas morning!

Shape these into a Christmas tree shape on a parchment-lined cookie sheet. Bake as directed on the packaging. Tint the icing green with a few drops of food coloring and let them decorate the rolls themselves.

I slide the rolls off of the hot cookie sheet and let them decorate while they are still hot, reducing the risk of burn elbows and arms by removing that hot sheet.

Easy Christmas Tree Cinnamon Rolls from MomAdvice.com. Easy Christmas Tree Cinnamon Rolls from MomAdvice.com. Easy Christmas Tree Cinnamon Rolls from MomAdvice.com.

This recipe is practically fool-proof, unless you were up with a screaming baby one night and on Christmas morning grabbed blue instead of green.

And maybe you declared it the year of the retro Christmas tree.

Maybe.

I hope you can embrace this as part of your annual holiday traditions. Be sure to check out my other ideas for Great Family Traditions to Celebrate the Holidays in a MEANINGFUL way. If you didn’t get around to creating an advent calendar yet, don’t worry! Check out my Use What You Have Advent Calendar!


Pin It

2 Ingredient Cranberry Pancake Syrup

Monday, November 25th, 2013

2 Ingredient Cranberry Pancake Syrup

Continuing with our Thanksgiving theme this week, today I wanted to share an easy recipe for Cranberry Pancake Syrup made from your leftover cranberry sauce. This cranberry pancake syrup recipe is made from two simple ingredients; your leftover cranberry sauce and maple syrup.

Walmart challenged me to create a recipe using some of our Thanksgiving leftovers and I immediately thought of this idea that I had for our leftover cranberry sauce.

Brandied Orange & Cranberry Sauce

This was the first year that I made my own cranberry syrup for Thanksgiving and I loved it so much that I wanted to use it as an ingredient in another dish that we could share after the holidays were over. This Brandied Orange & Cranberry Sauce was so heavenly that I knew it would be the perfect accompaniment with a big stack of pancakes.

2 Ingredient Cranberry Pancake Syrup

I couldn’t put this sauce on just any pancakes though, it had to be our family favorite- the Fluffy & Light Pumpkin Pancakes that we share (almost) weekly on Sundays in the autumn months.

When the pumpkin and cranberry are combined together, it is like experiencing Thanksgiving Day all over again! I hope you can give these a try with your own leftover cranberry sauce. I promise, it is a recipe that will not disappoint!

2 Ingredient Cranberry Pancake Syrup

Cranberry Pancake Syrup
Recipe Type: Condiment
Author: Amy Clark
Cook time:
Total time:
Serves: 4
An easy two ingredient pancake syrup that can be created from leftover cranberry sauce. Add this delicious syrup on top of a stack of Pumpkin Pancakes for a festive spin!
Ingredients
  • 2/3 cup cranberry sauce
  • 1 cup maple syrup
Instructions
  1. In a saucepan mix together cranberry sauce and maple syrup and heat until warm.
  2. Serve on top of your favorite pancakes.

What is your favorite dish to create with Thanksgiving leftovers?

walmart_mom_disclaimer

Pin It

Lemony Spinach & Tomato Quinoa Salad

Monday, October 14th, 2013

Lemony Spinach & Tomato Quinoa Salad

If there is one ingredient I love it is lemons. There is something about that citrus addition that brightens flavors so much. Today I am sharing my favorite Lemony Spinach & Tomato Quinoa Salad that is one of my favorite ways to use lemons in my house.

Lemony Spinach & Tomato Quinoa Salad

More importantly though, we are celebrating this citrus ingredient today in honor of a very special blogger that I have truly grown to love and her beautiful blog, “The Lemon Bowl.”  I am so excited to be celebrating Liz in a virtual baby shower today with so many amazing bloggers to share in this celebration.

If you haven’t visited The Lemon Bowl before, you are in for a treat. Liz creates the most delicious dishes and finds new ways to make healthy dishes seem absolutely sinful. She is one of my favorite food bloggers to follow on Instagram and you will often find her in recipe development or shopping at the local farmer’s market through her photo stream.

Everyone that is participating will be using lemons in some way whether it is a delicious side, a soup, an appetizer, or a dessert. Lemon is one of the most versatile ingredients and the zest and juice from lemons are often my secret weapon in making the dishes I create stand out.

Lemony Spinach & Tomato Quinoa Salad

Today I wanted to share my favorite lemon recipe that I love to create and share at potlucks, cookouts, and just as a quick and healthy lunch for myself. As you know, I am quinoa-obsessed these days. With the ease of preparing quinoa in the rice cooker, I love to make big batches of it to use in my dishes throughout the week.

This Lemon Spinach & Tomato Quinoa Salad gets all of its flavor from the zest and juice of a lemon. Tossing the quinoa with my favorite combination of spinach and tomatoes, a drizzle of olive oil, and just a little salt and pepper makes this dish both easy and very budget-friendly.

If you want to add even more protein to this, consider adding a little roasted chicken breast (I love this method of preparation)  or dice a little chicken using a prepared rotisserie chicken. Thanks to using quinoa in this, rather than pasta, you already have a protein-filled dish that doesn’t even need the meat.

If you are looking for more ideas to create with quinoa check out my Mexican Quinoa Stuffed Bell Peppers, my Greek Quinoa Salad, these Quinoa- Berry Breakfast Bowls, and the super delicious Pumpkin Nut Quinoa Breakfast that is just perfect for Fall. Don’t you just love how versatile this ingredient is?


Lemony Spinach & Tomato Quinoa Salad

 Want to join in on the virtual baby shower? Here is a list of all of the amazing participants and their delicious dishes that they created in honor of Liz and her new baby:

Appetizers

Beverages

Salads

Main Dish

Desserts

Lemony Spinach & Tomato Quinoa Salad
Author: Amy Clark
Prep time:
Cook time:
Total time:
Serves: 6
An easy gluten-free salad that is always a crowd-pleaser!
Ingredients
  • 1 pound spinach, washed, dried, stems removed
  • 1 pint grape or cherry tomatoes, halved
  • 2 lemons, zested (reserve the lemons for juicing over the pasta)
  • 2 cups cooked quinoa (use the technique I shared above)
  • 1 tablespoon extra-virgin olive oil, 1 turn of the bowl
  • Salt and pepper
Instructions
  1. Prepare quinoa in your rice cooker or as directed on packaging.
  2. Pile spinach leaves in stacks 1 on top of the other. Thinly slice stacks of leaves to make spinach confetti. Pile shredded spinach into the bottom of a medium sized mixing bowl.
  3. Halve grape or cherry tomatoes with a paring knife and add them to the mixing bowl.
  4. Add the zest of 2 lemons to the bowl reserve the lemons for adding juice to the sauce later.
  5. Add hot cooked quinoa to the mixing bowl. The heat of the quinoa will wilt the spinach and warm the tomatoes at the bottom of the bowl and get the juices flowing from veggies. The heat of the quinoa will also release the flavor and oils in the lemon zest.
  6. Drizzle 1 tablespoon extra-virgin olive oil and the juice of two lemons over the quinoa and toss to combine the veggies and quinoa.
  7. Add a generous amount of salt and pepper to taste. Toss the ingredients together to combine.
  8. Serve with grated parmesan cheese or leave plain if you are taking the salad on the go.
Pin It

A Happy & Healthy Halloween Night Feast

Tuesday, October 8th, 2013

Googly Eyed Apples for Halloween from MomAdvice.com.

Googly Eyed Apples for Halloween from MomAdvice.com.Who is ready for a happy & healthy Halloween feast? Halloween is just around the corner and this year Kenmore has you covered with an easy Halloween dish and treat that you can enjoy with your family before or after your trick-or-treating has begun. That’s right, there is no need to order a pizza or stress out about festive snacks, at least not this year!  This year I am sharing an easy slow cooker recipe idea and a treat that is not only healthy, but also a festive addition to your dinner offerings!

Head on over to the Kenmore blog to find a recipe and tips for throwing a happy and healthy Halloween feast this year!

Pin It