Archive for the ‘Desserts’ Category

Notebook Experiments: Can I Make Pretzels Like Auntie Anne’s?

Wednesday, February 18th, 2009

Experiment: Can I make pretzels like Auntie Anne’s?

Experiment Taken From: Notebook Entry 01.29.09

Materials Needed: Please see maya made for the full instructions.

Results: Remember when I mentioned that I totally failed on a notebook experiment? Well, this is the experiment that I did not end up doing well.

I thought it would be fun (my husband would say ambitious) to make my hubby some heart-shaped pretzels for a special Valentine’s Day treat. One of his favorite things in the world is soft pretzels and I thought this would be a wonderful way to show him how much I loved him, particularly during our No Spend Challenge month. I mean, what says I love you more than baking for someone?

The first mistake I made was not using the recipe that maya made had used. I actually used this recipe and used my bread machine to make the dough instead of the stand mixer. The dough was difficult to roll out and kept balling back up together.

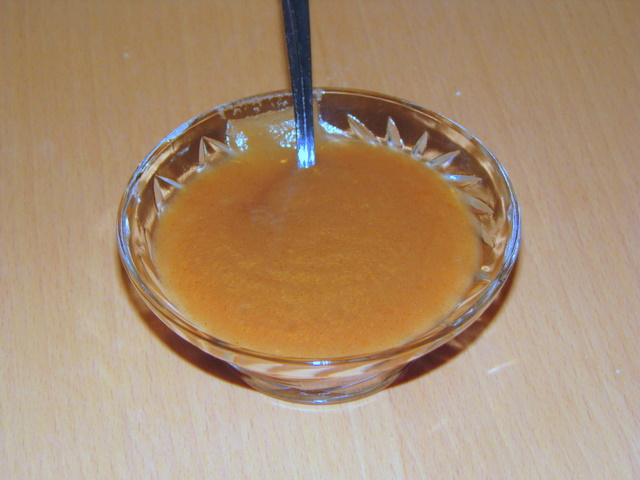
After finally maneuvering it into a heart shape, I then had to try and put them in the baking soda solution. My mistake, throwing in too many and leaving them in far too long. When I took them out, I started to wonder if it would have been better not to have put them in the solution.

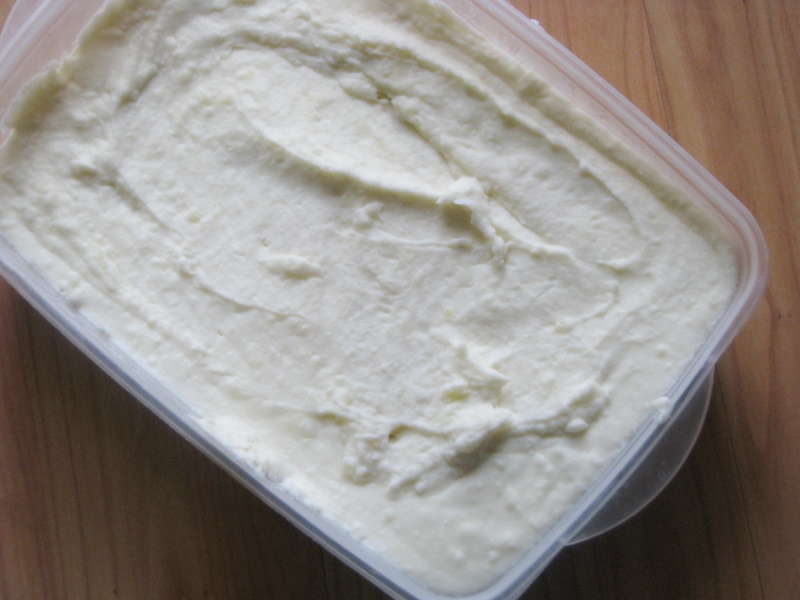
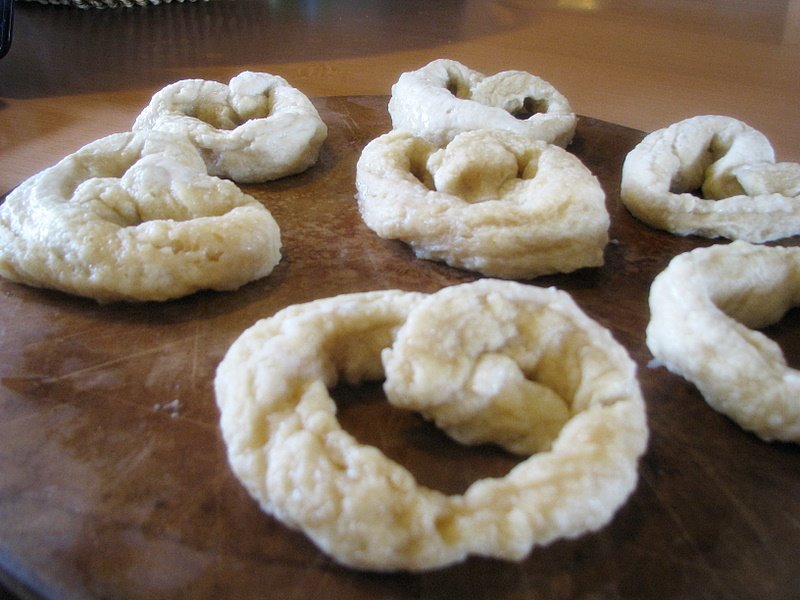
I’m all like, what in the hay happened to these pretzels?

At this point, I keep pressing on. After mixing dough, shaping dough, dipping dough in baking soda solution, letting dough rise, and getting ready to bake them again there is no way in heck I was going to do that again. And my kitchen was the biggest disaster you have ever seen-flour everywhere, dirty pots and pans, baking soda spilled all over my stove. I was worried, but I was going to wrap up this horrible idea of a project.

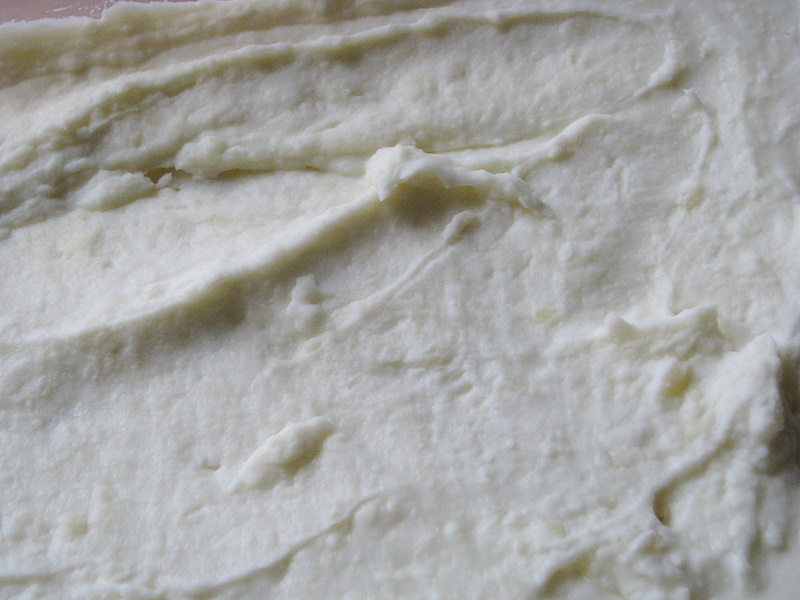
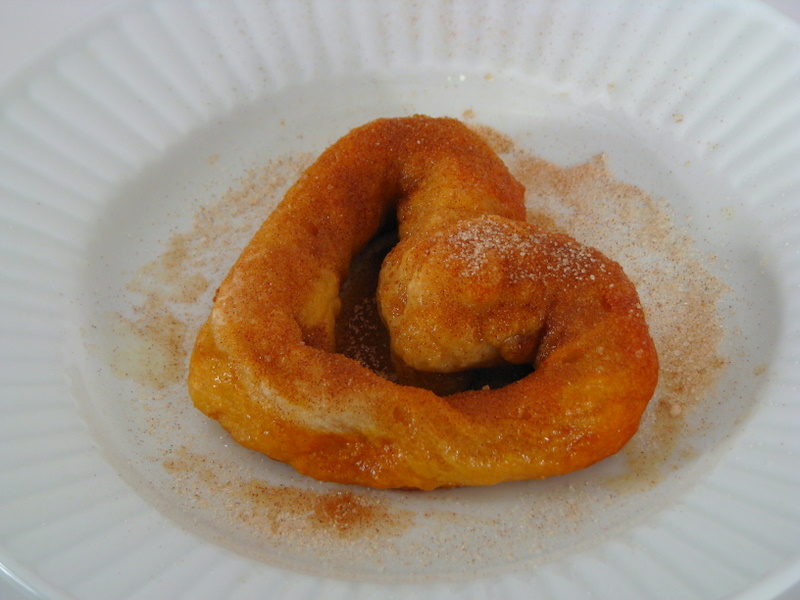
Delicious? This picture might be deceiving!

I took the hot pretzels out of the oven. The bottoms were brown, the tops were still doughy. I stuck them back in for two more minutes and melted butter. Yup, another pan! I brushed the butter on top and ran one down to take a picture of it. It actually looked yummy! I gave my husband the first one and he devoured it. He ate a second. Maybe I was a success.

Then I took a bite and I literally spit it on my plate. It tasted like baking soda through and through. Meanwhile, Emily has happily ate almost the entire pretzel and then suddenly looks at me with utter disgust and hands her pretzel back to me. “I no like this, mommy.” I think the cinnamon and sugar threw her off from the disgusting taste.

I didn’t cry as I surveyed the damage in my kitchen and hurled the poor excuse for pretzels in my trash can. It is the thought that counts, perhaps, but I shall never think this thought again.

Conclusion: I will never ever make pretzels again. I will leave this task to the highly trained people at the mall and I will pay six dollars (or whatever outrageous amount is charged) to have someone else do this for me.

Call me lazy, but some things are better left to the professionals and this is one of those tasks I can’t see myself repeating.

If you have made pretzels before, please feel free to share your tips! What has been your biggest cooking disaster?

**********************
Want to join in on the MomAdvice No Spend Challenge? Make sure to add your name to the linky list and read more about our challenge. You can also join our No Spend Challenge Flickr Group and upload your pictures of what you did each day.

To read all the entries on not spending, you can visit our No Spend Challenge category!
********************

I am so excited to open our Notebook Experiments up to everyone and I hope that you will be able to participate this week or in weeks to come! I will be posting this each Wednesday so please mark your calendars if you plan to participate. You can post your entries at any time throughout the week and then leave your entry in the links below.

We have this handy banner that you are more than welcome to use, but it is not a requirement! It is just something you can add to add a little sparkle to your entry.

Rules for Participation:

1. Choose anything from any of our notebook entries (past or present) to do with your family. We have hundreds of bookmarked links of crafts, ways to save money, and organizing ideas.
2. Complete an experiment from the notebook and share about it on your blog or website. We would love to see pictures of what you accomplished or a detailed description of how your projects turned out. Please include a link to this entry, a link to the original posting of the entry (at the original crafster’s blog), and (to help us relocate the project) the date or link of the notebook entry where you found it. You can use the same formatting as our entries or you can just include that information in your post in your own unique way!
3. Post a link below. Please include your name or blog name & a fast description of your project. Example- MomAdvice (WHO bread)

I can’t wait to see what you create and what you find inspiring!

Sugar Cookie Frosting

Sunday, January 18th, 2009

Sugar Cookie Frosting

4 cups confectioners sugar
1/2 cup shortening
5 tablespoons milk
1 teaspoon vanilla extract
Food coloring

In a large bowl, cream together confectioners sugar and shortening until smooth. Gradually mix in milk and vanilla with an electric mixer until smooth and stiff, about five minutes. Color with food coloring if desired.

Soft Sugar Cookies With Frosting

Sunday, January 18th, 2009

Soft Sugar Cookies

2/3 cup butter-flavored shortening
2/3 cup butter
1 1/2 cups sugar
2 eggs
2 teaspoons vanilla extract
2 1/2 cups flour
2 teaspoons baking powder
1 teaspoon salt

Preheat oven to 350 degrees. In a bowl, cream together butter, shortening, and sugar. Stir in the eggs and the vanilla. Combine flour, baking powder and salt and add these to the creamed mixture. Chill dough for one hour in a bowl covered with plastic wra. Roll dough into walnut size balls and roll balls in sugar (unless frosting). Place on an unprepared cookie sheet. Bake ten to twelve minutes or until the bottoms are lightly browned. Remove from sheets and allow to cool.

Sugar Cookie Frosting

4 cups confectioners sugar
1/2 cup shortening
5 tablespoons milk
1 teaspoon vanilla extract
Food coloring

In a large bowl, cream together confectioners sugar and shortening until smooth. Gradually mix in milk and vanilla with an electric mixer until smooth and stiff, about five minutes. Color with food coloring if desired.

Spiced Pumpkin Bread

Sunday, January 18th, 2009

Spiced Pumpkin Bread

3 cups sugar
1 cup vegetable oil
3 large eggs
1 16-ounce can solid pack pumpkin
3 cups all purpose flour
1 teaspoon ground cloves
1 teaspoon ground cinnamon
1 teaspoon ground nutmeg
1 teaspoon baking soda
1/2 teaspoon salt
1/2 teaspoon baking powder
1 cup coarsely chopped walnuts (optional)

Preheat oven to 350°F. Butter and flour two 9x5x3-inch loaf pans. Beat sugar and oil in large bowl to blend. Mix in eggs and pumpkin. Sift flour, cloves, cinnamon, nutmeg, baking soda, salt and baking powder into another large bowl. Stir into pumpkin mixture in 2 additions. Mix in walnuts, if desired.

Divide batter equally between prepared pans. Bake until tester inserted into center comes out clean, about 1 hour 10 minutes. Transfer to racks and cool 10 minutes. Using sharp knife, cut around edge of loaves. Turn loaves out onto racks and cool completely.

Fast Coffee Cake

Sunday, January 18th, 2009

Fast Coffee Cake

1 package vanilla instant pudding
1 package yellow cake mix
½ cup oil
4 eggs
1 cup orange juice

Mix these ingredients together and then swirl the following through the cake batter 1/3 c. sugar, 4 t. cinnamon, 4 t. sesame seeds (optional). Bake for 50-60 minutes at 350 degrees in a well-greased and floured bundt pan. Allow cake to cool for 45-60 minutes in pan. Sprinkle with powdered sugar.

Fast Peanut Butter Cookies

Sunday, January 18th, 2009

Elaine’s Peanut Butter Cookies (Courtesy of AllRecipes.com)

1 (18.25 ounce) package yellow cake mix
1 cup creamy peanut butter
1/2 cup vegetable oil
2 eggs
2 tablespoons water

1. Preheat oven to 350 degrees F (175 degrees C).

2. Pour the cake mix into a large bowl. Make a well in the center, and add peanut butter, oil, eggs, and water. Mix until well blended. Drop by teaspoonfuls onto ungreased cookie sheets. Flatten slightly using a fork dipped in water.

3. Bake for 10 to 12 minutes in the preheated oven. Let cookies set on cookie sheet for 2 to 3 minutes before carefully removing from the cookie sheet to cool on wire racks.

Lovely Little Birthday Cake

Monday, December 22nd, 2008


Emily celebrated her third birthday this weekend and made a few special birthday requests. She wanted presents, a party hat, a purple cake, and purple balloons.

I headed over to Michael’s and got the supplies to make this cake. I baked a white cake (using the white cake mix from Aldi) and baked it in a 9×13″ pan. While the cake baked, I made two batches of frosting. I tinted one cup of frosting white, two cups yellow, and three cups purple.

I let the cake cool and then popped it in the freezer (I froze mine overnight). In the morning, I put on a layer of yellow frosting and then piped rosettes as a border on the cake. The top was then covered in purple rosettes and then sprinkled generously with rainbow sprinkles.

To make the rosettes, I used a 1M tip bought at Michael’s. If you desire a smaller size rosette, you can use a #18 tip, which would be great for cupcakes or adding a little addition to your border.

To make a rosette, fill your piping bag with icing. Hold your bag at a 90 degree angle, with the tip slightly above the surface. Squeeze out the icing to form a star and without releasing pressure, move the tip in a tight complete rotation, starting at 9:00, moving to 12:00, then to 3:00, then 6;00, and then end it back at 9:00. Stop the pressure and lift your tip away. To see how to make these in pictures, I found this great little tutorial. If you want to fancy up the rosettes, you can add a dot in the center in a contrasting color.

I am no pro at cake decorating, but I have found the cake decorating classes offered by craft stores to be an invaluable tool to help me feel more confident in making birthday cakes for my children. It has really helped when my kids have come up with more unusual cake requests (like a Lego cake, for example) and it has saved us a lot of money over the years.

Here is the recipe for the frosting that I used for this cake!

Buttercream Frosting Recipe

1/2 cup solid vegetable shortening
1/2 cup butter or margarine
1 teaspoon vanilla extract
4 cups sifted confectioner’s sugar (approximately 1 pound)
2 tablespoons milk

Cream the butter and shortening with an electric mixer. Add vanilla. Gradually add the sugar, one cup at a time, beating well on medium speed. Scrape sides and bottom of bowl often. When all the sugar has been mixed in, the icing will appear dry. add milk and beat at medium speed until light and fluffy. (Yields 3 cups). Store icing in the refrigerator when not in use. Rewhip before using.

For Chocolate Buttercream Icing: Add 3 oz. melted unsweetened chocolate and 1 tablespoon more milk to the Buttercream Icing recipe.

For Stiffer Frosting (if needed when decorating): Substitute all vegetable shortening and 1/2 teaspoon butter flavoring.

Do you make birthday cakes or opt to buy them? What are some ways you save money on birthday celebrations?

My Favorite Frosted Sugar Cookies

Monday, December 8th, 2008

I love decorating cookies with the kids and these are a batch that we whipped up this past week. We let the kids have a decorating extravaganza and they were able to not only decorate our tree, but also decorate these cookies too.

These cookies would be great just plain and rolled in sugar, but I am frosting girl myself. I just can’t resist a smear of frosting on a sugar cookie.

With a little frosting and a shake of sprinkles, these cookies rival those yummy sugar cookies at the mall. May I recommend not rolling them in sugar though if you are doing the frosting? It is a little too much sugar even for the sugar-addicts in the group.

Soft Sugar Cookies

2/3 cup butter-flavored shortening
2/3 cup butter
1 1/2 cups sugar
2 eggs
2 teaspoons vanilla extract
2 1/2 cups flour
2 teaspoons baking powder
1 teaspoon salt

Preheat oven to 350 degrees. In a bowl, cream together butter, shortening, and sugar. Stir in the eggs and the vanilla. Combine flour, baking powder and salt and add these to the creamed mixture. Chill dough for one hour in a bowl covered with plastic wrap. Roll dough into walnut size balls and roll balls in sugar (unless frosting). Place on an unprepared cookie sheet. Bake ten to twelve minutes or until the bottoms are lightly browned. Remove from sheets and allow to cool.

Sugar Cookie Frosting

4 cups confectioners sugar
1/2 cup shortening
5 tablespoons milk
1 teaspoon vanilla extract
Food coloring

In a large bowl, cream together confectioners sugar and shortening until smooth. Gradually mix in milk and vanilla with an electric mixer until smooth and stiff, about five minutes. Color with food coloring if desired.

Do you have a favorite holiday cookie or holiday cookie recipe you would like to share? I would love to see what graces your cookie platters!

Make-Ahead Mashed Potatoes

Monday, November 17th, 2008


This will be my first year hosting the family Thanksgiving dinner so I am working on putting our food together to pop in the freezer so I can enjoy the day free from worries about everything getting done. What is one of my least favorite things to make? Mashed potatoes! I find them to be a little labor-intensive and they can dirty a lot of pots. It is a Thanksgiving staple though so I thought I would figure out how I could make them ahead of time.

I had found a recipe for mashed potatoes that not only freeze beautifully, but they also can be reheated on low in the slow cooker. Both of these qualities make them a winner because I can keep the oven freed up for the other dishes and I can make them early.

Here is my recipe, adapted to our personal taste, perfect for any holiday get together! These are creamy and have a hint of tang to them from the sour cream. Sprinkle with a little paprika, if you so desire, and enjoy the convenience of pulling these out of your freezer for this holiday season.


Make-Ahead Mashed Potatoes
Serves 15

5 pounds of potatoes
1 block (8 oz) of low-fat cream cheese, softened
3/4 cup low fat sour cream
4 tablespoons butter
3/4 cup milk (or more if desired)
1 1/2 teaspoons salt

Peel potatoes and cut into small cubes. Throw the potatoes in a large pot filled with cold water. Cook for 25 minutes or until fork-tender. Drain the potatoes and put them back into the hot pot. Add cream cheese, butter, milk, and salt. Mash with a potato masher or use a hand mixer to whip the potatoes. Spoon mixture into a freezer-safe container and label.

Thanksgiving Day: Put potatoes in the fridge 1-2 days before to allow them to completely thaw. Spray slow cooker with cooking spray and put potatoes in the slow cooker. Brush the top of the potatoes with a tablespoon of butter and sprinkle with paprika. Cook on low for two to four hours.

If you would rather bake these, bake the potatoes at 350 degrees for thirty to forty minutes or until completely hot.

This side dish was entered in the Frugal Thanksgiving Mini-Series hosted by Frugal Upstate. Be sure to visit for more great Thanksgiving meal ideas!

Notebook Experiment: Can I Make Applesauce In My Slow Cooker?

Thursday, October 23rd, 2008

Experiment: Can I make applesauce in my slow cooker?

Experiment Taken From: Notebook Entry 09.25.08

Materials Needed: Please see A Year of Crockpotting for the full instructions on ideas for completing this task. I followed the instructions exactly, but doubled the recipe to make a bigger batch. I also employed the use of a blender to make the applesauce even smoother. My family has weird texture issues so that is why it was a necessary tool in this experiment. NORMAL people can handle apple chunks (like myself), but my children cannot.

Results: Today’s experiment got to happen because I have a very thoughtful and sweet neighbor across the street who brought me all of these beautiful apples. They have a friend that is a farmer so she brought over a big bag of apples for our family to enjoy. I was so excited to put them to good use and could think of no better way than making some of that homemade applesauce in my slow cooker.

I peeled and chunked up the apples for the slow cooker, and poured a little lemon juice over them to make sure that they didn’t brown. It takes me a loooong time to peel apples. I have one of those apple thingamabobs from Pampered Chef, but sometimes that takes just as long so I skipped it. I need to work on my knife skills anyway.

Since the house was already going to smell like apples, I put the apple peels and cores in a freezer bag so I could break them out when I want the house to smell nice. I love to put these in a pot with water and cinnamon and simmer them on my cleaning day.

Here’s my apples all cut up and ready to go. I sprinkled the cinnamon, brown sugar, and vanilla on them and added my water. I put the slow cooker on low for about five hours, and then checked the apples. They mashed easily so I gave them a good mashing and then put them in the blender to make it smoother for my strange eaters.

I served the applesauce with a rosemary stuffed chicken in my thrifted clay cooker, some herb buttered noodles, & mashed potatoes. My husband declared it a Thanksgiving feast and we dug in.

And the kids gobbled it up…except the applesauce. The color was a brown color instead of their usual yellow because of the addition of spices and brown sugar. I used my marketing background and promoted my product as best I could (“Oh, this CINNAMON applesauce is so delicious, isn’t it Daddy? I have never tasted such good applesauce in my life!”)

I fooled no one. Which was fine by me because my husband & I could have polished off the whole dish and not ever share it with anyone.

Conclusion: I might try this again without the spices and see if it goes over better with my children. If you have picky eaters, be aware of the color difference and don’t be scared to employ the use of a blender to make it smooth as pudding. Hopefully your family is better sports about trying something new than mine. Regardless, GREAT recipe and thank you to A Year of Crockpotting for sharing all of her slow cooker endeavors.

********************

I am so excited to open our Notebook Experiments up to everyone and I hope that you will be able to participate this week or in weeks to come! I will be posting this each Thursday so please mark your calendars if you plan to participate. You can post your entries at any time throughout the week and then leave your entry in the links below.

We have this handy banner that you are more than welcome to use, but it is not a requirement! It is just something you can add to add a little sparkle to your entry.

Rules for Participation:

1. Choose anything from any of our notebook entries (past or present) to do with your family. We have hundreds of bookmarked links of crafts, ways to save money, and organizing ideas.
2. Complete an experiment from the notebook and share about it on your blog or website. We would love to see pictures of what you accomplished or a detailed description of how your projects turned out. Please include a link to this entry, a link to the original posting of the entry (at the original crafster’s blog), and (to help us relocate the project) the date or link of the notebook entry where you found it. You can use the same formatting as our entries or you can just include that information in your post in your own unique way!
3. Post a link below. Please include your name or blog name & a fast description of your project. Example- MomAdvice (WHO bread)

I can’t wait to see what you create and what you find inspiring!