Archive for the ‘Crafts & Celebrations’ Category

Free Woodland Thanksgiving Printables & Decor Ideas

Monday, November 10th, 2014

Free Woodland Thanksgiving Printables & Decor Ideas

This post is sponsored on behalf of BHG at Walmart.

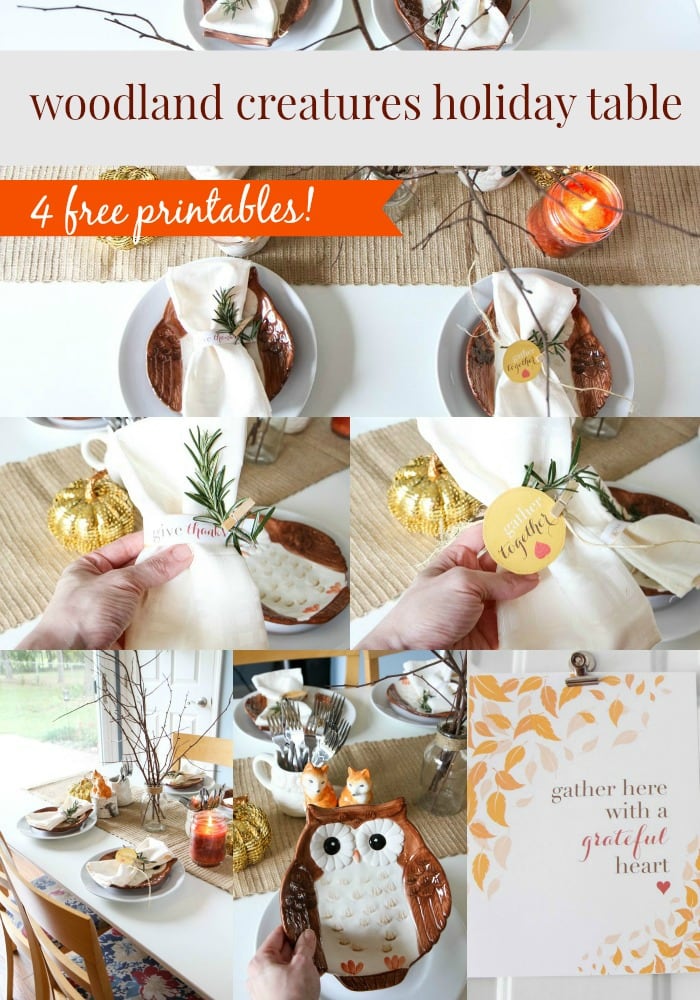
As part of the BHG Live Better Network, I am partnering with them this month to showcase a beautiful way to entertain for the holidays utilizing products from BHG that are available at Walmart.  Have you seen the woodland creatures line of dishes? Swoon- I am IN LOVE. These items are over in the seasonal display section of your store.  As someone who couldn’t be fonder of foxes or owls, I was so excited to see these beautiful dishes at the store and most of these items are under $3 each- what a fun way to dress up your table.

Free Woodland Thanksgiving Printables & Decor Ideas

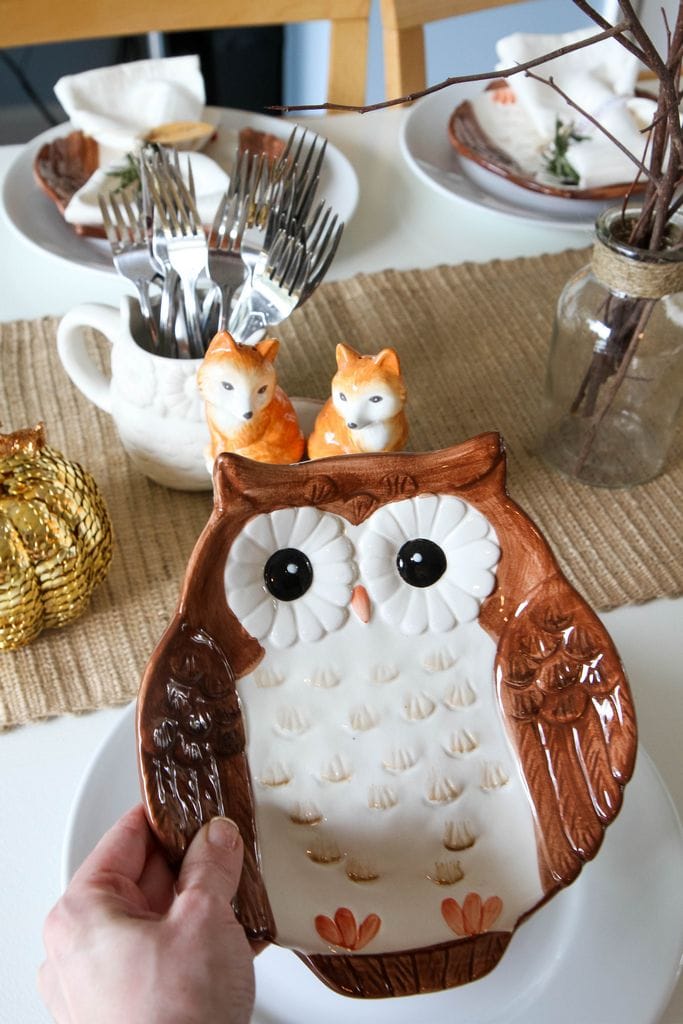
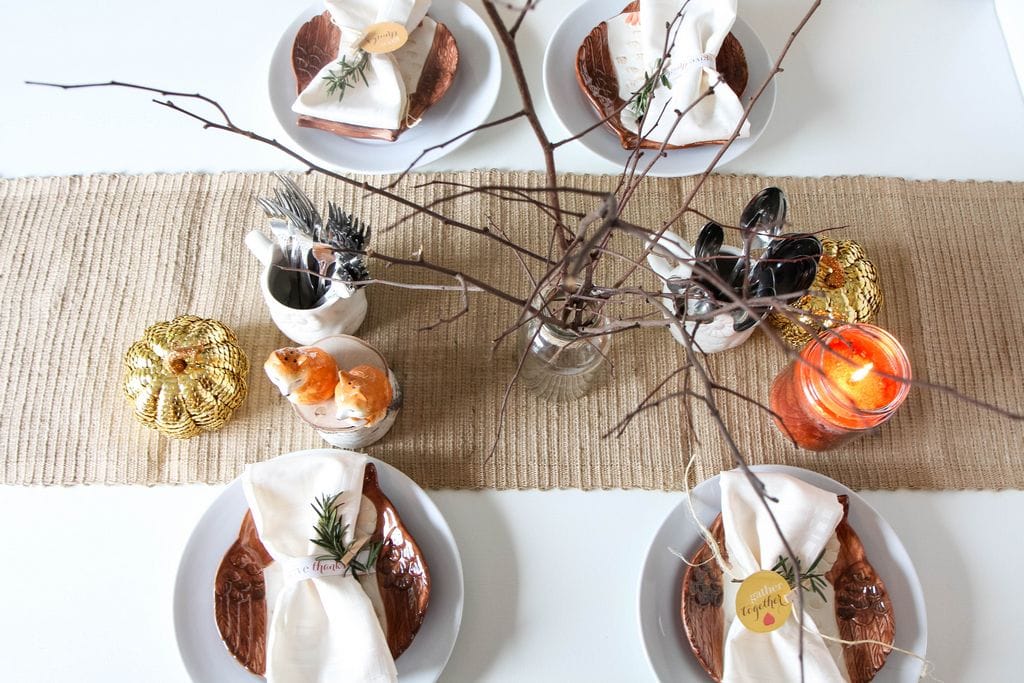
I used my basic white dishes as I do for every holiday and keep things economical by adding a fun design to my salad plates for the holidays each year. These owl plates are so sweet and add a little pop of color to my table. A natural table runner like this one helps add texture to my table and I used owl mugs to hold our forks and spoons for our dinner. The foxy salt and pepper shakers add a little woodland whimsy to round out the table.

Free Woodland Thanksgiving Printables & Decor Ideas 
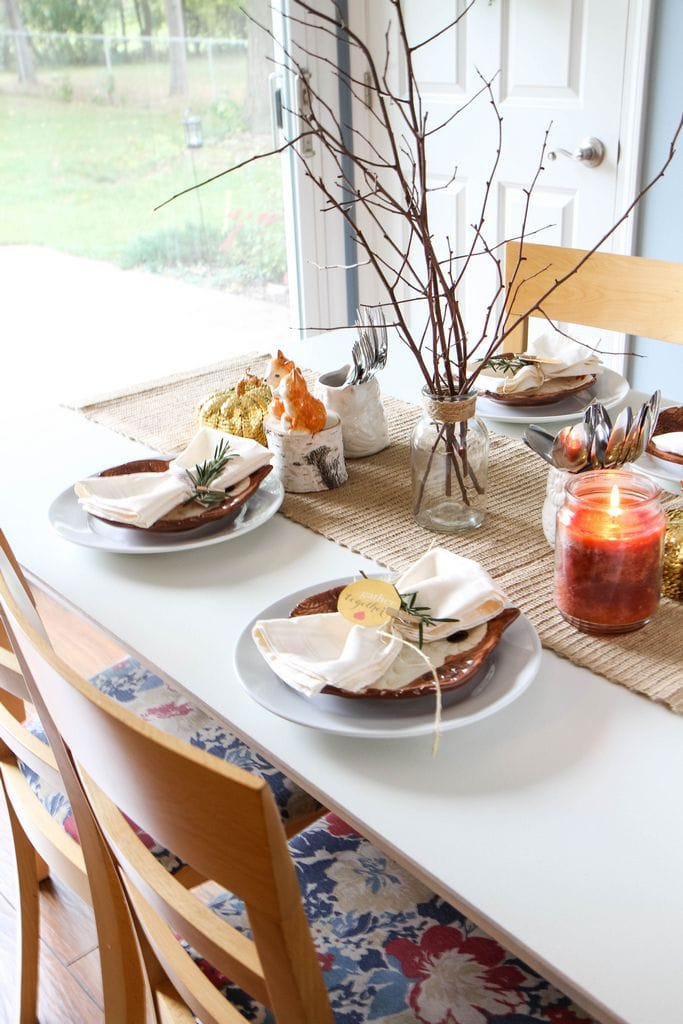
I used driftwood log cuts from our craft store to add different dimensions to the table, added a jar of branches from our backyard, and then added my DIY thumbtack pumpkins to finish the table.

Free Woodland Thanksgiving Printables & Decor Ideas

Free Woodland Thanksgiving Printables & Decor Ideas

Free Woodland Thanksgiving Printables & Decor Ideas

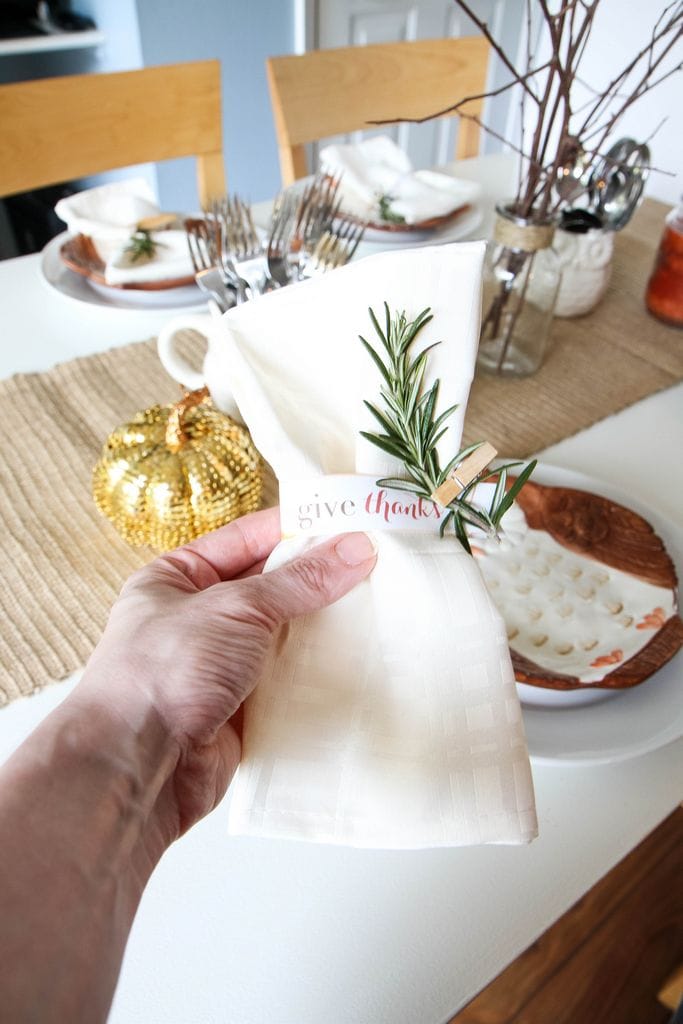
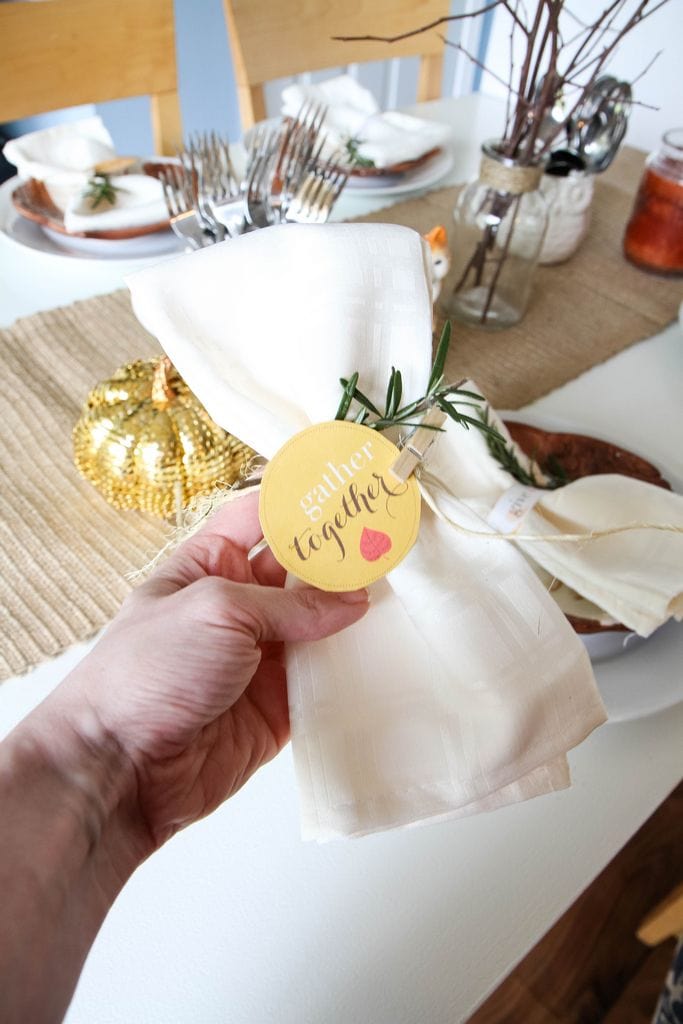
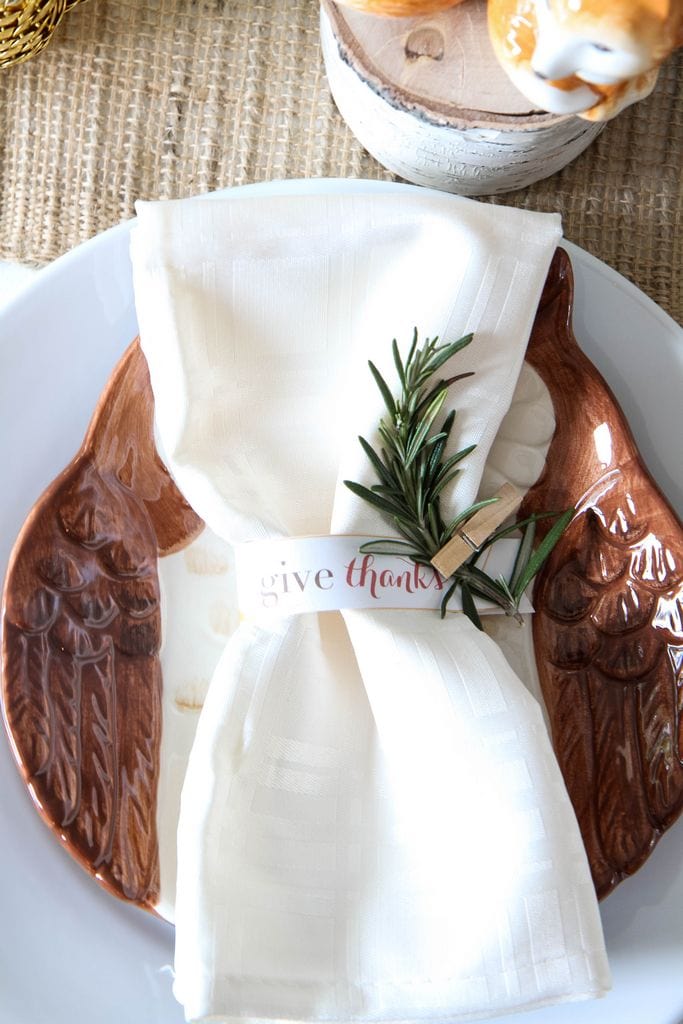
Crisp napkins made of stain resistant fabric are always top on my holiday shopping list for replacing each year. I found these over in the clearance section priced at a mere $1 each. I bought a package of rosemary, which adds a beautiful fragrance and a touch of green to the table, and clipped it with our free printable, “give thanks,” napkin tag and a mini clothespin.

You could also tie these napkins with a little jute twine and then clip the rosemary and, “gather together,” napkin tags to them, placing these on top of your owl plates. Print out all one variety of tag or use them both, alternating them at the place settings.

Free Woodland Thanksgiving Printables & Decor Ideas

Even with my burlap runner, this entire table setting (minus my white dishes) costs just a little over $30 for everything. I love an affordable touch and really love these trendy pieces that BHG is offering this year for the Thanksgiving table. These would also be adorable for a kid’s table for the holidays!

Free Woodland Thanksgiving Printables & Decor Ideas

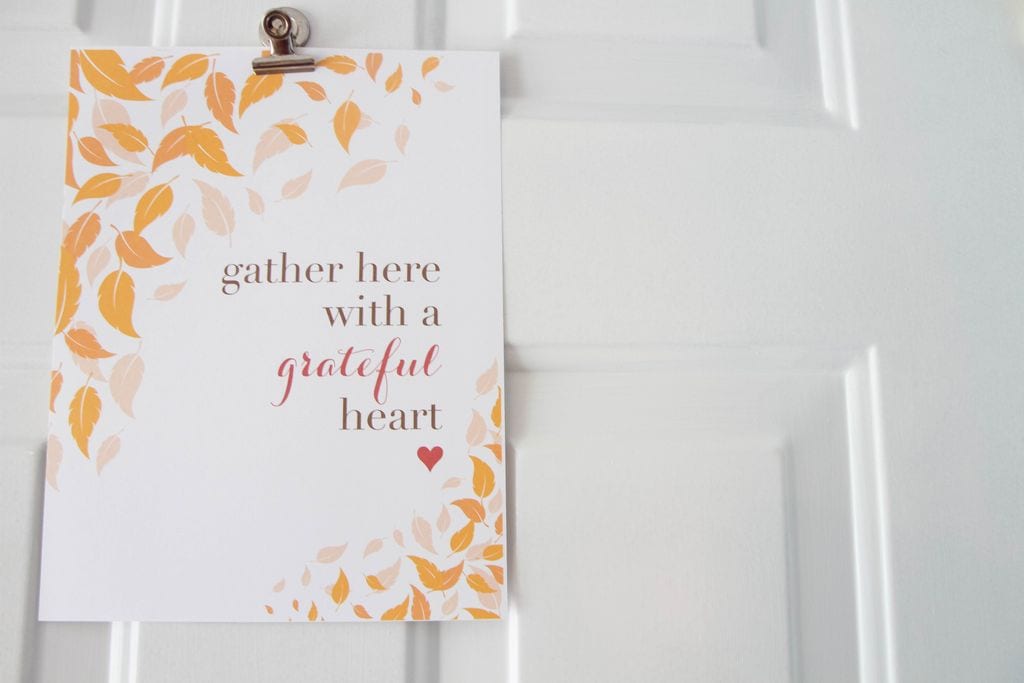
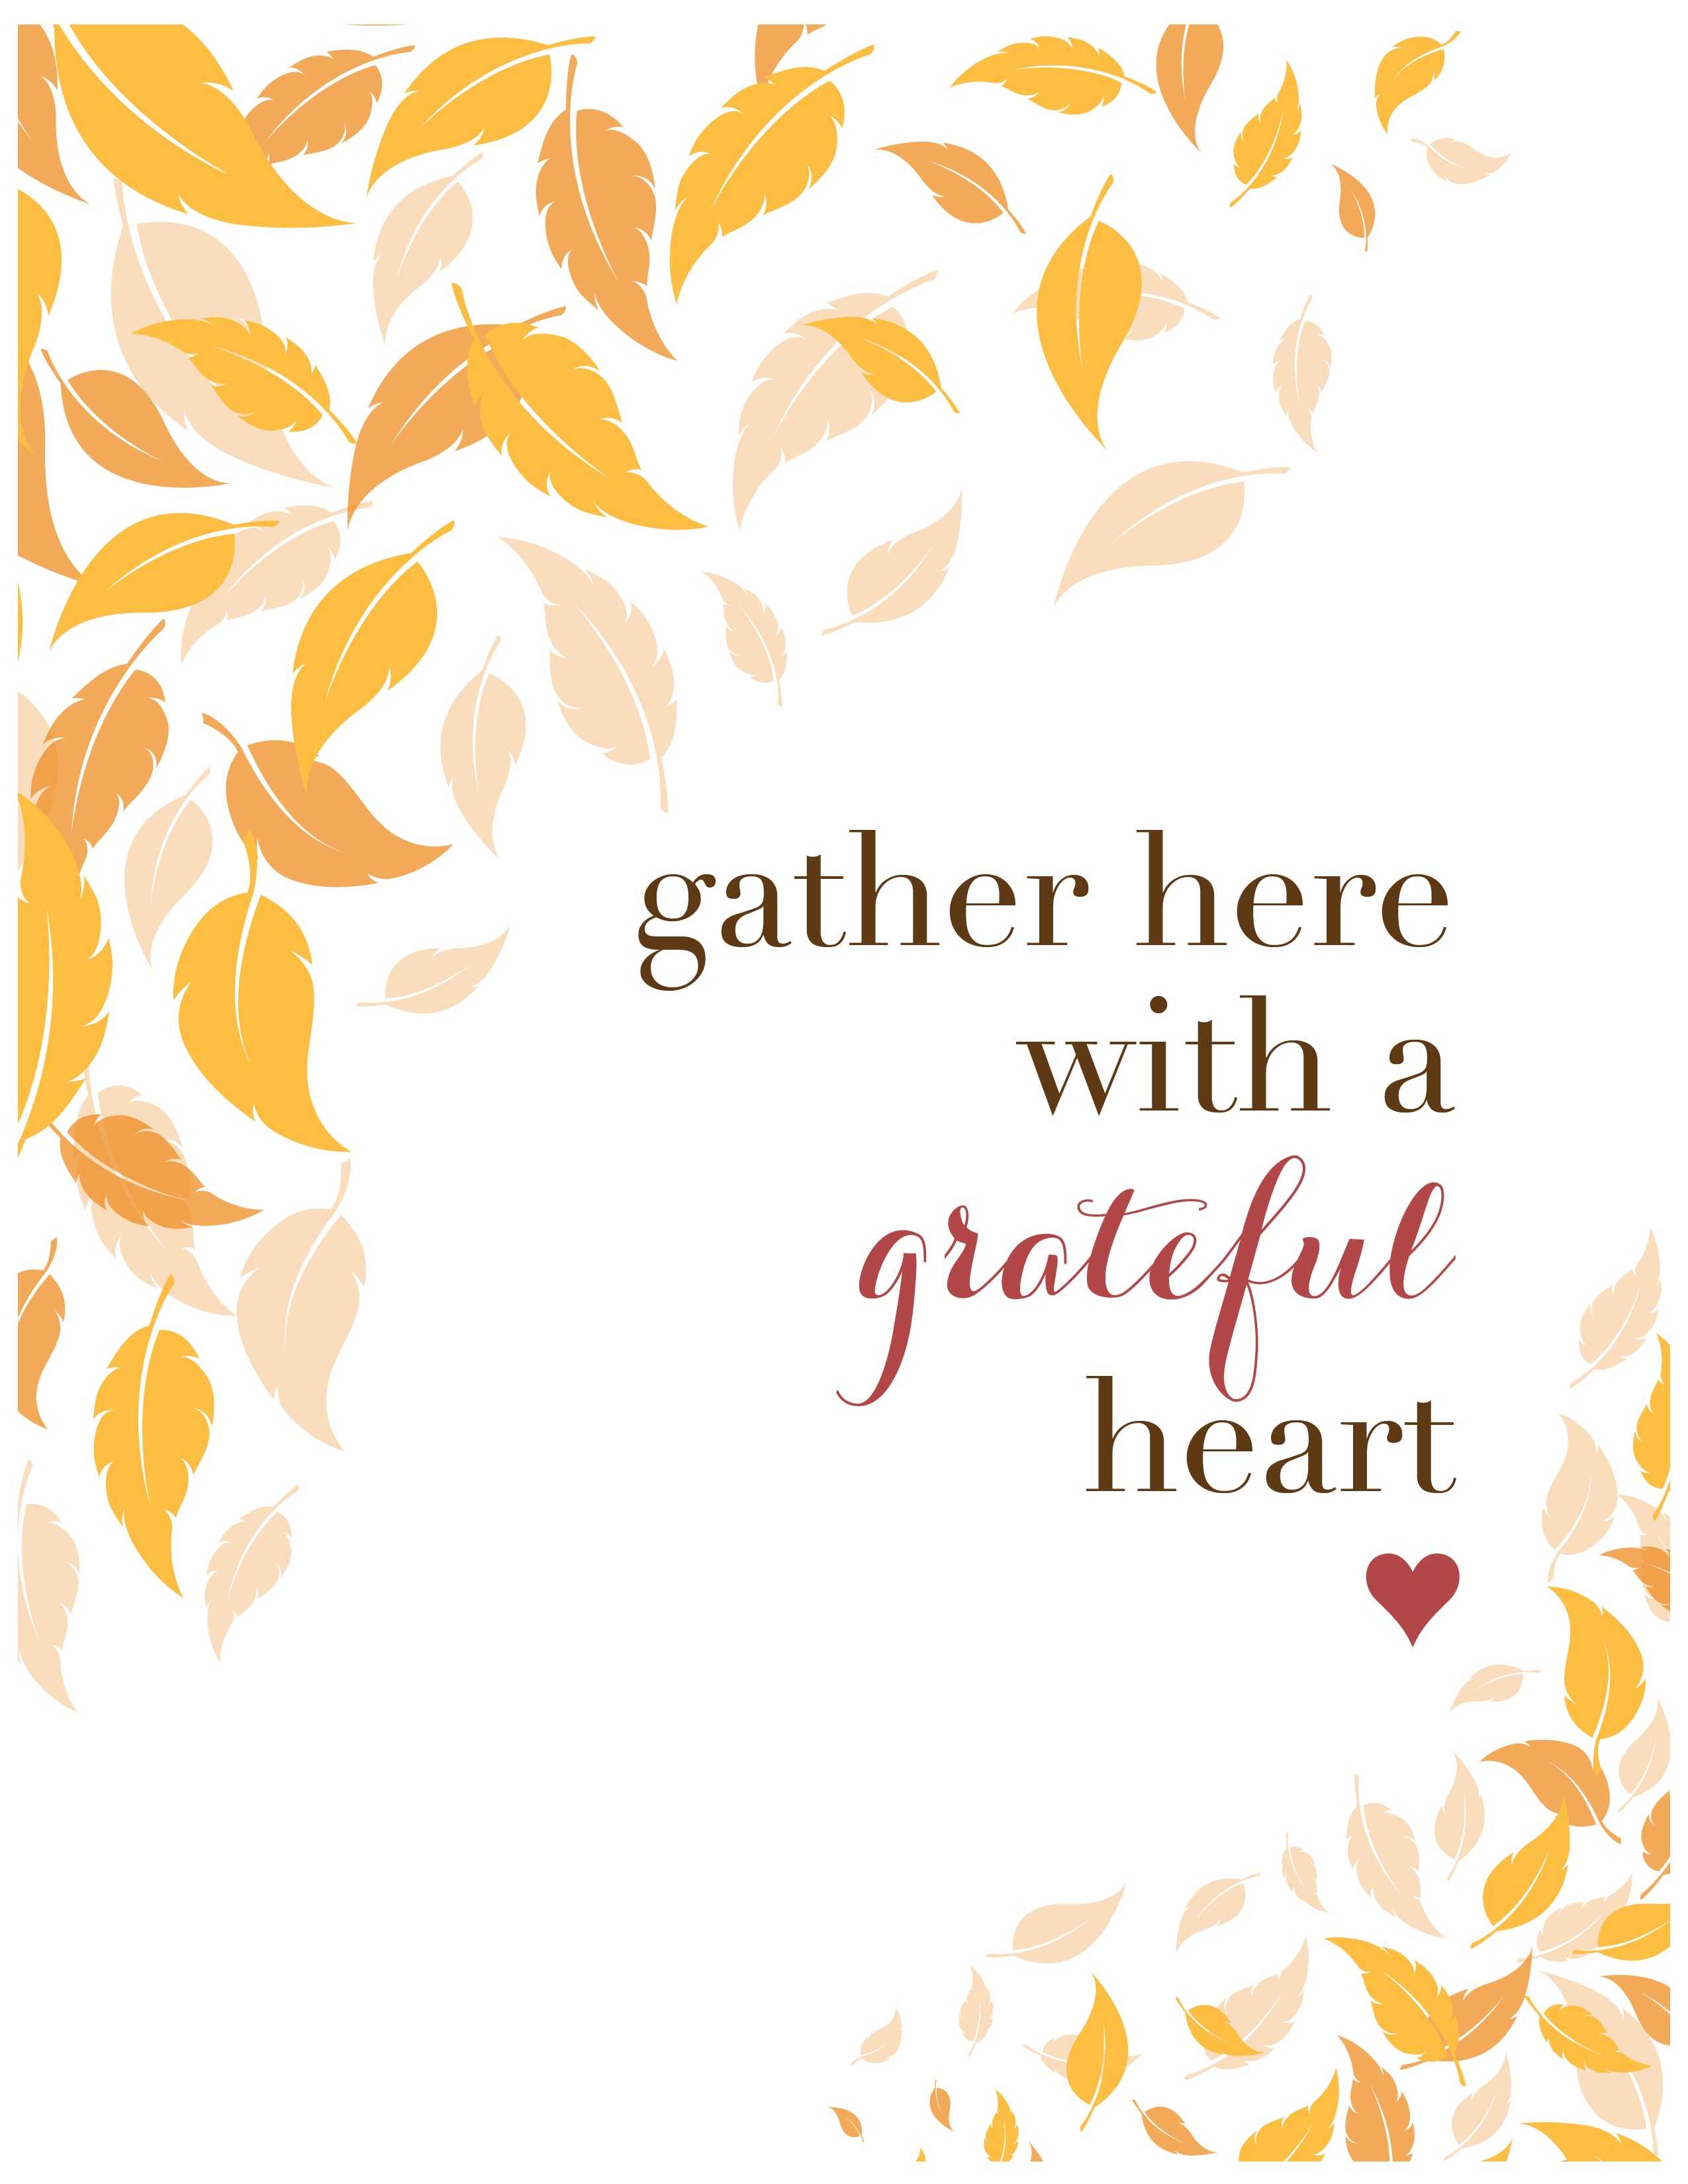
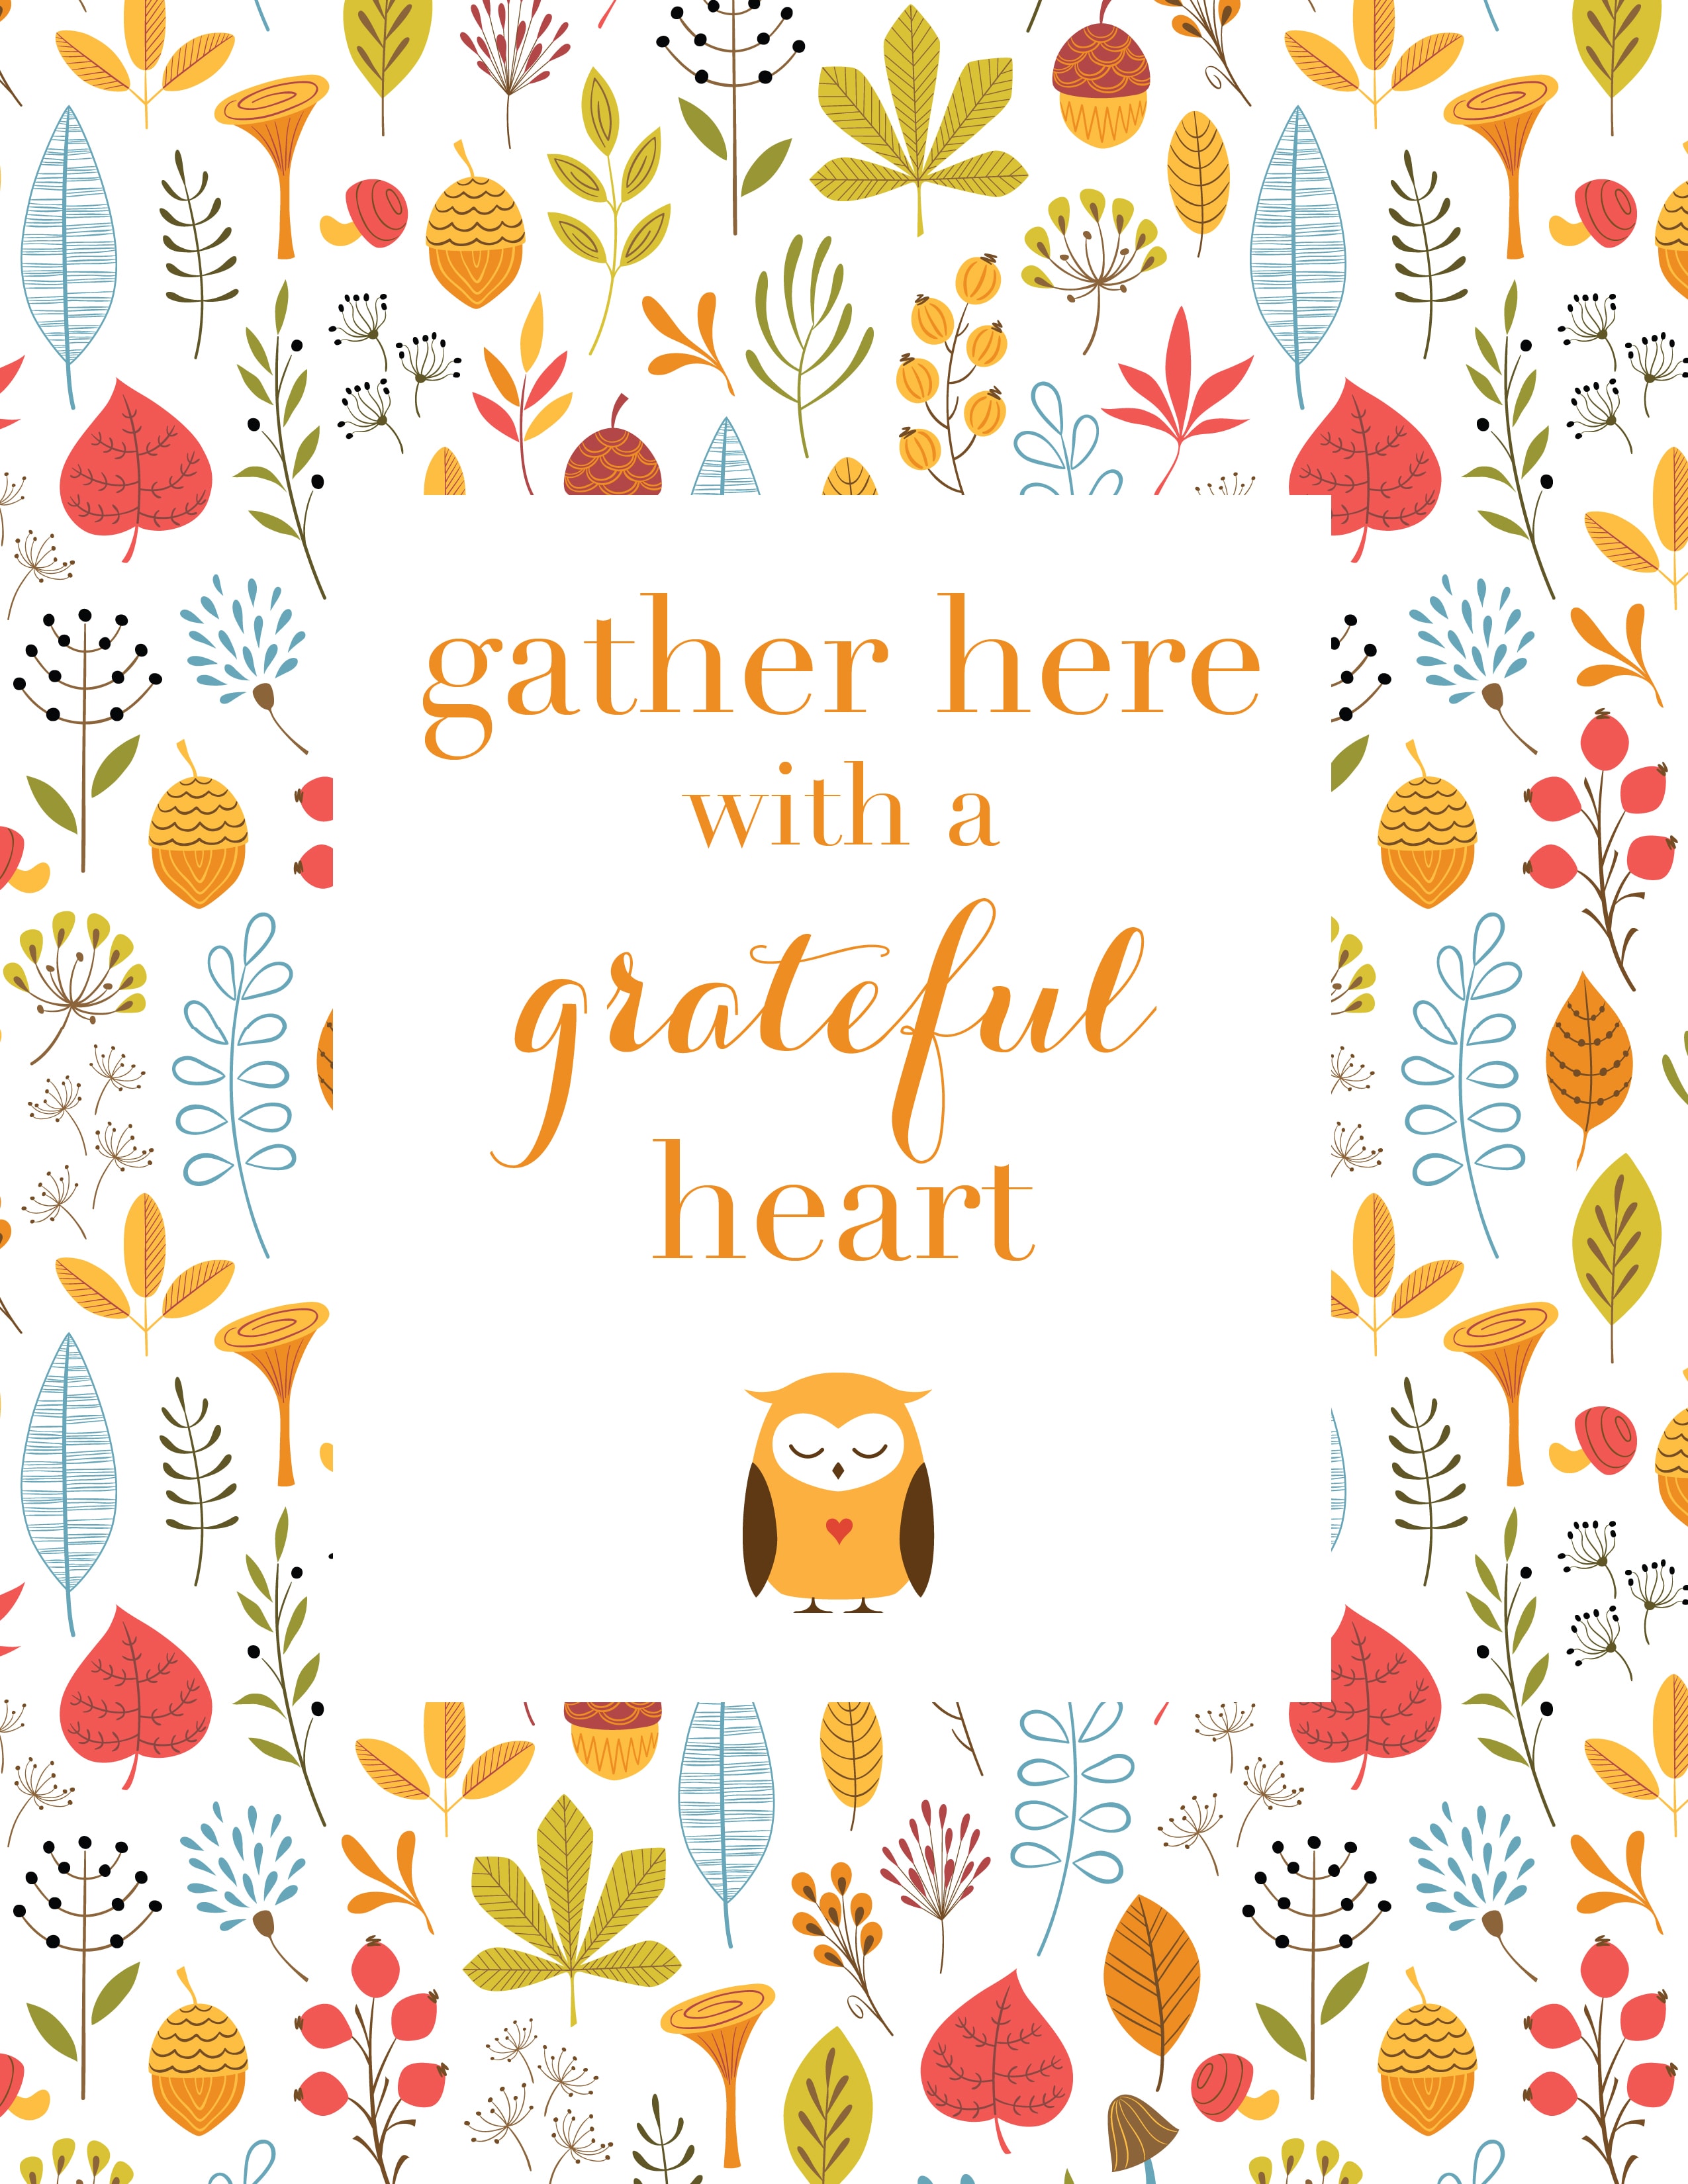
We also have these beautiful woodland printables that you can print and hang in your kitchen or foyer to welcome your guests to match with the rest of our beautiful printable offerings this year! To help your guest feel warmly welcomed, my amazing designer & contributor, Sarah Milne with sarah m style, has created these amazing printables that you can share with your guests for Thanksgiving Day.

Grab Your FREE Woodland Creature Printables:

Free Woodland Thanksgiving Printables & Decor Ideas

DOWNLOAD HERE

Free Woodland Thanksgiving Printables & Decor Ideas

DOWNLOAD HERE

Free Woodland Thanksgiving Printables & Decor Ideas

DOWNLOAD HERE

Free Woodland Thanksgiving Printables & Decor Ideas

DOWNLOAD HERE

Catch up on my other projects with BHG at Walmart:

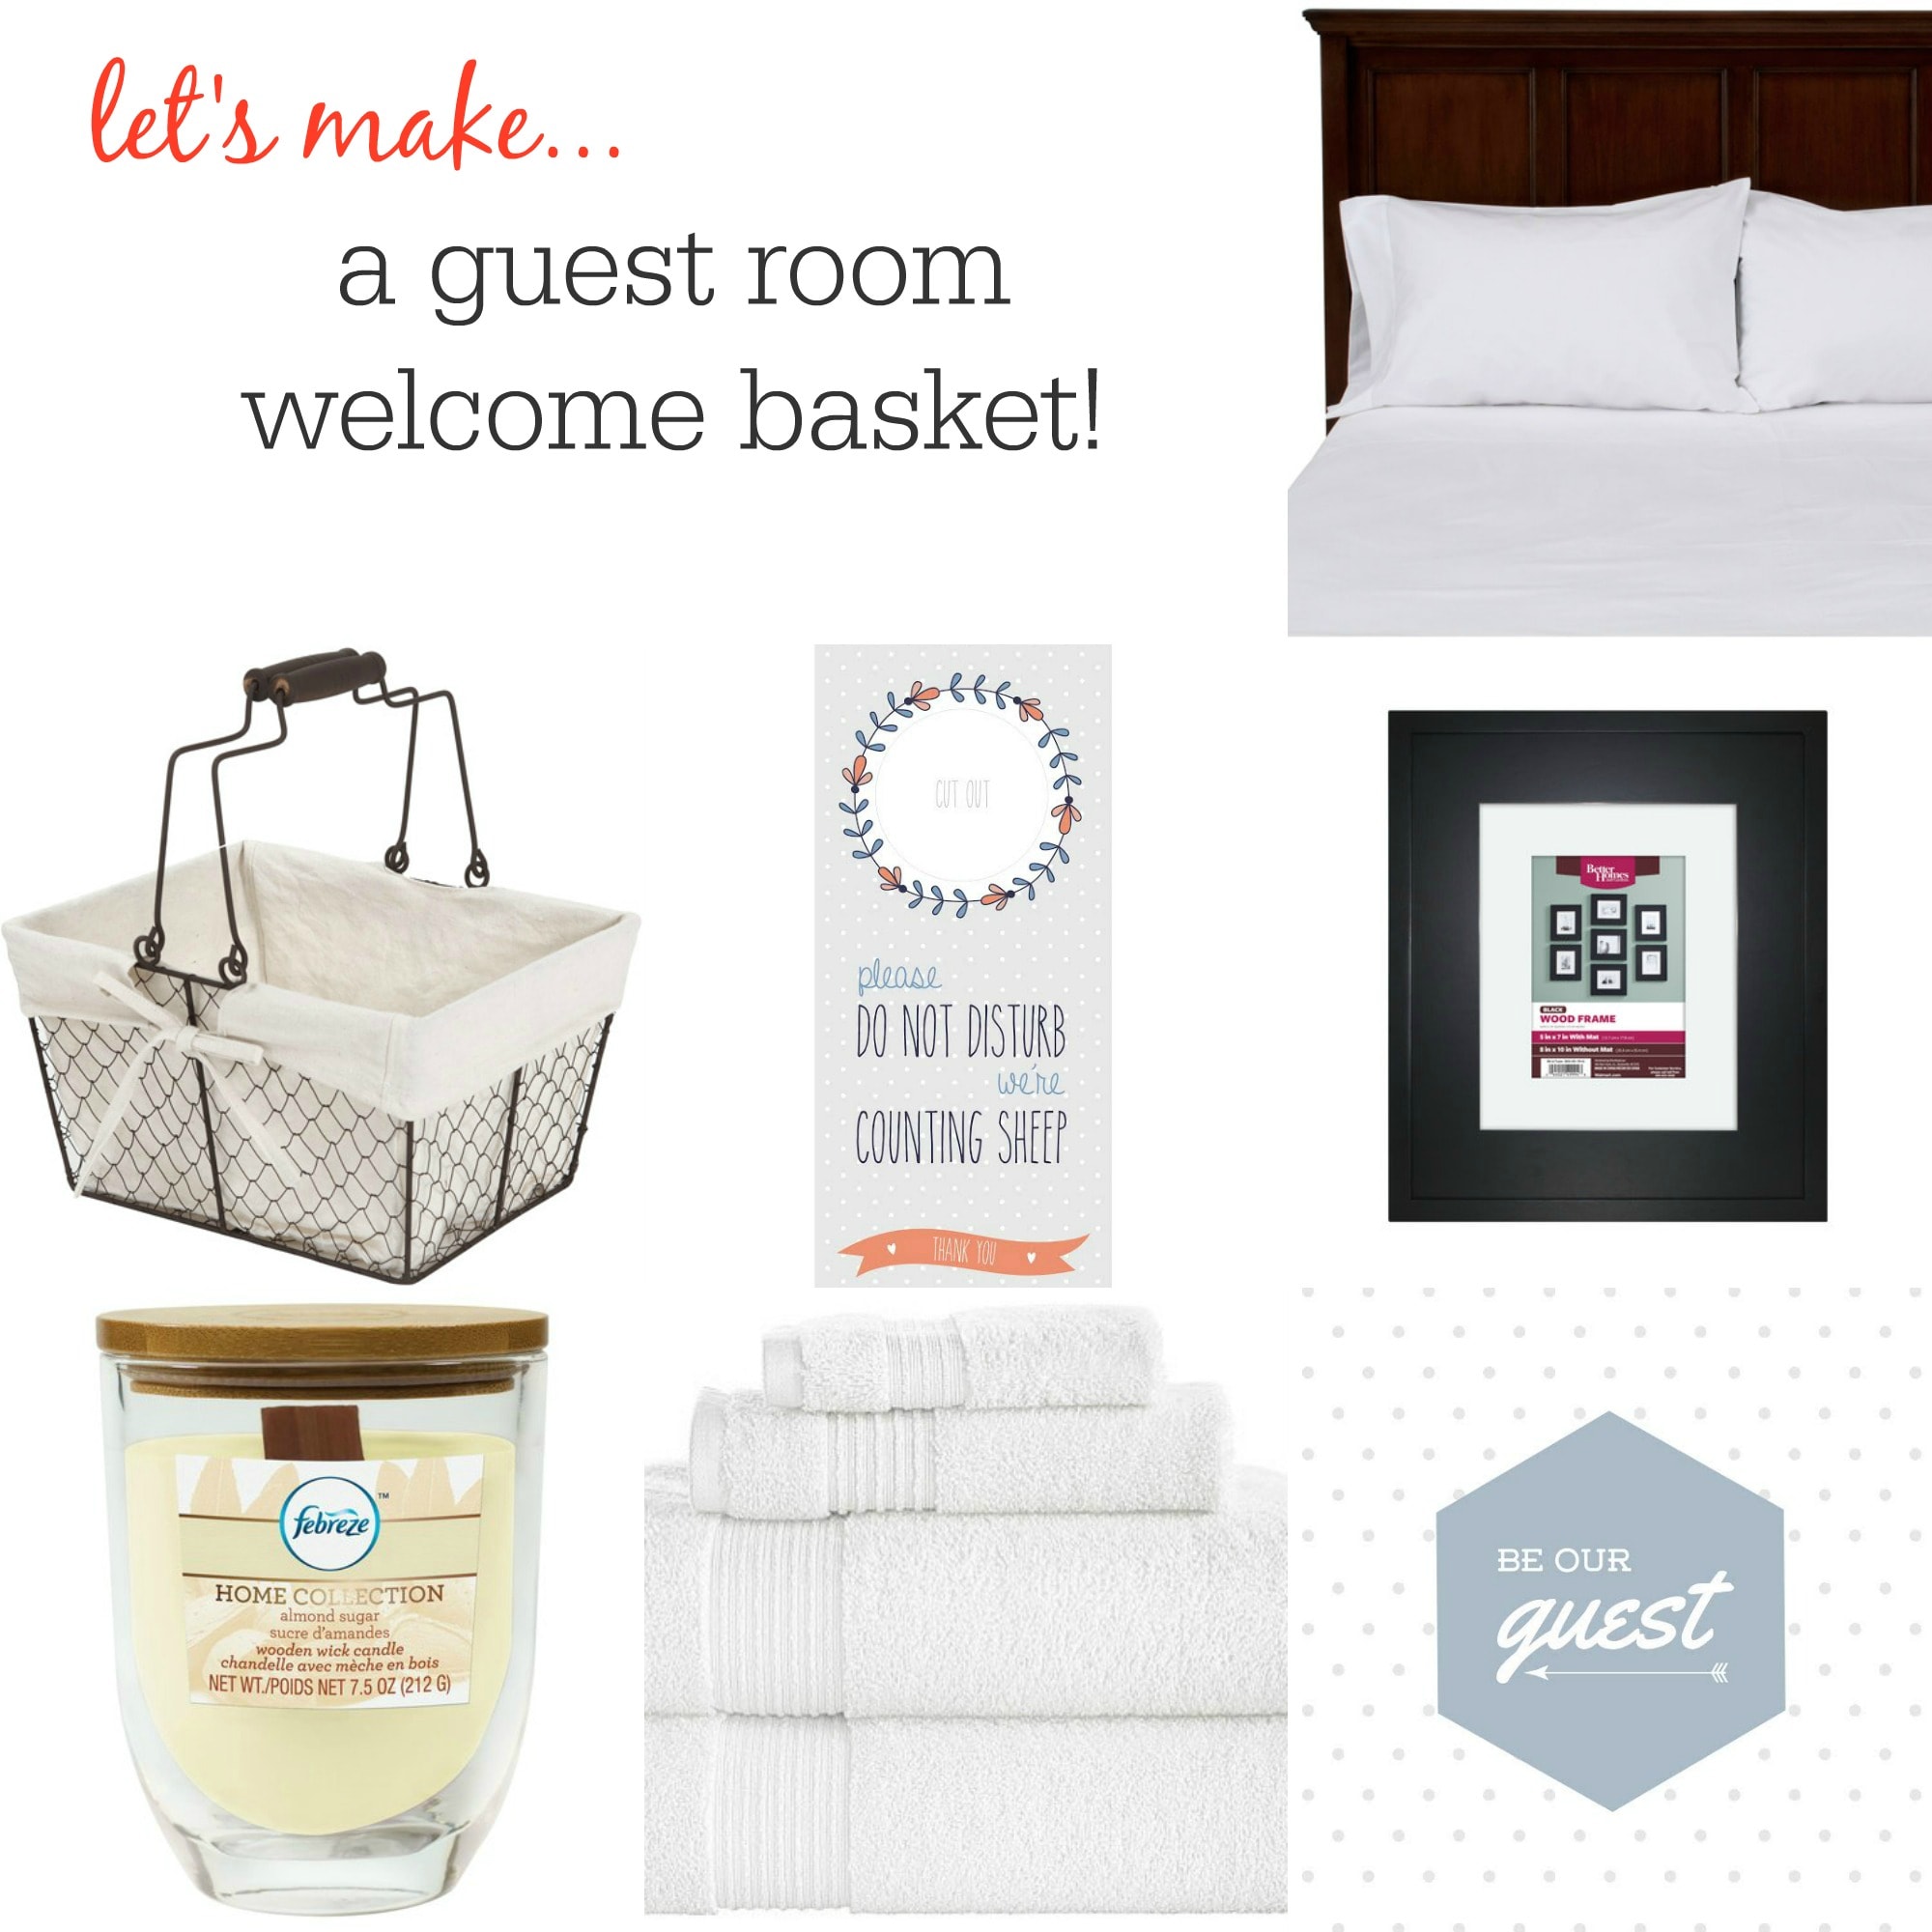
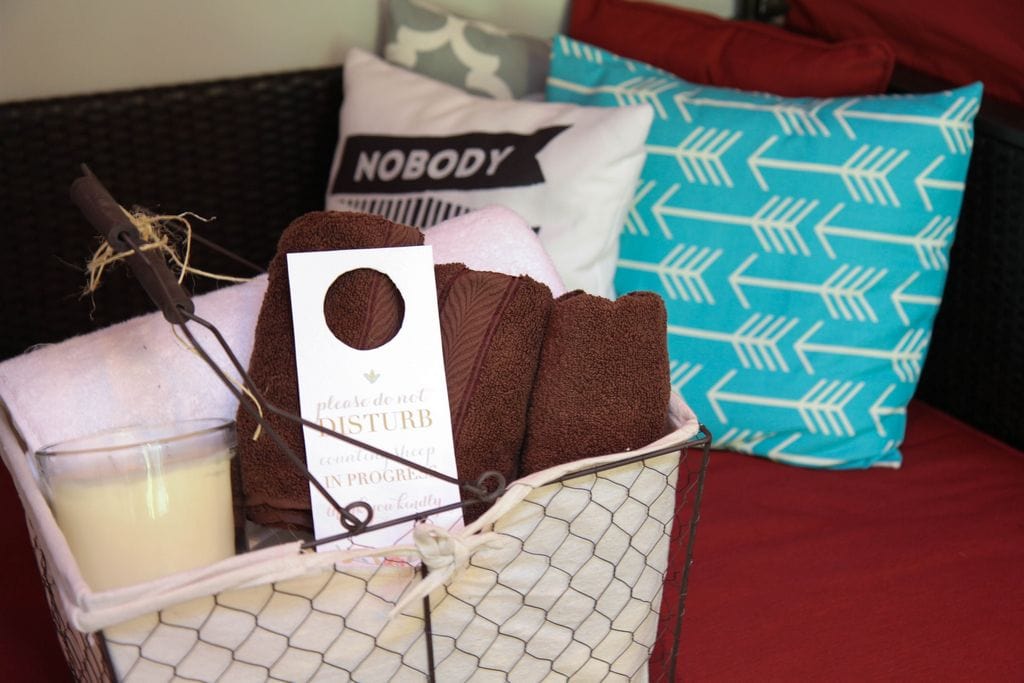
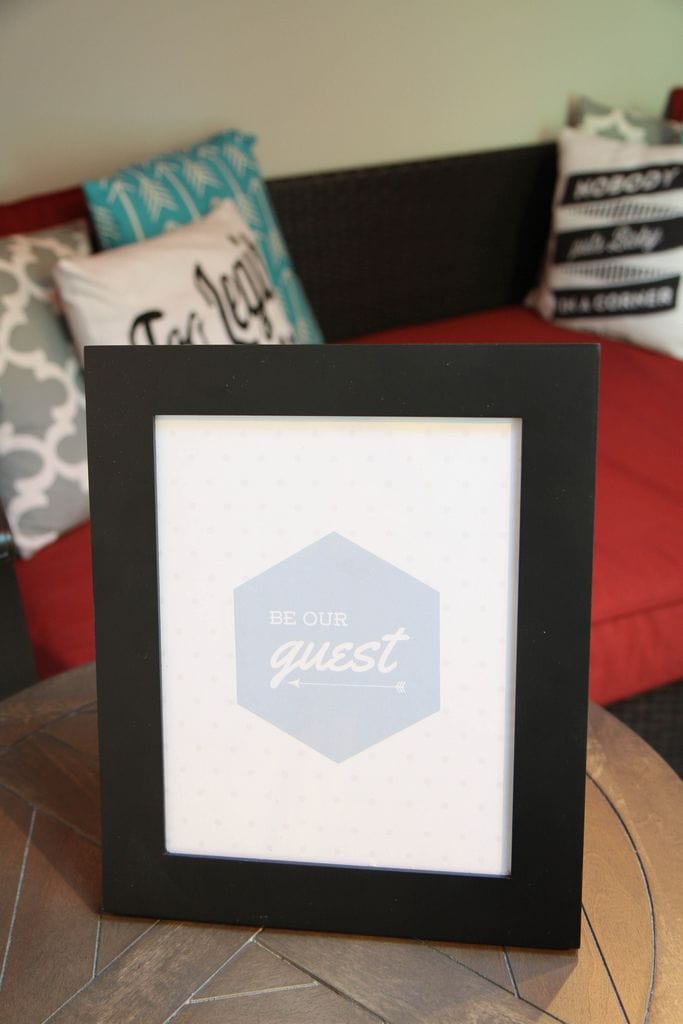
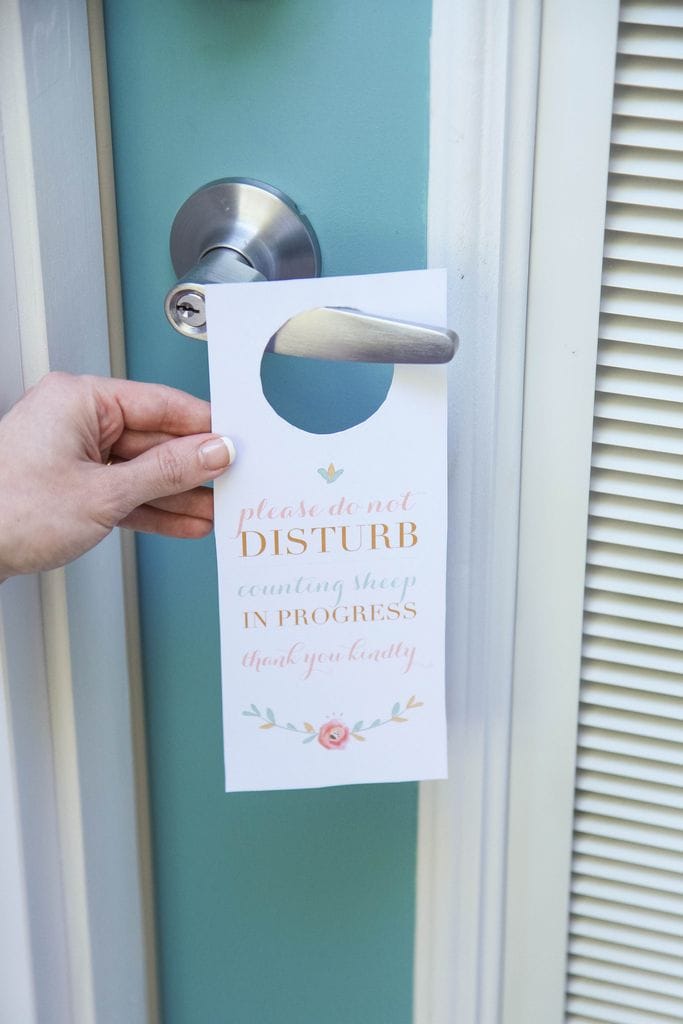
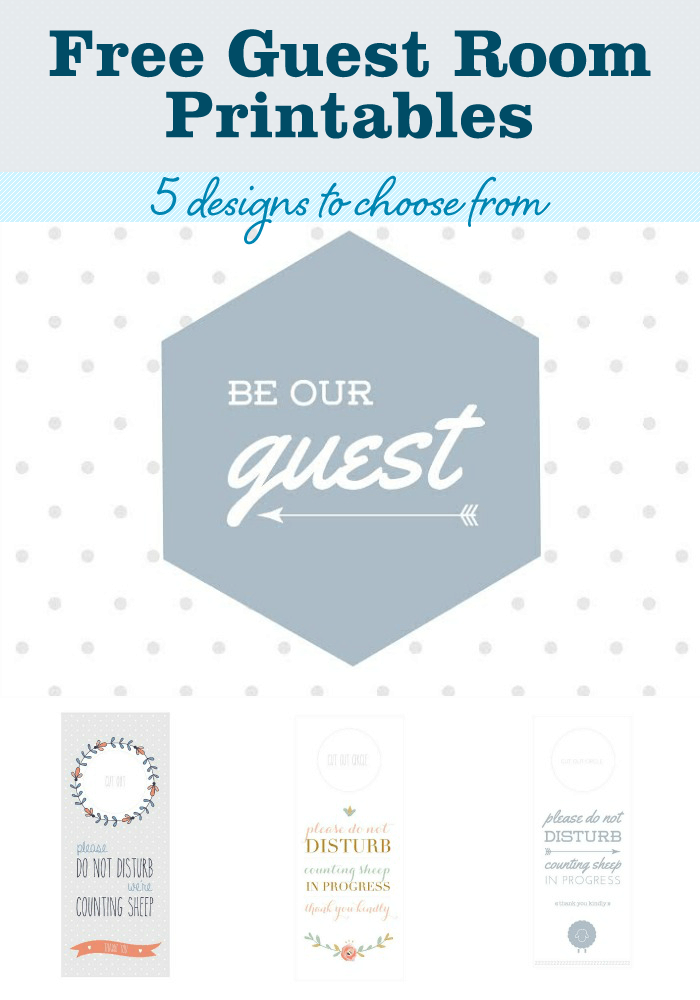
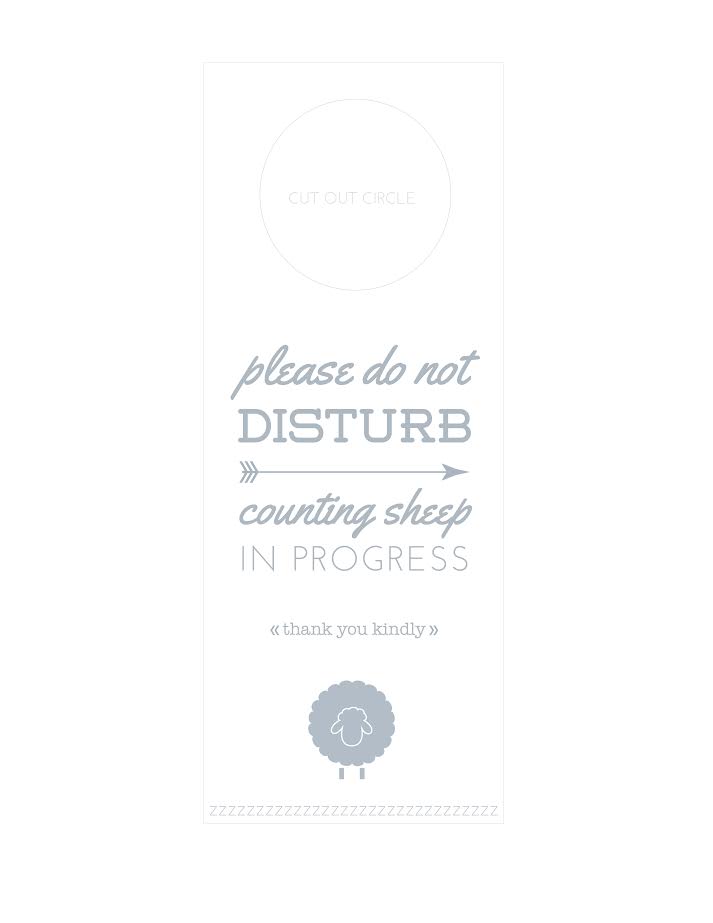
Make a Guest Room Welcome Basket (Free Guest Room Printables)

BHG Live Better Style Showcase

BHG Live Better Network

In accordance with the FTC Guidelines, I am disclosing that I received compensation from BHG at Walmart for my time and participation in the BHG Live Better Network. Although we have material connection to BHG, any publicly stated opinions of BHG and their products remain my own.

Fun New Ways to Dress Up Boots For Fall

Thursday, November 6th, 2014

Fun New Ways to Dress Up Boots For Fall

As soon as the temperatures start dipping, I know it is almost my favorite footwear season… boot season, friends!

There is nothing cozier than a warm pair of boots and this season, embellished boots and boot toppers are all the rage for making your boots feel fresh again.

Whether you score your boots at Goodwill or if you find the perfect pair elsewhere, I have some fun and creative ideas for making a tired pair of boots feel like new again with these 7 tutorials for fun ways to dress up your boots.

Add Some Fringe

Fringe boots are quite popular this year, but buying fringe boots might be out of your boot budget.

Instead of buying a bootie for a passing trend, check out these DIY Fringe Shoe Clips from Clones N Clowns made from a simple shoe clip and a little leather or faux leather (depending on your budget).

These look like they are part of the bootie, but are removable.

I love these not only for how customized these look, but also for how much space you can save by not buying multiple pairs of boots for one trend.


Make No-Sew Sweater Boots

If last season’s boots are looking tired or if you find a pair of UGG boots at Goodwill (which I REALLY have, if you can believe it!) adding a beautiful sweater detail can be a great way to refresh them for another season.
Since this blogger does not sew, I really love this fun no-sew sweater cuff that you can create from la vie DIY that can hide any imperfections in your boots.
The button detail could also be created with brooches, pins, or earrings that you find in the store!

Add Embellished Boot socks

If there is one thing that you can find at Goodwill in these Fall & Winter months, it is definitely loads of cozy sweaters.

This fun tutorial from My Sister’s Suitcase showcases adorable embellished boot socks you can create from old sweater sleeves.

The picture highlighted here showcases a fun striped sweater sleeve embellished with a ruffled ribbon detail, perfect for a little trick-or-treat fun for Halloween!

Add a Knitted Detail

I can’t sew, but I can knit so this past Fall, I created these easy knitted boot cuffs out of chunky yarn and big needles.

Thanks to the needle size and yarn, this is a fast and easy two hour knit project.

I highly recommend this project for someone who is just learning to knit in the round or as a first-time cabling project.

I promise that cabling looks far more complex than it really is and this is such a fun project to master the art of cabling since it is so small and quick!

I gave these beauties away to my best friend and have promised a few pairs for myself this year when I get back to knitting again this winter!

Add Faux Fur

Not only is fringe in this season, but faux fur seems to be enjoying its time in the Fall spotlight too.
I love a beautiful fur detail and these faux fur boot cuffs can transform a tired pair of boots into something new and on-trend.
Clones N Clowns strikes again with this adorable faux fur addition to her boots.
Be sure to scroll down all the way through the pictures to see how she adds this same adorable detail to a pair of Converse sneakers.
Say what?!
Awesome!

Add A Legwarmer Layer

Many tutorials showcase how you can use the top of a sweater sleeve to create a boot cuff, but why stop there?
With Indiana winters, I love an extra layer around my legs so consider using that whole sleeve off a second hand sweater as leg warmers to add warmth in these colder temperatures.
I love to look for sweaters with lots of details like striping, as pictured here, polka dots, or ones with interesting cables.
You can get the whole scoop on these DIY legwarmers made from a sweater on Petit Elefant.

Add a Little Lace

My favorite trends are always the very feminine ones and you can’t get more feminine than a little lace.
That is why I absolutely love these boot cuffs made from lace doilies for a fast and fun DIY boot cuff project.
These “pretend frilly socks” from Blah Blah Magazine are fast to create and can be embellished with a beautiful button to finish.

What are some fun ways you dress up your boots for Fall? Feel free to leave your ideas in the comments section below!

Excited for Fall? Check out more Fall crafts on MomAdvice.com:


Apple Wreath Tutorial


Slow Cooker Pumpkin Spice Candles


No-Sew Blanket Scarf


No-Sew Scarf with Hidden Pocket


This post contains affiliate links

SaveSave

SaveSave

SaveSave

SaveSave

Pin It

DIY Fitbit Bracelet Tutorial

Tuesday, October 21st, 2014

DIY Fitbit Bracelet Tutorial from MomAdvice.com.

This month I bought myself a Fitbit Flex and I have been absolutely loving it for exercise motivation, tracking my sleep, and its handy silent alarm feature. I did not, in fact, love the plastic bracelet that the Fitbit Flex came in. A plastic bracelet doesn’t really fit with my style and I didn’t want to wear it when I went out. Today’s tutorial is a fun way to dress-up your Fitbit with a stylish leather cuff alternative. This DIY Fitbit bracelet is beautiful and can be created for less than $10 and is done in just 5 easy steps.

I cannot take the credit for this amazing tutorial. My sweet friend, Andy,  let me come to her house and photograph how she made this for my blog. She was the genius behind this awesome idea and I can attest to both its durability and how well the Fitbit slides and hides inside this cuff. Although this is created for times when you are not working out, I did test it in my cardio dance class to make sure that it would stay secure. After one hour of jumping and dancing, the Fitbit was happily secure. I would still recommend sticking with your plastic bracelet for workouts, as it is more breathable, but this should stay secure if you use it in your daily activities.

DISCLAIMER:

You need to test your own bracelet to make sure that it is secure and that your Fitbit stays inside. I am not responsible for a lost Fitbit if you create this and it is not crafted securely. It is your responsibility to make sure that your Fitbit is securely fastened.

DIY Fitbit Bracelet Tutorial from MomAdvice.com.

Supplies Needed

Leather Cuff Bracelet (found at Hobby Lobby for $5.99 in the jewelry supplies)

Hemp Cord

Brown Embroidery Thread

Embroidery Needle

Scissors

Brown T-Shirt (old or thrift store purchase would be perfect for this!)

DIY Fitbit Bracelet Tutorial from MomAdvice.com.

1. Thread your hemp cord through an embroidery needle and use this to create a design in the holes of your choosing. You can ladder it up, as we have shown, or even just sew it back and forth to create your design.  You can also add beautiful details with crimp beads to your design. Continue weaving the hemp cord until you are at the end of the bracelet.

DIY Fitbit Bracelet Tutorial from MomAdvice.com.

2. Once you are finished with your design, knot it on the back and then weave the end in so it is no longer loose.

3. Next cut your shirt sleeve with the hem still intact to create a fast pocket for your Fitbit. You want this to be longer than your Fitbit so that it can slide securely towards the back of the pocket, as pictured above.

4. Using embroidery thread, stitch the pocket securely down the hemmed side with embroidery thread and securing one end to close it, leaving that others side open to slip in the Fitbit. If you want double security on this, you can attach a little velcro on this open end to close your pocket and to make sure that the Fitbit does not come loose. 

DIY Fitbit Bracelet Tutorial from MomAdvice.com.

5. Finish by knotting and securing the end of the embroidery thread, reinforcing and feeding it through one of the ends of one of the hemp stitches for double-security.

DIY Fitbit Bracelet Tutorial from MomAdvice.com.

I hope you love this fashionable DIY Fitbit Leather Cuff Bracelet as much as I do. I get so many compliments on it and no one can believe that this beauty is handmade and housing my Fitbit. This goes so well with my personal style and you can make it all your own with your own fun details. A big thank you again to Andy for sharing her fabulous tutorial with MomAdvice. Happy crafting, friends!

This post contains affiliate links.


Miniature Felted Pumpkin Tutorial

Friday, October 17th, 2014

Miniature Felted Pumpkin Tutorial

Some people lean towards the spooky decorating for Halloween. This girl leans towards a more classic look from dressing up my front door for the season to the small nod to autumn through our home decor. I have loved our knitted leaf centerpiece so much that I thought it would be fun to add some knitted pumpkins to the mix this year. Since Walmart challenged me to take on a Halloween craft, I thought it would be the perfect time to try something new. Not only are these a knitted stuffed item (something new for me), but they are also felted.

Before you run away, I was SO scared of felting that I have thought about felting for years and never tried it. Seriously, folks, could NOT be easier.

This project is super fast to create and will get lots of love in your home as a fun addition to a bookcase, a cute centerpiece for a Halloween party, or could even make a place card holder for the Thanksgiving table.

Miniature Felted Pumpkin Tutorial

Supplies List

4- US Size 11 double pointed needles (I prefer bamboo for their gripping ability in this project)

4- US Size 6 double pointed needles

Natural Fiber Yarn (any color) that will shrink (Walmart offers this inexpensive option for wool)

Poly-fill Stuffing (something like this)

Free Miniature Felted Pumpkin Pattern FOR FREE HERE

Miniature Felted Pumpkin Tutorial

Skills Needed to Tackle This Project

You need to be able to knit in the round- This is much easier than knitting a hat and can teach you how to increase and decrease your stitches.  If you have never knitted in the round before, check out this picture tutorial that I created to help you navigate the tricky terrain of 4 needles.  You will need to be able to knit both the body and the stem in the round. I actually find the stem to be more difficult due to its size.

You need to be able to i-cord- The first time I i-corded, I was like…”That’s it?” Seriously, it sounds complex, but it is just moving your stitches back and forth on a double-pointed needle. This is a fantastic video tutorial if you are trying to get the hang of it.

You need to be able to felt– Again, this one was a new one for me, but the pattern I shared offers some great tips for felting. I will note below how I did this in my front-loader.


Miniature Felted Pumpkin Tutorial

Words from a First-Time Felter

As you can see, wool shrinks up beautifully. I wanted to still have a little bit of stitching showing, but you can continue to shrink your piece if you want it to be completely smooth. For these pumpkins, I knitted them loosely (advice given by my wise knitting pal, Deb) so that the stitches would shrink well. For my front-loader, I placed these in the washing machine with two pairs of my jeans to help create agitation and friction on the yarn. I used the Whitest White cycle (which is the hottest cycle on my machine) and let the machine decide the level of water.  For detergent, I just used a small amount of Woolite (or you can use Eucalan Woolwash). To replicate this, I just ran the cycle for ten minutes and then hit cancel.  I then ran a spin & drain cycle just for a few minutes to get rid of the excess water and then stuffed my pumpkins while they were still damp.

You can read more about felting in the pattern above.

Miniature Felted Pumpkin Tutorial

Miniature Felted Pumpkin Tutorial


Miniature Felted Pumpkin Tutorial

Aren’t they adorable? Feel free to friend me on Ravelry and visit the Knitting section of our site for more cute yarn-lovin’ projects!


Looking for more great Halloween ideas? Check out my Knitted Princess Leia Hat, fun ideas for DIY Halloween Costumes, paint up some Chalkboard Pumpkin People, make pumpkins out of duct tape, throw some pumpkin chili in your slow cooker on Halloween night, and whip up some glow-in-the-dark JELL-O for dessert!  Happiest of Halloweens, friends!

walmart_mom_disclaimer

Pin It

5 Tips for Party Planning with Kids

Monday, October 13th, 2014

From our marriage & parenting contributor, Mary Carver.

5 Tips for Party Planning with Kids - Mom Advice

My six-year-old will turn seven in just a few weeks, which for our family means a party. My mom told me yesterday that Annalyn had reminded her of pending celebration and said, “I need to get busy and make some lists!”

Hello, apple. I’m your tree.

It’s true that my daughter gets her penchant for list-making and party planning from me. Some of that may come along with her curly hair and short legs, but most of it is likely a learned behavior. The fact is that I love planning events, and as my daughter has grown, I’ve shared that love with her.

When I planned her first few birthday parties, I handled every little detail – just like I have for every other event I’ve planned. From theme to food to decorations, I took care of all of it. But when I began dreaming of her fourth birthday party – a Mickey Mouse themed bash at our houseI decided to let her help.

Since then, my little mini me has jumped on every chance to help me plan a party, from birthdays and holidays to fundraisers and church events. She gets so excited, and it’s been a fun way to share something special. Today I’ve got a few tips for making party planning a family affair at your house – without losing your cool (or ending up with an all-candy buffet and buckets of glitter on your floor).

5 Tips for Party Planning with Kids - Mom Advice

5 Tips for Party Planning with Kids

1. Be prepared for brainstorming.

It can be a lot of fun to dream up ideas for your next party with your kids. But – what’s that phrase? Don’t give the keys to the zoo to the monkeys? (No, no, YOUR kids aren’t monkeys. Just mine.) Seriously, though. Unless you are truly 100% okay with your party taking any shape your kids can imagine, I’d recommend having a framework in mind before sitting down to brainstorm with your children.

Anyone can get overwhelmed or out of control when faced with too many options – and that rings even more true with children. I’ve learned the hard way to do my Pinterest surfing in advance, to narrow down the options and filter out the crazy (too expensive, too difficult, not age appropriate, etc.) ideas before bringing Annalyn into the mix. Now, I talk with her about ideas for a theme (if it’s her birthday party), then create a Pinterest board for us to look at together.

Not only does this keep her options limited and manageable, it also makes sure we don’t land on less-than-family-friendly pins and pages by accident while searching. (Believe it or not, searching for Minnie Mouse costumes with my four-year-old on my lap taught me that lesson!)

5 Tips for Party Planning with Kids - Mom Advice

2. Take the guesswork out of your guest list.

Left to her own devices, my daughter would invite every girl she’s ever met to her next birthday party. Telling her she was only allowed to invite seven girls took the wind out of her sails and began a weeks-long deliberation.

Unless your budget is unlimited, you might have to cap the number of invitations you send, too – and I’m learning that elementary school adds a whole new level of complication to this process. When we started talking about this year’s party, I didn’t realize the politics involved – and the life lessons that would come out of these conversations. After all, if you can’t invite every girl you know, choosing who to invite can be hard. Making these decision together has given me the opportunity to discuss friendship and fairness with my daughter – as well as financial responsibility. (Because yes, of COURSE inviting all 22 girls on her first list would be easier!)

3. Ask for input about the agenda.

Much as I like to think I’m hip to what the kids are loving these days, I don’t actually have a clue. So while I think musical chairs and carrot sticks in the backyard is a perfect plan for a sixth birthday party, it turns out my actual six-year-old (hypothetically speaking, of course) might prefer Goldfish and swimming at the community center.

Likewise, when planning a family event or other party that’s not necessarily celebrating your child, he or she might have the creativity you’re looking for. (Playing charades at the family reunion? Serving pizza at the committee meeting? Making a welcome banner for small group or book club? Why not?!)

5 Tips for Party Planning with Kids - Mom Advice

4. Cook up some fun with your menu and decor.

Keeping it simple is the key to every part of planning a party. But when you bring kids into the planning, you might just find your event looks a little more whimsical than you originally imagined. That might mean streamers in every color of the rainbow or balloons covering the floor instead of floating in bunches around the table. It could mean a build your own waffle bar or a pitcher of chocolate milk next to the fancy tea party china. Or it could mean pizza delivered to your door instead of the Pinterest-inspired three-course meal you’d envisioned.

Or, if you aren’t smart enough to curate a Pinterest board before your brainstorming session, it could mean you find yourself making an ocean-themed cake for a mermaid party – despite your annual vows to Never Make a Birthday Cake Again.

5. Put them to work!

When I was a kid, my parents often teased my brother and me by saying the only reason they had kids was to have someone to do chores. Now that I have my own home to manage, I’m not sure there wasn’t a bit of truth to that! But even more than lightening my load of work before and after a party (which may or may not happen, depending on the task and her age and ability), working side by side with my daughter as we prep for a party gives us one more opportunity to spend time together and teaches her the skills of cooking, decorating or cleaning. It also helps her understand just how much work goes into a fun afternoon or evening!

Special Offer: If you’d like more tips for planning parties – with or without kids – I’d like to offer a discount for my ebook, Plan a Fabulous Party {without losing your mind}. Just use the code MOMADVICE for 50% off the regular price!

Photo source

Pin It

7 Ways to Upcycle a Coat Into Something You Really Love

Tuesday, September 30th, 2014

7 Ways to Upcycle a Coat Into Something You Really Love from MomAdvice.com

With the fall temperatures upon us, it is time to start thinking about an extra outer layer to help keep us warm for these cooler Midwest temperatures.
Jackets can be an expensive investment and finding one that is the perfect cut and style can sometimes be difficult especially with everyone’s unique sizing and build.
Today’s tutorial offers some fun ideas for refashioning an old jacket into something you really love.
As a disclaimer, I am a sewing school drop-out and actually take everything I need altered to a seamstress because I flunked sewing school.
That being said, one thing I can attest to is having someone alter items for you is the most worthwhile investment so that you always look and feel your best.
As I am in the midst of a capsule wardrobe project for the fall, many of these pieces have been altered so that I always feel my best even with a smaller & more minimalist wardrobe.
Alterations, whether done yourself or by a professional, are the wisest investment when you really love something.
We are providing the after pictures to these projects so please click on the links to get the full scoop on the before and tutorials for each of these alterations.

Add Ruffles & Details

If the cut of a coat is good in the shoulder area, but the length is not, consider cutting off some length on your coat.
You can then use that excess fabric for feminine details that add femininity to a more masculine piece.
One of my favorite blogging friends, Tatertots & Jello, shows off a coat that she added a ruffled edge too and a fur trim on the end of her coat to create a coat that any girl would be proud to wear.
She offers 14 ideas for refashioning a coat that can help you while navigating the used coat selection.

Transform a Leather Jacket Into a Purse

Buying leather for your craft projects might be out of your budget, but buying a thrift store coat and then using the materials from it to create something truly unique might not be.
This showcases not only the beauty of making something yourself, but it also showcases the way a commonly found item can be made into something you really love.
Consider a leather coat as a plethora of craft possibilities whether it is using a wood burning tool to burn initials in the material to make tags for handmade gifts, being cut and sewn into an iPad cover, or simply adding leather details to a belt or headband.
The possibilities with a leather jacket, no matter what the size or style, are endless.

Turn a Suit Set Into a Long Jacket

If you are looking for the perfect jacket that feels more like a blazer than a heavy coat, then consider piecing together two matching suit pieces to create a beautiful Edwardian coat.
It is simply genius to think of these two separate pieces as something that could be made into a long coat, but Of Dreams and Seams saw hidden potential in this suit and made it into something she truly loves.
This looks like something I would shell hundreds of dollars out at Anthropologie and I particularly love that this suit started out handmade and was altered and appreciated for many more years.

Refashion a Hoodie Into a Peacoat Jacket

The peacoat will never go out of style, but I can’t say that I am mad for hoodie sweatshirts.
Perhaps you went through a hooded sweatshirt phase and are looking to whittle down your collection or you spy one at Goodwill that is the perfect shade, but you would love to look a little more polished?
This hoodie turned peacoat tutorial from Sisters,What! is such a great example of how you can refashion even the most basic piece into a cozy coat for fall by simply removing the zipper, adding a flap of fabric, and adding some buttons.
How cute is that?

Make a Mixed Media Jacket From Two Coats

This year the fashion world is mad about leather and even I, a very basic suburban mother, bought herself a moto jacket to wear this year.
In this post from ReFashionista, she was inspired by a very pricey Burberry Mixed Media Trench Jacket and decided to make a DIY trench jacket from two inexpensive jackets.
I love the idea that if you love the sleeves from one piece that you could attach them to another jacket to add texture and detail to a basic piece.

Add a Feminine Ruffle

The before photos on this piece from Charity Shop Chic is jaw-dropping.
She takes a piece of clothing that is stained and many, many sizes too big and uses the extra material to create a belt, feminine sleeves, and a ruffled bottom that was inspired by Kate Middleton.
While this Feminine Trench Coat is definitely something to be created by an advanced sewer, any crafter can appreciate the beauty in these feminine details and can be inspired that even the saddest and most ill-fitting pieces can be made into something of beauty when put in the right hands.

Turn a Sleeve Into a Clutch

You can never have too many clutches and this beautiful clutch is made from a simple coat-sleeve.
Over on Craftaholics Anonymous you can get the scoop on how they transformed a suit jacket sleeve into a beautiful clutch that you can carry your essentials in for a night out on the town.
Look for a sleeve that has beautiful button details or is made from a great fabric or pattern that will go well with other items in your wardrobe to really make the most of this DIY project.
With the holidays creeping upon us, it would also make a fantastic gift for a girlfriend, sister, mother, or grandmother.

What are some things you have done with coats from Goodwill? Feel free to share your stories here!


Don’t miss these other great posts from MomAdvice.com:


The Best of Fall, Halloween & Thanksgiving-49 Ideas for Decor, Crafts, Recipes, Costumes & More

The Best of Fall, Halloween & Thanksgiving 


Yarn Wrapped Letters Tutorial


No-Sew DIY Blanket Scarf


Burlap Wreath


Sign up for the MomAdvice newsletter

Pin It

Back to School Organization Ideas

Thursday, September 18th, 2014

Back to School Organization Ideas from MomAdvice.com.


*This post is sponsored by the Post-it Brand. All thoughts and opinions are my own.

It is such an honor to be working with the Post-it Brand for the back-to-school season.  I am so thrilled that you loved our DIY Homework Stations we created for our family and today I wanted to continue along that theme and share with you some additional ways that we keep our kids organized for back-to-school.

Since we live in a small home, organization is truly necessary to keep our small spaces functional.  I also am someone who prefers to not have a lot of visual clutter and appreciates smart hidden storage for our homework area rather than bulky caddies that can take up a lot of space since we don’t have a lot of storage space in our home. With that in mind, here are some of our ideas for organizing for back-to-school in a small space.

Back to School Organization Ideas from MomAdvice.com.

Designate a Small Area for Homework Organization- I recently created a bar cart for our shed bonus room and this cart has become the hub of this room for our back-to-school organization this year.  I purchased a chalkboard for tracking our to-do list, a small globe, and then stackable hollowed books for school supplies storage. This little area is efficient and has just what we need to stay organized.

A hub can be created in a corner of your own home, tucked away in a closet, or even just a designated drawer of supplies. The key isn’t how much space you have to organize, but just that the space is functional and that you always have on-hand what your child needs to complete their assignments.

Back to School Organization Ideas from MomAdvice.com.

Put Them in Charge- I can admit that I am a bit of a helicopter mom and it is hard for me to let my kids be in charge of their own tasks. This year I am really going to work on helping them to be more independent and make them be in charge of their own to-do lists and schedules.

Imagine if they went to college and wondered where their mother was to keep them on task.

This could get a little embarrassing.

I purchased this chalkboard and each child can jot down their own to-do list on Post-it Study Super Sticky Notes to attach to the chalkboard to remind themselves of the important tasks they need to accomplish for the week. I am loving the new Post-it Study Collection because it offers a fantastic new line of Notes, Notebook Kits, Flags, Tabs, and Page Markers that stick securely to papers, notebooks, folders, and more, yet remove cleanly. The products all work together to help your family stay organized on-the-go.  In this case with our Study Super Sticky Notes, once the task is accomplished, they can remove it from the board. As new tasks and assignments are added, they can create their own reminder list to attach to the chalkboard.  Each child gets their own color of Post-it Study Super Sticky Notes so that they know exactly whose task is whose, eliminating the need for two boards and creating a visual area for them of necessary items to accomplish.

Back to School Organization Ideas from MomAdvice.com.

Make Those School Supplies Part of Your Décor-  Pinterest has many ideas for creating storage caddies of homework supplies for your children which is great, but we don’t really have somewhere we can store it when those items are not being used. I happened upon these hollowed out books for storage at our craft store and realized that this was the perfect spot for camouflaging our homework helpers and adding visual interest to a room.

Inside the smallest book I stored crayons and glue sticks, the middle storage is for pencils and pens, and the largest book holds our Post-it Study collection homework helpers like Study Super Sticky Notes, Study Grid Notes, and Study Message Flags. This also houses our extra Post-it Super Sticky Notes for our chalkboard to-do list.

Back to School Organization Ideas from MomAdvice.com.

Back to School Organization Ideas from MomAdvice.com.

Cut Down the Distractions- The reason I love our bonus room for our homework area is that this area is screen-free and there is absolutely nothing in this room to distract them. I can be in the room with them to help them work through problems in a distraction-free environment.  The DIY Homework Stations we created for this room help each child to stay in their own zone and keep focused on their own list of tasks. Once everything has been completed, the kids can exit the space and head off to their technology-filled lives.

I really hope you enjoyed this fun series on back-to-school organization that I created with the Post-it Brand. Thanks to this job, I feel more confident than ever that we will have a successful and truly organized school year! To purchase some fun Post-it Brand items of your own, you will find that they are available at office superstores and mass merchandise retailers nationwide!


This post is sponsored by the Post-it Brand. I’ve received product samples and compensation for my time and effort in creating this post. All thoughts and opinions are my own.


Tracking Pixel

Easy DIY Homework Stations

Tuesday, September 16th, 2014

Easy DIY Homework Stations from MomAdvice.com

*This post is sponsored by the Post-it Brand. All thoughts and opinions are my own.

I’m so excited to be working with Post-it Brand for back-to-school and today I want to showcase a fun way to create a DIY Homework Station that is perfect for small spaces utilizing some of my favorite Post-it Products.

Since finishing our shed into a bonus room for the family, this has been a great screen-free place for our kids to hang out. I wanted to create a homework area that would be away from home distractions and help to keep us focused on our work. These DIY Homework Stations remind me of the quiet areas that were set up in our school area for tackling test-taking and reading. Since we only have one table in this room, it is necessary for us to work at the same table, but we needed some type of divider to help keep each child focused in this space.

Post-it Products have been a longtime family favorite for helping to create reminders in agendas, to flag assignments, and for communication back-and-forth to our teachers.  Have you seen the new Post-it Study collection that has hit store shelves? They are offering a new line of Notes, Notebook Kits, Flags, and Tabs that all work together to help you stay organized on-the-go and find the important things you need to remember quickly! I wanted to utilize some of my new Post-it Product discoveries from their Post-it Study collection to help organize a small space work area that would really keep their focus and keep them organized.

On a personal note, the transition from elementary school to middle school was a tough one for all of us. Never before have I needed more organizational helpers then now and I am hoping that if I provide the right tools for my kids from the start that I can help them succeed at being organized this year.

With that in mind, I have created these DIY Homework Stations and wanted to share this project with you to inspire you to create a couple of your own for this coming school year.

Easy DIY Homework Stations from MomAdvice.com

Easy DIY Homework Stations from MomAdvice.com

Supplies Needed:

1- tri-fold foam display board (this will make two homework stations for you)

Razor Blade

General All-Purpose Spray Adhesive

Measuring Tape

Post-it Study Pocket

Post-it Study Super Sticky Notes

Post-it Study Notebook Kit

Post-it Study Message Flags

Post-it Study Notebook Tabs & Arrow Flags

Post-it Study Flags

Post-it Study Grid Notes

Binder Clips

Scrapbook Paper in coordinating colors (8 sheets total per homework station- I chose four of each coordinating paper)

Hot glue & glue gun

Easy DIY Homework Stations from MomAdvice.com

1. Begin by measuring and marking the halfway point of your tri-fold display board. The display board is 48″ total, so you will want to cut it so that each side is 24″ long.

2. Cut the display board with a razor blade, making sure to cut carefully through all of the layers. If the edge is not clean, we can camouflage it with a fold-over on your scrapbook paper to finish it (demonstrated in a picture below).

3. Select eight sheets of scrapbook paper and set them up for where you would like to display them. Set them aside and, beginning with one side, line the bottom sheets up and, holding them in place with your hands, flip them up to add a little spray adhesive to the underside. Do this all along the bottom of your display board. One thing to keep in mind is that you want to make sure that the paper is not in the fold of the display board so that it can open and shut easily.

Easy DIY Homework Stations from MomAdvice.com

4.  For the top, I am  folding the edge of the paper over a bit on the top four sheets, making sure the edges are folded roughly the same side.  Now do the same process again on the top and allow the folded edge of the paper to hang over to the other side of the display. Secure the folded edge on the back with a little hot glue and to create a smooth finish on top. If your paper does not have a lip on it like this, don’t worry, you can still fold it over.

Easy DIY Homework Stations from MomAdvice.com

5. Using your Post-it Study Super Sticky Notes, jot down the days of the week and line them along the top of your homework station. This can be a place where your child can write down their daily reminders and tasks that need to be accomplished each day.

Easy DIY Homework Stations from MomAdvice.com

I also attached a Post-it Study Pocket and filled it with Post-it Study Flags, Post-it Study Notebook Tabs & Arrow Flags to have on-hand when items need to be noted and flagged in our homework and agendas. These were attached to my older child’s homework station since we have so much to remember. If you have a child in middle school, I know you understand how hard that is!

6. For younger kids, I love the Post-it Study Grid Notes for jotting down notes. The space on these is generous and perfect for younger children who are still working on writing. I also attached the Post-it Study Notebook Kit for jotting down notes and flagging items in work. To anchor it, I folded it away with a binder clip to be opened when she needed an item.

Easy DIY Homework Stations from MomAdvice.com

Easy DIY Homework Stations from MomAdvice.com

I hope this post inspires you to create a few homework stations of your own. It goes to show that you don’t need a lot of space to create the perfect focused work space! Post-it Products are available at office superstores and mass merchandise retailers nationwide to help you make an organized DIY Homework Station of your own!

This post is sponsored by the Post-it Brand. I’ve received product samples and compensation for my time and effort in creating this post. All thoughts and opinions are my own.

Tracking Pixel

Pin It

Make a Guest Room Welcome Basket (With 5 FREE Printables)

Tuesday, September 9th, 2014

Make a Guest Room Welcome Basket (With 5 FREE Printables)

This post is sponsored on behalf of BHG at Walmart.

With the holidays just around the corner, now is a great time to begin preparing your home for guests. Since we live in a smaller home, we have never had the luxury of having a guest room in our house since every inch of our home is just filled with…well, us. Recently though we finished our shed into a bonus room and realized that this is actually the perfect space to share with our guests when they come to visit.  It makes for the perfect guest room because you can come and go as you please with your very own space to escape from our wild and crazy family, since it is separate from our living space.

As part of the BHG Live Better Network, I am partnering with them this month to showcase an idea for welcoming guests in your home that you can create with products from BHG that are available at Walmart.  Since we don’t have a dedicated guest room for just this purpose,  I thought it would be fun to create a guest room welcome basket that you could tuck away in your basement storage or a linen closet to share with your guests when they arrive.  There is no need to make an addition to that house when you have a basket prepared of guest essentials that you can bring out when the unexpected house guest arrives.

Make a Guest Room Welcome Basket (With 5 FREE Printables)

Pictured Above: Better Homes & Gardens 400 Thread Count Egyptian Cotton Sheet Sets ($39.88- $69.88)/Better Homes & Gardens Large Chicken Wire Basket ($12.44)/ Please Do Not Disturb Sign (FREE- see below), Better Homes & Gardens 8×10 Frame ($9.97)/ Febreeze Home Collection Almond Sugar Candle ($11.97)/ Better Homes & Gardens White Bath Towels ($5.88)/ Be Our Guest 8×10 Printable (FREE- see below)

Make a Guest Room Welcome Basket (With 5 FREE Printables)

Make a Guest Room Welcome Basket (With 5 FREE Printables)

Make a Guest Room Welcome Basket (With 5 FREE Printables)

One of my favorite things about staying at a hotel is the plush sheets, fresh linens, the do not disturb sign I can hang on my door knob for privacy, and the welcoming touches and amenities that hotels offer. You can create that same experience for your very own guests at home with a few of the thoughtful touches that I have pulled together for our welcome basket.  Fresh white linens, a welcome sign you can display on a nightstand or table, a do not disturb sign for your door, plush white sheets, and a delicious smelling candle complete the touches in this lined chicken wire basket for a guest to enjoy when they come to visit.

Make a Guest Room Welcome Basket (With 5 FREE Printables)

You can find all of these special touches from the BHG product line at Walmart stores. A simple gathering of these items creates a sweet & thoughtful guest room basket instantly. Other sweet offerings could include chocolates, bedtime teas, a favorite good read or the morning paper, and a note to let them know how excited you are to have them as a guest. Think of all of the things you appreciate when you are a guest somewhere and include them in your basket to let your guests know how much you appreciate them.

Add our, “Be our Guest,” printable to a BHG 8×10 frame (priced at less than $10) and it really adds that special warm welcome that I hope we can achieve when hosting friends and family in our home.

Make a Guest Room Welcome Basket (With 5 FREE Printables)

To help your guest feel warmly welcomed, my amazing designer & contributor, Sarah Milne with sarah m style, has created these amazing printables that you can print and share in your basket for your guests! Aren’t these BEAUTIFUL and such a sweet touch for a welcome basket for guests?

Grab These FREE Printables For Your Guest Basket

Make a Guest Room Welcome Basket (With 5 FREE Printables)

Download this Printable HERE

Make a Guest Room Welcome Basket (With 5 FREE Printables)

Download this Printable HERE

Make a Guest Room Welcome Basket (With 5 FREE Printables)

Download this Printable HERE

Make a Guest Room Welcome Basket (With 5 FREE Printables)

Download this Printable HERE

Make a Guest Room Welcome Basket (With 5 FREE Printables)

Download this Printable HERE


What are some special touches you love to offer you guests? Any tips for families that don’t have a dedicated guest room? Feel free to share your tips below!

In accordance with the FTC Guidelines, I am disclosing that I received compensation from BHG at Walmart for my time and participation in the BHG Live Better Network. Although we have material connection to BHG, any publicly stated opinions of BHG and their products remain my own.

Pin It

DIY Family-Friendly Bar Cart

Tuesday, September 2nd, 2014

DIY Family-Friendly Bar Cart

I have been so excited to show off this incredibly cute DIY Family-Friendly Bar Cart that I created for Kenmore this month. This DIY bar cart is my new favorite thing in our house and I love that I can wheel it out for all of our entertaining needs.

Have you ever seen the pricing on beverage carts? It is quite astounding! I love to have a cheap chic home, especially when it comes to entertaining needs, and I just can’t picture spending $500 or more on a cart that houses our drinks. I decided to wow my friends with a budget-friendly and family-friendly drink cart that would sit perfectly in my budget. You know what fits right in my budget? A tool cart.

Today we are making over a Sears Hardware Cart into a beautiful bar cart. Say what? I know! This cart retails for a mere $82.87 and has just the type of clean and modern lines I was looking for in a more expensive cart. The best part is that you can personalize it to your own taste and color scheme.

DIY Family-Friendly Bar Cart

bar-cart

Head on over to the Kenmore blog to snag my easy tutorial for making a hardware cart into the perfect beverage cart for your entire family! I hope you love this cart as much as I loved creating it!

Pin It