Archive for the ‘Kids Crafts’ Category

Easy DIY Homework Stations

Tuesday, September 16th, 2014

Easy DIY Homework Stations from MomAdvice.com

*This post is sponsored by the Post-it Brand. All thoughts and opinions are my own.

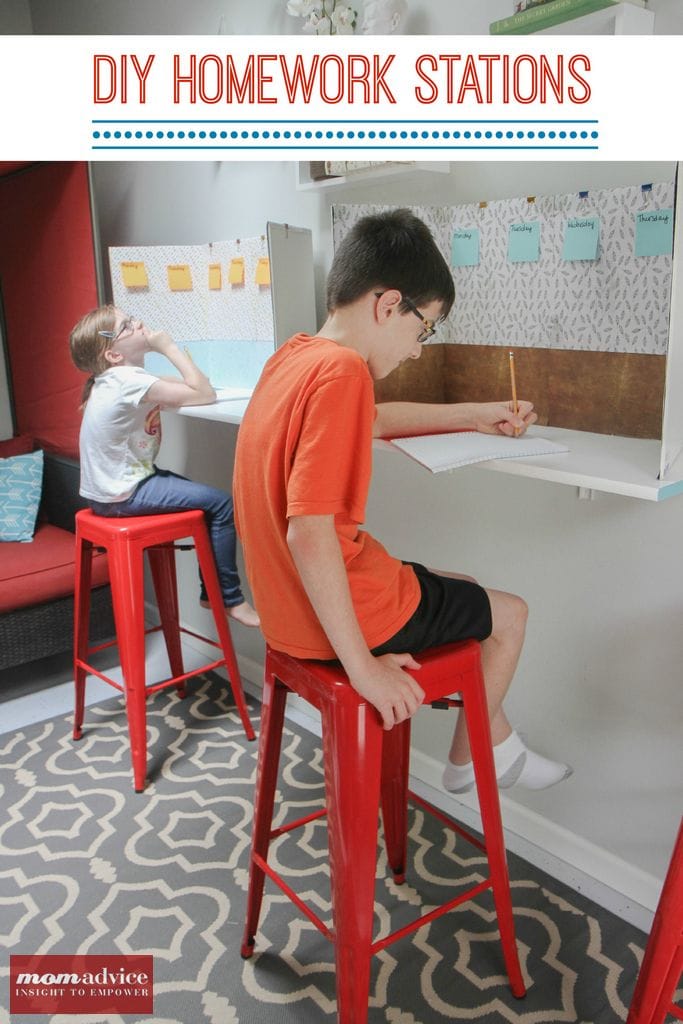
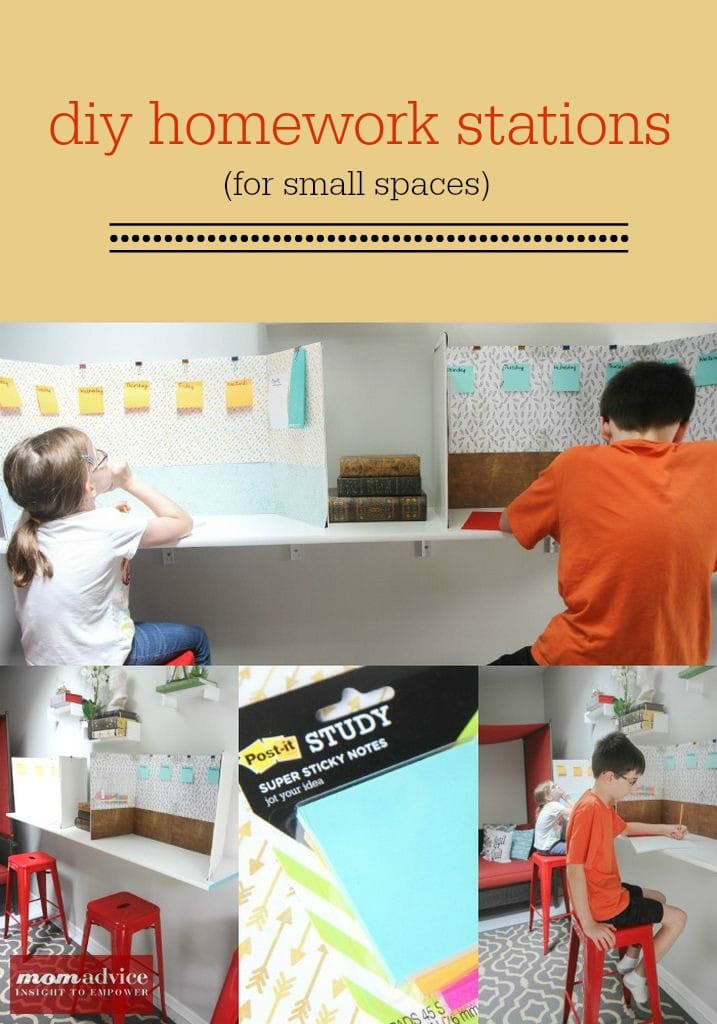
I’m so excited to be working with Post-it Brand for back-to-school and today I want to showcase a fun way to create a DIY Homework Station that is perfect for small spaces utilizing some of my favorite Post-it Products.

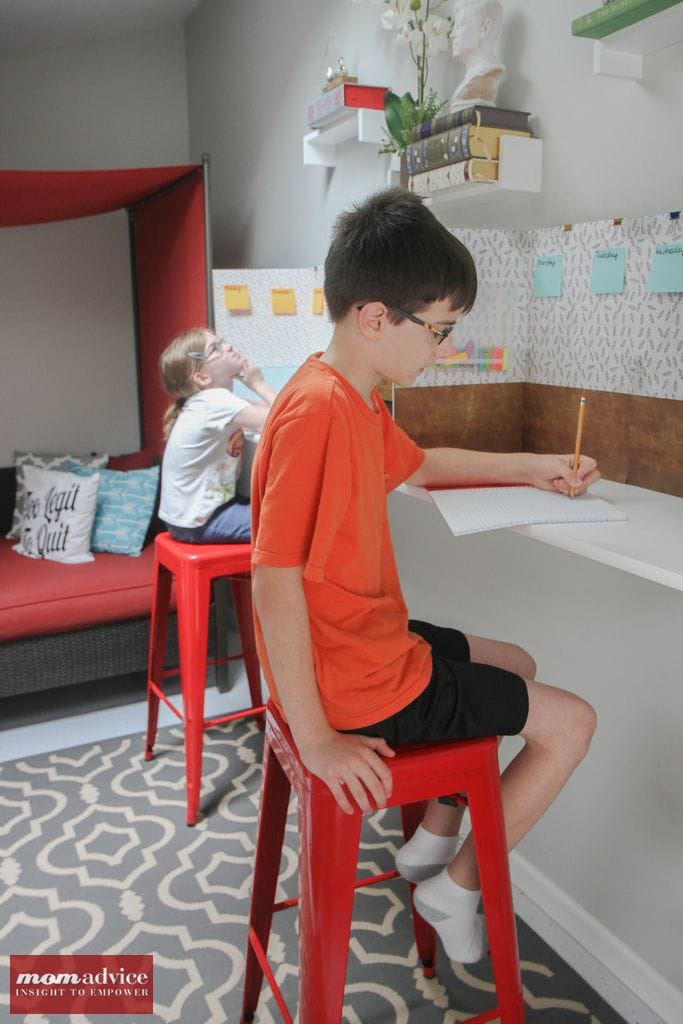
Since finishing our shed into a bonus room for the family, this has been a great screen-free place for our kids to hang out. I wanted to create a homework area that would be away from home distractions and help to keep us focused on our work. These DIY Homework Stations remind me of the quiet areas that were set up in our school area for tackling test-taking and reading. Since we only have one table in this room, it is necessary for us to work at the same table, but we needed some type of divider to help keep each child focused in this space.

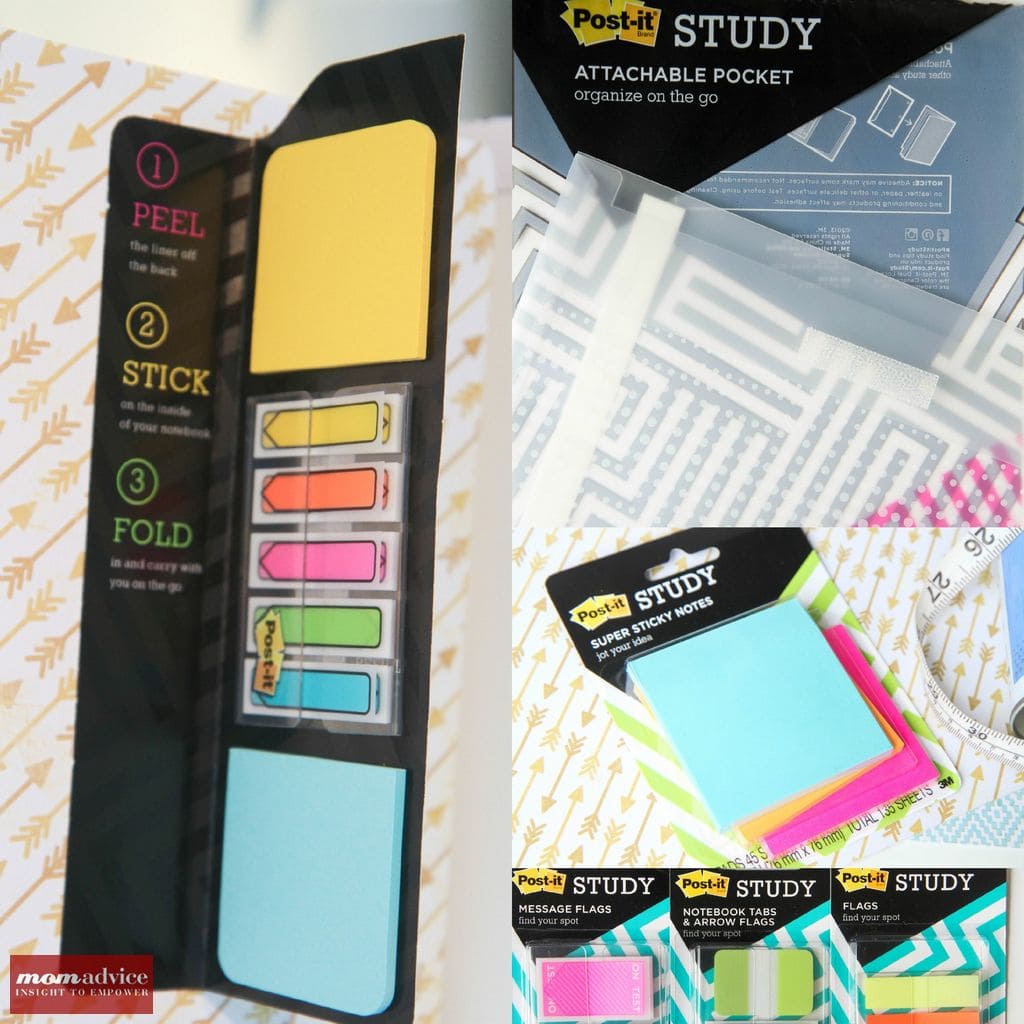
Post-it Products have been a longtime family favorite for helping to create reminders in agendas, to flag assignments, and for communication back-and-forth to our teachers.  Have you seen the new Post-it Study collection that has hit store shelves? They are offering a new line of Notes, Notebook Kits, Flags, and Tabs that all work together to help you stay organized on-the-go and find the important things you need to remember quickly! I wanted to utilize some of my new Post-it Product discoveries from their Post-it Study collection to help organize a small space work area that would really keep their focus and keep them organized.

On a personal note, the transition from elementary school to middle school was a tough one for all of us. Never before have I needed more organizational helpers then now and I am hoping that if I provide the right tools for my kids from the start that I can help them succeed at being organized this year.

With that in mind, I have created these DIY Homework Stations and wanted to share this project with you to inspire you to create a couple of your own for this coming school year.
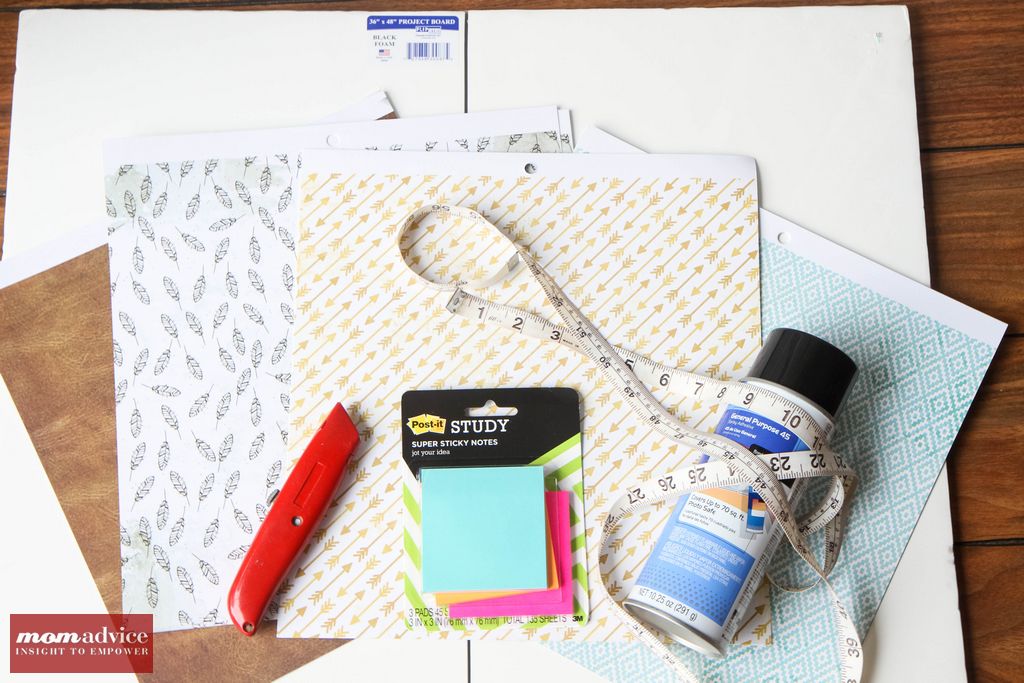
Easy DIY Homework Stations from MomAdvice.com

Easy DIY Homework Stations from MomAdvice.com

Supplies Needed:

1- tri-fold foam display board (this will make two homework stations for you)

Razor Blade

General All-Purpose Spray Adhesive

Measuring Tape

Post-it Study Pocket

Post-it Study Super Sticky Notes

Post-it Study Notebook Kit

Post-it Study Message Flags

Post-it Study Notebook Tabs & Arrow Flags

Post-it Study Flags

Post-it Study Grid Notes

Binder Clips

Scrapbook Paper in coordinating colors (8 sheets total per homework station- I chose four of each coordinating paper)

Hot glue & glue gun

Easy DIY Homework Stations from MomAdvice.com

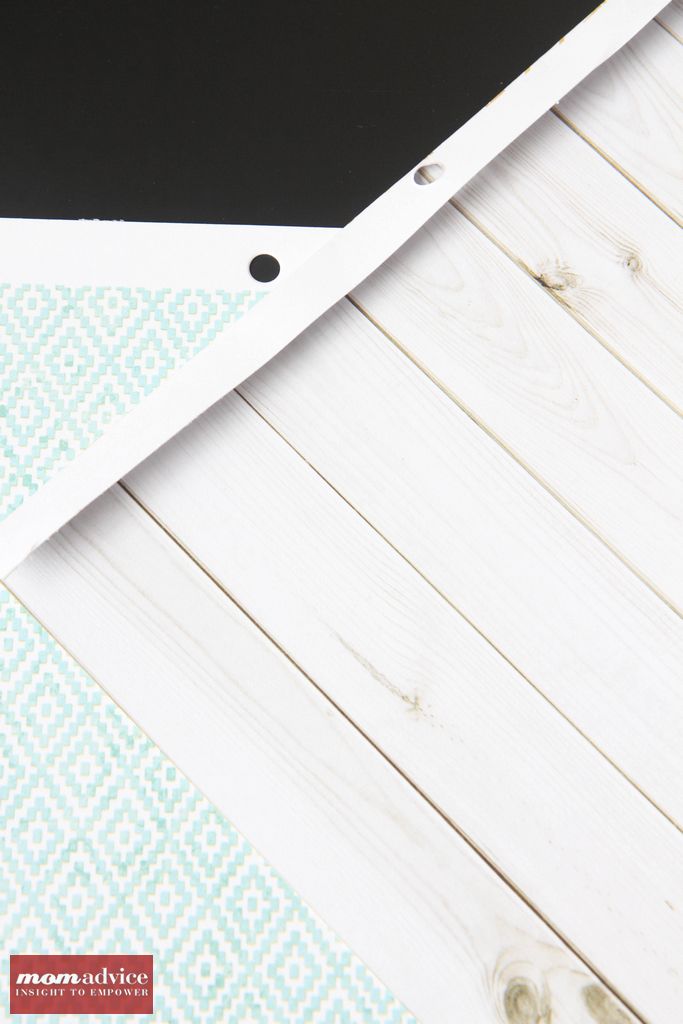
1. Begin by measuring and marking the halfway point of your tri-fold display board. The display board is 48″ total, so you will want to cut it so that each side is 24″ long.

2. Cut the display board with a razor blade, making sure to cut carefully through all of the layers. If the edge is not clean, we can camouflage it with a fold-over on your scrapbook paper to finish it (demonstrated in a picture below).

3. Select eight sheets of scrapbook paper and set them up for where you would like to display them. Set them aside and, beginning with one side, line the bottom sheets up and, holding them in place with your hands, flip them up to add a little spray adhesive to the underside. Do this all along the bottom of your display board. One thing to keep in mind is that you want to make sure that the paper is not in the fold of the display board so that it can open and shut easily.

Easy DIY Homework Stations from MomAdvice.com

4.  For the top, I am  folding the edge of the paper over a bit on the top four sheets, making sure the edges are folded roughly the same side.  Now do the same process again on the top and allow the folded edge of the paper to hang over to the other side of the display. Secure the folded edge on the back with a little hot glue and to create a smooth finish on top. If your paper does not have a lip on it like this, don’t worry, you can still fold it over.

Easy DIY Homework Stations from MomAdvice.com

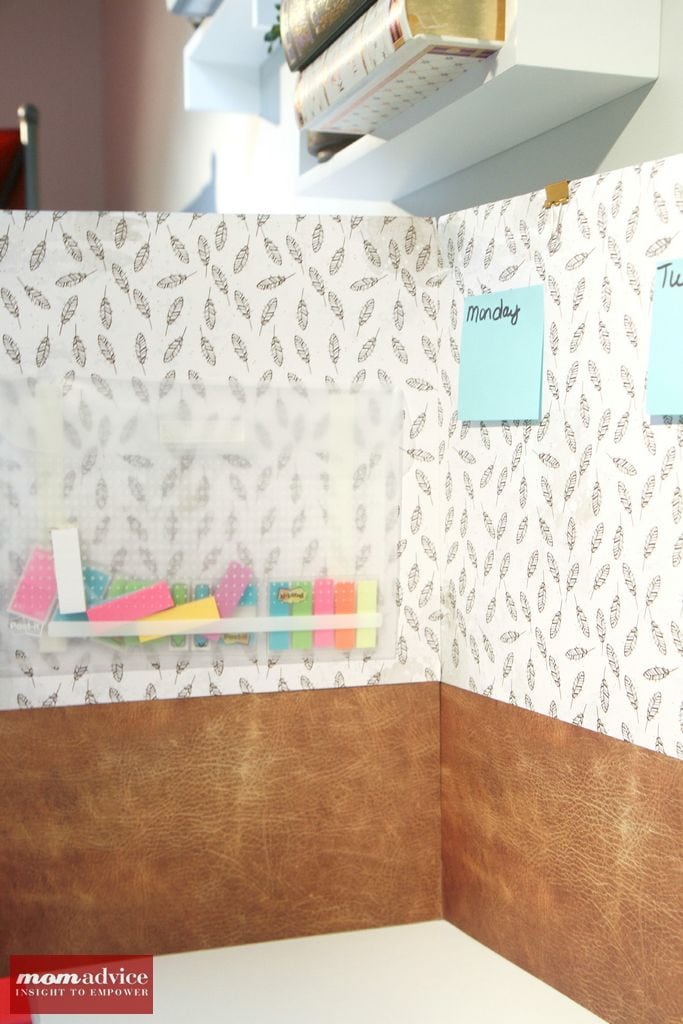
5. Using your Post-it Study Super Sticky Notes, jot down the days of the week and line them along the top of your homework station. This can be a place where your child can write down their daily reminders and tasks that need to be accomplished each day.

Easy DIY Homework Stations from MomAdvice.com

I also attached a Post-it Study Pocket and filled it with Post-it Study Flags, Post-it Study Notebook Tabs & Arrow Flags to have on-hand when items need to be noted and flagged in our homework and agendas. These were attached to my older child’s homework station since we have so much to remember. If you have a child in middle school, I know you understand how hard that is!

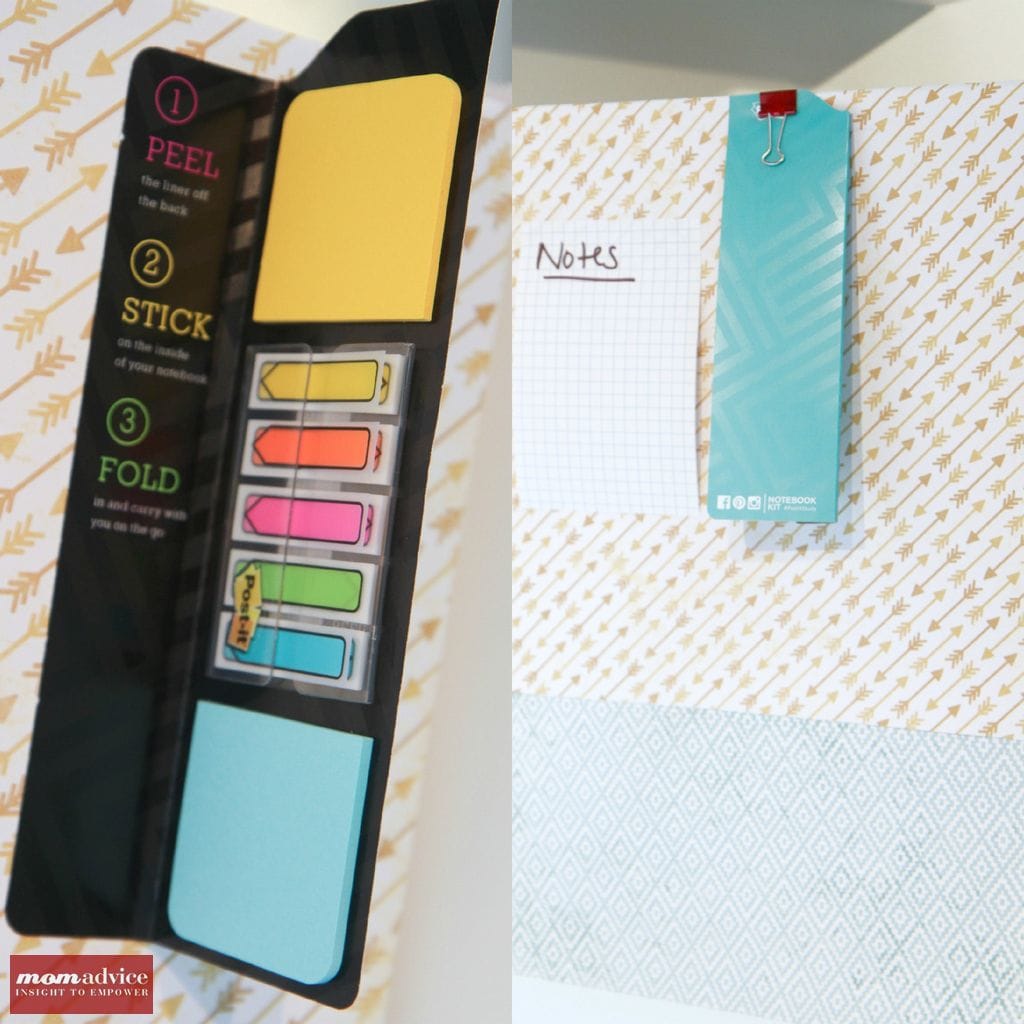
6. For younger kids, I love the Post-it Study Grid Notes for jotting down notes. The space on these is generous and perfect for younger children who are still working on writing. I also attached the Post-it Study Notebook Kit for jotting down notes and flagging items in work. To anchor it, I folded it away with a binder clip to be opened when she needed an item.

Easy DIY Homework Stations from MomAdvice.com

Easy DIY Homework Stations from MomAdvice.com

I hope this post inspires you to create a few homework stations of your own. It goes to show that you don’t need a lot of space to create the perfect focused work space! Post-it Products are available at office superstores and mass merchandise retailers nationwide to help you make an organized DIY Homework Station of your own!

This post is sponsored by the Post-it Brand. I’ve received product samples and compensation for my time and effort in creating this post. All thoughts and opinions are my own.

Tracking Pixel

Pin It

Celebrating 4th of July Heroes With Kids

Monday, June 23rd, 2014

Celebrating 4th of July Heroes With Kids

As my children grow older, I strive to find more meaningful ways to celebrate holidays.

The 4th of July has always been a burst of red, white, & blue through our home, but I can’t say that we have ever spent time together discussing the importance of this day and getting to know the heroes behind what makes the 4th of July so special.

Today I want to share with you a fun way you can share about the 4th of July Heroes in your home and a fun way to incorporate their images in your home to make the day more meaningful and festive.

I partnered with Walmart on this project and all the materials you need for this can be found at their store.

To begin, you can select your 4th of July Heroes that you want to talk about.

I found this great list for kids that I used to select our heroes to focus upon.

I then headed to Wikipedia and found images of each of our heroes and converted them to black & white and saved them on my computer.

If you would like to use the same heroes as us, here are the heroes we selected for our project.

George Washington

George Washington

Thomas Jefferson

Thomas Jefferson

Benjamin Franklin

Benjamin Franklin

John Hancock

John Hancock

Crispus Attucks

Crispus Attucks

John Adams

John Adams

Abigail Adams

Abigail Adams

Celebrating 4th of July Heroes With Kids

Once you have your heroes selected, head to the Walmart Photo Site and upload the images there.

In addition to having 1 of each image printed in 4×6, also add 1 set of wallets for each person.

 If you send these to the one-hour lab, it will be less than $6 for all of them.

While you are there, you can also pick up a package of mini-clothespins, a set of notecards for your kids to write on, supplies for this easy flag bunting, and this burlap wreath to decorate with.

Since I already had these things in our home, it helps cut down on cost and storage for us this year.

Celebrating 4th of July Heroes With Kids

Once you have your images, have kids select which person they are interested in discovering and have them find information about their 4th of July heroes.

I challenged my kids to find one or two facts about each hero.

We also read about the first 4th of July and how different is from how we celebrate today.

I am embarrassed to say that I was learning right along with my children and soaking it all in as much as they were.

Abigail Adams, for example, was one of our favorite people we learned about. Did you know that she had five kids that she cared for and homeschooled while her husband was away serving his country?

 Not only was she passionate about women’s rights, but she was also passionate about equality for all people, whether they were black or white.

She helped care for the soldiers in her home (feeding them and treating their injuries), and she even learned how to make her own gunpowder.

Emily and I are big fans of Abigail Adams now and all she did for our country.

Celebrating 4th of July Heroes With Kids

Likewise, my son loved John Adams and his fun fact was that he thought his teachers, “held him back.”

Despite being held back from his true potential in grade school, he passed his entrance exams to Harvard and his parents, who were farmers, gave up several acres of their own farm land to pay for John’s schooling.

And, boy, did that pay off!

John Adams strongly supported independence from Britain, signed the Declaration of Independence, and negotiated the treaty ending the Revolutionary War.

He later became the nation’s first vice president and second president.

This led to a great discussion about recognizing our true potential when sometimes others do not.

Did you know that Dr. Martin Luther King referenced Crispus Attucks in one of his speeches?

He held him up as an example of black patriotism at the beginning of our nation’s history.

Yet, we never knew anything about what he did for our country. I’m so glad we know now.

Celebrating 4th of July Heroes With Kids

If you have smaller kids, you can share simple facts and have them draw pictures.

Clearly, the fact that Abigail Adams rocked it as a mom and had five kids was worthy of a picture.

Make this time fun for your kids while acknowledging the sacrifices that so many gave up for our freedom.

Celebrating 4th of July Heroes With Kids

Once we were done discussing our heroes, I incorporated these pictures into our holiday decor.

I pulled some of the flags off of our bunting and switched them with pictures of our heroes.

 I took the items off of my burlap wreath and clipped the wallet images with mini clothespins on the wreath.

I hung this in the center of our mirror and added the flag & hero bunting around the frame of the mirror.

Celebrating 4th of July Heroes With Kids

I love these touches to our 4th of July decorating, but I love even more that my kids know about these patriotic heroes.

 I hope this idea inspires you to learn more about this holiday and the heroes who made this day possible for all of us.

Happy 4th of July, friends!

walmart_mom_disclaimer


Look at these other great ideas from MomAdvice.com:


How to Make Fluffy Slime


Pin It

How To Print Waterlogue Pictures

Thursday, May 1st, 2014

How To Print Waterlogue Pictures from MomAdvice.com.

I am so excited to share with you today’s tutorial on how to print Waterlogue images for easy and beautiful gifts for someone special in your life. With Mother’s Day just around the corner, the Waterlogue app is a great way to make beautiful watercolor prints for a favorite mama in your life.

Walmart challenged me to showcase a budget-friendly gift to give for Mother’s Day and I just knew that I had to show you how to do this so you can make beautiful images for a special lady in your life or as a gift to yourself. To get started, you will need to download the Waterlogue App ($1.99). The app is compatible with the iPhone, iPad, or iTouch. Once you have downloaded it, we can begin creating our art.

How To Print Waterlogue Pictures from MomAdvice.com.

How To Print Waterlogue Pictures from MomAdvice.com.

I took my kids in the backyard and had them pose for me. I wanted to get one of the back of them or a side angle. Although sometimes the app looks amazing with faces directly to the camera, I find that it can be a little tricky picking the right filter and I wanted to insure we had good success. I suggest trying a couple of different angles so you can play with the filters until you find the perfect one.

This is the picture that I took with my DSLR, but I did not make any edits to the image. I just wanted to make sure that it was nice and crisp for the app, but you can definitely just shoot with your iPhone too!

How To Print Waterlogue Pictures from MomAdvice.com.

To begin, tap on the camera to take a picture or import from your library. Since I took my photo with my DSLR, I emailed the photo to myself and then saved it to my phone to use for this. Next, you will want to select a filter. Each of the filters offers a different feel to your photos so have fun playing around with all the different options- there are twelve in all!

How To Print Waterlogue Pictures from MomAdvice.com.

As you scroll through the film strip at the bottom, you will have a couple of other options for making your picture. One is how dark or how light the brushstrokes are in your photo. Try out the different options before finalizing your picture.

How To Print Waterlogue Pictures from MomAdvice.com.

As you continue to scroll through the film strip, you will also see the option to select the size of the brushstrokes.  This is not the file size, this is just the size of the brushstrokes which can be a little confusing.

The final selection you can make on the film strip is if you would like a border or not on your image. I decided to leave the border off.

Click the HEART (above the filmstrip) to head to SETTINGS (you will need to scroll all the way to the other end of the options on the bottom row.  Click SETTINGS and then change your file size to LARGE.  From this menu you can SAVE TO PHOTOS or just click MAIL to email the file to yourself. 

How To Print Waterlogue Pictures from MomAdvice.com.

Once you have emailed the file to yourself you can open and print it just like a regular picture since it is in JPEG format.  Click the size of picture you want to print and simply print it on heavy-duty cardstock. You can find this over by the printer paper in the office supplies section of the store.

How To Print Waterlogue Pictures from MomAdvice.com.

Now that you have your picture,  you can place it in an inexpensive frame. I found these Better Homes & Gardens frames for a little less than $10 in the housewares. You will need to trim your image a bit, and you can use your removable mat to help figure out how to center and trim it. Place the picture inside and tie it with a little grosgrain ribbon for mom with an inexpensive bouquet of flowers.

How To Print Waterlogue Pictures from MomAdvice.com.

I hope you guys have the best time creating your own artwork and I hope this idea inspires you for an easy gift for someone special in your life!

For more great Mother’s Day gift ideas, check out these easy DIY Mother’s Day Gift Ideas!

Have you used the Waterlogue App before? What are you doing with this fun app?

walmart_mom_disclaimer

Pin It

3 Rainbow Science Experiments for the Legends of Oz: Dorothy Returns Movie

Tuesday, April 22nd, 2014

3 Rainbow Science Experiments

*This post is sponsored by Clarius Entertainment. All thoughts and opinions are my own.

In honor of the upcoming animated film release, Legends of Oz: Dorothy Returns, I am sharing three fun rainbow experiments you can try with your kids. These rainbow experiments are not only fun, but also educational. Before we begin these rainbow crafts though, I have to share with you that I have two major obsessions that you might not know about.

The first is anything to do with Oz and the characters. If you don’t believe me, here is the only year I asked my kids to do my dream costumes… and the only year I ever got away with it.

Wizard of Oz Halloween Costumes

This was my dream Halloween year as a mom and my mother-in-law even helped make the costume for me. Basically, all perfect Halloween dreams come true.

I miss those days.

The other thing you should know is that I am an enormous fan of Lea Michele and anything and all things related to Glee. I run to a Glee playlist, I pretty much cry about every emotional thing on that show, I sleep in a Glee shirt (yes, I do!), and Lea is my favorite actress in it. When I heard that not only was a Legends of Oz movie coming out, but that Lea Michele was doing the voice of Dorothy for it, I was beside myself with excitement.

I will be first in line to buy my tickets. And I will probably pre-order my tickets at my theater. That’s how excited I truly am!

Legends of Oz: Dorothy Returns

In the animated film, Legends of Oz: Dorothy Returns, Dorothy is called back for another adventure in Oz.  After waking to post-tornado Kansas, Dorothy (Lea Michele) and Toto are whisked to Oz on a magical rainbow mover sent by their old friends the Scarecrow (Dan Aykroyd), the Lion (Jim Belushi) and the Tin Man (Kelsey Grammer). Time in Oz has passed much faster than back in Kansas, and Dorothy discovers that the Jester (Martin Short) – the devious brother of the Wicked Witch of the West – is taking Oz over one region at a time, holding their leaders captive and casting a pall of darkness over the beloved land. Even Glinda (Bernadette Peters) is unable to combat the Jester’s evil powers, making Dorothy their only hope.

When she arrives in Oz, Dorothy’s plan is to travel to the Emerald City to reunite with her old friends and join forces with them to stop the Jester. However, the yellow brick road isn’t quite as easy to follow this time around, especially with the Jester planting tricky detours to lead her astray, so she enlists the help of Wiser the owl (Oliver Platt), Marshal Mallow (Hugh Dancy), China Princess (Megan Hilty) and Tugg the tugboat (Patrick Stewart) to help find her way.

Since Dorothy is sent to Oz on a magical rainbow mover, we decided to try three rainbow experiments that you can do together in honor of the film!


Make a Liquid Rainbow

3 Rainbow Science Experiments

Supplies Needed

Olive Oil

Rubbing Alcohol

Dawn Blue Dish Detergent

Corn Syrup

Food Coloring (red & green)

Large Jar


3 Rainbow Science Experiments

3 Rainbow Science Experiments

3 Rainbow Science Experiments

Experiment

Let’s make a liquid rainbow in a jar.

1. To make our blue slowly pour 1 cup of blue dish soap down the side of your jar.  You want to make sure to do this slowly too so you don’t create any bubbles.

2. Next mix  1 cup of water with four drops of green food coloring. Mix well.  Tip your jar and slowly pour the water down the side of the jar.

3. Next pour one cup of oil carefully down the side of the jar to create your yellow.

4. Finally mix 1 cup of rubbing alcohol with four drops of red food coloring.  Tip your jar and slowly pour the alcohol down the side of the jar.

3 Rainbow Science Experiments

3 Rainbow Science Experiments

Results from our Liquid Rainbow

Out of all of our experiments that we performed, this was our favorite. Our yellow got a little bubbly, but everything else stayed true with separate colors. This is a great lesson for teaching your kids about density. The different liquids all have different densities. Density means how much “stuff” there is in something. Not the thing’s weight nor its size, but how many atoms it has in it.  In our liquid rainbow, the dish soap is the densest layer and sits at the bottom of the glass, then the water is next, then the oil (which happens to be thick and can’t mix with water), and then the alcohol is the lightest in density. We are impressed with this one!

Make a Milk Rainbow

3 Rainbow Science Experiments

Supplies Needed

1 cup of half & half or whole milk

Food coloring (in any rainbow of colors)

Dish soap

Experiment

Let’s make a milk rainbow!

1. Pour 1 cup of milk into the bowl

2. Add 3 drops of one color to the edge of the bowl. Repeat with two other colors, placed in the other edges of the bowl. Be careful not to mix or jiggle.

3. Squeeze a drop of dish soap in the center of the bowl.

4. Watch what happens to the colors when the soap is added.

Results from our Soap Rainbow

Does anyone sell real liquid food coloring anymore? We just had the gels so we found that the liquid fell to the bottom in our first experiment The second time around, the dish soap was already added so I made a little mixture of gel food coloring with the water and then we poured it into our bowl. It was amazing to see how the colors stayed separate with this dot of soap in the middle. We learned that the dish soap does not mix with the milk. The dish soap floats on top and spreads over the surface. As it spreads, it grabs the food color we dropped into it. Where the colors meet, they combine to form new colors. We also learned, don’t do this with just gel food coloring. It produces a muddy river when mixed.

Make Rainbow Roses

3 Rainbow Science Experiments

Supplies Needed

Roses

Knife & cutting board (this part is for the grown-ups!)

Food coloring (any color of the rainbow)

Water

Cups

3 Rainbow Science Experiments

3 Rainbow Science Experiments

3 Rainbow Science Experiments

Experiment

1. Trim  the ends of your roses under cool running water.

2. Have a grown-up cut the rose in half.

3. Fill glasses with water and lots of food coloring.

4. Stand roses up and take the two sections of the rose and place them in two different colors of water. Allow them to stand in this water for 24 hours.

Results From Our Rainbow Roses

3 Rainbow Science Experiments

Did you think it would look like this? These Rainbow Roses have been promised on Pinterest dozens of times when I am on there. No, our roses did not look like this at all. They, were just slightly tinted with color on the edges, and two of them died during the rainbow color attempt. It might be better to try this one with carnations or to not split the stems at all.

3 Rainbow Science Experiments

Nailed it!

Well, maybe not.

We still saw how the color traveled through the flower although it wasn’t as rainbow awesome as we had hoped.

Legends of Oz

We know we are guaranteed spectacular rainbows though when Legends of Oz: Dorothy Returns hits theaters, so we plan to catch a rainbow there with the whole gang! I am so excited to see it and can’t wait to hear what you think of the movie when it releases on May 9!

*This post is sponsored by Clarius Entertainment. All thoughts and opinions are my own.

Tracking Pixel

Pin It

Gluten-Free Rainbow Bundt Cake

Thursday, March 6th, 2014

Gluten-Free Rainbow Bundt Cake from MomAdvice.com.

I am so excited to share a delicious Gluten-Free Rainbow Bundt Cake recipe that you can make using a simple boxed mix, a little food coloring, and a few odds & ends from your pantry. This Rainbow Cake is made in a tube pan, versus a layered cake, and is a fun addition to your St. Patrick’s Day spread.

Walmart challenged me to share a St. Patrick’s Day project that you could create out of items from their store. You may remember my rainbow cakes in a jar that I created a couple of years ago. Now that I am eating gluten-free, I wanted to replicate the idea of a rainbow cake, but I wanted to do it in one pan and I wanted to make it a quicker process by using a cake mix.

Gluten-Free Rainbow Bundt Cake from MomAdvice.com. Gluten-Free Rainbow Bundt Cake from MomAdvice.com.

To make a vibrantly colored cake, I want to point out that it is really important to use good icing colors to achieve your rainbow cake colors. Over by the party supplies, you will find professional cake decorating supplies at Walmart. You want to purchase the Wilton Icing Colors. These concentrated gels offer a much brighter color than what you will find over in the baking section of the grocery section. I just use a toothpick to dip in the gel and then swirl it through my cake batter. You may need to do this a couple of times to achieve this level of brightness, but it still will take a lot less than the other brands of food coloring.

Gluten-Free Rainbow Bundt Cake from MomAdvice.com. Gluten-Free Rainbow Bundt Cake from MomAdvice.com.

When I decided I wanted to make this cake, I went through tons of tons of cake recipes to figure out how to layer the batter. My inspiration for creating my rainbow arch was from not martha and her Leprechaun Trap Cake that she created a few years ago. Her arch is so much more beautiful than mine. I highly encourage you to read her tutorial for a perfect arch and read mine for a just meh arch. That being said, do prepare this in a tube pan versus a bundt pan to achieve the best arch. 

Do you have a digital scale? I highly recommend purchasing one because it will make projects like this a million times easier. I have had mine for many years and I use it for both weighing packages and as a food scale! Be sure to tare it with the bowl on top to begin your measurements each time.

I used the measurements outlined by not martha for measurements for my batter:

  • 6 ounces – red
  • 5 ounces – orange
  • 4 ounces – yellow
  • 3 ounces – green
  • 2 ounces – blue
  • 1 ounce – purple
  • The remainder of the rest of the batter, leave it white.

To scoop batter into the bowls, I relied upon an ice cream scoop to scoop it into the bowls on the scale. To make pouring the batter easier, place the cake batter in a baggie in a tall glass and hang the opening over the sides of your glass. Pour your batter in and then seal the baggie. Just snip a corner of the baggie to begin pouring your batter into the pan.

Gluten-Free Rainbow Bundt Cake from MomAdvice.com.

Gluten-free cakes tend to be more delicate so you definitely want to let this fully cool before trying to work with it. The side that has all the beautiful vibrant colors is not the top of the cake. It is the bottom of the cake. I accidentally iced this side so don’t make my mistake. If you find that your cake is puffy on the bottom, use a serrated knife to even it up a bit so your cake is not lopsided.

Gluten-Free Rainbow Bundt Cake from MomAdvice.com. Gluten-Free Rainbow Bundt Cake from MomAdvice.com. Gluten-Free Rainbow Bundt Cake from MomAdvice.com.

I posted a picture of this cake as I was glazing it on Instagram. To quote myself, “I never go easy on the sprinkles. I consider them the jazz hands on my desserts.”

Who quotes themselves? Sorry about that!

Glaze and sprinkle this cake liberally!

Gluten-Free Rainbow Bundt Cake from MomAdvice.com. Gluten-Free Rainbow Bundt Cake from MomAdvice.com.

I was disappointed that I had iced the wrong side and that my purple didn’t get perfectly centered. I think it is one of those cakes that might take a little more practice. My friends didn’t seem to notice or mind my errors though because this was one yummy cake! I doubt your kids would notice or care either. It might be a fun one to try together!

I hope you love it as much as we did and I hope this tutorial helps you while you make your own gluten-free rainbow cake!

Gluten-Free Rainbow Bundt Cake
Author: Adapted from Not Martha
Prep time:
Cook time:
Total time:
Serves: 8
A gluten-free rainbow cake perfect for celebrating St. Patrick’s Day
Ingredients
  • 1 Hodgson Mill Gluten-Free Yellow Cake Mix (over by the gluten-free ingredients in the candy aisle of your store, not in the baking aisle)
  • 1/2 cup butter softened
  • 2 large eggs, room temperature
  • 1 cup buttermilk
  • 2 teaspoons vanilla extract
  • 1 package of Wilton Gel Food Colorings
  • 1 1/2 cups confectioners’ sugar
  • 2 1/2 teaspoons milk (or milk substitute)
  • 1/8 teaspoon salt
  • 1/4 teaspoon vanilla extract
  • 1 teaspoon butter
  • Rainbow Sprinkles
Instructions
  1. Preheat oven to 350 degrees. Grease a tube pan liberally with cooking spray.
  2. In a mixing bowl, cream butter until soft. Add cake mix and blend completely.
  3. Add eggs, buttermilk, and vanilla extract and beat until completely blended. The batter will be thick.
  4. Divide your batter into eight bowls using the measurements in this post and tint accordingly.
  5. First pour the larger amount of white batter into the pan. Then pour the red batter in, making it a wide ring of batter. Then pour the orange over that, keeping it inside the red. Pour in each color, creating smaller and smaller rings.
  6. Bake at 350 degrees for 40-50 minutes, testing with a toothpick to check when the cake is done.
  7. Once the cake is cooled, prepare your icing.
  8. Melt the butter and add to rest of ingredients. Mix until creamy.
  9. Spoon the glaze over your cake and finish with rainbow sprinkles.

Enjoy this tasty treat with a DIY Shamrock Shake and our free St. Patrick’s Day straw printable!

walmart_mom_disclaimer


Pin It

How to Find & Write Pen Pals

Tuesday, March 4th, 2014

How to Find & Write Pen Pals

Pen Pals are a beautiful thing in a digital age where pen, paper, the process of writing, and waiting are so hard in our fast moving culture. Today I wanted to share about our experience with finding and writing pen pals that I hope will inspire you to find a pen pal of your own for your child after hearing about our experience.

How to Find & Write Pen Pals How to Find & Write Pen Pals How to Find & Write Pen Pals

Walmart challenged me to come up with a fun Spring Break activity for kids and finding a pen pal for my children is something that I have thought a lot about doing. We found items in their office supplies section like writing tablets (for big and small children), pretty note cards, and freshly sharpened pencils. With these arsenal of tools, we are now ready to begin a new adventure for our kids.

How Do You Find a Pen Pal?

Finding a pen pal is oh-so-easy thanks to social networks like Facebook, Instagram, and Twitter. I posted on my Facebook page that we were looking for children in our child’s age range that did not live in the United States to be pen pals with. Within minutes, we had many people replying about friends and family that lived in other countries with kids just around our age.

Of course, if finding someone living out of the states is harder to come by in your inner circle, consider just finding families that live in other parts of the United States. A child shivering in the polar vortex of Indiana, for example, might find a child’s life in Florida or California quite inspiring!

How to Find & Write Pen Pals How to Find & Write Pen Pals How to Find & Write Pen Pals How to Find & Write Pen Pals How to Find & Write Pen Pals How to Find & Write Pen Pals

Encourage Your Child to Craft a Great Letter

Writing letters not only improves our vocabulary and spelling, but it also helps teach children about the give and take of conversation.

Talk with your child about crafting a great introduction about themselves and how to weave in questions to find out more about their new pen pal. When my daughter asked me if her pen pal had glasses, I told her that this would be a great question to ask her so she could look forward to her response.

How to Find & Write Pen Pals How to Find & Write Pen Pals

Have Your Child Explore Their Pen Pal’s Town

It is easier than ever to learn more about where someone else lives thanks to Google’s Street View and Wikipedia. Although there was no street view for our pen pal, who resides in Greece, we were able to take a peek at pictures of landmark items in her country and read facts about where she lived.

Knowing information like this helps to build those initial letters as you get to know more about each other.

How to Find & Write Pen Pals How to Find & Write Pen Pals How to Find & Write Pen Pals How to Find & Write Pen Pals How to Find & Write Pen Pals

Send Your Letters Off

Once we were done writing our letter, we got to practice addressing an envelope and then added a few decorative touches to the back of our envelope for our new friend.

Although we ran our letter out to our mailbox at home, a great Spring Break activity might be to take that letter to the post office and make it feel even more, “official,” when sending it.

Now we must wait patiently for our response from our new friend and when she writes back, it will be a happy day, indeed!

How to Find & Write Pen Pals

I hope this inspires you to find a few pen pals of your own. And as double inspiration, here is my childhood pen pal. We met at church camp and became best friends through our letters back and forth. I remember that sweet anticipation of the mail dropping through the mail slot of our home and ripping them open to read, then reread, then reread again the precious words from my friend. 25 whopping years later, she is still my best friend for life.

I already told Emily to save her money and hopefully she will have a friend like that in her pen pal who she can visit someday! You just never know- we certainly never did! I shall be very jealous of her trips to Greece, should that happen!

Here’s a little video we put together of Emily’s first pen pal letter! I hope you enjoy it and I would love to hear if you had a pen pal and what they meant to you?


walmart_mom_disclaimer

Pin It

3 Favorite Ways to Top Off Your Dessert (Free Printables!)

Monday, February 17th, 2014

From our diy/craft contributor, Sarah.

Oh, my! You are in for a big treat today because Sarah Milne, from Sarah M Style, is an amazing crafting and design genius and she is joining us each month to share her knowledge. I am so thrilled to introduce you to her today and I know that she has many fun printables and ideas for our homes and crafts that you are going to be looking forward to her featured post each month! 

3 favorite ways to top off your dessert

February and March are birthday months for the boys in my life. In February, my little guy turns two, and in March, my husband, well, let’s just say he’ll be much closer to 40 than 35.  Whether it’s a homemade waffle birthday breakfast or a donut cake, we love our desserts around here! In my very first DIY and crafting post for MomAdvice.com, I’d like to show you three of my favorite ways to top off our sweet treats.


POM POM GARLAND

pom pom garland dessert topper

First, and my most fave, is this simple fuzzy and fluffy pom pom garland. Colourful and playful, it adds so much fun to your dessert. You could make this garland with tiny to large fuzzy pom poms or even craft your own poms out of yarn.

What you need.

Pom poms. Size and color of choice.
(I purchased an assorted bag from Michaels with my trusty weekly coupon.)
Twine or thread
Large needle
Scissors
Skewers, straws, small dowels

diy pom pom garland supplies

diy pom pom garland instructions

The how to.

  1. On your crafting surface, arrange your pom poms in your desired order.
  2. Thread your needle. Begin to thread the first pom onto the twine. Be sure to leave at least 5 inches excess on the end.
  3. Thread each pom onto the twine. Space the poms a desired distance apart.
  4. Once you’ve completed adding your poms, tightly secure the twine to your stick using a double knot. Trim your twine.
  5. Tightly secure the other end to your second stick and trim.
  6. Insert into your sweet treat.
  7. Dig in!


CHALKBOARD TOPPERS

diy chalkboard dessert toppers

I love that these toppers can be reused throughout the year and for all types of celebrations from birthday breakfasts to report card day! I found these small wooden shapes for less than 50 cents at Michaels and gave them a triple coat of chalkboard paint.

What you need.

Wooden shapes
Straws, popsicle sticks, or small dowels
Chalkboard paint
Foam brush
Paper towel or newspaper
Hot glue gun and glue
Chalk

diy chalkboard dessert toppers

The how to.

  1. Protect your crafting surface with paper towel or newspaper.
  2. Paint your wooden shapes using the chalkboard paint. When using chalkboard paint for crafts, I use a minimum of 3 coats. Allow for drying time in between coats. It seems to dry quickly.
  3. Attach your wooden shapes to your stick using a dab of hot glue.
  4. Draw or decorate your chalkboard topper for your occasion.
  5. Insert into your sweet treat.
  6. Dig in!


PAPER BANNER WITH WASHI GARLAND + FREE PRINTABLE

diy paper printable and washi garland dessert topper

Washi tape is a huge trend right now – and there are limitless crafts you can muster with it! My go-to topper are washi garlands. Paired with a paper banner, it makes a super sweet addition to your treat. I’ve designed two free printable paper banners in 3 colors for your next occasion.

What you need.

A collection of favorite washi tapes
Twine
Skewers, straws or small dowels
Free printable paper banner: {Click to download} HOORAY! or HAPPY BIRTHDAY

diy paper and washi garland dessert topper and free printable

The how to.

  1. Cut a 18 inch length of twine
  2. Cut your washi tape in equal or varied lengths and fold evenly over the twine, leaving 5 inches of vacant twine on each end.
  3. Print the free printable paper banner and trim.
  4. Secure your paper banner to the top of your sticks using a piece of washi or hot glue
  5. Below the paper banner, tightly secure your washi tape garland using a double knot or bow to each stick.
  6. Insert into your sweet treat.
  7. Dig in!

 Grab Your Free Printables HERE:

DIY Happy Birthday Dessert Topper

DIY HOORAY! Dessert Topper

Pin It

Gluten-Free Olympic Doughnuts

Thursday, February 6th, 2014

Gluten-Free Olympic Doughnuts from MomAdvice.com.

If there is one thing you know our family loves it is doughnuts. In honor of the upcoming Olympics, I am sharing a delicious gluten-free baked doughnut recipe that you can bake up as a treat for those opening ceremonies. This gluten-free doughnut recipe is as easy to put together as our other wonderful doughnut recipes and are so fun to decorate for the holiday.

Today’s project is sponsored by Walmart. Almost everything you need for this project can be found at their store!

Gluten-Free Olympic Doughnuts from MomAdvice.com.

One thing you will need to create these doughnuts is a doughnut pan. When I first started baking doughnuts, you had to order an item like this online and through specialty shops. Now you can find it right on the shelves at Walmart, in the same aisle as your cookie sheets & baking pans. The price on their Wilton doughnut pans is $7.19.  I have two of them because most recipes yield 10-12 doughnuts and it saves me time in the kitchen. These two pans have paid for themselves over and over again for our occasional sweet weekend treat!

Because I am new to gluten-free baking, I am using a gluten-free all-purpose mix to save me time in the kitchen. I bought a batch of Better Batter for my pantry and I have found that it is yielding impressive results for all of my baking needs. Buying it online from the company in bulk has saved me some money and storage in my pantry, thanks to not needing to buy multiple flours to blend. The bonus is that this mix does contain the Xanthan gum right in it. If your mix does not contain this, you will need to add that ingredient separately.

These doughnuts are light, fluffy, & sweet. The first things my kids remarked on was the spice in them. Although there is just a pinch of nutmeg, this ingredient really pulls through in the doughnut. For non-Olympic doughnut events, a sprinkle of powdered sugar on these is a delightful morning treat.

Gluten_Free_Baked_Olympic_Doughnuts-5

To make your Olympic-themed glazes, I simply made one batch of my favorite glaze and then added food coloring to each dish to reach the desired color. To achieve your black, if you are just working with a standard set of food colorings, equal portions of blue, yellow, and red will help achieve the color you are after.

Gluten_Free_Baked_Olympic_Doughnuts-4 Looking For More Fun Ideas to Celebrate the Olympics? Let’s take a peek at some more fun (and frugal!) ideas!

Fun Ways to Celebrate the Olympics

Olympic Medal Cookies

What could be sweeter than receiving an Olympic medal? How about an Olympic Medal filled with a cookie? AlphaMom offers this sweet little Olympic craft to do with your little ones. Stumped for a cookie idea?  I highly recommend an Oatmeal Chocolate Chip Sea Salt Cookie for your medal filling!

Olympic T-Shirts

Dress up a white t-shirt to dress up for the Olympic games. with a simple painted ring pattern on an inexpensive thrift store shirt, this is a craft that is easy enough to do with kids of all ages. Kate’s Creative Space offers this fun craft idea to her readers to celebrate the games.

DIY Olympic Torch

What child doesn’t dream of carrying around their very own Olympic torch. Hoosier Homemade showcases a fun craft that you can do to create your very own Olympic torch made from some commonly found items at your local craft store.

Olympics Party Fun

Why not throw a party for your family or for a group of families to celebrate the Olympics? A Small Snippet has you covered with everything from patriotic foods to great Olympic game ideas to play together, to fun ideas for decorations that don’t cost a lot.

 Olympic Torches Made From Recyclables

If hitting your craft store for supplies to make an Olympic torch isn’t in your budget, this Olympic Torch from The Idea Room is made from common items you have in your home and recyclables. These torches are made from a paper plate, a paper towel roll, and red & gold tissue paper. This is one that even the smallest child can do. Be sure to lift these high and participate in your own round of fun family Olympic games.

Olympic Rings Necklace

Even moms can jump in on the Olympic excitement with this cute craft, from Remarkably Domestic, for an Olympic Rings Necklace. This necklace is made from simple rings covered in Chinese knotting cord to create those Olympic rings everyone loves so much. This would be a fun craft to do while watching your favorite games this year!

However you celebrate the Olympic games this year, I hope this post inspires you for your Olympic game watching!

Gluten-Free Olympic Doughnuts
Recipe Type: Breakfast
Author: Adapted from Food & Wine Magazine
Prep time:
Cook time:
Total time:
Serves: 10
These gluten-free doughnuts are so easy to make and can be a fun snack to share while watching the opening ceremony this year!
Ingredients
  • 1 1/2 cups all-purpose gluten-free powder (I recommend Better Batter Flour)
  • 1 cup sugar (next time I may adjust to 3/4 cup sugar)
  • 2 teaspoons baking powder
  • 1/4 teaspoon nutmeg
  • 1/2 teaspoon salt
  • 2 large eggs, at room temperature
  • 1/4 cup canola oil
  • 1/2 cup whole milk
  • 1 teaspoon vanilla
  • 1 cup confectioners sugar
  • 2 tablespoons hot water
  • 1/2 teaspoon vanilla, butter, or almond extract
  • Betty Crocker Food Coloring Set (over in the baking aisle)
Instructions
  1. Preheat the oven to 350º and spray two nonstick 6-cavity doughnut pans with nonstick cooking spray.
  2. In a large bowl, whisk the flour with the sugar, baking powder, nutmeg and salt
  3. In a medium bowl, whisk the eggs with the oil and milk until smooth; add to the flour mixture and whisk until combined.
  4. Spoon the batter into 10 cavities of the prepared doughnut pans until about three-quarters full. Bake for 18 to 20 minutes, until a toothpick inserted in the center of a doughnut comes out clean.
  5. Let the doughnuts cool.
  6. In a bowl, mix together the confectioners sugar, hot water, and flavoring. Divide the glaze into five bowls and create your colors for the doughnuts. Dip or spoon the glaze over the doughnuts and allow the glaze to harden.


Pin It

Chinese New Year Family Tradition: We Are a Fortunate Family Felt Fortune Cookies

Monday, January 27th, 2014

Chinese New Year Family Tradition: We Are a Fortunate Family Felt Fortune Cookies from MomAdvice.com.

I love to create new holiday traditions with my family and today’s project is in honor of the Chinese New Year!  To celebrate, I am sharing a tutorial on how to make felt fortune cookies and a free printable that can be placed on a jar for a special Chinese New Year tradition.

I have partnered with Walmart on this project to showcase a fun project that you can do in honor of the holiday. All supplies for this project can be found at their store!

What is Chinese New Year?

Chinese New Year is the longest and most important celebration in the Chinese calendar.  The Chinese year 4712 begins on Jan. 31, 2014. A fun fact for this year is that this is the year of the horse.

New Year festivities traditionally start on the first day of the month and continue until the fifteenth, when the moon is brightest. In China, people may take weeks of holiday from work to prepare for and celebrate the New Year. Can you just imagine?

According to the Chinese legend,  Buddha arranged a meeting and asked all the animals to meet him on Chinese New Year. Twelve animals came and Buddha named a year after each one. If you were born in certain years, your personality is supposedly aligned with your animal. Those born in horse years are cheerful, skillful with money, perceptive, witty, talented and good with their hands. Since this is the year of the horse, if you have a child born this year, it sounds like you will have quite a talented and delightful child.

There are many great traditions around this holiday that include wearing red clothes which symbolizes fire and drives away bad luck, and a lantern festival, and one thing that Americans really seem to get behind is…

The  FEASTING.

Chinese New Year Family Tradition: We Are a Fortunate Family Felt Fortune Cookies from MomAdvice.com.

We are a Fortunate Family

Since the Chinese New Year is about feasting and family, I wanted to create a craft that would work for these two elements of the holiday. I love that many elements of this holiday focus on luck & good fortune. Incorporating this element, today we are making felt fortune cookies, but instead of filling them with predicted fortunes, we are going to fill them with all we are so fortunate for.

Because we are a FORTUNATE family. 

I love gratitude projects and thankfulness for all we have around the dinner table is definitely a tradition that I want my family to embrace.

Chinese New Year Family Tradition: We Are a Fortunate Family Felt Fortune Cookies from MomAdvice.com.

Supplies Needed

(All Available at Walmart)

Felt Sheets (any color)

3/8″ grosgrain ribbon

Floral Wire

Wire Clippers

Large Mason Jar

Scissors

Hot Glue Gun & Glue Sticks

1 piece of heavy cardstock

1 piece of white paper & pencil

Chinese New Year Family Tradition: We Are a Fortunate Family Felt Fortune Cookies from MomAdvice.com.

How to Make Felt Fortune Cookies

1. Using your ribbon spool or the bottom of your mason jar, trace a circle with a pencil or marker. Cut out your circle.

2. Snip a piece of floral wire, approximately the length of your circle, with your wire cutters. Add a line of hot glue, and place the wire in the center of the glue.

3. Snip grosgrain ribbon the approximate length of your circle and then secure over the wire with a little additional glue.

Felt_Fortune_Cookies_Tutorial-12

4. Fold your circle in half and then bend like a fortune cookie. Repeat the process until you have a jar full of fortune cookies.

Chinese New Year Family Tradition: We Are a Fortunate Family Felt Fortune Cookies from MomAdvice.com.

You can enlist your helpers to help make your fortune cookies. Since we have had UNLIMITED SNOW DAYS THAT NEVER END, I have many helping hands. Ahem.

The best part though, is involving them in the gratitude portion of this project. Using the writing prompt,

“I’m Fortunate For…”

Have children write down all the things that make their family special.

Chinese New Year Family Tradition: We Are a Fortunate Family Felt Fortune Cookies from MomAdvice.com.

Emily said, “I’m Fortunate For…that my family are GRATE dancers.”

What can I say? She comes from a long lineage of family members that just BRING IT on the dance floor!

Chinese New Year Family Tradition: We Are a Fortunate Family Felt Fortune Cookies from MomAdvice.com.

Mom & Dad can get in on the fortune cookie writing prompt too. Hopefully your husband doesn’t read this aloud and then ELABORATE endlessly on his AMAZINGNESS.

Awkward.

Chinese New Year Family Tradition: We Are a Fortunate Family Felt Fortune Cookies from MomAdvice.com.

Chinese New Year Family Tradition: We Are a Fortunate Family Felt Fortune Cookies from MomAdvice.com. Chinese New Year Family Tradition: We Are a Fortunate Family Felt Fortune Cookies from MomAdvice.com.

My husband designed this fantastic printable that you can attach to a jar. I just dabbed a little glue on my jar and attached this side. You could also print this on label paper or attach with a little double-sided tape to finish your project. (Grab the printable at the bottom of this post!)

If you are looking for dinner options, here are couple of great ones that I can recommend!

Gluten-Free Orange Chicken

This delicious gluten-free orange chicken would make a fantastic meal!

Peanut Ginger Chicken Noodles

These Peanut Ginger Chicken Noodles are always a big hit!

Weeknight Chicken Lo Mein

And this Weeknight Chicken Lo Mein is fast & easy to prepare!

However you celebrate this holiday, I hope this post offers some inspiration for fun ways to celebrate with your family.

Chinese New Year Family Tradition: We Are a Fortunate Family Felt Fortune Cookies from MomAdvice.com.

Grab Our FREE “We Are a Fortunate Family,” printable.

walmart_mom_disclaimer

Pin It

DIY New Year’s Eve Craft Ideas

Thursday, December 19th, 2013

DIY New Year's Eve Crafts

I can’t believe that December is already here and we are dreaming up great New Year’s projects for you!

Of course, I am featuring glittered projects and upcycle projects that could be enjoyed any time of the year.

The best part is that you can find many of the materials for these projects at your local thrift store for a fraction of the price compared to other retail stores.

Let’s find some thrifty ways to ring in the New Year!


Create Glittered Ballet Flats

If there is one thing I love, it is glitter!

I am always looking for festive additions to add to my wardrobe and these glittered flats couldn’t be easier to create and, according to We Are Not Martha, making these is less messy than you think.

For this craft, head to Goodwill to pick up a basic flat and then create a glittered layer with a little Modge Podge and glitter.

How festive would these be for the holidays?

Or your birthday?

Or everyday?


Make Confetti Surprise Jars

Sometimes the simplest of things bring us the most joy and this craft from diy studio is a joyful & frugal one.

My children would adore these Confetti Surprise Jars for a fun family NYE tradition.

Pick up a jar at Goodwill and spray paint the lid a dazzling shade of gold or silver, fill it with confetti, and add a special surprise inside for the recipient.

For your surprise choices, check out the jewelry section or locate small toys or game pieces that you can add as their surprise.

Don’t be afraid to spray paint those treasures in the same shade of gold or silver for the holiday.


Add A Little Sparkle to Your Wardrobe

If there is one thing that thrift stores have an overabundance of, it is sweaters and cardigans for the Winter season.
Don’t worry if you don’t sew (like me!), this is a project that can be done in minutes with just a little fabric glue.
Sincerely Kinsey offers this fantastic DIY that will add just a hint of sparkle to your wardrobe with this easy sequin cardigan.

Add A Little Sparkle To Your Home

There is always an abundance of vases and jars at Goodwill so I love that I can shop their store for this project.
These easy glittered vases are pulled together much like the glittered flat that I shared about earlier.
You simply need a vase or jar, Mode Podge, glitter, and a sponge brush to create these fun vases.
I think these would make the cutest NYE centerpiece or they could be a fun craft to do with your kids for the holiday season.
Check out this tutorial from the sweetest occasion.

Add Sparkle to Your Wine Glasses

I am no stranger to adding sparkle to stemware and last year I created these monogrammed wine glasses for my girlfriends.

If you are having a small NYE party, consider making these as a fun favor for your guests.
If you lack the ambition to monogram them, keep it simple and just add a glittered stem to your glasses.

Give a Cozy Hostess Gift 

As the resident craft expert for the Goodwill Tips blog, I can tell you that sweater crafts are one of our favorite projects to share about on here.
Yet again, the ever-versatile-and-available sweater makes its appearance in another craft post.
Warm Hot Chocolate shares an easy no-sew tutorial for creating a cozy sweater that can dress up a bottle of wine or champagne.
She adds an adorable pom-pom embellishment with a tag to complete this beautiful gift.

Wine hats and scarves

Wishing you the hap-hap-happiest of New Year’s from MomAdvice.com!! May your holiday be beautiful and thrifty this year!

This post contains affiliate links.
Here are a few more wonderful crafts from MomAdvice.com:

Scrappy Fabric Trees


No-Sew DIY Blanket Scarf


Valentine’s Day Cupcake Liner Trees


Paint-Dipped Spoon Set


Sign up for the MomAdvice newsletter