I have been jotting down ideas for this holiday gift guide over the year since each year I aim to create a really useful gift guide that you really will use and love when selecting your gifts.
This list is a compilation of my favorite things that have made me very happy and I believe they are the perfect gifts to share with someone you love.
I did not set a dollar limit this year on the gifts because I don’t get the opportunity to share some of the pricier things that I really have used and loved, but the list will offer a range of ideas for your own Christmas budget.
I also try to share if I have found them somewhere cheaper or where to snag a coupon to make these gifts more affordable.
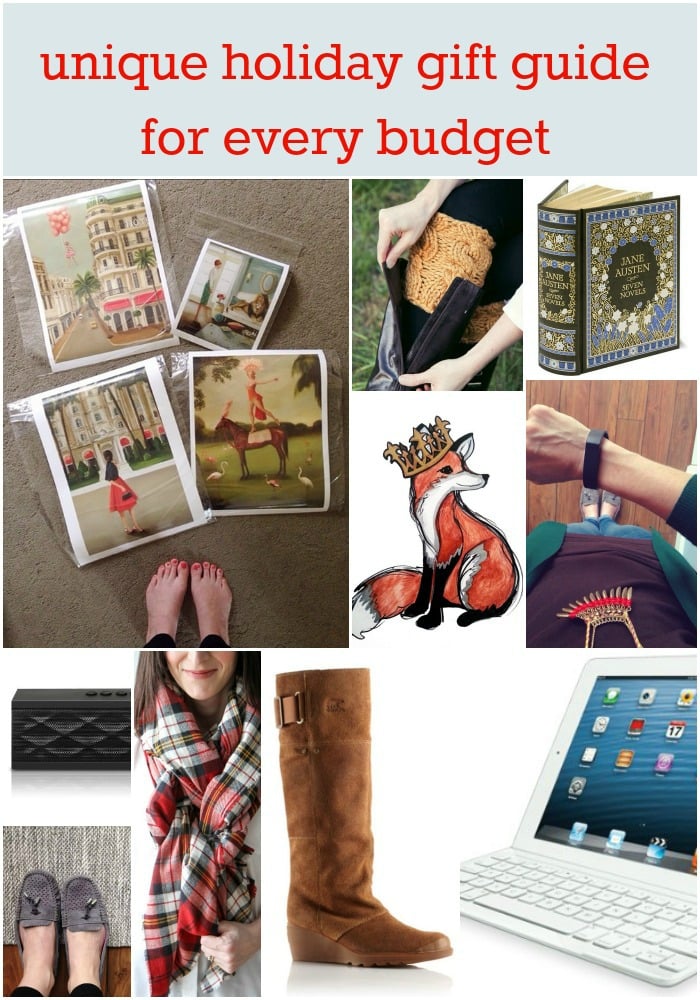
Bluetooth Speaker
I absolutely love my Speaker for listening to podcasts and music through my iPhone or iPad.
This little guy is Bluetooth-enabled so it can connect with your device and charges with a little USB cable that it comes with.
The sound is really good- not Sonos quality, but really perfect for my laundry/making dinner/cleaning house needs.
I am one happy girl now that I don’t have to hold my phone to my ear to keep up with all my stories and to hear my music.
I really think this is a sweet little gift and I love the price tag.
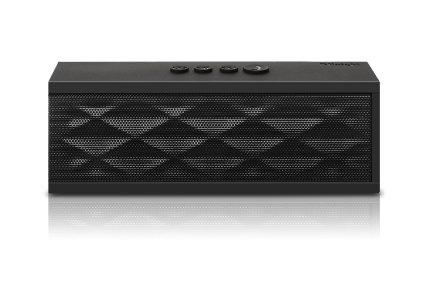
Blanket Scarves
Blanket scarves are very trendy this year and are the perfect gift to give for the holiday season.
These are also an ideal gift for someone who travels a lot since they fit perfectly in your carry-on luggage and can be wrapped around you when you get cold on the plane or at the airport.
I have an easy tutorial to create a blanket scarf for gift-giving this year for the crafty and the not-so-crafty.
Head over here and check to see if flannel fabrics are on sale.
You will DEFINITELY want to use this because it makes these scarves budget-friendly for the holidays.
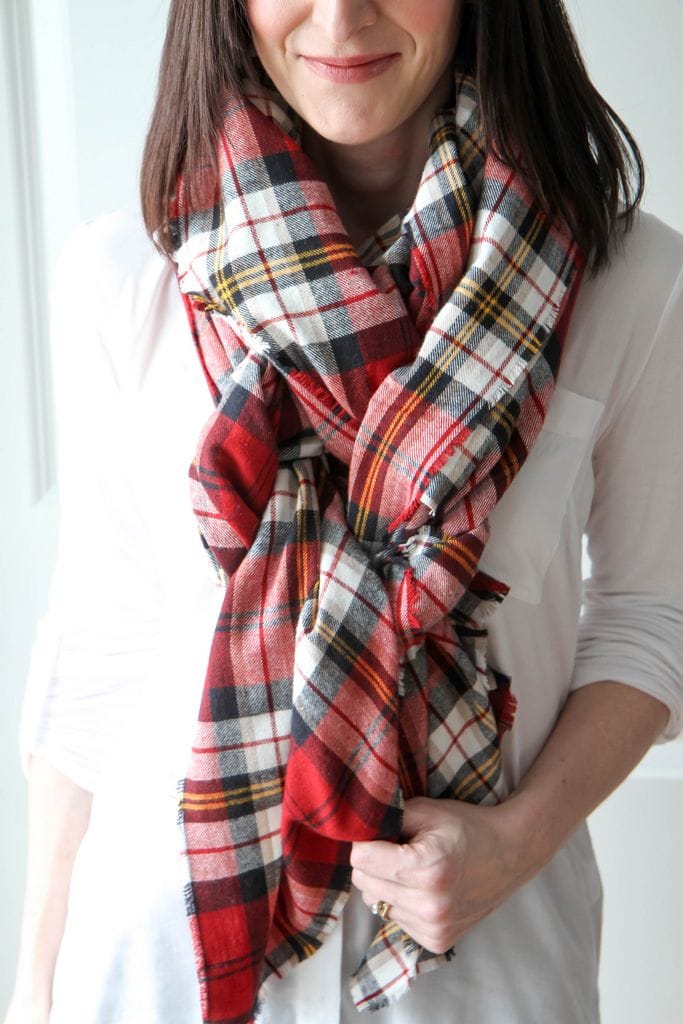
UGG Slippers
I wish I could give everyone in the world a pair of UGG slippers because these make me that happy. Every year I buy a cheap pair of slippers from Target that I trash and then have to buy another pair, usually mid-season.
I discovered that UGG makes slippers (I know, I am so behind on the times!) and I decided to hunt on eBay to see if I could find a pair of slippers for myself.
I wanted something that looked like a shoe and not yo grandma’s slippers.
I found these Gray Suede Driving Moccasins that were brand-new (just missing their box) and bought them for $55.
Considering I am probably spending that much on two cheap pairs every year, this is a worthy investment.
The best part is that they have leather inserts for warm days and then they have that delightful furry insert for freezing days.
UGG Slippers bought from elsewhere might be out of the budget, but checking eBay might be a great option for brand new slippers at a fraction of the price for someone you love!
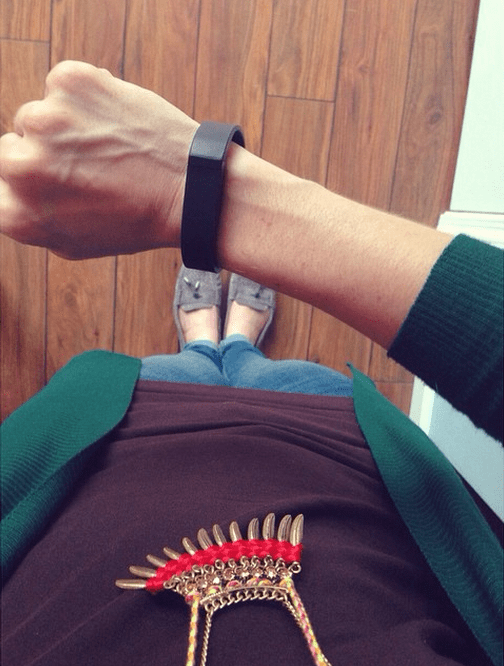
Fitbit Flex
I am one of those people that is slow to jump on the bandwagon when it comes to technology and gadgets.
Before the Fitbit Flex even launched, my husband knew about it and wanted to buy it for me.
Now that it has been enough time for the trend to pass, I figured I would look into getting one and I absolutely love it for motivating me to stay fit and hit the gym.
Several of my girlfriends have these and I tend to have an annoyingly competitive streak so being in a competition for the most steps has been pushing me to hit the gym and go on an evening walk so I can compete against my athletic friends.
The other thing that I love, not fitness related, is the silent alarm feature on the Fitbit Flex.
I have to be the first one up in our house and when my alarm goes off, it triggers my husband to wake up and our cat to start the annoying meowing baby cry reserved for the morning alarm.
You can set a silent alarm on the app and the bracelet vibrates to wake you in the morning.
I wake up happier, my husband continues to sleep, and the cat doesn’t start her annoying meowing baby cry until she realizes I am up.
Winning all around!
If you are gifting this, consider making a little DIY Fitbit Flex Leather Cuff to go with it- this has been one of my favorite things this year!
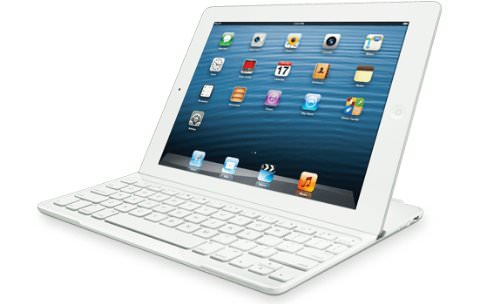
Logitech iPad Keyboard
I used to carry around my laptop when I traveled, but when I got my iPad, I knew that I wouldn’t need to carry that around with me anymore because HELLO…BROKEN BACK.
How many pounds is a laptop? Ouch!
Unfortunately, I couldn’t stand trying to type on the touch screen, particularly when sending lengthy emails or trying to conduct anything for my business.
I found this Logitech iPad Keyboard and it has been one of the best tech investments I have ever made.
It instantly turns your iPad into a mini-laptop that you can carry in your purse.
The battery life lasts forever before it requires a charge with a small cord, making it perfect for me to take to my conferences.
The outside of it is metal and durable, helping protect your iPad screen and it latches together magnetically, as though they weren’t meant to be together from the start.
The best part is that it holds my iPad up for me while I am laying in my hotel bed watching Parenthood episodes so that I can hold my Kleenex and cry without having to hold the screen at the same time.
Can you just imagine how hard that would be?
But it is also very important for business. Yes, for business.

This American Life App
An iTunes gift card makes the perfect little stocking stuffer for the holidays and may I offer a suggestion on how to spend it?
I am an NPR junkie and if you haven’t discovered it yet.
This American Life is mostly true stories of everyday people, and the best way I can describe it is that the show is like listening to a movie about these people.
It is typically told in three acts that all interact around the same theme. It is the best kind of storytelling and usually leads to a beautiful discussion about your own viewpoints after the show.
The app is wonderful for listening to all of the Staff Picks and the best of the best in This American Life offerings.
My husband and I sit in our respective chairs and hang on every word. Every. Word.
It’s become one of our favorite things to do in the evenings, further solidifying the exciting type of senior life you might expect from us in the future.
If you aren’t listening to NPR, you are missing the boat. And I can say this because I missed the boat for years and now I can’t imagine my life without it.
Faux Fur Blankets
I was hoping these blankets would be back from Better Homes & Gardens and spotted these faux fur throws back on the shelves this week at Walmart.
This is MY FAVORITE blanket and a great gift to give for the holidays. It is cozy fleece on one side and then the other side is a glorious faux fur.
They even had a free Better Homes & Gardens Magazine subscription attached to it which made the deal even sweeter.
Who wouldn’t love a cozy throw with a gift card to select a few favorite books to read.
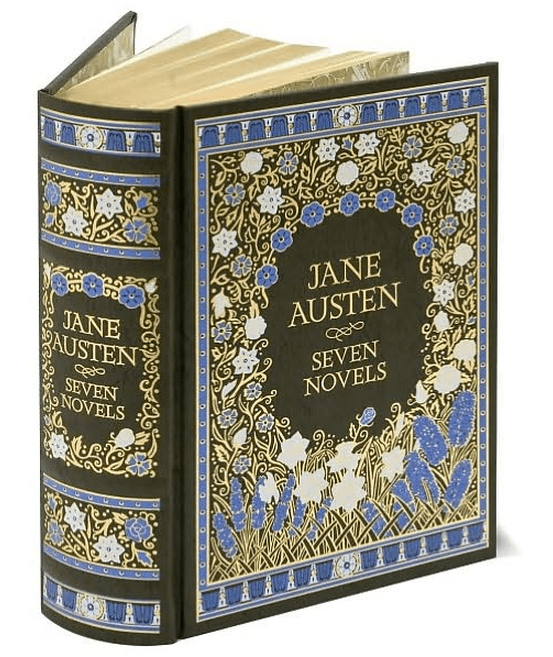
Barnes & Noble Collectible Editions
Every year I ask for one Barnes & Noble Collectible Edition to read.
These books are so beautifully bound and I try to read one classic each year so these beautiful books add a lot of motivation to read them since they are such a treat to page through.
This year I have my eye on this Ernest Hemingway collection or to dig into this Laura Ingalls Wilder collection to read with my favorite little girl in the evenings.
You will never regret these purchases for our bookshelf. I love all of the Barnes & Noble Collectible editions and even treated myself to The Giver collection this year (which I can’t wait to read!) that I found in my local store. (PS- Check here for coupons!)
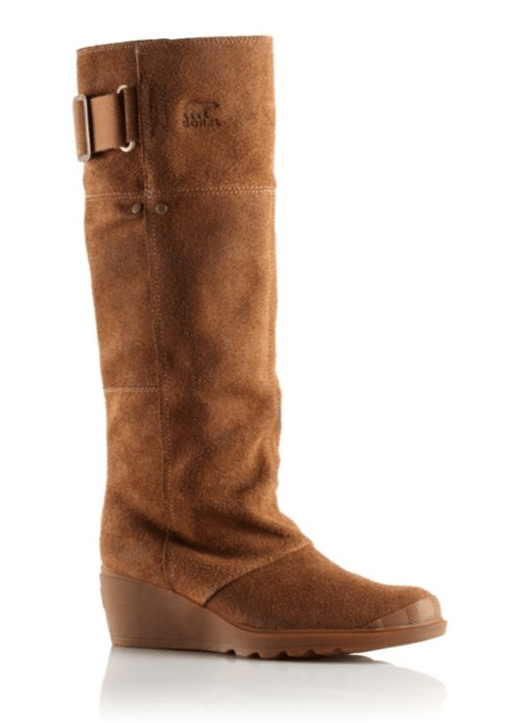
Sorel Boots
Five years ago I got my first (and only) pair of Sorel Boots and they still look just like the day that I got them.
They have a cozy layer of Thinsulate inside of them that keep my feet toasty and each year a little polishing and waterproof spraying helps them to go strong from year to year.
I have never spent a lot on shoes, but after the fifth year of these going strong, I can honestly say that they are a worthwhile investment especially if you live in the Midwest.
I am planning to ask for Sorel gift cards to put towards my next pair of boots from my family members so I can pool them together to get another pair.
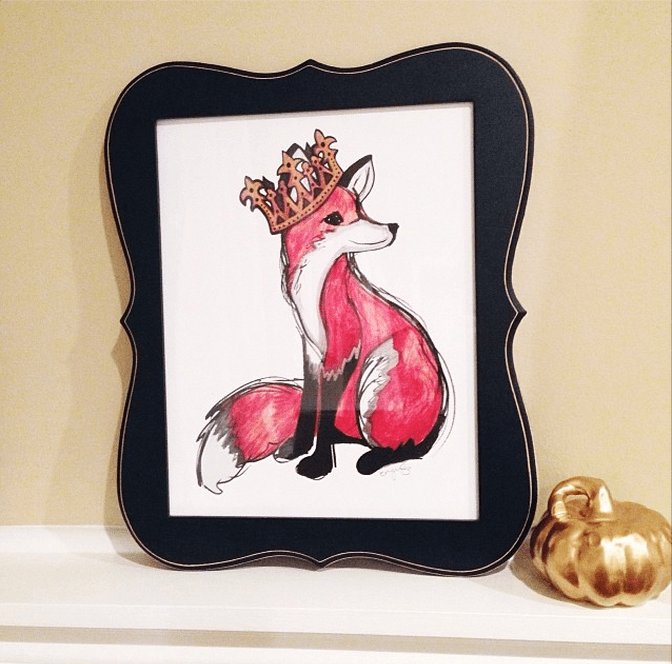

Royal Fox Print
My brother is an artist in NOLA and when I came to visit we had the best time checking out all of the art that the street vendors offered as well as the galleries full of unique art.
I only brought home one souvenir from my trip and it was this sweet little Royal Fox print that I found at the Gallery Burguieres in NOLA.
The artist was as sweet as could be and has recently had a little drama going on with this fox that has made him rather famous in the Taylor Swift world.
This shop is a little NOLA treasure and was one of my favorite galleries we visited and this print makes me smile every time I see it.
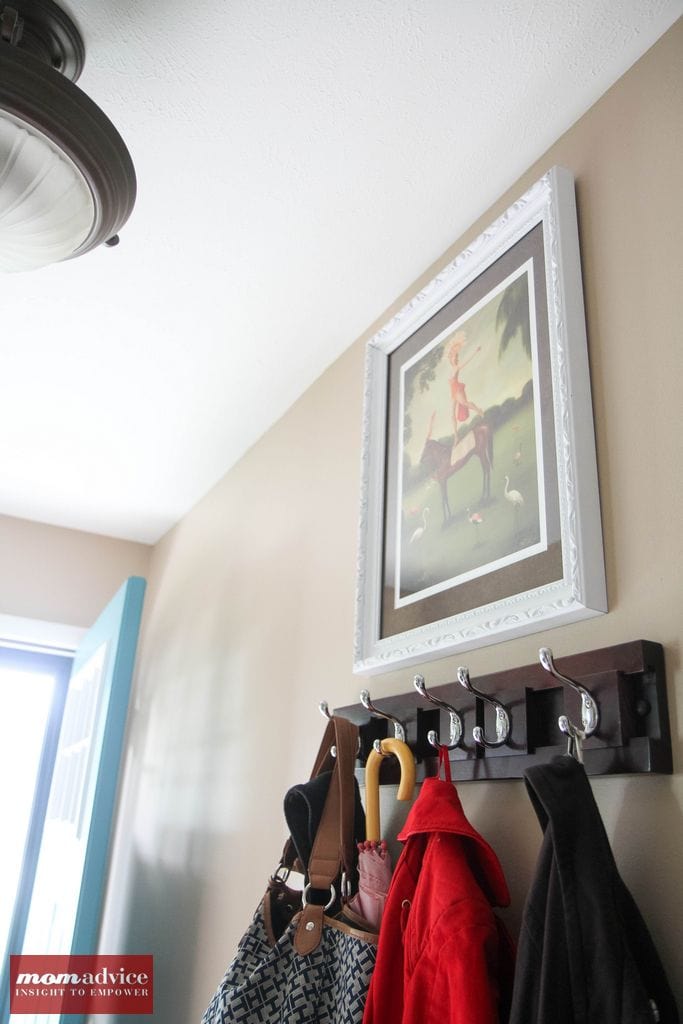
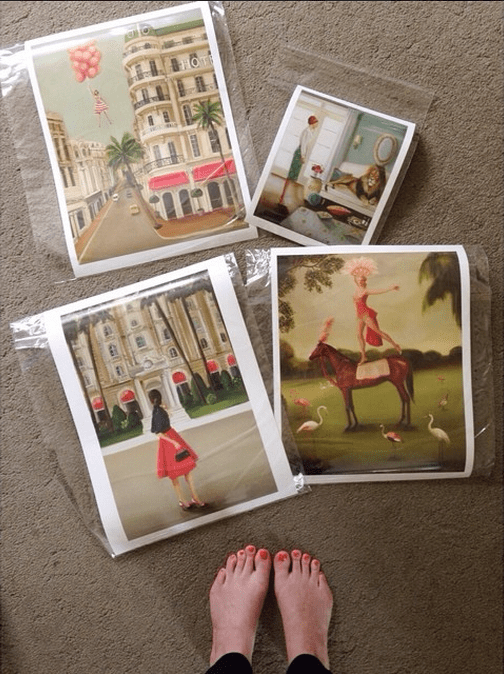
Janet Hill Prints
My home is filling quickly with Janet Hill prints and every single piece just speaks to my soul in a way no other artist has ever spoken to me.
Each print tells such a beautiful and unique story that I think would resonate with just about anyone.
These beautiful prints would be lovely to share with someone you love particularly if you frame them with an inexpensive frame.
I took mine to Hobby Lobby to get a matte that would make each one stand out.
Of course, Janet Hill is just one of many talented artists that share their wares on Etsy so you if you are unsure of your recipient’s taste, consider a gift card to Etsy to make gift-giving easy and unique.
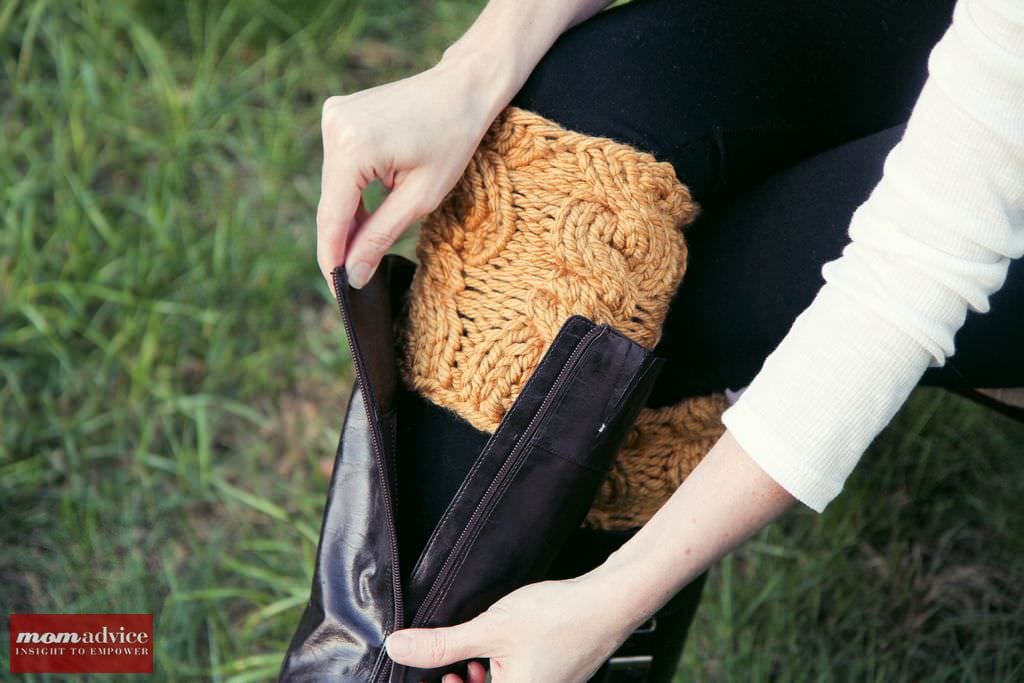
Knitted Boot Cuffs ($5)
Our most popular project on the site right now are these knitted boot cuffs that you can whip it up in a mere two hours. I gave these to my best friend Christmas last year and you can make them for about $5 in materials.
These are such fun toppers to your boots and would also make a sweet little stocking stuffer.
If you are new to cabling, this is an easy project to tackle to master cabling and you can’t beat that these can be created in such a short amount of time.
*this post may contain affiliate links- I only recommend what I love though. Check out past editions of It’s the 3 Little Things for more happiness givers.


