Archive for the ‘DIY’ Category

DIY Fitbit Bracelet Tutorial

Tuesday, October 21st, 2014

DIY Fitbit Bracelet Tutorial from MomAdvice.com.

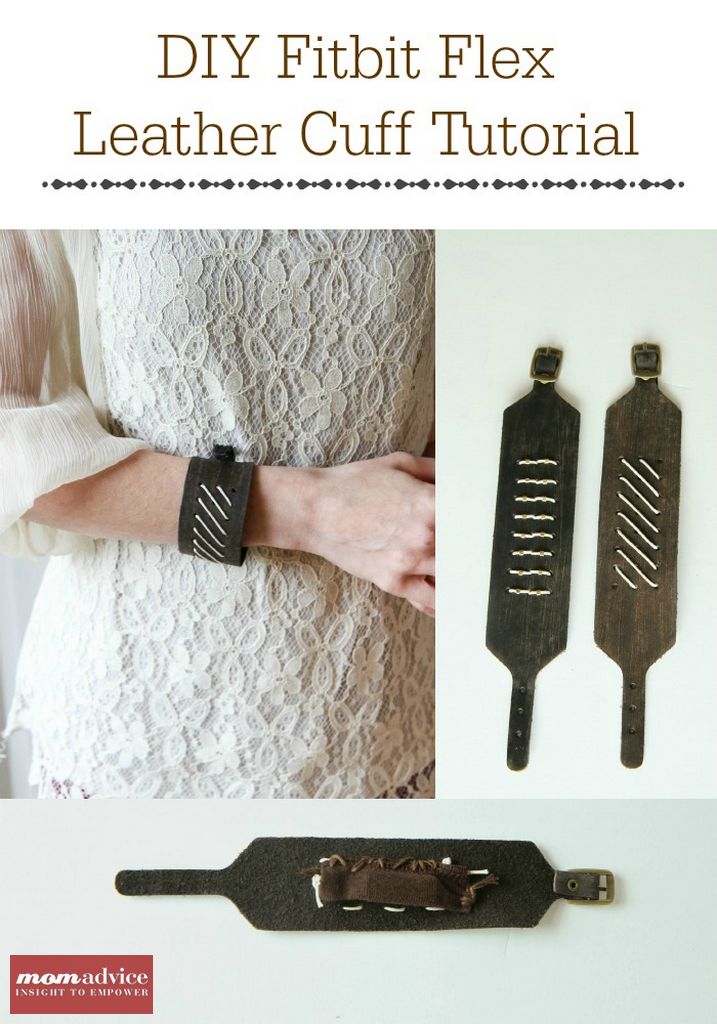
This month I bought myself a Fitbit Flex and I have been absolutely loving it for exercise motivation, tracking my sleep, and its handy silent alarm feature. I did not, in fact, love the plastic bracelet that the Fitbit Flex came in. A plastic bracelet doesn’t really fit with my style and I didn’t want to wear it when I went out. Today’s tutorial is a fun way to dress-up your Fitbit with a stylish leather cuff alternative. This DIY Fitbit bracelet is beautiful and can be created for less than $10 and is done in just 5 easy steps.

I cannot take the credit for this amazing tutorial. My sweet friend, Andy,  let me come to her house and photograph how she made this for my blog. She was the genius behind this awesome idea and I can attest to both its durability and how well the Fitbit slides and hides inside this cuff. Although this is created for times when you are not working out, I did test it in my cardio dance class to make sure that it would stay secure. After one hour of jumping and dancing, the Fitbit was happily secure. I would still recommend sticking with your plastic bracelet for workouts, as it is more breathable, but this should stay secure if you use it in your daily activities.

DISCLAIMER:

You need to test your own bracelet to make sure that it is secure and that your Fitbit stays inside. I am not responsible for a lost Fitbit if you create this and it is not crafted securely. It is your responsibility to make sure that your Fitbit is securely fastened.
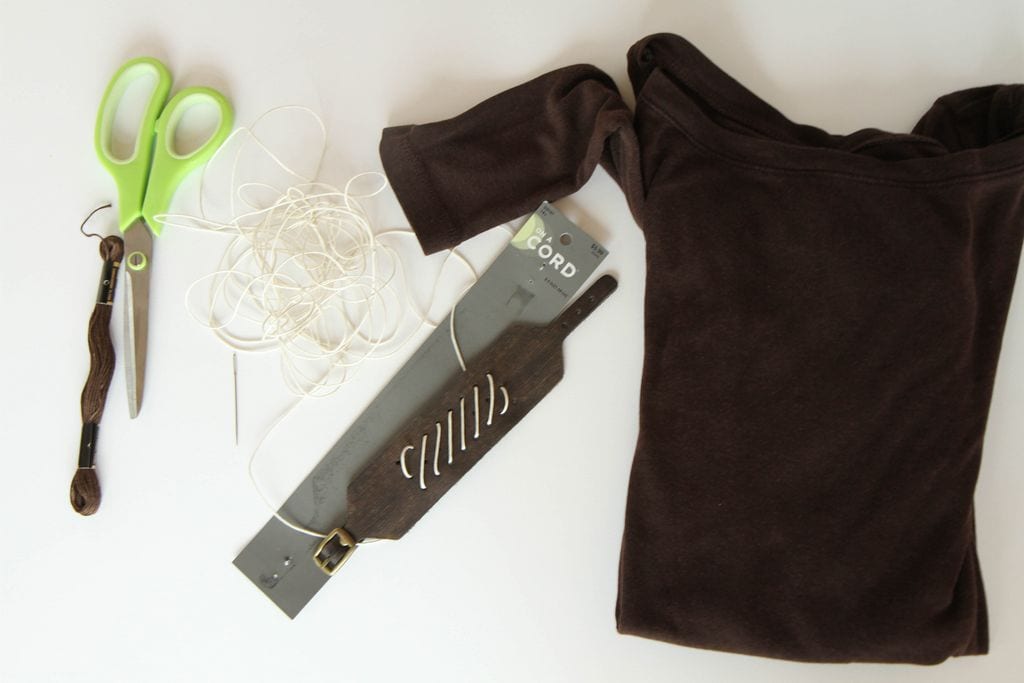
DIY Fitbit Bracelet Tutorial from MomAdvice.com.

Supplies Needed

Leather Cuff Bracelet (found at Hobby Lobby for $5.99 in the jewelry supplies)

Hemp Cord

Brown Embroidery Thread

Embroidery Needle

Scissors

Brown T-Shirt (old or thrift store purchase would be perfect for this!)

DIY Fitbit Bracelet Tutorial from MomAdvice.com.

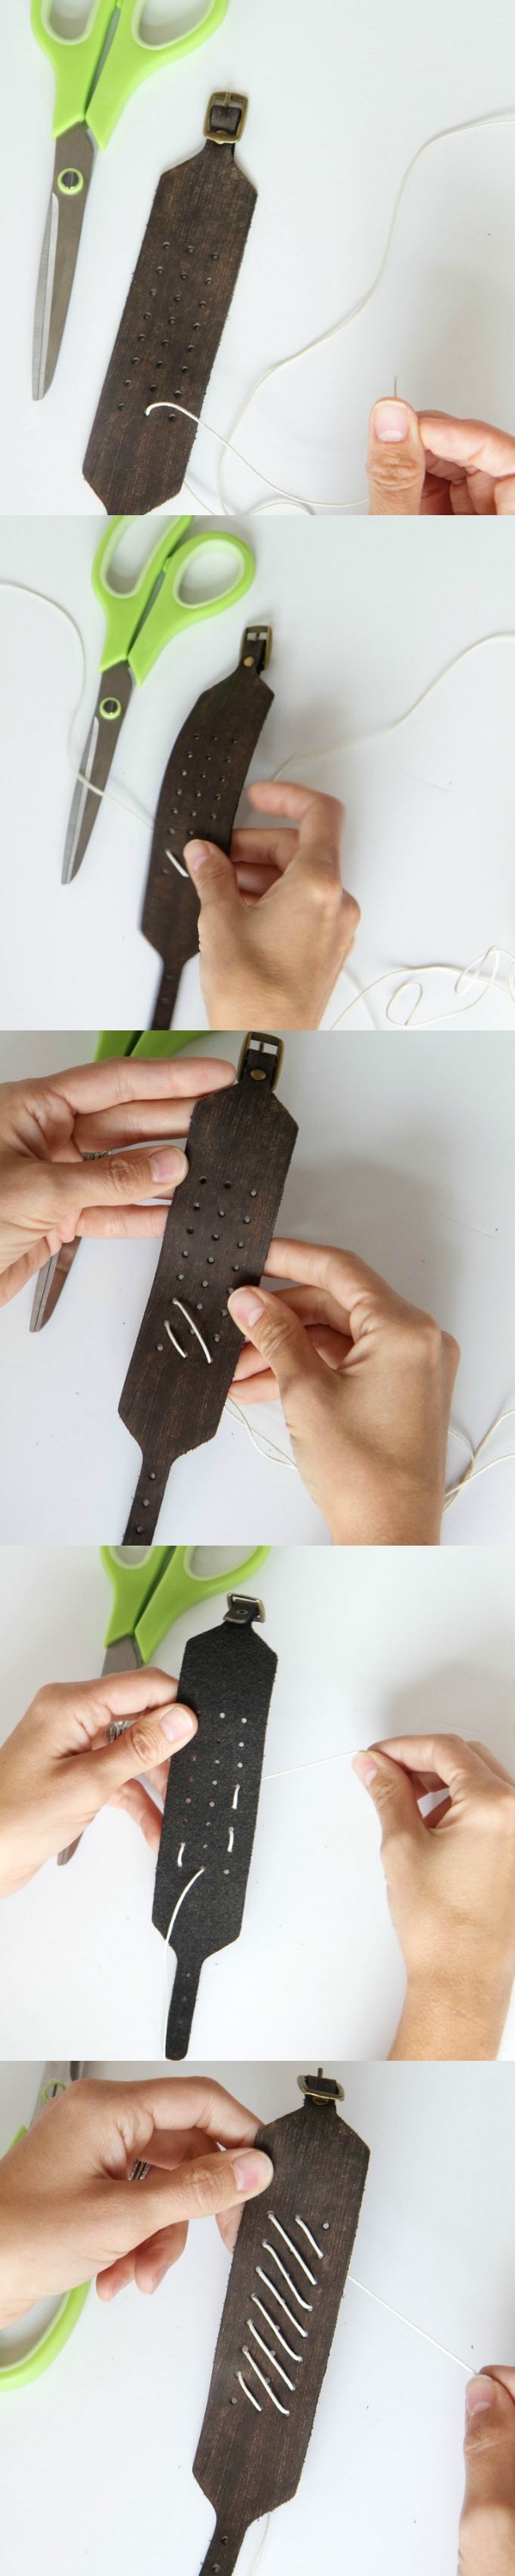
1. Thread your hemp cord through an embroidery needle and use this to create a design in the holes of your choosing. You can ladder it up, as we have shown, or even just sew it back and forth to create your design.  You can also add beautiful details with crimp beads to your design. Continue weaving the hemp cord until you are at the end of the bracelet.

DIY Fitbit Bracelet Tutorial from MomAdvice.com.

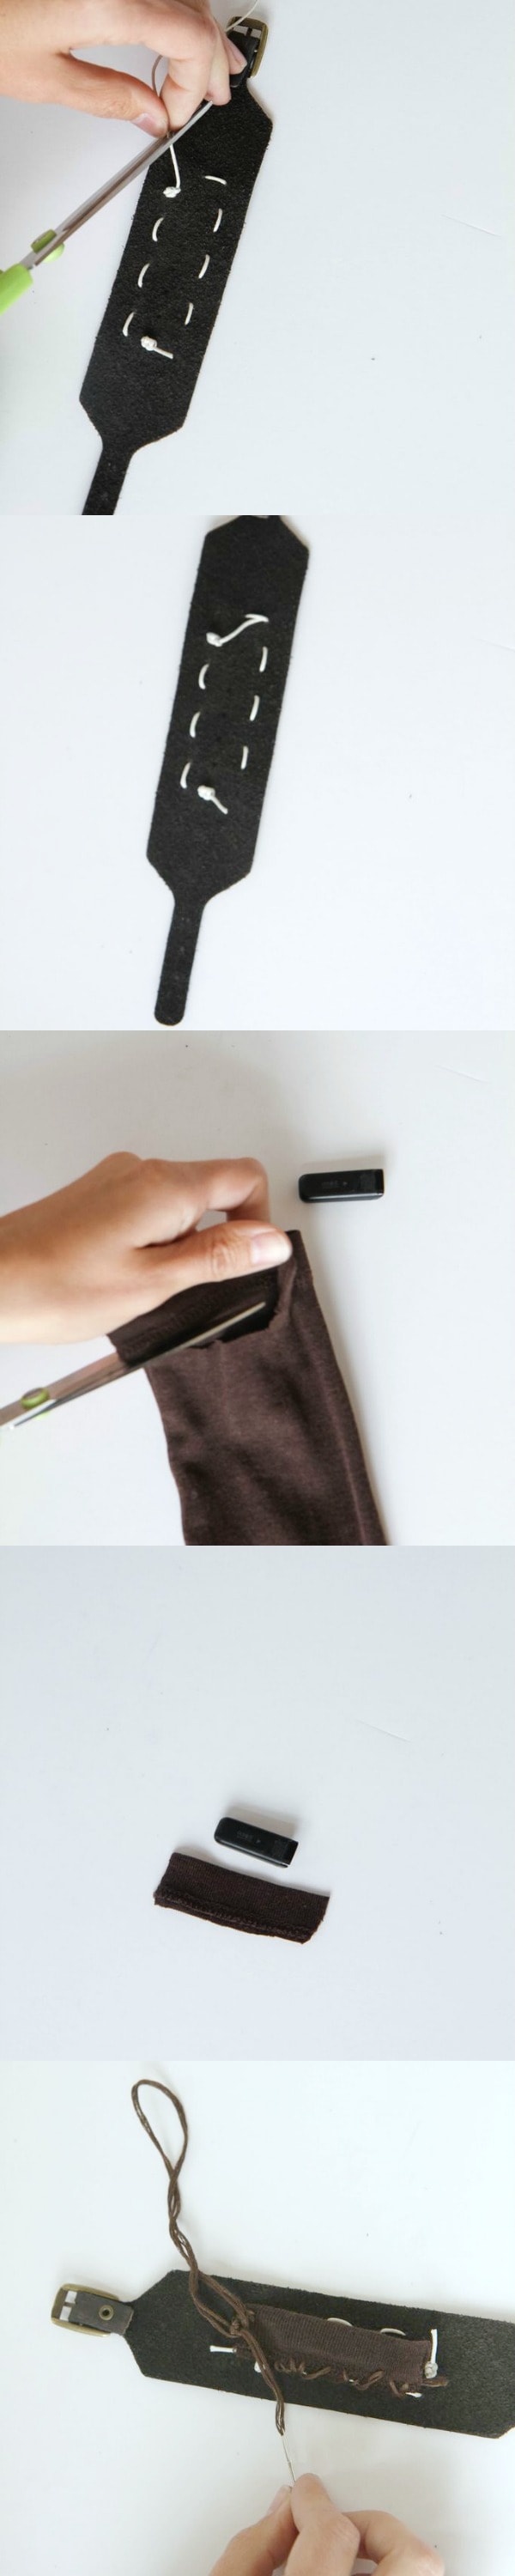
2. Once you are finished with your design, knot it on the back and then weave the end in so it is no longer loose.

3. Next cut your shirt sleeve with the hem still intact to create a fast pocket for your Fitbit. You want this to be longer than your Fitbit so that it can slide securely towards the back of the pocket, as pictured above.

4. Using embroidery thread, stitch the pocket securely down the hemmed side with embroidery thread and securing one end to close it, leaving that others side open to slip in the Fitbit. If you want double security on this, you can attach a little velcro on this open end to close your pocket and to make sure that the Fitbit does not come loose. 

DIY Fitbit Bracelet Tutorial from MomAdvice.com.

5. Finish by knotting and securing the end of the embroidery thread, reinforcing and feeding it through one of the ends of one of the hemp stitches for double-security.

DIY Fitbit Bracelet Tutorial from MomAdvice.com.

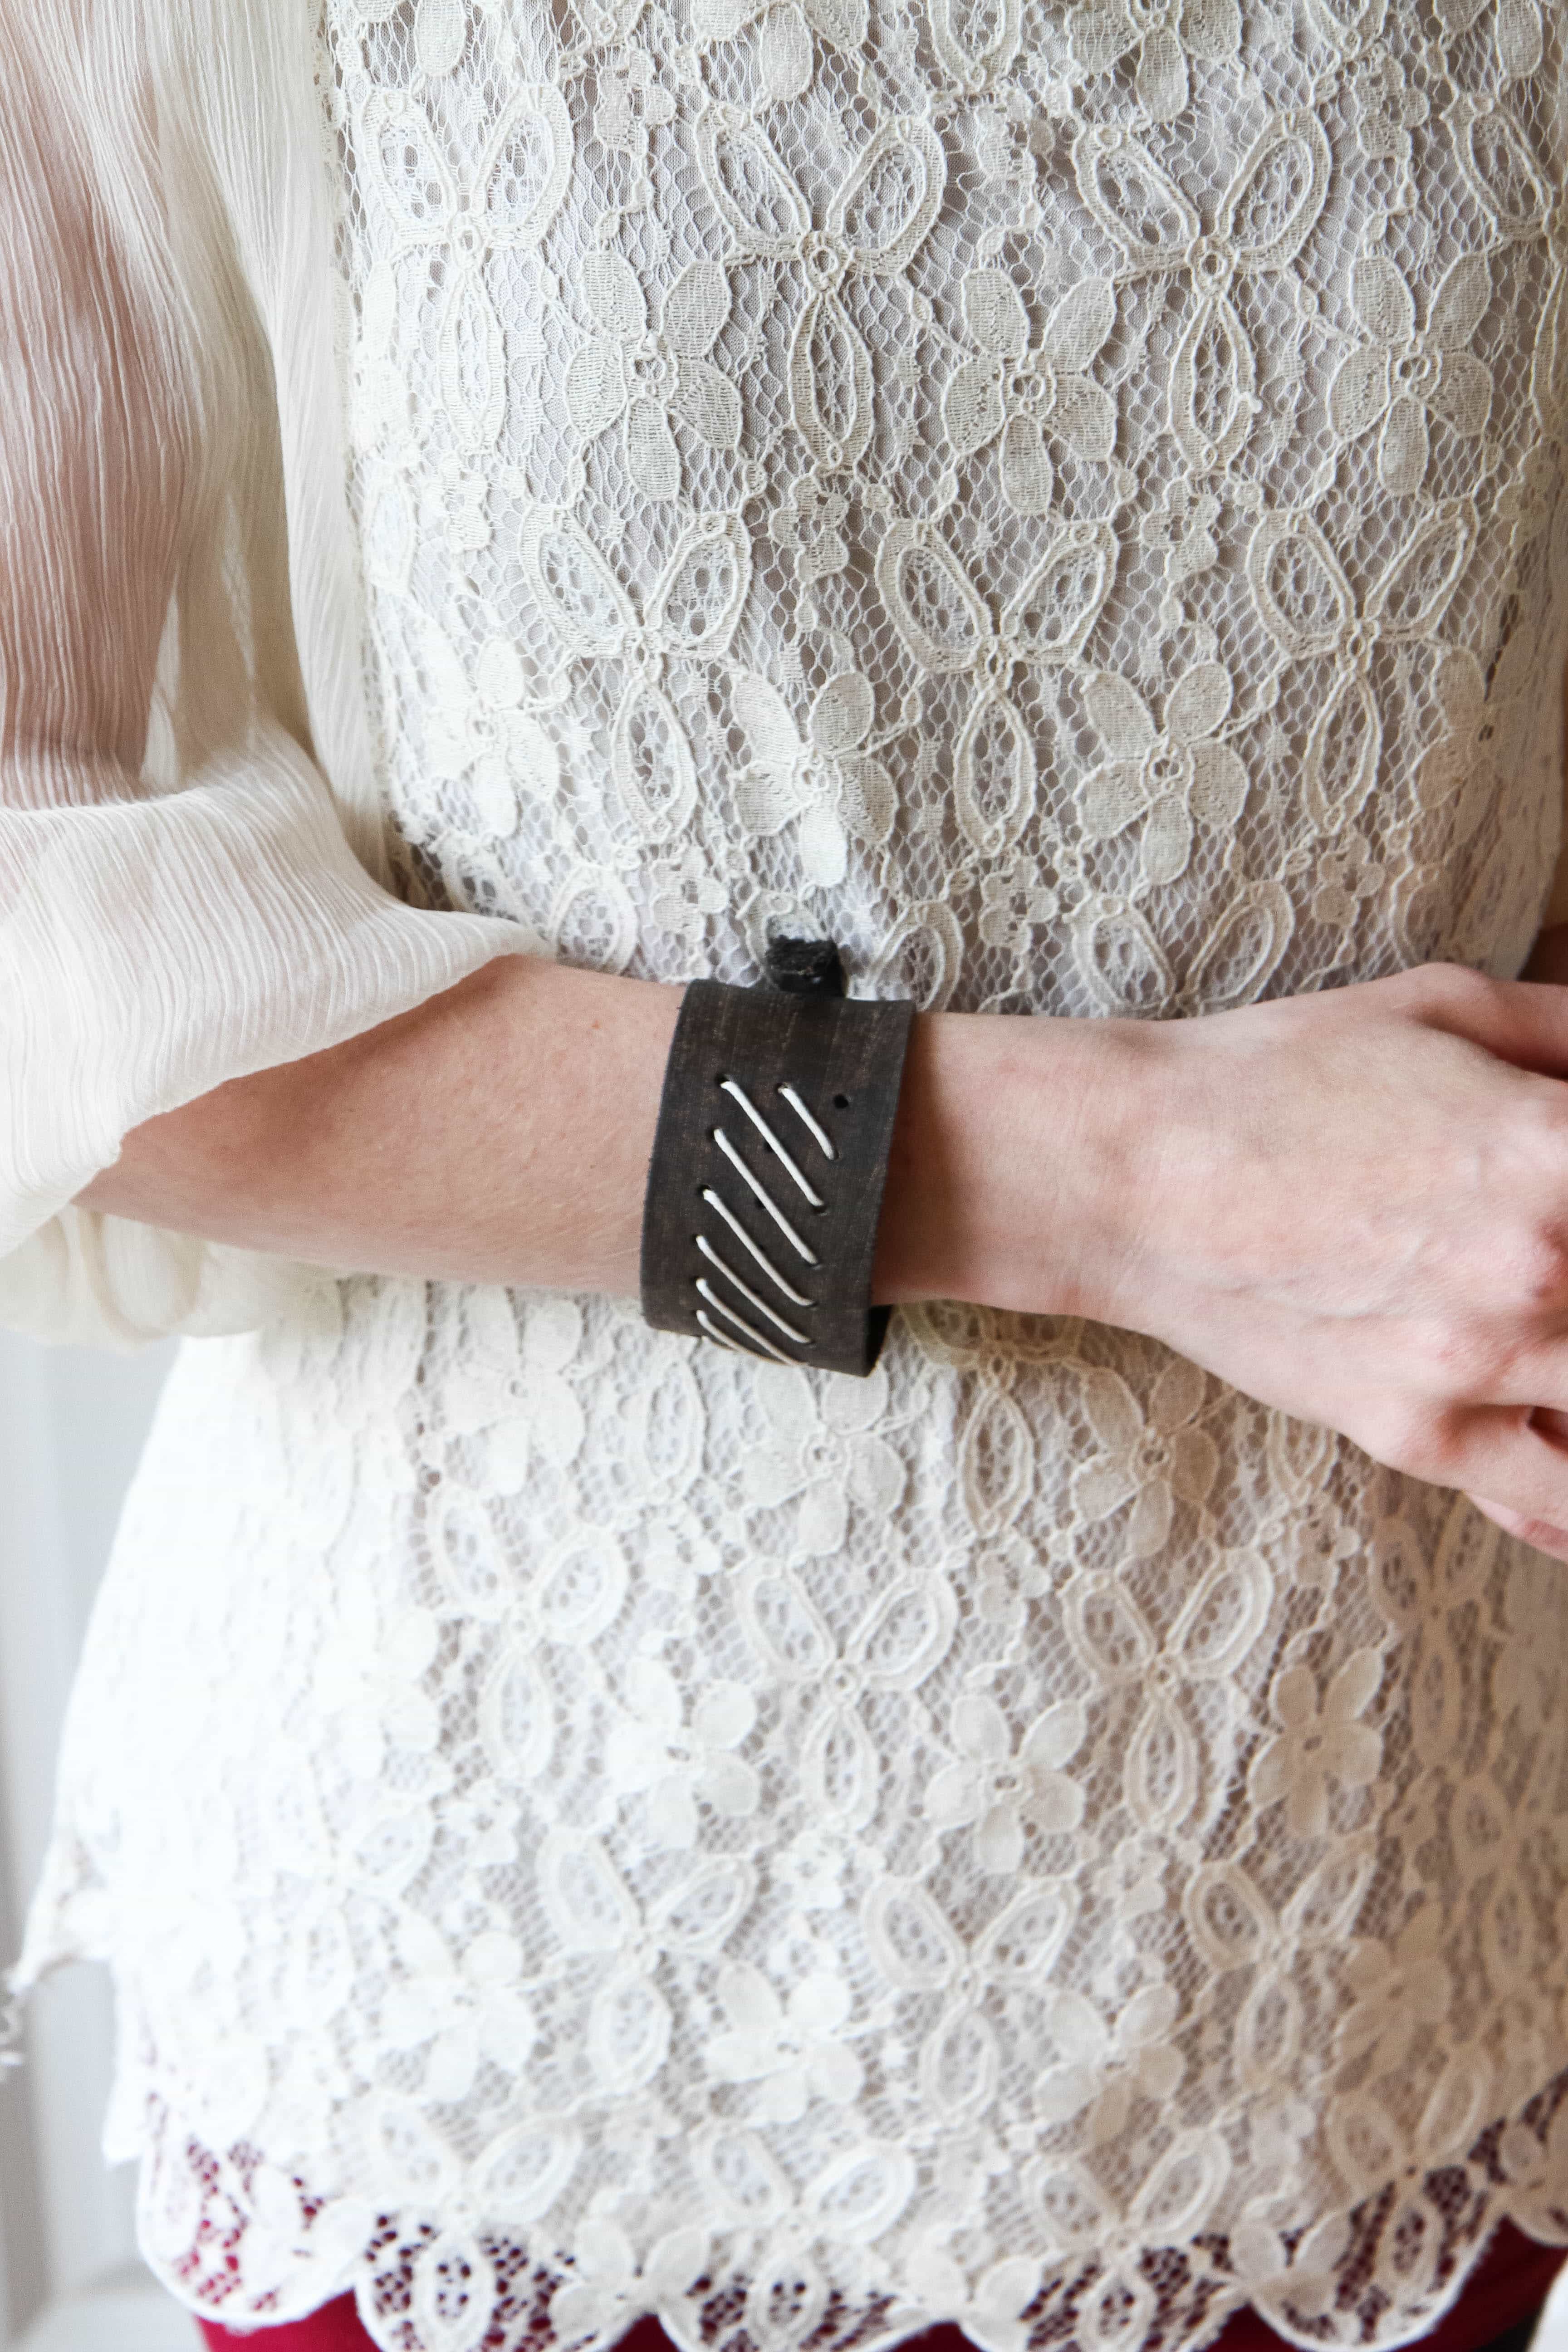
I hope you love this fashionable DIY Fitbit Leather Cuff Bracelet as much as I do. I get so many compliments on it and no one can believe that this beauty is handmade and housing my Fitbit. This goes so well with my personal style and you can make it all your own with your own fun details. A big thank you again to Andy for sharing her fabulous tutorial with MomAdvice. Happy crafting, friends!

This post contains affiliate links.


Miniature Felted Pumpkin Tutorial

Friday, October 17th, 2014

Miniature Felted Pumpkin Tutorial

Some people lean towards the spooky decorating for Halloween. This girl leans towards a more classic look from dressing up my front door for the season to the small nod to autumn through our home decor. I have loved our knitted leaf centerpiece so much that I thought it would be fun to add some knitted pumpkins to the mix this year. Since Walmart challenged me to take on a Halloween craft, I thought it would be the perfect time to try something new. Not only are these a knitted stuffed item (something new for me), but they are also felted.

Before you run away, I was SO scared of felting that I have thought about felting for years and never tried it. Seriously, folks, could NOT be easier.

This project is super fast to create and will get lots of love in your home as a fun addition to a bookcase, a cute centerpiece for a Halloween party, or could even make a place card holder for the Thanksgiving table.

Miniature Felted Pumpkin Tutorial

Supplies List

4- US Size 11 double pointed needles (I prefer bamboo for their gripping ability in this project)

4- US Size 6 double pointed needles

Natural Fiber Yarn (any color) that will shrink (Walmart offers this inexpensive option for wool)

Poly-fill Stuffing (something like this)

Free Miniature Felted Pumpkin Pattern FOR FREE HERE

Miniature Felted Pumpkin Tutorial

Skills Needed to Tackle This Project

You need to be able to knit in the round- This is much easier than knitting a hat and can teach you how to increase and decrease your stitches.  If you have never knitted in the round before, check out this picture tutorial that I created to help you navigate the tricky terrain of 4 needles.  You will need to be able to knit both the body and the stem in the round. I actually find the stem to be more difficult due to its size.

You need to be able to i-cord- The first time I i-corded, I was like…”That’s it?” Seriously, it sounds complex, but it is just moving your stitches back and forth on a double-pointed needle. This is a fantastic video tutorial if you are trying to get the hang of it.

You need to be able to felt– Again, this one was a new one for me, but the pattern I shared offers some great tips for felting. I will note below how I did this in my front-loader.


Miniature Felted Pumpkin Tutorial

Words from a First-Time Felter

As you can see, wool shrinks up beautifully. I wanted to still have a little bit of stitching showing, but you can continue to shrink your piece if you want it to be completely smooth. For these pumpkins, I knitted them loosely (advice given by my wise knitting pal, Deb) so that the stitches would shrink well. For my front-loader, I placed these in the washing machine with two pairs of my jeans to help create agitation and friction on the yarn. I used the Whitest White cycle (which is the hottest cycle on my machine) and let the machine decide the level of water.  For detergent, I just used a small amount of Woolite (or you can use Eucalan Woolwash). To replicate this, I just ran the cycle for ten minutes and then hit cancel.  I then ran a spin & drain cycle just for a few minutes to get rid of the excess water and then stuffed my pumpkins while they were still damp.

You can read more about felting in the pattern above.

Miniature Felted Pumpkin Tutorial

Miniature Felted Pumpkin Tutorial


Miniature Felted Pumpkin Tutorial

Aren’t they adorable? Feel free to friend me on Ravelry and visit the Knitting section of our site for more cute yarn-lovin’ projects!


Looking for more great Halloween ideas? Check out my Knitted Princess Leia Hat, fun ideas for DIY Halloween Costumes, paint up some Chalkboard Pumpkin People, make pumpkins out of duct tape, throw some pumpkin chili in your slow cooker on Halloween night, and whip up some glow-in-the-dark JELL-O for dessert!  Happiest of Halloweens, friends!

walmart_mom_disclaimer

Pin It

7 Ways to Upcycle a Coat Into Something You Really Love

Tuesday, September 30th, 2014

7 Ways to Upcycle a Coat Into Something You Really Love from MomAdvice.com

With the fall temperatures upon us, it is time to start thinking about an extra outer layer to help keep us warm for these cooler Midwest temperatures.
Jackets can be an expensive investment and finding one that is the perfect cut and style can sometimes be difficult especially with everyone’s unique sizing and build.
Today’s tutorial offers some fun ideas for refashioning an old jacket into something you really love.
As a disclaimer, I am a sewing school drop-out and actually take everything I need altered to a seamstress because I flunked sewing school.
That being said, one thing I can attest to is having someone alter items for you is the most worthwhile investment so that you always look and feel your best.
As I am in the midst of a capsule wardrobe project for the fall, many of these pieces have been altered so that I always feel my best even with a smaller & more minimalist wardrobe.
Alterations, whether done yourself or by a professional, are the wisest investment when you really love something.
We are providing the after pictures to these projects so please click on the links to get the full scoop on the before and tutorials for each of these alterations.

Add Ruffles & Details

If the cut of a coat is good in the shoulder area, but the length is not, consider cutting off some length on your coat.
You can then use that excess fabric for feminine details that add femininity to a more masculine piece.
One of my favorite blogging friends, Tatertots & Jello, shows off a coat that she added a ruffled edge too and a fur trim on the end of her coat to create a coat that any girl would be proud to wear.
She offers 14 ideas for refashioning a coat that can help you while navigating the used coat selection.

Transform a Leather Jacket Into a Purse

Buying leather for your craft projects might be out of your budget, but buying a thrift store coat and then using the materials from it to create something truly unique might not be.
This showcases not only the beauty of making something yourself, but it also showcases the way a commonly found item can be made into something you really love.
Consider a leather coat as a plethora of craft possibilities whether it is using a wood burning tool to burn initials in the material to make tags for handmade gifts, being cut and sewn into an iPad cover, or simply adding leather details to a belt or headband.
The possibilities with a leather jacket, no matter what the size or style, are endless.

Turn a Suit Set Into a Long Jacket

If you are looking for the perfect jacket that feels more like a blazer than a heavy coat, then consider piecing together two matching suit pieces to create a beautiful Edwardian coat.
It is simply genius to think of these two separate pieces as something that could be made into a long coat, but Of Dreams and Seams saw hidden potential in this suit and made it into something she truly loves.
This looks like something I would shell hundreds of dollars out at Anthropologie and I particularly love that this suit started out handmade and was altered and appreciated for many more years.

Refashion a Hoodie Into a Peacoat Jacket

The peacoat will never go out of style, but I can’t say that I am mad for hoodie sweatshirts.
Perhaps you went through a hooded sweatshirt phase and are looking to whittle down your collection or you spy one at Goodwill that is the perfect shade, but you would love to look a little more polished?
This hoodie turned peacoat tutorial from Sisters,What! is such a great example of how you can refashion even the most basic piece into a cozy coat for fall by simply removing the zipper, adding a flap of fabric, and adding some buttons.
How cute is that?

Make a Mixed Media Jacket From Two Coats

This year the fashion world is mad about leather and even I, a very basic suburban mother, bought herself a moto jacket to wear this year.
In this post from ReFashionista, she was inspired by a very pricey Burberry Mixed Media Trench Jacket and decided to make a DIY trench jacket from two inexpensive jackets.
I love the idea that if you love the sleeves from one piece that you could attach them to another jacket to add texture and detail to a basic piece.

Add a Feminine Ruffle

The before photos on this piece from Charity Shop Chic is jaw-dropping.
She takes a piece of clothing that is stained and many, many sizes too big and uses the extra material to create a belt, feminine sleeves, and a ruffled bottom that was inspired by Kate Middleton.
While this Feminine Trench Coat is definitely something to be created by an advanced sewer, any crafter can appreciate the beauty in these feminine details and can be inspired that even the saddest and most ill-fitting pieces can be made into something of beauty when put in the right hands.

Turn a Sleeve Into a Clutch

You can never have too many clutches and this beautiful clutch is made from a simple coat-sleeve.
Over on Craftaholics Anonymous you can get the scoop on how they transformed a suit jacket sleeve into a beautiful clutch that you can carry your essentials in for a night out on the town.
Look for a sleeve that has beautiful button details or is made from a great fabric or pattern that will go well with other items in your wardrobe to really make the most of this DIY project.
With the holidays creeping upon us, it would also make a fantastic gift for a girlfriend, sister, mother, or grandmother.

What are some things you have done with coats from Goodwill? Feel free to share your stories here!


Don’t miss these other great posts from MomAdvice.com:


The Best of Fall, Halloween & Thanksgiving-49 Ideas for Decor, Crafts, Recipes, Costumes & More

The Best of Fall, Halloween & Thanksgiving 


Yarn Wrapped Letters Tutorial


No-Sew DIY Blanket Scarf


Burlap Wreath


Sign up for the MomAdvice newsletter

Pin It

Back to School Organization Ideas

Thursday, September 18th, 2014

Back to School Organization Ideas from MomAdvice.com.


*This post is sponsored by the Post-it Brand. All thoughts and opinions are my own.

It is such an honor to be working with the Post-it Brand for the back-to-school season.  I am so thrilled that you loved our DIY Homework Stations we created for our family and today I wanted to continue along that theme and share with you some additional ways that we keep our kids organized for back-to-school.

Since we live in a small home, organization is truly necessary to keep our small spaces functional.  I also am someone who prefers to not have a lot of visual clutter and appreciates smart hidden storage for our homework area rather than bulky caddies that can take up a lot of space since we don’t have a lot of storage space in our home. With that in mind, here are some of our ideas for organizing for back-to-school in a small space.

Back to School Organization Ideas from MomAdvice.com.

Designate a Small Area for Homework Organization- I recently created a bar cart for our shed bonus room and this cart has become the hub of this room for our back-to-school organization this year.  I purchased a chalkboard for tracking our to-do list, a small globe, and then stackable hollowed books for school supplies storage. This little area is efficient and has just what we need to stay organized.

A hub can be created in a corner of your own home, tucked away in a closet, or even just a designated drawer of supplies. The key isn’t how much space you have to organize, but just that the space is functional and that you always have on-hand what your child needs to complete their assignments.

Back to School Organization Ideas from MomAdvice.com.

Put Them in Charge- I can admit that I am a bit of a helicopter mom and it is hard for me to let my kids be in charge of their own tasks. This year I am really going to work on helping them to be more independent and make them be in charge of their own to-do lists and schedules.

Imagine if they went to college and wondered where their mother was to keep them on task.

This could get a little embarrassing.

I purchased this chalkboard and each child can jot down their own to-do list on Post-it Study Super Sticky Notes to attach to the chalkboard to remind themselves of the important tasks they need to accomplish for the week. I am loving the new Post-it Study Collection because it offers a fantastic new line of Notes, Notebook Kits, Flags, Tabs, and Page Markers that stick securely to papers, notebooks, folders, and more, yet remove cleanly. The products all work together to help your family stay organized on-the-go.  In this case with our Study Super Sticky Notes, once the task is accomplished, they can remove it from the board. As new tasks and assignments are added, they can create their own reminder list to attach to the chalkboard.  Each child gets their own color of Post-it Study Super Sticky Notes so that they know exactly whose task is whose, eliminating the need for two boards and creating a visual area for them of necessary items to accomplish.

Back to School Organization Ideas from MomAdvice.com.

Make Those School Supplies Part of Your Décor-  Pinterest has many ideas for creating storage caddies of homework supplies for your children which is great, but we don’t really have somewhere we can store it when those items are not being used. I happened upon these hollowed out books for storage at our craft store and realized that this was the perfect spot for camouflaging our homework helpers and adding visual interest to a room.

Inside the smallest book I stored crayons and glue sticks, the middle storage is for pencils and pens, and the largest book holds our Post-it Study collection homework helpers like Study Super Sticky Notes, Study Grid Notes, and Study Message Flags. This also houses our extra Post-it Super Sticky Notes for our chalkboard to-do list.

Back to School Organization Ideas from MomAdvice.com.

Back to School Organization Ideas from MomAdvice.com.

Cut Down the Distractions- The reason I love our bonus room for our homework area is that this area is screen-free and there is absolutely nothing in this room to distract them. I can be in the room with them to help them work through problems in a distraction-free environment.  The DIY Homework Stations we created for this room help each child to stay in their own zone and keep focused on their own list of tasks. Once everything has been completed, the kids can exit the space and head off to their technology-filled lives.

I really hope you enjoyed this fun series on back-to-school organization that I created with the Post-it Brand. Thanks to this job, I feel more confident than ever that we will have a successful and truly organized school year! To purchase some fun Post-it Brand items of your own, you will find that they are available at office superstores and mass merchandise retailers nationwide!


This post is sponsored by the Post-it Brand. I’ve received product samples and compensation for my time and effort in creating this post. All thoughts and opinions are my own.


Tracking Pixel

Easy DIY Homework Stations

Tuesday, September 16th, 2014

Easy DIY Homework Stations from MomAdvice.com

*This post is sponsored by the Post-it Brand. All thoughts and opinions are my own.

I’m so excited to be working with Post-it Brand for back-to-school and today I want to showcase a fun way to create a DIY Homework Station that is perfect for small spaces utilizing some of my favorite Post-it Products.

Since finishing our shed into a bonus room for the family, this has been a great screen-free place for our kids to hang out. I wanted to create a homework area that would be away from home distractions and help to keep us focused on our work. These DIY Homework Stations remind me of the quiet areas that were set up in our school area for tackling test-taking and reading. Since we only have one table in this room, it is necessary for us to work at the same table, but we needed some type of divider to help keep each child focused in this space.

Post-it Products have been a longtime family favorite for helping to create reminders in agendas, to flag assignments, and for communication back-and-forth to our teachers.  Have you seen the new Post-it Study collection that has hit store shelves? They are offering a new line of Notes, Notebook Kits, Flags, and Tabs that all work together to help you stay organized on-the-go and find the important things you need to remember quickly! I wanted to utilize some of my new Post-it Product discoveries from their Post-it Study collection to help organize a small space work area that would really keep their focus and keep them organized.

On a personal note, the transition from elementary school to middle school was a tough one for all of us. Never before have I needed more organizational helpers then now and I am hoping that if I provide the right tools for my kids from the start that I can help them succeed at being organized this year.

With that in mind, I have created these DIY Homework Stations and wanted to share this project with you to inspire you to create a couple of your own for this coming school year.

Easy DIY Homework Stations from MomAdvice.com

Easy DIY Homework Stations from MomAdvice.com

Supplies Needed:

1- tri-fold foam display board (this will make two homework stations for you)

Razor Blade

General All-Purpose Spray Adhesive

Measuring Tape

Post-it Study Pocket

Post-it Study Super Sticky Notes

Post-it Study Notebook Kit

Post-it Study Message Flags

Post-it Study Notebook Tabs & Arrow Flags

Post-it Study Flags

Post-it Study Grid Notes

Binder Clips

Scrapbook Paper in coordinating colors (8 sheets total per homework station- I chose four of each coordinating paper)

Hot glue & glue gun

Easy DIY Homework Stations from MomAdvice.com

1. Begin by measuring and marking the halfway point of your tri-fold display board. The display board is 48″ total, so you will want to cut it so that each side is 24″ long.

2. Cut the display board with a razor blade, making sure to cut carefully through all of the layers. If the edge is not clean, we can camouflage it with a fold-over on your scrapbook paper to finish it (demonstrated in a picture below).

3. Select eight sheets of scrapbook paper and set them up for where you would like to display them. Set them aside and, beginning with one side, line the bottom sheets up and, holding them in place with your hands, flip them up to add a little spray adhesive to the underside. Do this all along the bottom of your display board. One thing to keep in mind is that you want to make sure that the paper is not in the fold of the display board so that it can open and shut easily.

Easy DIY Homework Stations from MomAdvice.com

4.  For the top, I am  folding the edge of the paper over a bit on the top four sheets, making sure the edges are folded roughly the same side.  Now do the same process again on the top and allow the folded edge of the paper to hang over to the other side of the display. Secure the folded edge on the back with a little hot glue and to create a smooth finish on top. If your paper does not have a lip on it like this, don’t worry, you can still fold it over.

Easy DIY Homework Stations from MomAdvice.com

5. Using your Post-it Study Super Sticky Notes, jot down the days of the week and line them along the top of your homework station. This can be a place where your child can write down their daily reminders and tasks that need to be accomplished each day.

Easy DIY Homework Stations from MomAdvice.com

I also attached a Post-it Study Pocket and filled it with Post-it Study Flags, Post-it Study Notebook Tabs & Arrow Flags to have on-hand when items need to be noted and flagged in our homework and agendas. These were attached to my older child’s homework station since we have so much to remember. If you have a child in middle school, I know you understand how hard that is!

6. For younger kids, I love the Post-it Study Grid Notes for jotting down notes. The space on these is generous and perfect for younger children who are still working on writing. I also attached the Post-it Study Notebook Kit for jotting down notes and flagging items in work. To anchor it, I folded it away with a binder clip to be opened when she needed an item.

Easy DIY Homework Stations from MomAdvice.com

Easy DIY Homework Stations from MomAdvice.com

I hope this post inspires you to create a few homework stations of your own. It goes to show that you don’t need a lot of space to create the perfect focused work space! Post-it Products are available at office superstores and mass merchandise retailers nationwide to help you make an organized DIY Homework Station of your own!

This post is sponsored by the Post-it Brand. I’ve received product samples and compensation for my time and effort in creating this post. All thoughts and opinions are my own.

Tracking Pixel

Pin It

DIY Family-Friendly Bar Cart

Tuesday, September 2nd, 2014

DIY Family-Friendly Bar Cart

I have been so excited to show off this incredibly cute DIY Family-Friendly Bar Cart that I created for Kenmore this month. This DIY bar cart is my new favorite thing in our house and I love that I can wheel it out for all of our entertaining needs.

Have you ever seen the pricing on beverage carts? It is quite astounding! I love to have a cheap chic home, especially when it comes to entertaining needs, and I just can’t picture spending $500 or more on a cart that houses our drinks. I decided to wow my friends with a budget-friendly and family-friendly drink cart that would sit perfectly in my budget. You know what fits right in my budget? A tool cart.

Today we are making over a Sears Hardware Cart into a beautiful bar cart. Say what? I know! This cart retails for a mere $82.87 and has just the type of clean and modern lines I was looking for in a more expensive cart. The best part is that you can personalize it to your own taste and color scheme.

DIY Family-Friendly Bar Cart

bar-cart

Head on over to the Kenmore blog to snag my easy tutorial for making a hardware cart into the perfect beverage cart for your entire family! I hope you love this cart as much as I loved creating it!

Pin It

8 Fun Dresser Makeovers

Tuesday, July 22nd, 2014

8 Fun Dresser Makeovers


I have so much fun gathering up ideas for repurposing items and look forward to showcasing these ideas for you each month.

Today’s post is all about a furniture staple…the dresser.

I have gathered 8 fun ways you can you can makeover a dresser that I know you will want to run right out and find this thrift store gem to create a new fun piece in your home.

In fact, I can’t wait to snag a dresser myself so I can implement these ideas in my own home.


Create a Unique Kitchen Island

Kitchen islands can be quite pricey, but they don’t need to be.
A dresser can be made over into the perfect kitchen island for your home with a fresh coat of paint.
A kitchen island made from a dresser offers ample storage for table linens and silverware as well as a generous top for a cutting board, fruit bowl, or cake stand.
I love this beautiful mint green kitchen island made from a dresser by You’re So Martha.

Make a Cute Dog Bed from a Drawer

As we showed off last month in our suitcase makeover piece, cute dog and kitty beds are all the rage and can be styled to match the interior of your home.
DIY Show Off takes it to another level with an adorable detachable parasol that offers your pooch shade in the summer months.
If you spy a dresser that isn’t in the best of shape at Goodwill or a garage sale, don’t dismiss the piece.
Dresser drawers are just as valuable for fun DIY projects.
Dare I say, in fact, sometimes even more fun than finishing an entire dresser piece?
 I adore this DIY dog bed and the adorable details for your fashionable 4-legged friends.

Make a DIY Costume Closet

Who knew girls came with so many costumes? When my daughter was small, our dress-up clothes resided in a drawer in her room that often exploded all over her floor.

I love the idea of creating a space just for these outfits and Rambling Renovators made a DIY Costume Closet out of an old dresser that is just too adorable for words.
I particularly love that there is a mirror on the side for a quick costume check and that there is storage for jewels and footwear.
The floral wrapping paper interior also adds a special girly touch that any little girl would flip for. This is a DIY-must for moms of girls!

Create a Planting Station

Although I was not blessed with a green thumb, I do have an appreciation for beautiful pieces that add beauty & function to our outdoor living.
Although I couldn’t find the source for this image, I just had to share this fun idea for a way you could transform a mirrored dresser into a planting station.
By adding peg board to the mirror stand, you now have the perfect storage for your gardening tools.
The top is the perfect stop for planting, or even for decorating outdoors.
The drawers make ideal storage for items like seed packets, small pots, gardening gloves, and your gardening cushion.

Turn It Into a Vanity

As we have found with our sixties home, bathroom renovations can be expensive even with the most basic of remodels.
Have you ever considered a dresser the perfect source for a vanity?
I know I hadn’t until I saw this incredible DIY Vanity made from a thrift store dresser from An Oregon Cottage.
The best part is that you can customize this to the size of your home, add a splash of color (or not), and a scratched-up tabletop basically disappears once you insert your sink.
How fabulous is that?

Create Unique Storage

Storage is always something I am thinking about and I love the idea of using dresser drawers for storage particularly in a guest room.
Liz Marie shows off her two beautiful drawers that have been stenciled with numbers as storage underneath the bed.
I can picture spare linens in here, a few basic toiletries, or even reading material for a rainy day.
Again, look at the bones of the pieces and find what is in the best condition and most valuable to you for your project needs.
This is a perfect example of an element you can use from a furniture piece.

Put a Number On It

Numbering things continues to be a trend and one simple addition that you can add to a dresser is numbering whether it is stenciled, applying house numbers, or getting creative with paint.
I love this modern dresser makeover with fresh paint and modern numbers on each drawer from HGTV.
Speaking of numbers, I am also madly in love with this numbered dresser that your child’s date of birth on it.
I found this adorable idea on To London With Love and it makes me want to do this adorable idea on a dresser for my kids.
What kid wouldn’t love to see his birthday everyday and what mom wouldn’t feel nostalgic every time she went into her child’s room.
I adore this!

Add Unique Hardware

For today’s final idea, I love the idea of looking for unique hardware made from other items you might find at Goodwill.
merrythought showcases a beautiful masculine detail on this dresser makeover utilizing leather belts for drawer pulls.
The same idea could be used with leather pieces from purses or purse straps too.
I love that this is such a simple detail, but can transform a dresser into a real showpiece.

Have you ever made over a dresser? We’d love to hear about it!


Don’t miss these other great ideas from MomAdvice.com:


Make a Closet Office Space


7 Fresh Furniture Painting Ideas


How to Spray Paint Furniture


7 Easy Chalkboard Paint Crafts


Sign up for the MomAdvice newsletter

Pin It

DIY Library Tote Bags with Free Printable Designs

Monday, July 21st, 2014

From our diy/craft contributor, Sarah Milne.

DIY Book Tote with free printable designs

DIY Book Tote with free printable designs

Our summer holidays are in full swing. We haven’t any big trips planned, but a few little adventures here and there, along with days filled with a good balance of relaxation and local outings.

One of our weekly summer activities includes a trip to the library. During the summer, it’s so important to keep those little brains stimulated. Also, my oldest is in a French Immersion school and the library is a great resource for her to brush up on her reading and language, en francais.

DIY Book Tote with free printable designs

DIY Book Tote with free printable designs
A good book bag is essential, especially when my girls seem to collect a giant stack of books each visit. I designed some awesome library totes for each of us to take along using a set of canvas tote bags from Michaels (bought with a coupon, of course), and I’ve prepared a set of printables for all of you to print and iron on your own canvas tote bags! These make for such a great gift for the book lovers in your life – there’s a grown-up quote, a floral heart and an adorable gal or guy fox to choose from.

DIY Book Tote with free printable designs

The supplies.

  • Canvas tote bag
  • Ink jet iron on transfer for light fabric
  • Free printable tote bag designs
  • Scissors
  • Iron
  • Towel
  • Hard surface for ironing

DIY Book Tote with free printable designs

DIY Book Tote with free printable designs

DIY Book Tote with free printable designs

The how-to.

  1. Download the free printable book tote designs (links to individual designs below).
  2. Following the instructions on your ink jet iron on transfer pack, print your desired design.
  3. Trim the design around it’s edges.  For the quote, trim each phrase separately.
  4. Diligently iron your canvas totes before applying the transfer to make for the smoothest surface.
  5. Place your transfer in its place and iron.  Follow the instructions on your transfer pack as each varies.  I ironed my transfer repeatedly over the course of 2 minutes.
  6. Let your transfers cool completely before removing the backing.
  7. Off to the library you go!

More ideas.

  • Embellish your totes by adding ribbon ties on the handles or sewing ribbon to the handle.
  • Have your child add their own personal touch by painting or drawing on the back of their totes using fabric paint or markers.
  • Roll up your tote and tie with a ribbon and tag and gift to the book lover in your life!


DOWNLOAD free printable tote bag designs.

she reads books quote tote bag design

floral heart tote bag design

gal fox books are cool tote bag design

guy fox books are cool tote bag design

DIY Book Tote with free printable designs


Pin It

8 DIY Vintage Suitcase Projects

Monday, June 30th, 2014

DIY-Vintage-Suitcase-Projects-Collage


Suitcases are one item that you can always find at Goodwill.

With that in mind, today’s post showcases 8 ideas for ways you can use vintage suitcases for your home.

Whether you are upcycling the suitcases into new pieces or simply adding them to an empty corner in your home, suitcases can offer both beauty and storage to your home.

When my kids were small, I made a rainy day suitcase that was filled with items from Goodwill, craft supplies, and fun dollar store items that they used to look forward to when we were cooped indoors.

I have long been a lover of this sweet item l and after you see these ideas, I know you will too!


Add Vintage Details to a Food Table

I do a lot of entertaining and I am always looking for pretty additions to our tables when entertaining.
Not only does it make for a beautiful display with the addition of a few fresh flowers, but it also gives you the chance to stack dishes at different heights and maximize your table while adding an interesting detail.

Create a Suitcase Side Table

One of my favorite things that I see suitcases being used for is as a furniture piece.
Not only does it add a beautiful detail to a room, but it also offers hidden storage within to house random items that might not have a designated space in your home.
Goodwill can be a wonderful resource both for the base, the suitcase, and any vintage items you might like to display on top.
Check out this fun tutorial for a diy vintage side table from A Diamond in the Stuff.

Add Detail to an Empty Corner

Although I am not a big fan of collecting things for my home, one collection I can get behind is one that both adds beautiful detail to a room and also offers storage for my home.

You know that corner where you usually put the Christmas tree during the holiday season?
That just might be the perfect corner to begin collecting interesting suitcases to stack.
I can totally picture these being filled with off-season items like ornaments and holiday decorations that would save us time hunting for items in our basement.
Try this fun suitcase collection inspired by Joys of Home in a corner in your house.

Create Unique Shelving in Small Spaces

One thing I am always looking for is shelving because our home did not come equipped with a lot of closet space.
This is the perfect spot to also tuck away any items you might want to keep on hand for your guests without cluttering up your space and is a fantastic way to use smaller suitcases in your home.

Add Whimsy to a Bar

This adorable guest room mini bar can be customized for each of your guests!

The Painted Home shows you how to take a small vintage case and turn it into the cutest idea for spoiling your overnight visitors.
Who wouldn’t love this for their guest room?

Create Creative Craft Storage

If your craft room is anything like my own, you are always looking for ways to store your oodles of craft supplies.

What a fun and chic solution for your creative space.

Make a Coordinating Set

The possibilities for decorating a suitcase abound and I browsed through millions of options before I happened upon this adorable set from A Beautiful Mess.

I love the idea of applying coordinating fabrics vintage suitcases to create an adorable matching set.
Wouldn’t these be so cute in a nursery for tucking away baby toys, spare diaper supplies, or spare bedding?

Make a Cozy Pet Bed

Pet beds on the market are pretty ugly, but a vintage suitcase can be transformed into a perfectly coordinated space for your furry friend with just a few supplies.

I love the idea of a cozy home out of an old suitcase and since my cat loves to climb in my suitcase when I am packing to leave for my trips, I have a feeling that this project would be a big hit at our house.
Get the full diy suitcase pet bed tutorial on The Everyday Aesthetic.

Now hurry and snag a suitcase for one of these fun projects today!

What are your favorite ways to use old suitcases?

Don’t miss these other great ideas from MomAdvice:


Crafting with Vinyl


DIY Bar Cart


No-Sew DIY Blanket Scarves


Rose Strawberry Wine Pops


Sign up for the MomAdvice newsletter


Pin It

Celebrating 4th of July Heroes With Kids

Monday, June 23rd, 2014

Celebrating 4th of July Heroes With Kids

As my children grow older, I strive to find more meaningful ways to celebrate holidays.

The 4th of July has always been a burst of red, white, & blue through our home, but I can’t say that we have ever spent time together discussing the importance of this day and getting to know the heroes behind what makes the 4th of July so special.

Today I want to share with you a fun way you can share about the 4th of July Heroes in your home and a fun way to incorporate their images in your home to make the day more meaningful and festive.

I partnered with Walmart on this project and all the materials you need for this can be found at their store.

To begin, you can select your 4th of July Heroes that you want to talk about.

I found this great list for kids that I used to select our heroes to focus upon.

I then headed to Wikipedia and found images of each of our heroes and converted them to black & white and saved them on my computer.

If you would like to use the same heroes as us, here are the heroes we selected for our project.

George Washington

George Washington

Thomas Jefferson

Thomas Jefferson

Benjamin Franklin

Benjamin Franklin

John Hancock

John Hancock

Crispus Attucks

Crispus Attucks

John Adams

John Adams

Abigail Adams

Abigail Adams

Celebrating 4th of July Heroes With Kids

Once you have your heroes selected, head to the Walmart Photo Site and upload the images there.

In addition to having 1 of each image printed in 4×6, also add 1 set of wallets for each person.

 If you send these to the one-hour lab, it will be less than $6 for all of them.

While you are there, you can also pick up a package of mini-clothespins, a set of notecards for your kids to write on, supplies for this easy flag bunting, and this burlap wreath to decorate with.

Since I already had these things in our home, it helps cut down on cost and storage for us this year.

Celebrating 4th of July Heroes With Kids

Once you have your images, have kids select which person they are interested in discovering and have them find information about their 4th of July heroes.

I challenged my kids to find one or two facts about each hero.

We also read about the first 4th of July and how different is from how we celebrate today.

I am embarrassed to say that I was learning right along with my children and soaking it all in as much as they were.

Abigail Adams, for example, was one of our favorite people we learned about. Did you know that she had five kids that she cared for and homeschooled while her husband was away serving his country?

 Not only was she passionate about women’s rights, but she was also passionate about equality for all people, whether they were black or white.

She helped care for the soldiers in her home (feeding them and treating their injuries), and she even learned how to make her own gunpowder.

Emily and I are big fans of Abigail Adams now and all she did for our country.

Celebrating 4th of July Heroes With Kids

Likewise, my son loved John Adams and his fun fact was that he thought his teachers, “held him back.”

Despite being held back from his true potential in grade school, he passed his entrance exams to Harvard and his parents, who were farmers, gave up several acres of their own farm land to pay for John’s schooling.

And, boy, did that pay off!

John Adams strongly supported independence from Britain, signed the Declaration of Independence, and negotiated the treaty ending the Revolutionary War.

He later became the nation’s first vice president and second president.

This led to a great discussion about recognizing our true potential when sometimes others do not.

Did you know that Dr. Martin Luther King referenced Crispus Attucks in one of his speeches?

He held him up as an example of black patriotism at the beginning of our nation’s history.

Yet, we never knew anything about what he did for our country. I’m so glad we know now.

Celebrating 4th of July Heroes With Kids

If you have smaller kids, you can share simple facts and have them draw pictures.

Clearly, the fact that Abigail Adams rocked it as a mom and had five kids was worthy of a picture.

Make this time fun for your kids while acknowledging the sacrifices that so many gave up for our freedom.

Celebrating 4th of July Heroes With Kids

Once we were done discussing our heroes, I incorporated these pictures into our holiday decor.

I pulled some of the flags off of our bunting and switched them with pictures of our heroes.

 I took the items off of my burlap wreath and clipped the wallet images with mini clothespins on the wreath.

I hung this in the center of our mirror and added the flag & hero bunting around the frame of the mirror.

Celebrating 4th of July Heroes With Kids

I love these touches to our 4th of July decorating, but I love even more that my kids know about these patriotic heroes.

 I hope this idea inspires you to learn more about this holiday and the heroes who made this day possible for all of us.

Happy 4th of July, friends!

walmart_mom_disclaimer


Look at these other great ideas from MomAdvice.com:


How to Make Fluffy Slime


Pin It