Archive for the ‘Blogging’ Category

How to Make Car S’mores

Friday, August 10th, 2012

Did you know that today is National S’mores Day? Who knew? I thought it would be fun to share with you a fun activity we did this summer that my kids absolutely flipped for. Have you ever ate a car s’more? No? Well, in my opinion, you haven’t lived until you have tried this fun food activity together. I guarantee that your kids will flip for this and I am betting that years from now my kids will be talking about that one time when their crazy mom let them make s’mores in the car.

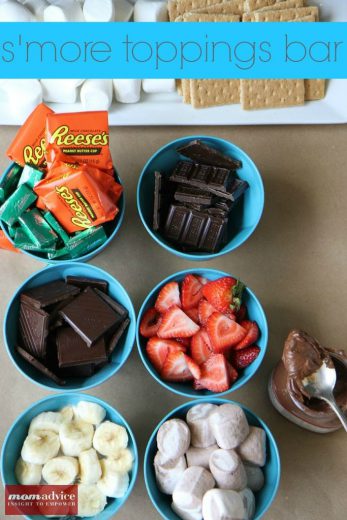
Today Emily is demonstrating for us one of two ways that you can make your car s’mores. We have tried two different versions and both of them turn out wonderfully. With this version, kids can help assemble foil packets to be placed on a cookie sheet. Simply assemble your s’more ingredients (whatever your favorite ingredients might be)  on a small piece of foil. Once your s’more is full assembled, wrap it up in the foil tightly, and place it on a cookie sheet.

For a simpler version, you can simply line a cookie sheet with foil and plop your s’mores right on them (as demonstrated below).

A really hot summer day, like this one, is the perfect place to cook your s’mores. Slide your cookie sheet onto the dash of your car and shut your car. Set your kitchen timer for 15-20 minutes. I highly recommend sipping some lemonade and enjoying the AC while they are cooking.

Retrieve your cookie sheet and show your kids their perfectly cooked s’mores.

Marvel in the fact that you completely blew their minds with your awesomeness. Remember, these are the stories they will tell their kids someday.

Happy S’mores Day, friends!

I am a part of the Walmart Moms program, and Walmart has provided me with compensation for these posts. My participation is voluntary and opinions are always my own.

Pin It

Back From Vacation Cleaning & Organizing

Friday, August 10th, 2012

Our family has just returned from a trip to Gatlinburg for a special family reunion for my husband’s side of the family. We had the incredible opportunity to climb Clingmans Dome with Ryan’s grandma to check climbing this mountain off her bucket list for her 80th birthday. We climbed this mountain in honor of his grandfather who recently passed away from cancer as a symbol of his motto to, “live strong.”  It was a very special moment for us all and I am so proud of my two kids who RAN the entire mountain for their great grandma & grandpa. There are no words for this moment!

We are still in recovery mode from being gone for the week. Unfortunately, there were many projects awaiting me upon my return. This week on the Kenmore Genius Blog you will find me sharing a few of the strategies I am working on to get my home back on track before the kids head back to school. Be sure to read this post for strategies on back from vacation cleaning and organizing.

I am also sharing my tips and strategies for organizing my closets this week! My car is fully loaded for a trip to Goodwill to donate items from our closet. It will be nice to start the Fall with a freshly organized space.


Pin It

Tips & Tools for Affordably Organizing Your Closet

Friday, August 10th, 2012

As we transition into Fall, now is a great time to evaluate what is in your closet and establish organization so you can begin preparing to add your fall wardrobes into your closet. Today I wanted to share with you some tips & strategies for reestablishing order in your closet and offer a few great organizing solutions from a store that just might surprise you.

I always lament that I don’t have a Container Store near me and I just know that if I had access to a store like that, my closets and drawers would look so much better. Who knew that Walmart offers great closet organizers and storage solutions for my cluttered life? Walmart gave me the chance to get my cluttered room organized and today I wanted to show you how I transformed my small disorganized closet into a thing of beauty.

Let’s start with a glance into my problem areas in my drawers and room. Perhaps, these are areas you are struggling with too!

Organize the Unmentionables-

Let’s start with my drawer of unmentionables and my sock bin (pictured above) as an example of a cluttered area that could be improved upon. I can never find what I need because everything is in complete disorder. There are many items that don’t fit or don’t have a match, but I have been to busy to organize this space.

With a simple compartment drawer organizer, I now know exactly where everything is. I organized socks to the right and unmentionables to the left. It took only minutes to assemble and I now feel like I am shopping my very own store in this drawer. I repeated the same process with my kid’s drawers and my husband’s drawer.  It makes this drawer feel surprisingly spacious and, at a quick glance, I know exactly where everything is.

Organize the Scarf Collection-

I have a slight obsession with scarves. They are such a fun and inexpensive fashion accessory to add to all of my outfits. Unfortunately, my collection had gotten out of hand and I had scarves tucked into my sock bins, draped over shelves in our closet and draped over hangers. I couldn’t find the accessories I needed and had run out of room in our closet for more baskets.

With one over rod scarf organizer, I was able to to put my scarf collection all in one place and have everything organized the way that I wanted it. This same simple organizing solution would be perfect for your tights or for a tie collection for men.

Maximize Your Space-

Since we have a small closet, it is always a challenge to make this space functional and to keep our wardrobes pared down so we have enough space to move everything around. Switching the types of hangers you use can be a quick and easy solution to double or triple the space in your closet. These bulky wooden hangers were hindering my husband from hanging up his entire wardrobe and I kept finding items draped over other shelves or piled on the floor of the closet.

Isn’t it incredible how the hanger switch out can make all the difference with your space? I am a big believer that these hangers can instantly transform closets and make things spacious within minutes!

  Get Vertical With Storage-

You might be surprised to know that this is my entire shoe collection. Can you believe my husband says that I don’t need anymore shoes? Me either! I had a lidded basket in our room where I would throw all of my shoes. They were definitely out of sight, but it was difficult to find what I needed when I had somewhere to be.

Over-the-door shoe organizers have come a long way and I absolutely love this organizer  for my shoe storage. The pockets were generous enough that ballet flats and sandals could slide into one compartment, allowing me to fit my entire shoe collection on the back of our door. Vertical storage makes sense, especially when you want to free up space on your closet floors!

Make Sock Storage Make Sense-

A long time ago, I purchased these organizers for our socks. Don’t they look organized? These bins drive me crazy and are not ideal storage for socks, but we had run out of drawer space in our dresser.  By whittling my sock collection down, I was able to put everything in the drawer organizer. My husband has an extensive sock collection though and many days are spent trying to find the perfect socks for the perfect occasion.

I divided my husband’s sock collection into two piles (whites and darks) and then put them in these handy collapsible covered storage bins. They were the perfect solution and got our sock collection off of the floor so that we had space for shoe storage.

Create Hidden Storage-

Other items like belts, ties, hats, and even flip flops can take up valuable storage space. Our collections of said items, may have been all over our closet floor and not easily found. With my new shoe organizer though, my door was already in use.

The backs of my bi-fold doors to my closet were the perfect spot to hide additional storage. One side now houses my belt collection. The other side now hides hat storage for my husband. Our flip flops are neatly organized and hanging by our back door outside. I would have never thought to use the backs of these doors for anything, but this was the perfect spot for these items!

What a transformation from where we started. This is my closet after sorting and organizing our space.  I feel like I got a brand new closet and I don’t have to be embarrassed about this space anymore.

Looking to organize your closet space? Here are a few of my favorite tools from Walmart that I used to organize my space! Visit your own store or shop online to find some of these organizing solutions for your own closet!

Canopy Velvet Hangers

Canopy Storage Bins (Small)

Canopy Collection Lidded Boxes (Small)

Mainstay Scarf & Tie Organizer (used for belts)

Honey Can Do 32 Compartment Drawer Organizer (set of two)

Household Essentials Revolving Shoe Tree

Mainstays Organize & Store Baseball Caps

Mainstays Flip Flop & Sandal Organizer

Canopy Handwoven Willow Laundry Basket

Canopy 3 Bin Sorter

Canopy Medium Storage Container

Mainstays Scarf Holder (Chrome)

Looking for more tips on closet organization? Be sure to visit this post for more ideas for organizing closets in your home along with a video on how to organize your closet in under 30 minutes!


I am a part of the Walmart Moms program, and Walmart has provided me with compensation for these posts. My participation is voluntary and opinions are always my own.

Pin It

Glad Mom Made

Tuesday, July 31st, 2012

These last few weeks of summer and the beginning of the school year can be a true challenge for moms. This month  I am excited to be partnering with Glad to showcase some great strategies for moms to help keep kids entertained and get your school year off to a great start.

If you read magazines like Taste of Home or Family Circle, you may have spotted a familiar face tucked within the pages of your magazine. I had the opportunity to work with Glad on a fresh initiative arming moms with ideas to keep the kids entertained during the summer months, lunchbox inspiration to breathe life into tired lunches,  and great printables to help you get organized for the back-to-school season.

If you would like to see some of my fun ideas including my favorite bubble recipe, homemade play dough, homemade sidewalk chalk, easy lunchbox noodles, and snag some great free printables to add a little sparkle to your child’s lunchbox, be sure to join Glad’s Facebook Community and click on Glad’s Mom Made tab for tips and tricks to manage the back-to-school madness.  That is just the tip of the iceberg though! Head over to Glad to get the full scoop on all of these fantastic ideas to get your school year started out right.

It thrills me to no end to get to share my ideas with Glad and I can’t wait for you to see what I was hard at work on this summer! Hurry over today for monthly inspiration created by some really fabulous mom bloggers.


Pin It

Fun Ways to Celebrate the Olympics

Tuesday, July 24th, 2012

Are you as excited as I am for the Olympic games to start?

In our family, the Olympics is something to watch and celebrate together through fun crafts and activities.

It is an opportunity to learn about other countries, to admire amazing athletes, and a time of celebration for our country.

The Olympic games are fast approaching and I am so excited to share a few fun ideas for craft and activities you can do to celebrate this exciting time.

Today I wanted to share with you seven fun activities you can try together as a family to make the Olympics extra special for your kids.


Olympic Medal Cookies

What could be sweeter than receiving an Olympic medal?

How about an Olympic Medal filled with a cookie?

AlphaMom offers this sweet little Olympic craft to do with your little ones.

Stumped for a cookie idea?

I highly recommend an Oatmeal Chocolate Chip Sea Salt Cookie for your medal filling!


Olympic T-Shirts

With a simple painted ring pattern on an inexpensive thrift store shirt, this is a craft that is easy enough to do with kids of all ages.

Kate’s Creative Space offers this fun craft idea to her readers and we think it pairs perfectly with a great t-shirt your probably already own!


DIY Olympic Torch

What child doesn’t dream of carrying around their very own Olympic torch?

Hoosier Homemade showcases a fun craft that you can do to create your very own Olympic torch made from some commonly found items at your local craft store.


Olympics Party Fun

Why not throw a party for your family or for a group of families to celebrate the Olympics?

A Small Snippet has you covered with everything from patriotic foods to great Olympic game ideas to play together, to fun ideas for decorations that don’t cost a lot.

Before heading to your local superstore, check your favorite thrift store for creative games and prop ideas for your very own mini-Olympics.


Olympic Torches Made From Recyclables

If hitting your craft store for supplies to make an Olympic torch isn’t in your budget, this Olympic Torch from The Idea Room is made from common items you have in your home and recyclables.

These torches are made from a paper plate, a paper towel roll, and red & gold tissue paper.

This is one that even the smallest child can do.

Be sure to lift these high and participate in your own round of fun family Olympic games.


Olympic Rings Necklace

Even moms can jump in on the Olympic excitement with this cute craft, from Remarkably Domestic, for an Olympic Rings Necklace.

This necklace is made from simple rings covered in Chinese knotting cord to create those Olympic rings everyone loves so much.

This would be a fun craft to do while watching your favorite games this year!


Discus Throw Frisbee

Are your kids excited about the Discus Throw?

This craft from My Sister’s Suitcase is a fun one for kids of all ages.

Print a design for the front of your Frisbee and then have your child decorate it to their heart’s delight.

What are some ideas you have for celebrating the Olympic games with your family?


Don’t miss these other great ideas from MomAdvice.com:


S’more Toppings Bar Party


4th of July Block Party Tips


Minecraft Costume Ideas


No-Sew, No-Glue, No-Cut Burlap Wreath


Sign up for the MomAdvice newsletter

Pin It

4th of July Block Party Tips

Monday, June 25th, 2012

4th of July is near, so this week I have  put together some tips and ideas for planning neighborhood block party.

When I was a child, each year I looked forward to the annual 4th of July block party.

I remember how exciting it was to be out way past my bedtime, eat loads of fun food and play flashlight tag through the neighborhood streets.

In a day and age where we often don’t even know our neighbors, 4th of July activities like block parties are a great way to create or renew friendships and strengthen your neighborhood’s community spirit.

Throwing a block party doesn’t need to be difficult or elaborate, but you will need a plan and ask some neighbors to help.

See below for my five key block party tips.

Invite the Neighborhood

If you have a neighborhood association or committee, you will have the makings of a great guest list.

If not, go door-to-door to request email addresses and names of the family members.

Go green by emailing invites (this will also save you the cost of stamps).

Ask for a small donation to cover the decorations, food and fun.

Publicize your event by putting up posters throughout the neighborhood and talking about it on your neighborhood’s social media pages if they have them.

Apply for a Permit

As soon as you’ve set the date, call your local police or municipal services department to notify them of your block party and see if you need a permit.

It’s best to make this call several weeks before your event.

You’ll also want to ask about roadblocks to keep the area safe.

Ask if your local police can deliver them the day before your block party to make setup easier.


Keep Decorations Festive & Simple

Decorate food tables with red, white and blue banners, hang tissue paper pom-poms on nearby trees, and fill glass vases or mason jars with red tissue paper and flags.

Make this cupcake pick wreath for your door and add some easy flag bunting!


Organize the Food

To keep the food easy and fair, have homes with odd house numbers bring a main dish and have homes with even house numbers bring side dishes or desserts.

Ask each family to bring their own folding tables, chairs, beverages and tableware.


Plan the Fun

Plan a few fun activities for the younger guests. A bike decorating contest is always a hit and fun for all ages.

Plus, you only have to provide the decorating materials.

Another great activity is a neighborhood scavenger hunt, which families could do together.

You could even offer a few prizes to those who complete the hunt.

4th of July Block Party Menu Suggestions


You will definitely want to make this easy and delicious red, white & blueberry trifle!


Look at these adorable Fourth of July Cut-Outs from Kellog!


Need a super easy no-cook contribution?

This fun flag fruit dessert tray is a perfect potluck dish!


Look at this yummy Patriotic Pesto Pasta Salad!


Want to use your grill for your 4th of July treats? It’s the perfect time of year for grilled corn!


I hope you have a wonderful 4th with your friends & family!


Don’t miss these other great ideas from MomAdvice.com:


Fruit-Infused Water Recipes


Mint Watermelon Berry Fruit Salad via MomAdvice.com

Watermelon Berry Mint Fruit Salad


Rose Strawberry Wine Pops


Roasted Corn Salsa


Sign up for the MomAdvice newsletter

DIY Salad Bar For Summer

Tuesday, June 12th, 2012

Healthy eating should always be a priority, but making it a priority in the summer seems to be more challenging because we seem to always be eating on the go. I decided to create an easy DIY salad bar that you can create on your grocery day and enjoy all week long. This DIY salad bar can be on hand in your fridge and I wanted to show off an easy way you can enjoy this DIY salad bar on the go too!

All of the supplies can be found at your local Walmart store. You will need a Freezer Storage Basket (found in the same aisle as the plastic containers in the housewares section of the store, $5.97), three Fresh Take Arm & Hammer 5 cup containers ($2.87), and 1 Sterlite Ultra Latch 12.5 cups container ($5.47).

Chop up your favorite salad ingredients and organize them in your containers like this. The largest container does not sit firmly flat, but it still wedges in there nicely so that you can place all of these neatly in this wire organizer.

Don’t you just love summer? I love having such fresh ingredients on hand to choose form and creating a salad bar couldn’t be easier with the fantastic selection we have of fresh fruits and vegetables. Pictured here are just a few of the basics I love in my salad. You could definitely fill your produce drawer up with a few other great salad add-ins!

Ingredients for a Great Salad Bar

Lettuce
Spinach
Kale
Egg
Tomato
Cucumber
Bell pepper
Sunflower Seeds
Croutons
Cheese
Mushrooms
Carrots
Corn Kernels
Onions (none for me please!)
Beans
Artichoke Hearts
Apples
Avocado
Broccoli
Shrimp
Steak
Homemade Dressings

One ingredient I always have on hand in the summer for quick summer salads and wraps is roasted chicken. I don’t keep a lot of fresh chicken around and prefer to buy the frozen chicken breasts instead. There is money to be saved in buying and preparing whole chickens, but my family only likes white meat  so for convenience sake (and to get them to eat it), we stick to the chicken breasts.

I buy the 3 pound bag of chicken  cook and slice all of the chicken for the week. The chicken is then ready to go to be made into wrap sandwiches, fast paninis, a protein addition to my salads for lunch, and it helps me save a step for our dinners for the week.

It is a matter of preference how you like to cook your chicken, but I will share my favorite way that I do weekly!

Roasted Chicken Breasts for Bulk Cooking

Preheat the oven for 375 degrees. Spread the frozen chicken breasts out over one or two cookie sheets. Drizzle a little olive oil over the chicken breasts and then sprinkle with kosher salt and fresh black pepper. Bake for 45-50 minutes or until the chicken is cooked through. Allow the chicken to rest ten to fifteen minutes (to allow the juices to redistribute within the meat). Dice, slice, or shred for your recipes for the week.

Here is my beautiful salad bar on full display! Isn’t she pretty? It makes me really happy to have all of our fruit and vegetables chopped and ready to go for our week. It is something I vow to try to do regularly for our family so that we can, literally, enjoy the fruits of our labor all summer long.

Since we are a family on the go, I wanted to show you a fun way to enjoy your salads while you are out and about.

Over by the other food storage containers were these cute Salad Break Bowls. The set came with two complete sets and cost $3.97 total! I picked up this collapsible basket (in the same aisle) for $6.97. Inside I placed our outdoor blanket, salads, fresh cut fruit, and homemade iced tea for an afternoon picnic. I plan to use these a lot this summer and think it will be a great way to encourage healthy eating wherever we might be.

I am a part of the Walmart Moms program, and Walmart has provided me with compensation for these posts. My participation is voluntary and opinions are always my own.


I hope this inspires you to make healthy eating a family priority this summer and would love to hear what summer shortcuts you use to achieve healthy in the summer months in your house?

Pin It

Creative Father’s Day Gifts Your Dad is Sure to Love

Friday, June 8th, 2012

t’s no secret that I love my dad like crazy!  Last year we got the opportunity to celebrate him at a dinner in honor of his 35 years of employment with Bayer. This picture of my sister & me with him is one of my favorites from that evening together.  Sadly, for us, our brother has moved to New Orleans so one piece of our puzzle was missing in this picture. He actually has three kids that are so proud of him and adore him!

I had a blast sharing with you my gift ideas for Mother’s Day, over on the Kenmore Genius blog,  and I can’t wait to showcase some of my favorite Father’s Day gifts that I have given my dad over the years. I hope you will find these ideas inspiring for this gift-giving season.

Head on over to my article on, “Creative Gifts Your Dad is Sure to Love,” to learn about my favorite gifts that I have given my dad(s) over the years!

Don’t forget that this year I also have an awesome DIY Chalkboard Conversation Bubble Cookie Jar that you can make and fill with your dad’s favorite cookies. I highly recommend these Oatmeal Chocolate Chip & Sea Salt Cookies for the perfect sweet and salty combination!

Pin It

Splendidly Homemade: The Perfect Mojito

Wednesday, June 6th, 2012

Today I am looking forward to sharing my recipe with you for the perfect mojito that I have created.  Splendidly Homemade Magazine is a beautifully designed magazine filled with great tutorials and pictures showcasing some amazing bloggers crafting and sharing their recipes for the perfect summer.

I had a blast contributing to their last issue with my Peppermint Cheesecakes in a Jar for the holiday season. When I was asked to create a fun summer drink, I knew the perfect drink to share with their readers. After all, what says summer more than sipping a mojito?

The inspiration for this issue happened to come from a trip to Miami I got to do in May with ALDI Supermarket. After working and networking throughout the day, I could not wait to plop into a chair and sip a mojito in the sunshine. When I received the tab for my first mojito of the afternoon, I almost fell over at the $18 bill. You can bet, I made the most of my drink and kept thinking how I couldn’t wait to replicate this drink on my frugal budget.

As soon as I got home, I set to creating the perfect mojito that you can enjoy right in your very own backyard. If you have a garden, these mojitos are the perfect way to use up some of your mint. It also happens to be the perfect summer drink to entertain with and cost pennies to create at home!

There is so much in this issue including how to dress your home up with Hampton style on a thrift store budget, how to create the perfect s’more push pop, make black raspberry chocolate chunk ice cream, and create a fun summer sewing project.

To view my recipe for the perfect mojito, head on over to take a peek at the latest issue of Splendidly Homemade! It is available for free online and a Kindle version of this is available for a mere, $.99 cents.  Give them a Like on Facebook and follow their latest news on Twitter.


Pin It

Review: Clear Scalp & Hair Beauty Therapy Shampoo & Conditioner (Video)

Tuesday, May 29th, 2012

(on set at Lunchbox Studios)


It is rare that I do very many reviews on this blog, but I had the unique opportunity to try Clear Scalp & Hair Beauty Therapy Shampoo and Conditioner for a week and head to LA to share my experience with the product before it went out on the store shelves.

In full disclosure, I have perhaps the driest hair in the world with lots of frizz. I am one of those girls that jumps from product to product hoping to find a magical cure that will give me sleek and shiny hair. I had doubts that I would ever find a shampoo that would help, but after 7 days with this shampoo and conditioner, I am a believer that a good shampoo and conditioner can make all the difference.

The unique thing about this is the idea of nourishing your scalp first. Traditionally, we have always been taught to ignore our scalp and focus on the ends of our hair. I have a very dry and flaky scalp, but worried that if I did apply conditioner to my scalp that it would weigh down my hair and cause me to have an root. With this product, you are instructed to nourish your scalp and concentrate your efforts on restoring the nourishment to the scalp instead of ignoring it. Surprisingly, I am no longer suffering from a flaky scalp and the product has not weighed down my hair at all.

How fun and glamorous to get to go and share your thoughts about the products you use on camera. It really was a blast! Here is a quick 30 second clip from the shoot.

You can see this clip plus some others now as in-store programming in Walmart Stores across the nation.  You can also see some different clips from myself as well as my other fellow Walmart Moms-  Colleen, Erika, Caryn, and Christine on the Clear Scalp and Hair Beauty Therapy landing page on Walmart.com. (Scroll all the way to the bottom then click that bottom picture of my beautiful friend, Erika, on the right)

I am still using the product and doubt that I will be switching. The difference is noticeable to me and has made me feel more confident. I think you would really love it too!

I also thought you might enjoy seeing this capture of me behind-the-scenes. I was happily plugging away at my knitting and working on another chemo cap for a friend while I waited my turn to get my hair & make-up done.

Disclosure: This is a sponsored post as a part of my role in the Walmart Moms program. I received product and was paid for my time in Los Angeles shooting the video. However, all opinions are, always have been, and always will be 100% my own.

Pin It