Archive for the ‘Blogging’ Category

Mama Francesca Cheese & Cheese Dusted Olives

Thursday, April 17th, 2014

Mama Francesca Cheese Review


*This post is sponsored by Mama Francesca

Last month I mentioned my partnership with Mama Francesca Grated Cheese. I am excited to share another fun recipe idea that you can create in your kitchen and this one happens to require very little cooking, but is an impressive appetizer to add to your next get together or antipasto platter.

Mama Francesca  is a delicious grated cheese that comes in six different flavor varieties including Aromatico (Parmesan, Basil & Oregano), Fiero (Parmesan & Red Pepper), & Pungente (Parmesan & Garlic), Audace (Parmesan & Romano), and Perfetto (Classic Parmesan).

Mama Francesca Terzetto Cheese

You can also find the Terzetto (Parmesan, Asiago & Romano).  The best part is that these can all be found on the shelves of your local Walmart stores, including the new Terzetto which will be available at Walmart on April 21st!

Did you catch last month’s delicious Gluten-Free Pasta & Meatball recipe? I hope you didn’t miss it because I have already made it a few times since I shared it!

For inspiration for this month’s recipe, I looked on the Mama Francesca website to create a dish to share with you. The site offers a variety of recipes and when I happened upon a recipe for Cheese Dusted Olives…well, be still my beating heart, because I am already in love just from the title alone.

 Cheese Dusted Olive Recipe

Have you ever infused oils before? It truly makes any dish a showstopper and it is just a simple technique of adding herbs and any desire of flavoring to heated oil and allowing it to infuse into it. I do this with my husband’s favorite roasted shrimp, but had never thought to do this with olives. It changes the taste of the olives completely and adds that special wow factor to your antipasto platters.

The oil is infused with lemon and thyme and then poured over your olives on a platter (or a martini glass like me!)  and finished with your favorite cheese blend. I wanted these to have a little garlic bite to them so I used the Pungente (Parmesan & Garlic) to add that cheesy garlic flavor that I love.

I rounded out my antipasto platter with salami, prosciutto, and fresh grapes- all delicious and all, happily, gluten-free snack options.

 Cheese Dusted Olive Recipe

Since getting a babysitter is expensive, I am always looking for date night experiences at home. In the summer months, we enjoy an antipasto platter outside and chat after the kids head to bed. In the winter months, this is best served with a great Netflix documentary or board game for a fun evening in.  To round out the evening, this gluten-free meatball recipe I shared last month would also be a beautiful accompaniment as your evening appetizer!

I have stopped thinking of these things as special occasion foods, but an investment into our relationship and time together.

I hope these posts about Mama Francesca have inspired you to pick up a few varieties of cheeses to try and I hope you can give these delicious Cheese-Dusted Olives a spin for a fun date night in!

 Cheese Dusted Olive Recipe

Cheese Dusted Olives
Recipe Type: Appetizer
Author: Mama Francesca Premium Cheese Website
Prep time:
Cook time:
Total time:
Serves: 8
An effortless & easy appetizer for lemon & thyme infused olives dusted with cheese.
Ingredients
  • ¼ cup Mama Francesca Parmesan Audace (or your favorite Mama Francesca cheese variety)
  • 2 cups Favorite Olives, rinsed
  • ½ cup Extra Virgin Olive Oil
  • 2 sprigs Thyme
  • 1 Lemon, strips of peel only
Instructions
  1. In a small sauce pan, heat oil over medium for 3 minutes, until warm, remove from heat.
  2. Place thyme and lemon peel in oil, let stand 1 hour.
  3. Once cooled, pour infused oil over olives on a platter.
  4. Sprinkle with Mama Francesca cheese.


 *This post is sponsored by Mama Francesca


Pin It!

Tracking Pixel

Pin It

How to Style Your Bookshelves

Thursday, April 10th, 2014

How to Style Your Bookshelves from MomAdvice.com.


The art of styling bookshelves had never really been important to me until I started perusing pictures on Pinterest and saw the carefully curated collections and beauty in the organized book spines.

Of course, I don’t have an unlimited budget where I can add decorative books in one carefully choreographed color or an unlimited budget for fantastic looking odds-and-ends to update my bookshelves.

That is why I am excited to share with you some easy ideas for updating your bookshelves with inexpensive items and a few budget-friendly craft materials.


Cover Books With Paper

If you have an eclectic collection of books or you want to pick up a collection of books at Goodwill to stock your shelves, one frugal way you can add order and beauty to your bookshelf is to simply wrap each book in paper.

These beautiful bookshelves from Chloe Moore Photography have beautifully hand-stamped spines that add a unique detail to them.

I also love how she has weaved in her photography equipment, adding her own personal nods to her favorite interests.


Spray Paint Items to Create a Cohesive Collection

Instead of trying to find items of a similar color for your bookshelves to add those unique details, consider creating your own collection of groupings with an inexpensive bottle of spray paint.

My own bookshelves were cluttered with items that did not mean anything to me and did not showcase my personality.

I took a day to declutter my shelves, added a fabric back to my bookshelf and then found items that I loved and spray painted them with a little gold spray paint.

It created just the look I was going for, and cost $15 to update my shelves.


Stack Your Books In a New Way

Sometimes we get into a rut with our styling. I thought there were only two ways to style my books- vertically or horizontally.

The Art of Doing Stuff though has me rethinking my book stacks and groupings because there are actually 7 ways you can stack your books.

The names are even fun- the Sandwich Stack, On the Bias, and the Spiral Stack…just to name a few.

Consider regrouping your stacks in new ways and adding to your stacks with items you can find at your store to round out your collection.


Add an Eye-Catching Design to Your Bookcase

Even inexpensive laminate bookcases finds can be transformed with a little paint and thoughtful styling into true things of beauty.

One thing I love to see on bookcases, is an interesting color on the inside of the bookshelves.

This can be added with a pop of color from a brightly colored paint, a pretty fabric, scrapbook paper, or even stenciling.

I love this fantastic idea from This is Our Bliss to use removable wallpaper to add a decorative touch that is both frugal and fast.


Add Your Own Personality

One thing that I have been trying to do is to weed out the clutter in my life and make room for the good stuff.

The same tactic can be applied towards our bookshelves and what we place on them.

My shelves have yarn and knitting books, a shelf dedicated to my favorite classics, and I have a cookbook shelf that not only holds my cookbooks, but also holds the biscuit cutter that my great-grandma used to make biscuits for me when I was a little girl.

Consider creating a bookcase or shelf towards your own personal hobbies and collections.

I love this beautiful cookbook collection from The Inspired Room that celebrates her love for beautiful cookbooks.

This would also be a great spot to find some pretty vintage cookbooks or vintage kitchen items that you could weave into your shelves.

What’s one of your favorite things on your bookshelves? What is one styling trick you like to use when styling your bookshelves? Feel free to share here!


This post contains affiliate links.


Don’t miss those other great ideas from MomAdvice.com:


15 Easy DIY Updates To Help You Love Your Home

15 Easy DIY Updates to Help You Love Your Home


How to Spray Paint Furniture


How to Create Vignettes in Decorating


DIY Table Runner


Pin It

Sundays With Writers: Hush Little Baby by Suzanne Redfearn

Sunday, April 6th, 2014

Sundays_With_Writers-1

One of the highlights of running our MomAdvice Book Club has been our author interviews. It is truly a dream come true to share these interviews with you and to get to ask writers my questions about their process, their pieces, and their own recommendations for great books.

With that in mind, I am starting a new series called, “Sundays With Writers.” It will not be a weekly feature, but as I read books that I think you will love, I will share an interview with you about them and about their books.  It gives me the chance to continue sharing about incredible books and the beautiful minds and thoughts behind their creation. It also gives me a chance to swim a bit more in their words and hopefully share about an author you may not know about.  So grab your coffee and let’s chat about beautiful books together!

We will begin our series with an incredible book that I hope you will run out and pick up! It is called, “Hush Little Baby,” written by Suzanne Redfearn. It is a well-paced psychological thriller that I could not put down. The recommendation came from my friend Kristen, at Dine & Dish, and as I closed on the final pages, I knew that I needed to interview her.

Hush Little Baby by Suzanne Redfearn

Hush Little Baby is the story of a woman named Jillian Kane who has the life that she always dreamed of. She is a successful businesswoman, she has two beautiful kids, she wants for nothing financially, and her husband is a well-respected cop who every woman wish she had. Jillian is living with a secret though.  For nine years, her husband has abused her and he is calculating enough to abuse her in ways that no one would ever suspect that she is a victim.

When things escalate too far, Jillian decides to run away from him with her two kids. Unfortunately, she has no money, no plan, and no one that she can turn to.  It is in this most pivotal moment of her life that she develops unlikely friendships and learns to finally save herself and her kids. Her husband though, is a cop and is determined to do everything in his power to get his children back…and kill her.

I could not put this book down because I was so worried about Jillian and her kids. For two days, every moment I had, I was reading this to make sure that they could get to safety. When I say that I had my heart all wrapped up in this one, it would not be an understatement.

Today I am talking with Suzanne about her amazing book and a little bit about her process in writing this!

Suzanne_Redfearn

The abuse that Jillian suffers is so painful to read through and yet illustrates how important it is for her to break free. Did you struggle with this as you were writing these scenes?

In order to accurately depict what Jillian was going through, I needed to do extensive research on domestic violence and reading the first person accounts and testimonials of victims was very difficult.  And then internalizing what I’d read so I could use it in the story was exhausting.  Writing is a lot like acting, in order to do it well, you need to get inside your character’s head, put yourself in their life, and experience what they are going through.  Jillian is a lot like me in some ways, so it wasn’t difficult to feel her plight.  The nice thing about being an author is that, unlike my characters, when it gets to be too much, I can step away and return to my real life, the one that is loving and warm and not full of violence and fear.

 One thing that really struck me in your book was that Jillian often thinks of herself in pivotal moments and not her children. This part really pulled at my heartstrings, but I wonder if it was meant to do that. Was this meant to showcase the guilt that we all have as mothers in putting our own needs first?

Great question and one I haven’t been asked.  This was a result of the research I did as well as my experience of being a mom myself.  Oftentimes this is the dilemma an abused woman faces, save herself or stay to protect her kids.  Fear plays havoc on the psyche and self preservation is an instinct that is hard to override.  But you’re right about the resulting guilt that occurs after a woman has those treacherous thoughts.  Even if she doesn’t act on them, it can be devastating.  Some readers have told me they didn’t like Jillian because they didn’t think she was a good mother.  I would defend that she is a real mother, one who is not perfect, who sometimes made mistakes and had selfish thoughts (haven’t we all?), who had been beat down to believe she wasn’t a good mother, but who ultimately risked everything to save her kids.

There is a pretty scary scene for me, as a mom, when Jillian finds her son torturing a frog at a birthday party. Was this meant to show us how the abuse had weaved its way into Drew’s life?

Thank you for picking up on that.  I think it was a pivotal moment foretelling of the perilous path Drew was on to follow in his dad’s footsteps.  Abuse begets abuse, and I believe it is because of that moment that Jillian realizes something needs to change, if not to save herself, to save her kids.  I contrasted the frog scene with the gift scene of the Hollyhock seeds to show that Drew is at a crossroads and that there is still hope to save him.

I had a secret hope that you would bring Jillian back to the Flying Goat and reunite her with the people that helped keep her safe. Did you consider bringing her back or weaving those characters in at the end?

So many readers have mentioned this, and I too fell in love with Goat and Paul and the entire crew from Elmer City, but the story told itself and ended where it was supposed to.  I will leave it to the readers’ imaginations to figure out when and where their paths cross again.

 I find it so unbelievable that this is your first novel- the writing is so beautiful and the scenes were woven together so well. It reminded me a lot of some of my favorite books from Heather Gudenkauf or Diane Chamberlain. Since you are an architect by profession, what brought you to this moment in your life to pursue writing and was this a difficult career transition for you?

 I am what someone termed an accidental author.  I did not go to school for writing and never considered becoming an author, but one day I sat down with an idea for a story and started to write and it poured out of me (that was seven years ago and it was not Hush Little Baby), and I discovered that I love to tell stories.  My grandfather was a storyteller, and I believe I inherited the gift from him.  I was hooked, and since architecture had tanked with the recession, I had time on my hands, so I set out to learn the craft and kept writing.  Hush Little Baby is the fifth novel I wrote but the first one to get published.  I still love architecture, and, if inspired, I will switch hats again and build something.  It’s not one or the other for me, it’s wherever I’m at in any given moment of time.  For now, the stories continue to flow, so I continue to peck at the keys, but who knows where this crazy path will lead or what I will do next.

 If you could tell anyone to read one book (other than your own) what would that book be?

 The Power of One by Bryce Courtenay.

 What do you have in store for us with your next project?

I am very excited about the next project.  It is another story about a mother protecting her children but in a very different context and with a very different protagonist.  I can’t disclose more than that, other than to say, it’s another rollercoaster ride of emotion.

*This series may contain affiliate links! 

Pin It

The New Flourish Boutique

Friday, April 4th, 2014

The New Flourish Boutique

We are so excited to share that our amazing site sponsor, Flourish Boutique, has relocated into a beautiful and more spacious home. Emily & I were invited to the Grand Opening event this Thursday evening and had the best time browsing all of the beautiful items that they have in their new place.

If you haven’t had the chance to check it out, you will be in for a treat.  Not only does the store carry an expanded line of clothing and jewelry, they have now added shoes, beautiful handbags, bath/beauty products, and fun gifts for everyone in your life (babies, kids, furry friends, and even bridal fun!)

The New Flourish Boutique

The New Flourish Boutique

The New Flourish Boutique

As you can see, they rolled out the red carpet for us to show you around. The new location is right next to the new Gigi’s Cupcakes on 310 West Cleveland Road in Granger.

I don’t know what you are waiting for… let’s head on in!

The New Flourish Boutique

The New Flourish Boutique

The New Flourish Boutique

The New Flourish Boutique

It was hard to take very many pictures to really show you everything because there were so many Flourish friends shopping that night. We had the best time browsing all of the items in the store. Of course, our eyes always go to the jewels whenever we are out and about.  Pictured here is just half of the store, if you can believe it, and an amazing little Clearance section is tucked in the back of the store.

The New Flourish Boutique

The New Flourish Boutique

The New Flourish Boutique

The New Flourish Boutique

The evening included a fashion show. If you know us, you know we love fashion. Everywhere we turned, we saw something we loved.  Flourish Boutique has a ton of new merchandise that you can order or find in their store. MomAdvice readers can get 25% off any of their regular priced merchandise using the code WEB25!

Pretty in Pleats Maxi (Flourish Boutique)

Pretty in Pleats Maxi (Flourish Boutique)

Pretty in Pleats Maxi (Flourish Boutique)

Pretty in Pleats Maxi (Flourish Boutique)

Mystree Jacket (Flourish Boutique)

Mystree Jacket (Flourish Boutique)

Scarf (Flourish Boutique)

Here are some of my FAVORITE finds that I scored last night. This Pretty In Pleats skirt in white & black are my new favorite summer item! I am barely over five feet, and a maxi like this is a DREAM COME TRUE for me. I love that the lining is also an appropriate length and adds to the breeziness of this skirt. Did I mention the belt is included? Swoon! Be sure to check out the What’s New link to see all the updates (as I am sure some of these I have pictured haven’t made it on the site yet!) You can always cash in on our coupon code- woohoo!

We feel so blessed to have this partnership with Flourish Boutique and are so thankful for their continued support and sponsorship over the years! It has been a dream come true that they sponsor and support my little business- thank you, Flourish!

Pin It

8 Fun Sweater Crafts from Goodwill

Thursday, April 3rd, 2014

8 Fun Sweater Crafts from Goodwill

Although those warmer temperatures seem like they are just around the corner, here in Indiana it is still sweater weather season for a while.
Whether you are looking to switch-up your winter wardrobe staple or looking for an easy craft to beat those last-days-of-cold-weather blues, Goodwill has you covered with these fun sweater crafts you can create for a fun pick-me-up!
Sweater crafts are the types of crafts that anyone can do and the possibilities are endless.
I am sharing eight ideas with you, for fun crafts you can try with items from your favorite thrift store!

Make a Cute Cowl

I love to knit up cowls for the cooler months, but I know not everyone loves to knit.
That is why I love this cowl made from a sweater that you can create with just some simple stitches on your sewing machine…no knitting required.
Check out this fun and easy tutorial from Madigan Made.
This would also be a fun one to create with light and Spring-y prints and lacier knits to create a beautiful scarf or cowl for Spring!

Make a Sweater Bag

One of my favorite gifts that I ever got was an adorable sweater bag that my best friend found for me at a boutique.
You don’t need to pay boutique prices though to create a cute sweater bag.
Look for sweater prints in fresh Spring colors and follow this adorable tutorial for by Lana Red Studio to create a cute sweater bag of your own!

Cozy Up a Pot

Indoor plants and terrariums are a fun trend that I am seeing pop up in all of my favorite catalogs like Pottery Barn & West Elm.
Even though I lack a green thumb, I have found myself picking up pretty indoor plants for my home as I await seeing our grass buried under the snow.
Consider visiting your favorite thrift store to find a sweater that matches your home decor to dress up a pot.
Not only would this be a cute addition to your own home, but it would also make an adorable housewarming present!
Check out A Cultivated Nest for this easy tutorial.


Make a Sweet Plushy

Does your child have a favorite sweater that the just can’t bear to part with?
Consider transforming their most-loved clothing item into a sweet plushy that they can sleep with at night.
I love this idea for creating a toy by Leigh Laurel Studios and she even includes a PDF that you can use to create your own toy.
Consider saving this sweet item for your child’s Easter basket this year!
Wouldn’t that be a fun surprise?

Embrace the Fox Trend

Foxes are a fun woodland animal trend that is happening both in clothing and in home decor.
Not only do I have an adorable fox locket from one of my sweet blogging friends, but we also found a beautiful fox print for our home.
Add a nod to this adorable trend by dressing up an old sweater with fox elbow patches.
Check out this fun tutorial from Adventures in Crafting and add a cute fox embellishment to your favorite sweater today!

Make Some Cozy Sweater Boots

It does not matter if it is the dead of winter or the dead of summer, I always have cold feet.
That is why I absolutely love this fun tutorial for creating cozy DIY Slipper Boots from a sweater.
Head to a local thrift shop and find a sweater that offers lots of warmth, but is not itchy against your skin.
Use this sweater as material to create your own slipper boots using this easy tutorial from Drawings Under the Table.

Add a Feminine Detail to a Spring Sweater

When I was a child, my mom always stressed that things should be just as pretty from the front as from behind on our clothing.
You would always find our Easter dresses with an unexpected buttons or a beautiful bow in satin or a contrasting fabric in the back.
As an adult, this philosophy towards clothing still applies and I love beautiful sweaters with feminine backs and details.
Look for a lightweight and delicate Spring sweater and add a satin bow detail using this tutorial from love maegan.

Sew a Sweater Skirt

Last, but not least, consider transforming your sweater into a skirt to dress up your wardrobe as we await the warmer months.
Look for a sweater that you love in a great basic color with cabling and use this easy tutorial from My Poppet to transform that sweater into a new skirt for your wardrobe.
Pairing these with leggings, a short sleeve basic-t-shirt, and a pair of ballet flats, would be absolutely adorable!
Check out these other craft ideas from MomAdvice.com:

Fun Ways to Dress Up Boots

No-Sew DIY Blanket Scarves


Knitted Dishcloths & Homemade Cleaning Recipes


Knitted Coffee Cup Sweaters


Sign up for the MomAdvice newsletter

Pin It

Mama Francesca Cheese & a Gluten-Free Meatball & Pasta Recipe

Monday, March 31st, 2014

Mama Francesca Premium Cheese Review

*This post is sponsored by Mama Francesca

I have been looking forward to sharing with you all week my new partnership with Mama Francesca Grated Cheese. The company reached out to me to share about their beautiful product and I couldn’t wait to start cooking with it and showing it off on our site.

Mama Francesca Premium Cheese Review Mama Francesca Premium Cheese Review

Have you heard of Mama Francesca? It is a delicious new grated cheese that comes in five different varieties. I am showcasing three flavors that I found at my own store. The ones pictured here are: Aromatico (Parmesan, Basil & Oregano), Fiero (Parmesan & Red Pepper), & Pungente (Parmesan & Garlic). As you can see from the picture, the cheese is light and fluffy while blended with delicious spices that you can see and taste in your dishes.

You can also find Audace (Parmesan & Romano), and Perfetto (Classic Parmesan) on your store shelves.

 Mama Francesca Premium Cheese Review

Many times when we think of parmesan cheese, we think of it as a way to just dress our dishes. With these fun cheese blends though, they offer a delicious ingredient alternative in your favorite recipes that, not only add flavor, but can save you time in the kitchen since they incorporate that perfect blend of spices.

My family is a big fan of pasta and meatballs.  I wanted to create that familiar dish that we love, but in a gluten-free variety using Mama Francesca’s cheese as the inspiration for our new dish. I replaced the spices and cheese with the Aromatico (Parmesan, Basil & Oregano) cheese blend and then replaced the breadcrumbs in these meatballs with a little gluten-free panko. The replacement of spices and cheese saved me time digging through my spice rack and the cheese blend managed to still perfectly spice our meatballs. When it comes to meatballs,  I recommend doubling these to enjoy a delicious meatball sub for a busy weeknight meal- topped with sauce & cheese.

With this dish, you can use any variety of gluten-free pasta shape you love. Rotini, shells, and elbow macaroni are three of my favorites in this dish. The pasta can be tossed gently in this delicate fresh tomato sauce.

Mama Francesca Premium Cheese Review 
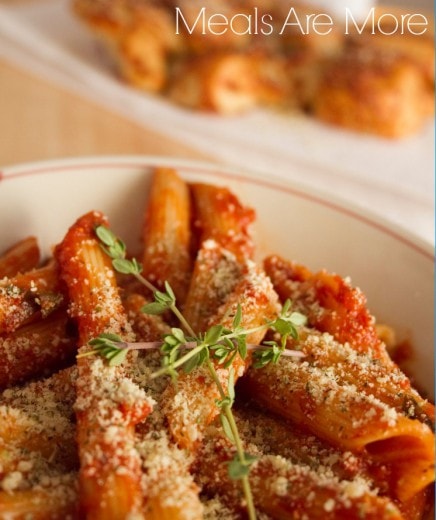
Of course, just because you use the cheese in the meatballs doesn’t mean you can’t shake on the cheese liberally over your plates of pasta. Set out a few varieties of cheese and let your family member’s customize their dishes for a fun family meal!

I hope you will give Mama Francesca a try for your next family dinner! I promise that this cheese does not disappoint!

Gluten-Free Meatball & Pasta Recipe

Gluten-Free Meatball & Pasta Recipe
Recipe Type: Main
Author: Amy Clark
Prep time:
Cook time:
Total time:
Serves: 6
A gluten-free meatball & pasta dish that is just as delicious as the gluten-filled version.
Ingredients
  • Gluten-Free Pasta With Meatballs
  • ¼ cup gluten-free panko
  • 2 large eggs, lightly beaten
  • 1 tablespoon whole milk
  • 1 tablespoon ketchup
  • ¾ cup Mama Francesca Aromatico (Parmesan, Basil & Oregano) Grated Cheese
  • ¾ teaspoon salt
  • ¾ teaspoon freshly ground black pepper
  • 1 pound Sweet Italian Turkey Sausages (remove the casings)
  • 1½ cups low-sodium chicken stock
  • 1 tablespoon olive oil
  • 1 tablespoon minced garlic
  • 4 cups cherry tomatoes, halved
  • 1 pound gluten-free pasta (any variety)
Instructions
  1. In a medium bowl, stir together the panko , parsley, eggs, milk, ketchup, cheese, salt, and pepper. Add the turkey and gently stir to combine.
  2. Make your meatballs the standard size and put them on a baking sheet.
  3. Bake at 400 degrees for ten to fifteen minutes.
  4. In a large pot, heat your olive oil and then heat your garlic for about thirty seconds. Next, heat chicken stock and tomatoes and bring to a boil.
  5. Bring a large pot of salted water to a boil over high heat. Add the pasta and cook until tender but still firm to the bite, as directed on the packaging directions of your favorite pasta variety.
  6. Drain the pasta and rinse well with warm water. Add the meatball mixture and garnish with fresh parsley and more cheese.

Tracking Pixel

Pin It

MomAdvice Summer Book Club Selection: Love With a Chance of Drowning

Friday, March 28th, 2014

Love With a Chance of Drowning

First, I just want to thank everyone for your feedback today about the MomAdvice Book Club. I hope you didn’t feel like I was coming down too hard about it, but the MomAdvice Book Club was a special project for me this year.  I have spent an unbelievable amount of time investing into reading so many books to find the perfect books, coordinating with publishing houses to get free books to giveaway, gathering questions for authors, and then posting/sharing each discussion. In all honesty, it became a little part-time job for me on top of my full-time job.

I didn’t mind doing it until the discussion and participation dwindled.

Based on your feedback, you are 1) very busy mamas 2) are waiting for library copies 3) didn’t have time to read this year.

Again, I get that! I totally do.

In order to make things more relaxed and fun again, we will be selecting a quarterly selection moving forward. This gives you plenty of time to get books, read them, and have questions for our featured authors. On alternate months, I will just share my book reviews as we have done in the past. 

Love With a Chance of Drowning

This summer we will be reading the AMAZING memoir of Torre DeRoche called, “Love With a Chance of Drowning.” It is our first non-fiction selection and I am so excited to share this book with you because I am enjoying it so much.

Not sure if you can get on board with a non-fiction pick? Just picture me laughing until tears are rolling down my cheeks ever since I picked this book up. Then picture me reading aloud almost the entire book to my husband, while trying to read it to him, still laughing with tears rolling down my cheeks and trying to catch my breath so I can read every word to him. It is that funny and that awesome.

Here is a book synopsis from Amazon…

City girl, Torre DeRoche,  isn’t looking for love, but a chance encounter in a San Francisco bar sparks an instant connection with a soulful Argentinean man who unexpectedly sweeps her off her feet. The problem? He’s just about to cast the dock lines and voyage around the world on his small sailboat, and Torre is terrified of deep water. However, lovesick Torre determines that to keep the man of her dreams, she must embark on the voyage of her nightmares, so she waves good-bye to dry land and braces for a life-changing journey that’s as exhilarating as it is terrifying.


Somewhere mid-Pacific, she finds herself battling to keep the old boat, the new relationship, and her floundering sanity afloat. . . .


This sometimes hilarious, often harrowing, and always poignant memoir is set against a backdrop of the world’s most beautiful and remote destinations. Equal parts love story and travel memoir, Love with a Chance of Drowning is witty, charming, and proof positive that there are some risks worth taking.

Our discussion for this book will be the last Tuesday in July! I will touch base with you in the upcoming month if I am able to secure a discussion with our author. If not, I still think this is a book that is perfect for your beach bag!

the_bear_claire_cameron_book_cover

In the meantime, this month’s selection, “The Bear,” is a short and powerful novel that I think you will be able to finish in just a couple of short days. It is hard to put down and is an author discussion that I am excited to participate in. I am doubly honored since Claire was featured in a glowing review from People Magazine, that she would take the time to chat with us.

I hope that you can join in and thank you for being candid in your thoughts about what works best for you!

xo,
Amy

Pin It

Mrs. Butterworth Sweet-Stakes Giveaway & Gluten-Free Overnight Waffles

Thursday, March 27th, 2014

Mrs. Butterworth Sweet-Stakes Giveaway

*This post is sponsored by Mrs. Butterworth

I am excited to share with you that I have partnered with Mrs. Butterworth today for a fun family prize pack giveaway and to share about their sweet-stakes they are hosting for their fans through April 30th!  Lucky for us, I am not only giving away a prize pack for our MomAdvice readers, but I am showing you a fun new recipe you can try to put that wonderful prize pack to work in your kitchen.

Mrs. Butterworth Sweet-Stakes Giveaway

This month, Mrs. Butterworth’s has teamed up with Busch Gardens to generate some more fun around the dinner table. They have launched a Family Fun Sweet-stakes where you can enter to win a trip to one of the Busch Garden parks.  You can read all about their fun contest here! This contest inspired me so much that I knew I had to head to my kitchen and create something in honor of it.

I have always been a syrup-loving girl. For years, we have made it a family tradition to indulge in, what we lovingly call, “Jazzy Sunday.” Jazzy Sunday amounts to throwing on a few jazz records and making waffles and pancakes drenched in syrup for a delicious Sunday brunch.

With eating gluten-free, I have found that it takes a lot of practice to replicate my favorite pancake and waffle recipes.  I began to think about the fluffiest waffles I had ever made and it was an overnight waffle recipe that my best friend shared with me years ago. I started wondering if I could replicate this with a gluten-free waffle recipe. Low and behold, after a few experiments, I found it is possible to make fluffy-as-air waffles with the overnight technique of warm milk, frothy yeast, and easy all-purpose gluten-free flour.

The batter is still dense, but it yields a fluffy waffle that no one will ever know is missing the gluten. When topped with fresh berries and Mrs. Butterworth’s Syrup, it is truly a Sunday treat that will make your own, “Jazzy Sunday,” complete.

Mrs. Butterworth Sweet-Stakes Giveaway

In honor of this fun contest, Mrs. Butterworth’s gave me a Family Fun Breakfast Kit that include goodies from Mrs. Butterworth’s and Busch Gardens, as well as jungle animal-themed pancake pans, perfect for the explorer in the family. If you don’t win it here though, they will also be giving away a Family Fun Breakfast kits every two weeks during this contest so there are some great chances you can win there too!

Enter our giveaway of one Family Fun Breakfast Kit using our Rafflecopter widget below and let us know one of your favorite breakfast traditions and LIKE Mrs. Butterworth’s for an additional entry! I will be selecting one winner on April 3rd so be sure to get those entries in! Grab the recipe for Gluten-Free Overnight Waffles below! 

Gluten-Free Overnight Waffles

Mrs. Butterworth Sweet-Stakes Giveaway & Gluten-Free Overnight Waffles
Recipe Type: Breakfast
Author: Amy Clark
Prep time:
Cook time:
Total time:
Serves: 4
A light, fluffy, and super delicious overnight waffle recipe that is also gluten-free!
Ingredients
  • 2 1/4 cups milk (or dairy substitute)
  • 2.25 teaspoons yeast
  • 1 teaspoon sugar
  • 1 teaspoon salt
  • 1/2 cup butter (1 stick)
  • 2 cups all-purpose gluten-free flour (I used Better Batter in this)
  • 2 eggs, beaten
  • 1/4 teaspoon baking soda
  • 2 teaspoons vanilla, gluten-free
Instructions
  1. Warm milk and butter in a medium saucepan over low heat just until the butter melts.
  2. Remove from the heat and allow to cool. Once to a lukewarm temperature, add dry yeast and sugar to the milk and let sit until the yeast is bubbly, about 5 minutes.
  3. Pour the liquid into a large container with a tight fitting lid.
  4. Add the salt and flour, mixing until smooth.
  5. Cover tightly and keep at room temperature overnight (don’t refrigerate).
  6. When you are ready to cook the waffles, preheat waffle griddle, stir in the beaten eggs, baking soda and vanilla.
  7. Pour 2/3 cup of the batter on the griddle (or enough to cover the surface) and bake until golden.
  8. Serve with fresh fruit and Mrs. Butterworth’s Syrup.
Recipe Slightly Adapted from About.com.

a Rafflecopter giveaway

Tracking Pixel

Pin It

Get Your Home Organized With Goodwill

Thursday, March 20th, 2014

Get Your Home Organized With Goodwill


At the beginning of the year, I get the strong urge to donate everything in my house and start fresh.

I am also always on the hunt to find new strategies for organization in my home that don’t cost a lot.

Today I am featuring some great ideas for organization from commonly found items at your favorite thrift store.

I am so inspired by these bloggers that I have a trip planned for myself this week to try to snag a few of these items.


Get Your Desk Organized

This last month I spent organizing my office and craft space.

One thing I really hate is desk clutter and I have been using a thrift store mug to organize all my writing and cutting tools.

I love this fresh idea for using a broom head as an office caddy for organizing these item in a fun nod to industrial-style and to add a little whimsy to your desk.

Grab the inspiration for this project from merry thought.


Get Your Bathroom Organized

One area I always struggle with organization is our bathroom.
You can always find an abundance of white dishes at Goodwill though and this painting tutorial from Fruetcake shows how to turn plain white dishes into copper vanity bowls with just a little spray paint.
This would be a fantastic way to organize things like bobby pins, cotton balls, or even as a small jewelry holder.

Organize Your Photos

One thing I have vowed to do this year is to print more photos.
Of course the dilemma always is where to hang and display these items.
Luckily for me, I found this adorable cabinet door photo display that you can create with just a few items for decorating the top of your dresser.
If you are an Instagram-addict like me, this is a must-do project for displaying your favorite pictures.

Organize Your Jewelry Collection

Vintage plates and china can be adorned or just allowed to show their original vintage beauty in this adorable jewelry display that you could create from plates at Goodwill.
I love that this organizing project not only organizes, but it also doubles as a cute way to decorate a wall or the interior of a walk-in closet.
To round out this display, check Goodwill’s sheets, linens, and kitchen towels for fabric to add to these embroidery hoops.
If you are a woman that isn’t as fully accessorized (pity the thought!) you can even add to your jewels with items found in their jewelry department.

Organize the Bookcase

Bookcases can become untidy quickly especially in my kid’s rooms.
Consider whittling down the book collection into a more manageable size and then create these adorable bookends from your child’s old action figures and toys.
With a quick mount and a little spray paint, you have a unique bookend that can tidy those stacks.
Grab the tutorial for these easy DIY Bookends from Canadian Family today!

Organize Your Menu Plan

If one of your goals this year is to save money, the one place I always recommend starting is with your grocery shopping and menu planning.
I am a visual person, so I love my chalkboard in my kitchen as a reminder of what we have in store for the week and to prompt me to prep and thaw ingredients for the days ahead.
If you don’t have a chalkboard in your kitchen, making one is very easy thanks to chalkboard paint.
Check your local thrift store for a frame, canvas, or serving tray that you can use to get your menu plan visual.

Organize the Paper Clutter

We talk a lot about book page crafts because this is an item you can always find at your local thrift.
Did you know that you can transform a donated book into an organizer?
As someone who frequently has a pile of cards and tiny notes to myself, I love this thoughtful storage idea for these items!

Organize the Toys

After the holidays, the toy clutter always seems to get out of control at our house.
Thankfully, you can find lots of jars at your favorite recycle shop that can be transformed into adorable containers to house those smaller toys in.
With a little spray paint and a figurine, car or train, you can create an adorable accent to your child’s bookshelves or to tuck away in your toy storage closet.
You can get the scoop on making these adorable toy corrals on Simplicity in the South.

What are your favorite things to use to organize your home? Have you upcycled anything into the perfect storage solution? Feel free to share it here!

This post contains affiliate links.


Need more organizing ideas? Check out these posts from MomAdvice.com:


Minimize morning stress with an organized command center

Organized Command Center


Organize Your Spice Rack


How to Organize Board Games


DIY Breakfast Caddy


Sign up for the MomAdvice newsletter

Pin It

Gluten-Free Rainbow Bundt Cake

Thursday, March 6th, 2014

Gluten-Free Rainbow Bundt Cake from MomAdvice.com.

I am so excited to share a delicious Gluten-Free Rainbow Bundt Cake recipe that you can make using a simple boxed mix, a little food coloring, and a few odds & ends from your pantry. This Rainbow Cake is made in a tube pan, versus a layered cake, and is a fun addition to your St. Patrick’s Day spread.

Walmart challenged me to share a St. Patrick’s Day project that you could create out of items from their store. You may remember my rainbow cakes in a jar that I created a couple of years ago. Now that I am eating gluten-free, I wanted to replicate the idea of a rainbow cake, but I wanted to do it in one pan and I wanted to make it a quicker process by using a cake mix.

Gluten-Free Rainbow Bundt Cake from MomAdvice.com. Gluten-Free Rainbow Bundt Cake from MomAdvice.com.

To make a vibrantly colored cake, I want to point out that it is really important to use good icing colors to achieve your rainbow cake colors. Over by the party supplies, you will find professional cake decorating supplies at Walmart. You want to purchase the Wilton Icing Colors. These concentrated gels offer a much brighter color than what you will find over in the baking section of the grocery section. I just use a toothpick to dip in the gel and then swirl it through my cake batter. You may need to do this a couple of times to achieve this level of brightness, but it still will take a lot less than the other brands of food coloring.

Gluten-Free Rainbow Bundt Cake from MomAdvice.com. Gluten-Free Rainbow Bundt Cake from MomAdvice.com.

When I decided I wanted to make this cake, I went through tons of tons of cake recipes to figure out how to layer the batter. My inspiration for creating my rainbow arch was from not martha and her Leprechaun Trap Cake that she created a few years ago. Her arch is so much more beautiful than mine. I highly encourage you to read her tutorial for a perfect arch and read mine for a just meh arch. That being said, do prepare this in a tube pan versus a bundt pan to achieve the best arch. 

Do you have a digital scale? I highly recommend purchasing one because it will make projects like this a million times easier. I have had mine for many years and I use it for both weighing packages and as a food scale! Be sure to tare it with the bowl on top to begin your measurements each time.

I used the measurements outlined by not martha for measurements for my batter:

  • 6 ounces – red
  • 5 ounces – orange
  • 4 ounces – yellow
  • 3 ounces – green
  • 2 ounces – blue
  • 1 ounce – purple
  • The remainder of the rest of the batter, leave it white.

To scoop batter into the bowls, I relied upon an ice cream scoop to scoop it into the bowls on the scale. To make pouring the batter easier, place the cake batter in a baggie in a tall glass and hang the opening over the sides of your glass. Pour your batter in and then seal the baggie. Just snip a corner of the baggie to begin pouring your batter into the pan.

Gluten-Free Rainbow Bundt Cake from MomAdvice.com.

Gluten-free cakes tend to be more delicate so you definitely want to let this fully cool before trying to work with it. The side that has all the beautiful vibrant colors is not the top of the cake. It is the bottom of the cake. I accidentally iced this side so don’t make my mistake. If you find that your cake is puffy on the bottom, use a serrated knife to even it up a bit so your cake is not lopsided.

Gluten-Free Rainbow Bundt Cake from MomAdvice.com. Gluten-Free Rainbow Bundt Cake from MomAdvice.com. Gluten-Free Rainbow Bundt Cake from MomAdvice.com.

I posted a picture of this cake as I was glazing it on Instagram. To quote myself, “I never go easy on the sprinkles. I consider them the jazz hands on my desserts.”

Who quotes themselves? Sorry about that!

Glaze and sprinkle this cake liberally!

Gluten-Free Rainbow Bundt Cake from MomAdvice.com. Gluten-Free Rainbow Bundt Cake from MomAdvice.com.

I was disappointed that I had iced the wrong side and that my purple didn’t get perfectly centered. I think it is one of those cakes that might take a little more practice. My friends didn’t seem to notice or mind my errors though because this was one yummy cake! I doubt your kids would notice or care either. It might be a fun one to try together!

I hope you love it as much as we did and I hope this tutorial helps you while you make your own gluten-free rainbow cake!

Gluten-Free Rainbow Bundt Cake
Author: Adapted from Not Martha
Prep time:
Cook time:
Total time:
Serves: 8
A gluten-free rainbow cake perfect for celebrating St. Patrick’s Day
Ingredients
  • 1 Hodgson Mill Gluten-Free Yellow Cake Mix (over by the gluten-free ingredients in the candy aisle of your store, not in the baking aisle)
  • 1/2 cup butter softened
  • 2 large eggs, room temperature
  • 1 cup buttermilk
  • 2 teaspoons vanilla extract
  • 1 package of Wilton Gel Food Colorings
  • 1 1/2 cups confectioners’ sugar
  • 2 1/2 teaspoons milk (or milk substitute)
  • 1/8 teaspoon salt
  • 1/4 teaspoon vanilla extract
  • 1 teaspoon butter
  • Rainbow Sprinkles
Instructions
  1. Preheat oven to 350 degrees. Grease a tube pan liberally with cooking spray.
  2. In a mixing bowl, cream butter until soft. Add cake mix and blend completely.
  3. Add eggs, buttermilk, and vanilla extract and beat until completely blended. The batter will be thick.
  4. Divide your batter into eight bowls using the measurements in this post and tint accordingly.
  5. First pour the larger amount of white batter into the pan. Then pour the red batter in, making it a wide ring of batter. Then pour the orange over that, keeping it inside the red. Pour in each color, creating smaller and smaller rings.
  6. Bake at 350 degrees for 40-50 minutes, testing with a toothpick to check when the cake is done.
  7. Once the cake is cooled, prepare your icing.
  8. Melt the butter and add to rest of ingredients. Mix until creamy.
  9. Spoon the glaze over your cake and finish with rainbow sprinkles.

Enjoy this tasty treat with a DIY Shamrock Shake and our free St. Patrick’s Day straw printable!

walmart_mom_disclaimer


Pin It