Archive for the ‘My Work’ Category

8 Fun Sweater Crafts from Goodwill

Thursday, April 3rd, 2014

8 Fun Sweater Crafts from Goodwill

Although those warmer temperatures seem like they are just around the corner, here in Indiana it is still sweater weather season for a while.
Whether you are looking to switch-up your winter wardrobe staple or looking for an easy craft to beat those last-days-of-cold-weather blues, Goodwill has you covered with these fun sweater crafts you can create for a fun pick-me-up!
Sweater crafts are the types of crafts that anyone can do and the possibilities are endless.
I am sharing eight ideas with you, for fun crafts you can try with items from your favorite thrift store!
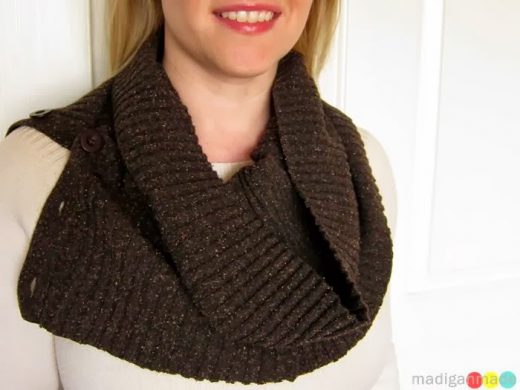
Make a Cute Cowl

I love to knit up cowls for the cooler months, but I know not everyone loves to knit.
That is why I love this cowl made from a sweater that you can create with just some simple stitches on your sewing machine…no knitting required.
Check out this fun and easy tutorial from Madigan Made.
This would also be a fun one to create with light and Spring-y prints and lacier knits to create a beautiful scarf or cowl for Spring!
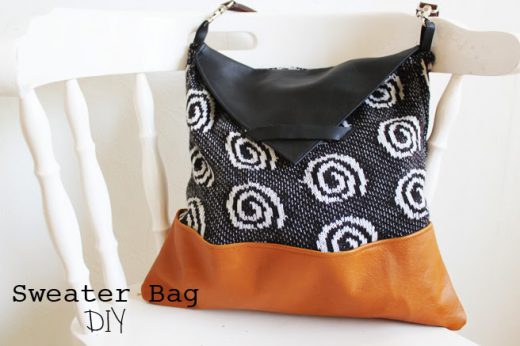
Make a Sweater Bag

One of my favorite gifts that I ever got was an adorable sweater bag that my best friend found for me at a boutique.
You don’t need to pay boutique prices though to create a cute sweater bag.
Look for sweater prints in fresh Spring colors and follow this adorable tutorial for by Lana Red Studio to create a cute sweater bag of your own!
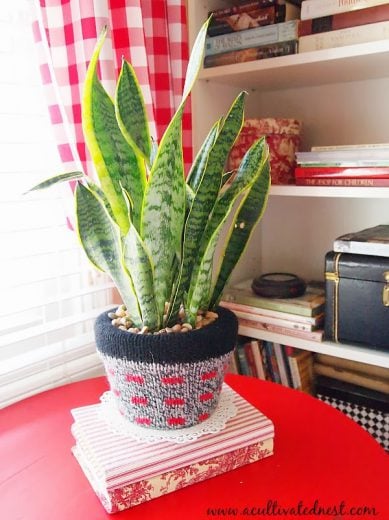
Cozy Up a Pot

Indoor plants and terrariums are a fun trend that I am seeing pop up in all of my favorite catalogs like Pottery Barn & West Elm.
Even though I lack a green thumb, I have found myself picking up pretty indoor plants for my home as I await seeing our grass buried under the snow.
Consider visiting your favorite thrift store to find a sweater that matches your home decor to dress up a pot.
Not only would this be a cute addition to your own home, but it would also make an adorable housewarming present!
Check out A Cultivated Nest for this easy tutorial.
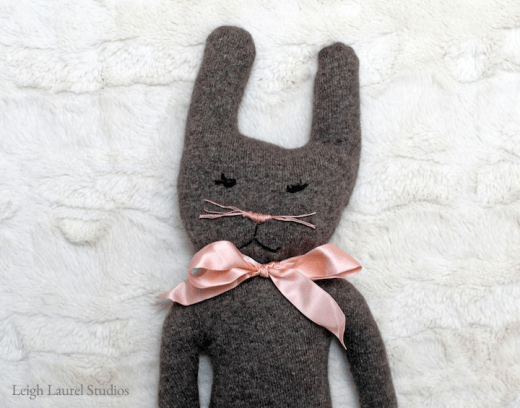
 

Make a Sweet Plushy

Does your child have a favorite sweater that the just can’t bear to part with?
Consider transforming their most-loved clothing item into a sweet plushy that they can sleep with at night.
I love this idea for creating a toy by Leigh Laurel Studios and she even includes a PDF that you can use to create your own toy.
Consider saving this sweet item for your child’s Easter basket this year!
Wouldn’t that be a fun surprise?

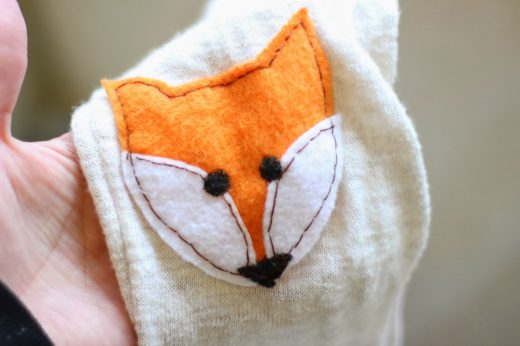
Embrace the Fox Trend

Foxes are a fun woodland animal trend that is happening both in clothing and in home decor.
Not only do I have an adorable fox locket from one of my sweet blogging friends, but we also found a beautiful fox print for our home.
Add a nod to this adorable trend by dressing up an old sweater with fox elbow patches.
Check out this fun tutorial from Adventures in Crafting and add a cute fox embellishment to your favorite sweater today!

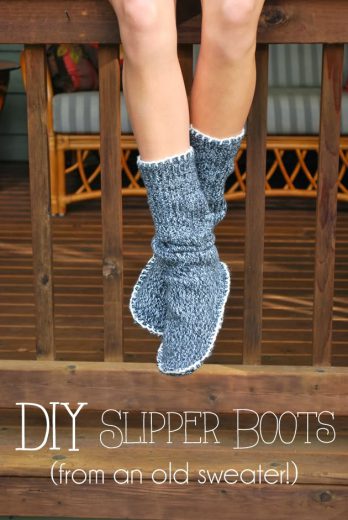
Make Some Cozy Sweater Boots

It does not matter if it is the dead of winter or the dead of summer, I always have cold feet.
That is why I absolutely love this fun tutorial for creating cozy DIY Slipper Boots from a sweater.
Head to a local thrift shop and find a sweater that offers lots of warmth, but is not itchy against your skin.
Use this sweater as material to create your own slipper boots using this easy tutorial from Drawings Under the Table.

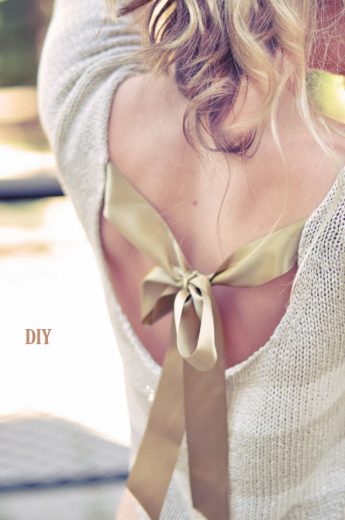
Add a Feminine Detail to a Spring Sweater

When I was a child, my mom always stressed that things should be just as pretty from the front as from behind on our clothing.
You would always find our Easter dresses with an unexpected buttons or a beautiful bow in satin or a contrasting fabric in the back.
As an adult, this philosophy towards clothing still applies and I love beautiful sweaters with feminine backs and details.
Look for a lightweight and delicate Spring sweater and add a satin bow detail using this tutorial from love maegan.
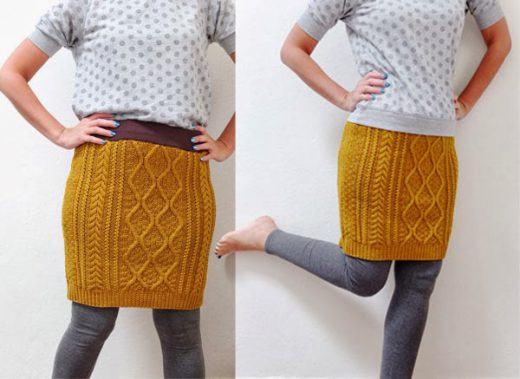
Sew a Sweater Skirt

Last, but not least, consider transforming your sweater into a skirt to dress up your wardrobe as we await the warmer months.
Look for a sweater that you love in a great basic color with cabling and use this easy tutorial from My Poppet to transform that sweater into a new skirt for your wardrobe.
Pairing these with leggings, a short sleeve basic-t-shirt, and a pair of ballet flats, would be absolutely adorable!
Check out these other craft ideas from MomAdvice.com:

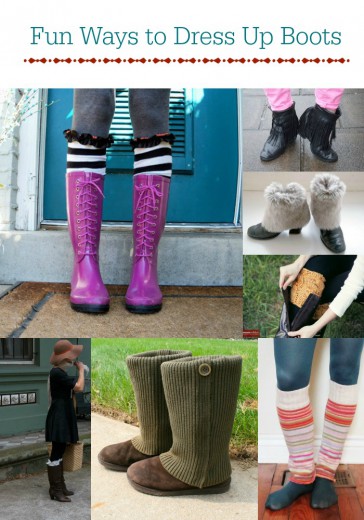
Fun Ways to Dress Up Boots

No-Sew DIY Blanket Scarves


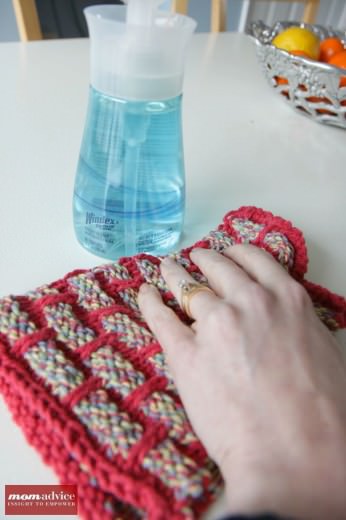
Knitted Dishcloths & Homemade Cleaning Recipes


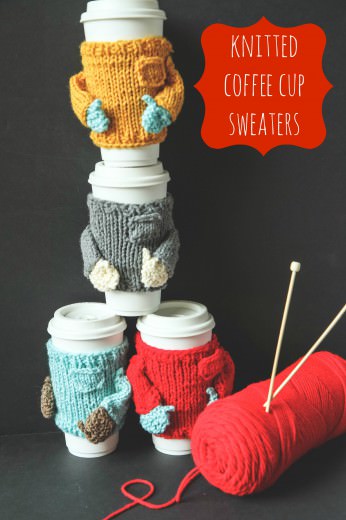
Knitted Coffee Cup Sweaters


Sign up for the MomAdvice newsletter

Pin It

Mama Francesca Cheese & a Gluten-Free Meatball & Pasta Recipe

Monday, March 31st, 2014

Mama Francesca Premium Cheese Review

*This post is sponsored by Mama Francesca

I have been looking forward to sharing with you all week my new partnership with Mama Francesca Grated Cheese. The company reached out to me to share about their beautiful product and I couldn’t wait to start cooking with it and showing it off on our site.

Mama Francesca Premium Cheese Review Mama Francesca Premium Cheese Review

Have you heard of Mama Francesca? It is a delicious new grated cheese that comes in five different varieties. I am showcasing three flavors that I found at my own store. The ones pictured here are: Aromatico (Parmesan, Basil & Oregano), Fiero (Parmesan & Red Pepper), & Pungente (Parmesan & Garlic). As you can see from the picture, the cheese is light and fluffy while blended with delicious spices that you can see and taste in your dishes.

You can also find Audace (Parmesan & Romano), and Perfetto (Classic Parmesan) on your store shelves.

 Mama Francesca Premium Cheese Review

Many times when we think of parmesan cheese, we think of it as a way to just dress our dishes. With these fun cheese blends though, they offer a delicious ingredient alternative in your favorite recipes that, not only add flavor, but can save you time in the kitchen since they incorporate that perfect blend of spices.

My family is a big fan of pasta and meatballs.  I wanted to create that familiar dish that we love, but in a gluten-free variety using Mama Francesca’s cheese as the inspiration for our new dish. I replaced the spices and cheese with the Aromatico (Parmesan, Basil & Oregano) cheese blend and then replaced the breadcrumbs in these meatballs with a little gluten-free panko. The replacement of spices and cheese saved me time digging through my spice rack and the cheese blend managed to still perfectly spice our meatballs. When it comes to meatballs,  I recommend doubling these to enjoy a delicious meatball sub for a busy weeknight meal- topped with sauce & cheese.

With this dish, you can use any variety of gluten-free pasta shape you love. Rotini, shells, and elbow macaroni are three of my favorites in this dish. The pasta can be tossed gently in this delicate fresh tomato sauce.

Mama Francesca Premium Cheese Review Of course, just because you use the cheese in the meatballs doesn’t mean you can’t shake on the cheese liberally over your plates of pasta. Set out a few varieties of cheese and let your family member’s customize their dishes for a fun family meal!

I hope you will give Mama Francesca a try for your next family dinner! I promise that this cheese does not disappoint!

Gluten-Free Meatball & Pasta Recipe

Gluten-Free Meatball & Pasta Recipe
Recipe Type: Main
Author: Amy Clark
Prep time:
Cook time:
Total time:
Serves: 6
A gluten-free meatball & pasta dish that is just as delicious as the gluten-filled version.
Ingredients
  • Gluten-Free Pasta With Meatballs
  • ¼ cup gluten-free panko
  • 2 large eggs, lightly beaten
  • 1 tablespoon whole milk
  • 1 tablespoon ketchup
  • ¾ cup Mama Francesca Aromatico (Parmesan, Basil & Oregano) Grated Cheese
  • ¾ teaspoon salt
  • ¾ teaspoon freshly ground black pepper
  • 1 pound Sweet Italian Turkey Sausages (remove the casings)
  • 1½ cups low-sodium chicken stock
  • 1 tablespoon olive oil
  • 1 tablespoon minced garlic
  • 4 cups cherry tomatoes, halved
  • 1 pound gluten-free pasta (any variety)
Instructions
  1. In a medium bowl, stir together the panko , parsley, eggs, milk, ketchup, cheese, salt, and pepper. Add the turkey and gently stir to combine.
  2. Make your meatballs the standard size and put them on a baking sheet.
  3. Bake at 400 degrees for ten to fifteen minutes.
  4. In a large pot, heat your olive oil and then heat your garlic for about thirty seconds. Next, heat chicken stock and tomatoes and bring to a boil.
  5. Bring a large pot of salted water to a boil over high heat. Add the pasta and cook until tender but still firm to the bite, as directed on the packaging directions of your favorite pasta variety.
  6. Drain the pasta and rinse well with warm water. Add the meatball mixture and garnish with fresh parsley and more cheese.

Tracking Pixel

Pin It

Mrs. Butterworth Sweet-Stakes Giveaway & Gluten-Free Overnight Waffles

Thursday, March 27th, 2014

Mrs. Butterworth Sweet-Stakes Giveaway

*This post is sponsored by Mrs. Butterworth

I am excited to share with you that I have partnered with Mrs. Butterworth today for a fun family prize pack giveaway and to share about their sweet-stakes they are hosting for their fans through April 30th!  Lucky for us, I am not only giving away a prize pack for our MomAdvice readers, but I am showing you a fun new recipe you can try to put that wonderful prize pack to work in your kitchen.

Mrs. Butterworth Sweet-Stakes Giveaway

This month, Mrs. Butterworth’s has teamed up with Busch Gardens to generate some more fun around the dinner table. They have launched a Family Fun Sweet-stakes where you can enter to win a trip to one of the Busch Garden parks.  You can read all about their fun contest here! This contest inspired me so much that I knew I had to head to my kitchen and create something in honor of it.

I have always been a syrup-loving girl. For years, we have made it a family tradition to indulge in, what we lovingly call, “Jazzy Sunday.” Jazzy Sunday amounts to throwing on a few jazz records and making waffles and pancakes drenched in syrup for a delicious Sunday brunch.

With eating gluten-free, I have found that it takes a lot of practice to replicate my favorite pancake and waffle recipes.  I began to think about the fluffiest waffles I had ever made and it was an overnight waffle recipe that my best friend shared with me years ago. I started wondering if I could replicate this with a gluten-free waffle recipe. Low and behold, after a few experiments, I found it is possible to make fluffy-as-air waffles with the overnight technique of warm milk, frothy yeast, and easy all-purpose gluten-free flour.

The batter is still dense, but it yields a fluffy waffle that no one will ever know is missing the gluten. When topped with fresh berries and Mrs. Butterworth’s Syrup, it is truly a Sunday treat that will make your own, “Jazzy Sunday,” complete.

Mrs. Butterworth Sweet-Stakes Giveaway

In honor of this fun contest, Mrs. Butterworth’s gave me a Family Fun Breakfast Kit that include goodies from Mrs. Butterworth’s and Busch Gardens, as well as jungle animal-themed pancake pans, perfect for the explorer in the family. If you don’t win it here though, they will also be giving away a Family Fun Breakfast kits every two weeks during this contest so there are some great chances you can win there too!

Enter our giveaway of one Family Fun Breakfast Kit using our Rafflecopter widget below and let us know one of your favorite breakfast traditions and LIKE Mrs. Butterworth’s for an additional entry! I will be selecting one winner on April 3rd so be sure to get those entries in! Grab the recipe for Gluten-Free Overnight Waffles below! 

Gluten-Free Overnight Waffles

Mrs. Butterworth Sweet-Stakes Giveaway & Gluten-Free Overnight Waffles
Recipe Type: Breakfast
Author: Amy Clark
Prep time:
Cook time:
Total time:
Serves: 4
A light, fluffy, and super delicious overnight waffle recipe that is also gluten-free!
Ingredients
  • 2 1/4 cups milk (or dairy substitute)
  • 2.25 teaspoons yeast
  • 1 teaspoon sugar
  • 1 teaspoon salt
  • 1/2 cup butter (1 stick)
  • 2 cups all-purpose gluten-free flour (I used Better Batter in this)
  • 2 eggs, beaten
  • 1/4 teaspoon baking soda
  • 2 teaspoons vanilla, gluten-free
Instructions
  1. Warm milk and butter in a medium saucepan over low heat just until the butter melts.
  2. Remove from the heat and allow to cool. Once to a lukewarm temperature, add dry yeast and sugar to the milk and let sit until the yeast is bubbly, about 5 minutes.
  3. Pour the liquid into a large container with a tight fitting lid.
  4. Add the salt and flour, mixing until smooth.
  5. Cover tightly and keep at room temperature overnight (don’t refrigerate).
  6. When you are ready to cook the waffles, preheat waffle griddle, stir in the beaten eggs, baking soda and vanilla.
  7. Pour 2/3 cup of the batter on the griddle (or enough to cover the surface) and bake until golden.
  8. Serve with fresh fruit and Mrs. Butterworth’s Syrup.
Recipe Slightly Adapted from About.com.

a Rafflecopter giveaway

Tracking Pixel

Pin It

Get Your Home Organized With Goodwill

Thursday, March 20th, 2014

Get Your Home Organized With Goodwill


At the beginning of the year, I get the strong urge to donate everything in my house and start fresh.

I am also always on the hunt to find new strategies for organization in my home that don’t cost a lot.

Today I am featuring some great ideas for organization from commonly found items at your favorite thrift store.

I am so inspired by these bloggers that I have a trip planned for myself this week to try to snag a few of these items.


Get Your Desk Organized

This last month I spent organizing my office and craft space.

One thing I really hate is desk clutter and I have been using a thrift store mug to organize all my writing and cutting tools.

I love this fresh idea for using a broom head as an office caddy for organizing these item in a fun nod to industrial-style and to add a little whimsy to your desk.

Grab the inspiration for this project from merry thought.


Get Your Bathroom Organized

One area I always struggle with organization is our bathroom.
You can always find an abundance of white dishes at Goodwill though and this painting tutorial from Fruetcake shows how to turn plain white dishes into copper vanity bowls with just a little spray paint.
This would be a fantastic way to organize things like bobby pins, cotton balls, or even as a small jewelry holder.

Organize Your Photos

One thing I have vowed to do this year is to print more photos.
Of course the dilemma always is where to hang and display these items.
Luckily for me, I found this adorable cabinet door photo display that you can create with just a few items for decorating the top of your dresser.
If you are an Instagram-addict like me, this is a must-do project for displaying your favorite pictures.

Organize Your Jewelry Collection

Vintage plates and china can be adorned or just allowed to show their original vintage beauty in this adorable jewelry display that you could create from plates at Goodwill.
I love that this organizing project not only organizes, but it also doubles as a cute way to decorate a wall or the interior of a walk-in closet.
To round out this display, check Goodwill’s sheets, linens, and kitchen towels for fabric to add to these embroidery hoops.
If you are a woman that isn’t as fully accessorized (pity the thought!) you can even add to your jewels with items found in their jewelry department.

Organize the Bookcase

Bookcases can become untidy quickly especially in my kid’s rooms.
Consider whittling down the book collection into a more manageable size and then create these adorable bookends from your child’s old action figures and toys.
With a quick mount and a little spray paint, you have a unique bookend that can tidy those stacks.
Grab the tutorial for these easy DIY Bookends from Canadian Family today!

Organize Your Menu Plan

If one of your goals this year is to save money, the one place I always recommend starting is with your grocery shopping and menu planning.
I am a visual person, so I love my chalkboard in my kitchen as a reminder of what we have in store for the week and to prompt me to prep and thaw ingredients for the days ahead.
If you don’t have a chalkboard in your kitchen, making one is very easy thanks to chalkboard paint.
Check your local thrift store for a frame, canvas, or serving tray that you can use to get your menu plan visual.

Organize the Paper Clutter

We talk a lot about book page crafts because this is an item you can always find at your local thrift.
Did you know that you can transform a donated book into an organizer?
As someone who frequently has a pile of cards and tiny notes to myself, I love this thoughtful storage idea for these items!

Organize the Toys

After the holidays, the toy clutter always seems to get out of control at our house.
Thankfully, you can find lots of jars at your favorite recycle shop that can be transformed into adorable containers to house those smaller toys in.
With a little spray paint and a figurine, car or train, you can create an adorable accent to your child’s bookshelves or to tuck away in your toy storage closet.
You can get the scoop on making these adorable toy corrals on Simplicity in the South.

What are your favorite things to use to organize your home? Have you upcycled anything into the perfect storage solution? Feel free to share it here!

This post contains affiliate links.


Need more organizing ideas? Check out these posts from MomAdvice.com:


Minimize morning stress with an organized command center

Organized Command Center


Organize Your Spice Rack


How to Organize Board Games


DIY Breakfast Caddy


Sign up for the MomAdvice newsletter

Pin It

Gluten-Free Rainbow Bundt Cake

Thursday, March 6th, 2014

Gluten-Free Rainbow Bundt Cake from MomAdvice.com.

I am so excited to share a delicious Gluten-Free Rainbow Bundt Cake recipe that you can make using a simple boxed mix, a little food coloring, and a few odds & ends from your pantry. This Rainbow Cake is made in a tube pan, versus a layered cake, and is a fun addition to your St. Patrick’s Day spread.

Walmart challenged me to share a St. Patrick’s Day project that you could create out of items from their store. You may remember my rainbow cakes in a jar that I created a couple of years ago. Now that I am eating gluten-free, I wanted to replicate the idea of a rainbow cake, but I wanted to do it in one pan and I wanted to make it a quicker process by using a cake mix.

Gluten-Free Rainbow Bundt Cake from MomAdvice.com. Gluten-Free Rainbow Bundt Cake from MomAdvice.com.

To make a vibrantly colored cake, I want to point out that it is really important to use good icing colors to achieve your rainbow cake colors. Over by the party supplies, you will find professional cake decorating supplies at Walmart. You want to purchase the Wilton Icing Colors. These concentrated gels offer a much brighter color than what you will find over in the baking section of the grocery section. I just use a toothpick to dip in the gel and then swirl it through my cake batter. You may need to do this a couple of times to achieve this level of brightness, but it still will take a lot less than the other brands of food coloring.

Gluten-Free Rainbow Bundt Cake from MomAdvice.com. Gluten-Free Rainbow Bundt Cake from MomAdvice.com.

When I decided I wanted to make this cake, I went through tons of tons of cake recipes to figure out how to layer the batter. My inspiration for creating my rainbow arch was from not martha and her Leprechaun Trap Cake that she created a few years ago. Her arch is so much more beautiful than mine. I highly encourage you to read her tutorial for a perfect arch and read mine for a just meh arch. That being said, do prepare this in a tube pan versus a bundt pan to achieve the best arch. 

Do you have a digital scale? I highly recommend purchasing one because it will make projects like this a million times easier. I have had mine for many years and I use it for both weighing packages and as a food scale! Be sure to tare it with the bowl on top to begin your measurements each time.

I used the measurements outlined by not martha for measurements for my batter:

  • 6 ounces – red
  • 5 ounces – orange
  • 4 ounces – yellow
  • 3 ounces – green
  • 2 ounces – blue
  • 1 ounce – purple
  • The remainder of the rest of the batter, leave it white.

To scoop batter into the bowls, I relied upon an ice cream scoop to scoop it into the bowls on the scale. To make pouring the batter easier, place the cake batter in a baggie in a tall glass and hang the opening over the sides of your glass. Pour your batter in and then seal the baggie. Just snip a corner of the baggie to begin pouring your batter into the pan.

Gluten-Free Rainbow Bundt Cake from MomAdvice.com.

Gluten-free cakes tend to be more delicate so you definitely want to let this fully cool before trying to work with it. The side that has all the beautiful vibrant colors is not the top of the cake. It is the bottom of the cake. I accidentally iced this side so don’t make my mistake. If you find that your cake is puffy on the bottom, use a serrated knife to even it up a bit so your cake is not lopsided.

Gluten-Free Rainbow Bundt Cake from MomAdvice.com. Gluten-Free Rainbow Bundt Cake from MomAdvice.com. Gluten-Free Rainbow Bundt Cake from MomAdvice.com.

I posted a picture of this cake as I was glazing it on Instagram. To quote myself, “I never go easy on the sprinkles. I consider them the jazz hands on my desserts.”

Who quotes themselves? Sorry about that!

Glaze and sprinkle this cake liberally!

Gluten-Free Rainbow Bundt Cake from MomAdvice.com. Gluten-Free Rainbow Bundt Cake from MomAdvice.com.

I was disappointed that I had iced the wrong side and that my purple didn’t get perfectly centered. I think it is one of those cakes that might take a little more practice. My friends didn’t seem to notice or mind my errors though because this was one yummy cake! I doubt your kids would notice or care either. It might be a fun one to try together!

I hope you love it as much as we did and I hope this tutorial helps you while you make your own gluten-free rainbow cake!

Gluten-Free Rainbow Bundt Cake
Author: Adapted from Not Martha
Prep time:
Cook time:
Total time:
Serves: 8
A gluten-free rainbow cake perfect for celebrating St. Patrick’s Day
Ingredients
  • 1 Hodgson Mill Gluten-Free Yellow Cake Mix (over by the gluten-free ingredients in the candy aisle of your store, not in the baking aisle)
  • 1/2 cup butter softened
  • 2 large eggs, room temperature
  • 1 cup buttermilk
  • 2 teaspoons vanilla extract
  • 1 package of Wilton Gel Food Colorings
  • 1 1/2 cups confectioners’ sugar
  • 2 1/2 teaspoons milk (or milk substitute)
  • 1/8 teaspoon salt
  • 1/4 teaspoon vanilla extract
  • 1 teaspoon butter
  • Rainbow Sprinkles
Instructions
  1. Preheat oven to 350 degrees. Grease a tube pan liberally with cooking spray.
  2. In a mixing bowl, cream butter until soft. Add cake mix and blend completely.
  3. Add eggs, buttermilk, and vanilla extract and beat until completely blended. The batter will be thick.
  4. Divide your batter into eight bowls using the measurements in this post and tint accordingly.
  5. First pour the larger amount of white batter into the pan. Then pour the red batter in, making it a wide ring of batter. Then pour the orange over that, keeping it inside the red. Pour in each color, creating smaller and smaller rings.
  6. Bake at 350 degrees for 40-50 minutes, testing with a toothpick to check when the cake is done.
  7. Once the cake is cooled, prepare your icing.
  8. Melt the butter and add to rest of ingredients. Mix until creamy.
  9. Spoon the glaze over your cake and finish with rainbow sprinkles.

Enjoy this tasty treat with a DIY Shamrock Shake and our free St. Patrick’s Day straw printable!

walmart_mom_disclaimer


Pin It

Gluten-Free Pancakes (With A Better Batter Coupon Code)

Tuesday, March 4th, 2014

Gluten-Free Pancakes from MomAdvice.com.

If there is one thing this girl loves, it is pancakes. Today I am sharing a recipe for gluten-free pancakes that taste as light and fluffy as our gluten-filled variety, but are perfect for creating for those who cannot tolerate gluten.

Gluten-Free Pancakes from MomAdvice.com.

Fluffy gluten-free pancakes are easier to create than you might think, it just requires the right measurements, a good flour, and a little milk on hand if your batter gets too thick. Before we made the switch to gluten-free, I loved to throw wheat germ into our hearty wheat-filled pancake. No wonder I felt so awful after our Sunday brunches!

Now we have substituted our wheat love-fest with flax seed in our pantry for our pancakes and energy bites, a deliciously healthy addition to just about anything, and still get that taste and texture that I love.  As with all my favorite pancake recipes, it is laced with cinnamon and vanilla while these pancakes get their sweetness from a little honey.

Gluten-Free Pancakes from MomAdvice.com.When I first discovered that I had to go gluten-free, my best friend recommended a book called, “Gluten-Free on a Shoestring.” (affiliate link) I treated myself to the cookbook for Christmas and loved that the author relied upon one all-purpose mix to make almost all of her recipes.

I placed my first order for Better Batter after reading it and started testing recipes with this cup-for-cup substitute shortly after buying it. None of us could believe how good everything had tasted and with very little adjustments in our favorite family recipes.

I immediately wrote the company and asked if they might be interested in a partnership. I truly believe in their product and how it can help beginner gluten-free chefs overcome their difficulties with baking. Not only did they send me some products for our recipes, but they also are offering valuable coupon codes for our readers to try their flour too.

Not only does the flour perform well, but it is much more affordable than other flours on the market. You can even buy their product in bulk to snag additional savings.

What are the Ingredients In This Flour?

The flour I have featured today is an an all-purpose flour substitute that you can use as a cup-for-cup substitute in your recipes. The packaging states that it contains: Rice flour, brown rice flour, tapioca starch, potato starch, potato flour, xanthan gum, and pectin (lemon derivative). It is the blend of these flours that makes it such a great performer in baking recipes. I hope that helps!

How Can I Save Money On This Flour?

I truly believe you will love this flour and am so excited that Better Batter is sharing some coupon codes with our readers to help them save even more. This month you can use the coupon code XNF6EBYK4JRT for $8 off ANY SIZE ORDER.

That’s right, I said ANY SIZE! 

I hope you can take advantage of the savings and can enjoy a stack of these delicious pancakes in your home!

Gluten-Free Pancakes from MomAdvice.com.

Gluten-Free Pancakes
Recipe Type: Breakfast
Author: Amy Clark
Prep time:
Cook time:
Total time:
Serves: 4
You won’t even miss the gluten with this delicious pancake recipe. Be sure to double your recipe so you can enjoy these all week long!
Ingredients
  • 2 cups Better Batter All-Purpose Flour
  • 1 teaspoon baking powder
  • 1 teaspoon baking soda
  • 2 tablespoons flax (optional)
  • 1 teaspoon cinnamon
  • 1 teaspoon salt
  • 2 teaspoons vanilla extract
  • 2 tablespoons honey
  • 2 eggs, lightly beaten & at room temperature
  • 6 tablespoons unsalted butter, melted and cooled
  • 2½ cups milk (or milk substitute)
Instructions
  1. Heat your griddle or nonstick pan and coat generously with butter.
  2. In a large bowl, place the flour, baking powder, baking soda, flax, cinnamon, and salt in and whisk to combine.
  3. Create a well in the center of the dry ingredients, and add the eggs, butter and milk, one at a time, blending well after each addition. Add vanilla and honey and continue to mix until the batter comes together and there are no lumps.
  4. Working quickly, ladle the pancake batter on the griddle surface, and allow to sit until bubbles begin to appear on the surface (2 to 3 minutes). Flip and continue cooking for another 1 to 2 minutes, or until the underside is browned.
  5. Remember that your batter thickens as it stands and may require more milk to keep your batter in a pourable consistency.
  6. Serve with fresh fruit and maple syrup.


Pin It

How to Find & Write Pen Pals

Tuesday, March 4th, 2014

How to Find & Write Pen Pals

Pen Pals are a beautiful thing in a digital age where pen, paper, the process of writing, and waiting are so hard in our fast moving culture. Today I wanted to share about our experience with finding and writing pen pals that I hope will inspire you to find a pen pal of your own for your child after hearing about our experience.

How to Find & Write Pen Pals How to Find & Write Pen Pals How to Find & Write Pen Pals

Walmart challenged me to come up with a fun Spring Break activity for kids and finding a pen pal for my children is something that I have thought a lot about doing. We found items in their office supplies section like writing tablets (for big and small children), pretty note cards, and freshly sharpened pencils. With these arsenal of tools, we are now ready to begin a new adventure for our kids.

How Do You Find a Pen Pal?

Finding a pen pal is oh-so-easy thanks to social networks like Facebook, Instagram, and Twitter. I posted on my Facebook page that we were looking for children in our child’s age range that did not live in the United States to be pen pals with. Within minutes, we had many people replying about friends and family that lived in other countries with kids just around our age.

Of course, if finding someone living out of the states is harder to come by in your inner circle, consider just finding families that live in other parts of the United States. A child shivering in the polar vortex of Indiana, for example, might find a child’s life in Florida or California quite inspiring!

How to Find & Write Pen Pals How to Find & Write Pen Pals How to Find & Write Pen Pals How to Find & Write Pen Pals How to Find & Write Pen Pals How to Find & Write Pen Pals

Encourage Your Child to Craft a Great Letter

Writing letters not only improves our vocabulary and spelling, but it also helps teach children about the give and take of conversation.

Talk with your child about crafting a great introduction about themselves and how to weave in questions to find out more about their new pen pal. When my daughter asked me if her pen pal had glasses, I told her that this would be a great question to ask her so she could look forward to her response.

How to Find & Write Pen Pals How to Find & Write Pen Pals

Have Your Child Explore Their Pen Pal’s Town

It is easier than ever to learn more about where someone else lives thanks to Google’s Street View and Wikipedia. Although there was no street view for our pen pal, who resides in Greece, we were able to take a peek at pictures of landmark items in her country and read facts about where she lived.

Knowing information like this helps to build those initial letters as you get to know more about each other.

How to Find & Write Pen Pals How to Find & Write Pen Pals How to Find & Write Pen Pals How to Find & Write Pen Pals How to Find & Write Pen Pals

Send Your Letters Off

Once we were done writing our letter, we got to practice addressing an envelope and then added a few decorative touches to the back of our envelope for our new friend.

Although we ran our letter out to our mailbox at home, a great Spring Break activity might be to take that letter to the post office and make it feel even more, “official,” when sending it.

Now we must wait patiently for our response from our new friend and when she writes back, it will be a happy day, indeed!

How to Find & Write Pen Pals

I hope this inspires you to find a few pen pals of your own. And as double inspiration, here is my childhood pen pal. We met at church camp and became best friends through our letters back and forth. I remember that sweet anticipation of the mail dropping through the mail slot of our home and ripping them open to read, then reread, then reread again the precious words from my friend. 25 whopping years later, she is still my best friend for life.

I already told Emily to save her money and hopefully she will have a friend like that in her pen pal who she can visit someday! You just never know- we certainly never did! I shall be very jealous of her trips to Greece, should that happen!

Here’s a little video we put together of Emily’s first pen pal letter! I hope you enjoy it and I would love to hear if you had a pen pal and what they meant to you?


walmart_mom_disclaimer

Pin It

DIY Shamrock Shake Recipe (And Free Straw Printables)

Thursday, February 27th, 2014

DIY Shamrock Shake Recipe (And Free Straw Printables)

DIY Shamrock Shake Recipe (And Free Straw Printables)

DIY Shamrock Shake Recipe (And Free Straw Printables)

St. Patrick’s Day is just around the corner!  This holiday makes me want to indulge in one of my all-time favorite treats… the oh-so-delicious Shamrock Shake. You don’t have to swing by your local fast food joint to indulge though because I have the recipe to this one and you can indulge in it for a fun family night treat any night of the week.

To grab the recipe for these easy DIY Shamrock Shakes, head on over to the Kenmore Blog to read all about these delicious treat.

Don’t forget to grab your free St. Patrick’s Day straw printables! Happy St. Patrick’s Day, friends!

Pin It

Gluten-Free Chicken Noodle Soup

Friday, February 7th, 2014

Gluten-Free Chicken Noodle Soup from MomAdvice.com

Going gluten-free is proving to be a fun adventure for me in the kitchen. This gluten-free chicken noodle soup recipe is just one example of an old family favorite that has been transformed into a delicious gluten-free version.

This week Walmart challenged me to create a great cold weather dish that you could create from items they have at their store. One of my favorite things to create with their ingredients is a weekly batch of soup. Not only is it the perfect cold weather dish, but it is the perfect “convenience food,” that I love to have on hand for nights when I don’t feel like cooking.

Gluten-Free Chicken Noodle Soup from MomAdvice.com

One item that I buy frequently there is their rotisserie chickens for all of my chicken-filled soups. It saves me some cooking time and I find that they bring a lot of flavor to my easy weeknight soups. They are priced at $4.98, which is about the same price as buying a whole chicken and cooking it from scratch, so I find it to be a good soup investment.

Gluten-Free Chicken Noodle Soup from MomAdvice.com

My biggest challenge has been finding a pasta that tastes like my old familiar white-floured starchy friend. We have sampled every variety of noodles under the son from corn blends to quinoa blends to rice blends. When I posted on Instagram that I was still on the hunt, Tinkyada was the brand that fellow gluten-free friends recommended. Friends, let me tell you, this was the closest pasta I have ever tasted to the real deal. The best part is that it is strongly made so it can withstand being reheated, unlike the other blends that fell apart in my soup.

I had been hunting for this in the pasta aisle at our store, but it is not in the pasta aisle. This pasta is over with the other gluten-free specialty foods, on the end of one of the candy aisles in our store. A pound of this was $2.87, while the fancier and not as appetizing pastas, were costing me over $4 and did not contain a pound.

For a pasta-filled soup, you only need half the bag (or approximately two cups of pasta). Since everything seems to cost an arm and leg if it is marked gluten-free, this is a pasta we all loved AND didn’t cost a fortune! Winning, I say!

Gluten-Free Chicken Noodle Soup from MomAdvice.com Gluten-Free Chicken Noodle Soup from MomAdvice.com Gluten-Free Chicken Noodle Soup from MomAdvice.com

To me, this looks like the perfect bowl of soup. I thought I would never have a good chicken noodle soup again after this gluten-free debacle of mine, but I am mourning the loss of my soup no more.

It is the ultimate cold weather comfort food dish! I hope you enjoy this one as much as we have!

Gluten-Free Chicken Noodle Soup
Author: Amy Clark
Prep time:
Cook time:
Total time:
Serves: 8
A gluten-free chicken noodle soup that is the ultimate cold weather comfort food dish. One pot serves many, so share this with someone in need!
Ingredients
  • 2 cups Tinkyada Rice Pasta Elbows
  • 2 tablespoons of olive oil
  • 2 stalks chopped celery
  • 3 chopped carrots
  • 3 tablespoons chopped garlic
  • 12 cups low-sodium chicken broth
  • 1 rotisserie chicken
  • Salt & pepper to taste
  • fresh parsley
Instructions
  1. Bring a large pot of lightly salted water to a boil.
  2. Add gluten-free elbows and cook 12-14 minutes. Drain and rinse with water. Set aside.
  3. Meanwhile, in a large saucepan or Dutch oven, saute the carrots and celery in two tablespoons of olive oil for five minutes to start your soup base. Add garlic at the end (to prevent burning)
  4. Add your rotisserie chicken and any drippings form the chicken to the pot, directly on top of your vegetables. Pour your chicken broth directly over the chicken to incorporate all of the good flavors.
  5. Heat up broth and bring it to a simmer.
  6. Reduce heat, cover, and simmer 15 minutes.
  7. Pull out your chicken and set aside to dice.
  8. Stir in noodles and diced rotisserie chicken, and heat through.
  9. Toss in a handful of fresh chopped parsley and ladle into bowls.

walmart_mom_disclaimer


Pin It

Gluten-Free Olympic Doughnuts

Thursday, February 6th, 2014

Gluten-Free Olympic Doughnuts from MomAdvice.com.

If there is one thing you know our family loves it is doughnuts. In honor of the upcoming Olympics, I am sharing a delicious gluten-free baked doughnut recipe that you can bake up as a treat for those opening ceremonies. This gluten-free doughnut recipe is as easy to put together as our other wonderful doughnut recipes and are so fun to decorate for the holiday.

Today’s project is sponsored by Walmart. Almost everything you need for this project can be found at their store!

Gluten-Free Olympic Doughnuts from MomAdvice.com.

One thing you will need to create these doughnuts is a doughnut pan. When I first started baking doughnuts, you had to order an item like this online and through specialty shops. Now you can find it right on the shelves at Walmart, in the same aisle as your cookie sheets & baking pans. The price on their Wilton doughnut pans is $7.19.  I have two of them because most recipes yield 10-12 doughnuts and it saves me time in the kitchen. These two pans have paid for themselves over and over again for our occasional sweet weekend treat!

Because I am new to gluten-free baking, I am using a gluten-free all-purpose mix to save me time in the kitchen. I bought a batch of Better Batter for my pantry and I have found that it is yielding impressive results for all of my baking needs. Buying it online from the company in bulk has saved me some money and storage in my pantry, thanks to not needing to buy multiple flours to blend. The bonus is that this mix does contain the Xanthan gum right in it. If your mix does not contain this, you will need to add that ingredient separately.

These doughnuts are light, fluffy, & sweet. The first things my kids remarked on was the spice in them. Although there is just a pinch of nutmeg, this ingredient really pulls through in the doughnut. For non-Olympic doughnut events, a sprinkle of powdered sugar on these is a delightful morning treat.

Gluten_Free_Baked_Olympic_Doughnuts-5

To make your Olympic-themed glazes, I simply made one batch of my favorite glaze and then added food coloring to each dish to reach the desired color. To achieve your black, if you are just working with a standard set of food colorings, equal portions of blue, yellow, and red will help achieve the color you are after.

Gluten_Free_Baked_Olympic_Doughnuts-4 Looking For More Fun Ideas to Celebrate the Olympics? Let’s take a peek at some more fun (and frugal!) ideas!

Fun Ways to Celebrate the Olympics

Olympic Medal Cookies

What could be sweeter than receiving an Olympic medal? How about an Olympic Medal filled with a cookie? AlphaMom offers this sweet little Olympic craft to do with your little ones. Stumped for a cookie idea?  I highly recommend an Oatmeal Chocolate Chip Sea Salt Cookie for your medal filling!

Olympic T-Shirts

Dress up a white t-shirt to dress up for the Olympic games. with a simple painted ring pattern on an inexpensive thrift store shirt, this is a craft that is easy enough to do with kids of all ages. Kate’s Creative Space offers this fun craft idea to her readers to celebrate the games.

DIY Olympic Torch

What child doesn’t dream of carrying around their very own Olympic torch. Hoosier Homemade showcases a fun craft that you can do to create your very own Olympic torch made from some commonly found items at your local craft store.

Olympics Party Fun

Why not throw a party for your family or for a group of families to celebrate the Olympics? A Small Snippet has you covered with everything from patriotic foods to great Olympic game ideas to play together, to fun ideas for decorations that don’t cost a lot.

 Olympic Torches Made From Recyclables

If hitting your craft store for supplies to make an Olympic torch isn’t in your budget, this Olympic Torch from The Idea Room is made from common items you have in your home and recyclables. These torches are made from a paper plate, a paper towel roll, and red & gold tissue paper. This is one that even the smallest child can do. Be sure to lift these high and participate in your own round of fun family Olympic games.

Olympic Rings Necklace

Even moms can jump in on the Olympic excitement with this cute craft, from Remarkably Domestic, for an Olympic Rings Necklace. This necklace is made from simple rings covered in Chinese knotting cord to create those Olympic rings everyone loves so much. This would be a fun craft to do while watching your favorite games this year!

However you celebrate the Olympic games this year, I hope this post inspires you for your Olympic game watching!

Gluten-Free Olympic Doughnuts
Recipe Type: Breakfast
Author: Adapted from Food & Wine Magazine
Prep time:
Cook time:
Total time:
Serves: 10
These gluten-free doughnuts are so easy to make and can be a fun snack to share while watching the opening ceremony this year!
Ingredients
  • 1 1/2 cups all-purpose gluten-free powder (I recommend Better Batter Flour)
  • 1 cup sugar (next time I may adjust to 3/4 cup sugar)
  • 2 teaspoons baking powder
  • 1/4 teaspoon nutmeg
  • 1/2 teaspoon salt
  • 2 large eggs, at room temperature
  • 1/4 cup canola oil
  • 1/2 cup whole milk
  • 1 teaspoon vanilla
  • 1 cup confectioners sugar
  • 2 tablespoons hot water
  • 1/2 teaspoon vanilla, butter, or almond extract
  • Betty Crocker Food Coloring Set (over in the baking aisle)
Instructions
  1. Preheat the oven to 350º and spray two nonstick 6-cavity doughnut pans with nonstick cooking spray.
  2. In a large bowl, whisk the flour with the sugar, baking powder, nutmeg and salt
  3. In a medium bowl, whisk the eggs with the oil and milk until smooth; add to the flour mixture and whisk until combined.
  4. Spoon the batter into 10 cavities of the prepared doughnut pans until about three-quarters full. Bake for 18 to 20 minutes, until a toothpick inserted in the center of a doughnut comes out clean.
  5. Let the doughnuts cool.
  6. In a bowl, mix together the confectioners sugar, hot water, and flavoring. Divide the glaze into five bowls and create your colors for the doughnuts. Dip or spoon the glaze over the doughnuts and allow the glaze to harden.


Pin It