Archive for the ‘My Work’ Category

Grilled Tomato Bread with Prosciutto

Thursday, May 29th, 2014

Grilled Tomato Bread with Prosciutto

Tomatoes are one of my favorite summer foods and I try to incorporate them into almost every dish we eat. The fresh burst of flavor compliments just about any dish whether it is a garnish to our favorite pasta dishes, a fresh sauce, or a flavorful addition to our summer salads.  When I was pregnant, it was the food that I most craved with a drizzle of olive oil, a generous shake of salt, with a red wine vinegar finish. Although I am far from those years in my life, it is still my favorite summer craving.

Each month Walmart challenges me to create something in my kitchen with an item from their produce department. Today’s piece is dedicated to the fun varieties of tomatoes you can find in their produce department.

Cherry Tomatoes

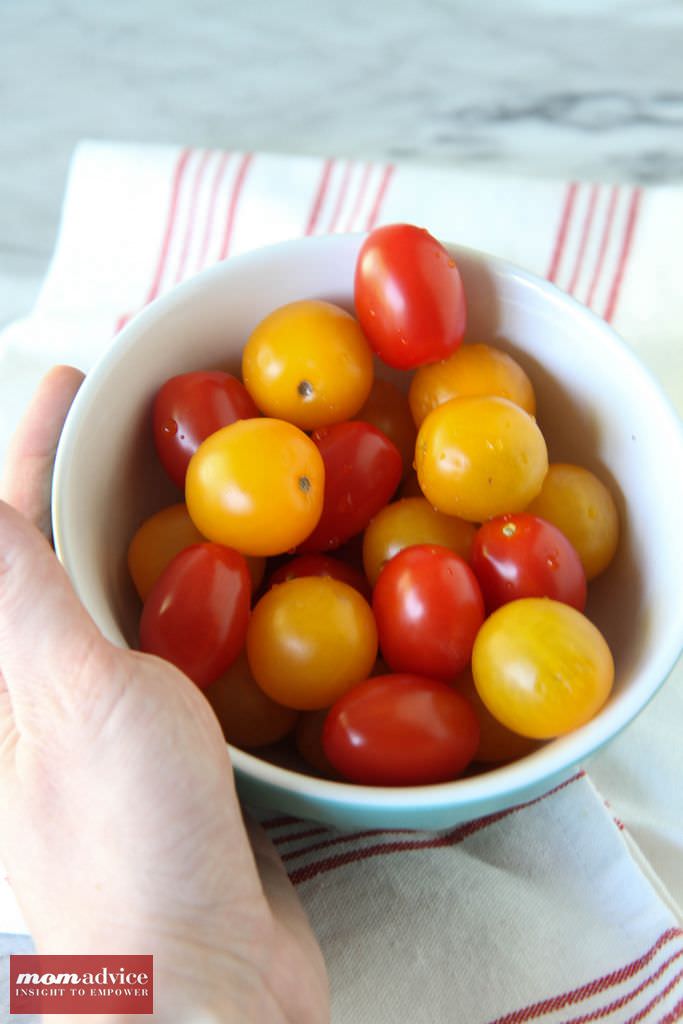
We can all get in a rut when it comes to selecting our produce, myself included. Although I am a fan of my cherry red tomatoes, I incorporated some of these delicious yellow tomatoes into my dish today to add even more color to this easy summer appetizer.  I love to challenge myself to try the new varieties of fruits and vegetables out there and, especially this time of year, there is always so much to love!

Grilled Tomato Bread with Prosciutto

Grilled Tomato Bread with Prosciutto

Grilled Tomato Bread with Prosciutto

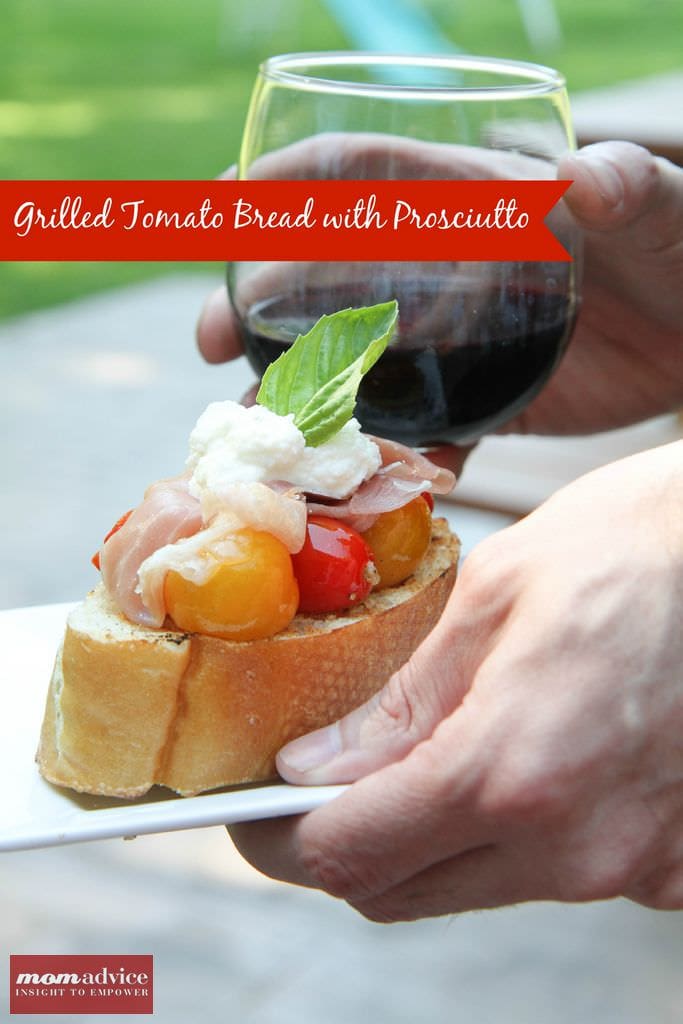
Today’s recipe is for a very simple Grilled Tomato Bread with Prosciutto that requires just a few ingredients and can all be done out on your grill.

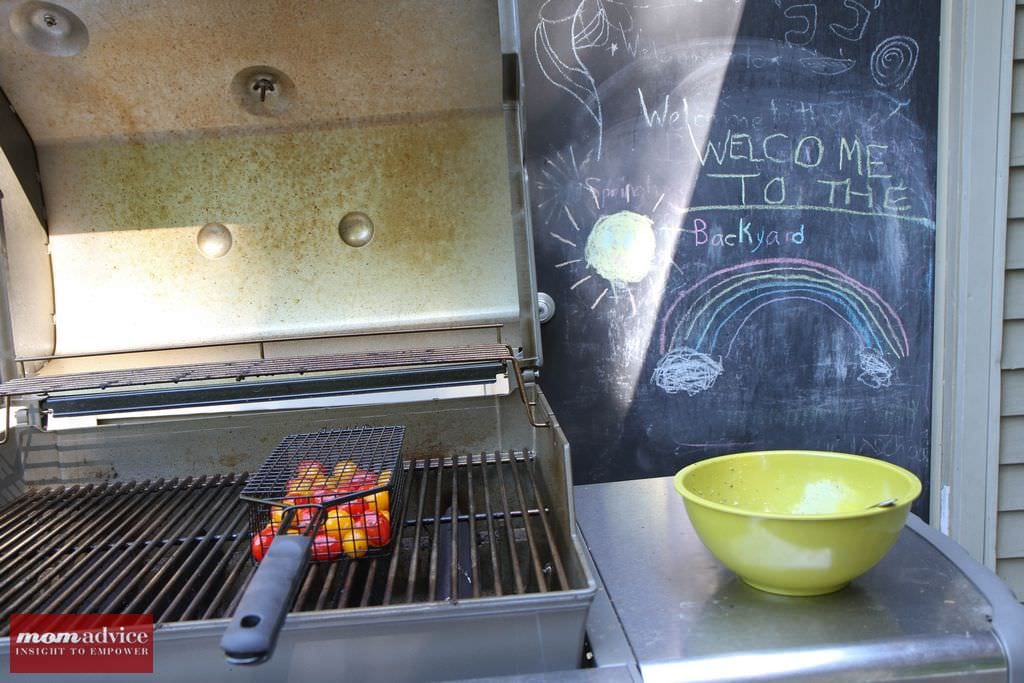
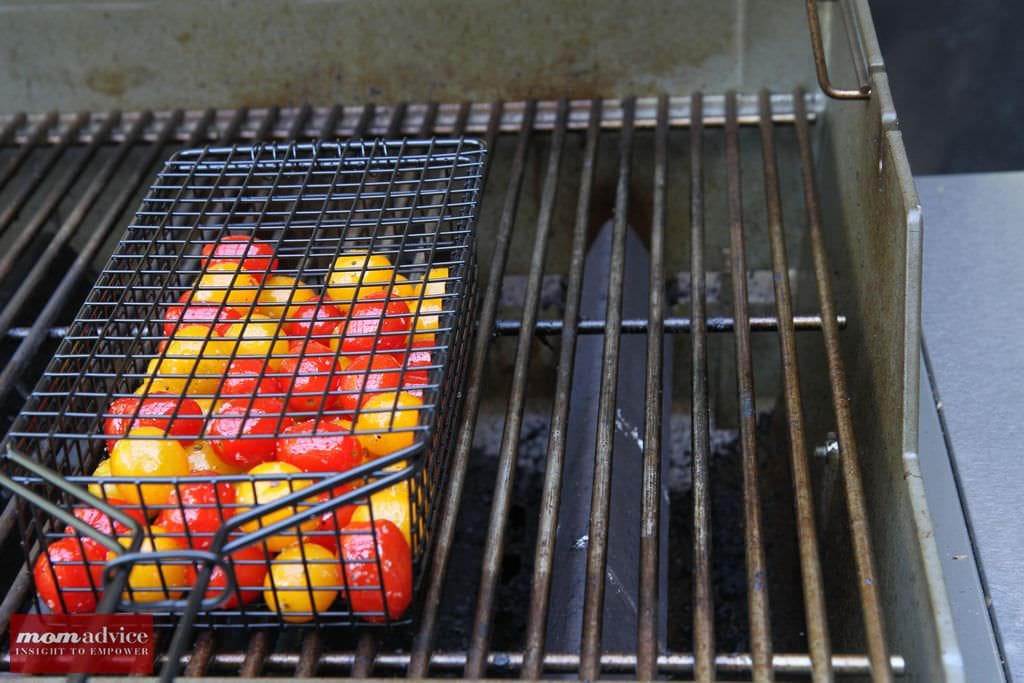
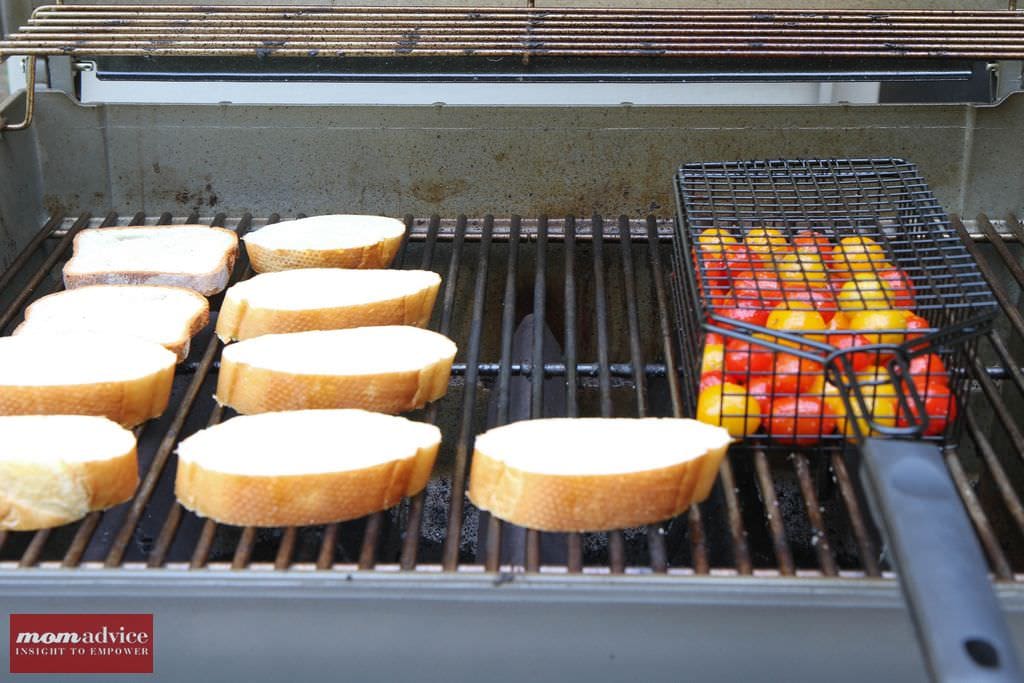
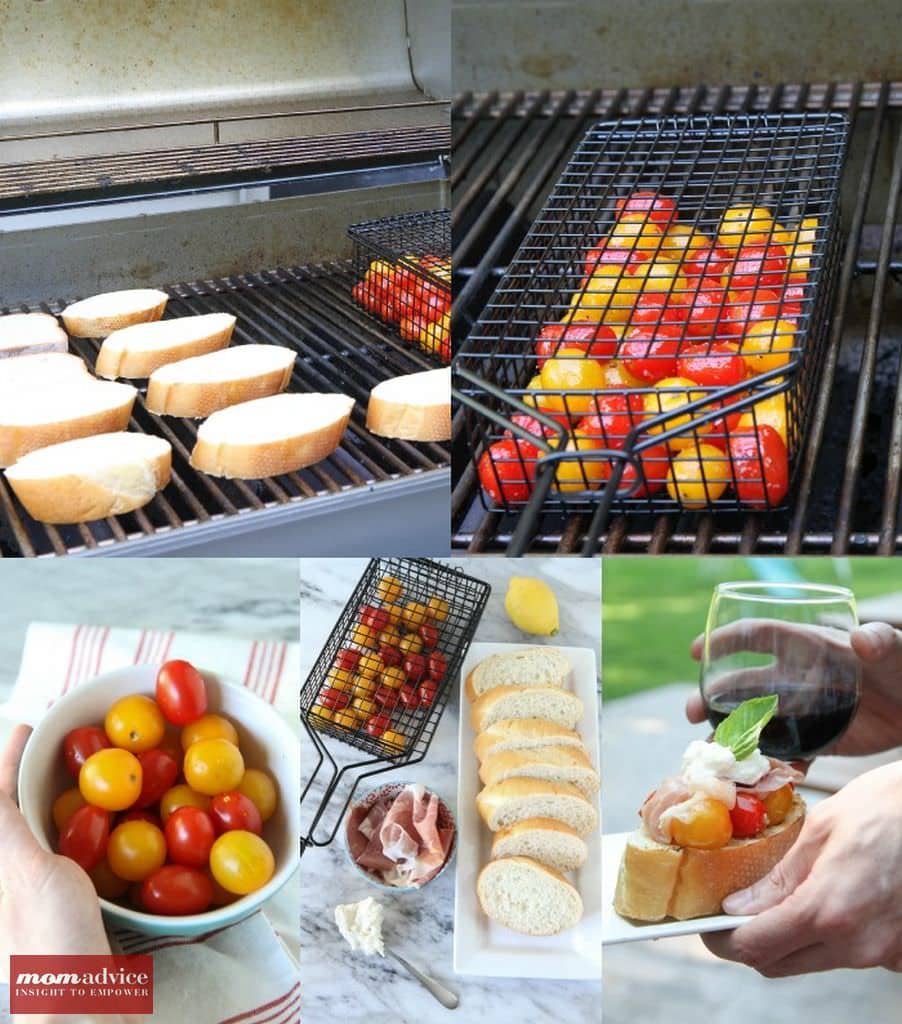
Have you ever grilled tomatoes before? It adds a layer of smokiness to the tomatoes, warming them and bursting the skins to create a sauciness to the bread.  I found this recipe that Bobby Flay created and he recommends grilling the tomatoes on high heat, until they are charred. I prefer a gentler heat with less charring, but I think that is a matter of one’s own personal taste. I recommend getting one of these grilling baskets for your veggies (and fish!) or purchasing a package of disposable grill pans for preparing these tomatoes all summer long. Not only are they delicious on top of bread, but grilled tomatoes can be flavored with any variety of herb in your garden or spiced up with your favorite dried spices and stand alone as a side dish with your favorite grilled meats!

Grilled Tomato Bread with Prosciutto

Even though the recipe calls for a loaf of crusty French Bread, I also toasted up some gluten-free bread for myself so I could enjoy this appetizer with the family. If you want to keep it fancy, purchase a gluten-free baguette, but I found that with so many flavors in this appetizer, that my regular loaf helps hold this appetizer together and offered a sturdy base for my overflowing of tomato topping.

Although the ingredient list couldn’t be simpler- cherry tomatoes, ricotta cheese, a fresh loaf of bread, prosciutto, and a little lemon juice, this appetizer is both impressive and satisfying. The saltiness from the meat balances the acidity from the tomatoes & lemons, while also incorporating the sweetness of the tomato with the creaminess of  the cheese. We paired this with our favorite red wine, but it would also pair beautifully with a glass of sangria or a mojito for a lighter combination.

No need to heat up the kitchen for this summer appetizer and it is a beautiful one to create for your next barbecue and shared with friends & family!

Grilled Tomato Bread with Prosciutto

Grilled Tomato Bread with Prosciutto
Recipe Type: Appetizer
Author: Adapted from Food Network
Prep time:
Cook time:
Total time:
Serves: 12
An easy and impressive appetizer that you can create entirely on the grill!
Ingredients
  • Cherry Tomatoes (in red & yellow), total of one pint
  • Olive oil
  • Salt and freshly ground black pepper
  • 2 cloves garlic, finely chopped
  • 12 slices French bread, sliced 1/2-inch thick slices (can substitute with gluten-free bread)
  • 1/2 cup ricotta cheese
  • 12 slices prosciutto
  • 1 lemon cut in half
  • Basil for garnish
Instructions
  1. Heat grill to medium heat.
  2. Toss tomatoes in oil and season with salt and pepper in a small bowl.
  3. Place on the grill in a grilling basket and grill until softened, turning a few times, about 10 minutes.
  4. Remove to a bowl.
  5. Crush the garlic with a little salt to form a paste and add to the bowl with a few tablespoons of olive oil.
  6. Brush bread with olive oil. Season with salt and pepper, and place on the grill. Grill the bread until lightly golden brown on both sides, about 20 seconds per side.
  7. Combine the ricotta with a little olive oil in a small bowl and season with salt and pepper. Mound some of the tomato mixture on the bread. Lay prosciutto on top. Dollop with some ricotta mixture and garnish with lemon juice squeezed over the top.
 Adapted from Food Network walmart_mom_disclaimer
Pin It

DIY Bike Makeover Ideas

Thursday, May 22nd, 2014

DIY Bike Makeover Ideas


With warmer temperatures on the horizon, I am looking forward to spending lots of time biking with my kids this summer.

Is there anything that makes you feel like a kid again like riding on a bike? I think not!

Today’s post offers 7 ideas for a DIY Bike Makeover that you can do on a bike you already own or on a bike that you might like to purchase from your local thrift store or at a garage sale.

Did you know that Goodwill has bikes?

I often see them lined up outside of our store and I had been dreaming of buying one and updating it with a few embellishments and spray paint of my own.

As I had been dreaming and bookmarking my plans, my husband secretly surprised me with a bike to celebrate selling my first book.


Here is a picture of my new baby.
Don’t worry, I always wear shoes and a proper helmet, but this is the moment that we captured when I first got my bike.
I still plan to add a few embellishments to my bike basket and can’t wait to put a few more miles on her so I still flip through my upcycling inspiration boards to add my own personal touch to her.
To inspire you (and me!) I have pulled together seven ideas that you could try for customizing a bicycle of your own.
May I also say, as a mother to a very girlie-girl, that this is also a great way to transform a BOY bike to a GIRL bike with a little spray paint, duct tape, or even fabric!
Let’s get dreaming!

Add a Knitted or Crocheted Embellishment

I am a knitter so I can appreciate any good craft with yarn especially when it comes to knitted or crocheted embellishments.

If your bike basket is lacking a little sparkle, consider knitting or crocheting some beautiful flowers like claireabelle makes.

My favorite resource for knitted/crocheted embellishments is to visit Ravelry and sign up for a free membership and search through their patterns for flowers.

I sort them by FREE patterns so that I don’t have to spend a lot to create something new and it is a great way to stash bust yarn you already have or to put to good use donated yarn from Goodwill!

Make a Brand New Bike With Duct Tape

Duct tape and washi tape crafts are a hot trend this Spring and what could be easier than recovering a bike with a little duct tape?
Simply pick out a few different patterns and cut strips to recover your bike like Skunkboy did in their tutorial.
This craft is fantastic for kids that have outgrown the patterns on their bike or for redoing a boy bike into a fresh girl version, or a girl bike into a more masculine looking bike.
The best part is that this craft is simple enough that your children could do it and the cost is minimal for a brand new new-to-you bike!

Recover With Fabric & Ric-Rac

Fabric is one thing that is in abundance at our local thrift store whether it is from houseware items, clothing items, or even fabric from someone’s abandoned sewing hobby.
That is why I love this adorable bike makeover on poppytalk that transforms a bike into a thing of beauty by covering it in fabric.
I also love the added details of a freshly painted metal basket and a ric-rac trim to really pull out the beautiful colors of the fabric-covered bike.
Aren’t you in love with this one too?

Add Some Ribbon Tassels

Tricycles need a little love too and I remember as a kid how much fun it was to have my ribbon and glittered tassels blowing in the wind while I rode my bike, and the sounds as they flapped through the breeze.

If your child’s ribbon tassels are looking a little sad or you want to add that special flair to a Goodwill bike, consider making your own ribbon tassels with this fabulous ribbon tassel tutorial from Northstory, made from wooden golf tees and a variety of cute ribbons!

Crochet a Cute Seat Cover

Who says the seat on your bike needs to be boring?

Why not put your needlecraft skills to good use and crochet a seat cover for your bike?
I am in love with this fabulous pattern created over at And Sew We Craft for dressing up your bike seat.

Consider spray painting your bike in a similar theme to the yarn or yarn bomb your bike by wrapping yarn around the different metal parts or handles.

This seat cover would also be cute paired with those knitted embellishments that we talked about on our basket!

Create a Fabric Bunting

Is there anything that DOESN’T benefit from a bunting?

Surely not!
I think this fabric bunting would be a cute one to try for bike parades for the 4th of July in a red, white, & blue for the holiday.
Once again, claireabelle makes shows off a cute tutorial for sewing a simple fabric bunting to add to your bike basket!

Spray Paint, Spray Paint, Spray Paint

There are two things that this girl can do- hot glue it up or spray paint it up.
There is very little that doesn’t get a coat of spray paint in our house although I try to avoid painting my children (but often end up painting myself).
I adore this bike makeover using spray paint that was created by We Can Make Anything.
There is nothing that freshens up a bike more than a fresh coat of paint.
This is a great DIY to try if you love the bones of a bike at Goodwill, but aren’t crazy about the paint job.
The best part is that spray paint requires zero craft skills and it is inexpensive to purchase!
Before I wrap up this piece, I just wanted to remind you that even the parts from bikes can be used in beautiful and creative ways.
Victorious Living shows off an adorable way to use a bike wheel for displaying pictures or even your to-do list.
I think this would be such a fun addition to our office and I am going to be on the lookout for a wheel of my own to use!

Have you ever made over a bike? Tell us how you made your own bike special!


This post contains affiliate links.


Don’t miss these other great posts from MomAdvice.com:


How to Spray Paint Furniture


Yarn Wrapped Letters Tutorial


Crafting with Vinyl


DIY Bar Cart 


Sign up for the MomAdvice newsletter

Pin It

5 Ways to Use Kids ‘N’ Pets Stain & Odor Remover #mommusthave

Thursday, May 8th, 2014

5 Ways to Use Kids ‘N’ Pets Stain & Odor Remover

*This post is sponsored by Kids ‘N’ Pets Stain & Odor Remover

This was a big year for our family because we adopted a beautiful little kitty named Lulu from the shelter.  Our kids fell madly in love with her and we were so excited to bring her home and make her a part of our family. The kids even threw her a birthday party this year! When we got her home though, we soon realized that Lulu had some difficulty adjusting to our family.  She had some accidents and seemed nervous and stressed around us. She didn’t like being alone and she let us know how unhappy she was when we had been gone all day.

We had testing done at the vet clinic and even had a meeting for behavioral therapy. Having a pet that is struggling to adjust in your home and is wreaking havoc on your house is extremely stressful. After some behavioral therapy, we were able to modify her behavior, which has relieved a lot of stress for all of us.  She is doing so much better and we are so thankful, but removing pet odors and feeling at peace in my home again was tough.

When Kids ‘ N’ Pet contacted me, I knew that we would be the perfect family to test their Kids ‘N’ Pets Stain & Odor Remover.  Not only did we have a history of pet stains, but I have two messy kids who could help me test their cleaner. They sent me the cleaner to try and I have been using it for the last month on my house with wonderful results.  I am genuinely excited to share about this product with you and can’t recommend it enough.

Kids N’ Pets cleaner is non-toxic and biodegradable,  made from high speed natural enzymes, isopropyl alcohol, surfactant Ordenone, water and a natural citrus scent.  Thanks to this formula it is safe to use around your kids and furry friends without worries.  The cleaner is also one of those great all-in-one cleaners that doesn’t take up a lot of space on your shelves, but packs a punch by performing a multitude of tasks including removing stains, odors, boosting your laundry, and cleaning carpets.

Today I want to show you 5 ways we used Kids ‘ N’ Pets Stain & Odor Remover in our home this month!

5-ways-to-use-kids-n-pets-cleaner

  • Spot Clean Your Couches- Do you get MYSTERY stains on your couches that you wonder if someone may have used your couch as a napkin or as a tissue for their nose? I don’t either. That’s disgusting. If you did though, I would tell you that this cleaner works fantastic on those types of stains on your couches and leaves your couch looking and smelling fresh. You will want to test for colorfastness by applying the cleaner on a hidden area and allowing it to dry first, especially if you are the kind of family that buys fancy couches. We are the kind of family that knows that our couch is going to be used as a napkin and a tissue on occasion, so that is why we used this with no problems at all.  The product also gets out red wine and coffee stains…if you are that kind of mom sitting on your couch after the kids goes to bed trying to soothe yourself. Again, this is completely hypothetical.

Bissell_DeepClean_Premier_Carpet_Cleaner_Review_2

  • Freshen Up Your Carpets- As I illustrated in my story above, our carpets really needed freshening up and if you are dealing with pet stains, you want to make sure that your pets are not coming back to their spots of habit and wreaking more havoc on your home. We have used other products, but often the overly powerful scents meant to mask the urine odors were just as painful. While this has a citrus scent, it dissipates quickly, leaving everything smelling fresh. You can treat stains on your carpet directly with Kids ‘N’ Pets or you can put sixteen ounces of the cleaner per gallon of water in your Carpet Cleaner and freshen your carpets up in one fell swoop. After cleaning up Vomitfest 2014 from my cat this weekend, I can attest that this cleaner performs beautifully, but I really wish that I could not attest to that scenario at all. The cleaner also works like a dream on hardwood or on tile.
  • Get Your Laundry Really Clean- As you know, I love to make my own laundry detergent and I try to use cleaners and products that are safe for our family in our home.  When doing a load of whites, my homemade detergent needs a little boost and Kids ‘N’ Pets works great in our laundry loads. You just add a cup of it to your regular wash load and it helps get your whites whiter and your colors brighter.  If your child also likes to carry around pencils in his pockets and didn’t empty them and everything got marked with pencil, this cleaner also works wonderfully to remove stains, even after they have gone through the load. Ideally, you want to pre-treat them and spray them on the stains and let it work for a few minutes, but you can also spray after, like my scenario, and leave it on for an hour or more to really cut through tough stains. It might not help with your angry yelling when you see the pencil on top of your load and your new workout gear covered in pencil. suitcases
  • Freshen Up Your Suitcases- Did you loan your best friend your suitcase to take to Mexico? That might have been a mistake. Instead of crying about how bad baggage claims messed up your luggage, consider spraying it down with Kids ‘N’ Pets to make your luggage look like new again.  Spray generously, wait ten minutes, and blot up the stains with a cloth. Within twenty minutes, my luggage looked almost like new and ready for another trip to Mexico…or not.
  • Care for Your Fur Baby- Sharing our struggle with you about pet stains is embarrassing, but I am sure our situation is a common one for pet owners. Not only does Kids ‘N’ Pets get out urine stains, but it also can be used to clean pet cages (hello, guinea pig owners!), can be used to clean out your litter boxes, and can clean the areas in your home your pets frequent. Have a pet bed that needs a little freshening? Give it a spray with Kids ‘N’ Pets and allow it to air dry. It will smell fresh in no time flat!

I also love companies that support great causes and Kids ‘N’ Pets works with participating pet adoption organizations nationwide, providing products and services that help pet foster families and pet adopters! As someone who just adopted a shelter animal, that really makes my heart happy!

I love this cleaner and I hope you can give it a try in your home- I consider it a #mommusthave. You can find this product at Amazon or Walmart!

*This post is sponsored by Kids ‘N’ Pets Stain & Odor Remover

Tracking Pixel

Pin It

How to Make a Succulent Centerpiece

Saturday, May 3rd, 2014

How to Make a Succulent Centerpiece from MomAdvice.com

You may think, “Who am I reading? I thought she couldn’t take care of anything (even herself?)!  Well, surprise, SURPRISE, I am showing you an easy DIY succulent centerpiece today and wanted to share with you a few tips on caring for succulents. I think I got my confidence back this year after creating that terrarium for you all and now I think I am some kind of green-thumb-ish-person and I want to take you along on my journey. In all honesty, I worked many a summer in a greenhouse, but I had lost my love of plants when I started changing diapers, cleaning a house, and feeding a family. Maybe you felt the same way?   Today’s project was sponsored by Walmart and they asked me to showcase a fun creation you can make for your own backyard from their gardening department and I thought I would highlight a plant I am kind of crazy about right now…the succulent.

Painted Succulent Pictures

Have you seen a painted succulent before?  True green thumbs may cringe at the painted plants, but (as I illustrated above) I am a newbie to the houseplant world and I love anything that is painted. These succulents have been painted which I think can add a pop of color to your home or as an outdoor centerpiece for your outdoor table, as I am showing off today.

How to Care For Your Succulents

Succulents don’t need a lot to survive, but they do have some small requirements- a lot of light, thoughtful watering, and a little plant food every couple of weeks.

A  succulent is any plant with thick, fleshy (succulent) water storage organs. Succulents store water in their leaves, their stems or their roots. These plants have adapted to survive arid conditions throughout the world, from Africa to the deserts of North America.These plants can take many different leaf forms and plant shapes, including paddle leaves, tight rosettes, and bushy or trailing columns of teardrop leaves.

Light- 

The one requirement I worry about in my home is the lighting conditions because my house doesn’t get a ton of light in it. If you have a home with bright sunny windows, succulents are a perfect houseplant option.

Succulents prefer bright light, such as found on a south-facing window. Succulents will let you know if you are not putting them in an ideal location. Some species will scorch if suddenly exposed to direct sunlight. Their leaves will turn brown or white as the plant bleaches out and the soft tissues are destroyed. If the plant is not getting enough light, succulents will begin to stretch, with an elongated stem and widely spaced leaves. Many varieties of succulents will thrive outdoors in the summer and, depending upon your weather, this might be a better option.

Water-

Most people think that they don’t need to water their succulents very often, but in the Spring & Summer months, succulents actually need more water than they do in the Winter & Fall. Make sure to water your succulents often in the summer.  Allow the potting mix to dry between waterings, but do not underwater. During the winter, when the plants go dormant, cut watering back to once every other month. Really, the watering is probably the most tricky part about succulents!

Fertilize-

Make sure that you purchase some houseplant fertilizer while you are at the store. In the Spring & Summer months, fertilize your plant every two weeks.  Just make sure you stop fertilizing in the winter months.

How to Make a Succulent Centerpiece from MomAdvice.com

Now that we know all about succulents, let’s make a cute centerpiece for our outdoor table!

Supplies Needed

3-4 Succulents (painted or not)- these are priced at $6.88 each

Gold Spray Paint

White Spray Paint

Inexpensive Pizza Pan (this was just $.92)

Painters Tape

How to Make a Succulent Centerpiece from MomAdvice.com

Directions

1. Remove plant in plastic pot from the clay pot. Remove stickers. Hold your can 8 inches away from your surface and spray in a sweeping motion side to side with a slight overlap. It has always been my experience to go thin with the paint, allow it to dry, and then to add another layer for the best results and minimal drip. Allow the paint to dry for one hour.

2. Using your painters tape, tape off anywhere you would like to have some gold peeking through. You can do a paint dipped pot and do the bottoms, trim the top in gold, or create your own unique paint effect with geometric taping. Spray paint those parts gold and allow your pots to dry.

3. Finally, spray paint your pizza pan gold.

4. Once it is dry, pull everything together and display it on your outdoor table for a unique centerpiece.

How to Make a Succulent Centerpiece from MomAdvice.com

How to Make a Succulent Centerpiece from MomAdvice.com

How to Make a Succulent Centerpiece from MomAdvice.com

How to Make a Succulent Centerpiece from MomAdvice.com

Have any tips for succulent care or selection? Feel free to leave them here- I’d love to hear about your experience with these plants!

walmart_mom_disclaimer

Pin It

How To Print Waterlogue Pictures

Thursday, May 1st, 2014

How To Print Waterlogue Pictures from MomAdvice.com.

I am so excited to share with you today’s tutorial on how to print Waterlogue images for easy and beautiful gifts for someone special in your life. With Mother’s Day just around the corner, the Waterlogue app is a great way to make beautiful watercolor prints for a favorite mama in your life.

Walmart challenged me to showcase a budget-friendly gift to give for Mother’s Day and I just knew that I had to show you how to do this so you can make beautiful images for a special lady in your life or as a gift to yourself. To get started, you will need to download the Waterlogue App ($1.99). The app is compatible with the iPhone, iPad, or iTouch. Once you have downloaded it, we can begin creating our art.

How To Print Waterlogue Pictures from MomAdvice.com.

How To Print Waterlogue Pictures from MomAdvice.com.

I took my kids in the backyard and had them pose for me. I wanted to get one of the back of them or a side angle. Although sometimes the app looks amazing with faces directly to the camera, I find that it can be a little tricky picking the right filter and I wanted to insure we had good success. I suggest trying a couple of different angles so you can play with the filters until you find the perfect one.

This is the picture that I took with my DSLR, but I did not make any edits to the image. I just wanted to make sure that it was nice and crisp for the app, but you can definitely just shoot with your iPhone too!

How To Print Waterlogue Pictures from MomAdvice.com.

To begin, tap on the camera to take a picture or import from your library. Since I took my photo with my DSLR, I emailed the photo to myself and then saved it to my phone to use for this. Next, you will want to select a filter. Each of the filters offers a different feel to your photos so have fun playing around with all the different options- there are twelve in all!

How To Print Waterlogue Pictures from MomAdvice.com.

As you scroll through the film strip at the bottom, you will have a couple of other options for making your picture. One is how dark or how light the brushstrokes are in your photo. Try out the different options before finalizing your picture.

How To Print Waterlogue Pictures from MomAdvice.com.

As you continue to scroll through the film strip, you will also see the option to select the size of the brushstrokes.  This is not the file size, this is just the size of the brushstrokes which can be a little confusing.

The final selection you can make on the film strip is if you would like a border or not on your image. I decided to leave the border off.

Click the HEART (above the filmstrip) to head to SETTINGS (you will need to scroll all the way to the other end of the options on the bottom row.  Click SETTINGS and then change your file size to LARGE.  From this menu you can SAVE TO PHOTOS or just click MAIL to email the file to yourself. 

How To Print Waterlogue Pictures from MomAdvice.com.

Once you have emailed the file to yourself you can open and print it just like a regular picture since it is in JPEG format.  Click the size of picture you want to print and simply print it on heavy-duty cardstock. You can find this over by the printer paper in the office supplies section of the store.

How To Print Waterlogue Pictures from MomAdvice.com.

Now that you have your picture,  you can place it in an inexpensive frame. I found these Better Homes & Gardens frames for a little less than $10 in the housewares. You will need to trim your image a bit, and you can use your removable mat to help figure out how to center and trim it. Place the picture inside and tie it with a little grosgrain ribbon for mom with an inexpensive bouquet of flowers.

How To Print Waterlogue Pictures from MomAdvice.com.

I hope you guys have the best time creating your own artwork and I hope this idea inspires you for an easy gift for someone special in your life!

For more great Mother’s Day gift ideas, check out these easy DIY Mother’s Day Gift Ideas!

Have you used the Waterlogue App before? What are you doing with this fun app?

walmart_mom_disclaimer

Pin It

3 Rainbow Science Experiments for the Legends of Oz: Dorothy Returns Movie

Tuesday, April 22nd, 2014

3 Rainbow Science Experiments

*This post is sponsored by Clarius Entertainment. All thoughts and opinions are my own.

In honor of the upcoming animated film release, Legends of Oz: Dorothy Returns, I am sharing three fun rainbow experiments you can try with your kids. These rainbow experiments are not only fun, but also educational. Before we begin these rainbow crafts though, I have to share with you that I have two major obsessions that you might not know about.

The first is anything to do with Oz and the characters. If you don’t believe me, here is the only year I asked my kids to do my dream costumes… and the only year I ever got away with it.

Wizard of Oz Halloween Costumes

This was my dream Halloween year as a mom and my mother-in-law even helped make the costume for me. Basically, all perfect Halloween dreams come true.

I miss those days.

The other thing you should know is that I am an enormous fan of Lea Michele and anything and all things related to Glee. I run to a Glee playlist, I pretty much cry about every emotional thing on that show, I sleep in a Glee shirt (yes, I do!), and Lea is my favorite actress in it. When I heard that not only was a Legends of Oz movie coming out, but that Lea Michele was doing the voice of Dorothy for it, I was beside myself with excitement.

I will be first in line to buy my tickets. And I will probably pre-order my tickets at my theater. That’s how excited I truly am!

Legends of Oz: Dorothy Returns

In the animated film, Legends of Oz: Dorothy Returns, Dorothy is called back for another adventure in Oz.  After waking to post-tornado Kansas, Dorothy (Lea Michele) and Toto are whisked to Oz on a magical rainbow mover sent by their old friends the Scarecrow (Dan Aykroyd), the Lion (Jim Belushi) and the Tin Man (Kelsey Grammer). Time in Oz has passed much faster than back in Kansas, and Dorothy discovers that the Jester (Martin Short) – the devious brother of the Wicked Witch of the West – is taking Oz over one region at a time, holding their leaders captive and casting a pall of darkness over the beloved land. Even Glinda (Bernadette Peters) is unable to combat the Jester’s evil powers, making Dorothy their only hope.

When she arrives in Oz, Dorothy’s plan is to travel to the Emerald City to reunite with her old friends and join forces with them to stop the Jester. However, the yellow brick road isn’t quite as easy to follow this time around, especially with the Jester planting tricky detours to lead her astray, so she enlists the help of Wiser the owl (Oliver Platt), Marshal Mallow (Hugh Dancy), China Princess (Megan Hilty) and Tugg the tugboat (Patrick Stewart) to help find her way.

Since Dorothy is sent to Oz on a magical rainbow mover, we decided to try three rainbow experiments that you can do together in honor of the film!


Make a Liquid Rainbow

3 Rainbow Science Experiments

Supplies Needed

Olive Oil

Rubbing Alcohol

Dawn Blue Dish Detergent

Corn Syrup

Food Coloring (red & green)

Large Jar


3 Rainbow Science Experiments

3 Rainbow Science Experiments

3 Rainbow Science Experiments

Experiment

Let’s make a liquid rainbow in a jar.

1. To make our blue slowly pour 1 cup of blue dish soap down the side of your jar.  You want to make sure to do this slowly too so you don’t create any bubbles.

2. Next mix  1 cup of water with four drops of green food coloring. Mix well.  Tip your jar and slowly pour the water down the side of the jar.

3. Next pour one cup of oil carefully down the side of the jar to create your yellow.

4. Finally mix 1 cup of rubbing alcohol with four drops of red food coloring.  Tip your jar and slowly pour the alcohol down the side of the jar.

3 Rainbow Science Experiments

3 Rainbow Science Experiments

Results from our Liquid Rainbow

Out of all of our experiments that we performed, this was our favorite. Our yellow got a little bubbly, but everything else stayed true with separate colors. This is a great lesson for teaching your kids about density. The different liquids all have different densities. Density means how much “stuff” there is in something. Not the thing’s weight nor its size, but how many atoms it has in it.  In our liquid rainbow, the dish soap is the densest layer and sits at the bottom of the glass, then the water is next, then the oil (which happens to be thick and can’t mix with water), and then the alcohol is the lightest in density. We are impressed with this one!

Make a Milk Rainbow

3 Rainbow Science Experiments

Supplies Needed

1 cup of half & half or whole milk

Food coloring (in any rainbow of colors)

Dish soap

Experiment

Let’s make a milk rainbow!

1. Pour 1 cup of milk into the bowl

2. Add 3 drops of one color to the edge of the bowl. Repeat with two other colors, placed in the other edges of the bowl. Be careful not to mix or jiggle.

3. Squeeze a drop of dish soap in the center of the bowl.

4. Watch what happens to the colors when the soap is added.

Results from our Soap Rainbow

Does anyone sell real liquid food coloring anymore? We just had the gels so we found that the liquid fell to the bottom in our first experiment The second time around, the dish soap was already added so I made a little mixture of gel food coloring with the water and then we poured it into our bowl. It was amazing to see how the colors stayed separate with this dot of soap in the middle. We learned that the dish soap does not mix with the milk. The dish soap floats on top and spreads over the surface. As it spreads, it grabs the food color we dropped into it. Where the colors meet, they combine to form new colors. We also learned, don’t do this with just gel food coloring. It produces a muddy river when mixed.

Make Rainbow Roses

3 Rainbow Science Experiments

Supplies Needed

Roses

Knife & cutting board (this part is for the grown-ups!)

Food coloring (any color of the rainbow)

Water

Cups

3 Rainbow Science Experiments

3 Rainbow Science Experiments

3 Rainbow Science Experiments

Experiment

1. Trim  the ends of your roses under cool running water.

2. Have a grown-up cut the rose in half.

3. Fill glasses with water and lots of food coloring.

4. Stand roses up and take the two sections of the rose and place them in two different colors of water. Allow them to stand in this water for 24 hours.

Results From Our Rainbow Roses

3 Rainbow Science Experiments

Did you think it would look like this? These Rainbow Roses have been promised on Pinterest dozens of times when I am on there. No, our roses did not look like this at all. They, were just slightly tinted with color on the edges, and two of them died during the rainbow color attempt. It might be better to try this one with carnations or to not split the stems at all.

3 Rainbow Science Experiments

Nailed it!

Well, maybe not.

We still saw how the color traveled through the flower although it wasn’t as rainbow awesome as we had hoped.

Legends of Oz

We know we are guaranteed spectacular rainbows though when Legends of Oz: Dorothy Returns hits theaters, so we plan to catch a rainbow there with the whole gang! I am so excited to see it and can’t wait to hear what you think of the movie when it releases on May 9!

*This post is sponsored by Clarius Entertainment. All thoughts and opinions are my own.

Tracking Pixel

Pin It

How to Stain a Picnic Table

Friday, April 18th, 2014

How to Stain a Picnic Table from MomAdvice.com.

It’s that time of year again and I just finished staining my picnic table for another year of memories around this table! I thought it might be good to bring this post back to remind you how easy it is to restore and stain that picnic table. I hope these tips help! 

Have you ever stained a picnic table before? This was our first year staining our table and I wanted to share with you some tips on how to stain a picnic table so you can enjoy it all summer long.  Thanks to a coat of stain, our table looks and feels just like new and I can’t wait to show you just how easy it is to do.

How to Stain a Picnic Table from MomAdvice.com.

Have you ever spotted something in a magazine and just knew you had to have it… yet, you could find it nowhere?

Many years ago, I flipped through a magazine and spied a picnic table that Katie Brown owned that was in her backyard and I just knew I wanted a table like that.

After inquiring on Facebook, we found a gentleman in town who makes picnic tables and after telling him what I envisioned, he built this beautiful table for us that comfortably sits eight to ten people.  When I look out my window, this makes me so happy and the meals shared at this table are what summer is all about.

To keep her looking good, we decided to freshen her up for another year of family meals.

I wanted to share with you my tips for the best type of stain for picnic table and my advice on utilizing a semi transparent stain that can protect our table for years to come (while allowing that natural wood grain to still come through), protect it from uv damage, and that will only require a minimal amount of light sanding. This piece of furniture gets so much love in our backyard and I’m excited to share my tutorial with you today.

How to Stain a Picnic Table from MomAdvice.com.


Supplies Needed:

Thompson’s Waterseal Waterproofing Stain (we did our table in Nutmeg Brown in Semi-Transparent)

Drop Cloth

Knit Rags

Paint Tray

Foam & Paint Brush

Sandpaper

Heavy-Duty Cleaner

How to Stain a Picnic Table from MomAdvice.com.

Directions

1. Before we begin, we need to prep our surface. Using a heavy-duty cleaner, spray and wipe down your table to remove any dirt and grime. Be sure that you clean the entire surface well and then wait 10-15 minutes, or until the table is completely dry, to begin staining. You never want to stain the table while it is wet so be sure that you are not trying to stain after a heavy rain.

How to Stain a Picnic Table from MomAdvice.com.

2. Since our piece was in good condition, it did not require any sanding.

If your piece needs to be smoothed though, use a medium grit sandpaper sanding in the direction of the grain. This can be done with a small palm sander or can be done by hand. Once you are done with that, finish with a finer grit of sandpaper to smooth out any rough areas and give the table an even, smooth finish for the stain. Once it is sanded, make sure to use a tack cloth to remove any sanding.

3. Once your piece has been cleaned and prepped, it is time to begin applying stain.  With the Thompson’s Water Seal Waterproof Stain you do not want to thin this.  Make sure that you shake well and shake, stir or mix thoroughly before and occasionally during use. Before you begin staining, make sure you try a test run with a small trial patch in an inconspicuous place, like the underside of your bench or table, to make sure that the stain is the color you are going for.

Apply using an exterior paint pad, brush, roller, or even a rag to begin applying the stain to your table.  If you are doing the legs and underside of the table, lay down your drop cloth and invert your piece and do the bottom first. Allow the bottom to dry, it should take less than two hours to be fully dry, and then begin staining the top.

How to Stain a Picnic Table from MomAdvice.com.

5. Use your foam brush to get into the detail parts and legs of your table, using a rag to remove any drip marks on the ends.

6. Allow your table to dry for two hours.

How to Stain a Picnic Table from MomAdvice.com.


How to Stain a Picnic Table from MomAdvice.com.

How to Stain a Picnic Table from MomAdvice.com.

How to Stain a Picnic Table from MomAdvice.com.

How to Stain a Picnic Table from MomAdvice.com.

This table looks just like new again and it only cost me $30 in supplies.

Since picnic tables do reside outside, they are exposed to all of the weather elements, which means you need to stain your table from time to time.  This stain typically will last two to three years, but possibly less time than that, depending on if your picnic table is in direct sunlight.

The properties of  sunlight can dry out the stain and cause it to weather much faster.  It also has a lot to do with how much freezing and thawing happens, which in our area, seems to happen often! 

I’m so proud of my table and I hope it inspires you to freshen up your own picnic table for Spring.  Speaking of staining,  I am still SO proud of this stained table I created for our office. If you are looking for tips on indoor staining, be sure to visit that post!

Looking for more stain and paint projects? Here are a few of our favorite makeovers!

How to Stain Furniture how to easily stain furniture

how to paint a laminate fireplace

how to spray paint furniture

How to Paint a Kitchen Table

                               how to paint a kitchen table

Have you ever stained a picnic table or deck? What tips can you share on this?

This post contains affiliate links! I only recommend what I love & genuinely use though! 

Pin It

Mama Francesca Cheese & Cheese Dusted Olives

Thursday, April 17th, 2014

Mama Francesca Cheese Review


*This post is sponsored by Mama Francesca

Last month I mentioned my partnership with Mama Francesca Grated Cheese. I am excited to share another fun recipe idea that you can create in your kitchen and this one happens to require very little cooking, but is an impressive appetizer to add to your next get together or antipasto platter.

Mama Francesca  is a delicious grated cheese that comes in six different flavor varieties including Aromatico (Parmesan, Basil & Oregano), Fiero (Parmesan & Red Pepper), & Pungente (Parmesan & Garlic), Audace (Parmesan & Romano), and Perfetto (Classic Parmesan).

Mama Francesca Terzetto Cheese

You can also find the Terzetto (Parmesan, Asiago & Romano).  The best part is that these can all be found on the shelves of your local Walmart stores, including the new Terzetto which will be available at Walmart on April 21st!

Did you catch last month’s delicious Gluten-Free Pasta & Meatball recipe? I hope you didn’t miss it because I have already made it a few times since I shared it!

For inspiration for this month’s recipe, I looked on the Mama Francesca website to create a dish to share with you. The site offers a variety of recipes and when I happened upon a recipe for Cheese Dusted Olives…well, be still my beating heart, because I am already in love just from the title alone.

 Cheese Dusted Olive Recipe

Have you ever infused oils before? It truly makes any dish a showstopper and it is just a simple technique of adding herbs and any desire of flavoring to heated oil and allowing it to infuse into it. I do this with my husband’s favorite roasted shrimp, but had never thought to do this with olives. It changes the taste of the olives completely and adds that special wow factor to your antipasto platters.

The oil is infused with lemon and thyme and then poured over your olives on a platter (or a martini glass like me!)  and finished with your favorite cheese blend. I wanted these to have a little garlic bite to them so I used the Pungente (Parmesan & Garlic) to add that cheesy garlic flavor that I love.

I rounded out my antipasto platter with salami, prosciutto, and fresh grapes- all delicious and all, happily, gluten-free snack options.

 Cheese Dusted Olive Recipe

Since getting a babysitter is expensive, I am always looking for date night experiences at home. In the summer months, we enjoy an antipasto platter outside and chat after the kids head to bed. In the winter months, this is best served with a great Netflix documentary or board game for a fun evening in.  To round out the evening, this gluten-free meatball recipe I shared last month would also be a beautiful accompaniment as your evening appetizer!

I have stopped thinking of these things as special occasion foods, but an investment into our relationship and time together.

I hope these posts about Mama Francesca have inspired you to pick up a few varieties of cheeses to try and I hope you can give these delicious Cheese-Dusted Olives a spin for a fun date night in!

 Cheese Dusted Olive Recipe

Cheese Dusted Olives
Recipe Type: Appetizer
Author: Mama Francesca Premium Cheese Website
Prep time:
Cook time:
Total time:
Serves: 8
An effortless & easy appetizer for lemon & thyme infused olives dusted with cheese.
Ingredients
  • ¼ cup Mama Francesca Parmesan Audace (or your favorite Mama Francesca cheese variety)
  • 2 cups Favorite Olives, rinsed
  • ½ cup Extra Virgin Olive Oil
  • 2 sprigs Thyme
  • 1 Lemon, strips of peel only
Instructions
  1. In a small sauce pan, heat oil over medium for 3 minutes, until warm, remove from heat.
  2. Place thyme and lemon peel in oil, let stand 1 hour.
  3. Once cooled, pour infused oil over olives on a platter.
  4. Sprinkle with Mama Francesca cheese.


 *This post is sponsored by Mama Francesca


Pin It!

Tracking Pixel

Pin It

How to Style Your Bookshelves

Thursday, April 10th, 2014

How to Style Your Bookshelves from MomAdvice.com.


The art of styling bookshelves had never really been important to me until I started perusing pictures on Pinterest and saw the carefully curated collections and beauty in the organized book spines.

Of course, I don’t have an unlimited budget where I can add decorative books in one carefully choreographed color or an unlimited budget for fantastic looking odds-and-ends to update my bookshelves.

That is why I am excited to share with you some easy ideas for updating your bookshelves with inexpensive items and a few budget-friendly craft materials.


Cover Books With Paper

If you have an eclectic collection of books or you want to pick up a collection of books at Goodwill to stock your shelves, one frugal way you can add order and beauty to your bookshelf is to simply wrap each book in paper.

These beautiful bookshelves from Chloe Moore Photography have beautifully hand-stamped spines that add a unique detail to them.

I also love how she has weaved in her photography equipment, adding her own personal nods to her favorite interests.


Spray Paint Items to Create a Cohesive Collection

Instead of trying to find items of a similar color for your bookshelves to add those unique details, consider creating your own collection of groupings with an inexpensive bottle of spray paint.

My own bookshelves were cluttered with items that did not mean anything to me and did not showcase my personality.

I took a day to declutter my shelves, added a fabric back to my bookshelf and then found items that I loved and spray painted them with a little gold spray paint.

It created just the look I was going for, and cost $15 to update my shelves.


Stack Your Books In a New Way

Sometimes we get into a rut with our styling. I thought there were only two ways to style my books- vertically or horizontally.

The Art of Doing Stuff though has me rethinking my book stacks and groupings because there are actually 7 ways you can stack your books.

The names are even fun- the Sandwich Stack, On the Bias, and the Spiral Stack…just to name a few.

Consider regrouping your stacks in new ways and adding to your stacks with items you can find at your store to round out your collection.


Add an Eye-Catching Design to Your Bookcase

Even inexpensive laminate bookcases finds can be transformed with a little paint and thoughtful styling into true things of beauty.

One thing I love to see on bookcases, is an interesting color on the inside of the bookshelves.

This can be added with a pop of color from a brightly colored paint, a pretty fabric, scrapbook paper, or even stenciling.

I love this fantastic idea from This is Our Bliss to use removable wallpaper to add a decorative touch that is both frugal and fast.


Add Your Own Personality

One thing that I have been trying to do is to weed out the clutter in my life and make room for the good stuff.

The same tactic can be applied towards our bookshelves and what we place on them.

My shelves have yarn and knitting books, a shelf dedicated to my favorite classics, and I have a cookbook shelf that not only holds my cookbooks, but also holds the biscuit cutter that my great-grandma used to make biscuits for me when I was a little girl.

Consider creating a bookcase or shelf towards your own personal hobbies and collections.

I love this beautiful cookbook collection from The Inspired Room that celebrates her love for beautiful cookbooks.

This would also be a great spot to find some pretty vintage cookbooks or vintage kitchen items that you could weave into your shelves.

What’s one of your favorite things on your bookshelves? What is one styling trick you like to use when styling your bookshelves? Feel free to share here!


This post contains affiliate links.


Don’t miss those other great ideas from MomAdvice.com:


15 Easy DIY Updates To Help You Love Your Home

15 Easy DIY Updates to Help You Love Your Home


How to Spray Paint Furniture


How to Create Vignettes in Decorating


DIY Table Runner


Pin It

The New Flourish Boutique

Friday, April 4th, 2014

The New Flourish Boutique

We are so excited to share that our amazing site sponsor, Flourish Boutique, has relocated into a beautiful and more spacious home. Emily & I were invited to the Grand Opening event this Thursday evening and had the best time browsing all of the beautiful items that they have in their new place.

If you haven’t had the chance to check it out, you will be in for a treat.  Not only does the store carry an expanded line of clothing and jewelry, they have now added shoes, beautiful handbags, bath/beauty products, and fun gifts for everyone in your life (babies, kids, furry friends, and even bridal fun!)

The New Flourish Boutique

The New Flourish Boutique

The New Flourish Boutique

As you can see, they rolled out the red carpet for us to show you around. The new location is right next to the new Gigi’s Cupcakes on 310 West Cleveland Road in Granger.

I don’t know what you are waiting for… let’s head on in!

The New Flourish Boutique

The New Flourish Boutique

The New Flourish Boutique

The New Flourish Boutique

It was hard to take very many pictures to really show you everything because there were so many Flourish friends shopping that night. We had the best time browsing all of the items in the store. Of course, our eyes always go to the jewels whenever we are out and about.  Pictured here is just half of the store, if you can believe it, and an amazing little Clearance section is tucked in the back of the store.

The New Flourish Boutique

The New Flourish Boutique

The New Flourish Boutique

The New Flourish Boutique

The evening included a fashion show. If you know us, you know we love fashion. Everywhere we turned, we saw something we loved.  Flourish Boutique has a ton of new merchandise that you can order or find in their store. MomAdvice readers can get 25% off any of their regular priced merchandise using the code WEB25!

Pretty in Pleats Maxi (Flourish Boutique)

Pretty in Pleats Maxi (Flourish Boutique)

Pretty in Pleats Maxi (Flourish Boutique)

Pretty in Pleats Maxi (Flourish Boutique)

Mystree Jacket (Flourish Boutique)

Mystree Jacket (Flourish Boutique)

Scarf (Flourish Boutique)

Here are some of my FAVORITE finds that I scored last night. This Pretty In Pleats skirt in white & black are my new favorite summer item! I am barely over five feet, and a maxi like this is a DREAM COME TRUE for me. I love that the lining is also an appropriate length and adds to the breeziness of this skirt. Did I mention the belt is included? Swoon! Be sure to check out the What’s New link to see all the updates (as I am sure some of these I have pictured haven’t made it on the site yet!) You can always cash in on our coupon code- woohoo!

We feel so blessed to have this partnership with Flourish Boutique and are so thankful for their continued support and sponsorship over the years! It has been a dream come true that they sponsor and support my little business- thank you, Flourish!

Pin It