Archive for the ‘My Work’ Category

Gluten-Free Cake Mix Sugar Cookies Recipe

Monday, November 4th, 2019

Gluten-Free Cake Mix Sugar Cookies Recipe from MomAdvice.com

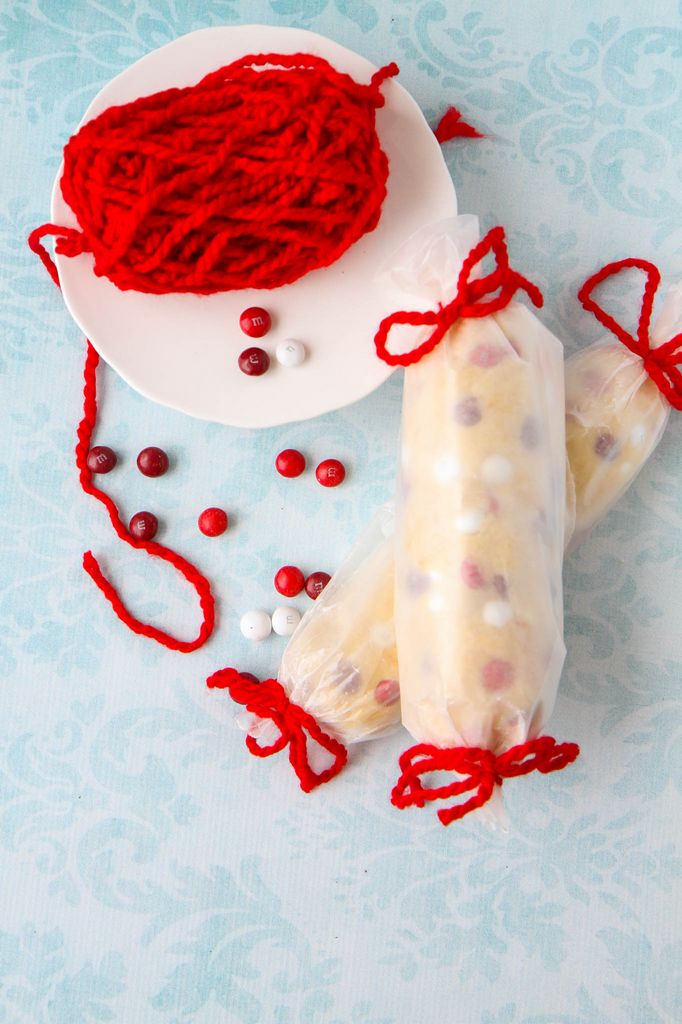
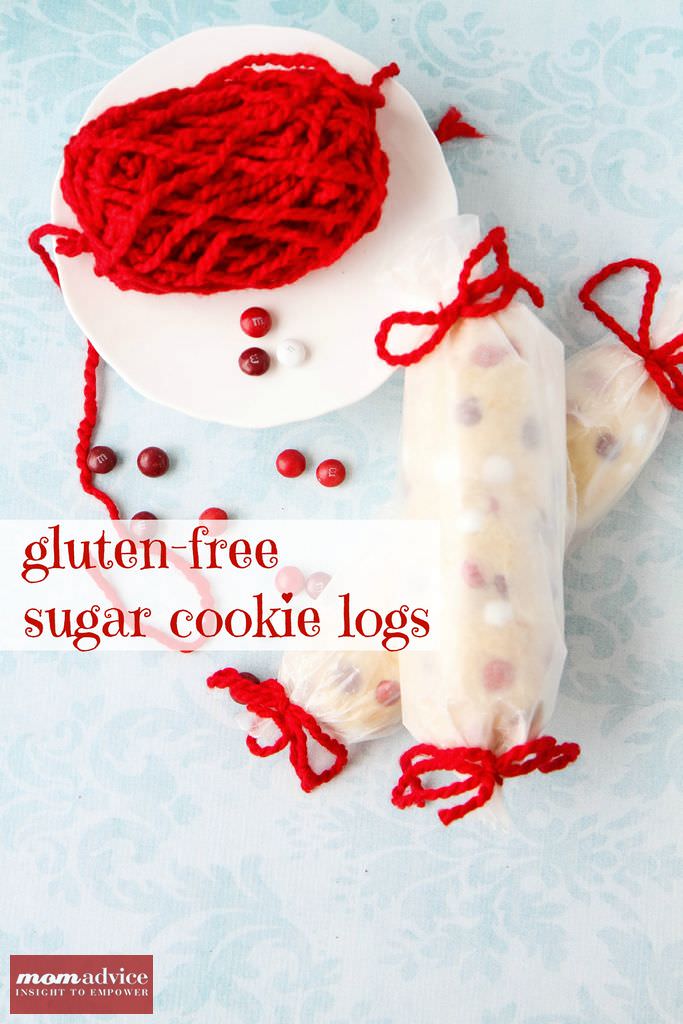
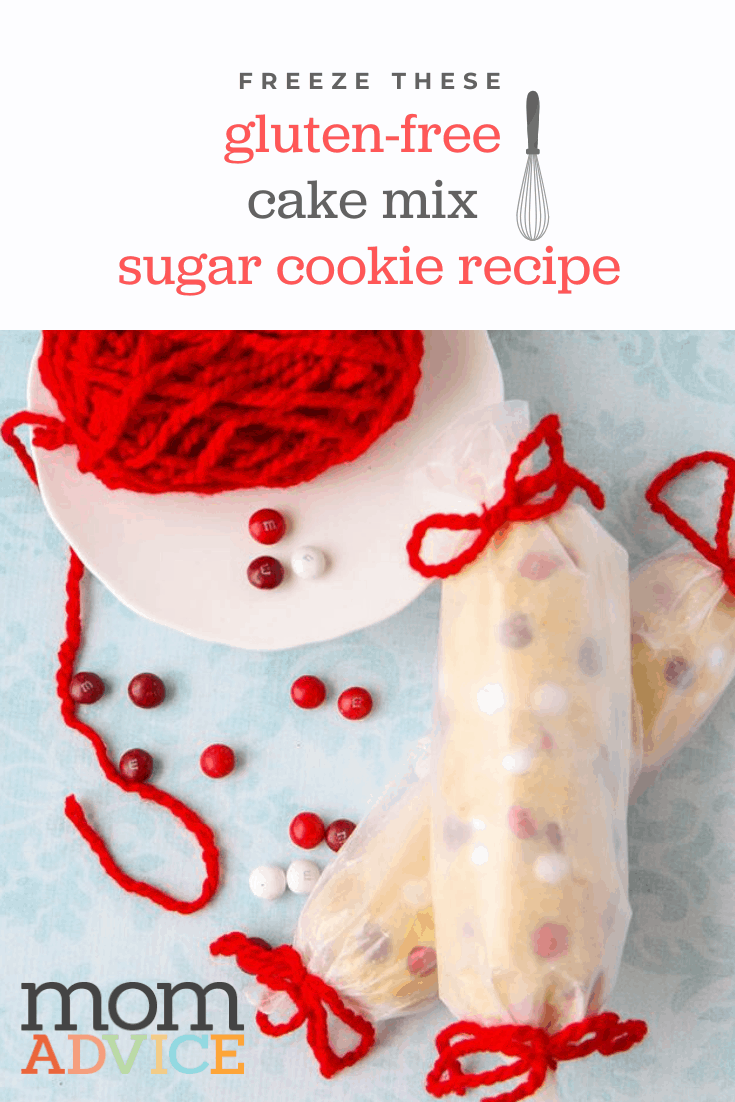
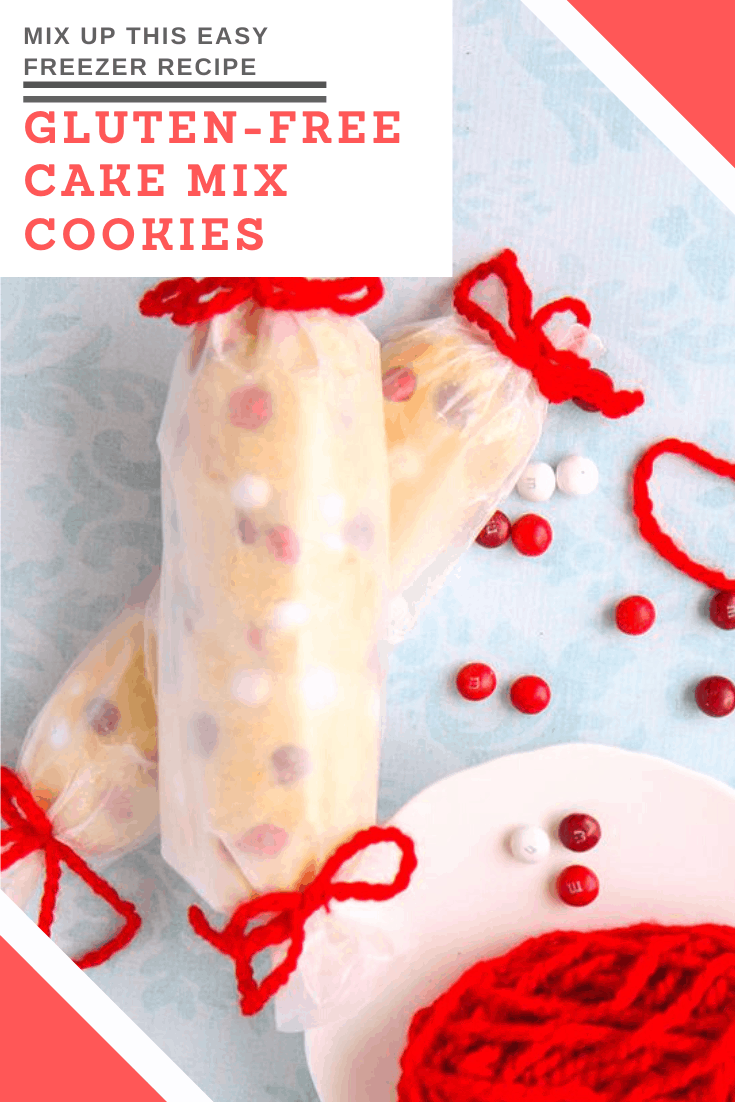
 Gluten-Free Cake Mix Sugar Cookie recipe can be made into beautiful sugar cookie rolls with just a few simple ingredients. This easy freezer recipe for gluten-free cookies is such a great item to keep stocked for the perfect hostess gift or for a friend in need. Tied with ribbon, you have the perfect gift for any occasion!

Gluten-Free Cake Mix Sugar Cookies Recipe from MomAdvice.com

Gluten-Free Cake Mix Sugar Cookies Recipe from MomAdvice.com

Gluten-Free Cake Mix Sugar Cookies Recipe from MomAdvice.com

Do you ever have a really hard time with a recipe and then later wonder if it had ever been tested?

That was the case with this project from start to finish.

These cookies were supposed to be simple and straightforward, but the recipe ended up being written completely wrong.

Thankfully for you, I spent a whole day figuring out what went wrong with this one and how we can fix it so that you can have an awesome baking day!

Please read this post carefully, I am offering you a load of tips for a successful baking day!

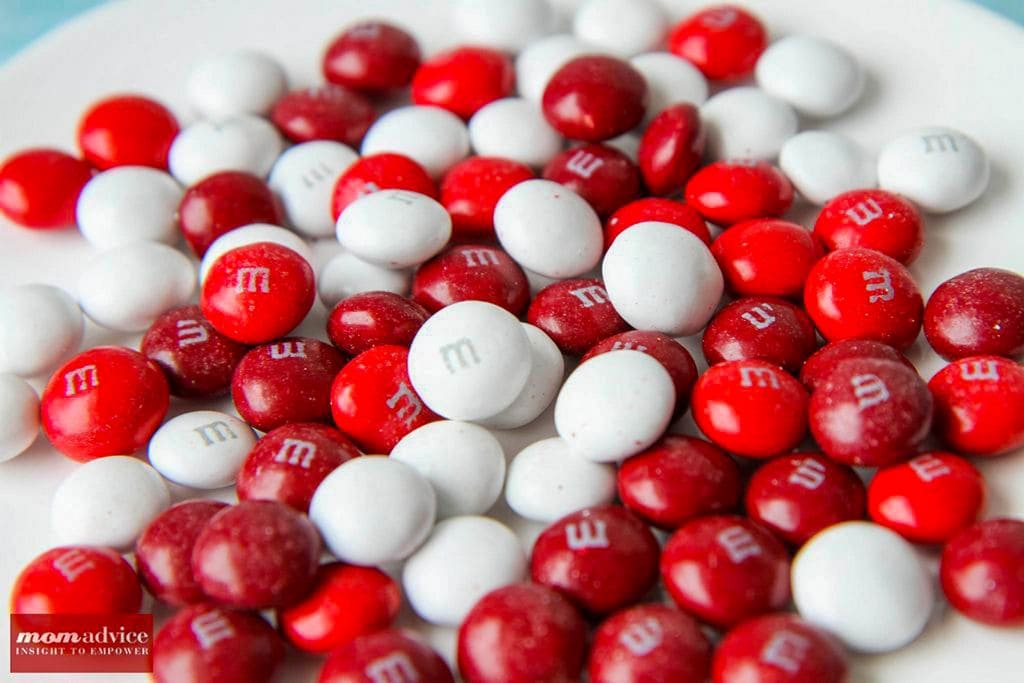
Are M&M’s Gluten-Free?

Let’s begin with the question, are M&M’s gluten-free?

The answer is that most M&M’s are gluten-free.

In fact, most of the varieties they typically carry, other than their pretzel variety, are gluten-free.

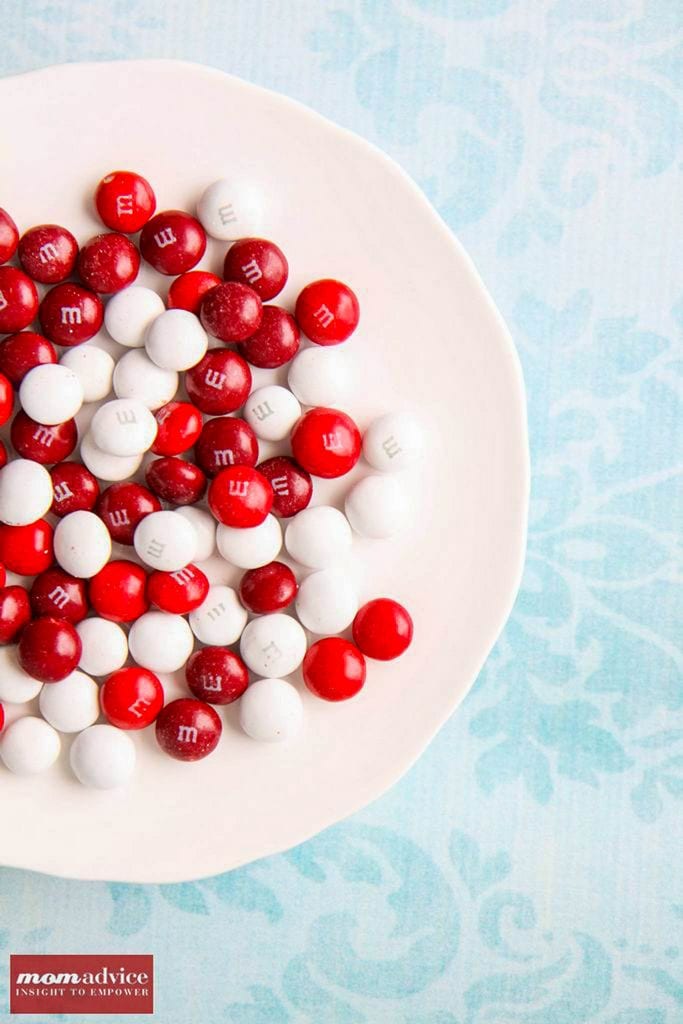
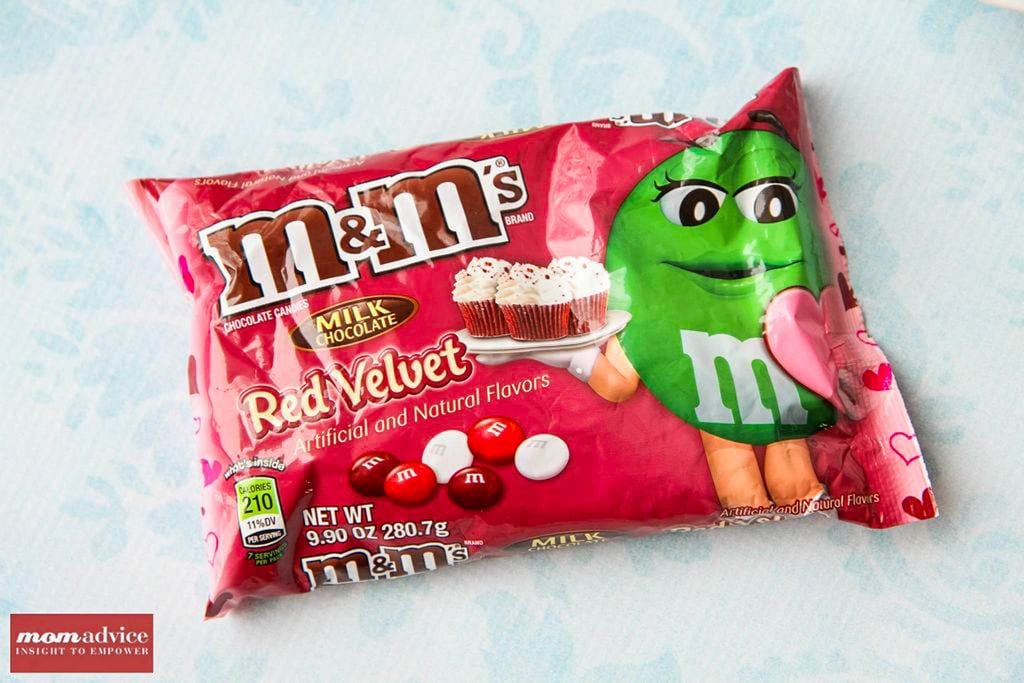
What I found with the Red Velvet M&M’s though are that they are gluten-free, but in high times of production, like Halloween & Valentine’s Day, Mars uses alternative facilities to make its candy and some of those may introduce cross-contamination risks.

These Red Velvet M&M’s are ones that could have been cross-contaminated.

If this is of high concern, look for the plain M&M’s, preferably mini-M&M’s to help your dough hold up better. 

It is always important to read your labels carefully and know that Mars Chocolate always promises to call out any wheat, barley, and rye ingredients by name, as well as any cross-contamination risks on their labels.

I recommend this information page for finding which candies are safe to eat.

Gluten-Free Cake Mix Sugar Cookies Recipe from MomAdvice.com

Gluten-Free Cake Mix Sugar Cookies Recipe from MomAdvice.com

Tips for a Successful Dough

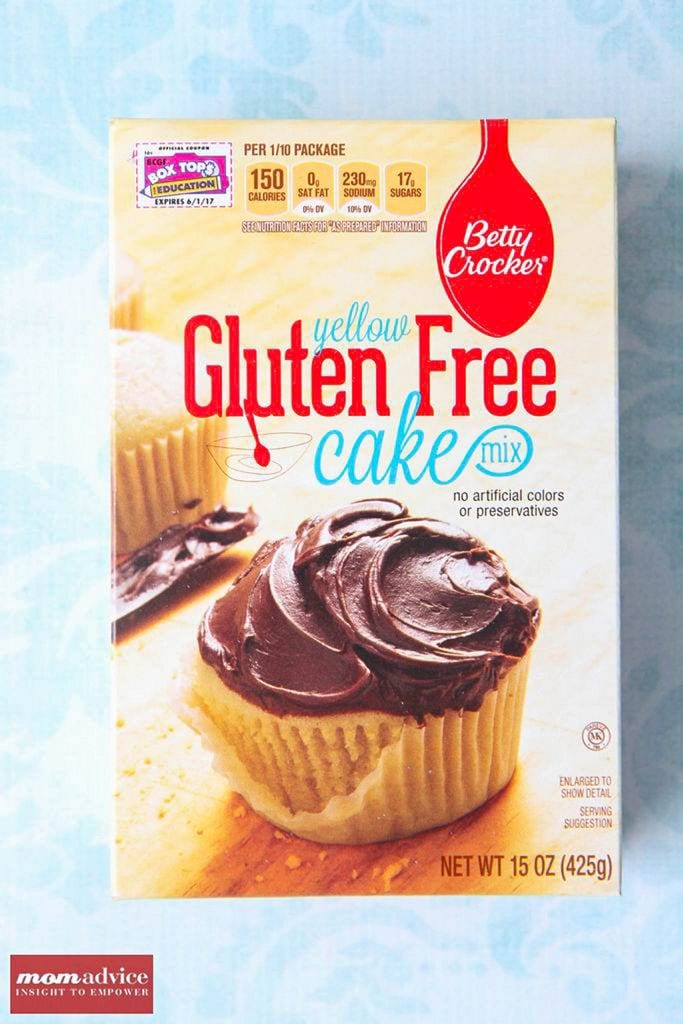
As, I am a big fan of the Betty Crocker cake mixes, I used this mix to create my cookies.

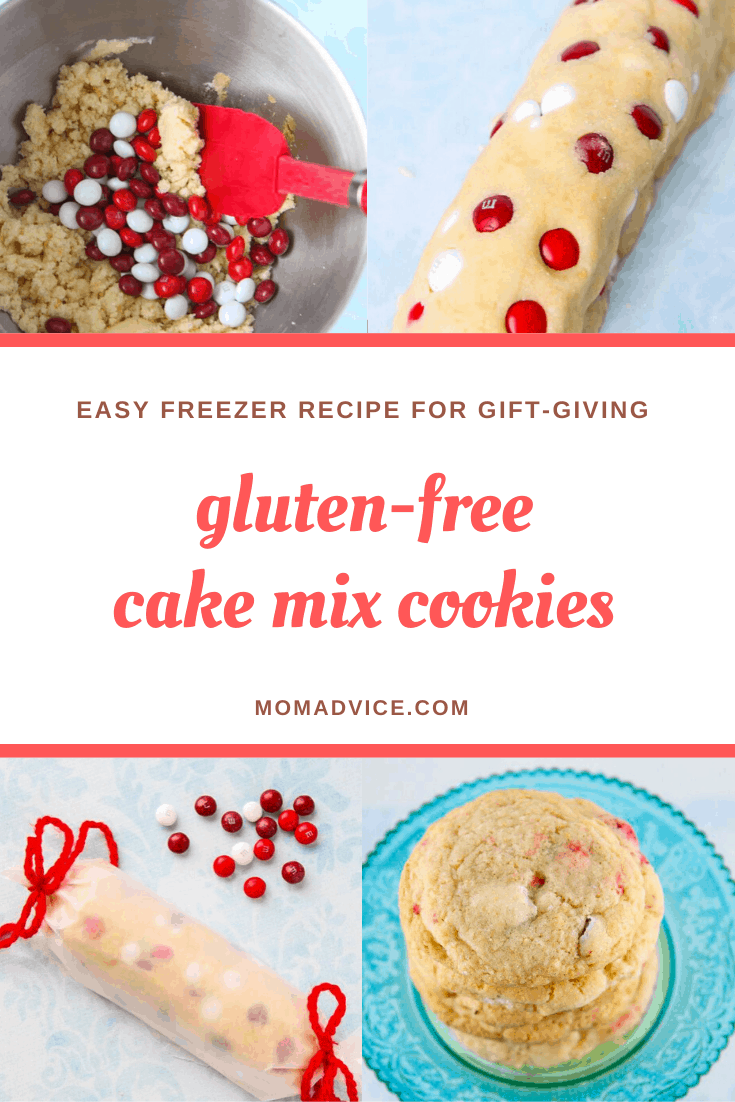
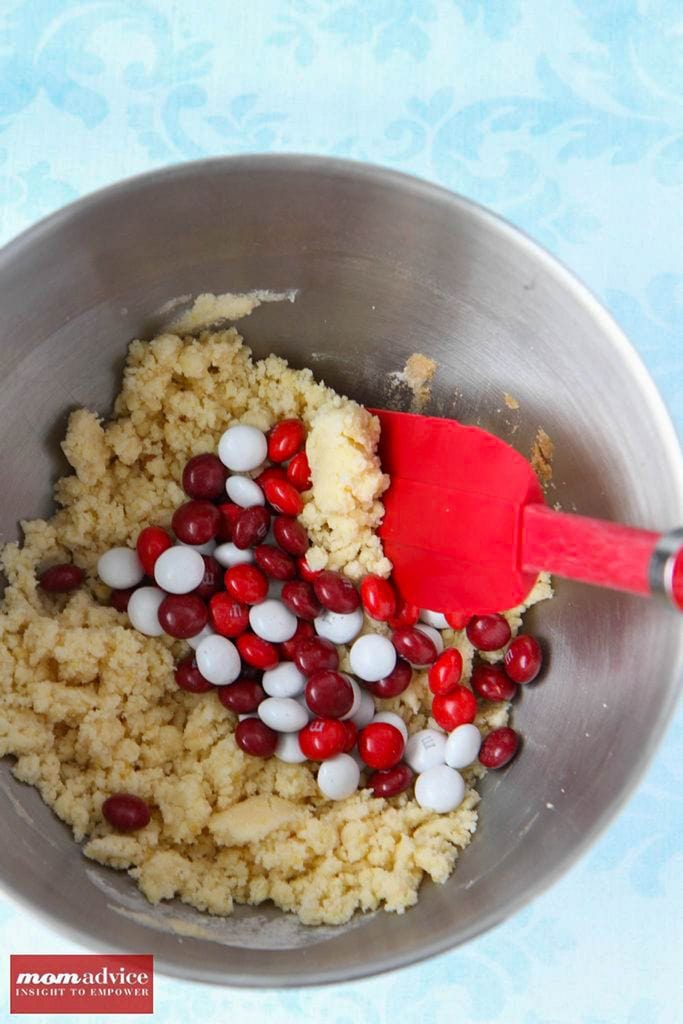
As you can see when I mixed the ingredients together, this dough is very crumbly.

To help make this dough really hold and stick together, add 3-4 teaspoons of water to the dough, until it really comes together. This will help when slicing your sugar cookie rolls.

The recipe that was written did not add this to the dough and so when I sliced them, the cookie dough crumbled. I had to add my water later and chill them again for another three hours.

Once I sliced with the liquid addition, the dough held much better.

If you need these cookies to be dairy-free as well as gluten-free, please read the notes in the recipe on how you can create these without the butter.

Gluten-Free Cake Mix Sugar Cookies Recipe from MomAdvice.com


Tips for a Successful Sugar Cookie Log

One more thing, I learned while creating this cookies is that it is better to make your sugar cookie roll WITHOUT the M&M’s in it and then add them to your cookies after so you can get beautifully clean slices.

Trying to cut through these Red Velvet M&M’s was a real challenge so I would encourage adding them after or just doing these cookies as a drop cookie.

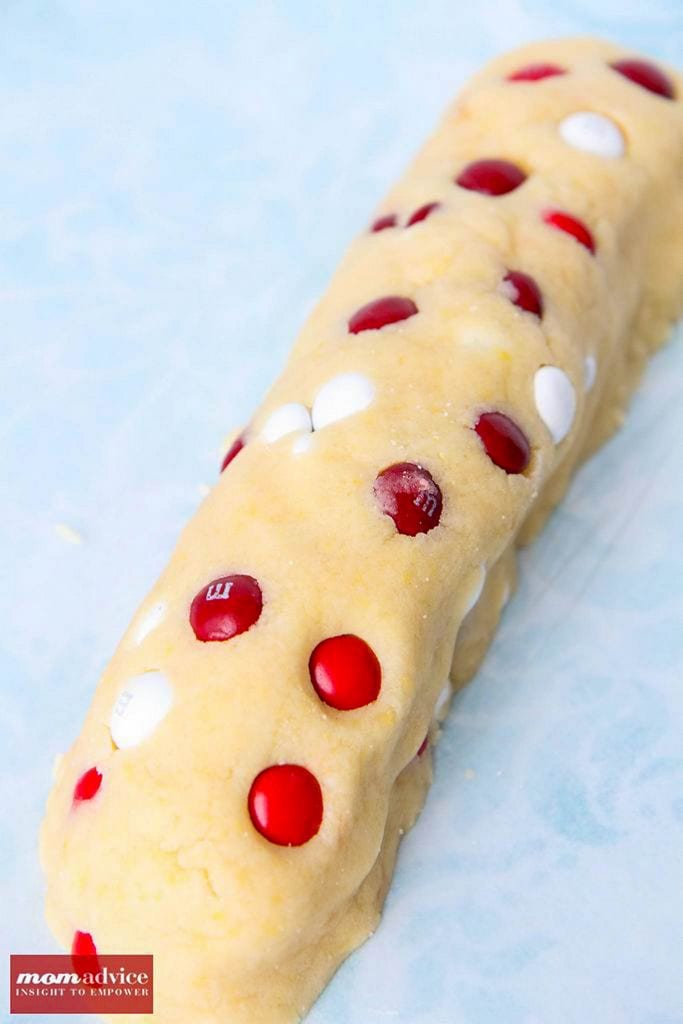
To do a sugar cookie roll, as pictured above with M&M’s, seek the mini varieties.

Again, read the packaging carefully to insure that they are safe for eating.

Gluten-Free Cake Mix Sugar Cookies Recipe from MomAdvice.com

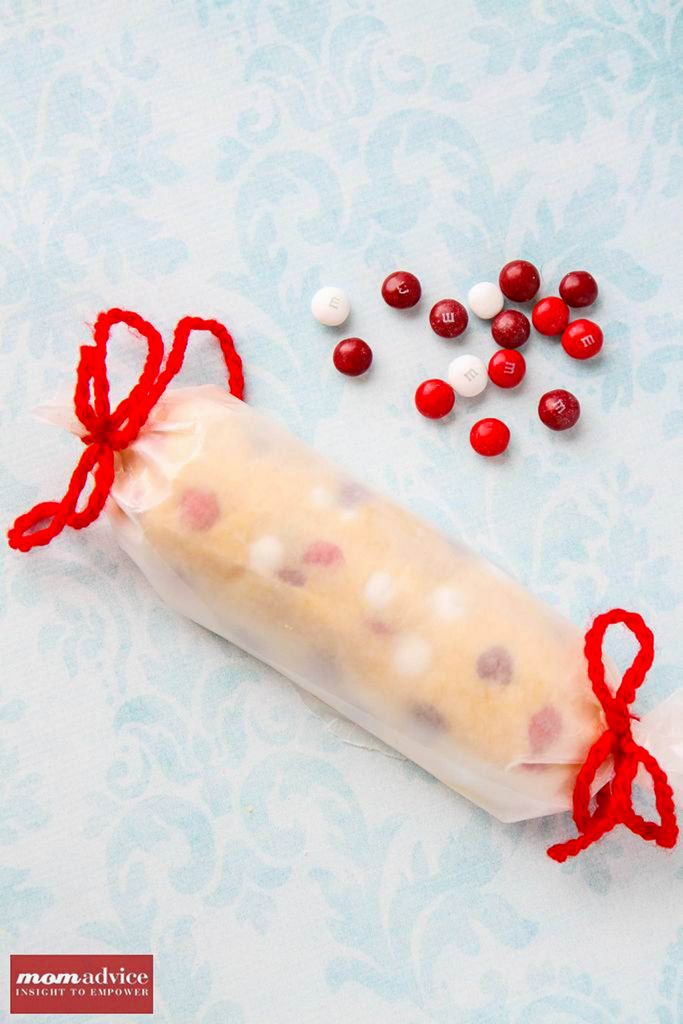
Wrap your sugar cookie roll in wax paper and chill for three hours or more.

Once you are ready to bake off your cookies, preheat your oven to 350 degrees and then slice them and place on a parchment-lined cookie sheet or a well-greased cookie sheet.

I prefer parchment paper squares (like these), both for the ease of clean-up and how beautifully these cookies will set up.

Allow these to cool and then transfer.

These cookies are very delicate in texture so you will want to give them plenty of time to set up. 

Gluten-Free Cake Mix Sugar Cookies Recipe from MomAdvice.com

What Do They Taste Like?

These cookies are so delicious that you will NEVER know that they are gluten-free.

The dough is so flavorful and the healthy dose of vanilla in the batter makes these taste like a cookie dough that you truly slaved over.

The addition of the candies adds that yummy chocolate flavor that I think every good cookie should have.

With these helpful tips, I hope you will have a successful baking day and hope that this easy treat idea will help as you plan your own holiday treats this year!

Can I Freeze These?

Cookies can be frozen!

It is recommended that you wrap them in aluminum foil or in a resealable plastic bag for up to one month.

Let the cookies thaw on the kitchen counters overnight before serving.

What Other Ways Can I Spice Up These Cookies?

If you can’t have chocolate, there are many other ways you can spice these easy cookies up.

Add Sprinkles– Lightly beat one egg white and brush the tops of your cookies with it, then sprinkle with gluten-free sugar sprinkles.

Add Zest– Add 1 teaspoon of grated lemon, orange, or key lime zest

Switch Your Extract– Try a different extract in your dough like almond or butter

Make It Spicy– Add a pinch of nutmeg, cinnamon, or dust the tops with the egg white & a cinnamon & sugar combo.

Check out the recipe below! Love this project? Here are a few other gift ideas I think you will like!

diy your own chai tea mix

diy vanilla chai mix

diy orange sugar scrub

how to make knitted wine hats and scarves diy knitted wine hats & scarves

diy mojito bath salts

DIY Grilling Seasoning Mixes for Father's Day with printable labels diy grilling seasoning mixes

How to Make a Knitted Coffee Sweater

knitted coffee cozies


Gluten-Free Cake Mix Cookies
 
Author: Amy Clark
Prep time:
Cook time:
Total time:
Serves: 3 dozen
Cake mix cookies that can be gluten-free and dairy-free for a fun treat to share for any holiday.
Ingredients
  • 1 package (15 ounces) yellow gluten-free cake mix
  • 8 tablespoons (1 stick) unsalted butter- if dairy-free replace with vegetable shortening, MELTED
  • 1 large egg
  • 3-4 teaspoons warm water, just until you see your dough pull together
  • 1 tablespoon pure vanilla extract
  • 3/4 cup M&M’s or read the post for other ways to spice up these cookies
Instructions
  1. Place the cake mix, butter (or vegetable shortening), egg, water, and vanilla in your mixing bowl and beat on low speed until well-combined.
  2. Using a spatula fold in the M&M’s (if mini-sized) or reserve to press these into each cookie after they have been cut (if large-sized)
  3. Place the cookie dough on a sheet of wax paper and then press with your hands to form a long,approximately 12 inches long and 2 inches in diameter. Tightly roll the dough and chill it in the refrigerator for at least three hours or overnight.
  4. Preheat your oven to 350 degrees. Grease two cookie sheets well or cover these in parchment paper.
  5. Unwrap the dough and transfer to a cutting board and slice them in 1/4-3/8″ slices.
  6. Place the baking sheets in the oven and bake until the cookies are lightly browned on the edges,7-10 minutes.
  7. Let the cookies fully cool before transferring.


Have you ever made gluten-free cake mix sugar cookies? Do you have any tips for beginning gluten-free bakers on ways to increase success with cake mix cookies?

As an Amazon Associate I earn from qualifying purchases. 

This post contains affiliate links.

Gluten-Free Cake Mix Sugar Cookies Recipe from MomAdvice.com

Gluten-Free Cake Mix Sugar Cookies Recipe from MomAdvice.com

Gluten-Free Cake Mix Sugar Cookies Recipe from MomAdvice.com


Pin It

Best No-Bake Ghost Cake Idea (Fast and Easy)

Monday, October 14th, 2019
Best No-Bake Ghost Cake Idea (Fast and Easy)

This ghost cake is a fun and spooky Halloween cake that even your kids can make it!  Using store-bought ingredients, you can have a Halloween treat in minutes.

If you are anything like me, you are already on the hunt for easy Halloween ideas!

Today’s easy food craft is for a festive Halloween cake that you can whip up quickly to celebrate with your kids, fellow trick-or-treaters or to add to your Halloween party spread.

This can be made for under $20 and NO COOKING is required!

Can I get an AMEN?

What if I Don’t Want to Spend $20 on Halloween Cake?

As you know, I’m pretty darn frugal, so I want to share a tip that might help you at your store.

Be sure to check the rear of your store (over by the dairy section usually) to see if there are any reduced to sell bakery items on a rolling cart.

It is there where I often spy prepared cakes and doughnuts that are perfect for sharing with guests or for rounding out a meal together with friends.

If you check there first, it is possible you might be able to score these treats for a fraction of the price that I paid.

I promise to not be jealous.

How Can I Make This Treat Gluten-free?

Welp, you know that gluten-free cake isn’t going to be an affordable treat.

Oh, the price ding on removing wheat!

Ouch.

Did you know that you can purchase gluten-free donut holes in the freezer section of many supermarkets.

Is it just me or are you scared to pay a million dollars for gluten-free snacks because you got burned on a past purchase?

I am learning that the best move is to check the reviews before making anymore snack purchases. Here’s the page on gluten-free doughnut reviews to help you make your best decision.

Best No-Bake Ghost Cake Idea (Fast and Easy)

How Can I Save Money at My Local Gluten-free Bakery?

If you aren’t using Groupons, you are missing out on some free money. Anytime that we eat or do anything local, we check to see if there are any deals on things like this. You just never know when the new up and coming bakery might be looking for a fresh way to promote their business.

What Can I Substitute for Cake if I’m Gluten-Free?

I found this useful gluten-free directory to help you find a gluten-free bakery near you.

Gluten-free cakes can be expensive though so I recommend you bake a cake yourself. I have some super easy gluten-free cake recipes to share with you that might just make the most perfect cakes.

I promise, these gluten-free cakes are as easy to put together as any other cake because I rely upon cake mixes for their creation.

Here are a few that our family has loved!

Best No-Bake Ghost Cake Idea (Fast and Easy)

Doughnut Hole Ghost Cake from MomAdvice.com

Supplies Needed

Pro Crafter Tip: Don’t forget to download the Rakuten app to save some money through their links to retailer sites!

1 prepared cake

1 container of powdered sugar doughnut holes (I had enough in an assortment pack)

Roll of white tulle (over by the party/wedding favor supplies)

Black Decorating Icing small pieces cut off a stripe of candy corn, candy eyes, or small Halloween candy (like Mini M&M’s) for your eyes.

1 prepared cake

1 container of powdered sugar donut holes (I had enough in an assortment pack)

Roll of white tulle (over by the party/wedding favor supplies)

Black Decorating Icing (over by the cake decorating supplies/crafts), small pieces cut off a stripe of candy corn, candy eyes, or small Halloween candy (like Mini M&M’s) for your eyes.

Cookie Sticks(over by the cake decorating supplies/crafts)

White Twine

Scissors

Best No-Bake Ghost Cake Idea (Fast and Easy)


Instructions

1. On a rimmed cookie sheet, insert the cookie stick into your doughnut hole.

2. Cut out two squares of tulle, approximately the same size, and angle them slightly. Fold them over your doughnut hole. Secure with a little white twine, making sure to bring the tulle down snugly over the top of the doughnut hole to make a level surface for your piping.

3. Pipe two eyes and a mouth on your doughnut hole. I found that getting the icing a little warm helped make the piping easier so keep that in mind!

4. Stick your ghosts on top of your cake.

Done.

How easy is that?

Best No-Bake Ghost Cake Idea (Fast and Easy)

This cake was such a hit and I loved that it adds a homemade touch to a store-bought treat!

As you know, I’m pretty darn frugal, so I want to share a tip that might help you at your store.

Be sure to check the rear of your store (over by the dairy section usually) to see if there are any reduced to sell bakery items on a rolling cart.

It is there where I often spy prepared cakes and doughnuts that are perfect for sharing with guests or for rounding out a meal together with friends.

If you check there first, it is possible you might be able to score these treats for a fraction of the price that I paid.

I promise to not be jealous.

I look forward to sharing more fun Halloween ideas with you in the upcoming month and hope you love this festive (and easy) treat idea!

Don’t miss these other great ideas from MomAdvice.com:

DIY Thumbtack Pumpkins from MomAdvice.com

DIY Thumbtack Pumpkins

How to Make Pumpkin Hand Pies

How to Paint Pumpkins With Acrylic Paints from MomAdvice.com

Painting Pumpkin with Acrylic Paints

//www.momadvice.com/post/easy-burlap-wreath-tutorial

Autumn Burlap Wreath

Easy Homemade Gluten-Free Pumpkin Bread


This post contains affiliate links

Pin It

How To: Slow Cooker Pumpkin Spice Candles

Thursday, October 3rd, 2019

Slow Cooker Pumpkin Spice Candles from MomAdvice.com

Learn how to make your own DIY candles in your crockpot or slow cooker. Did you know you can make pumpkin spice scented candles at home with just wax, a wick, and essential oils? This easy tutorial will have you make large batches of candles in no time.

DIY Slow Cooker Pumpkin Spice Candles from MomAdvice.com

Gift-giving season is upon us and I am always looking for great gifts that don’t cost a lot, can be made in bulk, and will actually be used!

Do you remember when we made Citronella Candles in our slow cooker for thoughtful hostess gifts for the cookout season?

We are going to replicate that same idea, but with one of my FAVORITE fall scents…Pumpkin Spice!

Can you believe you can make candles in your crockpot?

The first time I tried making candles in my slow cooker, I knew that I was hooked on a new favorite craft.

I am so excited to show you, yet again, how to make candles in your slow cooker and this time we are making easy Slow Cooker Pumpkin Spice Candles.

As a Pumpkin Spice everything addict, these are full of my favorite holiday scent and can be made with just a few inexpensive purchases.

These candles can also be added to a tabletop with some winter squash and some jack-o-lanterns for a festive Fall display.

FYI- I just want to warn you how good your house is going to smell so GET READY!

Slow Cooker Pumpkin Spice Candles from MomAdvice.com

This is an easy DIY for homemade pumpkin spice scented candles perfect for Autumn.

Use your slow cooker to make your own pumpkin pie candles to give as gifts or to make your house smell like all the best things of Fall.

Supplies Needed

8 Pint-Sized Mason Jars

5 Pounds Candle Wax Flakes

6” Natural Candle Wicks

2 Jars of Pumpkin Spice Fragrance Oil

8 Bamboo Skewers (or you can use pencils!)

Slow Cooker or even your pressure cooker on the slow cooking setting

Food Scale or Postal Scale

Decorative Accents to finish your candles – I used twine and tags, but other lovely ideas would be ribbon, burlap, stencils, or even glitter!

Slow Cooker Pumpkin Spice Candles from MomAdvice.com


Directions for Making Slow Cooker Pumpkin Candles

1. Measure and weigh out 7 ounces of soy wax flakes for each mason jar in a glass measuring cup (be sure to tare your scale).

It should fill jar to the top, and we will be adding more flakes after the first round melts down and creates more space inside the jar.

Repeat the measuring with all of the other candles you plan to prepare.


Slow Cooker Pumpkin Spice Candles from MomAdvice.com


2. Add an inch or two of water to your slow cooker to create a water bath for your candles. Nestle the mason jars inside the slow cooker, place a lid on top, and turn it on HIGH for two hours.

As the wax melts down, feel free to add more wax flakes into the jars to the desired height. These will melt down to about half the size of your jar, so approximately 7 more ounces of soy flakes can be added to get a full candle like my pictures.

3. Once the “cooking time” of two hours has passed, open the lid and add 10-20 drops of Pumpkin Spice fragrance to each candle (approximately 1 ml of oil).

Using a bamboo skewer, stir each candle after adding the oil. Turn your slow cooker off, then add your candle wick in the center of each candle.

Take a bamboo skewer or pencil and wrap the top of the wick to the middle of it and allow it to help stand the wick up in the center of the candle. 

Leave the candles in the slow cooker until the wax begins to harden. Remove them and then dry the jars well with a dish towel. 

Allow the candles to fully harden on your countertop.

4. The next day, trim your wicks and attach a little jute twine and thank you note for your favorite hostess.


Slow Cooker Pumpkin Spice Candles from MomAdvice.com


Slow Cooker Pumpkin Spice Candles from MomAdvice.com


Slow Cooker Pumpkin Spice Candles from MomAdvice.com


The best part about making these is how incredible your house is going to smell all day long as these cook and then cool.

My kids thought I had baked pies all day when they got home from school.

What sad trickery I played on them with a slow cooker full of candles for our friends (#worstmomever).

I hope you have fun making this easy Fall craft for those you love!


DIY Slow Cooker Pumpkin Spice Candles from MomAdvice.com


diy slow cooker pumpkin spice candles momadvice.com

This post contains affiliate links! Thank you for supporting the site with your purchases!


Don’t miss these other great ideas from MomAdvice.com:


Easy Homemade Gluten-Free Pumpkin Bread

Easy Homemade Gluten-Free Pumpkin Bread


DIY Thumbtack Pumpkins from MomAdvice.com

DIY Thumbtack Pumpkins


Homemade Pumpkin Spice Latte

Homemade Pumpkin Spice Latte


http://www.momadvice.com/post/easy-burlap-wreath-tutorial

Autumn Burlap Wreath


Sign up for the MomAdvice newsletter


 Pin It

DIY Decorative Thumbtack Pumpkins

Thursday, September 19th, 2019

DIY Thumbtack Pumpkins from MomAdvice.com

These gold pumpkins are the perfect craft for autumn, even if you aren’t crafty. You will love these DIY Thumbtack Pumpkins for your home!

I don’t know about you, but I am always looking for new ways to decorate the holiday table that are festive while staying easy on the budget. The gold trend has really been catching my eye this year so I wanted to create something beautiful and gold that anyone can do, no matter what your craft level.

Today’s tutorial is for a decorative thumbtack pumpkin that requires just two items for a fun and festive touch to your table.

DIY Thumbtack Pumpkins Tutorial

Decorative Thumbtack Pumpkin Tutorial from MomAdvice.com

Supplies Needed

700 (or more!) gold or silver thumbtacks– these can be purchased in a package of 300 at your local dollar store

Small Faux Styrofoam Pumpkin (look for one with a fun stem detail like the glittered stem on this one)


DIY Thumbtack Pumpkins from MomAdvice.com

Directions

  1. Going along one of the ridges of the pumpkin, begin inserting thumbtacks, starting at the very top and working your way down. You will want to make sure that they overlap just a bit to create a feathered effect on your pumpkin. You do not need to go to the very bottom, just enough to cover it so that if the pumpkin is placed on a pedestal or candlestick holder that you can’t see the plastic bottom. This row helps to anchor your ridge as you place the thumbtacks in.
  2. Right next to that row, again overlapping from the side and down the row, begin placing thumbtacks in the same way, repeating this process until you have covered the entire ridge. Once the ridge is filled, just check and make sure there aren’t any holes in any places and fill, as necessary, with additional thumbtacks.
  3. Begin in the next ridge, just as you did with the first, giving just a little room between those ridges so you can still see that pumpkin shape. Now repeat this process again and again, until you have filled the entire pumpkin. This small pumpkin took 700 thumbtacks, but you may need more or less depending on how tightly you are overlapping your thumbtacks.

DIY Thumbtack Pumpkins from MomAdvice.com

DIY Thumbtack Pumpkins from MomAdvice.com

DIY Thumbtack Pumpkins from MomAdvice.com

DIY Thumbtack Pumpkins from MomAdvice.com

Isn’t this absolutely beautiful? Who would ever have guessed that it costs around $5 to make! I made two of them and wanted to show you a fun way to dress up your holiday table with these.

I spray painted two other faux pumpkins and then roughed them up with a little sandpaper. I filled a glass bottle with branches from our backyard to center these and then purchased these faux logs from my local craft store in two different heights to place my gold pumpkins on. I love all the variations on height and the different textures in this budget-friendly centerpiece.

I hope you find this idea easy and inspiring! Use your own creativity to create a few beautiful pumpkins of your own.

Speaking of autumn crafts…here are a few tutorials you might enjoy!

how to make a blanket scarf how to make a blanket scarf

Painted Pumpkins painted pumpkins tutorial

woodland art download FREE autumn printables

cabled earwarmer pattern cabled ear warmers (free pattern)

easy burlap wreath easy burlap wreath tutorial

Fall Burlap Wreath fall burlap wreath tutorial

how to paint laminate painted laminate fireplace to cozy up by

she shed make a she shed (best investment EVER!)

doughnut-hole-ghost-cake doughnut hole ghost cake

DIY Thumbtack Pumpkins from MomAdvice.com

This post contains affiliate links!

Pin It

Painting Pumpkins With Acrylic Paints

Thursday, September 12th, 2019

How to Paint Pumpkins With Acrylic Paint from MomAdvice.com

Have you ever decorated for fall with acrylic paint pumpkins? This tutorial shows you what kind of paint to paint pumpkins with and how to paint those faux pumpkins to match your home decor.  You’ll love these creative ways to paint a pumpkin.

This post was created in partnership with Waverly Inspirations. Thank you for supporting the companies that support our site! 

Who could use a pumpkin decorating craft for fall?

I decided to decorate fake pumpkins this year and am showing how you can do the same thing with supplies from your local craft store or even dollar store.

This was my first time painting our pumpkins this way and it could not be easier. I wanted to create a pumpkin display that would be perfect for the entire fall season and wanted to show you a cute way to display your pumpkins this year!

I am not big on decorating for Halloween and would prefer to skip right over that part of the fall decorating.

This month’s challenge was to create a Halloween decorations so I wanted to create a minimalistic display that would give a nod to the season, but complement our decor until it is time to deck the halls.

The best part is that these pumpkins can be used year after year and the painting is a lot less messy than carving pumpkins or using spray paint.

How to Paint Pumpkins With Acrylic Paint

Painting Pumpkins With Acrylic Paints with MomAdvice.com


How to Paint Pumpkins With Acrylic Paint from MomAdvice.com

Supplies Needed (all of these supplies can be found at Walmart!)

Any size you like of their faux pumpkins- the small ones are just $.98!! (you could also do real pumpkins!)- try Etsy for supplies.

Waverly Inspirations Acrylic Paints in Elephant, Plaster, Pool, & White

Waverly Inspirations 4-piece wide brush set

Cup with water, paper towels, and something to cover the surface while painting

Wooden Crate 

How to Paint Pumpkins With Acrylic Paint from MomAdvice.com

Remove the labels from the pumpkins and protect your surface with cardboard while painting.

With a clean wide brush, begin painting your pumpkins, using the stalk of the pumpkin as a handle to work around the surface.

If you find the area around the stem to be difficult to decorate, you can pull the stems off carefully and use hot glue to reattach after they dry.

Paint the entire pumpkin and then set it aside to dry. Don’t feel limited by painting them all one color though. Feel free to add designs on your pumpkin for Halloween too or decorate your pumpkins with an autumn-theme. The possibilities are endless on the pumpkins you can create. Personally, I love polka dots and think that would be fun AND easy.

 Drying time can take anywhere between 15 minutes to one hour, depending on how thickly you applied the paint.

Repeat this process as many times as you like to achieve the hue you are going for.

I found the gray pumpkins only required a single coat, while the white pumpkins required two coats.

Once dry, sprinkle these pumpkins throughout your house or create a crate display like I have done.

I love how these pumpkins spill out onto some of my favorite childhood reads.

The chalkboard side on this crate gives me the chance to make this display feel a little more Halloween and then can be replaced with a different label later in the fall.  I added my knitted leaf centerpiece to the side of the table- I can’t believe how well these branches have held up over the years!

For a corner in our home that used to have nothing, this has quickly become my favorite focal point in our living room.


How to Paint Pumpkins With Acrylic Paint from MomAdvice.com

How to Paint Pumpkins With Acrylic Paint from MomAdvice.com

How to Paint Pumpkins With Acrylic Paint from MomAdvice.com

How to Paint Pumpkins With Acrylic Paint from MomAdvice.com


I love how these pumpkins spill out onto some of my favorite childhood reads.

The chalkboard side on this crate gives me the chance to make this display feel a little more Halloween and then can be replaced with a different label later in the fall.  I added my knitted leaf centerpiece to the side of the table- I can’t believe how well these branches have held up over the years!

For a corner in our home that used to have nothing, this has quickly become my favorite focal point in our living room.

Do you prefer to paint your pumpkins with chalk paint? I think you will get a kick out of the pumpkins we created for the season when our kids were small.  We really have some of the best pumpkin painting ideas on here so please stick around!

What is the Best Way To Clean Up After Painting With Acrylic Paints?

Acrylic paint crafts can get pretty messy, especially if you are involving your kids in on the fun. I use a simple formula for removing paint from little hands that you should definitely try.

Whether you are dying eggs for the Easter season or painting pumpkins for Halloween, this formula is a great one to keep in your back pocket.

The best way to remove acrylic paint from your hands is to squirt a small amount of whitening toothpaste, add a squirt of facial exfoliant (or body exfoliant), and a squirt of baby oil.  Just rub this combination on your hands until you have removed all the paint. 

The best part is that you will have baby soft hands after you are done! 

This post contains affiliate links. I receive a commission if you make a purchase through our links.

Love this project? Check out these additional craft projects!

dollar store thumbtack pumpkins

autumn burlap wreath

slow cooker pumpkin spice candles

diy game day bar cart

no-sew blanket scarves

Do you want more craft inspiration from Waverly? Try these!

DIY No-Sew Reversible Chair Cushions

Fabric Wreath & Matching Garland

Fabric Bulletin Board Tutorial

This post was created in partnership with Waverly Inspirations and contains affiliate links. Thank you for supporting the companies that support our site! 

How to Paint Pumpkins With Acrylic Paint from MomAdvice.com


Pin It

How To Host or Join a Reading Retreat

Thursday, July 25th, 2019

Have you ever dreamed of going on a reading retreat? Check out this post for reading retreat ideas and discover how you can participate in one!

This past week was a whirlwind of excitement as I hosted my very first MomAdvice Reading Retreat.

I, honestly, still can’t believe that this actually happened. 

The first time I uttered the words, “reading retreat,” I was met with a lot of confusion. 

As soon as I began to explain my idea for this though, almost everyone said that they could use a retreat like this in their life.

Let’s be honest, it seems that there has been a retreat for everything including writing retreats, yoga retreats, retreat centers for wellness, and even social media retreats.

With all these types of retreats offered, I began to wonder why I couldn’t find a reading retreat for bookish people or an introvert retreat that catered to people like me.

Today I wanted to share some book club retreat ideas and strategies for how to host a retreat. More importantly, I would love to invite you to join the next one. The quickest way to stay in the loop is to join our book club and retreat mailing list. Please note, the retreat mailing list is separate from your weekly happy newsletter.

Should history repeat itself these spots go REALLY fast and that just might be one reason why I think the bookish retreat is going to be the next big thing for our community. 

I could not have done it without these two ladies- thank you, Meg & Symbol!!!

Personally, I have felt like blogging is just not filling my cup the way it used to. I have missed the feelings of connectedness that we used to have through comments and interactions.

The book club has been my way of coping with these changes and figuring out how my path might look moving forward.

The idea for a reading retreat really was hatched when I read about retreats happening in other parts of the country.  Although they were hosted much differently than mine, I began to brainstorm a different type of reading retreat that would build better connections within our book club community.  Keep in mind, I began the research and planning in January to execute this in the summer.

We also surveyed our book club members to see if they were even interested in the retreat, what part of the country they were in, what the best price point would be, and also what months worked best.


Once that data was collected, I scouted midwest retreat rentals, set an attendee amount, and established an application process for these spots. I read through all of the responses and tried to gather a group that I thought would mesh well together,  as well as support the most active members in our community. 

Catering to introverts (not to say that ALL readers are introverts, but many are) helped me make the decision to keep the group more intimate.

Each of our attendees received a copy of, “The Masterpiece,” by Fiona Davis,  for our discussion, in the mail.

Have you read it?

I am pretty sure that every person walked away with a brand new impression of the Grand Central Terminal.  For example, not many of us knew that an art school was tucked away in this historic building or the woman who made history streamlining the interior design of the Studebaker. 

You’ll have to read this one to get the scoop on these exciting times in history.  

thank you, gae, for joining our book club- check out her books here

I also encouraged everyone to dig into, “In Sight of Stars,” so that we could have a great chat with this month’s author, Gae Polisner. It was so fun to chat with our author this month and to better understand her writing process.  

As expected, Gae was amazing and we all loved being able to connect with her in this way.  I am hoping that we can offer more chats like these in the future!

Out of Print shared these adorable book totes for our reading retreat. 

Aren’t these the cutest? They even have a library card holder!  I put my Cricut to work and made name tags for each of these bags so the ladies could pick these up on the way to their room. 

Thank you, Out of Print, for making these bags so darn special!

I designed another custom shirt with Bonfire (you can view our book club shirt here too!) and had these camp shirts made with our retreat name and date on the back! 

I wanted each of the retreat attendees to feel special and for this to feel like a true getaway experience so I requested the women share their favorite drinks, dietary restrictions, shirt sizing, and morning beverage choice before they arrived.

It was so fun to surprise them with a fridge full of their favorite things. 

I also reached out to many authors and publishing houses to see if they had any books they might want to share with our retreat attendees. We had so many generous authors who shared their work with our group. 

Want to see who shared their books? Here are a few pictures of what books the reading retreat attendees received. Thank you to ALL who donated!! 

evvie drake starts over by linda holmes

keeping lucy by t. greenwood

the buddha at my table by tammy letherer

i’m fine and neither are you by camille pagan

i’ll never tell by catherine mckenzie

bare by susan hyatt

We spent the entire weekend doing loads of bookish things like talking about books, book swapping, movies based on books, and reading time. 

I just loved coming into a room and seeing everyone curled up with their books and Kindles.

Is there anything better than being surrounded by YOUR people?

thank you to Best Hair Days With Carolyn for providing our hair care products for the event- what a treat!

look how cute Dine & Dish and Good Life Eats are!

These incredible women came from all over the United States and Canada to spend a weekend with me. I could not be more grateful.

On a personal (and selfish) level, it was an incredible experience to meet people who have been reading the site for years and years. I was so honored that they would make this trip to connect with me and with each other IN REAL LIFE.

We did our best to spoil all these special ladies with homemade meals and snacks (all day and all night long!), lots of wine, quiet time for reading, and EVERYTHING BOOKS.

Organizing a retreat came with some important lessons for the next gathering.

Here’s the thing, no one becomes an expert by doing something only once and I have lots to learn.

I do plan to extend the retreat by a day so people have a quiet day of reading when they arrive (and to hopefully weather those flight delays better), I have a better grasp of retreat expenses now that I have done this, and I need to continue working on solidifying great partnerships for our attendees for the future to keep the expenses down.

All in all, I couldn’t be prouder how this event turned out!

If you are interested in connecting with our book club, I’d love to have you!

What would you like to know about the MomAdvice Reading Retreat? I am happy to answer any questions!

This post contains affiliate links

 Pin It

5 Ways to Save Money When Facing a Chronic Illness

Tuesday, June 25th, 2019

This post is sponsored by RxSaver by RetailMeNot and includes tracking links. For more information about tracking links and how to opt out, please visit All About Do Not Track prior to clicking any links found in this post. All thoughts and opinions are my own! 

If there is one thing I have learned since my Ehlers-Danlos Syndrome diagnosis, it is just how expensive having a chronic illness can be. The daily maintenance of medications, supplements, therapeutic services, doctor visits, medical devices, and dietary requirements can be extremely taxing on our budget. 

That is why I’m excited to partner today with RxSaver by RetailMeNot to share their online tool that helps you find the lowest prescription prices available. You can shop right at your own nearby pharmacy and save tons. 

As a budget-conscious person, I also wanted to share with you some strategies I have been using to save money to help offset some of our medical expenses. While we can’t always do financial planning for a chronic illness, we can learn better strategies for managing your money with your chronic illness.  

Here are 5 easy ways we saved while not compromising on the care I need to treat my condition!

Get Familiar with Your Health Insurance Plan

If you are fortunate enough to have health insurance, it is SO important to read what benefits are covered under your plan. With a brief scan, you may discover potential savings that allow you to explore services you thought you would have to pay out of pocket for. Many plans can offer coverage for items like medical equipment, home health agency services, physical or occupational therapy, and even your chiropractic care. 

Two appointments I have been regularly booking, for example, have been for acupuncture (to help treat my TMJ symptoms) and massage therapy (to also work out issues around my jaw and neck).  

Those typically sound like spa services, don’t they? 

Can you believe they are covered at my chiropractor’s office? I’m able to have these services processed under the umbrella of chiropractic medical care through my health insurance company.  

Isn’t that so great?

If you are unclear if a particular service is covered, contact the number on the back of your insurance card to request an associate look at your policy and help you walk through your benefits.  This is also a great time to ask about potential discounts for healthy and wellness like discounts on a gym membership, nutritional counseling, or mental health services.  

Save Time & Money By Researching Prescription Prices

Did you know there are ways to save on prescription drugs whether you have insurance or not? If you can’t afford your chronic disease medications, you can take advantage of apps that save you money on your prescription needs. 

Simply head to the RxSaver website (or download the app) to comparison shop the pharmacies near you and evaluate which store offers the best deal for your money.

The nice thing about this service is that they don’t require any personal information to use it and you don’t have to have a membership to take advantage of the savings. Simply enter your prescriptions in, compare prices, and choose the best price and location for you.

When I typed in my own medications, for example, I was surprised to find $20-50 savings on one of my medications thanks to this tool finding the lowest prices for me. Check your own prescriptions right over here.

This quick price check can yield your family up to 80% off at pharmacies nationwide!

Find Ways to Earn Money & Trim Your Current Expenses

When you become diagnosed with a chronic condition, you may find that your days look a lot differently than they did. Honestly, I found that my day was really structured around appointments and squeezing in a little rest.

As we all know, when our days look different our spending can also look different.  

This is a great time to reevaluate your monthly subscription services to see if they are being used enough to justify the expense.  If they no longer fit with your new lifestyle, consider reducing or dropping services to save money to pay for your future medical expenses.  

A monthly gym membership, for example, could be reduced down to a class pass instead that can work with your new daily schedule. 

Small switches like this can free up funds for future medical expenses.

Also, consider tweaks that can help you earn money to help offset costs. Moving your savings to a high interest earning online bank, for example, can yield up to twelve times more interest than what you may currently be earning.

As you explore your financial systems, I would also encourage you to get advice from a trusted financial planner to discover ways you can earn more from interest or strategies for investing wisely to help cover any unexpected expenses. 

Discussing what your new normal looks like, with your financial advisor, can impact lots of future decisions. This is a great time to go over things like estate plans, life insurance, and strategies for covering your medical costs.  The more transparent you are with your financial advisor, the better dialogue you will have to prepare for your future.

Take Advantage of Wholesale Club Prices Without the Membership (or Heavy Lifting)

Wholesale club memberships can be expensive up front, but can yield great money-back rebates and savings on items or services needed for your health. Just think of all the potential savings on things like vision, supplements, or medical care equipment needs. 

Now that I use Instacart for grocery delivery, I discovered that you don’t need a wholesale club membership card to have a grocery delivery service gather your groceries for you. This workaround on the Costco membership means that I can take advantage of all the store has to offer online and have these heavy items delivered to my door.

If you do have a card, you can input your membership number for them to use, securing more in your future rebates without the hassle of shopping for it all yourself.

Keep in mind that the grocery service does not typically purchase a lot of the over-the-counter medications you need though and that section of the store can save hundreds on your health expenses.

No grocery delivery in your area? 

As a small town girl, I feel your pain!  

You may consider doing a grocery pick-up service and having someone at home to assist you with the heavy lifting. 

Single? 

I have found a rolling shopping cart saves me time and energy on my grocery days.  #stillwinning 

Ask About Patient Assistance Programs

Lastly, if I learned anything from my Dad, it is that it never hurts to ask for a discount!  Many places I visit offer a discount card for repeat visits, a reduction on medical bills if paying out of pocket, or can share samples of prescription medication that can help offset a bit of your day to day expenses. 

I highly recommend asking too if there are discounts for students, seniors, military, long-term disability, or being low income discount. I have often been surprised what discounts I had at my disposal that I would have never known about if I had not asked.

Not only is asking about a patient assistance program at your various appointments beneficial, but it is also something you should look for when shopping for items you may be purchasing online.

In fact, many expensive medical devices or medical supplement sites may have a page dedicated to Assistance Programs, on their website. These programs allow you to apply for a set discount on your purchases that can save you a lot of money or can be covered by your health savings account.

Just like being transparent with your financial advisor, I encourage you to have transparency with your physician about your budget too.  When our son’s medication skyrocketed hundreds, we set up an appointment to discuss alternatives that wouldn’t be as costly. By having this conversation, we were able to switch our son to a higher milligram pill that could be split into two doses, giving us twice the amount of pills for a lot less.

Don’t forget though, you have a patient assistance program right in the palm of your hand. The RxSaver app can help you narrow down who has the cheapest prescriptions in your area and get you back to resting in no time flat.

This post is sponsored by RxSaver by RetailMeNot. All thoughts and opinions are my own! Pin It

Let’s Talk About Books and TV!

Tuesday, April 16th, 2019

I had the honor of being a guest on The Couch Podcast with Mary Carver this week! Mary asked if I would join her to talk about TV and books and it was such a blast. My homework to prepare was to take a list of great television shows people are loving and share them a couple of books I think they would like, based on their taste in television.

When I got done piecing together my notes, I sent them off to Mary so she could create a giant reading guide for you that you can take to your local library for some books you just won’t want to put down!

We chatted about Arrested Development (bring on the quirky characters), Outlander (you know I love a good time travel story!), The Marvelous Mrs. Maisel (I love female characters that buck the system), Friends (specifically, Ross & Rachel), The Handmaid’s Tale (fight the power!), & Stranger Things (the weirder the better).

We ran out of time to talk about The Crown, but I managed to squeeze in my recommendations in today’s reading guide. Phew!

Head HERE to grab your free reading guide and to listen to this fun podcast! 

Thank you, Mary, for giving me a space to share about my favorite books!


Looking for more great books? Here are some posts you might want to visit!

53 historical fiction novels to escape with

19 thrillers to keep you up all night

the best books of 2018

join our FREE MomAdvice Book Club

grab you free reading challenge worksheet

I hope these posts inspire you to curl up with a great book this week! Happy reading!


DIY Yarn Wrapped Letters Tutorial

Tuesday, March 12th, 2019

Create a beautiful wall display with letters and scrap yarn. This Anthropologie-inspired craft really adds a beautiful element to any home. This tutorial will show you step-by-step how to achieve a wall display of your own!

There are a few decorations in our home that have stood their test of time and the wall display in our bedroom remains one of those tried-and-true craft projects that I still love today.

I love to create projects that can be great stash-busters for the knitter AND a great yarn project for someone who doesn’t knit, but would love to have those textures in their home. Today’s project requires zero knitting skills and is simple enough that you could yarn-wrap those letters with your child.

I can’t wait to show you how easy it is to make this yarn display for a wall in your home.

Additions to my home, like these, really bring that Anthropologie shopping experience right in my home. It is, in fact, a lot of the inspiration for the crafts I try to do around here!

Let’s get started!

How to Yarn-Wrap Letters


Supplies Needed

23.5” paper mache letters that spell LOVE  (or your word of choice)

6 skeins of bulky yarn (the back of the packaging should tell you the weight of the yarn)

Scissors

Hot Glue/Tape, or even a Thumbtack for securing yarn in place

Large Package of clear 3M hooks for damage-free mounting


Directions

To begin, grab a skein of yarn and begin wrapping your letters in one direction (I started going up and down first).

Do your best to cover the letter in that direction and feel free to cut and secure yarn on the back as you go to cover the entire letter.

You can begin and end the securing of your yarn with a thumbtack, a piece of clear tape, or a little dab of hot glue.

Once you have covered the letter to the best of your ability, now begin wrapping the yarn in the other direction.

Navigating around detailed corners will be tricky. Don’t be afraid to stop and start the yarn to wrap the letters. I found that the corners were a bit bulkier to try to cover, but no one will notice that.

For the last letter, utilize all the ends of each of your skeins to create a scrappy letter from the three colors used in your L,O, and V.

I tried to layer the colors in places, securing again with a little hot glue, tape or thumbtacks for starting and finishing these wrapped places.

I also added a few knitted accessories to my last letter. The same idea could be achieved with fabric, interesting buttons, or purchased accessories. The possibilities are limitless and can fit your own style.

To mount them, I used clear 3M hooks, and used a razor blade to cut an “X” in the back of the cardboard letter to create a spot to hide the hook internally. Some of the letters could be mounted with just one hook (like the O) while others require d two or three hooks to secure.

The best part is that you can move your letters around or remount the hooks if you struggle with getting everything level.

These won’t damage your walls and when you get tired of this display, you can remove them and try something else.

bed from overstock (if you can believe it!!)

DIY Yarn Wrapped Letters Tutorial from MomAdvice.com

As you can see from my giant display, I tend to go all out when I tackle projects like this, but you could definitely use smaller letters and thinner yarn to make this display of LOVE on a smaller scale.

Anybody else want to curl up and read Little House with me?

Love this yarn project? We have SO many more fun ways to use yarn on the site!

check out this viral sensation- how to make a pom-pom wreath

diy yarn trees (make in different colors for different seasons!)

6-stitch knitted ruffle scarf

knitted leaf centerpiece (made from scraps and twigs!)

quick & easy knitted boot cuffs

knitted sweater coffee cozies

how to make a pom-pom flower bouquet


This is one of those projects that you can make all your own and I hope you share your interpretation with us! xo

This post contains affiliate links.

Gixo Fitness App for the New Year (GIVEAWAY!!!)

Thursday, January 10th, 2019

This post is sponsored by Gixo. All thoughts and opinions are my own. Thank you for supporting our sponsors!

When my health challenges started to make my gym routines difficult, I began to realize that a gym membership just couldn’t be in my cards anymore. I had no idea from day to day if my body was going to cooperate and there were months that I paid for a full membership and only was able to make a class or two.

That, my friends, was not a good return on investment.

That is when I REALLY began to realize the beauty in online month-by-month memberships and how affordable they were. Online apps typically cost less than a single class at my gym and pay for themselves rather quickly. Even more than that, I am able to use these apps around my busy work schedule!

Haven’t tried a gym app before?

Well, today I wanted to show off a new-to-me app called Gixo! Gixo is designed for busy schedules with 15, 25 or 40-minute workout classes and include offerings like:

Cardio: walking, running (all treadmill compatible)

Strength training: core, glutes, total body

Yoga and pilates


Stretching and mobility

You are able to exercise wherever you are (at home, outdoors, traveling, at the gym, or on the go) and ZERO equipment is required.


Here are a few other reasons why I REALLY love this app!

The accountability factor- One of the reasons many people gravitate towards gym memberships is that accountability factor. Although many classes are available as on-demand options, you can sign up for class times just like you would with a traditional gym membership. Signing up for a class means that you will receive a text reminder that you have a class coming up (and what equipment you might need), and then a text that reminds you when your class is starting. Scheduling a class requires you to commit and then follow through on what you set out to do for the day.

The fun coaching- When you sign into class, you take a quick selfie to check in, and your coach has access to your screen to help guide you through your class. Having this view, they are able to help you make adjustments that help reduce the risk of injury.  I loved that when I checked in for class, I even got a shoutout from the coach, all the way in London,  to thank me for joining in. It makes the experience feel more intimate than just a recorded class and it gives you a personal trainer experience.

The incredible music- Workouts, for me, are ALL about the music and each of their classes has awesome music mixes curated by Gixo’s in-house DJ. I also appreciate that you can make adjustments to coaching and the music levels so if I want to just do my own workout to their amazing mixes, I can do that by turning down the volume on the coaching.

When would I do this?

Oh, how about when I am KILLING IT around my house or doing my laundry.

How fun is that?

They Add Variation to My Winter Treadmill Workouts- It is hard to make a treadmill workout fun, but Gixo manages to do it. Thanks to this app, I’m able to hit my goals with steps and they weave in strength routines, like a series of pushups, that make this more fun and more beneficial to your body.

It is affordable- Memberships start at just $14.99/mo (billed at $179.99/year) or $19.99/mo. This cost means that it is less than the cost of a single studio class and that you are able to get A LOT for your money. You also aren’t put into one gym class type category. I can do a strength class, yoga, run or walk (outside or on my treadmill), 

Want to try it out? How about some coupons AND a giveaway today?

Use code momadvice on the Gixo app to get a 7-day free trial and 20% off either a monthly or one-year subscription!

Follow the instructions below to enter to win a 1-year subscription to Gixo! Good luck, everyone!

a Rafflecopter giveaway

This post is sponsored by Gixo. All thoughts and opinions are my own. Thank you for supporting our sponsors!Pin It