Anthropologie DIY Ruffled Lamp

November 15th, 2011

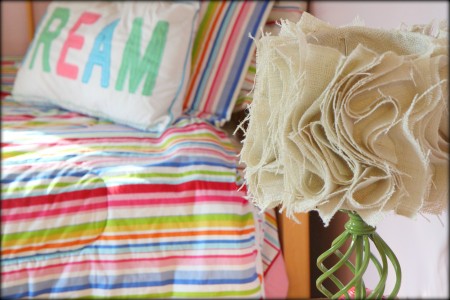
We have come to the final project in my daughter’s big girl room makeover. I am so proud of all of the little detai this room.  Many of the items in my daughter’s room had great bones, but seemed a little young for her.  The lamp in her room looked like it belonged in a nursery so I was excited to update this for her.  Instead of getting rid of a perfectly good lamp though, I wanted to figure out a way that I could do a stylish budget-friendly update to it. I happened upon this Ruffled Burlap Lamp tutorial on mama says sew and knew that this would be the perfect way to update her lamp and add a little big girl style to her nightstand.


As you can tell from the picture above, I was planning to just spray paint the original base and save myself a few dollars. Unfortunately, it rained that night and I had a spray paint fail with the paint never hardening and creating a big giant mess. I ended up buying a new lamp base for $12 at Walmart and then spray painted that to match her room. It goes to show that I can screw up even some of the simplest craft projects around here.

I bought one can of spray paint and two yards of burlap which worked out to be eight dollars in supplies (if you don’t count my big spray paint screw-up).

You will first want to cover the entire base of your lamp with a layer of burlap. Any of the metal around my lamp shade base, I just snipped a tiny slit to work the burlap around it. I used my hot glue to cover around it and secured the glue along the edge of the interior of the base.

If you have never worked with burlap before, this material is a MESS to work with. I had burlap pieces and strings everywhere. You definitely want to cut this on newspaper that you can toss out when you are done.

I got out this clothes-presser-thingie (can’t remember what this contraption is called) and pressed strips of burlap that were 1 1/2 times the length of my shade. These were 2″ strips that were then folded in half.

Just attach the pieces in a roughly manner all around the lamp. I went around it once and then filled in any empty spots with a ruffle in the middle where any holes were.

Keep going around and around until the shade is full. It is so pretty and I absolutely love how this turned out. I want to make one for our bedroom now since it is such a fun way to dress up a lamp.


This is definitely one of my favorite projects in my daughter’s big girl room and I would highly recommend making a lamp for a room in your house too. Thanks to mama says sew for the inspiration. Please visit her blog for the full details on measurements and a tutorial on how to make a ruffled lamp for a corner in your room.

What craft projects have you been working on?  Feel free to share any links to what you are working on! Access all of our craft fun on MomAdvice by visiting our Craft Section. Happy crafting, friends!

An Apron Full of Giveaways 11.15.11

November 15th, 2011

Rupert’s Woolies, $25

Welcome to our Apron Full of Giveaways! I hope everyone is having a great week this week! As we do each week,  here is our round-up of giveaways for our readers. We hope that this is beneficial to you and your family! Please let us know if you guys win anything- I love to hear the success stories!

Below are the contest links-if you are hosting a contest please link it up below. Sorry, we aren’t giving away the aprons just showcasing them! Please put your site name and then what type of contest you are hosting. For example, “MomAdvice (Kid’s Movies).”

Please let me know if you have any questions and good luck to each of you!

Herb-Roasted Turkey Breast

November 14th, 2011

To say I was nervous about cooking the Thanksgiving turkey would have been an understatement last year. Cooking the perfect turkey seemed a culinary challenge that I just was not equipped to do.  In the year’s past that I had taken on the task of hosting our Thanksgiving dinner, my grandmother would provide the turkey for us.  Last year, I really wanted to see if I could live up to the challenge of cooking the perfect turkey.

A marathon of Martha Stewart how-to television watching ensued. I read every blog and turkey website I could on how to cook the bird. Once armed with my aresenal of knowlege, I decided to cook two turkey breasts based on the fact that no one really loved the dark meat and I thought it would be a great way to dip my toe in the water of turkey roasting.

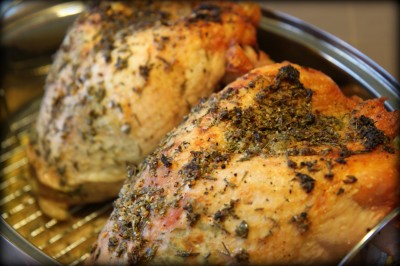
I read a lot of recipes and decided on Ina Garten’s Herb Roasted Turkey Breast. Everything about this turkey sounded delicious to me and the recipe had rave reviews. Ina had never lead me astray and so I created two of her delicious turkeys for our dinner.

This turkey is so moist and flavorful. A paste is created from fresh herbs, dried mustard, lemon juice, and minced garlic.  I relied on my inexpensive handheld food chopper to make quick work of chopping the herbs. The white wine added to the bottom of the pan offers a delicious finish on top of the turkey and keeps the meat from drying out.

Armed with this simple turkey breast recipe and my Make-Ahead Thanksgiving Side Dishes and my Make-Ahead Thanksgiving appetizers, I guarantee that you will be on track for the perfect first Thanksgiving in your house. There is no need to be nervous with great planning and fabulously foolproof recipes.

Of course, turkey isn’t just for Thanksgiving Day in our house. Don’t forget that a Weeknight Turkey Breast can yield amazing lunches for your family. These are way better than lunch meat and just as easy to prepare as any other weeknight meal.

Recipe:

Herb-Roasted Turkey Breast

1 whole bone-in turkey breast, 6 1/2 to 7 pounds

1 tablespoon minced garlic (3 cloves)

2 teaspoons dry mustard

1 tablespoon chopped fresh rosemary leaves

1 tablespoon chopped fresh sage leaves

1 teaspoon chopped fresh thyme leaves

2 teaspoons kosher salt

1 teaspoon freshly ground black pepper

2 tablespoons good olive oil

2 tablespoons freshly squeezed lemon juice

1 cup dry white wine

Directions:

Preheat the oven to 325 degrees F. Place the turkey breast, skin side up, on a rack in a roasting pan.

In a small bowl, combine the garlic, mustard, herbs, salt, pepper, olive oil, and lemon juice to make a paste. Loosen the skin from the meat gently with your fingers and smear half of the paste directly on the meat. Spread the remaining paste evenly on the skin. Pour the wine into the bottom of the roasting pan.

Roast the turkey for 2- 2 1/2 hours, until the skin is golden brown and an instant-read thermometer registers 165 degrees F when inserted into the thickest and meatiest areas of the breast. (I test in several places.) If the skin is over-browning, cover the breast loosely with aluminum foil. When the turkey is done, cover with foil and allow it to rest at room temperature for 15 minutes. Slice and serve with the pan juices spooned over the turkey.

Prep Time: 25 minutes
Total Time: 2 hours

Serving Size: 6
Source: Adapted from Food Network (Barefoot Contessa)

How to Use a Meat Thermometer

The cooking timeline for your turkey will depend on the weight of the turkey breast you purchase.  The best investment a novice chef can buy for her kitchen is a meat thermometer that can let you know when your turkey has reached the desired temperature. I have a simple instant-read thermometer (less than $10),  but you can also make the investment into a digital thermometer that you can beep at you when your bird is done (less than $20).

Make sure you stick the thermometer into the thickest part of the turkey breast to get the most accurate reading. For this turkey breast, you want the thermometer to be at 170 degrees for a perfectly cooked breast. The turkey breast, above, recommended 165 degrees, but 170 degrees is what you should aim for. Be sure to test the bird in several spots to make sure that it is cooked through.

***************************************************

Here are some basic cooking guidelines for how long to cook that turkey breast. These turkey breast cooking guidelines are for roasting the bird at 325 degrees.

Turkey Breast Cooking Guidelines

2 to 3 pounds 1½ to 2 hours

4 to 6 pounds 1½ to 2¼ hours

7 to 8 pounds 2¼ to 3¼ hours

Splendidly Homemade Magazine

November 14th, 2011

Today I am excited to share with you a fun  online magazine that you can enjoy all winter long. Splendidly Homemade Magazine is a beautifully designed magazine filled with great tutorials and pictures showcasing some amazing bloggers crafting and sharing their recipes for a perfect and joy-filled holiday season. You can learn how to do everything from making the perfect pie crust to adding adorable yo-yo embellishments to your holiday attire to creating stockings from old sweaters.

In this issue I have created a fun and easy No-Bake Peppermint Cheesecake in a Jar that would make the perfect hostess gift.  I am also sharing some cute ways to package those jars that make this an elegant gift to share with someone special in your life.

If you want to see this project, just head on over to the magazine to get the scoop. Did I mention that this requires no baking?

Once you are done making these No-Bake Peppermint Cheesecakes, you can put your peppermint extract to work and whip up a delicious Homemade Peppermint Mocha with my easy recipe.

Just be warned…

These are highly addictive and taste like a little bit of heaven.

I had a hard time just eating one or having just one cup of coffee! You can blame me for your holiday weight this year!

You can enjoy wonderful holiday content from all of these fabulous contributors in Splendidly Homemade:

Gina from The Shabby Creek Cottage
Liz from Hoosier Homemade
Barbara from Barbara Bakes
Holly from iGoBoGo
Tiffany from Eat at Home
Kellie from Nest of Posies
Laura from Real Mom Kitchen
Jessica from Kohler Created
Ashley from Ashley Pichea.com

Splendidly Homemade is available for free online and a Kindle version of this is available for a mere, $.99 cents.  Give them a Like on Facebook and follow their latest news on Twitter.

Happy Holidays, everyone!

Amy’s Notebook 11.09.11

November 9th, 2011

This Thanksgiving countdown tree would be a fun holiday tradition (@ tatertots & jello)

These raspberry breakfast bars look like a delicious way to start the day (@ Picnics in the Park)

I love this cute idea for creating a portable gift wrap station (@ Two Shades of Pink)

This chicken sausage brown rice stuffing with celery & mushrooms looks like a delicious and healthy Thanksgiving side (@ Skinny Taste)

This cannoli dip would make a perfect appetizer to bring at my holiday gatherings (@ Big Red Kitchen)

These knitted zig-zag mittens would be a fun holiday gift to knit (@ Just Crafty Enough)

This wearable blanket for baby would be a fun way to keep your little one toasty (@ Make It & Love It)

This broccoli & cheese soup is going on my menu planner for my lunches this fall (@ The Pioneer Woman)

I am so inspired by these cute Christmas cottage decorating ideas for the holidays (@ The Lettered Cottage)

I am loving these couple costumes for Halloween– definitely bookmarking for next year (@ the rockstar diaries)

I will have to try these DIY flour tortillas (@ Annie’s Eats)

I like this idea for glamming up a pair of thrift store pumps with lace (@ How Does She?)

These felt pinwheel clips would be a darling way to accessorize your daughter for the holidays (@ Sugar Bee Crafts)

This DIY princess hat would be so fun for playing dress-up or for a princess party (@ Maker Mama)

I want someone to make a pumpkin pie milkshake kit for me (@ giver’s log)

I love the idea of creating your own iPhone case from vintage goodies (@ under the sycamore)

Holiday Entertaining Made Easy (and Budget-Friendly)

November 9th, 2011

As I shared with you last month, I have had a wonderful opportunity to work as the brand ambassador for Minute Maid Pure Squeezed orange juice beverages. A couple weeks ago I spent the day in New York City and did a little filming on ways to make holiday entertaining easier on your family. Today, I am excited to share that segment with you, along with other tips for effortless entertaining!


When it comes to entertaining, I really believe that advanced preparation is key! For me it is all about freezing those dishes in the weeks prior to your Thanksgiving dinner, stocking your pantry with the essentials for last minute guests and finding new ways to transform that holiday dinner into delicious meals for the next day. These small things really do make the holidays much less stressful and more enjoyable!

Here are a few tips for making the most of your money and your holidays this year:


Skip the Big Cooking Day. I don’t know about you, but I just don’t have a day free anymore to do a marathon of cooking. I learned years ago that in order to make any celebration happen in our house, I needed to acquaint myself with dishes that could be made ahead of time, frozen and then pulled out on the big day.

After years of trial and error, I have found that I can make almost every Thanksgiving side dish and a plethora of holiday appetizers in the weeks prior to our Thanksgiving feast…and it tastes just like the day I made it. If you are looking for make-ahead recipes to add to your feast this year, be sure to visit my Make-Ahead Side Dishes recipes and my Make-Ahead Appetizers for those lingering guests who want to snack before or after the big meal.

Keep it Simple. When people ask me what special traditions we do for our family on Thanksgiving, I sometimes feel that my answer is too simple –we don’t have any grandiose traditions other than spending the morning watching the parade in our pajamas and snuggling together on the couch as a family. By hosting the Thanksgiving feast in the evening, it gives us time to remember what the holiday is all about… Being together. Being a family.

Now that my kids are both reading, I’ve added a little Thanksgiving Bingo to our holiday tradition. They can play and munch on some Thanksgiving snacks while I prepare our dinner.

Skip the Fancy Centerpieces. If your kids are anything like mine, they are bringing home quite a few Thanksgiving crafts.  We started a tradition of skipping the fancy centerpieces and using the kid’s fabulous masterpieces from school to decorate our tables.

If you want to create a family tradition that is low on cost, but embraces this time of thankfulness, create your own Thankful Tree. Have the kids gather branches from the yard and spray paint them your favorite color. Next, have them cut out leaves from scrapbook paper. When your guests arrive, have them all write what they are most thankful for and hang them with ribbon off of the tree.

Check Your Stock. You no doubt have a long grocery list for the multiple Thanksgiving dinner dishes you and your family will enjoy this holiday season. Don’t forget to stock your fridge with crowd favorites for those guests who stick around after the holidays. Make sure to pick up:

  • Bread – you can always whip up some French toast for breakfast or a quick leftover turkey sandwich for an easy lunch
  • Eggs –  make frittatas in the morning with your leftover vegetables or easy breakfast burritos for guests that may be heading out to do their Black Friday shopping
  • Medicine – for those guests that have had one too many glasses of wine the night before J
  • Minute Maid Pure Squeezed No Pulp 100% Orange Juice – it tastes just like a fresh ripe orange and comes in a 59 oz container, so you’ll have enough to go around for all of your guests
  • Granola bars or trail mix – either option is a great, filling snack to pack for your traveling family and friends

Use Those Leftovers. Although visitors can be a blessing, hosting out-of-towners can mean entertaining even after the holidays! Make Black Friday easier by planning a light breakfast, using holiday leftovers, for all your visiting guests so they are fueled to hit the mall or get back on the road. Some of my favorite leftovers to use include pumpkin pie, steamed veggies, turkey and mashed potatoes. Oh, and don’t forget your beverages – you’ll need a great tasting orange juice like Minute Maid Pure Squeezed to satisfy your guests!

Light & Fluffy Pumpkin Pancakes

makes 4 servings

Ingredients

  • 1 1/4 cups all-purpose flour
  • 2 tablespoons sugar
  • 2 teaspoons baking powder
  • 1/2 teaspoon cinnamon
  • 1/2 teaspoon ginger
  • 1/2 teaspoon nutmeg
  • 1/2 teaspoon salt
  • 1 pinch clove
  • 1 1/4 cup low-fat milk
  • 1/3 cup leftover pumpkin pie (just the filling from the pie)
  • 2 tablespoons melted butter1 egg

Directions

1. Whisk flour, sugar, baking powder, spices and salt in a bowl.

2. In separate bowl whisk together milk, pumpkin, melted butter, and egg. Fold mixture into dry ingredients.

3. Spray or grease a skillet and heat over medium heat: pour in 1/4 cup batter for each pancake. Cook pancakes about 3 minutes per side. This recipe makes six 6-inch pancakes.

************************************************

Turkey & Veggie Frittata (adapted from Family Fun)

makes 8 servings

Ingredients

  • Your choice of vegetables – use leftover steamed or fresh vegetables!
  • Turkey – cut your leftover turkey into cubes for this yummy breakfast
  • 8 eggs, beaten
  • 4 teaspoons olive oil
  • ½ cup Parmesan cheese
  • 1 teaspoon salt
  • 1 teaspoon pepper
  • 1 teaspoon rosemary

Directions

1. In a 10-inch nonstick, ovenproof skillet, sauté leftover vegetables in 1 teaspoon olive oil for 3 to 4 minutes. Season with rosemary, pepper and salt to taste. Empty mixture into a medium bowl and add turkey and eggs.

2. Add the remaining olive oil to the skillet. Set over medium-low heat and pour the egg mixture into pan. Cook 10 to 15 minutes or until the eggs are set on the bottom and lightly browned. Sprinkle Parmesan cheese over top and broil 3 to 4 minutes, or until cheese is lightly browned.

************************************************

Hash Browns (Courtesy of AllRecipes.com)

makes 8 servings

Ingredients

  • 4 cups mashed potatoes – use leftover potatoes!
  • 2 eggs, beaten
  • 2 onions, finely diced
  • 1 teaspoon salt
  • ½ teaspoon ground black pepper
  • 4 tablespoons olive oil

Directions

1. Beat egg in a medium size mixing bowl. Mix egg and onion with mashed potatoes. Add salt and pepper.

2. Heat olive oil in a medium size frying pan, over a medium heat. Scoop the potato mixture into the frying pan in 4 inch circles, pat with a spatula to flatten the mounds to approximately 1/2 to 1 inch thick. Cook until bottom is browned. Flip the patty over and brown on the other side.

************************************************

For more great tips, please watch the video, above, to learn more ways to make holiday entertaining effortless and budget-friendly!

Happy holidays to your family from our family!
Easy Coffee Filter Flowers

November 8th, 2011

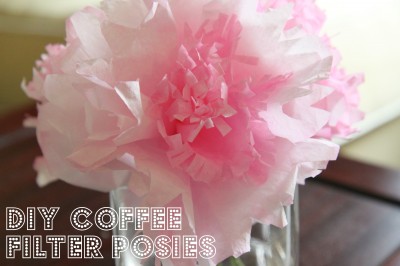
Maybe you were one of those lucky kids chopping up coffee filter flowers in elementary school. I never had a tutorial on this in my art class though, but I have been dying to make coffee filter flowers and wanted to share with you just how easy and inexpensive it is to make these for a fun table centerpiece for the holidays or just a few posies on your nightstand in those cold winter months.  If you made the Coffee Filter Wreath from last week, you should have enough left to make a few of these pretty posies!

To begin our flowers, we will need to dye our coffee filters. The trick with getting these to look like real flowers is to divide the filters into three different bowls with three different shades of dye.

Pour a 1/2 cup of hot water into each dish, two tablespoons of vinegar, and ten drops of food coloring your first bowl. In the next bowl add the hot water and vinegar, but add only eight drops of food coloring. In the last bowl, we will be doing the same thing again, but only six drops of food coloring. Submerge fifteen coffee filters into each bowl and wait ten to fifteen minutes.

I used the Betty Crocker pink neon food coloring for this project (leftover from our marbled egg dying from this past year) so these only required about five minutes in the bowls.  Just keep half an eye on them until you reach the desired color that you are going for.

Once the coffee filters are done, you need to spread them out on an old towel and let them dry.  Ignore comments from your husband like, “Yum, yum! Coffee filters for dinner?” or, “Oh, wow! ANOTHER craft project?”

You are on the fast track to being another Martha Stewart even though the house looks like a bomb exploded and it WILL be coffee filters for dinner tonight. You can’t be good at everything.

If you want to speed up the process a bit, you can blow dry these coffee filters. Again, ignore your husband when he busts in on you hunched over with coffee filters blowing around the bathroom as you blow dry them. Just keep thinking,

“Martha would totally do this…or,ahem, she has PEOPLE who would totally do this. Totally.”

Grab some floral tape and floral wire from your craft supplies (or over in the floral section of the craft supply store. Cut the wire to the length that you desire and twist and wrap the floral wire with the floral tape until the wire is covered. You can also cover a wooden skewer with floral wire if you want a flower that stands straight up. I prefer the wire because you can bend it a bit and make the flowers a little more droopy so they look a little more natural.

Here is a handy chart for what we are going for with these. You need two of the darkest coffee filters cut like this for the center of the flower, two coffee filters in the medium dye for the middle of your flower, and just one coffee filter cut like this for the outer part of the flower.

To make the center, fold your coffee filter in half, in half again, in half again, and then in half again (four folds). Take your scissors and cut it as pictured above. Repeat with another filter in the same shade.

To make the middle of your flower, fold your coffee filter in half, in half again, in half again (three folds). Take your scissors and cut it as pictured above (but better than me since I am not the brightest with my cutting). Repeat with another filter in the same shade.

To make the outside of your flower, fold your coffee filter in half and then in half again (two folds). Take your scissors and cut a scalloped edge to your flower. You just need one of these.

Stack your flowers (still folded) and then trim the tiniest little end off of the bottom of them. This will create a small hole so that we can insert the wire into the center of it.

Slip the first filter over your wire twist it at the base, and then wrap a little floral tape around it to hold it all in place. Repeat with the next dark filter, than the each medium filter, and finish with the exterior of your flower. Finish the flower with a little more floral tape to secure everything in place.

Behold your posy! Isn’t she pretty? Make as many as you like for a fun addition to any room. I saved a stack of coffee filters and plan to make this pretty flowers to adorn my daughter’s birthday presents this year.

These posies have found a home on my daughter’s nightstand in her new big girl room. I found a short glass vase for $3.99 at Meijer Supermarket that was just the perfect size to hold three of these coffee filter flowers.  I think these would make such a fun birthday centerpiece addition though with hanging tissue paper pom poms in the same shades for a birthday party.

Right next to those flowers is this handmade lampshade that I made. I will show you how I did that last week. It is another fun, easy, and inexpensive craft that would be a cute addition to any room.

What craft projects have you been working on? Did you ever make coffee filter flowers when you were a kid?  Feel free to share any links to what you are working on! Access all of our craft fun on MomAdvice by visiting our Craft Section. Happy crafting, friends!

Pin It

An Apron Full of Giveaways: Windex Giveaway Closing Today

November 8th, 2011
Lover Dovers, $32

Welcome to our Apron Full of Giveaways! I hope everyone is having a great week this week! As we do each week,  here is our round-up of giveaways for our readers. We hope that this is beneficial to you and your family! Please let us know if you guys win anything- I love to hear the success stories!

Don’t forget to get those entries in for our huge Windex prize pack since our giveaway ends this evening!  It is more than just cleaners, friends, it includes a camcorder and a $50 American Express gift card.  I just don’t want you to miss out on all of these great prizes as Windex celebrates their 75th anniversary!

Below are the contest links-if you are hosting a contest please link it up below. Sorry, we aren’t giving away the aprons just showcasing them! Please put your site name and then what type of contest you are hosting. For example, “MomAdvice (Kid’s Movies).”

Please let me know if you have any questions and good luck to each of you!

Amy’s Notebook 11.02.11

November 2nd, 2011

I can’t wait to try these 14 ways to refashion a winter coat (@ tatertots & jello)

I love this round-up of 25 flirty & fun nail trends to try (@ babble)

I am going to have to bookmark these seven tips for making better soup in the slow cooker (@ the kitchn)

I love this cardigan vest made from a t-shirt for a fun layering piece (@ Somewhat Simple)

This spiced pumpkin seed brittle looks divine (@ The Etsy Blog)

These simple roasted apples would make a great dessert finish to an autumn dinner (@ joy the baker)

I want to try these chewy chocolate chip pumpkin cookies (@ Handle the Heat)

I am so inspired by this t-shirt filing system (@ a little bite of everything)

I am in total awe of this girl’s bedroom makeover (@ life in grace)

This scrappy lampshade would be a cute addition to a girl’s room or craft space (@ Our Home’s Cool)

I love this beautiful burlap wreath for the front door (@ Polka Dot Bungalow)

I am going to make these knock-off Anthropologie letters made from paper mache (@ 346 Living)

Easy Holiday Entertaining Recipes

November 1st, 2011
(mobile upload on set with Walmart)

In August, I got the opportunity to head to Bentonville to shoot some segments on holiday entertaining with Walmart. One of the best parts of my job is getting to do filming like this. I will admit,  I actually had so much fun doing my video that I asked if they would let me shoot another video while I was there.

I hope you love these ideas for easy holiday entertaining as much as I do. I am sharing with you an easy barbecue ranch dip that you can create with a chicken bite platter that you can pick up over in the deli, as well as a simple smoked salmon dip that can be served on top of a toasted baguette. These easy appetizers will be my dishes to share at our family gatherings and fun holiday potluck dinners we have coming up, and I hope they can be easy dishes to try in your house too.