Archive for the ‘Home & Organization’ Category

MomAdvice Simplified: Simplifying Our Cleaning Routines

Thursday, April 30th, 2009

On MomAdvice Simplified, we are joined by Trish Suhr, the amazing co-host of “Clean House” on the Style Network, to help offer us tips on keeping our homes in tip top shape. Trish has some great tips for making our homes the sanctuaries that they should be and offers valuable advice on ditching the clutter in our homes so we can truly enjoy it. Trish is lovely and dynamic and I had the best time interviewing her. Talking to her was like chatting with an old friend and I hope you will enjoy this interview half as much as I enjoyed conducting it!

This podcast airs weekly at 2PM EST each Thursday. Due to Trish’s busy schedule, we did have to pre-record the interview portion, but we will be offering a great giveaway for five of our listeners sponsored by Pledge Multi Surface.

Simplifying Home Organization Resource List

Thursday, March 26th, 2009


A big thank you again to Stephanie Vozza, from The Organized Parent, for joining us today for our show. I hope you got a lot out of it and we can’t wait to bring more great guests to you on our show!

Here is the resource list from today’s podcast:

The Organized Parent– Be sure to check out Stephanie’s website for oodles of smart & stylish organizing tools for moms. Stephanie said her top seller is this chic File Tote that was featured in Family Circle Magazine.

Wuduplz– This is text messaging service that Stephanie uses to get her older child motivated to help. You can text your children and let them know what you need assistance with around the house. Now that is a brilliant way to send a chore list!

Organize Your Week– This was one of the original articles I wrote when we began the website five years ago. Although I have tried other methods of organizing my week, I always fall back on this great plan and I definitely recommend trying this in your house!

Free Weekly Planner Download– Be sure to visit our Resources section for your printable needs. In addition to our great Weekly Planner Download (filled with loads of room for all your most important engagements), you will also find a great Menu Planning Sheet that would be a lovely addition to your fridge!

20 Tips for Finding Your Routine With Kids– I had to highlight Tsh’s excellent article this week, on Simple Mom, because it falls in step perfectly with finding organization in your week. Be sure to read this article to give you more great ideas for establishing a good routine!

On next week’s show…

Next week on MomAdvice Simplified we will be discussing how to simply capture great photos! I am so excited to be joined by photographer extraordinaire, Mishelle Lane, who blogs at Secret Agent Mama. I had the great pleasure of meeting Mishelle at Blissdom ’09 and couldn’t wait to have her on our show as a guest.

Mishelle will be sharing her tips for purchasing the right photography equipment, some ideas for capturing our busy children, and how to get out of the manual mode on our cameras.

This episode will air next Thursday (April 2nd) at 2PM EST.

MomAdvice Simplified: Simplifying Home Organization

Thursday, March 26th, 2009


This week on MomAdvice Simplified, my weekly podcast for moms, we will be joined by Stephanie Vozza, the Founder of The Organized Parent and organizational expert, and she will be giving us simple and affordable techniques and tools that moms can used to stay organized in our home.

Stephanie knows that most mothers have been in the workplace (or still are) before their “mom lives” began. She also recognizes that in corporate and home offices, there are tools and standard practices to structure a workday. But when it comes to organizing your personal life, it’s every mom for herself!

Stephanie is going to guide us in this journey towards getting our mom lives as organized as our corporate lives were. That podcast will be airing today at 2PM EST so if you are looking to get your life organized again, be sure to tune in for that episode.

Just for our listeners, we will be giving away a product from The Organized Parent to one lucky caller. Please tune in for this fun and exclusive giveaway!

Simplify the Clutter Resource List

Thursday, February 5th, 2009

A big thank you again to Laura, from I’m An Organizing Junkie, for joining us today on MomAdvice Simplified. Laura had some really invaluable tips for cutting the clutter in our homes and ideas for making our lives more organized.

I completely forgot about the code word for the day for the podcast. I apologize about that- I am feeling a bit scattered today. If you email me at amy(at)momadvice(dot)com and tell me one frugal organizing solution that we recommended during the half hour, you will get an extra entry for the iPod Touch!

Here is the resource list from our show:

Menu Planning Mondays
– Join in on the menu-planning round-up each Monday on I’m An Organizing Junkie. Hundreds of people participate and it can help breathe some new life into your menu plans.

Organizing Polly Pockets– One question on the chat was how to organize Polly Pockets and all of their pieces. Laura has a great solution for this that you should definitely check out.

Organize Your Week– This article offers some general guidelines for simplifying your week and routines. By doing this, you will have some time to cut the clutter. I also share my idea for setting aside one day to tackle the one thing you hate.

Simplify the To-Do List– Simplify the to-dos in your life and you will have more time to get organized.

On the Show Next Week…

Does your closet overwhelm you? What key pieces do you need in your wardrobe to look good? My friend and local fashionista, Kathy Friend, is joining me to share her tips for simplifying our closets. With her guidance, we can simplify our closets easily and make a list of what to look for when doing our thrift shopping or wardrobe shopping. Join us next Thursday (02/12) at 2PM EST for some ideas on Simplifying Your Wardrobe.

Simplifying Our Time In the Kitchen Resource List

Thursday, January 22nd, 2009

Thank you so much to everyone who was able to catch the show live and chatted with me while I was on the air. Anyone who listened has to agree that Robin Miller was full of such great information for moms. It was really an incredible interview and I hope you can take a half hour to listen to what she shared with us!

As promised, here is today’s resource links and a couple of recipes from Robin Miller!

Getting to Know Your Freezer– Some inspiration and ideas for ways to stock your freezer!

Starbucks Peppermint Mochas– This is my favorite recipe to share and just one reason to stock those ice cubes in your freezer.

Schedule a Day In Your Kitchen– Recipes for items you can make ahead of time on a scheduled day in your kitchen. This is a great way to save cash and eliminate the convenience foods in your diet.

Bulk It Up– Ideas for maximizing that wholesale club membership to the fullest, if you plan to cook in bulk.

Feed the Freezer Cooking Guide

Sneak Up on Freezer Cooking

Freezer FAQ

30 Day Gourmet

Recipezaar’s Freezer Recipes

Books to Check Out:

Robin to the Rescue

Quick Fix Meals

Dream Dinners Cookbook

Frozen Assets

Super Suppers

Don’t Panic- Dinners in the Freezer

Beef Stroganoff

Recipe Courtesy of Robin Miller and Tyson Foods

Recipe serves 4
Preparation Time: 15-20 minutes
Time Savings: 30 minutes compared to traditional recipe

Ingredients

8 ounces wide egg-free egg noodles
2 teaspoons olive oil
½ cup chopped onion
2 cups sliced fresh cremini or white button mushrooms (about 8 ounces)
1 teaspoon dried thyme (optional)
1 ½ cups reduced-sodium beef broth
2 packets (6 ounces each) Tyson® Fully Cooked Seasoned Steak Strips
1 cup light sour cream
1 teaspoon Dijon mustard
Pinch salt and ground black pepper
2 tablespoons chopped fresh chives (optional)

1. Cook noodles according to package directions. Drain and set aside.
2. Heat oil in a large skillet over medium-high heat.
3. Add onion and sauté for 2 minutes. Add mushrooms and sauté for 3 minutes, or until mushrooms are tender. Add thyme (if using) and stir to coat.
4. Add beef broth and steak strips and bring to a simmer. Reduce heat to low and simmer for 5 more minutes.
5. Stir in cooked egg noodles, sour cream and Dijon mustard. Mix well.
6. Remove from heat and season to taste with salt and black pepper. If desired, top with fresh chives just before serving.

Chicken Parmesan Casserole

Recipe Courtesy of Robin Miller and Tyson Foods

Recipe serves 4
Preparation Time: 30 minutes
Time Savings: 30 minutes compared to traditional recipe

Ingredients

1 pound whole wheat pasta
2 packets (6 ounces each) Tyson® Fully Cooked Grilled Chicken Breast Strips
¾ cup prepared no-salt added tomato sauce (pasta sauce or pizza sauce)
1 cup shredded mozzarella cheese, regular or part-skim
3 tablespoons grated parmesan cheese
2 tablespoons Panko bread crumbs
Pinch salt and ground black pepper

1. Cook whole wheat pasta according to package directions. Drain and set aside.
2. Preheat oven to 375 degrees Fahrenheit.
3. Arrange chicken breast strips in the bottom of a shallow baking dish. Pour tomato sauce over the chicken and sprinkle mozzarella cheese over the tomato sauce.
4. In a small bowl, combine the parmesan cheese and bread crumbs. Mix well and sprinkle the mixture over the mozzarella cheese.
5. Bake for 20 minutes, or until the top of the casserole is golden brown and the cheese is bubbly, and season to taste with salt and black pepper. Let stand 5 minutes before serving.
6. Divide whole wheat pasta among four individual bowls, spoon casserole mixture over the top and serve.

MomAdvice Simplified: Simplifying Our Time in the Kitchen

Thursday, January 22nd, 2009

I am very excited to have a very special guest on MomAdvice Simplifed this week. Food Network star, Robin Miller, from Quick Fix Meals with Robin Miller is joining me today to share her tips for simplifying our time in the kitchen.

I am so incredibly excited about this interview because I am such a big fan of Robin Miller and her time-saving strategies for making healthy meals without cooking for hours and hours. Robin promotes healthy eating and I so admire what she has done with her background in nutrition. During this interview, Robin is going to share with us some ideas for stocking our freezer, some ideas for easy side dishes that aren’t boring, and ideas for ingredients that you can make ahead so you can spend more time with your children, and less time cooking.

Robin Miller has 18 years of experience as a food writer and nutritionist and is the author of the best-selling cookbook “Quick Fix Meals.” Her popular show, Quick Fix Meals with Robin Miller, currently airs on Food Network, and her prime time show, Robin to the Rescue premiered on Food Network in March 2007.

Robin’s recipes and nutrition features can be seen regularly in a variety of magazines, including Clean Eating, Experience Life, Guideposts, Cooking Light, Health, Fit Pregnancy, and Toddler. Robin is also the author of eight books including her latest, Robin to the Rescue.

Robin has been a guest on hundreds of local and national television and radio programs and has hosted home videos (for Jane Fonda), cable television vignettes (for Food Network and a variety of food companies) and spoken at media events in various markets nationwide.

She regularly appears on local, network and cable television, with past appearances including The Early Show (CBS), Regis & Kelly, The View, The Today Show (NBC), Good Morning America(ABC), CNN, ABC Eyewitness News and CBS Evening News.

As a nutrition expert, chef and mother of two, Robin has teamed up with Tyson Foods to give busy families strategies and tips using Tyson® Fully Cooked Chicken and Steak Strips to create faster, lighter and budget-friendly versions of favorite meals.

Just as a reminder, you can listen to the show live every Thursday at 2PM EST or you can listen later right here on my the left sidebar!

I hope you will join me and feel free to chat with me in the chat room or you can even phone in your questions. I think this is going to be an invaluable episode for moms and I am really excited about the information that we are going to share in this half hour.

Mommy Time Management: Making My Plans Work

Tuesday, September 16th, 2008

We did a really great series on self-care awhile back (you can scroll through my Mommy Time Management category for all of the discussions and related talks on implementing self-care in your life) and I just wanted to check in with each of you and see how your self-care is going. I know that I have found it is easy to care myself during the summer, but when our new school year starts, I suddenly seem to lose myself again. I am wondering if you are feeling the same way?

My self-care has really come from trial and error and discovering what type of person I am. Here is what I am discovering.

1. I am not a morning person. I have tried being a morning person and I just can’t do it. My workout attempts to wake up early left me feeling horrible the rest of the day and getting a jump on the day usually means I am tapping into the time when I feel less creative. Therefore, I am not pushing being a morning person and am instead concentrating on utilizing the times when I feel best…which is the evening. I will no longer apologize for not being a morning person and will understand that maybe I will come to a stage in my life where mornings work better for me, but for now I am content on being groggy in the morning and enjoying the first bit of laziness while I can.

2. I am not a gym person. I tried the gym with my kids and it did not work. My daughter is at a stage in her life where she is shy and scared when I am away from her. I don’t know how long this stage will last, but dragging one whining kid and one crying kid to the gym so I could work out left me feeling stressed and guilty. We decided to, instead, put our tax refund check towards a good treadmill that we could use while caring for our children at home. My husband is now able to run and train for his races in the winter seasons and I am able to squeeze in a workout when it is convenient for me. I am working out more often and I feel better than I did before.

3. My self-care needs to be convenient for it to work. A treadmill in the basement…not convenient. A treadmill that is near my workspace so it is ready and waiting for me. Yup, that works. Call me lazy, but self-care will only work for me if it is convenient. This means that I have to make those things available to me and group items in such a way that I will actually use them. My foot soak goodies are all together waiting for the night when I can soak my feet. My library books sit in a basket in my living room where I can grab one and read them. My craft supplies are ready for me to spend an evening working on what makes me most happy. Keeping stocked on my self-care items helps me to actually care for myself when I need it most.

4. I need to put myself on a self-care schedule. I have made a commitment to myself to do one nice thing for myself for one hour a day. It is not an hour where I am watching my favorite show while I fold the laundry, pick up the kid’s toys, and sign papers. No, the only multitasking that will be occurring is if I am watching my television show while soaking my feet. As a mom, I get in the habit of making it about everyone else, even during the time that I should be caring for myself. One hour of total and carefree time devoted to myself is just what I need. The world will still spin, our house will still function, and I will be feeling better about myself in the process.

How do you care for yourself? Do you find it more difficult as the school year and activities begin? How do you make this a priority… or do you?

(Photo Source: David Joyce)

Ask the Frugal Momma: How Do You Organize Your Pantry & Cupboards?

Thursday, September 4th, 2008

I know you guys were most impressed with the way we organized our closet, but what you *REALLY* wanted to know is how do we organize our pantry.

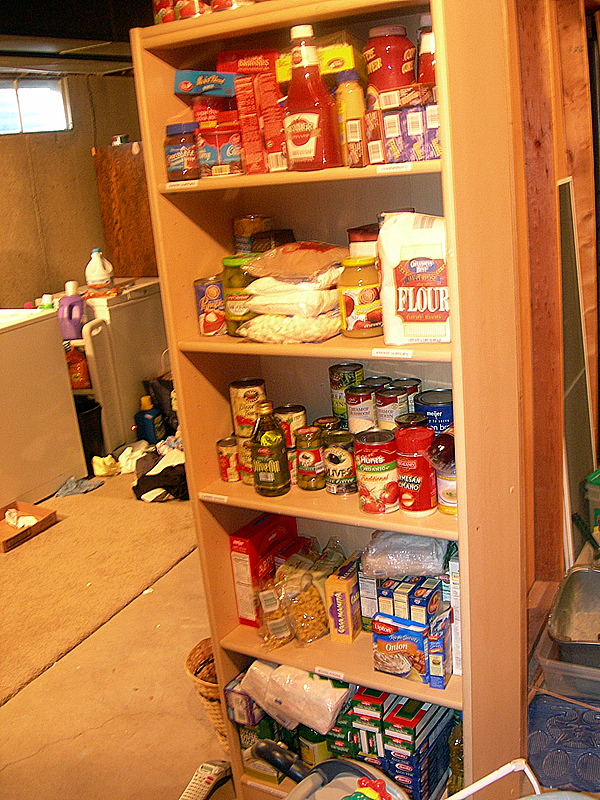
Remember when I revamped my laundry system and my yard sale system? That day I hit up the same college student for a great bookcase that she was getting rid of for only $20! I knew right away what I wanted to do with it and couldn’t wait to bring it home and put it in our basement.

First, let me give you some background information on our house and previous storage solutions. My kitchen does not have very many cupboards or pantry space so I have had to be more creative with my storage. Our big dream is to expand my tiny utility closet into a walk-in pantry, but until that happens I have been storing the majority of my pantry items in our basement.

Previously, we had a dark wood bookcase that was extremely deep that we were using to store the pantry items. We had ripped this “bookcase” out of our closet that we had turned into an entertainment unit. Yes, you could say that we are pretty creative with our smaller home. We have tried to maximize the space in places that were not being used properly instead of moving into a bigger home.

Due to the depth and darkness of the unit, what had ended up happening was that I found myself doing the repeat-buying. I would look in the unit and say to myself, “No tomato paste?” And then I would rush to the store and buy tomato paste. When I would pull items out though, I would see twenty cans of tomato paste that I had already bought. This was not frugal and the bookcase was working against me.

The location of the unit was also not the smartest place for me. With a quad level home, I was already making the trek down all of our stairs to retrieve items and then walking into the farthest corner of the basement to get what we needed. It was inconvenient and not a functional storage solution.

Welcome to the new home for my canned goods! This bookcase rests just at the bottom of the stairs in a well-lit area of our basement. The light wood color makes it easier to see what is in my pantry and the labels (created with my label maker) make it easy for even my husband to find what we need out of the pantry.
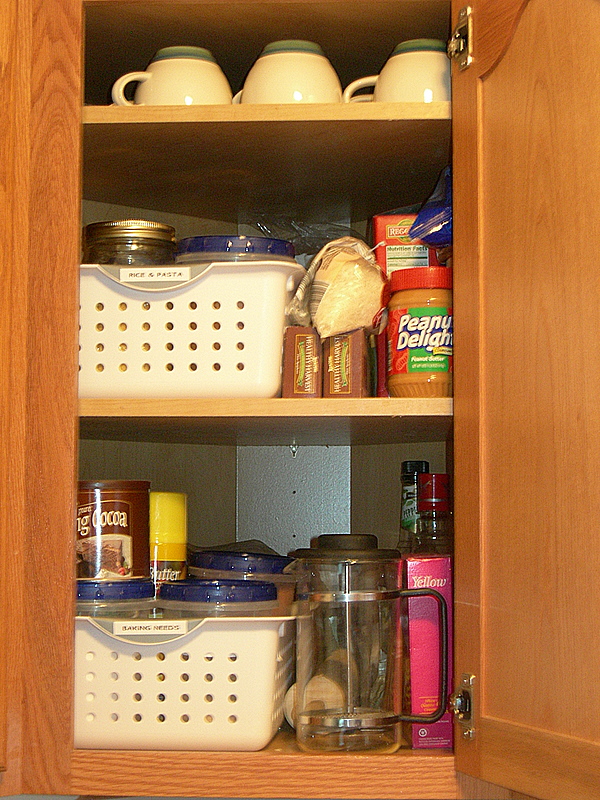
Our upstairs cupboards needed revamping as well. We have the same problem with our cupboards as we did with our former basement storage solution. One cupboard was extremely deep and items would get shoved back there until we said, “Hmmm… do you think that this is still good if it expired in 2003?” Obviously, we were wasting food and valuable cupboard space.

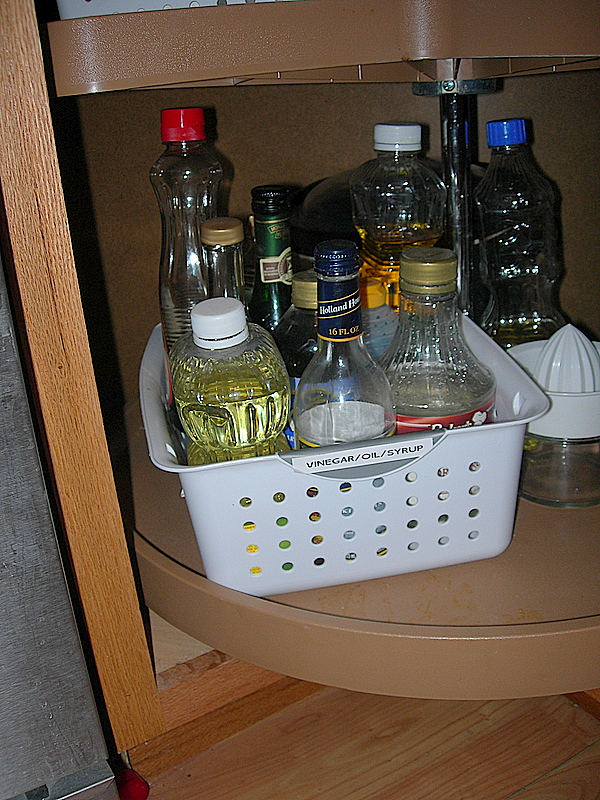
Repeat the same scenario above with the Lazy Susan unit that we had, but just make the items revolve in mass chaos. Clearly, we had a serious problem!

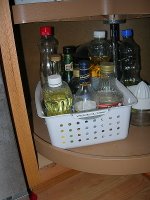
I got these handy storage baskets for less than two dollars each and divided our pantry items into categories. The storage baskets made it much easier for me to pull down exactly what I needed, rather than climbing up on a chair to try and dig through the back of the pantry. It also makes throwing items out quicker, when I need to clean out the pantry, and makes tasks easier because I had grouped like items (or cooking projects) together.
Here is how I grouped the items:

Spices- All of the spice containers were gathered together and imagine my surprise that we had plenty of repeat performers in this category. I wiped down the spices and consolidated them into one container. The spice container is residing in the cupboard closest to the stove. I can pull the small basket down and take out whatever we need and slip it back into the cupboard when I am done cooking. This is much easier than rifling through fifty teeny bottles and makes shopping day easier too!

Cake/Cookie Decorating Supplies- These are items that are used less frequently, but still needed a home. I put these higher up in a basket with handles. Piping bags, piping tips, cookie cutters, food coloring, sprinkles and the birthday candles (that no one could ever find) all went into this container.

Baking Supplies: This is a pretty general category, but it was all of the items that I needed, but could never find. In this larger basket went our baking powder, baking soda, confectioners sugar, shortening, and cocoa powder.

Rice/Pasta: These ingredients went into a larger basket and all of the boxes were consolidated and smaller pastas and the rice were placed into clear Mason jars. The mason jars were labeled and have the cooking instructions labeled on them (unless I knew the directions by heart). In the Mason jars were white rice, brown rice, jasmine rice, orzo pasta, macaroni, and couscous. Larger pasta included linguine, angel hair, and thin spaghetti. Everything fit more neatly and anything extra went into the downstairs bookcase unit.

Flour/Sugar: This organizing unit went into our Lazy Susan. This included wheat flour, white flour, self-rising flour, cake flour, brown sugar, and white sugar.

Syrups/Oils/Vinegars: This organizing unit also went into our Lazy Susan and included corn oil, vegetable oil, canola oil, olive oil, balsamic vinegar, white wine vinegar, red wine vinegar, molasses, honey, and maple syrup. Using this unit eliminated the “sticky” factor, which usually occurred, making a huge mess in the bottom of our pantry. Any extra condiments also get put in there, as they are often used in recipes.
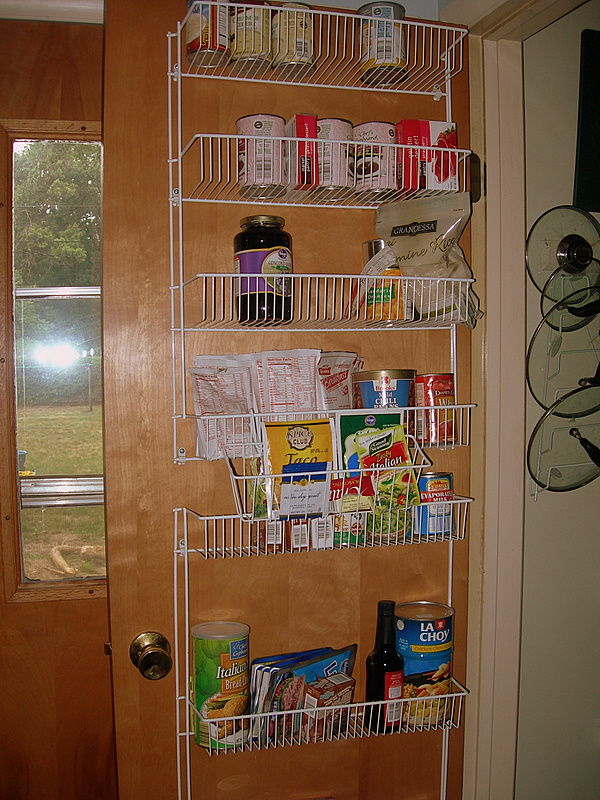
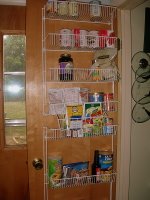
Finally, the items that I like to keep on hand upstairs all go into our pantry door. We bought one of these wire units that mounts on the door and keep items that I might need on hand. A smaller unit, that clips onto the larger unit, houses all of those little packets that we might need to assemble a meal. I try to keep what we need for the week in the upstairs pantry door and then the excess (or whatever doesn’t fit) ends up going downstairs.
If you want, I am happy to share where we keep appliances and stuff like that, just leave me a comment!

I hope that this will help give you some creat
ive storage solutions for your pantry!

Note: You can click on the pictures to expand the size.

Related Readings:

Free Up Pantry Space & Make a Snack
Making Your Spice Rack Usable
Getting the Car Organized
Gettin’ Quick in the Kitchen
Living Out of Your Pantry

Sound Off: What storage solutions have you found work in your pantry?

*Originally aired July 25, 2007*

Organizing Your Laundry Room

Thursday, September 4th, 2008

Tis the season for college students to began moving out and that means loads of great deals on organizing units and apartment style furnishings. Not only that, but many kids just offer up the stuff for free to rid themselves of having to lug the stuff home and back to school again. Keep in mind all those students who are graduating and don’t think they will need their furnishings in their new & more lucrative lives. It is a bargain-hunters dream so be checking the local papers and the free online classifieds for all these goodies.

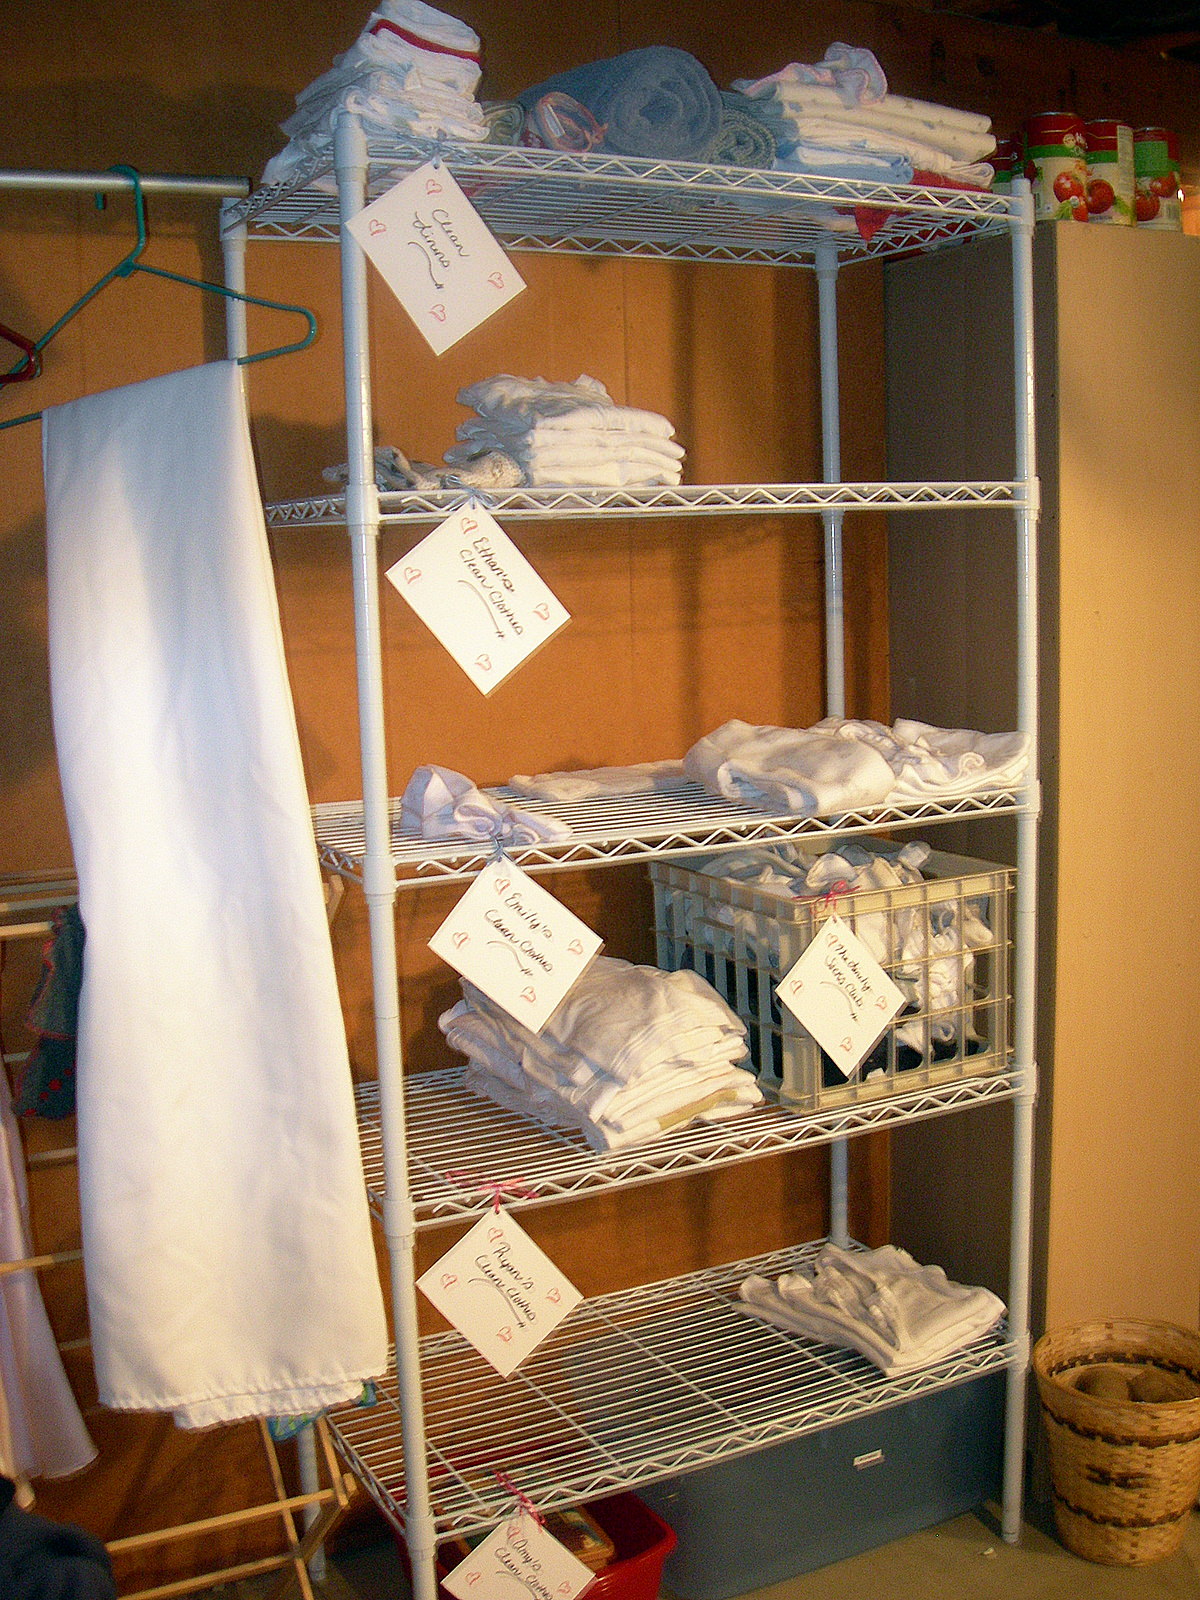
Last weekend I scored several very nice organizing units and I was able to revamp some of the organizing systems in our house. The first organizing system that I created, was a unit that I purchased for our laundry room.

I saw this organizing idea on one of those organizing shows on television and thought, “I should do that!” The show was about a mom who just couldn’t keep up with her laundry and she had no good laundry system in place. She had a laundry area in her basement (just like me!) and clothes were piled everywhere. She had no idea of what was clean or what was dirty and the basement was a disaster.

The team came in and renovated her laundry area and added a shelving unit that assigned each person in the house a shelf for clean laundry. They used baskets to organize and made things look very pretty.

I loved this idea, but I wasn’t willing to fork over the big bucks for a huge unit like that. Lucky for me, a graduating university student had an organizer that she didn’t need anymore and I was able to score this unit for only twenty dollars.

My husband reassembled it in our basement and I set to work on creating a system for our own family. Each person has a tag now for their respective shelf. The top shelf is for our linens and then we go down the line for the family members.

Some other features that I added to my station are:

– A small dish tub, that rests below, that houses a small sewing kit and is reserved for items that need mending. Mending must be simple, but those items are now separated and have all the materials needed for a quick & easy repair.
– A larger tub for ironing. I don’t iron, but someone else in the family can now find anything they want to iron themselves. Aren’t I thoughtful?
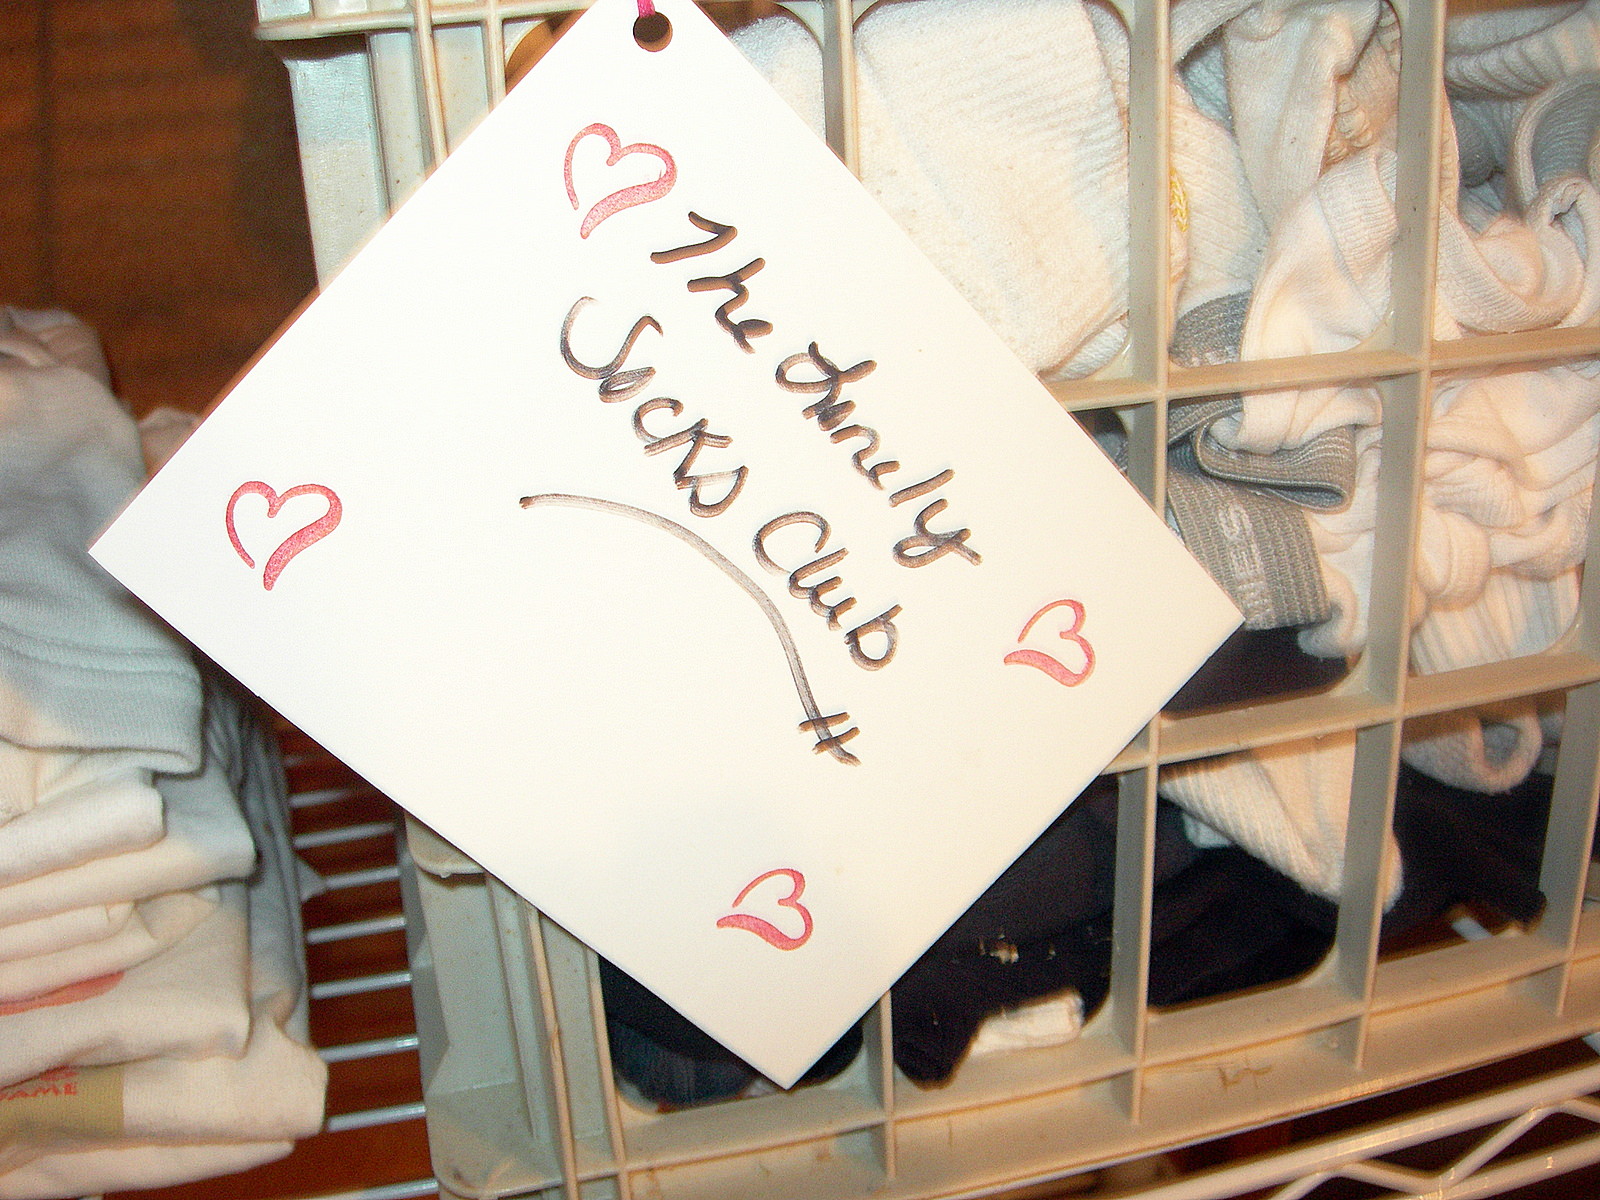
– A bin for the, “Lonely Socks Club.” We sort socks at the end of all our loads, but all socks who are missing a partner are now located there. It makes finding matches much quicker.

The unit is only a holding station for the family. This is not a storage facility. When the kids get a little older, everyone will be responsible for clearing their own shelf and and putting their own clothes away. Baskets are neatly assembled beside the unit and each family member has a basket for themselves.

What are some ways that you organize your laundry area? What are some important items that you keep in your laundry room? Any systems that work great for you? Please share!

*Originally aired April 17, 2007*

Cleaning Out The Fridge

Thursday, September 4th, 2008

Continuing the Play it Again, Momma series, we are going to discuss some ways to clean and organize your digs. Enjoy!

Today’s entry request was to cover the topic of cleaning out your fridge. Now ladies, I have been plagued with cleaning questions and ya’ll are making me feel pretty bad about my house. Maybe some money-saving questions might be a better fit for this tired mom? I will continue to answer cleaning questions as they come in, but do not, I repeat, DO NOT look around my house or the items in question. I do enjoy the research though and it has inspired me in ways I didn’t think possible so continue to throw your questions my way. Please email requests to amy@momadvice.com. The column will continue to run until I run out of questions. Be sure to check out next week’s entry where we talk about that nasty toaster oven sitting on our counters.
I do not enjoy cleaning out my refrigerator, but it one of those things that must be done. I wait until the day before grocery day to do it though because this is the day where there is the least amount of items that need to be moved around. It is also a great time to check my inventory before making the shopping trip to see if I really do need half the things on my list.
When I clean out the fridge, I break out two dishwashing tubs & a cookie sheet to accomplish this task. I fill one of these tubs with two tablespoons of baking soda and one quart of warm water (no need to measure this, just an idea of how much to use). The cookie sheet is used to put all of the condiments on and drawers are emptied into the other dishwashing tub to move items quickly in and out of the fridge.

Before cleaning the interior of the fridge, fill each drawer with the same amount of baking soda solution in each one and let the baking soda solution do the dirty work while you are wiping out the inside of the fridge.
I use a rag to do the interior and just get the rag wet with the baking soda solution. Gently wipe the interior of the refrigerator and wipe off all of the surfaces and interior of the refrigerator. If the washing solution begins to look nasty, be sure to chuck it and get another tub full to clean with.
For stuck on interior stains, you can sprinkle a little baking soda directly on the spot and add just a little water to it to make a paste. Allow this to set on the stain and then scrub gently and allow the paste to remove the gunk.
Go back to your drawers and empty them and wipe the interiors of these. Now place these back into the fridge and then take your dishwashing tub of solution and empty it into the sink. Refill the tub with just warm water and add a dash of lemon juice to the water. Now use your rag to do a final swipe using just this water & lemon juice solution. This will remove any grit that might be left in the fridge and the lemon juice will give it a nice fresh scent throughout too. Dry throughly with a terry towel.
Take your cookie sheet of condiments and make sure to give each of these a quick swipe with the rag before returning them. Half the battle is just not having clean items in your fridge and this is a good way to start fresh. Return all of the items in the other tub, at this time, to their proper homes.
The exterior of your fridge can often be overlooked, but it needs attention too. As a mother of two little ones, tiny little fingerprints and smudges are all over my fridge on any given day. To remove these, use my homemade all-purpose cleaner and spray this on your fridge. I then use a microfiber cloth to clean the outside as it is still gentle on the appliance but also abrasive enough to remove any marks. Any scuffs still left? Break out your Mr. Clean Eraser (a mom’s best friend!) You can find a generic equivalent of one of these at your local dollar store.
If you have a stainless steel appliance, dip your microfiber cloth into a little vinegar and give the outside of the fridge a good swiping with the vinegar. Then give the appliance another swipe with just plain water and dry thoroughly with a terry towel. If you have soft water, that won’t show any water marks, you can just use the water to clean the exterior.
Now when was the last time you saw the top of your fridge? You might want to hop up there on occasion and give that a good wiping too. If you have a handheld vacuum, use that to suck up any crumbs and debris. After that, use the all-purpose cleaner and give that a good wiping down too.
Just as a side note, after I clean out my fridge, I also empty the ice out of our icemaker and clean it with the same solution and dump all of the old ice out. This can be a breeding ground for bacteria, so it is an easy addition to my routine since I already have everything out.

Additional Tips:
When cleaning out your fridge, always use baking soda and warm water to wipe the insides of your refrigerator and freezers- soap or dishwashing liquid will leave a smell and can taint food.
Once every few months, remove all the food, switch off the refrigerator and wipe down all the surfaces. Defrost the freezer at the same time if necessary.
A box of baking soda can be added to your fridge and freezer to neutralize those smells.

Frugal Momma’s Money-Saving Tip:
Make sure that the door seals on the refrigerator, freezer compartment, or freezer are working efficiently by closing the door on a piece of paper. If the paper can be pulled out easily, the seal is worn and should be replaced.
Make sure to vacuum your refrigerator coils (located on the back of your fridge) twice a year. It is recommended that you do this more often if you have pets in the home. Just use your vacuum with the crevice attachment attached to the vacuum hose and give it a good vacuuming. The coils are located either on the bottom of your fridge or in the rear of your fridge. Doing this will save you money because if these are clean, your fridge won’t have to work as hard lowering your bills!

Suggested Reading:


Tips to Keep White Appliances from Looking Yellow (Warning: This does include bleach so be careful with your floors and clothing!)

What else would you like to see featured here? Please drop me an email or reply by leaving me a comment!


*Originally aired March 29, 2007*