Archive for the ‘Cleaning’ Category

Spring Cleaning: Week One, Day One

Monday, March 10th, 2008

As promised, I am putting together printables for tackling your spring cleaning this year. I just want to stress that we would like for you to share these with others, but ask that you direct them to our site to print them. They have been formatted into PDF files to try and retain as much ownership on them as I can.

I have been working my tail off on these all weekend and I am hoping that you will find them useful. Today we have an introductory letter explaining how the plan will work, what tools you will need to accomplish your tasks, and then your assignment for you to complete. For fun, I have included a recipe/meal idea that you can use. The point is to have a meal in mind so your cleaning doesn’t have you running out to McDonald’s every night, not necessarily that you have to make whatever is on my agenda.

I am working through these tasks with you and will do my best to post my pictures of my progress. I anticipate my blogging to be a little sluggish as I am trying to put these printables together, spring clean along with you, and keep up with all of the other stuff on my plate. I will do my best though!

Please send some feedback my way- I am anxious to hear it!

Today’s Printables:

Spring Cleaning Introductory Page

Spring Cleaning Recipes

Spring Cleaning Your Kitchen Day One

PS- I am trying to upload my photos for today, but am getting errors and timeouts from Google. Is anyone else having trouble with Blogger?

Spring Cleaning Agenda

Friday, March 7th, 2008

It is that time of year again and I am so excited to share with you my spring cleaning goals and accomplishments for this year. To be honest, I really dread doing the spring cleaning routine, but I do love the sense of accomplishment I get and being able to restore my home to some semblance of order for the year.

I work hard as a mom and I work hard on our site so doing an entire marathon of cleaning won’t be on my agenda. I keep a fairly tidy home, but I do have problem spots that desire attention. Maybe you work? Maybe you homeschool? Maybe you have a new baby? Marathon cleaning might not be for you!

I am hoping my proposed agenda might be a little more appealing. Each week we will tackle one room in our home and our tasks will be divided into one hour tasks for each day of the week, concentrating on our focused room. I am hoping to put together some printable checklists for the rooms, to help accomplish our goals for the year and to act as motivation for our spring cleaning routine.

The first room that I will be addressing in my home is my kitchen. Tidy enough to eat in? Yes! Scared when company opens a drawer or cupboard? Absolutely!

My goals for the kitchen might be different from yours though so take this weekend to think of seven one hour tasks you could do to get your kitchen/dining room in order.

Goals for My Kitchen (7 Tasks)

1. Clean out the refrigerator (interior)
2. Deep clean the floors (I steam my floors bi-weekly) and washing/shaking out rugs
3. Organize Pantry
4. Clean the refrigerator (exterior) & organize the cupboards under the sink
5. Weeding Out Day (removing unnecessary or unused items in my kitchen)
6. Continue Organizing Pantry (can do inventory at this point for grocery shopping needs)
7. Clean out the freezer

** Monica at the Homespun Heart is offering a giveaway to help motivate you to do your cleaning! Be sure to visit her site for the scoop on the contest and how to participate!!**

Spring Cleaning Your PC

Wednesday, March 5th, 2008

I am very excited to share that I have a guest author that will be sharing on our site monthly to help all of our working mommas and to also help those of us that are..um, challenged technically! Nicole, from the Geek Squad team, will be tackling all of our questions each month about our computers and she wants to know what you are interested in. Have a story idea for Nicole? You can send it her way to [email protected].

To coincide with our new relationship with the company, the Geek Squad has generously offered to participate in a giveaway with us. This giveaway has a retail value of $169 and has just been listed on our product review site, The Motherloot. Hurry over there and get your entries in!

Many thanks to Nicole and her team for making this opportunity possible!

Spring Cleaning Your Computer by Nicole Conway

So it’s that glorious time of year again! Time to clear the clutter and cobwebs from their hiding places and tidy the home for the coming Spring. But what about your computer? Often overlooked, your computer also needs Spring cleaning, and some basic maintenance measures to keep it humming along. So what are some basic things that you can do?

Well first, print this page so that you can refer to it during the first part of the Spring Cleaning!!

Keeping the inside of your computer’s case clear of dust is important for the long life of your computer. It also saves electricity, because your computer does not have to work so hard to keep itself cool. The inside of your computer attracts a lot of fine dust. The build up of dust can clog the vents and fans, and eventually cause your computer to get too hot. This can cause some parts to stop working correctly. In order to clean it, you will probably want to bring it outside on a clear day. First, turn off your computer, and unplug the different wires and cables. Don’t worry! If you take a good close look at the back of your computer, you will find that everything only fits where it belongs. Putting it together again should only take a few minutes. Most computers have a side that opens easily, after a large screw is loosened on the back. Remove the side, being careful not to touch any of the parts or cards inside. You can buy a can of compressed air at nearly any major electronics store, do to the job.

Keeping an arm’s length away, spray the high pressured air from one side of the computer, pushing the dust to the other side and then out. Watch out! It may create quite a cloud of swirling dust devils and bunnies!!! Repeat the sweep a few times, until the inside of the case, and the vent holes of the sides, are relatively clear. You will notice that the can gets very cold. It is probably a good idea to keep this, like any other high pressured can, out of the reach of the little ones.

Slide the side of the case back on, and bring your clean computer back inside. This is a good time to dust out the space where the computer is normally kept, and to get those cables and wires wiped down, as well.

Now it’s time to plug everything back in. Look carefully at the plugs and wires. You will notice that they are mostly color coded, and some have different shapes. Almost everything in the back of a computer will only go where it is supposed to. The only exception is those flat USB plugs. These can be plugged into any USB ports.

Turn your computer back on, and now we will get down to some basic software maintenance.

So what makes up “software clutter?” Temp files, cookies, browsing history and the like. To start your clean up, we will start with the Control Panel. The Control Panel is the best place to start for safe computer maintenance. Click on the Start menu, and then choose Control Panel. Once this comes up, you will see a number of different options. First, we will choose Internet Options. When you click it, another window pops up, called “Internet Properties” , and you will see that there are some options there to choose from. First click on “Delete Cookies”, then on “Delete Files”, lastly on “Clear History”. This will remove some unnecessary temporary files that your computer saves. Once this is finished, you can close out of this by clicking “OK”.

Close out of the Control Panel, and let’s do some more clean up. If you click on “My Computer” it will open up, and you will see some of the things that makeup your computer. The main drive of your PC has the letter C assigned to it, and you can right click it to see a menu of options. At the very bottom is the Properties choice, which we will select here. A picture will come up, which tells you how much space is on your computer, and how much has been used already. Click on “Disk Cleanup” and let that little program do its thing. When it is finished scanning for potential free space, it will give you a tidy list of files you can clean out. To be on the safe side, make sure you only choose the Temporary types of files, and then click “OK” followed by “Yes” when it asks you if you are sure. Let this run, and then you can close out of it when it completes.

Lastly, now that we have cleaned out what isn’t needed, it is time to organize! So how do we organize the files in the computer? With a good “defrag” once a month. Defragging sounds like a complicated thing, but it is really a pretty simple thing. When your computer saves something, it breaks the file up into little pieces. Sometimes, the pieces are in different places, and all defrag does is move them all together so your computer can find them quicker!

If you right click on “My Computer” you can choose “Manage” from the menu. A new window will come up, with some pretty confusing things, but we will only need one. Click on Disk Defragmenter, and the main display window will change, to show you a picture of your computer’s storage space. When you click “Defragment” a bunch of red and blue lines will show up, and one or two blocks of green. The green will not move, but as you watch, the blue and red will move around until the red lines are almost completely gone, and the blue lines are more or less all together, in a blue block. If this is the first time that your computer is going through this, it may take a couple of hours! Don’t be alarmed. Afterwards, your computer will be able to find files quicker, and will run much better.

Although Spring Cleaning is a good time to start taking care of your computer, it is a good idea to do these basic preventative tasks once a month. This will keep your computer humming away, and give you longer life, better performance, and save you over the long term.

About Nicole Conway, Geek Squad Deputy Field Marshal
Conquering the tech terrain means knowing it’s ok to run a sticky keyboard through the dishwasher (yes, just take it out before the hot drying cycle starts) or befriend your daughter on myspace so that you can monitor her activity (and every high school boy that goes near her).

When I’m not coaching on the soccer field, gardening, helping my three daughters (Emily 14, Erica 12, Erin 9) complete homework, or caring for my Beagle, 3 cats, 4 parakeets, and 2
hermit crabs (*catch breath), I’m hard at work as a Geek Squad Deputy Field Marshal. With a license to tech for three years now, I specialize in hardware repair, Networking, Virus and Spyware removal.

In other words, I’m that person you want to call when you’re about to throw your computer out the window.

After 17 years of “another career” (too painful to talk about), I pursued my true passion for computers. I relish the challenge behind life’s biggest annoyances — the jammed printer, the keyboard soaked with juicy juice, the wireless router that doesn’t route, the pile of wires your child devilishly jumbled up (need I say more?).

Go ahead, tell me if you have any issues (ones I can actually address). I should note I am a European History buff and cloth diaper sewer, so questions about Henry VIII and mending seams are not off limits!

Have a burning question about your computer? Send an email to [email protected] and get answers!

Clean: The Cooktop

Wednesday, December 19th, 2007

Every Sunday, I make it a ritual to clean a few important items in our kitchen. One of the tasks on my list is to give our stove and sink a deep cleaning. A week of cooking can really make my range look bad, but my deep cleaning gives it a nice clean top for the week. I combine this with a clean sink and I feel like my kitchen has gotten some great refreshing.

I just have a standard gas range so my routine is for this. I can post some directions I found for cleaning other surfaces, but will use my stove for this example.

1. First, I fill a sink with warm soapy water. I place all of the burner pieces gently inside of the sink and let them soak while I clean the the top of our stove. At this point, you can also take the knobs off and let them soak too. Just make sure the knobs are in the off position and pull straight out to remove (Side note: It is also possible to put these items in the dishwasher, but I prefer to hand wash them because I think it is more gentle on the pieces)

2. I then take my spray bottle filled with my homemade all-purpose spray and spray the top of my range. I let this soak in for a couple of minutes while I work on other tasks around the house.

3. Once the cleaner has done its work, I take a soft damp cloth and wipe off the cleaner.

4. If there are persistent spots that won’t come up, you can try a couple of things to get them off. I pour a couple spoonfuls of baking soda on the spots and then make a paste out of this with a little water. Using the same soft cloth, gently try and get the stain up. If there is stuck on gunk, I take a different (but still gentle!) approach towards cleaning this. I use a Pampered Chef Scraper (if you don’t have one of these, an old credit card is great) for getting this off. The important thing is that you are gentle with your actions, so it doesn’t scratch up your appliance. Use the same gentle tactics on your glass oven door. I first try using my homemade glass cleaner. If that doesn’t do the trick, you can try and get the gunk off with your handy credit card or plastic scraper. Be very careful though- you want to keep your stove looking nice!

5. Next, I use my stainless steel cleaner on my stove with one of my microfiber cloths. I just spray my cloth directly (very teeny tiny bit) and then gently remove any fingerprints that might have taken up residence on my appliance. Remember to chant, go with the grain, go with the grain, go with the grain as you are cleaning.

6. Lastly, I drain the sink and give my pieces a good rinse with cool water. At this point, you can just let them air dry or you can give them a dry with a soft towel and place them back on the stove.

Cleaning Tips for Other Types of Stoves (thanks Martha!):

Stainless-Steel Cooktop Surface: Wipe with a sponge and a little dishwashing liquid or you can use a product for stainless-steel cleaning. Be sure to dry thoroughly afterward with a clean microfiber cloth; otherwise you will have streaking. To remove stuck on gunk, soak the area with a towel dampened with hot water to loosen the material and then gently scrape with a rubber spatula.

Glass Ceramic Cooktop Surfaces: Wipe with a very lightly dampened cloth. This type of surface scratches extremely easy, in fact, even the gritty stuff that can get pushed around with a dirty sponge can cause damage. You have be really diligent to clean spills as soon as they happen. If spills do harden. You can buy special cleaners for this type of surface (available at your local hardware store). Remember to never slide pans or metal utensils across the cooktop.

Porcelain Enamel Cooktop Surfaces: Clean as directed above, but realize that the porcelain enamel can become chipped very easily. If it does get chipped though, you can camouflage damage with a little appliance touch-up paint.

Sound Off: Do you have any tips for cleaning your cooktops?

(For more great tips, visit Rocks In My Dryer)

Booster Seat Cleaning Solution

Wednesday, December 12th, 2007

I hate cleaning underneath my daughter’s booster seat, but the things that can get stuck under there can be quite unappetizing a few days after sitting there.

The other day I decided to tuck Emily’s plastic placemat under her seat instead of on the table and can’t believe I had not thought to do that sooner. Now after we enjoy our meal, I just pick the seat up and slide out the mat for a quick rinse instead of trying to clean under the seat, creating a sea of crumbs under our table.

It doesn’t help the nasty on the top of the seat, but sure makes the nasty underneath a little bit easier.

For more fun solutions for your family, be sure to visit Works-For-Me Wednesday over at Rocks in My Dryer.

Sound Off: Do you have any clever solutions for dinner clean-up?

Cleaning Out the Coffee Carafe

Tuesday, September 25th, 2007

I love my coffee carafe and use it regularly. When we had a mommy’s helper this summer, I would pour all of my coffee into it and then take it with me into my office and shut my door. It was a great way to keep the coffee warm and also keep me from going up and down the stairs for refills while I worked.

Cleaning a narrow thermos or carafe can be difficult, but my trusty baby bottle brush has pulled through for me on these occasions. I use this to wash these narrow items and get them squeaky clean. They also are great for washing wine glasses or other dainty glasses.

Sound Off:
What baby items do you still use in your house? What new purposes have you found for these things?

Caring for Stainless Steel Appliances

Friday, September 14th, 2007

We have been gradually making the switch over to stainless steel appliances. The cost on these is higher, but I have been doing bargain shopping to get the best prices on these. I am hoping that when we sell our home that it will make our kitchen look a little higher end and I love the look of the appliances for our family.

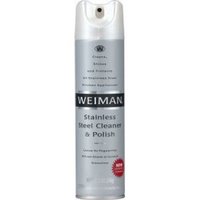
My best friend also has stainless steel appliances and when she found out that I had gotten a stainless steel stove, she told me she was going to bring a special gift over for my new stove. She showed up on my doorstep with a bottle of her favorite stainless steel cleaner that she had sworn by. She had picked up a bottle of Weiman Stainless Steel Cleaner & Polish that she had purchased for me from Wal-Mart. She said it was the best cleaner out there and instructed me to spray a very tiny bit on a soft cloth and wipe the appliance off going with the grain of the steel.

Thanks to this little bottle of cleaner (and my extremely smart friend!) I have been able to keep my appliances gleaming clean, requiring very little cleaner and effort on my part. The bottle of cleaner was $5.99, but I have had it for over two years and have barely made a dent in it.

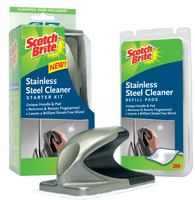
Scotch-Brite recently contacted me though to see if we would be interested in reviewing a new product that they had come out with for stainless steel appliances. They recently came out with two new cleaners, their Stainless Steel Cleaner & Cook Top Cleaner. These cleaners have handles for gripping, making it easier to get in all of the nooks and crannies of your appliances. They are ergonomically designed and offer streak-free cleaning.

After trying these out, I was impressed with how it could into all of the grooves of my stove and I was able to deeply clean the crevices of the appliance that had not been ever cleaned. There was definitely some hidden areas that needed attention and the handle made the cleaning very easy.

Unfortunately, the Scotch-Brite pads are not reusable and would require additional refill purchases, much like the Swiffer systems and other similar products. I am not as big on products that require additional purchases and this is why I stay away from systems such as these.

The Scotch-Brite pads would be great for someone who just wants to do a quick touch-up, but with starter kits at $6.99 and refill pads an additional $3.99, this is not the most cost-effective option.

Scotch-Brite is offering a $1 coupon on their website though, if you would like to give their new products a try.

I am pretty hooked on the Weiman cleaner, but would be interested to hear how you all care for your stainless steel appliances. Do you use any special cleaners? Do you have any tips that you have found work the best for your appliances? How about cook tops? This is an area that I know nothing about!

Ask Frugal Momma: Washin’ the Washer

Tuesday, July 17th, 2007


Dear Frugal Momma, Would you mind doing an entry on cleaning the washing machine…both inside and out? I know that probably sounds strange, but I try to clean everything in my home on a regular basis! Thanks in advance! The Cleaning Queen

I have to admit that this is something I had never really thought about, although I am sure it is one of those items that I should add to my regular home maintenance. This entry required a little research so I hope that it will help someone else out there!

For the interior of the washer, you will want to clean your washing machine from time to time by running it empty on a hot cycle. I will offer up two choices for cleaning the washer. You can do it the environmentally-friendly way or by trying the bleach version.

The first way that you can clean the washer is by running the hot cycle with one cup (250 ml) of white vinegar. Just add it during the cycle and allow the vinegar to clean the washer for you. The vinegar will help remove any detergent deposits that have built up on your washing machine.

The second alternative for cleaning can actually be used in disinfecting a variety of non-food-contact surfaces. The recipe was supplied by, “Home Comforts” written by Cheryl Mendelson. This method is recommended for your washer, as well as the bathtubs, showers, sinks, marble, plastic, fiberglass, diaper pails and indoor garbage cans. The disinfecting solution is not recommended, however, for metal fixtures or on dark or colored grout.

Disinfecting Solution

3/4 cup bleach
1 gallon warm water
1 tablespoon of powdered laundry detergent

Using solution, wash surface or object clean. Then keep it wet with the solution for at least five minutes. Rinse and let dry.

The exterior of most washer and dryer tops are made from porcelain enamel or synthetic enamel. This type of material does not stand up well to repeated exposure of chemicals such as ammonia, chlorine bleach, or any abrasive cleaners.

The best solution for cleaning the exterior of the washer (and just about everything else) is my homemade all-purpose cleaner. The recipe for that is:

All-Purpose Cleaner

2 tablespoons dish soap (any kind works fine)
2 cups warm water

Put two ingredients into a spray bottle and give it a shake to incorporate them.

If you begin to see any mildew damage to the rubber door seal, on your washing machine, you will want to disinfect it to discourage further problems and to remove what has already occurred. Make a solution of one cup chlorine bleach to two cups warm water. Wearing rubber gloves, first wipe the lower portion of the door seal (where the water and bacteria will be most concentrated) with a soft cloth soaked in the bleach solution. Then wipe down the entire seal. Finally fill the bleach dispenser with bleach and run the washer empty through one hot cycle. You can repeat this process every two to four months to keep mildew down. This is particularly recommended if you live in a humid climate or if your laundry room is not well-ventilated.

I hope this helps answers your question! Please feel free to email your questions directly to me at [email protected] on any topic related to homemaking or saving money. I would be happy to answer your questions. You can also submit your questions through our forum.

Related Readings:

Happy Homemaking the Homemade Way
Cleaning Out Yo Fridge
Frugal Solutions for the Swiffer
Frugal Carpet Steaming
Favorite Frugal Cleaners
Organize Your Week

Washing Your Child’s Lovies

Monday, July 9th, 2007

“It doesn’t happen all at once,” said the Skin Horse. “You become. It takes a long time. That’s why it doesn’t happen often to people who break easily, or have sharp edges, or who have to be carefully kept. Generally, by the time you are Real, most of your hair has been loved off, and your eyes drop out and you get loose in your joints and very shabby. But these things don’t matter at all, because once you are Real you can’t be ugly, except to people who don’t understand.”

(The Velveteen Rabbit)

Do you see anything strange hanging on our line? Emily’s rabbit makes an appearance there quite regularly, and it always cracks me up to see him pinned and waving in the breeze by his ears. There is just something so comical about that.

Since Emily was three weeks old, she has been in love with bunnies. Before she was born, my grandmother and I were antique shopping and ran across a cute little gift shop. Inside the gift shop was a bunny that I pointed out to her and said how perfect it would be for a little one to carry around since it was smaller than a blanket. She ended up buying one for Emily and she absolutely loved it. A girlfriend also happened to send a very similar bunny to us as a baby gift for Emily. She always had one of these little guys tucked under her arm since she was really small and now we can’t go anywhere without them. Her rabbits remind me of my favorite story growing up, “The Velveteen Rabbit.” I was never attached to anything in this way, but I always wished I loved something like that.

Emily’s bunny collection has grown and now we have four bunnies in tote with us on any given day. She likes to chew on their ears and drag them around on dirty floors. With all the love they receive, they need frequent baths.

Here are some tips for cleaning your child’s stuffed animals:

– For smaller toys, like beanie babies, you can actually throw them in your dishwasher. My girlfriend’s daughter loves to tote these around and she just puts them in the dishwasher on the top rack. The chemicals that help whiten the dishes, will also help whiten the stuffed animal. Allow the stuffed animal to air dry. Other smaller toys, that your child puts in their mouth, can also be thrown in the dishwasher for a quick and easy way to keep them clean.

– For larger stuffed toys or ones that have been loved a bit too much and could fall apart in the washer, you can stick the stuffed animal in a paper bag with a little baking soda. Shut the top of the bag and shake the bag until the animal is coated in the baking soda. Let the animal sit in the bag for about a half hour and then take him out and give him a quick swipe with a towel, to get any lingering baking soda residue off. He should smell nice and fresh.

– In most cases, you can throw the stuffed animal in a pillowcase and run the delicate cycle in your washer. Before you throw the animal in, make sure that all of the stuffing is sealed in and all body parts are attached. Perform any emergency surgeries before the washing, and then run the cycle. Avoid the dryer, if at all possible, and allow the animal to air dry. In our situation, we have a back-up that we can use, but if you don’t the waiting-to-dry process can seem like days. If you have a clothesline, you can hang the animal out there and let the sun dry the animal. Trust me, it is a lot quicker and time is of the essence when it comes to your child’s most loved items!

– If you have animals that are collecting dust (this is most likely not the case when it comes to the lovies), you can use your vacuum hose and suck the dust off of the animal.

Sound Off: Does your child have an animal that they carry around with them? How do you care for your animals and how do you distract your child while they are being cared for?

Getting the Car Organized

Wednesday, March 28th, 2007

This week’s Works-For-Me Wednesday solutions are all ideas for your car. Shannon requested any great ideas for moms on the go. It is great timing to read all of these entries with Spring Break fast approaching. Be sure to read all of the entries there!
I like to keep a tidy home, but the car is a completely other story. It seems like we are in the car a lot and somehow cleaning out the car becomes last on my task list.

A couple of weeks ago, the warm weather got me out to finally clean my

car though and I must say that the car is looking much better this month. Whether or not we can maintain that is yet to be seen, but I do like some of the solutions I came up with for organizing it (for now!)
– I had two small milk crates that I put on each side of the back seat of the car for each child. My son’s crate is filled with crayons, paper, flash cards, and workbooks for him to work on. My daughter’s crate is filled with lots of baby toys for her to play with. Each child’s also contains a clean sippy cup. This solution has worked really well for us if we visit people’s houses who don’t have toys or when we go into a restaurant and want to keep the children entertained. The container is small enough that my son can carry his own and I have been toting my daughter’s around when I meet friends for coffee and such. This is much better than toys haphazardly thrown around in the back and they now have their own organized space.
– In the front seat, I have a small folder and today I am working on printing out directions to all of the local parks and a few day trips in the area. This will be a great reference for us if we want to get out of the house when the weather is nice out and it will save me a step when we need to be somewhere. I also keep directions to other people’s homes that I frequent. I belong to a good size mom’s group and to try and remember where everyone is can be difficult. This makes for a great reference and saves me from printing the same directions out multiple times.
– In my trunk, I have a small tote bag filled with a few things that the kids can do when we go to the park. I put two Frisbees in there, bubbles, and bubble wands. I am planning to hit our dollar tree to get a few more things to add to the mix, but it is a nice thing to have to keep the kiddos entertained.
– We also keep a spare phone book in the trunk of our car. This makes it easy to call for directions or place reservations with restaurants.
– Take advantage of times when you are filling your gas tank, to clean out wrappers and such out of the car. I keep a tissue box filled with plastic bags under our seat and I pull that out to make gathering trash up a little easier.
– One thing that I try to do is keep a spare backpack in the trunk of our car. Sometimes we are on the road and aren’t able to get home to pick up a backpack before I have to drop my son off for school. This spare backpack comes in handy for those occasions and helps the teacher too!
Feel free to share your own car solutions and be sure to check out all of the entries this week!