
Happy Holidays! I could not be more thankful for my readers and for this wonderful outlet for sharing. I hope you all have a wonderful holiday season and I will see you all back here after the New Year!
xoxo,
Amy
Happy Holidays! I could not be more thankful for my readers and for this wonderful outlet for sharing. I hope you all have a wonderful holiday season and I will see you all back here after the New Year!
xoxo,
Amy

This was a big year for Emily! We celebrated her birthday with a family brunch and followed it up with her first fantastic friend birthday party with twenty-six guests! While throwing two parties may sound expensive, I wanted to share a few ways that we were able to celebrate Emily’s big day and keep it on a budget.
The first thing I did was send an evite to invite everyone in lieu of fancy invitations. We planned an afternoon get together with snacks and a decorate your own Christmas craft and cupcake bash instead of a luncheon. It was a great way to kill the afternoon, the time allowed for our older friends to come after school, and everyone got to leave with their own little creation.
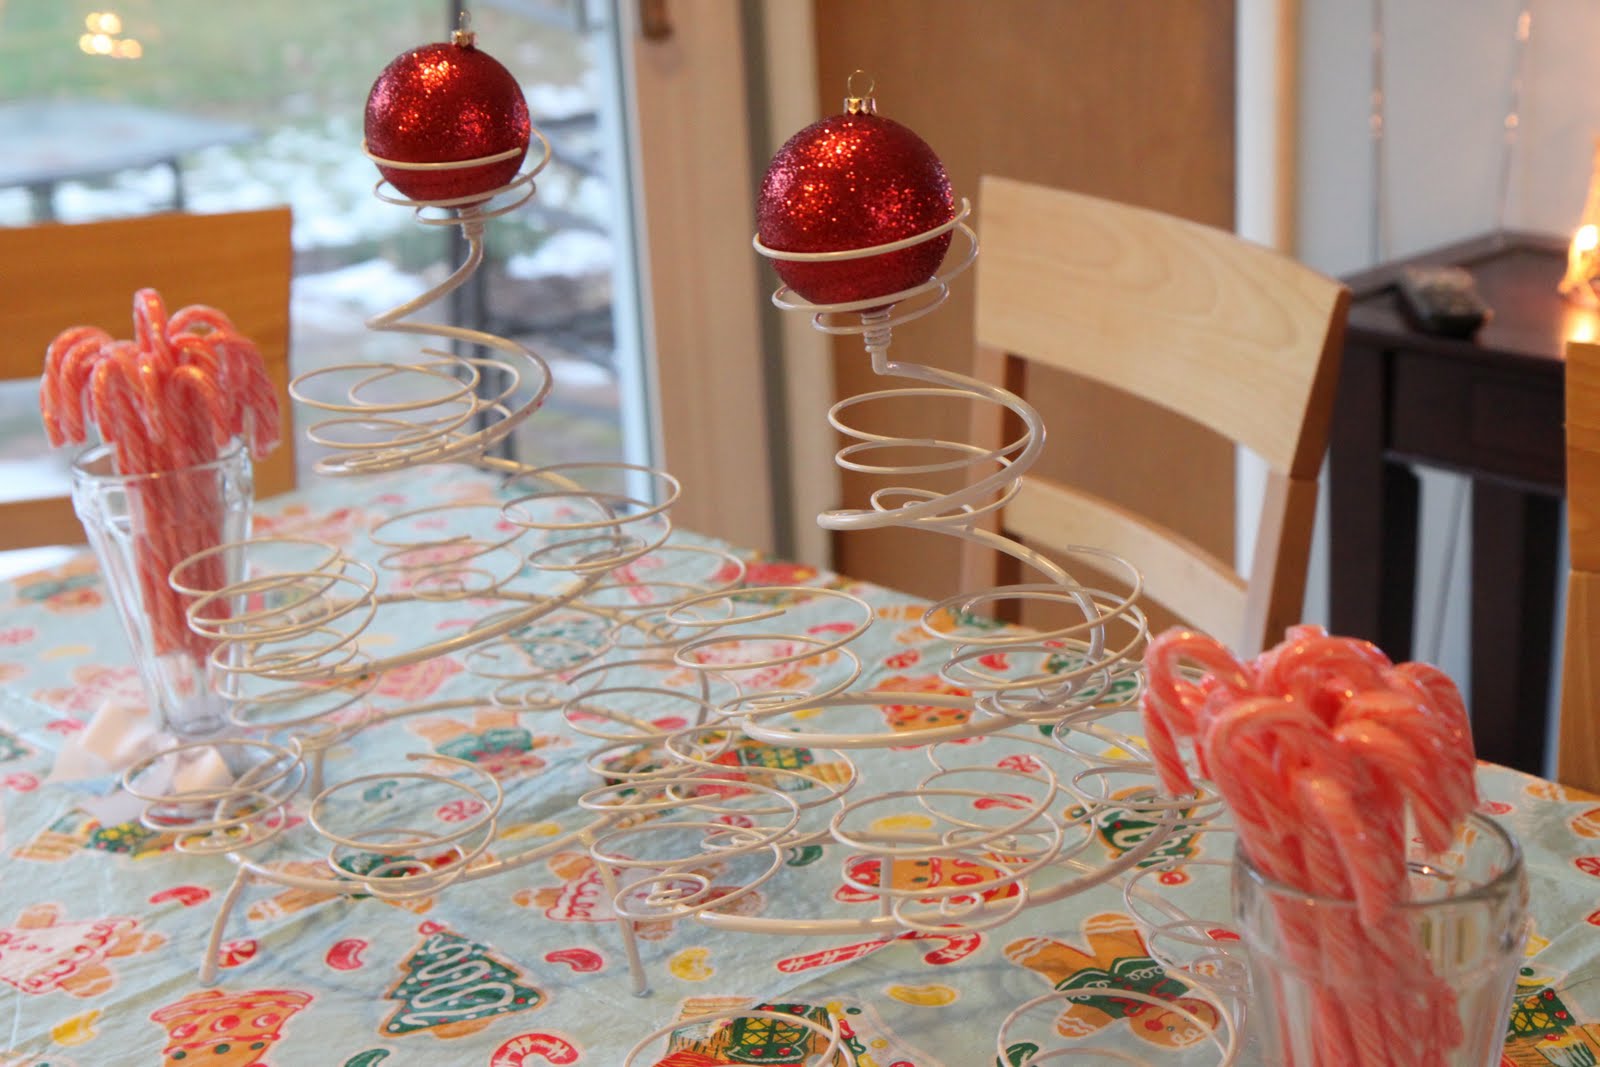
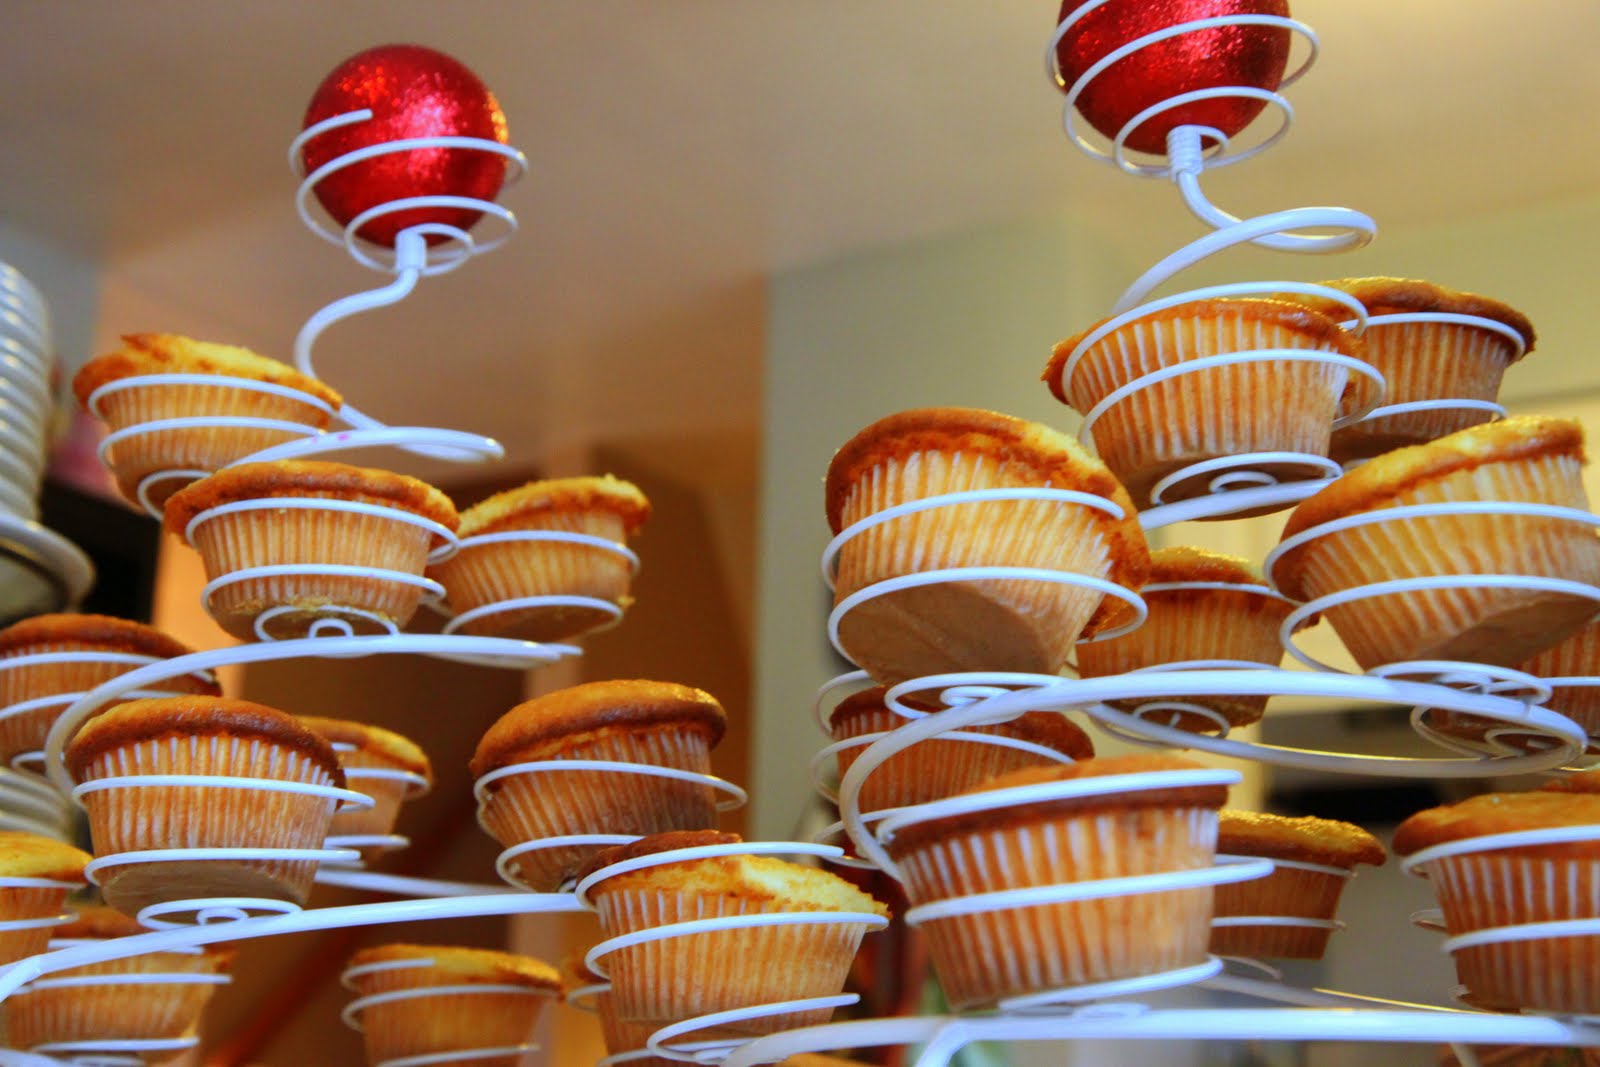
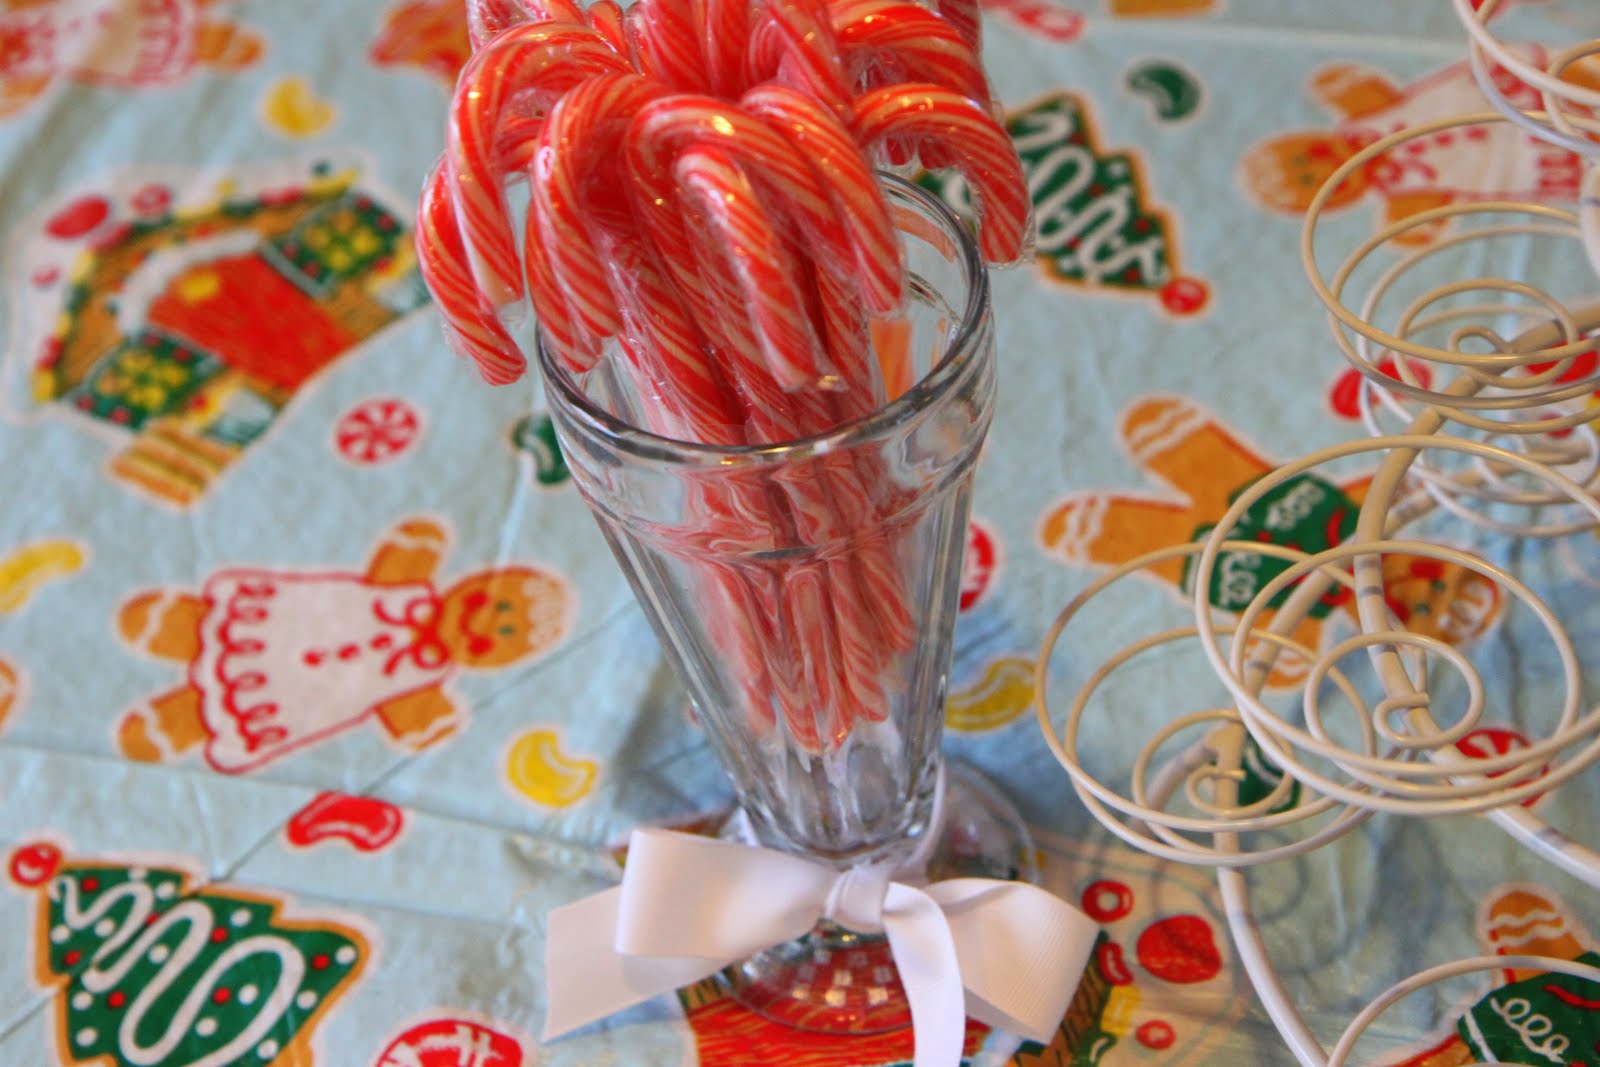 The table was set with another inexpensive vinyl tablecloth from The Christmas Tree Shoppe ($2.99). I brought out our cupcake stands (a Walmart purchase for $5 each) and topped each with a red ornament. Sundae cups from the Dollar Store (already in the cupboard) were filled with candy canes that each child could take home and tied with a little white grosgrain ribbon.
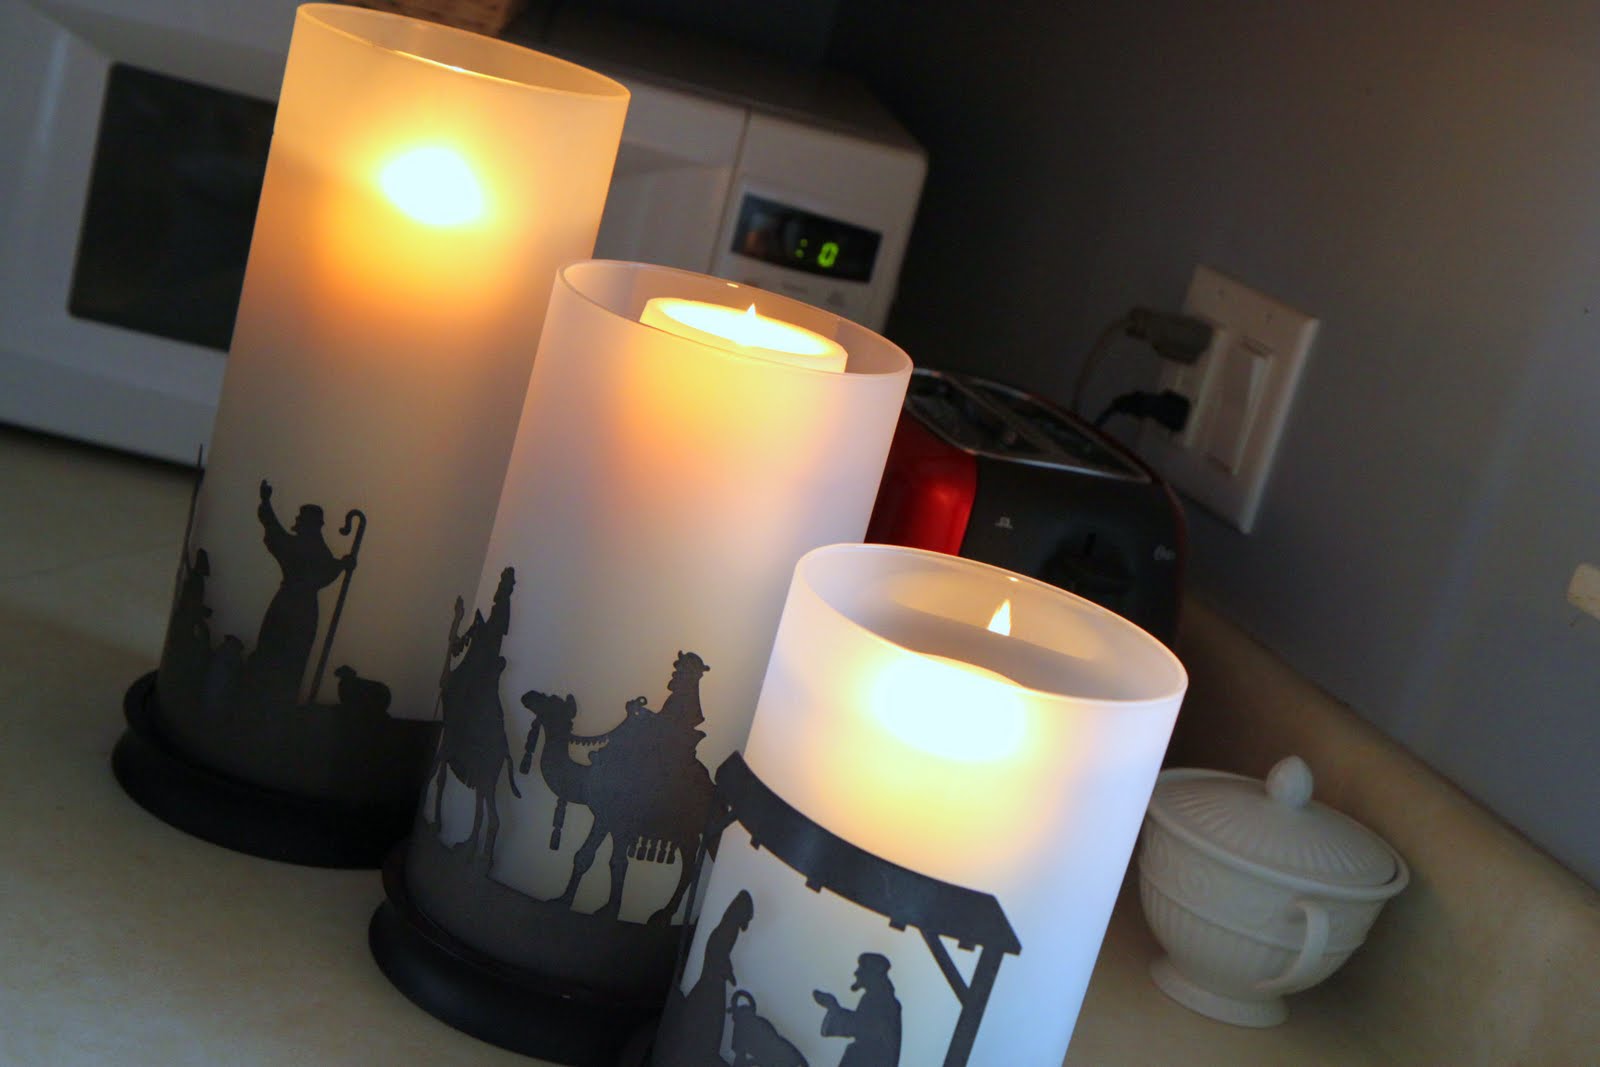
 To complete the holiday look, I got out my beautiful Nativity Hurricane Candle Set that I had received last year from DaySpring to review. In all of the holiday madness, I didn’t get to show these off last year, but I could not wait to get them out this year. Aren’t they stunning?
I also threw together a holiday music playlist on our computer for everyone to enjoy while we did our decorating and crafting. Everything from Diane Krall to Bing Crosby to Ella Fitzgerald was mixed into our holiday celebration. No celebration is complete without music, in my humble opinion!
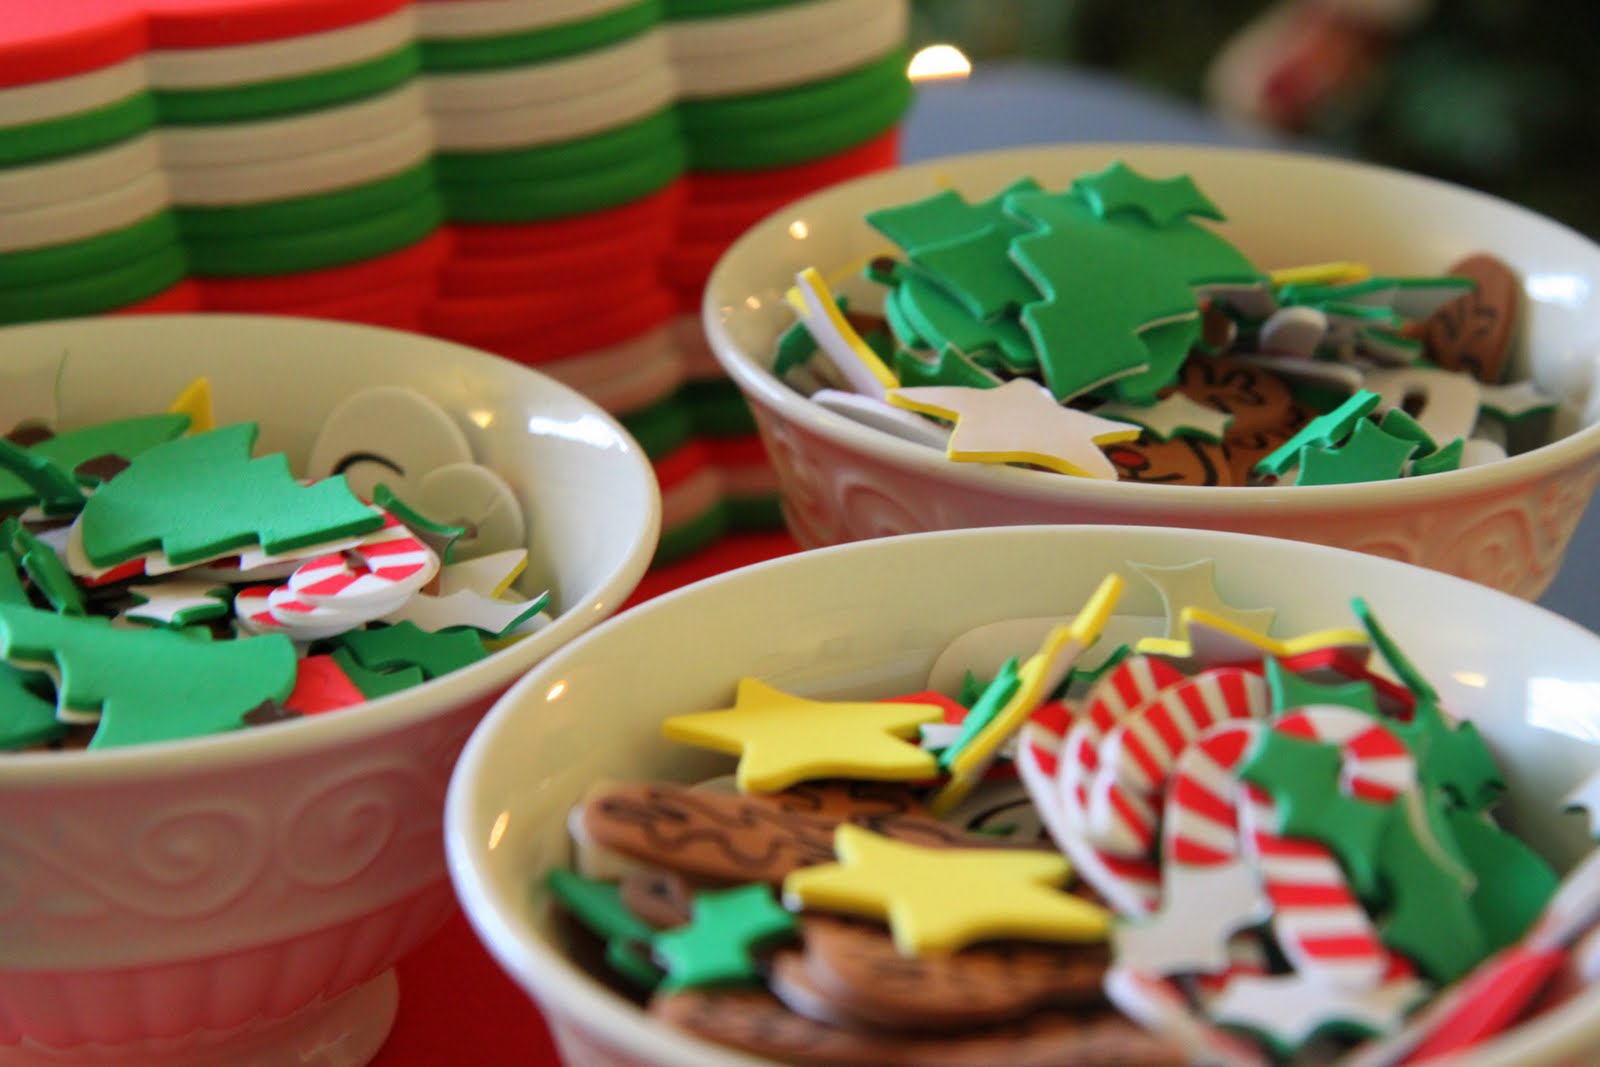
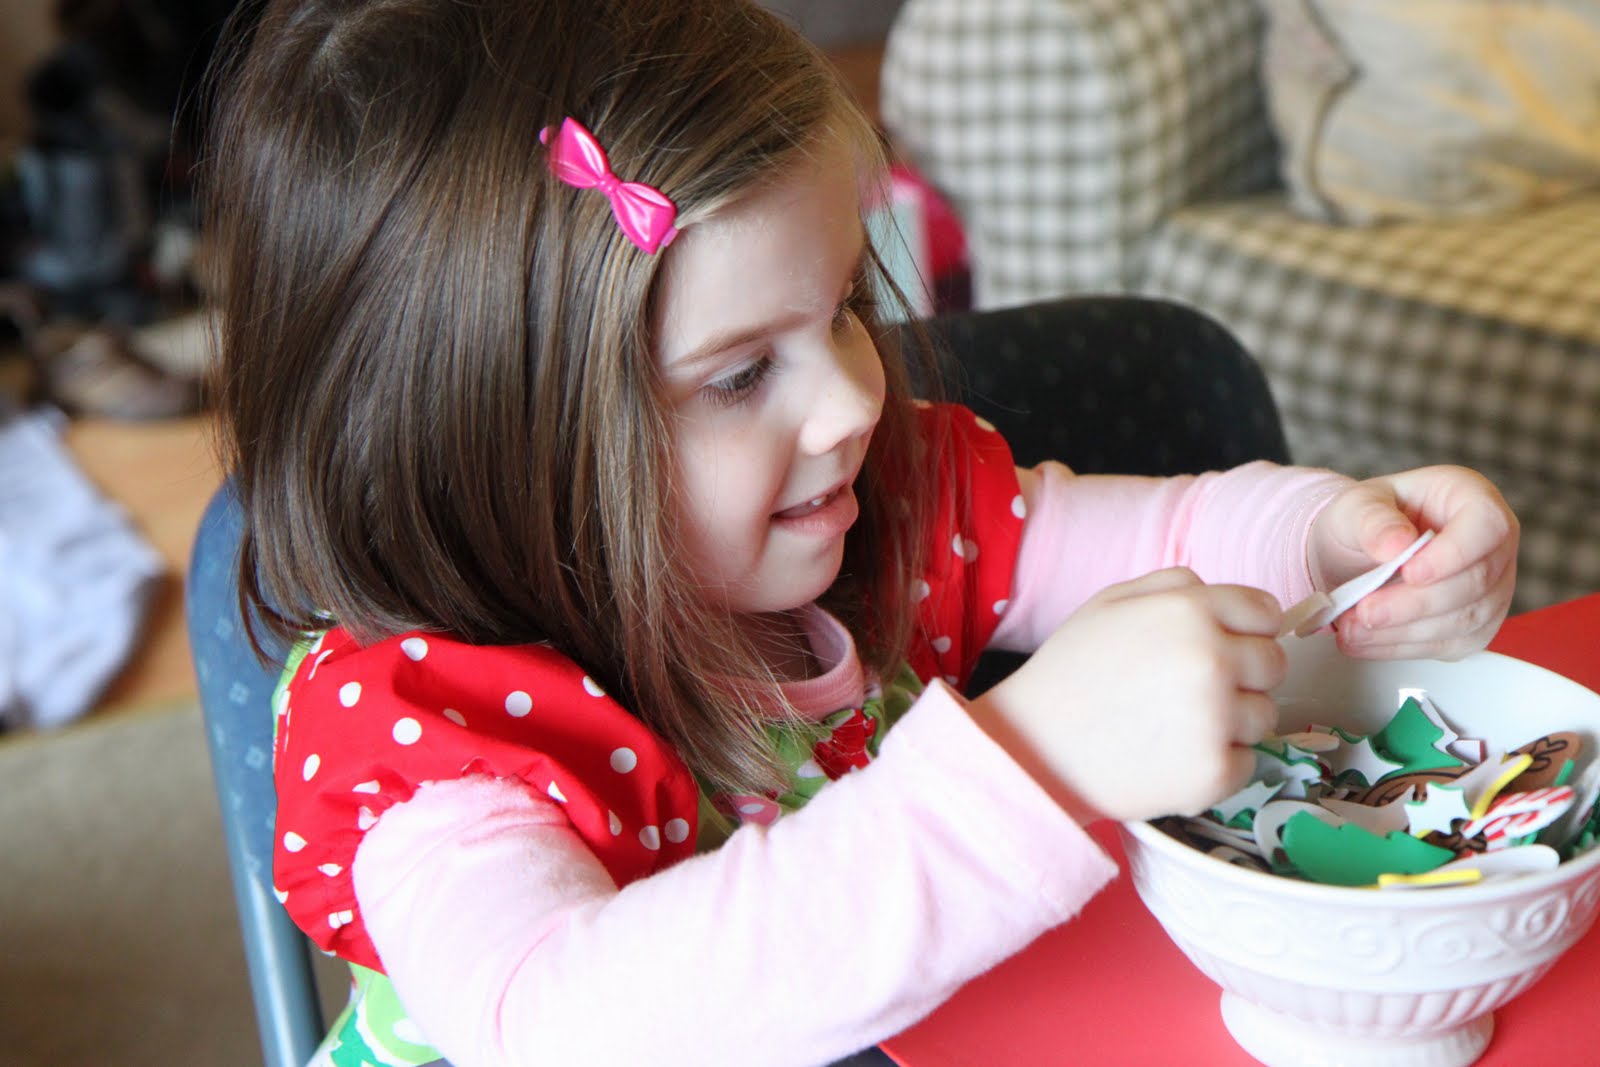 In our front room, I set up a folding table with all of the holiday crafting supplies on it. I was going to do ornament decorating, but it got expensive with the amount of supplies I was going to need to buy. I found these cute little foam kits that included placemats and door hangers with tons of fun little foam stickers…enough for twenty crafts in each kit. The total cost spent on all of the craft supplies (with plenty leftover for decorating on Christmas Eve) was $10 thanks to the half off sales at Hobby Lobby.
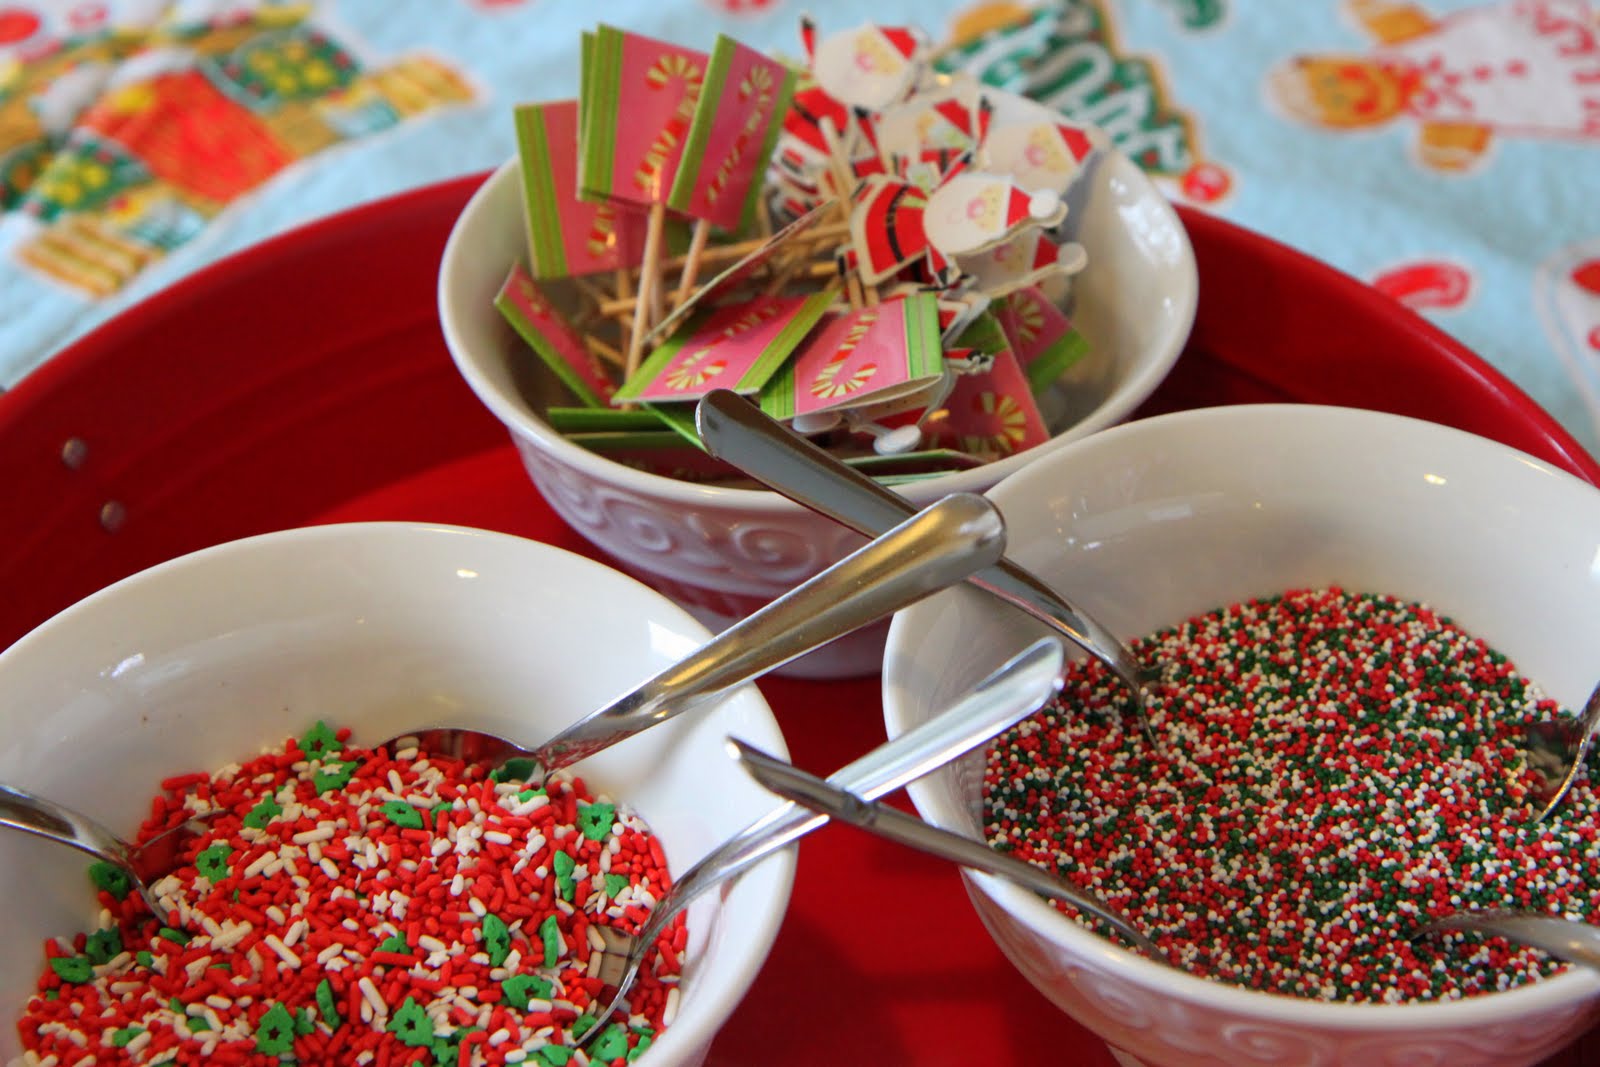 I was so inspired by the cupcake decorating party that was featured on Ohdeedoh (and in our weekly Notebook) that I thought that would be a fun activity for the kids to do too. I spent $4 on cupcake decorating supplies and piled them into my tin tray for the kids to assemble. I had bought a ton of cute tin stuff for entertaining for my son’s patriotic birthday party. With a holiday baby and a 4th of July baby, I know that the red items can be used often in our house.
 It was time to wait for our friends to arrive and enjoy all of the food and festivities with them. We are so thankful to have so many great people in our lives to celebrate with us! The food and punch bowl overfloweth for the big day!
Here are the dishes that we shared with our friends! What made these dishes really special though? They were ALL make-ahead dishes and ALL thrifty so that I could enjoy the day with my special birthday girl!

 It was time to enjoy our favorite Birthday Cupcakes. These are my favorite cupcakes in the world and are always the hit of any party. If you decorate them, the chocolate syrup frosting with sprinkles are a must! This year we left them undecorated for our activity for the kids.
The Best Birthday Cupcakes (From Cupcakes: The Cake Doctor Book)
24 paper liners
1 package plain butter recipe golden cake mix (I subbed with white and loved it!)
1 package (8 ounces) reduced-fat cream cheese, at room temperature
1/2 cup sugar
1/2 cup water
1/2 cup vegetable oil
4 large eggs
1 tablespoon pure vanilla extract
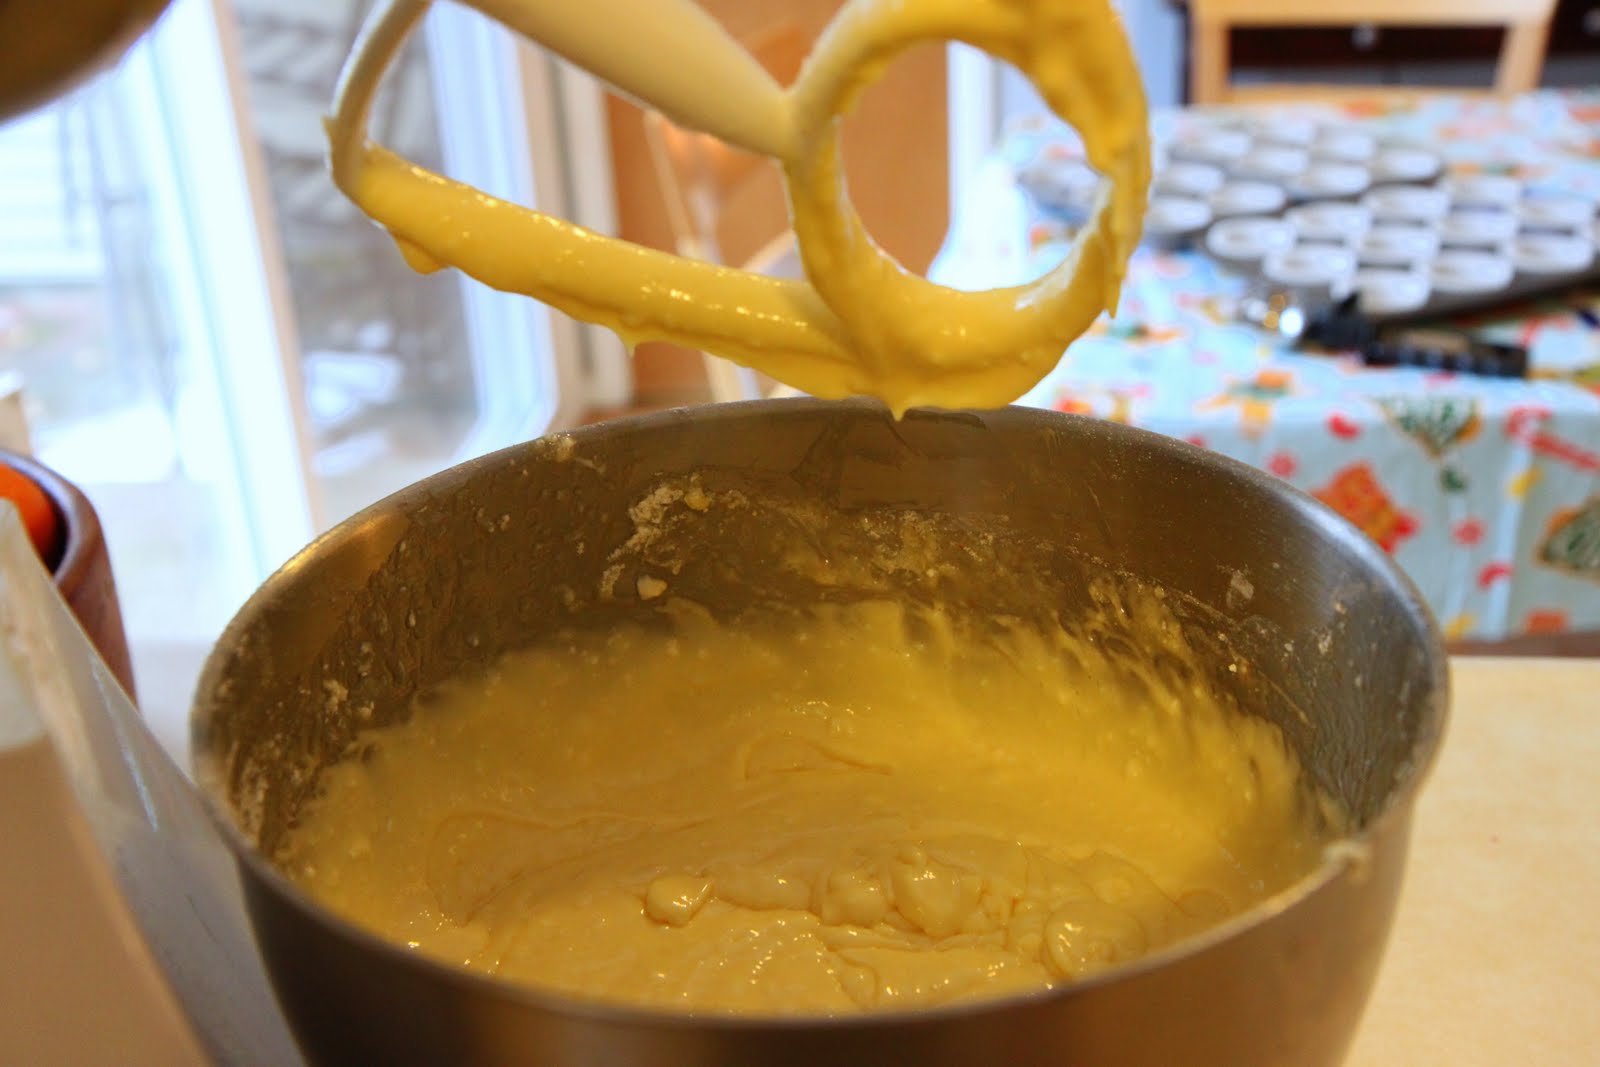
Place a rack in the center of the oven and preheat to 350 degrees. Line cupcake cups with liners. Set the pans aside. Place the cake mix, cream cheese, sugar, water, oil, eggs, and vanilla in a large mixing bowl. Blend on low speed with an electric mixer for 30 seconds, until the ingredients are well blended then stop the machine and scrape down the sides.
Increase the mixer to medium speed and beat for 1 1/2 minutes to 2 minutes more, scraping down the sides again if needed. The batter should be smooth and thickened.
Spoon or scoop 1/4 cup batter into each lined cupcake cup, filling it two thirds of the way full (You should get between 22-24 cupcakes). Place the pans in the oven.
Bake the cupcakes until they are golden and spring back when lightly pressed with your finger, 24-27 minutes. Remove pans from oven and place them on wire racks to cool for five minutes. Run a dinner knife around the edges of the cupcake liners, lift the cupcakes up from the bottoms of the cups using the end of the knife, and pick them out of the cups carefully with your fingertips.
Place them on a wire rack to cool fifteen minutes before frosting.
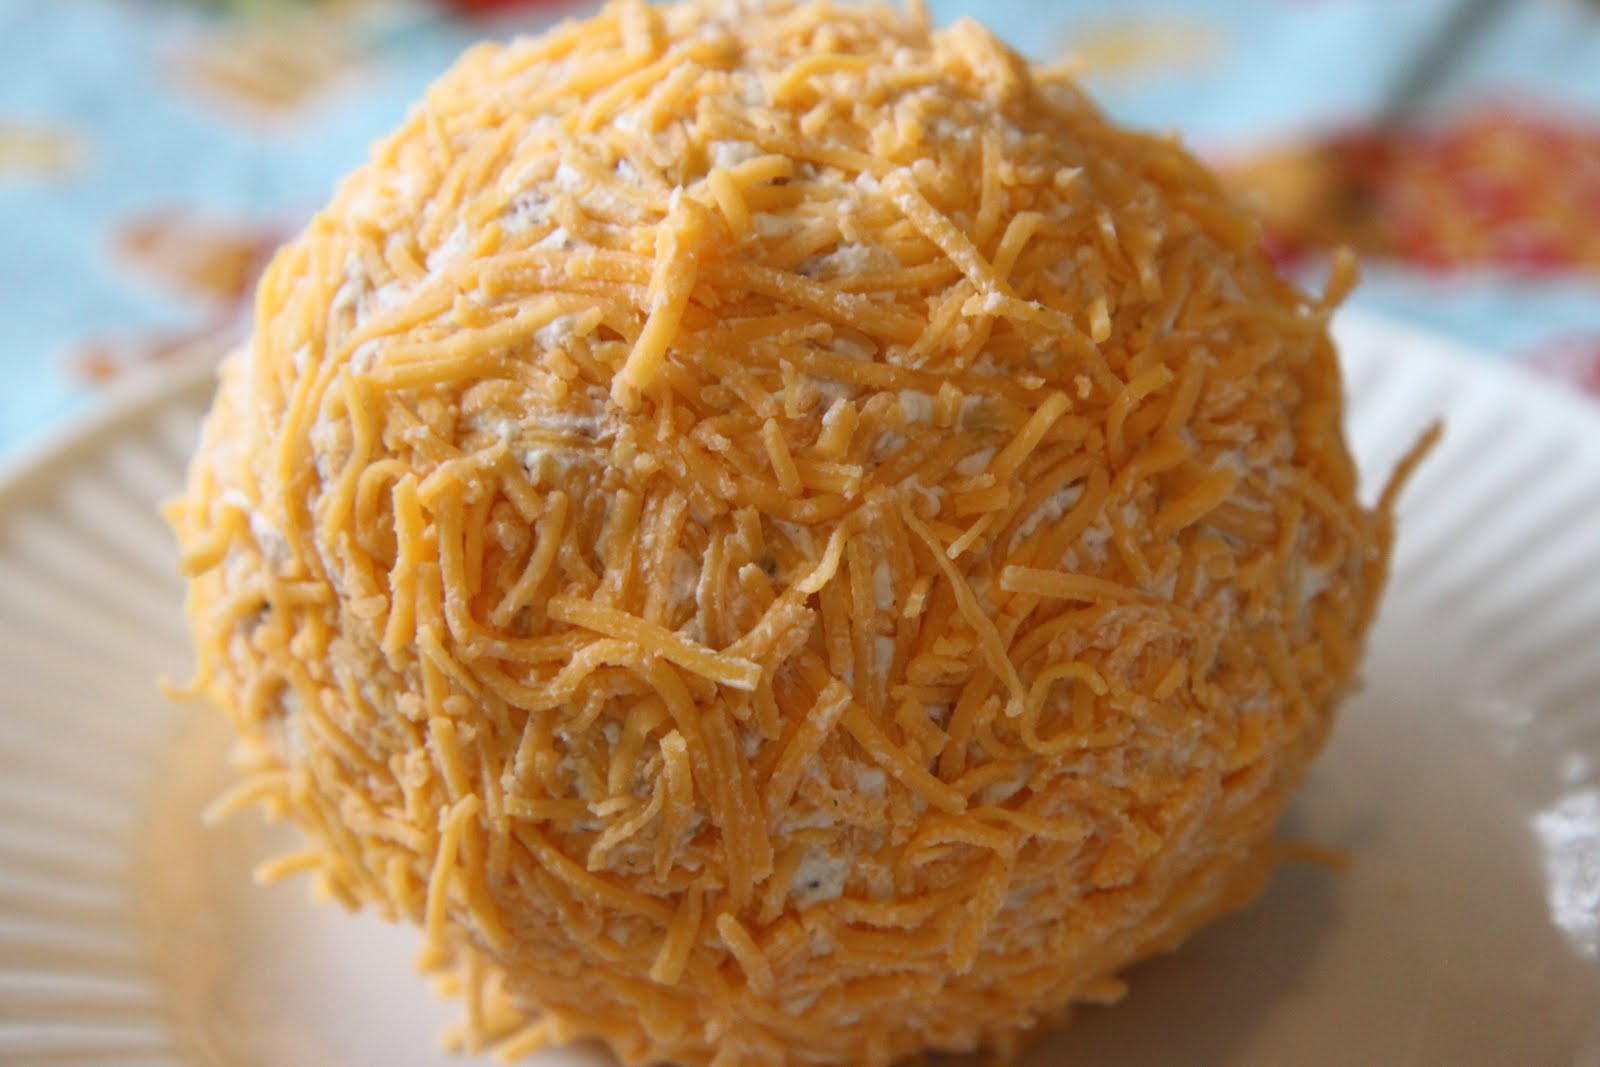 The star of the party, by far, was the cheese ball. I had so many recipe requests after the party for this one! It is so embarrassingly easy, but is always a showstopper when I bring it to holiday get togethers. Put the ingredients for this recipe on your grocery list and relish the joy in ease of the preparation and the compliments that come from it!
Bacon & Ranch Cheese Ball
2 (8 ounce) packages of low-fat cream cheese, softened
1 package of Ranch dressing mix
1 cup cheddar cheese
5-7 strips of bacon cooked and crumbled (or buy prepackaged crumbled bacon)
Mix all of the ingredients together with a mixer until they are incorporated. Shape into a ball and roll in a plate of shredded cheese. Cover with plastic wrap and refrigerate for two hours.
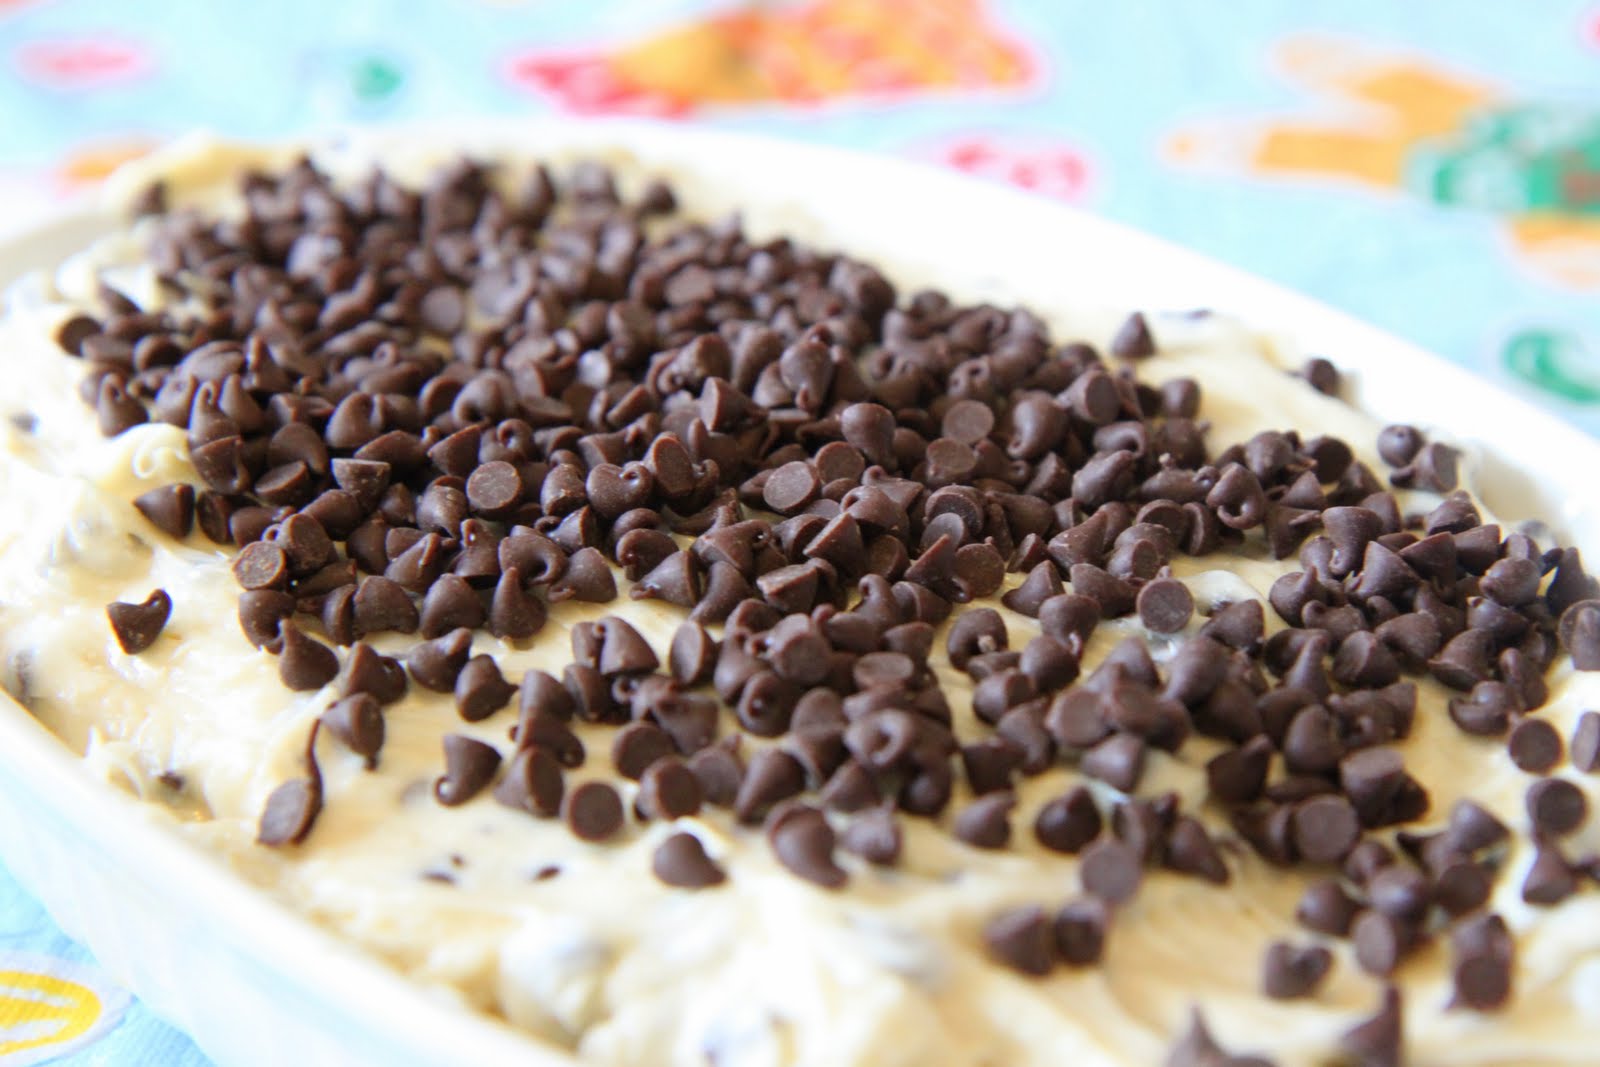 This dip was nicknamed “Crack Dip” after the bowl was scraped clean when I brought it for Thanksgiving one year. I love to bring a sweet dessert dip that can be an unexpected surprise among the pies and holiday cookies. If you want to buy all of the ingredients at Aldi, I have employed my hand held chopper to chop up regular size chocolate chips for this recipe before with great results!
Chocolate Chip Cookie Dough Dip
8 ounces cream cheese, softened
1/2 cup unsalted butter, softened
1/4 teaspoon vanilla extract
3/4 cup powdered sugar
2 tablespoons brown sugar
3/4 cup miniature semisweet chocolate chips
More chocolate chips (optional) or chopped nuts, to roll the ball in
In a mixing bowl, beat cream cheese, butter, and vanilla until fluffy. Gradually add sugars and beat until just combined. Stir in chocolate chips. Cover and refrigerate for 2 hours. Form cheese into a ball using hand protection (Saran wrap, wax paper, etc). Optional- just before serving, roll in additional chocolate chips or nuts of your choice. Serve with graham crackers.
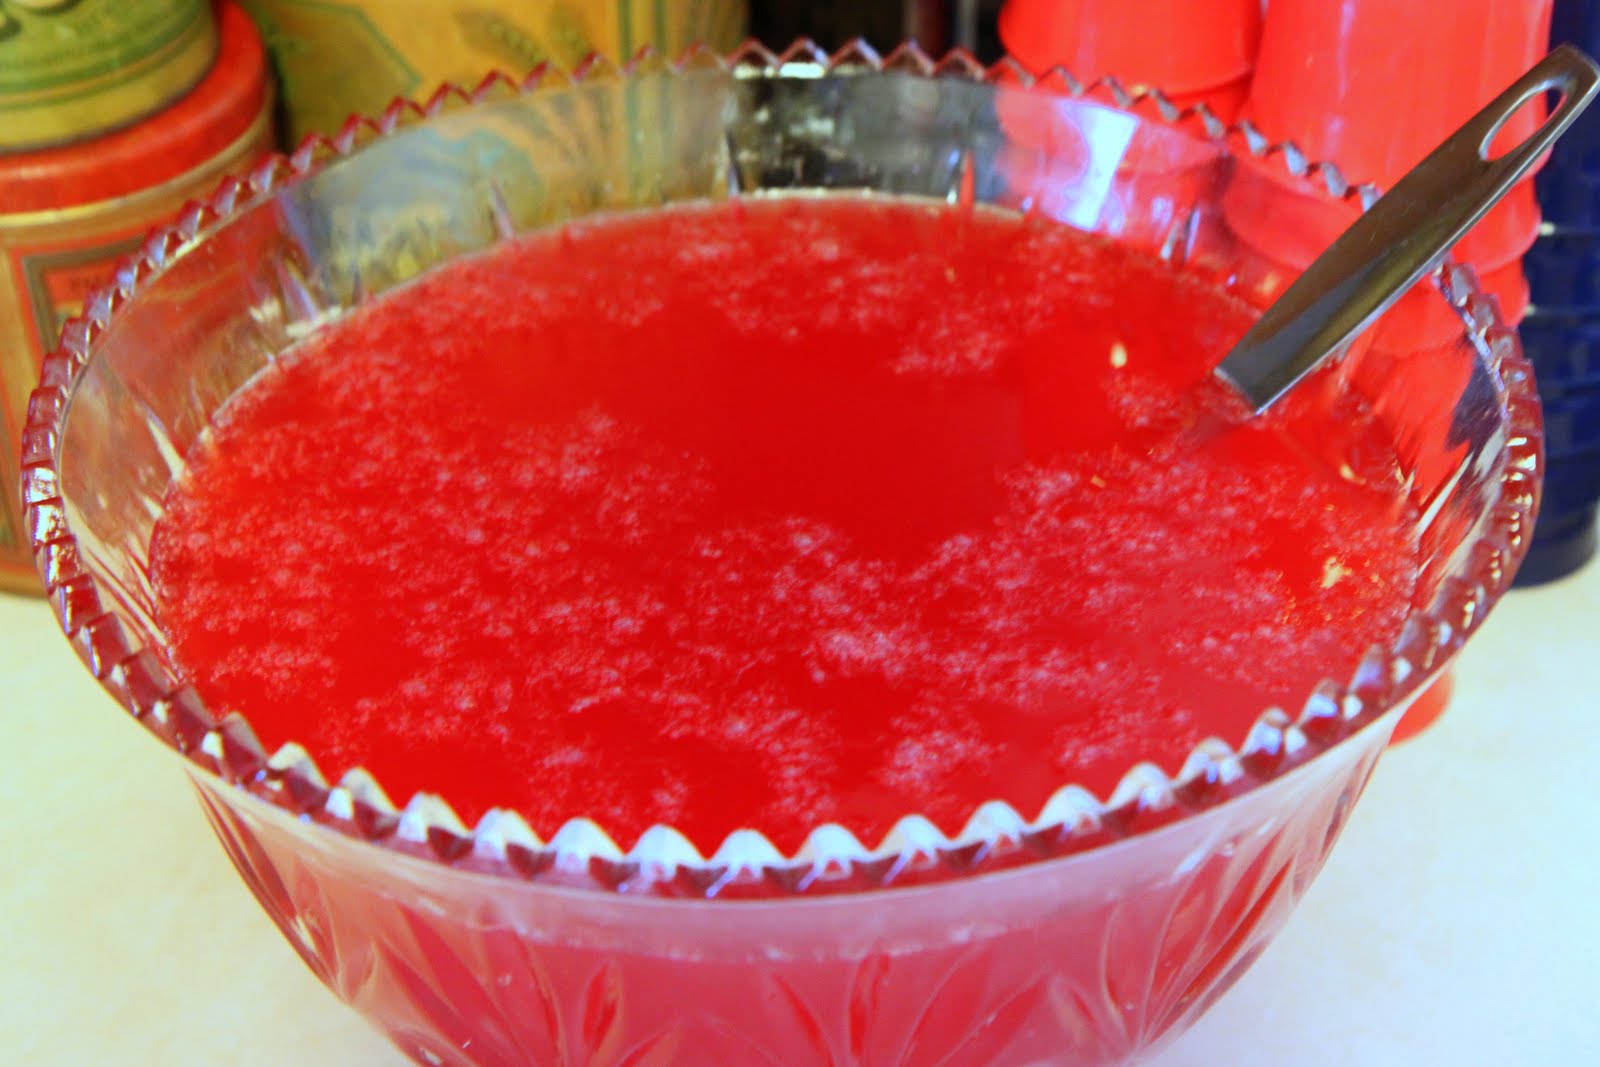 Hate punch? It is likely you just hate that ginger ale in the punch. This punch is ginger ale free and looks positively festive for any holiday occasion. I barely had enough for a glass left and this punch is always a hit at all of our parties!
Holiday Party Punch
2 liter bottle strawberry-flavored soda (I found this at Walmart)
2 liter 7-Up
1 (12 ounce) can frozen pink lemonade concentrate
1 (12 ounce) can frozen lemonade concentrate (yellow)
1 can pineapple juice
Mix all the ingredients together for the punch. This will fill one large punch bowl or two smaller ones.
 Hit the thrift stores for vintage tins and fill them up with holiday goodies for a unique display of yummy treats! This Chex Mix was cooked up in the slow cooker. If your slow cooker runs hot, I would just keep it on LOW instead of the HIGH that the recipe calls for. Mine about burnt up without keeping a careful eye on it. Putting it in the slow cooker while cooking up the rest of the food is a great way to make the house smell yummy and free up your stove in the process! This recipe easily doubles and I did just that for our party!
Slow Cooker Chex Mix
1 cup Cheerios toasted oat cereal
1 1/2 cups Rice Chex
1 cup Wheat Chex
1/2 cup peanuts
1/2 cup pretzel stick
1/4 cup butter, melted
2 tablespoons Worcestershire sauce
1/4 teaspoon seasoning salt
1/4 teaspoon garlic powder
1/4 teaspoon onion salt
Combine first 5 ingredients in your slow cooker. Mi
x remaining ingredients and pour over cereal mixture; toss to coat. Cook on HIGH, uncovered, for 2 hours (I would recommend cooking on low if your slow cooker runs really hot like mine!) Stir mixture well every 30 minutes. Turn slow cooker to LOW and cook for 2-4 hours. Store in air tight container. Makes 5 cups.
 Emily had a fantastic party filled with more girlie gifts than a girl could ever ask for. My, turning four is quite grand! Happy birthday sweet Emily Marie! I am so thankful for your honest-to-goodness girl power, girlie ways, and assertive little spirit. I am one lucky mom!
 This past weekend we celebrated Emily’s 4th birthday. Being a December baby sure is hard because your birthday is always crammed into the festivities. This year we decided to do a separate friend party and family party. Her family party was celebrated this weekend with a holiday brunch at our house following her holiday concert. This took a lot of party planning to make it come together, but it was so wonderful to be sitting down fifteen minutes after everyone arrived to a delicious meal together.

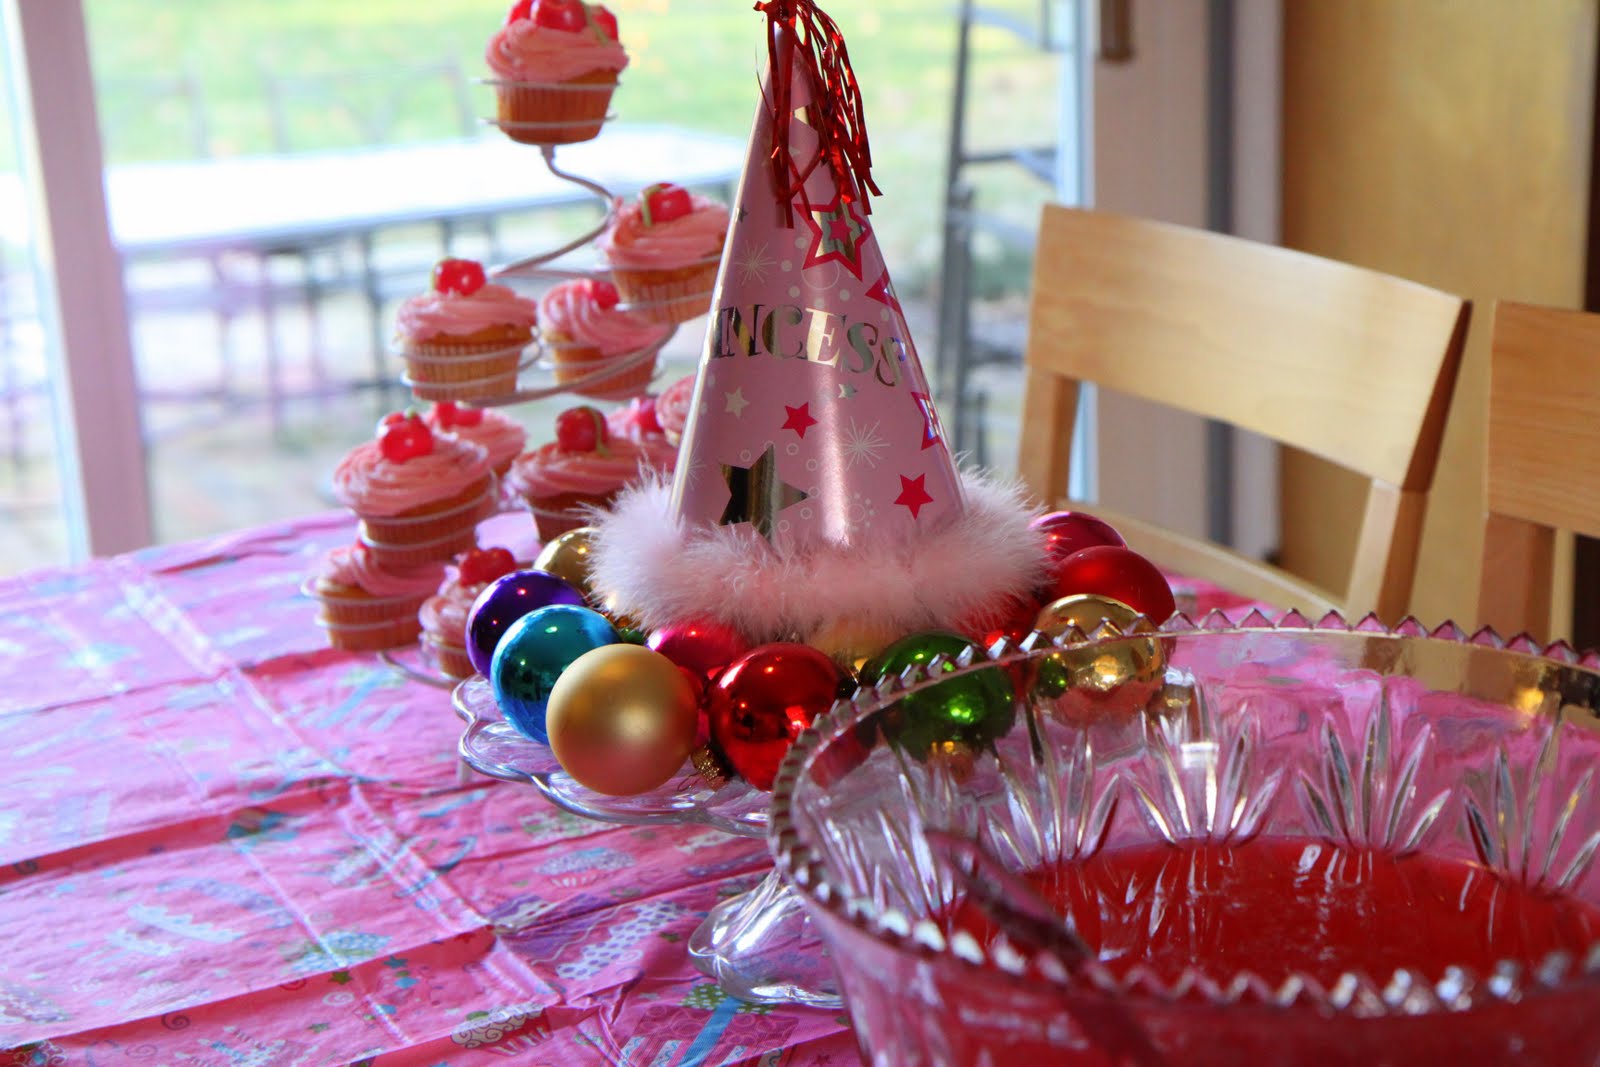 I wanted her table to look very festive and Emily’s favorite color this year is pink. I pulled out a cake stand that I had bought from Goodwill and topped it with vintage-colored ornaments that we had in our holiday supplies already. The cardboard princess hat and pink vinyl tablecloth came from the newly opened Christmas Tree Shoppe ($1 for the hat and $2.99 for the tablecloth). I loved tying in the holiday and birthday elements together.
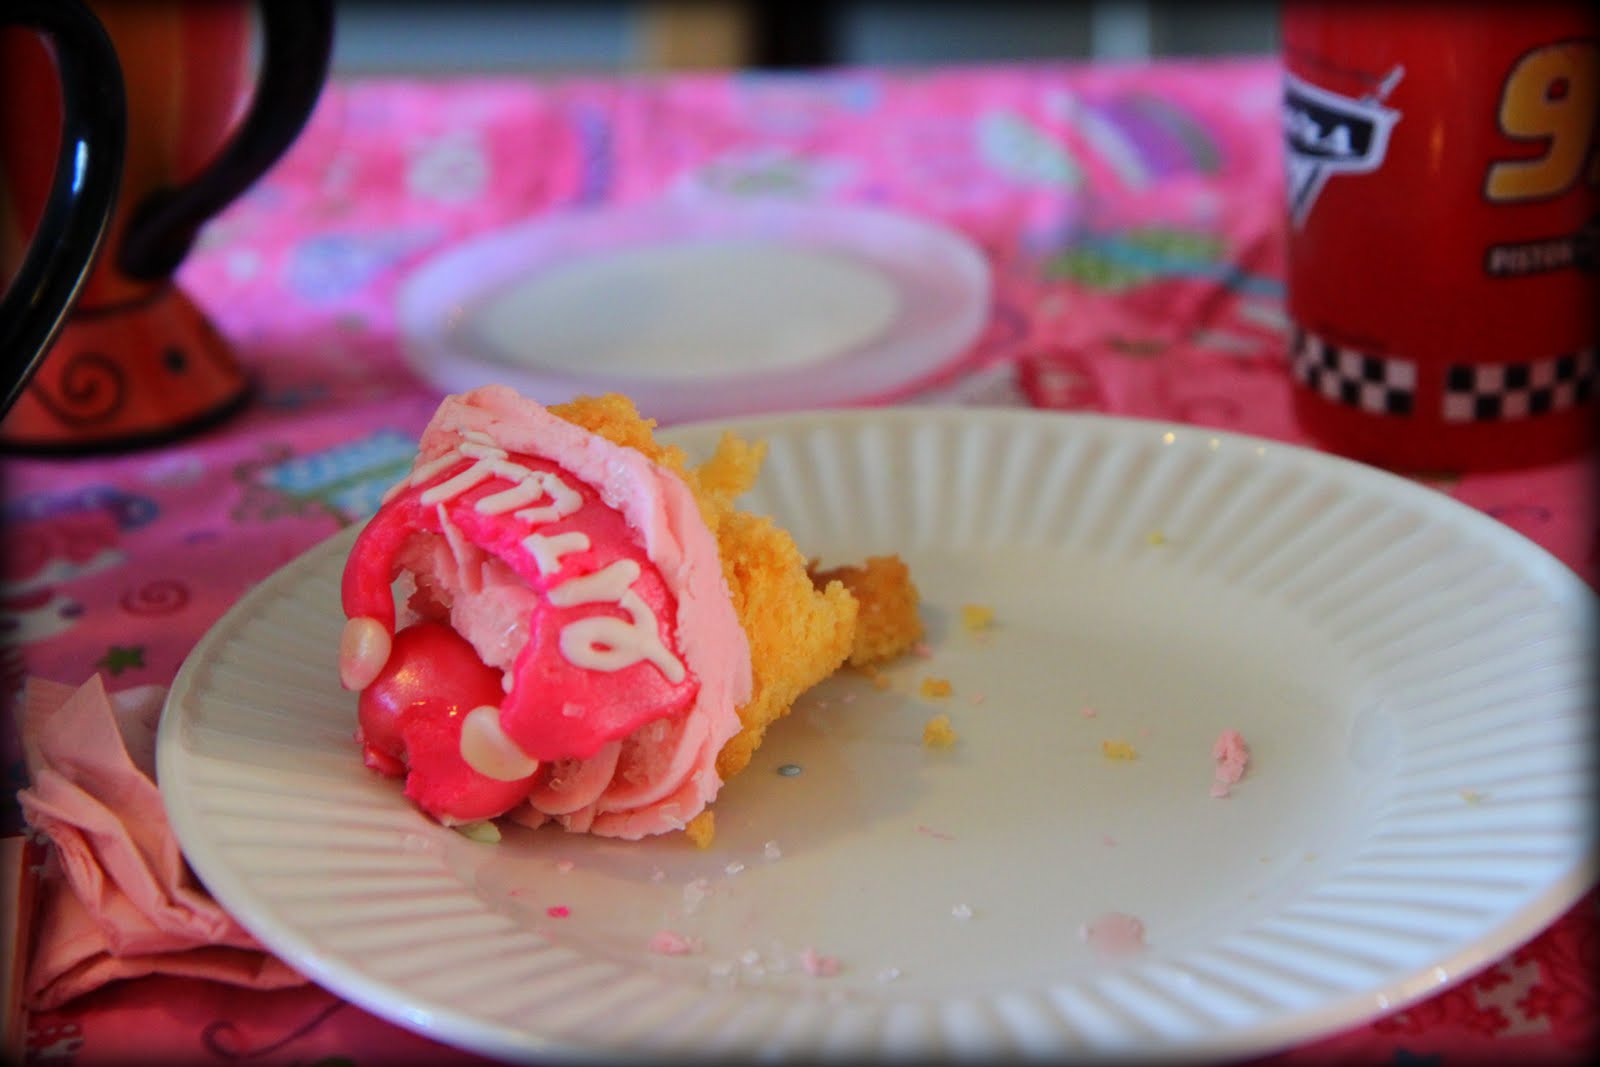
 One thing I did purchase were the cupcakes for the party. Emily wanted pink princess cupcakes with sprinkles and cherries on top. My girlfriend Holly, of Sweet Cakes by Holly, was just launching her cake business in town. There is nothing I love more than work-at-home moms supporting work-at-home moms. Hiring her to do the job gave me the time I needed to pull the other food together AND support another mom doing her business. They were fantastically wonderful and pulled in our theme perfectly! The cupcake stand was found at Walmart for $5 and will be used for her friend birthday party this year too!


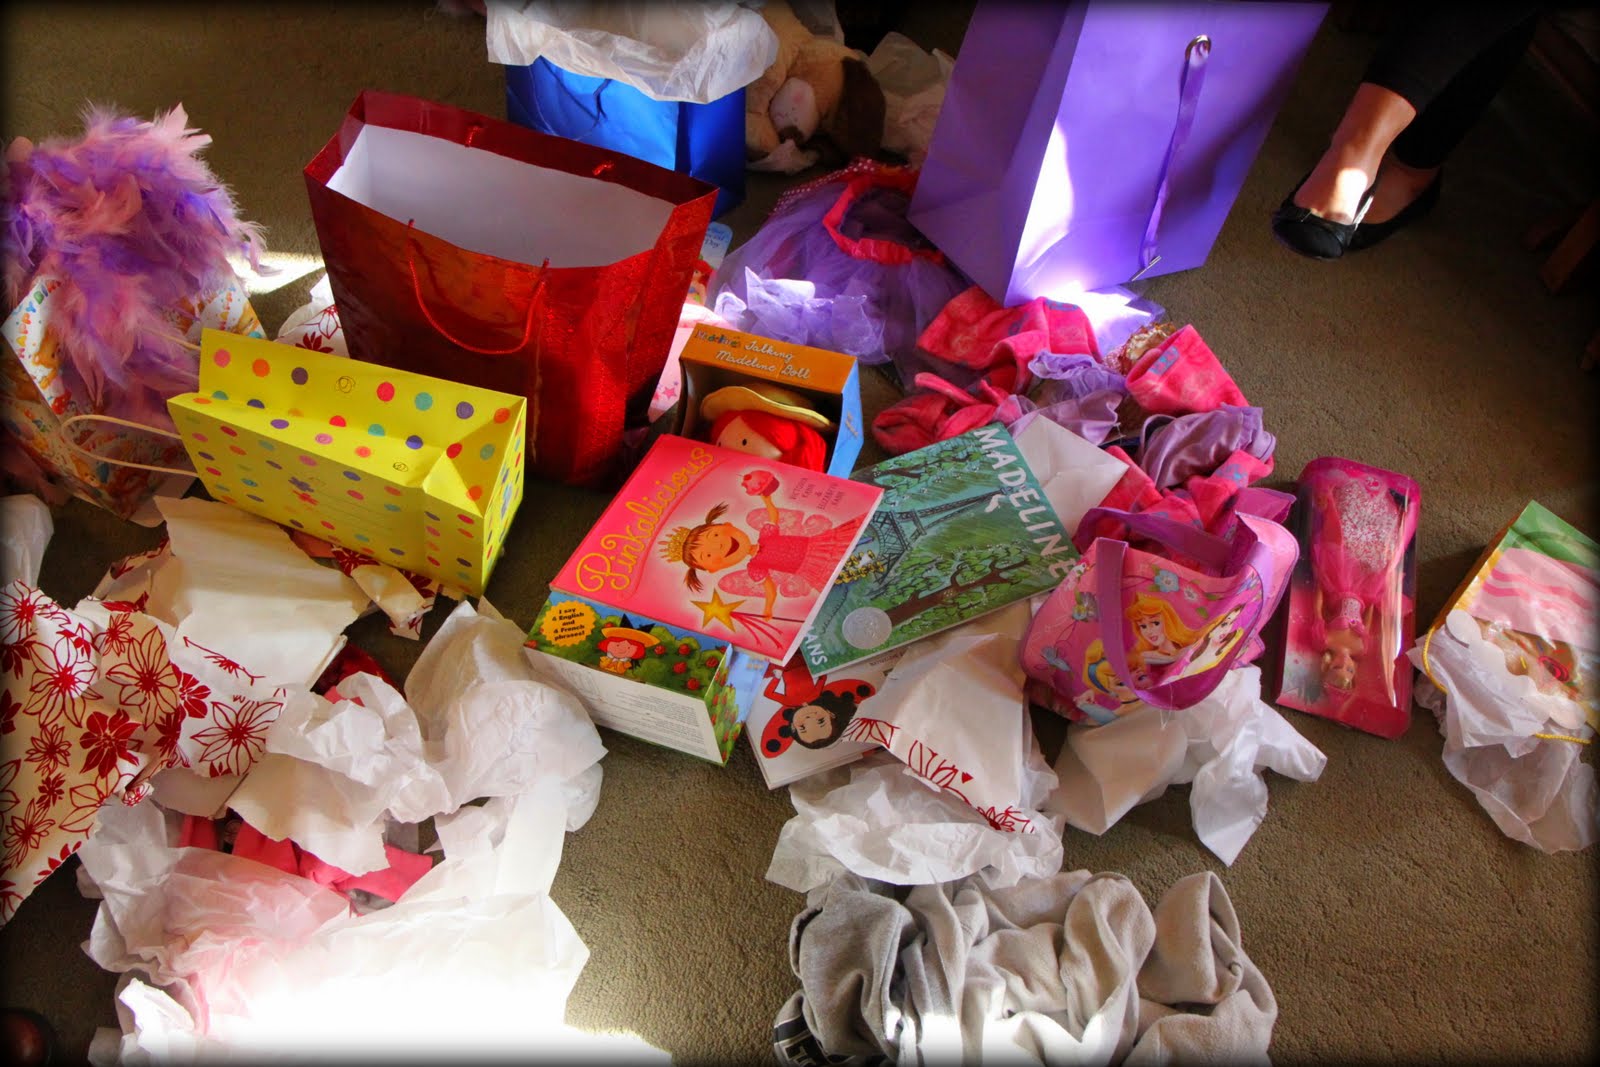
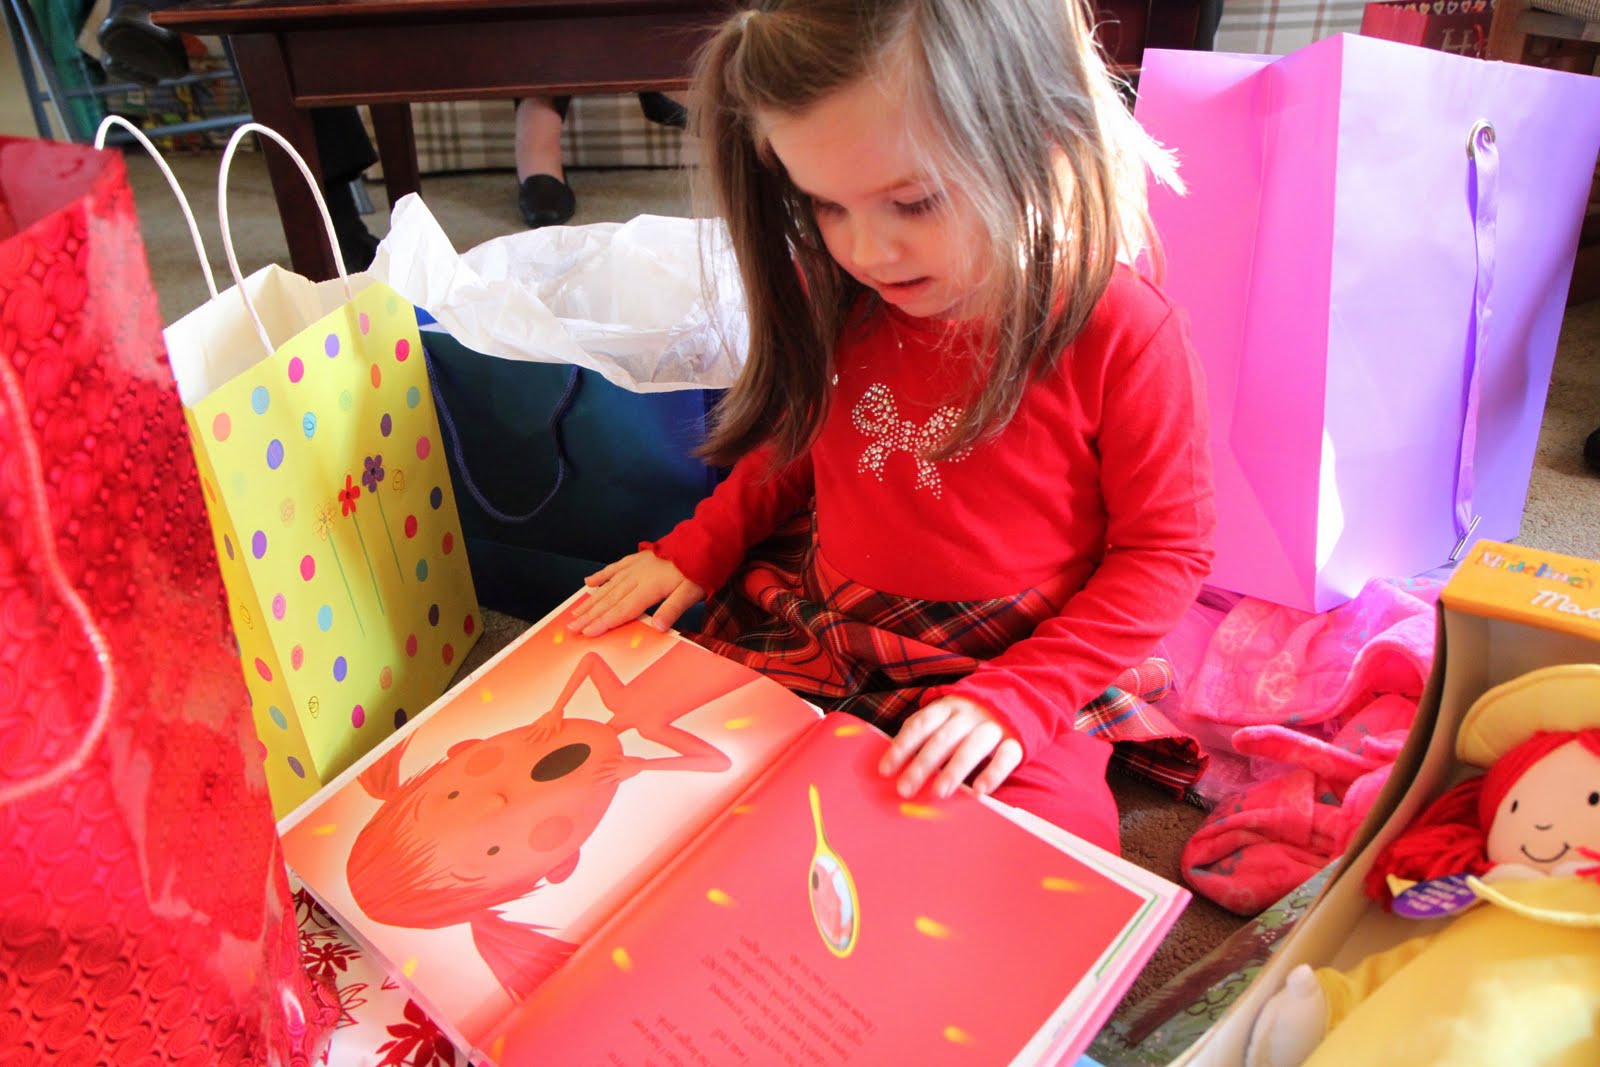 Emily got so many princess-y gifts including three princess nightgowns, a princess robe, a Fancy Nancy tutu with feather boa, oodles of girlie books (the favorite being Pinkalicious that was featured in our Top 10 Books to Give), a Madeline doll, a Barbie princess movie, and her very first Barbie.
Here are two of my favorite recipes from our princess birthday brunch…
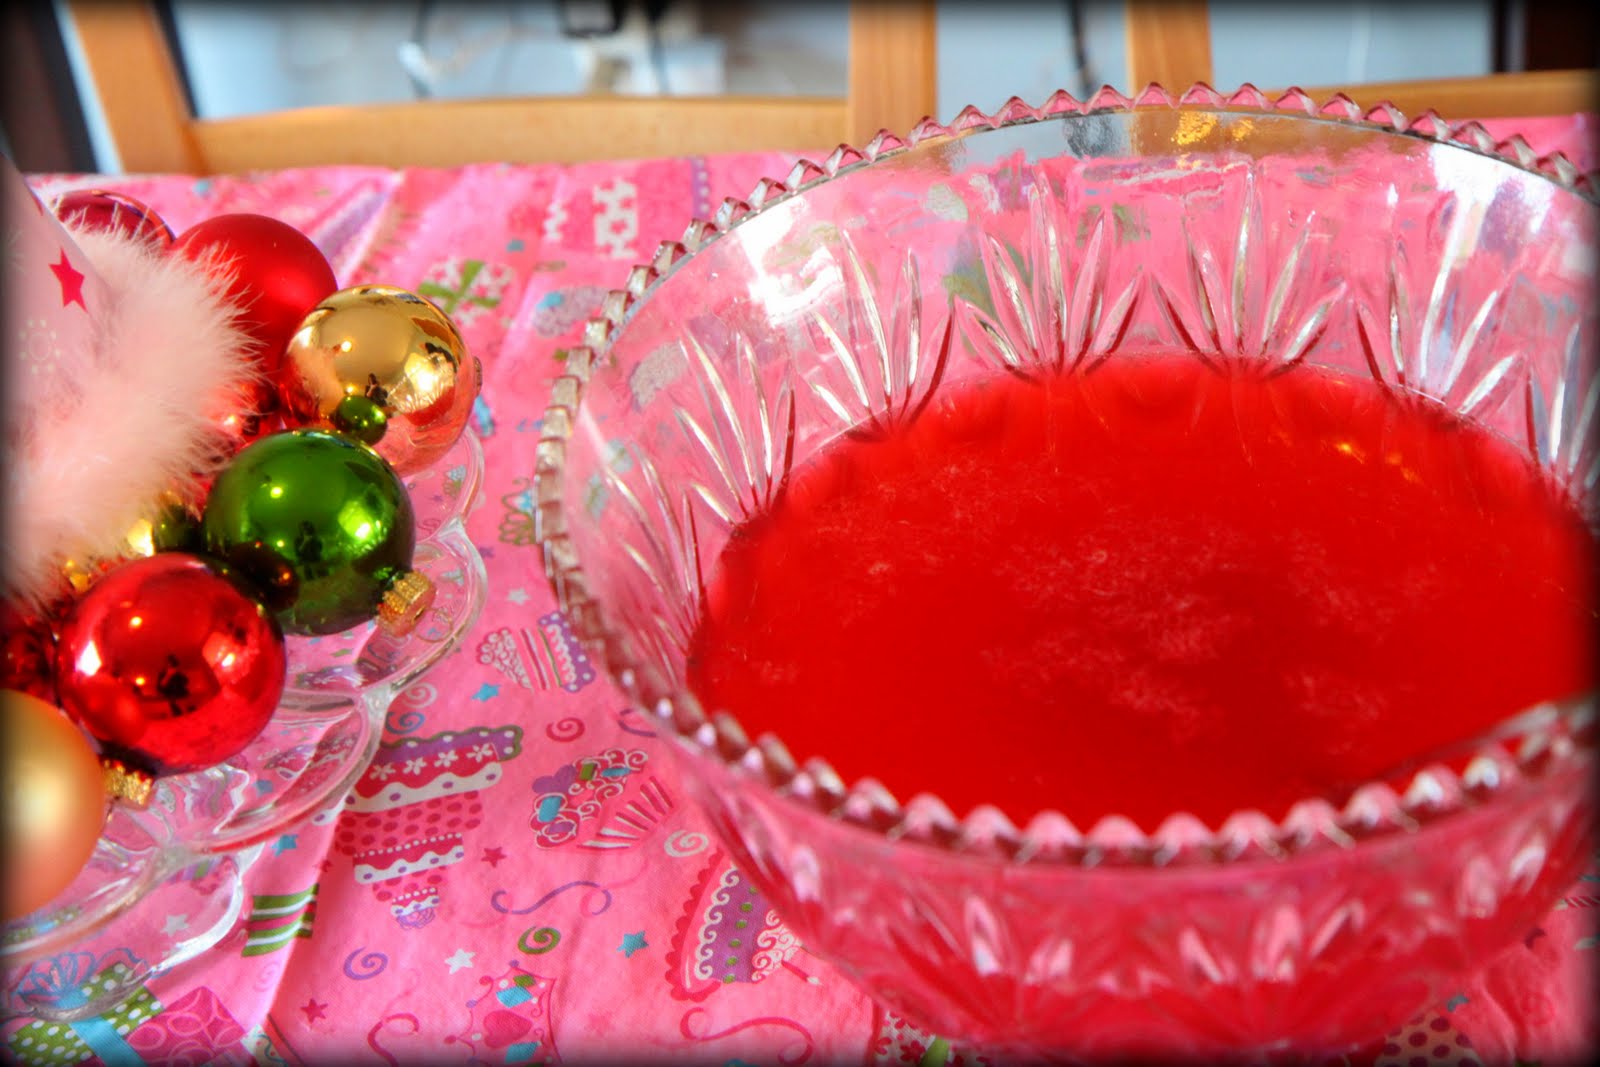
Perfectly Pink Princess Party Punch
2 liter bottle strawberry-flavored soda (I found this at Walmart)
2 liter (half a bottle) Cherry 7-Up
1 (12 ounce) can frozen pink lemonade concentrate
1 can pineapple juice
Mix all the ingredients together for the punch. This will fill one large punch bowl or two smaller ones.
****************
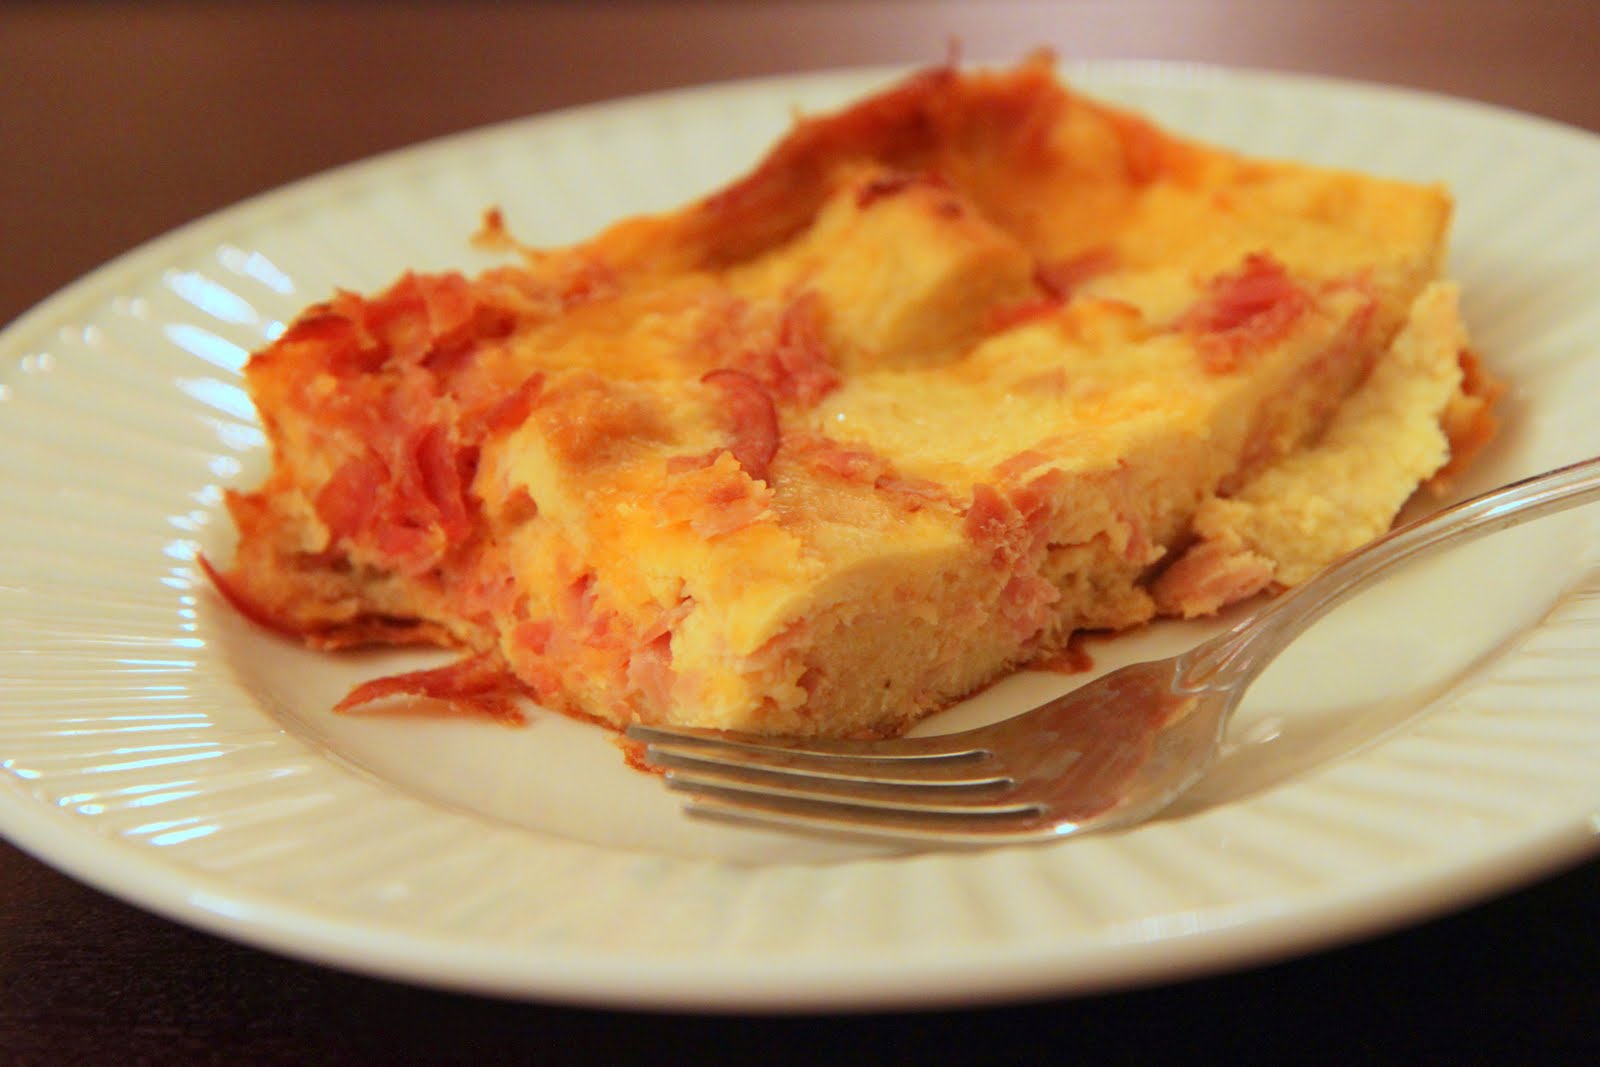
Overnight Breakfast Casserole for a Crowd
1 pound sliced ham (lunch meat)
2 teaspoons mustard
½ teaspoon salt
6 eggs, beaten
2 cups milk
8 slices white bread, toasted & cut into cubes
8 ounces mild cheddar cheese
In a medium bowl, mix together mustard, salt, eggs, and milk. Add the ham (cut into cubes), bread cubes, and cheese, and stir to cat evenly. Pour into a greased 9×13″ baking dish. Cover & chill in the refrigerator for eight hours, or overnight. Preheat oven to 350 degrees. Cover and bake 60 minutes. Uncover and reduce temperature to 325 and bake for an additional 15-25 minutes or until set.
****************
Things We Did To Keep the Party… On Track
1. Cooking Prep Was Done the Day Before– I opted for overnight breakfast casseroles that could be made and refrigerated until we needed them instead of something that would need to be prepared the morning of the event.
2. I Used the Preset Functions on My Appliances- Take a peek at your stove and see if your stove offers a “Cook/Bake and Hold” option. I set my temperature to bake the casseroles at
350 degrees and then the length of time that they would need to cook. Once the casseroles were cooked, the hold option switches to keep the food warm (ours went down to 170 degrees). I also preset my coffeemaker and timed it to the time I anticipated we would be eating.
Thanks to taking advantage of these preset functions on my appliances, I was able to attend my daughter’s holiday recital and have the food cooking and coffee brewing while we enjoyed her show. If it wasn’t so fresh in my mind all of the prep work from the day before, you would have thought that the food made itself!
3. All of the Prep Was Done in Stages– Hosting a party can be really overwhelming so I always try and break down the prep work over the course of the week. One day is spent party-planning/list-making, the next day is spent shopping for what is needed, another day is spent cleaning & decorating, the last day is the food preparation and wrapping gifts. If you look at the grand picture, it is quite overwhelming. If you look at it in smaller chunks though, it makes it a little easier to manage.
****************
Things We Did To Keep the Party… On Budget
1. We Threw a Reusable & Repurposed Kind of Party– My set of white dishes were put to good use again and I had leftover pink napkins from another party that I used for the big day. We opted for a vinyl tablecloth that will now be used for all of our girl parties ($2.99) and a cheap princess hat that made my daughter so happy.
The centerpiece was made from found items from around the house and gathered together for her table and we used the ultimate centerpiece to finish out the birthday table…the food!
If you are looking for accessories or centerpieces to keep your parties frugal, hit the thrift shops for some amazing items to take your parties to the next level. Our punch bowl was a $2 find (complete with dainty cups), the cake stand was only $1. Mix in those yard sale finds with your fancy dishes and no one will ever know the difference!
2. We Threw a Birthday Brunch– Brunch is the ultimate in frugal eating and one way that I keep my party budgets on track. With almost twenty people in our immediate family, it can be difficult to stay on budget and still throw a great party. Casseroles, coffee, and punch all are frugal food & drink alternatives. We did splurge this year with a baker’s dozen of Panera bagels and by purchasing the cupcakes this year, but by keeping the rest of the food frugal, we stayed within our budget.
3. Party Gifts Were Compliments of Swagbucks– I horde and deposit my Swagbuck points and credit them towards gift cards for Amazon. I got a nice stack of books for our little princess using these points with all of her favorite books that we have to keep checking out from the library. I don’t know anything more frugal than free gifts!
Need more party inspiration? Swing by and see this Nutcracker Ballet Birthday Party from Like Merchant Ships!
How do your birthday bashes on budget and on track in your house? Feel free to share recipes & party-planning tips here!
In the years past, we have always had a Christmas Jar of activities. Each day we would randomly draw from a set number of activities and enjoy a holiday activity together as a family. This year, our life with our two children has become increasingly busy and scheduled. We have two school schedules, extracurricular activities, homework, holiday programs, holiday family events, and so much more going on. Our life of leisure seems to have taken a detour and I have had to be more thoughtful in our approach towards carving time out for what we would hope to accomplish this year.
I wanted to create our own countdown to Christmas in a creative way, but I didn’t want to spend any money on it. I decided to use what I had to create our homemade Advent filled with fun activities and wanted to share with you what we created!
Supplies needed:
A large circle punch (in scrapbook supplies at craft store) or a jar or glass for tracing
Tape
Scrapbook or festive holiday gift wrap
Ribbon
Marker
2 Muffin Tins
A picture frame stand or a place to prop your finished tins
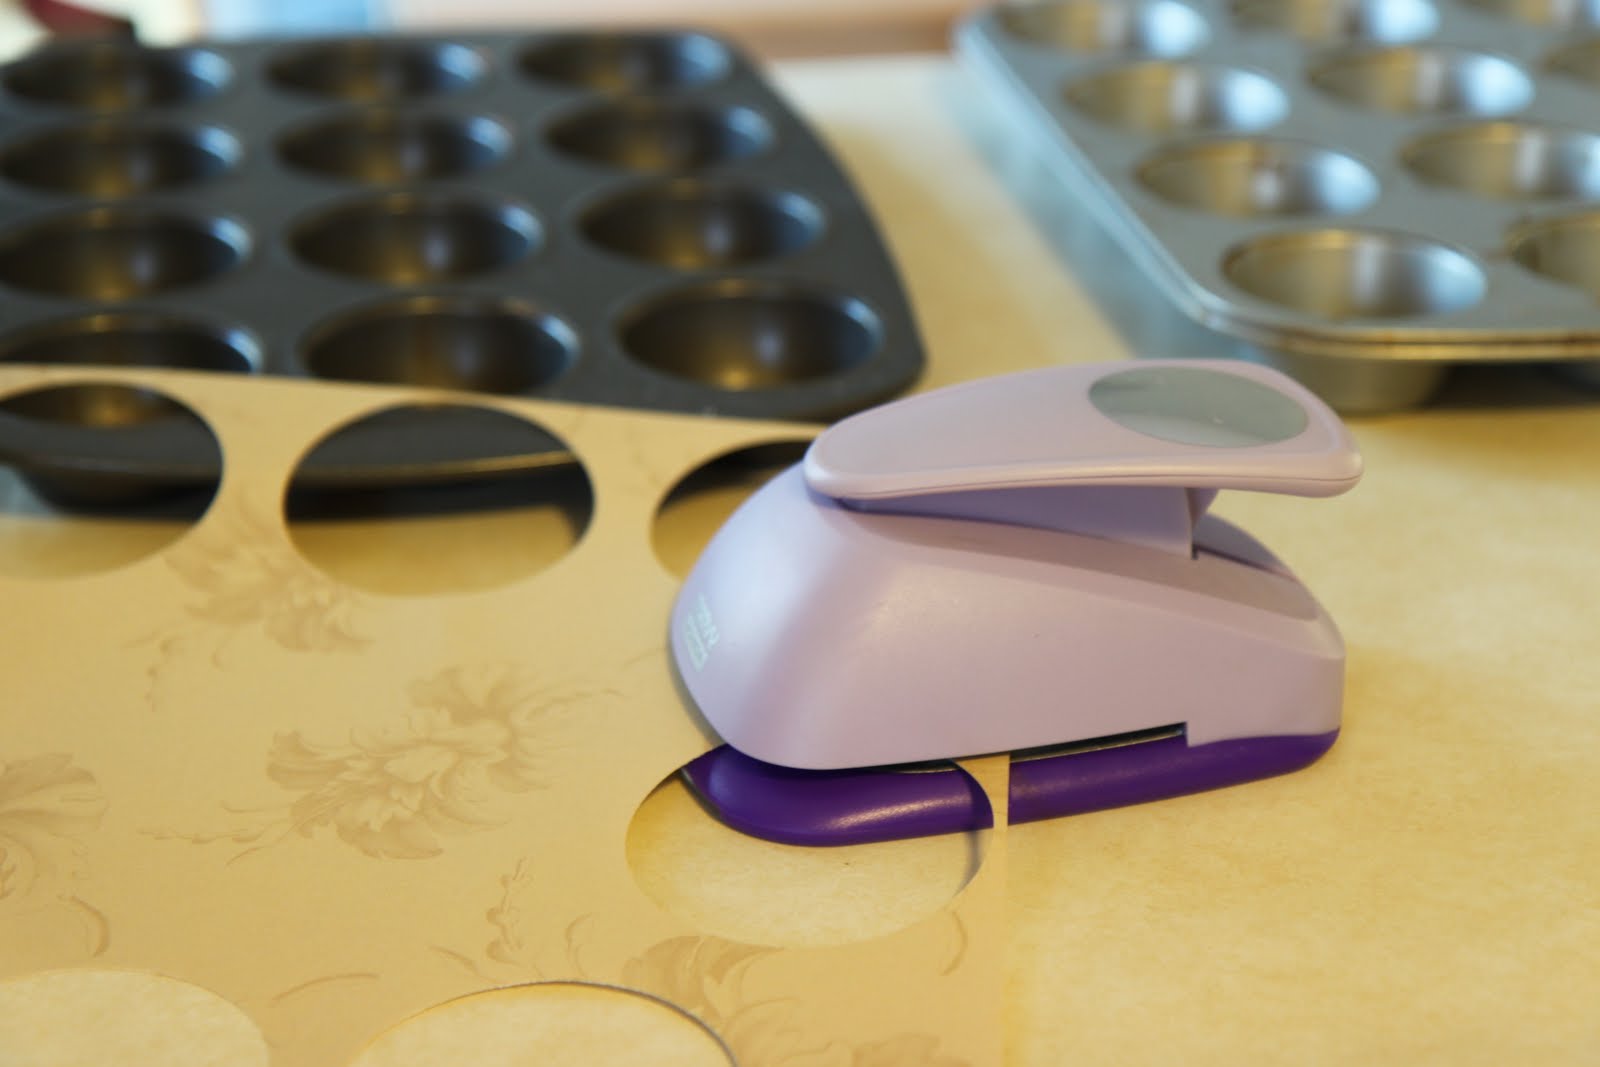 I began this project by punching out 48 circles. On half of these write the numbers 1-24 and on the other half you can write fun activities to do with your children in anticipation of the big day.

Stick your holiday activity folded up inside of each muffin tin and then attach the numbered circles to each individual muffin tin. Secure with tape on both sides to hold your activities in securely.
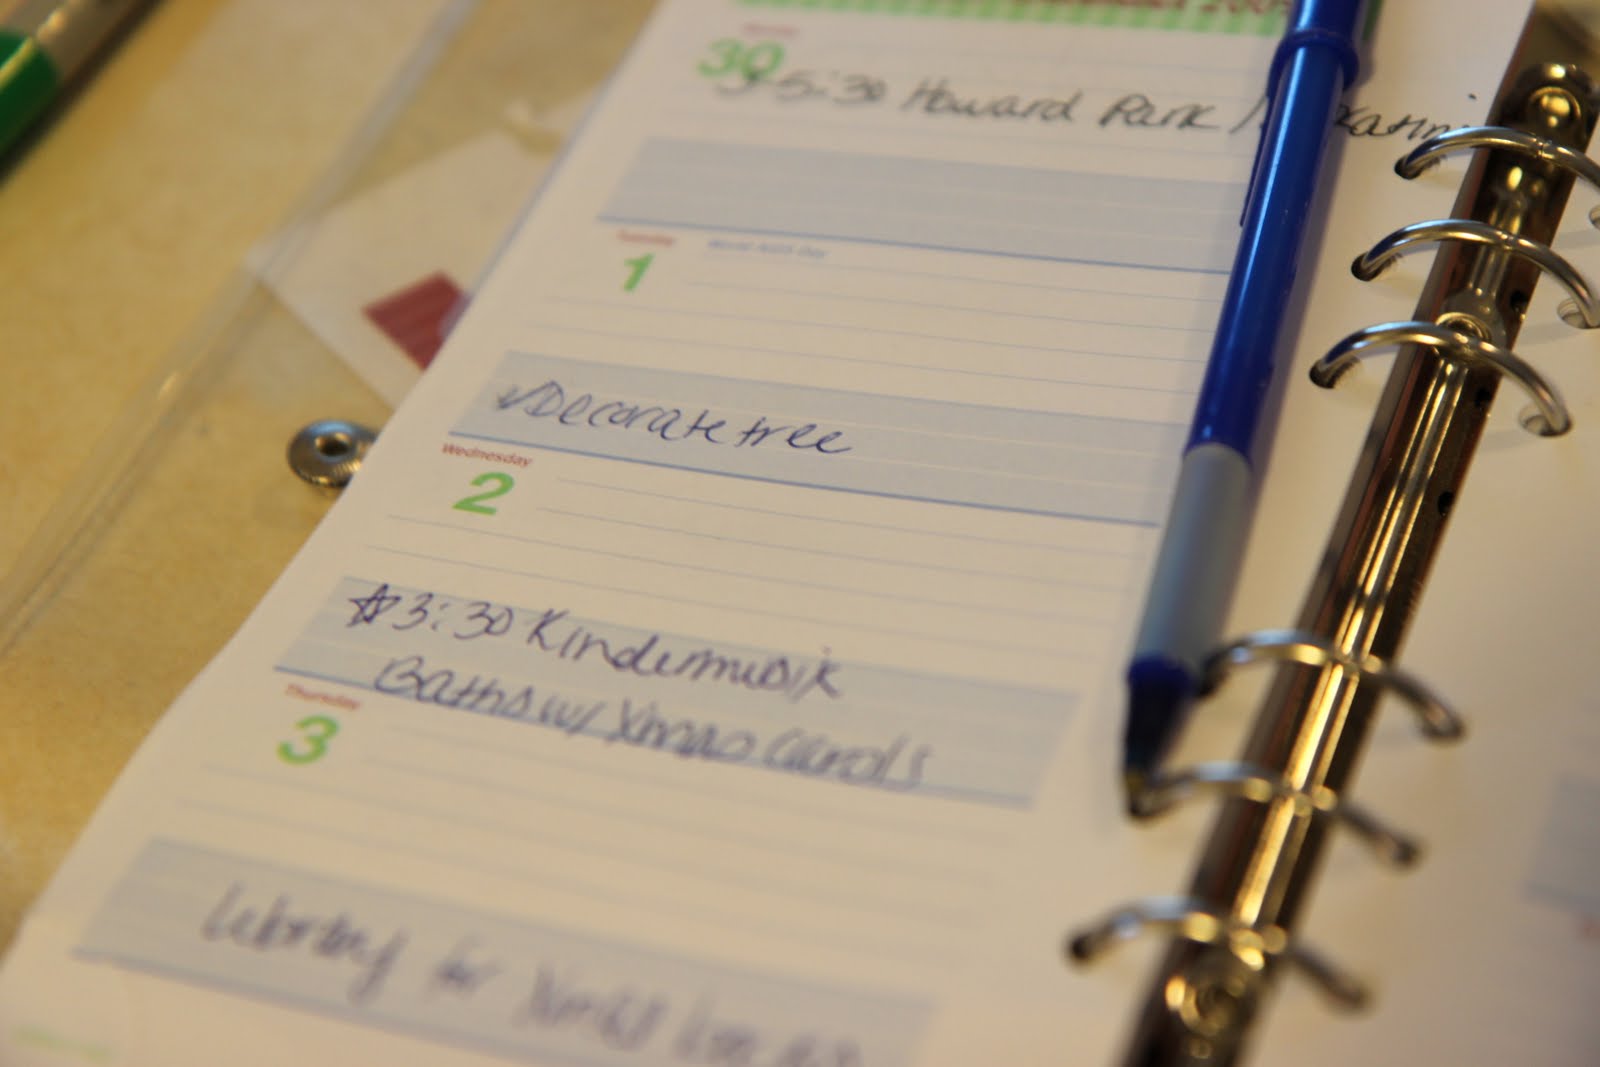
Break out your trusty calendar and jot down the activities for each day to remind yourself what you need to plan for and what supplies will need to be purchased to accomplish the activities.
 Add a little festive ribbon to the top of your muffin tin. Display the muffin tin by using a picture frame stand or finding a sturdy wall to prop it up with. Have your child draw an activity each morning to complete as a family.
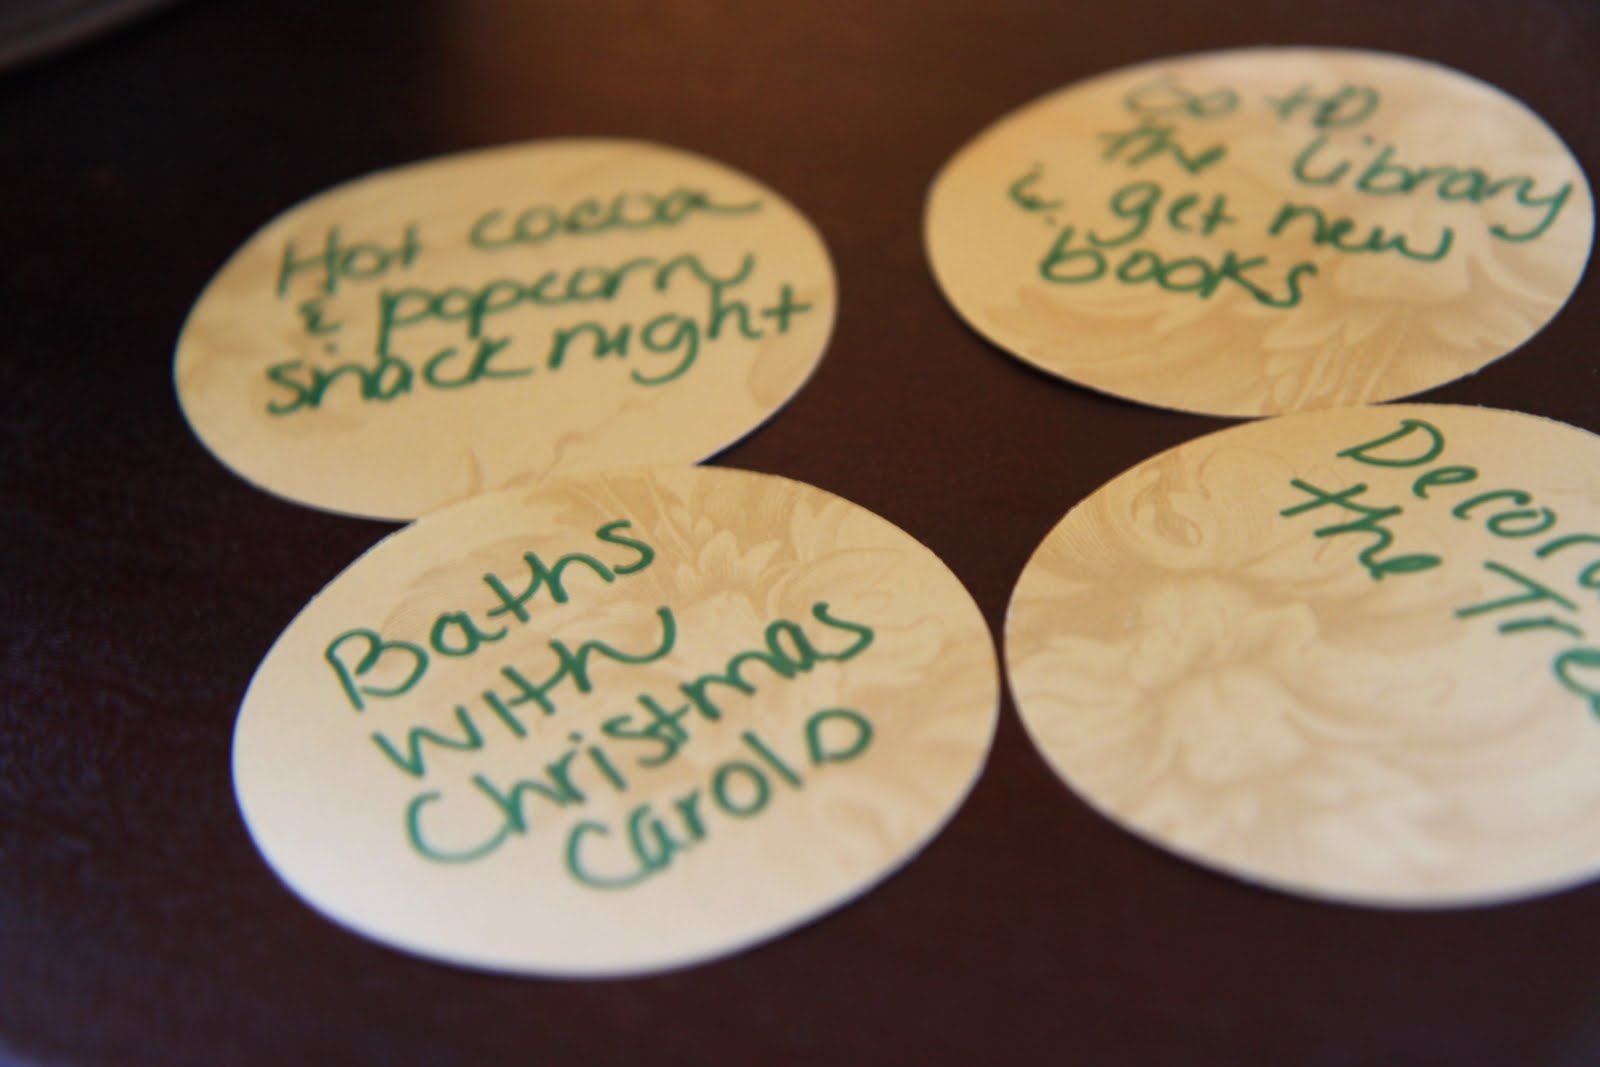 Our Activity List
1. Decorate the Christmas tree.
2. Big bubble baths with holiday music playing.
3. Going to the library to pick out holiday books.
4. Special popcorn and hot cocoa snack (possible visit for the tree lighting ceremony in town).
5. Going to a Christmas Concert.
6. Decorating gingerbread houses.
7. Make Christmas cards for our special friends.
8. Watch a holiday movie.
9. Color a holiday coloring page.
10. Bake Christmas cookies.
11. Go see holiday lights.
12. Go see Santa and a trolley ride through downtown.
13. Write a letter to Santa.
14. Pop popcorn & play a board game together.
15. Host an ornament decorating party.
16. Color a holiday picture.
17. Holiday party to attend.
18. Go to the dollar theater and see a movie.
19. Go see the Christmas lights.
20. Deliver holiday treats to our friends & the firefighters in town.
21. Big bubble bath with holiday music.
22. Open one gift early.
23. Watch a holiday movie.
24. Celebrate our family Christmas.
Total cost for this project was zero and very little money will be spent to do these activities together. The memories I hope to create with my children though, I hope those will be priceless!
Do you do an Advent calendar or have a special way your family celebrates the countdown to Christmas? I would love to hear your ideas!


 Happy Halloween from our family to yours! May it be fun, safe, and not too spooky!
Oreo & Fudge Ice Cream Cake
1/2 cup hot fudge ice cream topping, warmed
1 tub (8 oz.) whipped topping, thawed, divided
1 pkg. (3.9 oz.) chocolate instant pudding
8 Oreo cookie sandwiches (approximately 1 cup) (I use the off-brand available at Aldi)
12 vanilla ice cream sandwiches
Pour fudge topping into medium bowl. Whisk in 1 cup whipped topping. Add dry pudding mix; stir 2 min. Stir in chopped cookies. Arrange 4 ice cream sandwiches, side-by-side, on 24-inch-long piece of foil; top with half the whipped topping mixture. Repeat layers. Top with remaining sandwiches. Frost top and sides with remaining whipped topping. Bring up foil sides; double fold top and ends to loosely seal packet. Freeze (at least) four hours.
Amy’s Notes- One year I had difficulty with the tin foil sticking to my cake so this year I prepared the cake in a cupcake tote container with a lid and that worked much better than wrapping in tin foil and was easier to stack with other items in our freezer.
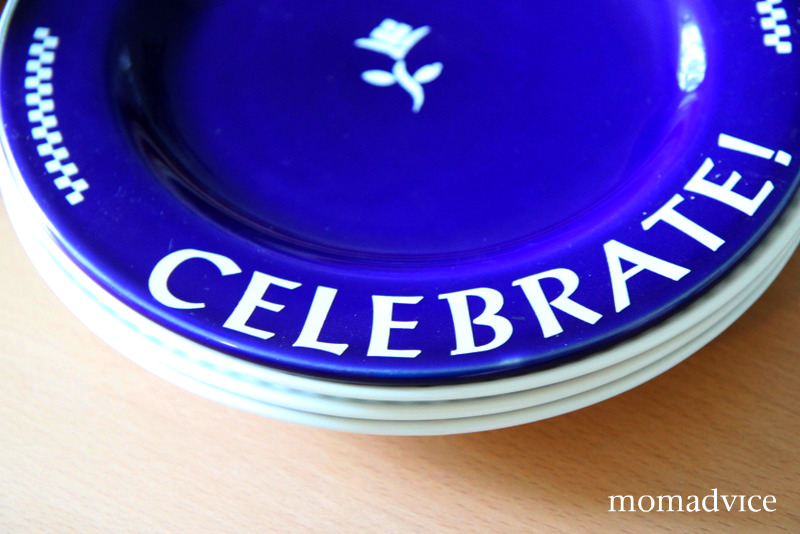 In our house, we celebrate just about everything. If there is a reason to do some celebrating, our family will find it. We had to break out the celebration plate twice this past week to celebrate our first day of school. Ethan started on Tuesday and Emily started on Thursday. Next year I plan to combine the celebration into one because doing this twice was a lot of work in that busy first week of school. Hindsight is always 20/20 though, but I wanted to share with you some pictures from our parties.
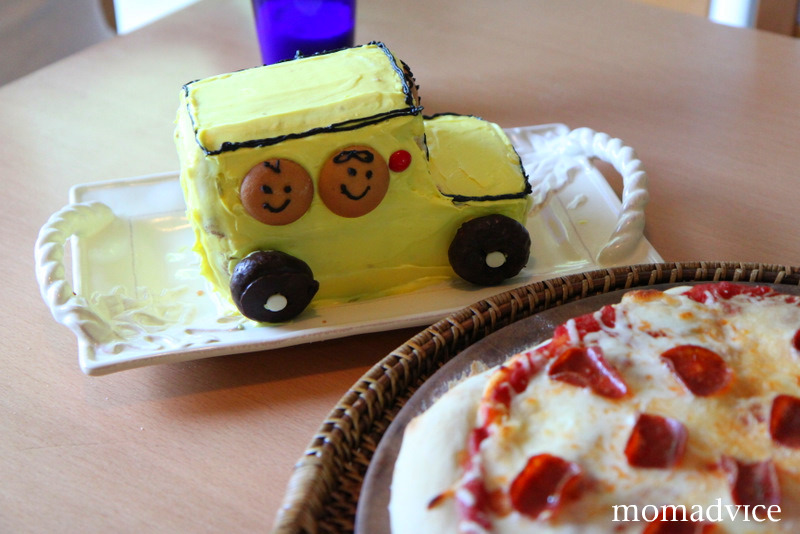
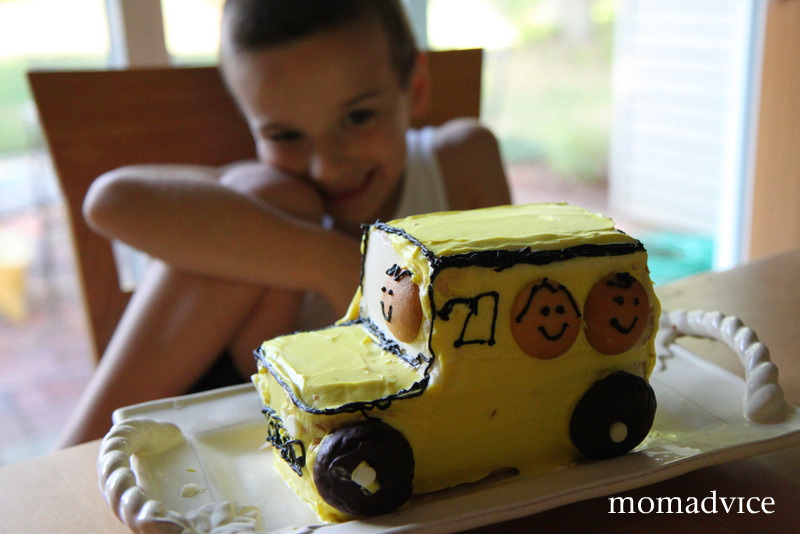

For Ethan’s big day, we all worked together to make the Family Fun school bus cake (there is also a video tutorial here). This cake was absolutely adorable and will be the new Clark family tradition. We found angel food cake loaves at Aldi over by the bread which helped make this cake a little bit lighter. Four people fit on the bus, so we added our family on the bus, complete with a hair bow in Emily’s hair! The kids adored this cake. After we cut into it, we headed over to the neighbor’s house to share it with the other little boy in our neighborhood who just started his first week of school.
Served with the cake, I made my simple pizza crust in the bread machine so that we could enjoy a little pizza with our cake.

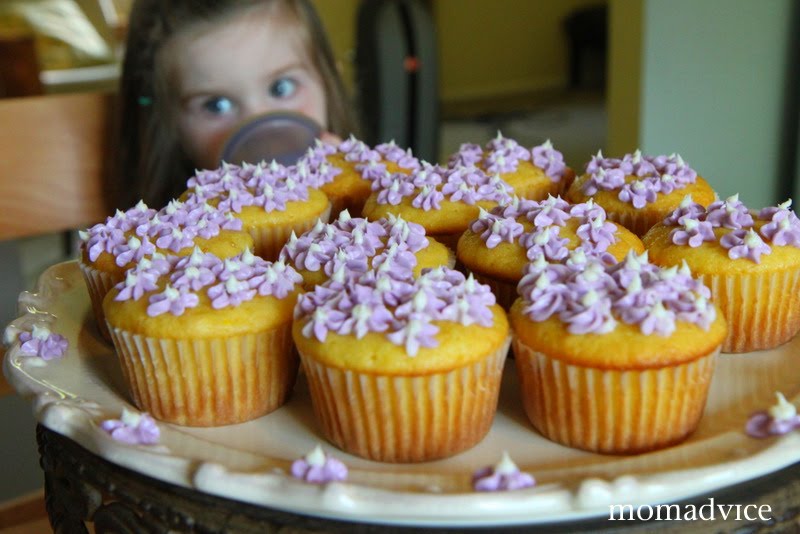

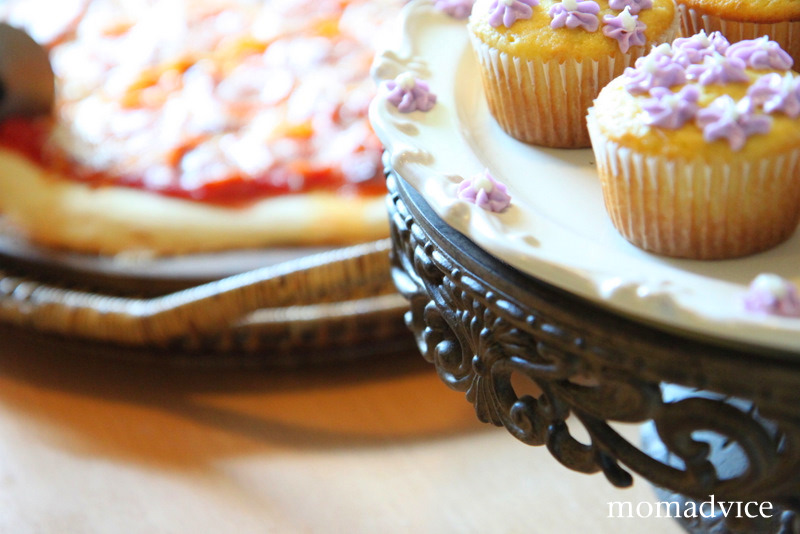
In case you missed Emily’s theme for her school year it is purple and flowers. Unbeknown to me, as we sat down for the “back to school party” on Tuesday night, Emily said she could not wait for her perfect purple flower cake for her party. With weary eyes, I looked at my husband over our pizza. “I hope you like pizza,” I said.
For her party, I just used store-bought cake mix and frosting. I used tip #129 to pipe flowers and then used tip #4 for the center dot in white on each flower. Prepared icing is a pain to work with, but the day had been too crazy to make a batch of icing. She is three so I didn’t think she would mind that the flowers were not as perfect as I hoped.
I love to pipe a little border on the cake plate to go along with the toppings on cupcakes. I think it pulls it all together. Just as her brother’s party, Emily’s flower cupcakes were served with my simple pizza crust in the bread machine so that we could enjoy a little pizza with our cake.
I am thinking we will be skipping our Friday night pizza routine this week!
What are your back-to-school traditions? Do you do anything special for the big day?
 I don’t know why it has never occurred to me before, but we decided to have a patriotic themed birthday party for my son’s birthday this year. His birthday is just a few days after the Fourth of July and so we decided to host a backyard barbecue for our family and friends.
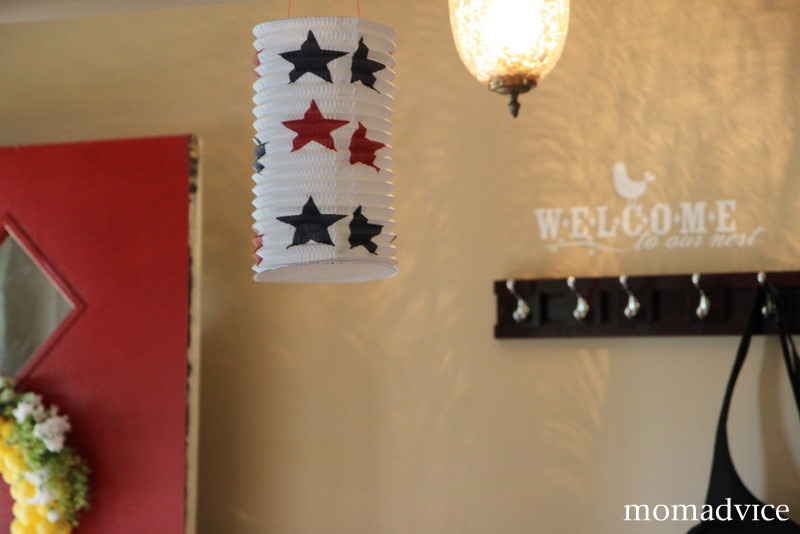 We kept the decorations simple and I tried to buy a lot of things that we could reuse for future parties. These paper lanterns offered a little festivity to our space and I found blue star garland to decorate around our patio doors.
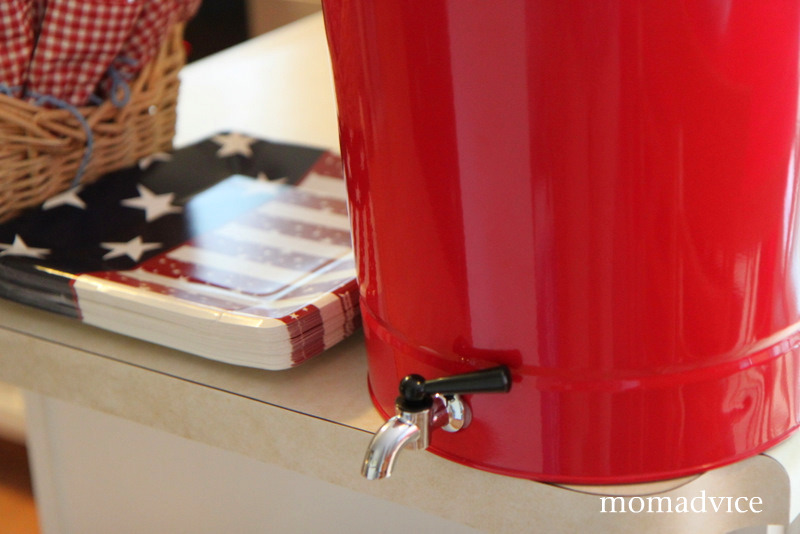 To save on drinks, we used this tin bucket and filled it with a huge batch of birthday punch instead of cans of soda. For each of the kid’s birthdays, I try to do a festive punch to go along with our food and a batch of strawberry punch was a perfect accompaniment to our fun little barbecue. I filled this tin clear to the top and my husband laughed and told me there was no way all of that punch would be drank. He was wrong and we had enough for one glass left at the end of the day. It is always amazing how quickly you can go through things like that!
Instead of buying paper cups, I got plastic cups in red & blue that we could use for all of our parties. The price was right at Walmart (in their summer supplies- only $1 for six cups). They will definitely come in handy for playgroups and future birthday parties.
 I rolled all of the silverware in paper gingham napkins. I had yarn leftover in my yarn stash to use for tying the rolled silverware sets. When I hosted my last party, I found inexpensive sets of silverware at our wholesale club in the restaurant supplies. They aren’t the best quality, but they work so wonderfully for occasions like this. Thrift stores also sell silverware and you can often find bags of it very inexpensively. Rolling these into sets made it easier for everyone to grab what they needed and kept the line for the food moving a little quicker.
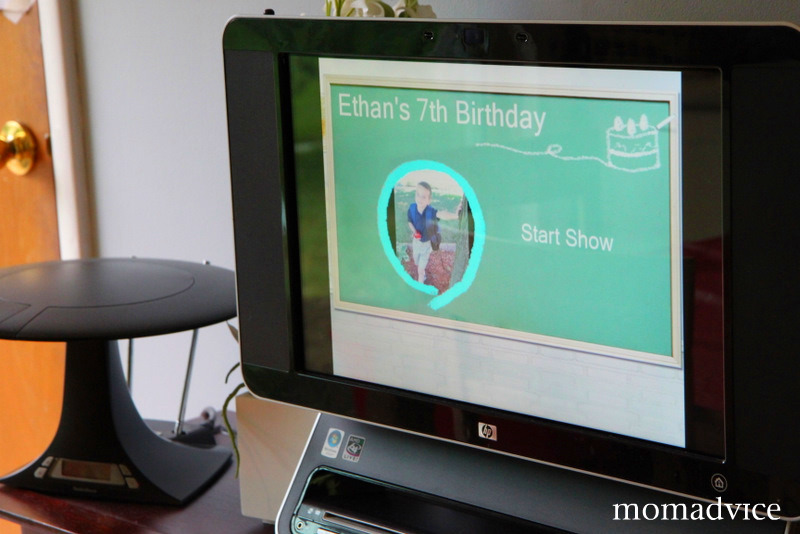 Each year I make a little slide show for the kids that the family can view before we cut into the cake. Amazon sells songs for $.99 and I try to pick one great song to go along with their three minute movie. This year one of our son’s favorite albums is Justin Roberts, “Meltdown” and his, “It’s Your Birthday!” song fit the bill perfectly. The grandparents love this and I think my kids watched this movie sixteen times before the guests arrived. There is nothing like seeing tons of pictures of themselves set to their favorite tunes to put a smile on their faces. I recommend saving this and putting it on when you need to get your party preparation done- it works like a charm!

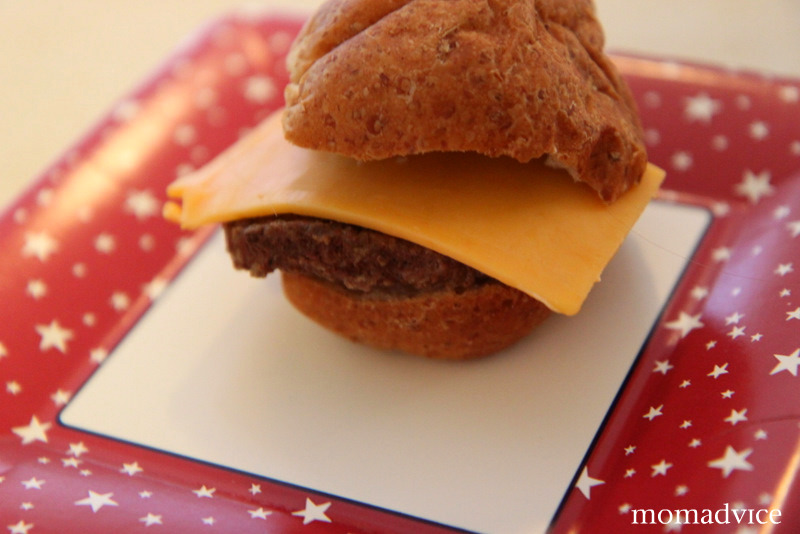

I found these adorable mini burgers at Walmart and they had 24 in a package for $7.00. I got wheat and white rolls in the bakery and got a variety of cheeses and toppings to make a little burger buffet for our guests. We also grilled hot dogs for the kids, but I have to say the mini-burgers took center stage. People could really load their plates up with the sides or have a burger and a hot dog on one plate.
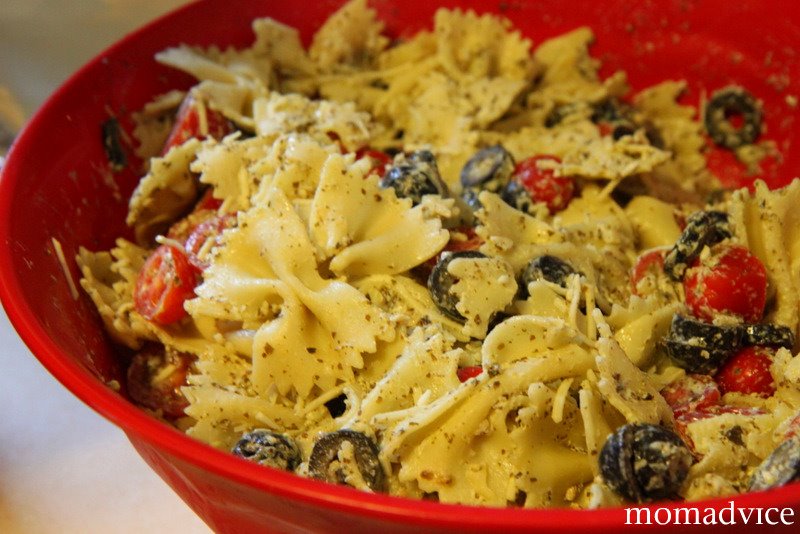
I served that Pesto Pasta Salad which was a hit again at another get together. I also found an amazing recipe for Hot Potato Salad from French Knots (hat tip to Make & Takes for sharing this one) that had everyone talking because it was so different. I followed her recipe, but omitted the green onions and substituted those with fresh chopped flat leaf Italian parsley from our garden. I also added 1/3 cup of Parmesan cheese on top before I baked it and substituted the regular sausage with Italian turkey sausage to cut down on the fat a bit. By substituting with these flavors, it gave it more of an Italian flair and everyone really seemed to enjoy it!
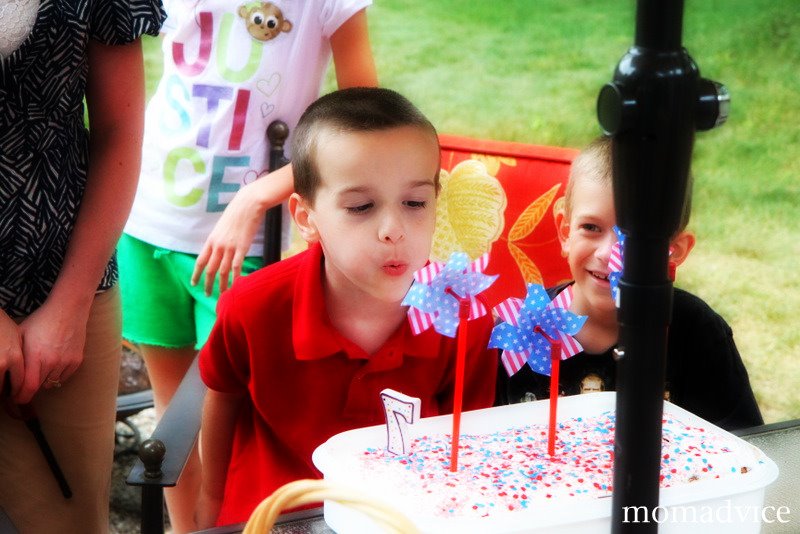
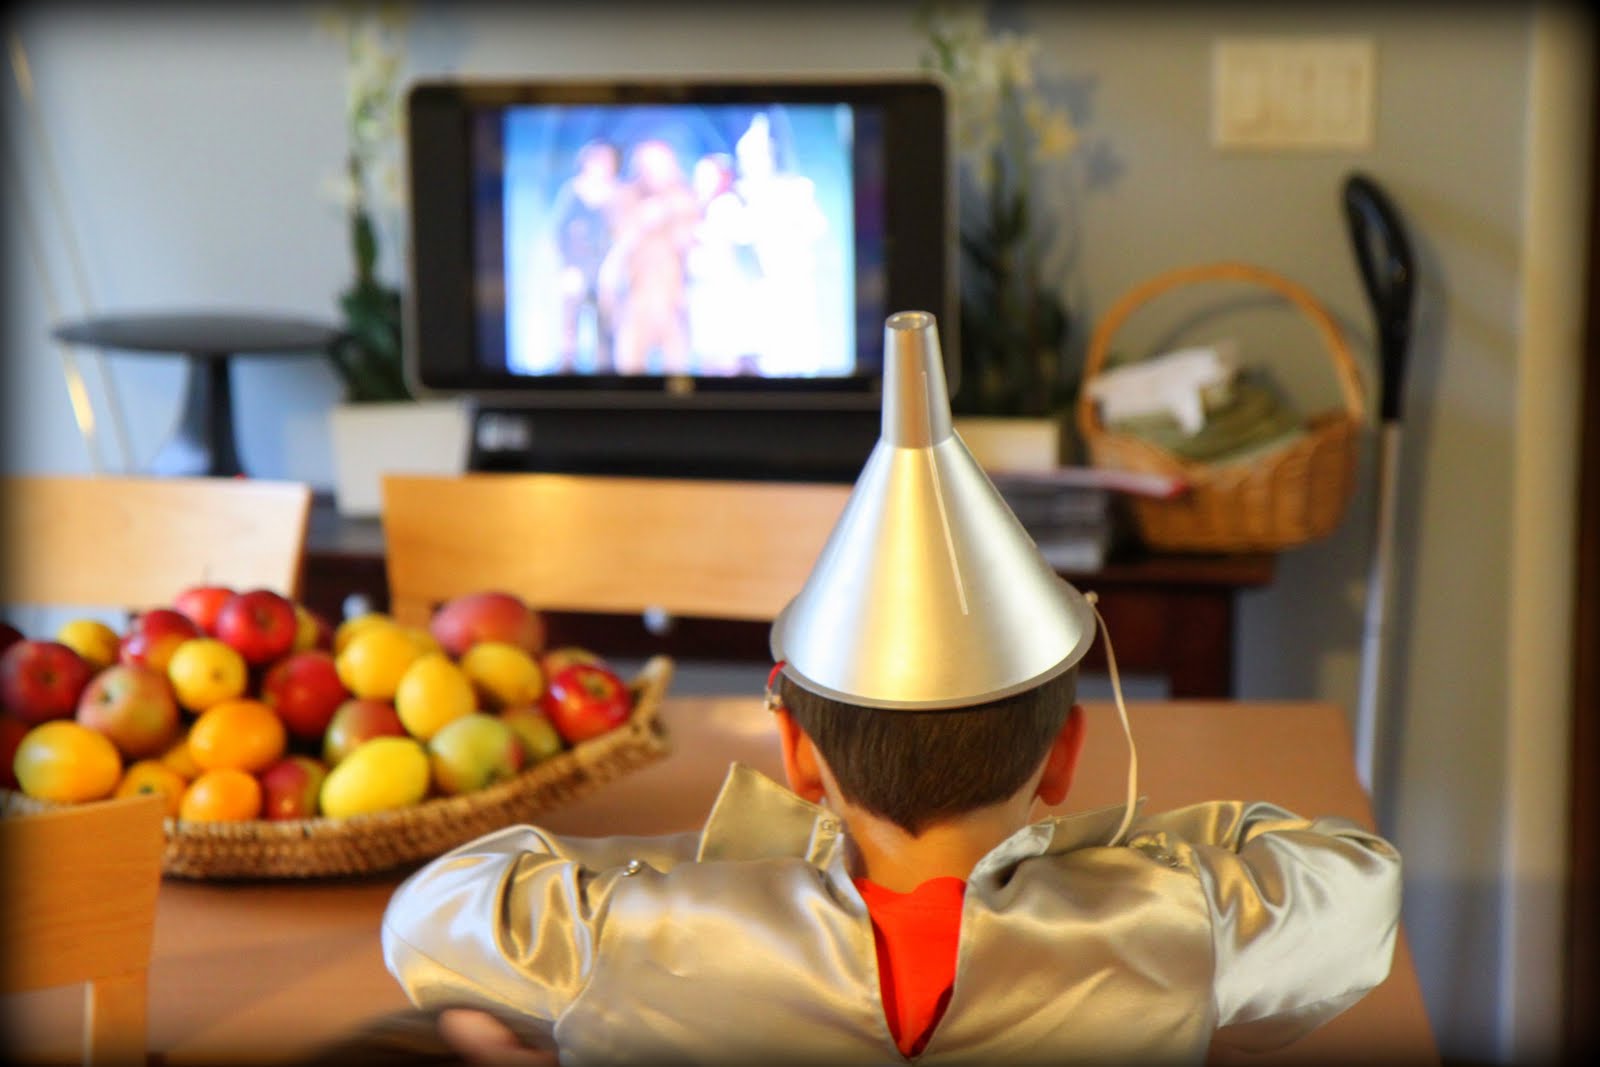
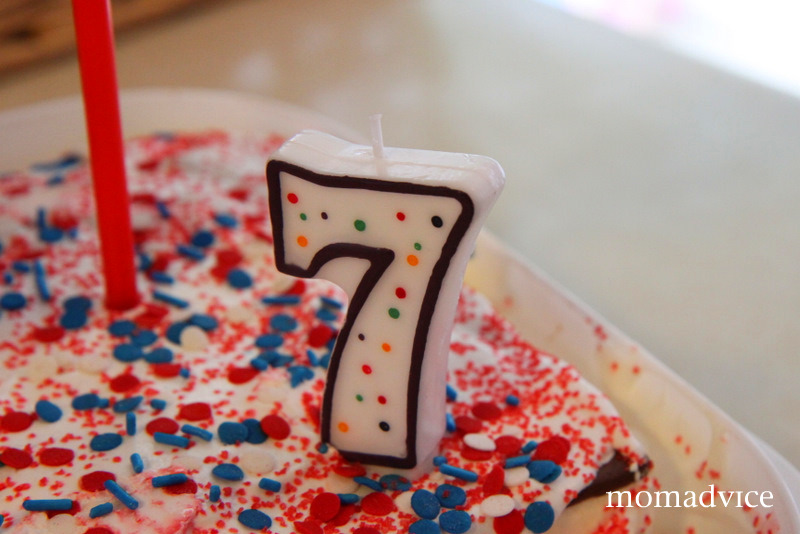
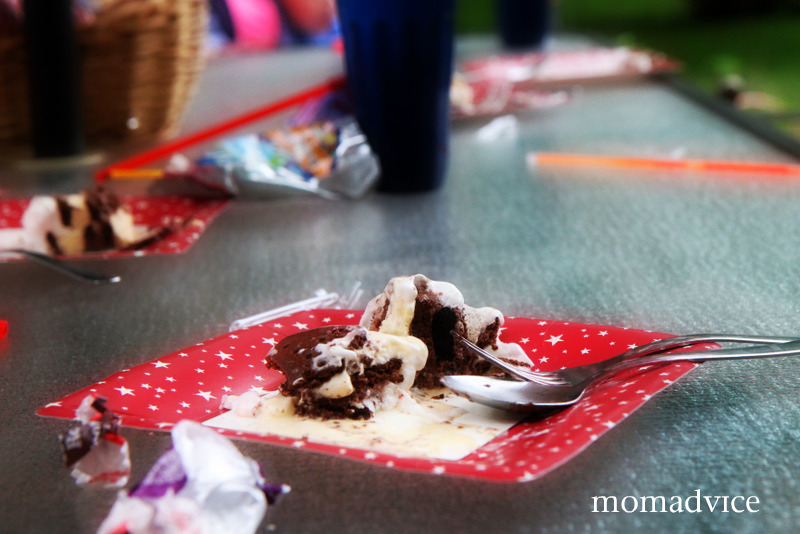
 In case you missed the post yesterday, this was the big birthday cake- an Oreo Fudge Ice Cream Cake. The patriotic pinwheels were a steal at the Dollar Store. They had six in a package for $1 so I used three of these as a cake topper for his cake and cut them in different lengths to add a little pizazz to the cake. The best part about these is that when Ethan blew out the candles all of the pinwheels spun around too. I wish we were able to capture that in motion because it was really cute.
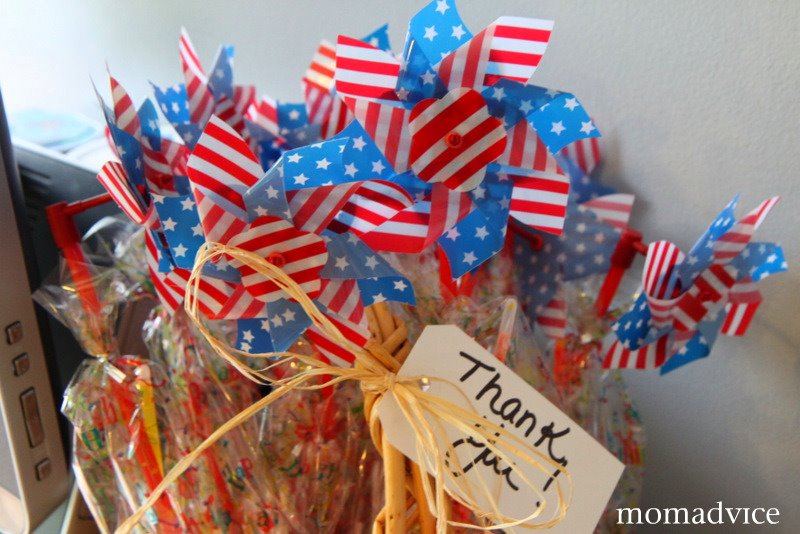 As our party favors, we gave each of the kids a bag with a pinwheel, glow-in-the-dark bracelets and little patriotic bracelets, and some candy all courtesy of the Dollar Store.

Recipe Highlights From Our Patriotic Party:
 Pesto Pasta Salad (courtesy of “The Farm Chicks in the Kitchen“) and you can visit The Farm Chicks Blog too!
3 cups bowtie pasta (about 8 oz)
1/4 cup pesto (Sam’s Club has pesto for really cheap, if your garden isn’t ready for pesto-making yet)
1/4 cup sour cream
1 cup chopped fresh tomatoes (about two medium)
1/2 cup halved pitted black olives
1/3 cup grated Parmesan cheese
1/4 cup pine nuts (optional)
Cook pasta as directed. Drain and rinse under cold running water and let cool. Place in a salad bowl. In another bowl, mix the pesto and sour cream together and add to the pasta, tossing to coat. Add the tomatoes, olives, parmesan cheese, and pine nuts and toss to mix. Serve.
Patriotic Strawberry Punch
1 (2 liter) bottle strawberry-flavored soda (I found this at Walmart)
1 liter (half a bottle) Sprite or 7-Up
1 (12 ounce) can frozen lemonade concentrate
1 (12 ounce) can frozen pink lemonade concentrate
2 (1 liter) cans pineapple juice
Mix all the ingredients together for the punch. This will fill one large punch bowl or two smaller ones.
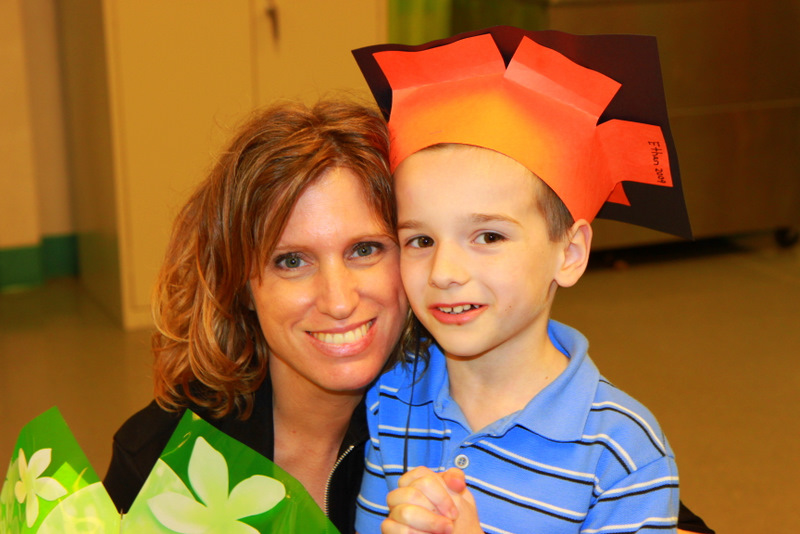
 Ethan,
We are so proud of you, Ethan! You did it! You graduated kindergarten with flying colors and wowed us all this year. I can’t believe you are reading, adding, subtracting, multiplying, and doing it all with that boundless energy that we so admire!
I was sad to see you on that big yellow school bus on your first day of school. I clung to the side of the bus as you assured me that it was all going to be okay. You were so right. You did great and I could not be more proud.
This is just the beginning, son! You are going to do so many great things, meet so many great people, and touch people’s lives in great ways. God has a purpose for you and I can’t wait to see that all unfold.
xoxo,
Mom


Can you guess what I got for Mother’s Day? I am feeling a little giddy and geeking out quite a bit, but my husband upgraded my camera equipment as a gift to me. It still doesn’t seem real that I am now the proud owner of a Canon Rebel T1i with an EF-S 17-55 mm lens. Yes, it was completely extravagant and not normal for us at all, but to his credit the lens was used by another photographer who happened to be upgrading his equipment.
When I asked him why he would spend that much, he simply said, “I believe in you and your business.” He has been pricing, bidding, and researching for months what would be best to buy me, without disclosing any of it to me. He believes that this investment will pay off.
So if things start to shape up in the photography department around here, you will know why! These are my first shots and I haven’t read the manual or figured a thing out yet, but I am already pleased as can be with what I am able to do with this upgraded equipment.
Thank you to my husband for believing in me and what I can do!