These wings…oh, these chicken wings. This picture does not do them justice, but maybe if I tell you that I really hate chicken wings and I would eat these any day of the week, it just might convince you to try this recipe.
Since we have been doing the No Spend Challenge, I only had a 1/4 cup of soy sauce left in a bottle and no other bottles in my pantry. I did have a bottle of Teriyaki sauce so I substituted half of the soy sauce with Teriyaki sauce instead and hoped for the best.
My husband looked up at me and said, “Whatever you did, do this every single time.”
So I will and I am blogging it too so I don’t ever forget it.
May I recommend a fun appetizer night with your family? After all, what is better than a ton of fun snacky foods and a good family flick?
Chicken Wings With Honey BBQ Sauce(updated)
3 pounds chicken wings 1 cup honey 1/4 cup soy sauce 1/4 cup Teriyaki sauce 1/4 cup BBQ sauce 1/8 cup vegetable oil 1 clove garlic, minced (I just used a tablespoon of bottled minced garlic)
Season wings with salt & pepper. Place frozen wings on broiler pan and broil for twelve-fifteen minutes on each side. Transfer wings to the slow cooker. Combine ingredients and pour over wings. Cook on high two hours or low for four hours.
Experiment: Can I make waffles that are as light as air?
Experiment Taken From: Notebook Entry02.25.09
Materials Needed: Please see Serious Eats for the full instructions.
Results: I loved all your feedback last week on my failed pretzel experience. I thought it was important to share that I can totally flop in the kitchen just like anyone else. I have had many failed experiments over the years, but I probably do not share those as often as I should. I try to only showcase the tried and true recipes, but there are those days where the cooking isn’t very stellar in this house and I want to share that with you too!
That failed experiment though did not stop me from attempting another recipe in the notebook. As soon as I saw this recipe for waffles, I knew that I wanted to try it. I love my waffles, but often wish that they were not so dense so that is why I was intrigued by this recipe. I decided to make a double batch, hoping they would turn out and make a fun breakfast for the kids out of the leftovers.
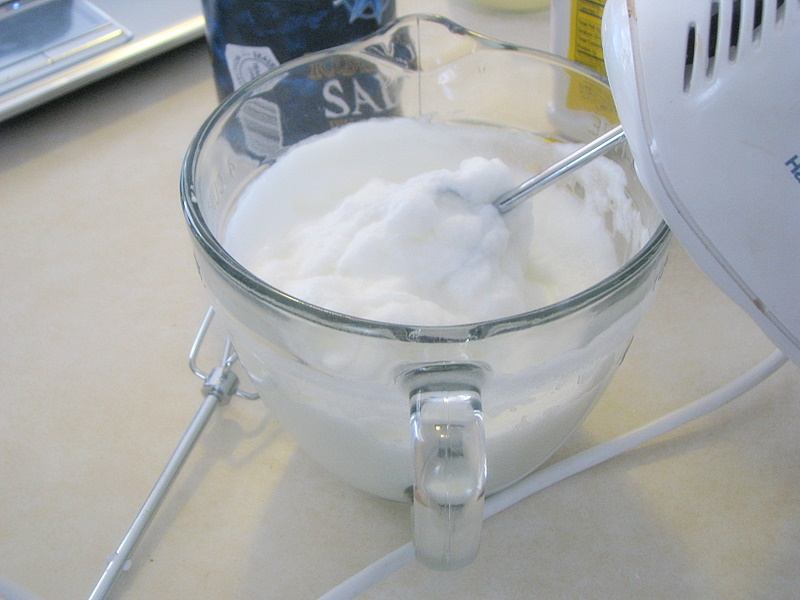
There were several things that made this recipe different from others I have tried. There was no vanilla in it, no sugar even, and it required you to separate the yolks and whites in the egg, whipping the whites until they were at the stiff peak stage. After mixing the batter together, you then fold in the egg whites which created a lot of volume and airiness to the batter.
This combination of ingredients was absolutely perfect and folding in the egg whites helped to create the perfect balance of crispness and airiness that I have been looking for in a waffle recipe. The lack of sugar in the recipe also made it so the waffles were not so sweet and could be heavily coated in homemade pancake syrup without making them too heavy.
1. In a medium mixing bowl stir together flour, baking powder, and salt. Make a well in the center.
2. In another bowl beat egg yolks slightly. Stir in milk and oil.
3. Add egg yolk mixture all at once to the dry mixture. Stir just till moistened (should be lumpy).
4. In a small bowl beat egg whites until stiff peaks form (tips stand straight up).
5. Gently fold egg whites into flour and egg yolk mixture, leaving a few fluffs of egg white, Do not overmix.
6. Spoon waffle batter into your waffle iron, making sure not to overfill it.
7. Serve with real maple syrup and unsalted butter.
Side Note– I doubled this recipe for my family of four and we had enough for three extra Belgian waffles
Conclusion: I will make these waffles again and again because they were absolutely perfect. They truly were the best waffles ever and I look forward to serving these again for a fun brunch or weeknight meal!
To read all the entries on not spending, you can visit our No Spend Challenge category! ********************
I am so excited to open our Notebook Experiments up to everyone and I hope that you will be able to participate this week or in weeks to come! I will be posting this each Wednesday so please mark your calendars if you plan to participate. You can post your entries at any time throughout the week and then leave your entry in the links below.
We have this handy banner that you are more than welcome to use, but it is not a requirement! It is just something you can add to add a little sparkle to your entry.
Rules for Participation:
1. Choose anything from any of our notebook entries (past or present) to do with your family. We have hundreds of bookmarked links of crafts, ways to save money, and organizing ideas. 2. Complete an experiment from the notebook and share about it on your blog or website. We would love to see pictures of what you accomplished or a detailed description of how your projects turned out. Please include a link to this entry, a link to the original posting of the entry (at the original crafster’s blog), and (to help us relocate the project) the date or link of the notebook entry where you found it. You can use the same formatting as our entries or you can just include that information in your post in your own unique way! 3. Post a link below. Please include your name or blog name & a fast description of your project. Example- MomAdvice (WHO bread)
I can’t wait to see what you create and what you find inspiring!
One of my favorite things in the world is a delicious bowl of soup. After my visit to Campbell’s and a recent article that I read in All You Magazine about soup being a great way to consume less calories during your lunch hour, I was inspired to make a big batch of soup for myself. And when I say myself, I mean only me. No one else in my family likes soup so I am able to eat a batch of this for a week or even freeze it to eat over the course of a couple of weeks.
This soup was in my Slow Cooker Menu Planner, but I wanted to make it a little lighter for the lunch hour. By omitting the ground turkey and using small pasta shells and increasing the liquid a bit, I had the perfect balance for a filling soup that wasn’t too heavy plus it is a great way to get in all those yummy veggies.
The soup did seem to absorb a lot of the broth so if it got too thick, I would just add a little beef or chicken broth to thin it out when reheating it.
This is definitely comfort food at it’s best!
Italian Veggie Pasta Soup
3 carrots – chopped very small
4 stalks celery
2 cans diced tomatoes – do not drain (I used the petite diced)
2 cans red kidney beans – drained
4 cans beef broth
1 jar spaghetti sauce
8 ounces noodles – I used the small past shells
2 tablespoons olive oil
Add two tablespoons of olive oil to the pot and saute vegetables for 15-20 minutes, until the vegetables are softened. Sprinkle these liberally with salt and pepper. While these are cooking, in a separate pot boil water and cook pasta shells until they are just cooked (about 5-6 minutes). Drain the pasta water, but do not rinse the pasta. Set aside. Next add diced tomatoes (do not drain), kidney beans, beef broth, and spaghetti sauce to the pot with the vegetables. Allow this to cook for an hour or so, until the veggies are cooked through and the flavors are incorporated. Add the pasta right before serving to the pot. Dish up and serve with a crusty bread for dipping.
Materials Needed: Please see maya made for the full instructions.
Results: Remember when I mentioned that I totally failed on a notebook experiment? Well, this is the experiment that I did not end up doing well.
I thought it would be fun (my husband would say ambitious) to make my hubby some heart-shaped pretzels for a special Valentine’s Day treat. One of his favorite things in the world is soft pretzels and I thought this would be a wonderful way to show him how much I loved him, particularly during our No Spend Challenge month. I mean, what says I love you more than baking for someone?
The first mistake I made was not using the recipe that maya made had used. I actually used this recipe and used my bread machine to make the dough instead of the stand mixer. The dough was difficult to roll out and kept balling back up together.
After finally maneuvering it into a heart shape, I then had to try and put them in the baking soda solution. My mistake, throwing in too many and leaving them in far too long. When I took them out, I started to wonder if it would have been better not to have put them in the solution.
I’m all like, what in the hay happened to these pretzels?
At this point, I keep pressing on. After mixing dough, shaping dough, dipping dough in baking soda solution, letting dough rise, and getting ready to bake them again there is no way in heck I was going to do that again. And my kitchen was the biggest disaster you have ever seen-flour everywhere, dirty pots and pans, baking soda spilled all over my stove. I was worried, but I was going to wrap up this horrible idea of a project.
Delicious? This picture might be deceiving!
I took the hot pretzels out of the oven. The bottoms were brown, the tops were still doughy. I stuck them back in for two more minutes and melted butter. Yup, another pan! I brushed the butter on top and ran one down to take a picture of it. It actually looked yummy! I gave my husband the first one and he devoured it. He ate a second. Maybe I was a success.
Then I took a bite and I literally spit it on my plate. It tasted like baking soda through and through. Meanwhile, Emily has happily ate almost the entire pretzel and then suddenly looks at me with utter disgust and hands her pretzel back to me. “I no like this, mommy.” I think the cinnamon and sugar threw her off from the disgusting taste.
I didn’t cry as I surveyed the damage in my kitchen and hurled the poor excuse for pretzels in my trash can. It is the thought that counts, perhaps, but I shall never think this thought again.
Conclusion: I will never ever make pretzels again. I will leave this task to the highly trained people at the mall and I will pay six dollars (or whatever outrageous amount is charged) to have someone else do this for me.
Call me lazy, but some things are better left to the professionals and this is one of those tasks I can’t see myself repeating. If you have made pretzels before, please feel free to share your tips! What has been your biggest cooking disaster?
To read all the entries on not spending, you can visit our No Spend Challenge category! ********************
I am so excited to open our Notebook Experiments up to everyone and I hope that you will be able to participate this week or in weeks to come! I will be posting this each Wednesday so please mark your calendars if you plan to participate. You can post your entries at any time throughout the week and then leave your entry in the links below.
We have this handy banner that you are more than welcome to use, but it is not a requirement! It is just something you can add to add a little sparkle to your entry.
Rules for Participation:
1. Choose anything from any of our notebook entries (past or present) to do with your family. We have hundreds of bookmarked links of crafts, ways to save money, and organizing ideas. 2. Complete an experiment from the notebook and share about it on your blog or website. We would love to see pictures of what you accomplished or a detailed description of how your projects turned out. Please include a link to this entry, a link to the original posting of the entry (at the original crafster’s blog), and (to help us relocate the project) the date or link of the notebook entry where you found it. You can use the same formatting as our entries or you can just include that information in your post in your own unique way! 3. Post a link below. Please include your name or blog name & a fast description of your project. Example- MomAdvice (WHO bread)
I can’t wait to see what you create and what you find inspiring!
Would you like to prepare a dish that is going to totally wow your company? Maybe you are looking for a restaurant-quality dish, but one that can be whipped up on a weeknight? Well, then I have the dish for you!
I have had this recipe in my recipe box for years, but hadn’t tried it yet. I don’t know why I let it gather dust for so long because it was a hit with every single person in our family. It is a great balance of cream and tomato and the sausage adds a great burst of flavor in each bite.
I tried to make it a little more figure friendly by substituting regular sausage with Italian turkey sausage and substituted the heavy whipping cream with half & half. What resulted was a dish that was still rich and elegant, but shaved a little bit of the fat off of the equation.
I hope you can give this recipe a try in your rotation. I promise you won’t be disappointed!
Bow Ties With Sausage, Tomato, & Cream
1 (12 ounce) package bow tie pasta 1 tablespoon olive oil 1 lb Sweet Italian Turkey Sausage (removed from the casing) 1/2 teaspoon red pepper flakes (can omit/decrease if your family doesn’t like spicy dishes) 1/2 cup diced onion 3 garlic cloves, minced 1 (28 ounce) can Italian-style plum tomatoes, coarsely chopped 1 1/2 cups heavy cream (or half & half to save on calories) 1/2 teaspoon salt 3 tablespoons minced fresh parsley
Bring a large pot of lightly salted water to a boil. Cook pasta in boiling water for 8 to 10 minutes, or until al dente; drain. Heat oil in a large, deep skillet over medium heat. Cook sausage. Stir in onion and garlic, and cook until onion is tender. Stir in tomatoes, cream, and salt. Simmer until mixture thickens, 8 to 10 minutes. Stir cooked pasta into sauce, and heat through. Sprinkle with parsley.
I can admit that I fall short on the side dishes. I can whip up a mean dinner, but then when it comes time to plan the side dishes I stick with Rice A Roni and raw or cooked vegetables. If I am feeling adventuresome, I might even break out the applesauce. Yes, the sides have been lacking the creativity that my main dishes offer.
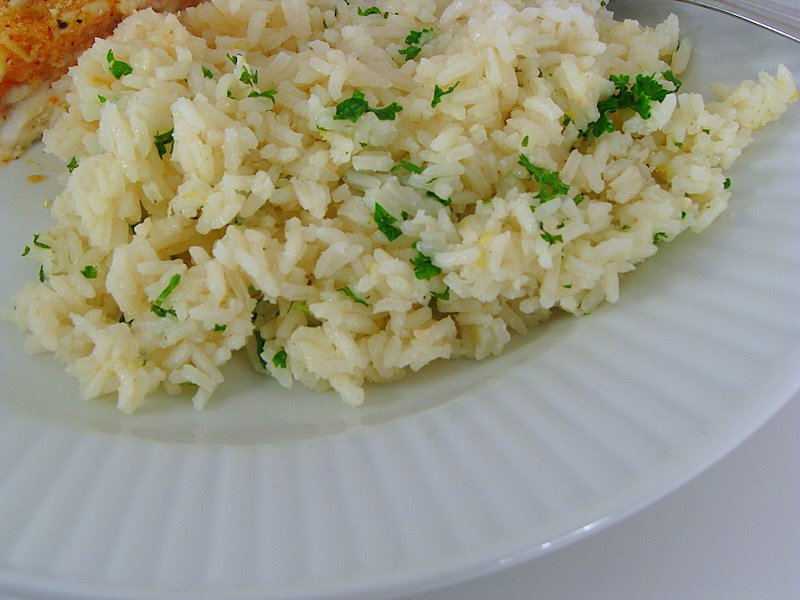
That is why I was so excited when I saw this recipe for Lemony Rice Pilaf. My husband is a fan of the boxed rice mixes, but has never really went for any other ideas that I have put together for rice. While I love a burst of lemon flavor, he drags his heels about anything that is too lemony. With those facts in mind, I knew it would be a true challenge to convert him over to loving this Lemony Rice Pilaf.
It was inspected by everyone with disdain- flecks of fresh parsley, white rice with lemon mixed in. I held my breath and watched everyone scoot it around on their plate.
I leaned in to eat mine and my husband looked up and said, “This is incredible!” We all agreed it was the best rice side dish I have ever made and a perfect balance to the fish that I had served with it.
This rice is sticky, but bursts with flavor from the lemon and the chicken broth that is mixed in. The lemon in it is subtle, but gives just a hint of fresh flavor. The fresh parsley that was chopped up to mix in it gave it a fresher taste and a hint of color, which is always pleasing to the eye.
This is a recipe repeat for sure and I am so thankful to have freshened up my boring side dish!
1 teaspoon vegetable oil, preferably canola oil 1 cup finely chopped onion 1 1/2 cups long grain white rice 3 cups chicken stock (vegetable stock makes this vegetarian/vegan) 1 grated lemon, rind of 1 tablespoon freshly squeezed lemon juice 1/2 cup coarsely chopped flat-leaf Italian parsley fresh ground pepper
In a heavy saucepan, heat oil over medium heat and cook onion for 5 minutes, or until softened. Stir in rice, then stock, and bring to a boil. Reduce heat and cover; let simmer for 20 minutes, or until rice is tender. Stir in lemon zest, lemon juice, and parsley; taste and add pepper if you wish. Note: This reheats very well so you can make a double batch for another night, if you like!
I have been stepping out of my comfort zone lately with my recipe collection and new recipes for pork chops was another one that I felt like I should tackle, I have my top three ways I like pork chops- my Ranch Pork Chops, the Italian Chops, & then the Slow Cooked Pork Chops. No other recipes seem to do it for me, but I had the ingredients hiding in my pantry to make this dish and thought I would take the plunge.
This has to be the best pork chop I have ever eaten in my life. The combination of cooking the pork chop in the butter with the olive oil helped keep the breading on the pork chop instead of stuck to the pan. The flavorful coating helps to keep the pork chop moist so you don’t have the dried out chops like most recipes usually end up with.
The special ingredient that takes this over the edge though is definitely the lemon zest mixed in with the Parmesan cheese & Italian breadcrumbs. I saved the lemons after zesting them and squeezed the lemons ofter the hot chops when they came out of the oven. Sprinkling it with a little fresh parsley takes this from a boring flavor experience to a very exciting one. Pairing this with my cheesy orzo made for the perfect combination!
I would highly recommend making this dish as soon as you can! No one could stop eating it and the leftovers were leftover barely a night in our house.
1 1/2 cups breadcrumbs (I used the Italian bread crumbs) 1 cup grated Parmesan cheese tablespoon dried rubbed sage 1 lemon, rind of, teaspoon grated (save the lemons for squeezing over the hot chops) 2 large eggs, whisked 1/4 cup flour, seasoned with salt and pepper 4 pork chops, about 1 inch thick (can use bone in or out ones) 1/8-1/4 cup butter 2 tablespoons olive oil Fresh sprinkle of parsley when you are done
Preheat oven to 425F degrees. Mix in bowl, bread crumbs, grated parmesan cheese, dried rubbed sage and grated lemon peel. Then, on a plate put flour seasoned with salt and pepper; coat chops with flour. Dip in egg. Then dip in bread crumb mixture. Melt butter and olive oil in a oven-proof skillet. Brown chops until golden. Transfer to oven and bake until meat thermometer says 150 degrees, about 20 minutes.
2 tablespoons extra-virgin olive oil, 2 turns of the pan 1/2 small onion, chopped (I omit this ingredient) 2 cloves garlic, chopped 2 cans (14 ounces) chicken or vegetable broth or stock 2 cups orzo pasta (enriched rice may be substituted) 1/2 cup grated Parmigiano or Romano (I just use Parmesan cheese) Salt and freshly ground black pepper
Preheat a 8 inch pot with a tight fitting cover over moderate heat. Add oil, onion and garlic and saute for 2 or 3 minutes. Add broth to the pan and bring to a boil. Stir in orzo and return broth to a boil. Cover pot and reduce heat to simmer. Cook 15 minutes, stirring occasionally, or until liquid is absorbed and pasta tender. Remove lid and stir in cheese. Season with salt and pepper to your taste. You favorite fresh herbs may also be stirred into the orzo or rice to strengthen the flavor even more.
After our discussion on my old school baking day, I had lots of great ideas for how I could get around actually buying a bread machine. One of our readers, named Noreen, suggested that I check out a book called, “Artisan Bread in Five Minutes a Day” which would help me get around the whole bread machine process and required no kneading.
As soon as I read her comment, I put a hold on it at our library and picked it up the next day. With a cup of iced coffee in hand, I read through the entire process and what I would need to complete it.
For copyright reasons, I will refrain from going into the recipes themselves, but I will explain the process of this method so that you can decide if this something you could/would do to make bread for your family. The master mix recipe I am using is actually located here so you could attempt the first recipe without even getting the book.
There are lots of different recipes in the book and then different ways of shaping the dough recipes. I attempted the master recipe which included just the basics- water, yeast, flour, and salt.
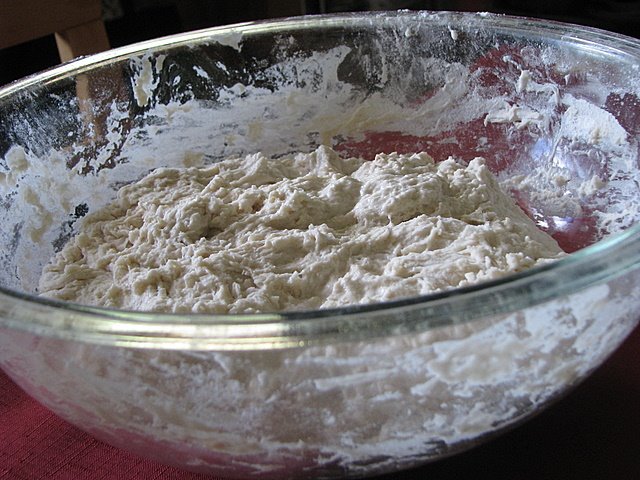
The difference between making this dough and the traditional dough is that you literally dump the ingredients in (no need to even proof the yeast) and use a wooden spoon to just mix everything together. The dough is very wet and easy to stir and you don’t even have to break out the mixer.
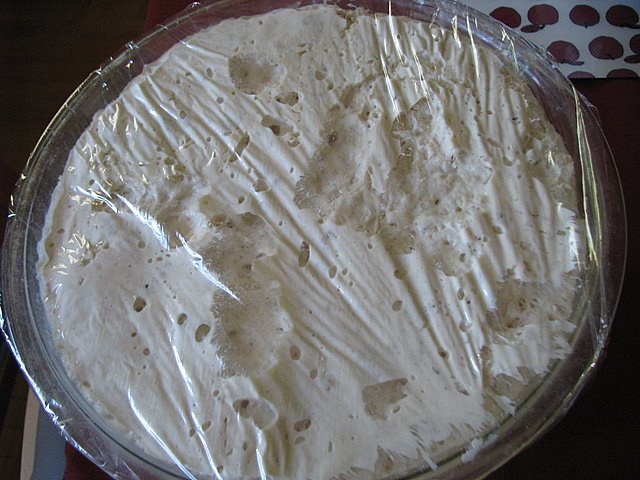
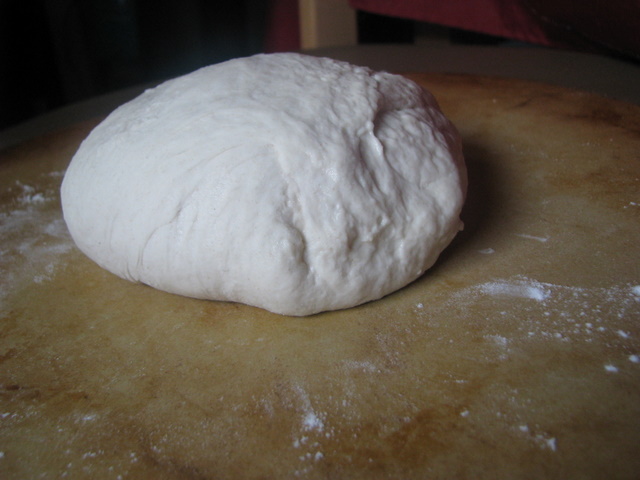
You cover the dough and let it rise for two hours and then you stick it in the fridge for a minimum of three hours and up to fourteen days. Yes, that’s right..fourteen days! According to the authors, the dough will taste better and better the longer the dough sits in there and you can even use some of your old dough as a starter for a new dough, much like the process of making a sour dough starter. The first picture shows what this dough looks like when it is just incorporated- stringy and yucky looking. This second picture shows what the dough looks like after it rises. This master recipe was enough for four loaves so that is why it looks like there is so much. They have bigger recipes than this, but this is the amount of fridge space I could spare for the week.
I let this dough sit for two days before I made my first loaf. When you make your first loaf, you just “cloak the dough,” (sprinkle the dough on top with some flour) and then cut off a grapefruit section of the dough for your first loaf. Without any kneading or any real handling of the dough, you tuck the corners of the dough underneath and put it on a pizza peel (I used my extra pizza stone) that has been sprinkled with a little cornmeal. Now you let it rise and preheat your oven for 450 degrees. They suggested twenty minutes, comments on Amazon suggested preheating the entire forty minutes that the dough is rising to help achieve the best crust.
It should look something like the picture above. It is relatively smooth on top, but the corners are all tucked underneath. After you have shaped it like this and let it rise, you can slice the top two or three times.
You now slide the loaf (very awkwardly if you have no pizza peel) and then you fill a boiler tray with one cup of hot water and put it in the oven to help steam the oven up to give you a nice crisp crust. Don’t ever open the door and let it cook for thirty minutes.
When I took it out, it looked like this. Now remember, this is my first loaf so I am sure I will get better at it, but I am pretty impressed with how this first loaf looks. Next time I will score it a little more and I will probably make more than one loaf at a time. The exterior of this loaf is nice and golden, and it is solid and crusty on the outside. Perfection!
The interior was a bit gummy though so I may cook it for another ten minutes or raise the temperature. This will just require some tweaking on my part, but our family still thought it tasted pretty darn good.
Now that I have made this first loaf, I am so excited to try the other loaves in the book. The entire process took very little of my time and I had very little clean-up (my least favorite part of making bread) so it is a great solution for a busy mom who wants to make homemade bread, but doesn’t have the tools or time to make bread from scratch.
Let’s also talk about the cost savings too. In our town, our local market has artisan breads for sale that cost about $4 a loaf. I buy my ingredients in bulk at Sam’s Club and I am estimating that this loaf of bread costs me about forty cents or less. What a savings and how elegant is this to bring to parties and when entertaining? You just can’t beat it!
A big thank you to Noreen for the suggestion and I hope you can try this recipe and tell me what you think! I have a demonstration from the authors posted below- this might help explain the process further.
Have you experimented with no-knead artisan breads? Do you make your own bread throughout the week? I would love to hear your process for bread making!
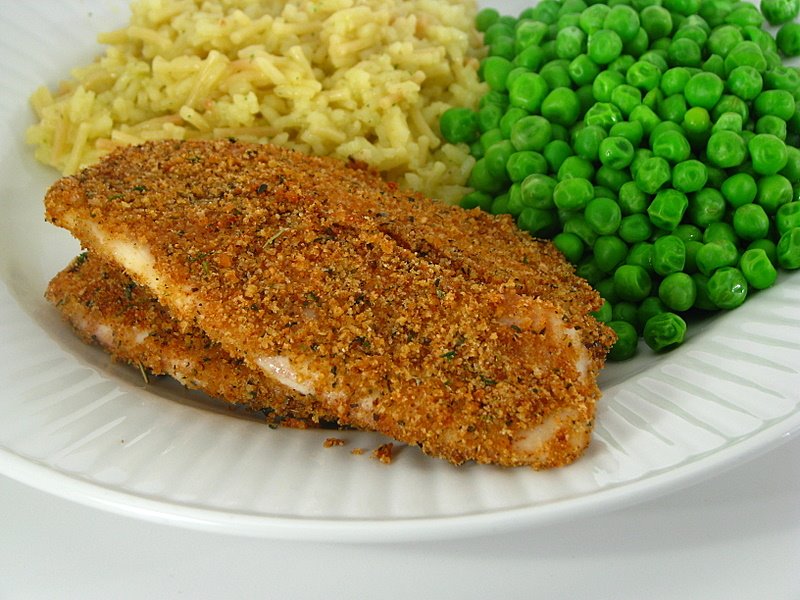
I have wanted to try some new tilapia recipes for a long time now, but I have to admit that I was afraid to waste a package of it and have it not turn out. My Herb Baked Tilapia is served almost weekly in our house and is loved by the whole family. Why mess with a good thing, right?
Well, I saw this recipe and just had to try it. It is so low in fat (one tablespoon of olive oil for four pieces of fish total), was made with everything in my spice cabinet, and it was a baked fish so I wouldn’t have to dirty up a skillet or my oven to make it. I thought it would be worth a try, just to see if we could switch up our old standby.
This fish was excellent. The balance of spices in this is perfect, the crust tasted almost fried because it crisped up so well, and the fish was perfectly flaky. Our whole family truly loved it and I think I will be making this again and again. It would make an excellent fish sandwich so I think I will be trying that next time, just to keep the dish fresh and new.
Thank goodness I stepped out of the comfort zone so I could add this meal to our meal rotation! Baked Tilapia With Lots of Spice (Recipe from Recipezaar)
Preheat the oven to 450 degrees. In a small bowl combine the spices from the salt through the Italian seasoning and set it aside. In a shallow container mix the bread crumbs, dried parsley, and green onions. Measure 4 tsp of the spice mix and sprinkle that all over the 4 fish fillets. Add the remaining spice mix to the bread crumbs, mixing well. Add the olive oil to the bread crumb mix, blending it in with your hands. Dredge the fish in the breadcrumbs, coating well. Shake off any excess breadcrumbs. Place the fish on a baking pan that has been sprayed with non-stick spray. Bake for 6 minutes. Turn over and bake for 4 minutes. Turn over again and bake until flaky, about 4 more minutes. Serve immediately.
 These wings…oh, these chicken wings. This picture does not do them justice, but maybe if I tell you that I really hate chicken wings and I would eat these any day of the week, it just might convince you to try this recipe.