Archive for the ‘Main Dishes’ Category

12 Great Tailgating Recipes

Thursday, September 6th, 2012

12 Great Tailgating RecipesHip-Hip-Hooray! Tailgating season is finally here and today I wanted to showcase to you twelve great dishes you can take with you to your next tailgating event. After all, what tailgating event would be complete without a great dish to share with friends?

It may surprise you that I don’t care a thing about football…Oh, who are we kidding? I am sure you already knew this about me. I will admit that I may not love the game, but I am all about the yummy food, drinks, and festivities with friends that surround the games.

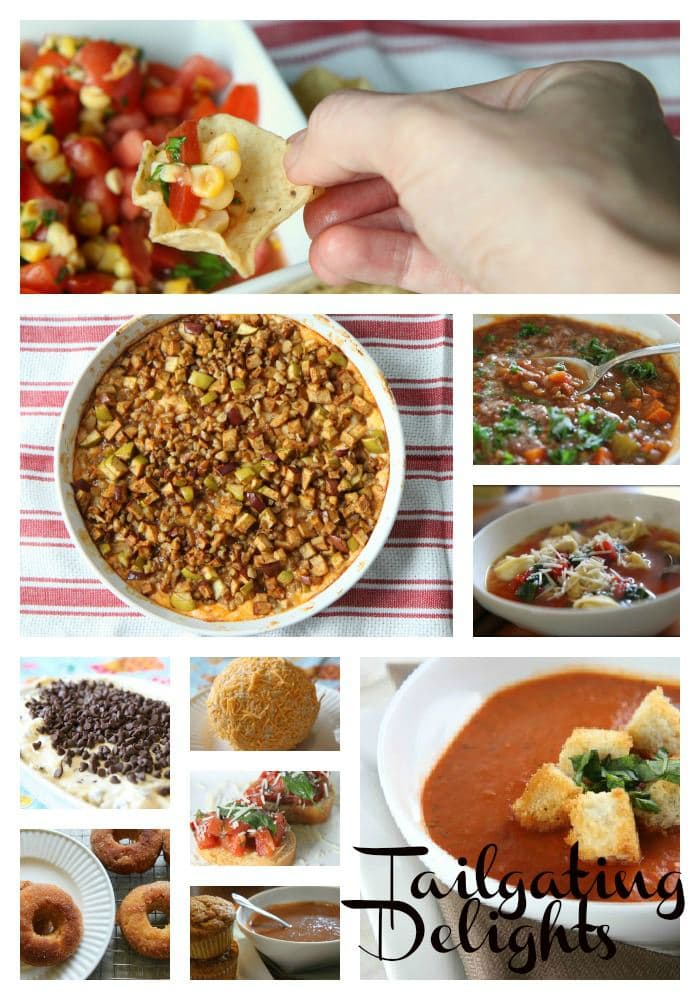
Here are my top twelve choices for taking to your next tailgate:

1. Roasted Corn Salsa  Fresh chopped tomatoes, roasted corn, and parsley are tossed with just a little red wine vinegar, olive oil, hot sauce, salt, and pepper to create this unique and easy appetizer. What makes this appetizer unique is the process of broiling your corn under the broiler to add a smokey flavor that will have your friends begging for the recipe!

2.  Cheddar Apple Pie Dip–  One of my favorite combinations for fall eating is cheddar and apples. If you haven’t tried this before, it is the perfect balance of sweet and savory and they all come together in this easy dip to tailgate with.  Diced on top  is a mixture of red and green apples that have been tossed with brown sugar, cinnamon, and coarsely chopped walnuts. The layer underneath offers a surprise of cheddar cheese mixed with cream cheese and sour cream, cooked until hot and bubbly. Serve with your favorite cinnamon chip or cracker.

3. Lentil Soup– Looking for a wallet-friendly soup to feed a big crowd? Lentil soup is the perfect answer to feasting on a budget.  If you haven’t cooked with lentils before, you should really give them a try! Unlike dried beans, lentils do not require any pre-soaking overnight prior to being cooked. Instead, most cooks recommend that you first pick over these legumes, and remove any that look broken or damaged. A quick rinse after you have picked out the damaged lentils, and you are ready to go. The ease and minimal prep time for cooking these is why lentils are a wonderful and easy addition to any soup and the perfect soup to tailgate with!

4. Pesto Chicken Tortellini Soup–  This tortellini soup brings together all of the flavors that my family loves, but is a versatile recipe that could be created with what is at your supermarket that day. For our vegetarian readers, the chicken tortellini and chicken broth can easily be switched to a cheese-filled tortellini with vegetable broth instead. I used basil pesto in this, but you could also try a sun-dried tomato pesto or omit the pesto altogether if it is not a favorite of your family. Versatility is the beauty of a good soup recipe  and this recipe is quite versatile! Not only is this sup a crowd pleaser, but it also is an easy soup to double or triple for your tailgating needs.

5. Homemade Tomato Soup– This tomato soup is all of our favorite flavors in the perfect merriment for our family.  Chicken stock, whole tomatoes, crushed tomatoes, and a little heavy cream are all mixed together. To cut the acidity, a pinch of sugar and a healthy dose of pesto round out the flavors. Be warned, a single batch makes enough to serve a small army. I love to serve this soup with a variety of fun crackers, croutons, or shredded cheeses for topping.

6. Cookie Dough Dip This dip was nicknamed “Crack Dip” after the bowl was scraped clean when I brought it for Thanksgiving one year. I love to bring a sweet dessert dip that can be an unexpected surprise among the savory dips that are usually offered for tailgating spreads.

7. Bacon & Ranch Cheese Ball This cheese ball is so embarrassingly easy, but is always a showstopper when I bring it to any get together. I try to always keep these ingredients on hand in my fridge or pantry for the unexpected get together for the games!

8. Double Tomato Bruschetta– This bruschetta is a double tomato bruschetta which combines the super sweet and chewy flavors of the sun-dried tomatoes with the delicious juiciness of the Roma tomatoes. The flavors together are phenomenal and are mixed with just a little balsamic vinegar,olive oil, garlic, and a little fresh garlic.  You can prepare this one a few hours in advance, allowing the flavors to marinate together and break down the tomatoes a bit, or you can prepare it and eat it within ten minutes of preparation. I promise it won’t last long wherever you take this one!

9. Black Bean & Roasted Red Pepper Soup– Looking for a soup that will stick to your ribs through the whole day? I happen to have just the soup for you! The spices in this soup are perfect , the roasted red pepper adds a beautiful color and flavor to the soup, the sour cream adds that perfect balance of creaminess, and the beans add that filling soup combination to help keep you full throughout the day, while the chicken broth makes this soup light enough that even black bean soup haters could learn to love it… well, most black bean soup haters. This is a great soup to double or triple depending on the crowd that is gathering!

10. Baked Apple Pie Donuts– I love baking donuts and these Baked Apple Pie Donuts are the perfect treat to take to your next tailgate! The dominate flavor in this one is definitely the apple followed by the earthy and nutty flavor of ground nutmeg that helps round out the flavor profile of these donuts.  Once these delicate donuts are done baking, they are brushed lightly with butter and then dipped into a cinnamon and sugar coating that helps bring all of those delicious fall flavors together and that little bit of gritty, yummy crunch that just so happens to be my favorite thing about donuts. I guarantee that not a single one will be left within minutes of their arrival!

11. Pumpkin Cornbread Muffins Pumpkin Cornbread Muffins are my family’s favorite side dish if it is fall or the dead of summer. I try to make sure to stockpile pumpkin for just this reason and you might be doing the same after making a batch of these for tailgating season. These are best served at room temperature which is just the right temperature for your next tailgate!

12. Sub Sandwiches- Walmart gave us a chance to throw a game party with their subs to showcase what an affordable tailgating party option these are. For $28, you can get a six foot sub with your favorite meats and cheeses and all of the toppings.

As you can see from the way that these subs got plated, I took the opportunity to throw a GAME party quite literally and hosted a board game night with my best girlfriends.

Here is a little sneak peek at my table and the spread that I did with my tailgating recipes for a fun board game night with friends. Be sure to check back next week for ideas on how to decorate, board game ideas, and other fun crafty projects you can incorporate within your own game party. This might be a fun one to throw for the wives while the husbands are enjoying the game!

Be sure to check out my tutorial this week for those cute DIY Chalkboard Food Label Frames! Those would make a fun addition to any game day party table that you might be creating!

Happy tailgating, friends!


I am a part of the Walmart Moms program, and Walmart has provided me with compensation for these posts. My participation is voluntary and opinions are always my own.


Pin It

Grain and Nut Whole Wheat Pancakes

Monday, September 3rd, 2012

I am always trying to incorporate whole grains into our morning meal routines for both of my children. These Nut and Grain Whole Wheat Pancakes packed a triple punch for a morning starter because they are filled with not only whole wheat flour, but the additional benefits of being laced with ground oatmeal and chopped walnuts for a hearty and satisfying pancake.

Thanks to the fact that the kids are continually exposed to whole grain foods, I think it is pretty cool that they seem to prefer these now over the white stuff. In fact, our favorite waffle recipe is still my recipe for Cinnamon Whole Wheat Waffles and the kids beg for these for our Sunday morning brunches.

These are definitely the type of pancakes that stick to your ribs which make them perfect for those long days at school before the lunch hour. I have a feeling your family will love these just as much as mine did. Top them with a little maple syrup or favorite fruit preserves and a small handful of walnuts for a beautiful finish.


Grain & Nut Whole Wheat Pancakes
Recipe Type: Main
Author: Adapted from AllRecipes.com
Prep time: 10 mins
Cook time: 20 mins
Total time: 30 mins
Serves: 6
A hearty pancake laced with whole wheat flour, ground oatmeal, and chopped walnuts.
Ingredients
  • 1 1/2 cups old-fashioned oatmeal
  • 1 1/2 cups whole wheat flour
  • 2 teaspoons baking soda
  • 1 teaspoon baking powder
  • 1/2 teaspoon salt
  • 1 1/2 cups buttermilk
  • 1 cup milk
  • 1/4 cup canola oil (or you can substitute with 1/2 cup applesauce)
  • 2 eggs
  • 1/3 cup brown sugar
  • 2 teaspoons vanilla
  • 1 teaspoon ground cinnamon
  • 3 tablespoons chopped walnuts (optional)
Instructions
  1. Grind the oats in a blender or food processor until fine. In a large bowl, combine ground oats, whole wheat flour, baking soda, baking powder, cinnamon, and salt.
  2. In another bowl, combine buttermilk, milk, oil, eggs, vanilla, and sugar with an electric mixer until smooth.
  3. Mix wet ingredients into dry with a few swift strokes.
  4. Stir in nuts, if desired.
  5. Lightly oil a skillet or griddle, and preheat it to medium heat.
  6. Ladle 1/3 cup of the batter onto the hot skillet; cook the pancakes for 2 to 4 minutes per side, or until brown.
  7. Recipe should yield 12 pancakes.


Pin It

The Best Steak Marinade Recipe for Grilling

Monday, August 27th, 2012

The Best Steak Marinade Recipe for Grilling Header

Looking for an easy steak marinade for your next cookout? These steaks can marinate in a freezer bag while you prepare your side dishes. This recipe elevates any cut of steak so no need to spend money on a filet mignon.

Adding flavor and tenderness to an inexpensive steak is so easy to do with a simple steak marinade.

If I am spending a lot of money on a more expensive cut, like a gorgeous filet mignon, I skip the marinating and allow this cut of meat shine.

The truth is, we don’t often purchase filets though. We, instead, rely heavily on the old, “who has steak on sale this week?” method for selection instead.

One technique that I’ve mastered over the years is thinly cutting my beef to disguise any toughness in texture.

It is why you often see inexpensive cuts, like skirt or flank steak, cut very thin strips for tacos.

Which steak is best for this recipe?

I happened to hit a great sale on NY strip steaks, but normally I would use this recipe on tougher cuts of beef that would benefit from being tenderized.

This recipe is great for cuts of beef like chuck steaks, hanger, skirt, or flank.

Consider any tougher cuts of beef that you might prepare in your slow cooker too.

New York Strip Steaks from Grocery Store

marinated steaks on open grill

Should you marinate a New York strip steak?

I did marinate my New York strip steaks, but this is definitely not necessary! This cut of meat is tender and flavorful without a lot of intervention.

What is the best way to cook New York strip steaks then?

Fancy cuts of meat don’t require a lot.

Since New York strip steaks are so tender, they don’t require anything beyond a pat of butter.

steaks on the grill with vegetables

What cooking method is best for each cut of beef?

I recommend taking a peek at this article on 4 expensive cuts of beef that are big on flavor. This guide should help explain which cooking method is best and help you understand the difference in flavor profiles between different cuts of meat.

For example, how ribeye and New York strip steak differ?

That, and all your burning questions about the difference between filet mignon and top sirloin are worth reading so you can adapt your cooking techniques based around steak sales.

I really think this is an incredible guide for beginner and experienced cooks.

If you use this method to make a medium rare New York strip steak, you will want to cook it to 140 degrees and then allow it to rest before cutting.

Speaking of New York strip steaks, I can’t wait to try this frozen New York strip steak technique in my kitchen soon.

Cooked Filet in Cast Iron Skillet

I don’t want to grill. How do I cook a steak like a restaurant does?

Tired of paying premium prices at your local steakhouse?

One of the best time investments I have made has been learning to make our steak dinners at home.

The trick is starting the steak on the stovetop and then finishing it in the oven.

The best part is that everything can be done in ONE cast iron skillet.

Did someone say LESS DISHES?

Count me in!

Once you master this cast iron skillet method, you can enjoy a weekly steak without the guilt.

I can’t recommend my pan seared oven roasted steak recipe enough.

This is my recommendation for that restaurant experience in your own kitchen.

The Best Steak Marinade Recipe for Grilling finished

The Best Steak Marinade Recipe for Grilling Plated

What can I marinade my beef in that isn’t made of plastic?

Consider purchasing one of these reusable glass dishes for your marinades.

The Best Steak Marinade Recipe for Grilling

Today I wanted to share with you a recipe I tried for a steak marinade.

I am no stranger to marinated steak and the beauty of creating a great steak meal at home. In the past, I have relied on a little balsamic vinegar and olive oil marinade.

I was looking for a fresh marinade recipe and stumbled upon this one.

Honestly, I have never tried a better steak marinade recipe than this one and it is made from ingredients you probably already have in your pantry.

For the best results, you will want to marinate your steaks for 24 hours.

Simply add steaks to a gallon size bag (I double bag these or use a freezer bag instead) and then add marinade ingredients to the bag. Seal the bag, removing the excess air, and store it in the fridge until it is time to grill.

Now that I have tried this recipe, it is highly likely I will never make my steak any other way again. You won’t believe the flavors in this and none of them overpower the delicious taste of the meat itself.


Best Steak Marinade in Existence  
Recipe Type: Main
Author: Adapted from AllRecipes.com
Prep time: 5 mins
Cook time: 10 mins
Total time: 15 mins
Serves: 6
A flavorful steak marinade that will enhance the flavor of any cut of meat you might find on sale at your local supermarket.
Ingredients
  • 1/3 cup soy sauce
  • 1/2 cup olive oil
  • 1/3 cup fresh lemon juice
  • 1/4 cup Worcestershire sauce
  • 1 1/2 tablespoons garlic powder
  • 3 tablespoons dried basil
  • 1 1/2 tablespoons dried parsley flakes
  • 1 teaspoon ground white pepper
  • 1 teaspoon kosher salt
  • 1 teaspoon minced garlic
Instructions
  1. Place the soy sauce, olive oil, lemon juice, Worcestershire sauce, garlic powder, basil, parsley, minced garlic, salt, and pepper in a mixing bowl and whisk well.
  2. Pour marinade over desired type of meat.
  3. Cover, and refrigerate overnight. Grill meat as desired.

As an Amazon Associate I earn from qualifying purchases.

Looking for great grilling side recipes? Check out these easy side ideas!

corn on the cob on the grill recipe corn on the cob on the grill

Grilled brussels sprouts grilled brussel sprouts

three cheese grilled potatoes

quinoa salad in a jar quinoa salads in a jar (with spinach & tomatoes)

Happy grilling!

The Best Steak Marinade Recipe for Grilling Header


Insta Meal Plan: Six Meal Ideas For Your Busy Week

Monday, August 20th, 2012

Whole Wheat Cinnamon Waffles with Blueberry Syrup (made from berries I had stashed in my freezer).

Roasted Chicken Cooked in Milk with Roasted Green Beans & Baby Roasted Potatoes.

Mongolian Beef with steamed rice & broccoli.

Baked Chicken Enchiladas with blue corn tortilla chips & fresh strawberries

Homemade Pizza with Cheesy Bread & Dipping Sauce.

Chicken Pesto Open-Faced Flatbread Sandwiches with baby carrots and grapes

Nutella S’mores on the fire pit. Nutella plus marshmallows plus graham crackers equals heaven.

I hope you enjoy a peek into what we ate this week! Let’s be friends on Instagram! You will find me under the username momadvice!

Linking to Menu Planning Monday today over at I’m An Organizing Junkie!

Pin It

Asian Lunchbox Noodles

Tuesday, August 14th, 2012

My kids will be beginning their school year in just a couple of short weeks. I am so sad to see our summer come to an end, but also love their excitement and enthusiasm to get back to their favorite friends and learning.

With beginning the school year comes the challenge of making lunchtime fun for my kids. Sandwiches are our usual lunchbox standby, but I thought it would be fun to step out of the sandwich box, so to speak, and offer my kids another fun lunch that could be made and prepared ahead for our busy mornings.

These Asian Lunchbox Noodles fit the lunch bill perfectly! They can be made ahead, are great at any temperature, and you can add your child’s favorite flavors to them to spice them up. Tuck these into a reuseable Glad container or prepare these for any easy weeknight meal when extracurricular activities can wreak havoc on the evening routines. These noodles are great anytime and a great solution for any lunch or dinner.


Asian Lunchbox Noodles
Recipe Type: Main
Author: Amy Allen Clark
Prep time: 10 mins
Cook time: 10 mins
Total time: 20 mins
Serves: 6
Ingredients
  • 1 pound linguine, cooked
  • 4 tablespoons fresh parsley
  • 3 cloves garlic
  • 1/2 cup soy sauce
  • 1/4 cup sesame oil
  • 1/4 cup canola oil
  • ¼- ½  cup peanut butter (depending on your preference)
  • 2 tablespoons rice vinegar
  • 3 tablespoons brown sugar
  • 1/2 cup Shredded Carrots
Instructions
  1. Cook your linguine noodles as directed on the packaging. Reserve a little of the pasta water to help thin your sauce, if needed.
  2. Blend garlic in a food processor until fine.
  3. Add soy sauce, oils, vinegar, and brown sugar. Add enough peanut butter to make slightly thick. Add reserved pasta water, if needed, to thin the sauce.
  4. Blend until smooth.
  5. Add to pasta and toss with shredded carrots.
  6. If desired, you can top with chopped peanuts, sesame seeds, or grilled chicken strips.

This is just one example of the great things you will discover this month over on the Glad site.  If you would like to see some of my fun ideas including my favorite bubble recipe, homemade play dough, homemade sidewalk chalk, and snag some great free printables to add a little sparkle to your child’s lunchbox, be sure to join Glad’s Facebook Community and click on Glad’s Mom Made tab for tips and tricks to manage the back-to-school madness.   Head over to Glad to get the full scoop on all of these fantastic ideas to get your school year started out right.

Check back next week for a fun project to get those back-to-school lunches organized that will get your whole family involved!

Pin It

Mongolian Beef

Monday, August 13th, 2012

There are days where photographing your food is difficult. That was the case with this Mongolian Beef recipe that we prepared this week. It wasn’t that the food was hard to photograph, it was that the Mongolian Beef was so darn delicious that I had a hard time stealing a plate away from my family so I could take a picture of it.

I am one of those people that finds one dish that she likes when she goes out to eat and sticks to it all the way. When I order Chinese, the only dish I want is my Chicken Lo Mein. I rarely browse the menu, for fear I might waste an opportunity to eat out on a dish that isn’t as good as my old standby.

My girlfriends have been bragging about a recipe that they discovered on Pinterest for Mongolian Beef. I decided this might be a fun way to switch up my Chinese food routines and try something new.

This Mongolian Beef is so divine that I felt like we were eating out at P.F. Chang’s, but at a small fraction of the price. The sweetness from the brown sugar in the sauce mixed with the saltiness of the soy sauce and then finished with the heat from red pepper flake are truly a perfect balance in flavors.  We served this over rice and with a side of steamed broccoli, to add a little green and crunch to our plates.

I highly recommend giving this recipe a try for your next Chinese food craving night!  I am already thinking about the delicious leftovers I get to have for lunch today and can’t wait to eat this again!

Mongolian Beef
Recipe Type: Main
Prep time: 15 mins
Cook time: 15 mins
Total time: 30 mins
Serves: 6
A perfect balance of sweet, salty, & spicy!
Ingredients
  • 2 pounds flank steak, thinly sliced crosswise
  • 2/3 cup cornstarch
  • 6 teaspoons of canola or vegetable oil
  • 1 teaspoon grated ginger
  • 2 tablespoons minced garlic (I use bottled minced garlic)
  • 1 cup of water
  • 1 cup soy sauce
  • 3/4 cup brown sugar
  • 1/2 teaspoon crushed red pepper flakes
  • 3 large green onions, sliced crosswise into thirds (we omitted because we don’t like onions)
Instructions
  1. Slice your flank steak crosswise into thin strips. Pat your meat dry with a paper towel and then toss the meat with cornstarch, making sure each piece is coated thoroughly. Place the meat into a strainer and shake off any excess cornstarch from the meat.
  2. Heat half of the oil in a large wok at medium-high and add the garlic and ginger. Allow this to cook for one minute.
  3. Add soy sauce, water, brown sugar and pepper flakes. Cook the sauce for about 2 minutes and transfer to a bowl. The sauce will be thin, but will later thicken in the cornstarch.
  4. Turn the heat up to medium-high and add the remaining oil to the wok.
  5. Divide your meat into two batches. Add the first batch of beef and cook, stirring until it is all browned. Remove this meat and then cook your second batch.
  6. Place all of the meat back into the wok. Pour the sauce back into the wok and let it cook along with the meat.
  7. Cook the sauce down for three to five minutes to reduce.
  8. Finish by adding your green onions and cook for one minute.
  9. Serve it hot with rice and a side of steamed broccoli.

Adapted from Pink Bites

Pin It

Brown Butter Waffles With Cherries

Monday, August 6th, 2012

In our family, there is nothing we love more than our weekly batch of waffles. I decided to pair together two flavors that our family had never experienced before, brown butter and cherries, for a fun spin to go along with our favorite summer fruit.

Browning butter adds a surprising depth of flavor to your dishes and takes a mere three minutes to pull off. Just by cooking your butter in a saucepan a tad past the melting point, it results in the milk solids in the butter browning, and creates a wonderfully nutty aroma in your kitchen and in your foods.

Much like one of my other favorite  waffle recipes, whipped egg whites add lightness to these waffles and help balance the nutty flavoring of the browned butter in these waffles.

I had half a pound of cherries in our refrigerator and this recipe was the perfect way to use them up. I pitted the cherries and cut them in half, then allowed them time to marinate in a few tablespoons of honey while I gathered the ingredients for the waffles. The sugars in the honey help to break down the cherries and release their cherry juices into the honeyed sauce. It results in a sweet topping that is just sweet enough to balance the delicate flavors of these waffles.

A double batch of these in our freezer won’t last long and I doubt they will last long in your house either! Happy waffle making!

Brown Butter Waffles With Cherries
Recipe Type: Main
Author: Adapted from Williams-Sonoma Blog
Prep time: 10 mins
Cook time: 4 mins
Total time: 14 mins
Serves: 4
Make a double batch of these light and airy waffles for eating and for freezing. They won’t last long!
Ingredients
  • 2 cups cherries (about 1/2 pound)
  • 3 tablespoons honey
  • 4 tablespoons unsalted butter
  • 2 cups milk
  • 2 large eggs, separated
  • 1 teaspoon vanilla extract
  • 2 cups all-purpose flour
  • 3 tablespoons sugar
  • 4 teaspoons baking powder
  • 1⁄4 teaspoon salt
Instructions
  1. Halve and pit the cherries and place in a bowl.
  2. Add the honey, stir to mix evenly and let stand at room temperature for about 30 minutes to allow the cherries to release some of their juice.
  3. Preheat a waffle iron.
  4. In a small saucepan, melt the butter over medium-low heat and bring to a boil. Cook, stirring occasionally, until the milk solids in the bottom of the pan turn a toasty brown, about 3 minutes.
  5. Transfer to a bowl and let cool slightly.
  6. Add the milk, egg yolks and vanilla, and whisk until combined.
  7. In a large bowl, sift together the flour, sugar, baking powder and salt. Add the milk mixture and whisk just until combined (a few small lumps are okay).
  8. In another bowl, using a clean whisk or a handheld mixer, whip the egg whites until soft peaks form. Scoop the whites onto the batter and, using the whisk, gently fold them in evenly.
  9. Spoon the batter into your waffle maker (sprayed with nonstick spray), and cook until the waffle is golden brown, usually about 4 minutes.
  10. Serve the waffles piping hot with a big spoonful of the cherries.


Looking for more great waffle recipes? Be sure to visit this post with six different varieties of waffles you can make with your waffle iron!

Pin It

Baked Shrimp Scampi

Monday, July 30th, 2012

Sometimes an episode of a great cooking show will get stuck in my head and never let me go. It is often the case with the infamous Barefoot Contessa. Let’s face it, there is very little from that show that would not make me happy. Fancy food, fancy friends, a florist pal who brings the perfectly arranged flowers to every meal, the husband who jets off in his convertible to pick up the perfect wine or cheese to compliment all of my suppers. It all sounds like a dream, doesn’t it? It is one of those episodes that I could not escape from and decided to finally recreate the perfect shrimp scampi.

I have started a tradition of making a fancy Sunday supper each week for our family. I love Sunday afternoons spent in the kitchen while my husband keeps the kids entertained. I have been trying to challenge myself to make those dishes that I have always wanted to try and allowing myself the chance to truly enjoy the cooking process, instead of simply rushing to get everyone fed.

This Shrimp Scampi is sinfully delicious. Jumbo shrimp are coated in a topping created from fresh herbs, crunchy panko, a tiny bit of heat from red pepper flake,  and an unbelievable amount of butter. The results yield a perfectly rich shrimp that is the perfect topper to a pile of linguine and a loaf of bread to mop up all the deliciously buttery sauce.

Shrimp Scampi


Baked Shrimp Scampi
Recipe Type: Main
Author: Barefoot Contessa
Prep time: 30 mins
Cook time: 13 mins
Total time: 43 mins
Serves: 6
Delicious shrimp are coated in a butter coating of panko, fresh herbs, and a hint of lemon and spice. These are the perfect topper to your favorite pasta!
Ingredients
  • 2 pounds (12 to 15 per pound) shrimp in the shell
  • 3 tablespoons good olive oil
  • 2 tablespoons dry white wine
  • Kosher salt and freshly ground black pepper
  • 12 tablespoons (1 1/2 sticks) unsalted butter, at room temperature
  • 4 teaspoons minced garlic (4 cloves)
  • 1/4 cup minced shallots
  • 3 tablespoons minced fresh parsley leaves
  • 1 teaspoon minced fresh rosemary leaves
  • 1/4 teaspoon crushed red pepper flakes
  • 1 teaspoon grated lemon zest
  • 2 tablespoons freshly squeezed lemon juice
  • 1 extra-large egg yolk
  • 2/3 cup panko (Japanese dried bread flakes)
  • Lemon wedges, for serving
Instructions
  1. Preheat the oven to 425 degrees F.
  2. Peel, devein, and butterfly the shrimp, leaving the tails on.
  3. Place the shrimp in a mixing bowl and toss gently with the olive oil, wine, 2 teaspoons salt, and 1 teaspoon pepper. Allow to sit at room temperature while you make the butter and garlic mixture.
  4. In a small bowl, mash the softened butter with the garlic, shallots, parsley, rosemary, red pepper flakes, lemon zest, lemon juice, egg yolk, panko, 1/2 teaspoon salt, and 1/4 teaspoon of pepper until combined.
  5. Starting from the outer edge of a 14-inch oval gratin dish, arrange the shrimp in a single layer cut side down with the tails curling up and towards the center of the dish.
  6. Pour the remaining marinade over the shrimp. Spread the butter mixture evenly over the shrimp. Bake for 10 to 12 minutes until hot and bubbly.
  7. If you like the top browned, place under a broiler for 1 minute.
  8. Serve with lemon wedges.


Looking for other recipes to enjoy with shrimp? Try Shrimp Pasta with Oven Dried Tomatoes, Easy Grilled Shrimp Kabobs, or Roasted Shrimp with Rosemary & Thyme for three other great ideas!

Pin It

Summer Dinner Inspiration: Roasted Shrimp Pasta, Cinnamon Whole Wheat Waffles, & Grilled Chicken Tenders

Monday, June 25th, 2012

Looking for summer dinner inspiration? Look no further than these Monday posts for dinners that will inspire your kitchen table. This summer I am taking a few mobile pictures to help inspire your summer meals. I will try to share three great dishes to enjoy each week around the dinner table. 

We went on vacation last week so the dishes I am sharing all had to be easy and be able to be prepared with limited pots & pans to create them. The first dish that I created was to kick off our vacation and it is this Roasted Shrimp With Rosemary & Thyme. I served it over a platter of angel hair pasta and we did our favorite lemon roasted green beans for a side dish.

If you haven’t tried this roasted shrimp before, I cannot recommend it enough. These are great served over your favorite pasta, can be served with a great brown rice side, or served alone with your favorite summer veggies. I make this almost every week and it never disappoints!

One of our favorite summertime dishes is these Cracker Barrel Chicken Fingers. I served these with these roasted fingerling potatoes, roasted asparagus, and fresh strawberries from a cute little market in the town.

The tenders were particularly yummy since I created the marinade before we left for our trip and had the chicken marinating for a couple of days before we actually ate them. I also love that the marinade only has three ingredients, making it an easy marinade to pull together!

I have become a huge fan of those disposable containers for marinating foods because they are so easy to transport out to our grill and are easy to stack, especially if you are headed out for a picnic. It may also be because I have had  a few too many leaky bags in my fridge so I find these to be a great option for me!

I love to stick these, marinade and all, in the freezer and prep a few different marinades in one afternoon. Most marinades have similar base ingredients (dressings, olive oil, vinegars, salt, pepper, seasonings, Worcestershire sauce, etc..) and it is so much easier to do this all at once rather than getting them out each time. What a time saver!

I had berries leftover from our meal the night before and decided to dice them with blueberries to top our Cinnamon Wheat Waffles that we devoured for our brunch. I make a double batch of these almost every week and my son loves to eat the leftover frozen waffles for his breakfast each morning. I love that these are packed with whole wheat flour, wheat germ, no sugar, and very little fat in them. It is a great way to start a day and a fun summer brunch.

What is on your summer dinner menus this week?

Pin It

Summer Dinner Inspiration

Monday, June 18th, 2012

I love planning summer meals because they are so easy to execute. I am hoping to provide a few ideas for summer dinner inspiration from recipes we have available on our site. I believe though that if you have a grill and you have a slow cooker, you have all the tools you need in the world to get a great dinner on the table without a lot of effort in the summertime.

This summer I am taking a few mobile pictures to help inspire your summer meals. I will try to share three great dishes to enjoy each week around the dinner table. 

I love a good Sunday dinner and one of our family’s favorite dishes is roast chicken. There are a million ways to roast a chicken, but absolute favorite is this Roast Chicken Cooked in Milk. Once I found this recipe, I have never cooked my chicken any other way. It is a fun flavor combination of sage, cinnamon, lemon, and milk. The sauce is heavenly. I served this with crusty bread with dipping sauce (pesto with a generous drizzle of olive oil) and roasted fingerling potatoes.

The potatoes were cooked at 375 for 45 minutes. They were tossed with olive oil, rosemary, thyme, and kosher salt. These were golden and crunchy. We dipped those in our pesto dipping sauce too.

There is pasta and there is summertime pasta. My Rotini with Turkey Meatballs is one of those deliciously light dishes that you just can’t stop eating. If you have cherry tomatoes and herbs in your garden, you have the makings for a really great sauce for this dish. We served it with the leftover bread from our meal and my favorite roasted green beans. To drink, I have become addicted to Tazo Passion Fruit Tea. I mixed this with some lemonade and it was so delicious and refreshing.

Breakfast for dinner is always a hit around our house. Thanks to using the Cooks Illustrated guide to freezing my blueberries last summer, I still enjoying the last of our fabulous blueberries for our dishes.

Nothing screams summer to me more than a pile of these blueberry pancakes. If you have some blueberries on hand in your house, I highly recommend visiting my list of eight great recipes to try with your blueberries this year.


Pin It