
Archive for the ‘Blogging’ Category
National Blogging Day of Remembrance
Monday, December 17th, 2012Giving Back In Our Own Community
Wednesday, December 12th, 2012

If there is one thing we have been embracing this year, it is the power of giving to others. I shared with you last week our tutorial on how to make homeless care packages (complete with free printables for buying your supplies for your own kits and a community resource list).
This month Walmart gave our family a chance to select charities in our own town that we are passionate about for the holidays and showcase how families could recreate a giving project in their own homes. As I always disclose, I am compensated for my writing, BUT instead of accepting the compensation, we invested what I would have earned along with the gift card budget Walmart gave me to give back to a couple of special organizations in our town.
 The first thing we did with our funds was head to Walmart and stock up on canned peas, boxes of macaroni, and cans of tuna that were being requested for a Kids Helping Kids food drive that was happening over at our church. The Faithworks program had a drive to help area kids who would be on Christmas Break. They had a goal of providing a meal to 1,400 students at a couple of our area schools and giving each of these kids a bag of food to take home.
Emily was my assistant and helped me count up the donations. We were able to provide 76 kids with a meal which was so exciting for both of us to do and to get the opportunity to share. None of those three items cost more than $.68 so for less than $3, we were able to provide a meal to one child.


 The other project that we selected was at our own school this year. They had a hat and glove tree set up in the lobby for students that needed hats and gloves for the winter season. Emily and I selected hats and gloves in all different colors for the students. If you are looking for an inexpensive spot to pick up donations, Walmart carries Faded Glory hats and gloves for a mere $.97! If you choose plain gloves, you can get them 2 for $.97!
We were able to grab enough for 25 of the students and I had fun decorating the tree with all of these cold weather accessories. We hope it keeps a few more students warm on the playground this year.
Thank you to Walmart for giving us the opportunity to give back in our own community this year. We feel so blessed to get to pay it forward to those in need around the holidays!
I am a part of the Walmart Moms program, and Walmart has provided me with compensation for these posts. For this project, all compensation was invested in aiding our community. My participation is voluntary and opinions are always my own.
Top Ten Christmas Ideas For The Family
Tuesday, December 11th, 2012
 This week you will find me blogging over at the Snackpicks site sharing my top ten Christmas ideas for the family.

If you are looking for some fun family time ideas complete with great recipes and crafts, you will want to visit this post to read more! I am sharing a few of our favorite Christmas recipes and some great ways we celebrate the holidays without spending a lot of money.
The best part is all of the points you will score for all of the time you spend with your kids during this busy season! Who could argue with that? See you there!
Pin ItThe Good Life for Less Book Update
Thursday, November 29th, 2012

There are no words to explain seeing and holding your book for the first time. Last week a box arrived on my doorstep from Penguin and, with shaky hands, I opened the book and drank it all in. The only thing that even comes close to this experience is the birth of my children.
Last week I received an email that nearly brought me to my knees. My editor emailed to let me know that we had already sold the first print run of the book and they had to reprint it. I can’t even begin to wrap my head around that, can you?

The big question I am always asked is how you even begin the process of writing a book. My experience getting published was a unique one because it came through a truly unique opportunity for our family. Several years ago, I had replied to a media inquiry for a magazine that was looking for families that choose to live a life without credit cards. I submitted our family as an example and shared that we also had celebrated paying off our credit cards with our kids by throwing a debt-free party with them. They loved this unique spin on debt-free living and sent a team out to my house to photograph me for Redbook and wrote a feature on us. It was, perhaps, the most glamorous day of my life and I couldn’t believe all of these people were in our little house in Granger.
That magazine somehow landed in the hands of a literary agent who reached out to me and asked if I had ever considered writing a book.
The rest, as they say, is history.
 Photo Credit: Nancy Lary Studios

Of course, the process of going from a blog and freelance article writer to a book writer was a difficult one. The entire process took me three years, mainly due to my own obstacles with running my site and running after small children. When we finally sold the book, I had only gone over the first hurdle. You see, with nonfiction books, you sell your proposal before you sell a book. Writing the proposal is writing the blueprint for what you envision the book will look like. It sets up the skeleton of how it will all look, but it is not the book.
Once that was sold, I still had a book to write.
I remember talking to another author about how I had never realized what a process this all would be and he shared with me that it isn’t really about how talented of a writer you are, it is just if you have the endurance to get through the process of publishing a book. I now understand.

When I finally received a copy of my book in my hands after all that writing, it was a big girl’s little girl dream come true. I don’t know if I ever will get over how incredibly incredible it all is. You see, even as a child, I wanted to be a writer and to write my very own book.
I remember sitting and listening to my teachers read to me and rolling around words and phrases in my head and mouth because I loved them so much. I wished that I could have that power with words that my words would someday get stuck in their heads the way they did in mine.
One of my favorite authors was Beverly Cleary and now that I am rereading her books with my daughter, it brings even more joy to me as I roll the words around in my mouth again and her stories bring new meaning to me as an adult.
When I was a kid, I used to type furiously on an old typewriter in my parent’s basement, writing my own little books of stories of my own imagination. My mother can also attest to the elaborate storytelling (that’s how I like to think of it) and my power at embellishing every story I told. I wanted more than anything to be a writer.

Photo Credit: Nancy Lary Studios
When my husband suggested I start a blog for my ideas, it turned out to be a fantastic outlet for me when I first became a stay-at-home mom and has fed that creative part of my brain so well over the years. I could be a “published author,” simply by hitting a button to post my words. Granted, it was publishing that anyone can do, but I have always treated it like my life’s work to write words and have people read them. More empowering is when someone reads your words and then they share with you how you have changed their lives through them.
If you have followed me over the years, you have seen the evolution of the blog, the words, and the found love for creating beautiful images with those words. If there is one thing I have learned it is that there is always the potential to do and be better. I am still evolving.

I hope you will be able to pick up my book and read more about our family’s journey out of debt and unemployment and into a life far richer than we could have ever imagined…in all the important ways.
The book will be out on bookstore shelves on January 2nd (a slight shift in dates due to our reprinting), but is now available for pre-order. Here are some options for great places to order it! I also encourage you to hit your local bookstore to pick it up!
My first book signing will be on January 19th from 2-4 PM at the Mishawaka Barnes & Noble Store in the University Park Mall. Feel free to accept my invitation to join me on that day. I will admit, I am SUPER nervous about that. I can just picture me and my mom sitting at a table alone.
To crickets.
You don’t want that do you? I would be so honored to meet you all and please forgive me ahead of time about knowing everyone’s name. I know Facebook faces, Twitter profile handles, and can recognize you on IG… BUT I tend to have an old lady brain and can’t always remember actual names! That is the other part I am nervous about so I thought I would say that in advance!
Thank you all for your continued love and support for me through this project. I find myself randomly bursting into tears when I think of how kind everyone has been to us through this process and the genuine excitement from our friends about all of it.
Happy Holidays, everyone!
Pin ItHow to Entertain the Kids on Thanksgiving Day
Tuesday, November 20th, 2012

It has been so much fun preparing for the holidays with all of you. Today I am concluding our post series with Pure Charity with some fun ideas for keeping your kids entertained on Thanksgiving morning while you are busy preparing all of that Thanksgiving food…or just preparing for all of that fun with those relatives.
If you haven’t been following along the past three weeks, I have been sharing about a great site called Pure Charity and how your holiday shopping can make an impact on the organizations you are most passionate about. Did I mention signing up for this account is free and easy! I really encourage you to join in!
What is Pure Charity?
Pure Charity is a simple, but awesome concept for giving back to those causes you care most about. Basically, you install a simple toolbar into your web browser and then it alerts you with a small banner at the top when a store you are shopping with has a partnership with Pure Charity. Click on that little button and you are making a percentage deposit into your Giving Fund. Your Giving Fund can then be applied to the charities that are important to you and that you have a desire to support.

 The first week we discussed some elegant and simple ways to create the perfect Thanksgiving table. I love that these ideas incorporated elements of nature, along with thoughtfully purchased items to mix into your everyday items, and a thankful chalkboard where the kids can jot down what they are most thankful for in their lives.
 Next we created the Perfect Pumpkin Pie for our Thanksgiving dessert. I found beautiful tools to create a detailed crust and serve ware that made the pie look like a little piece of art through the Pure Charity partner sites.
 Thanksgiving happens to be one of my favorite holidays and I love to make these holidays special and memorable for my kids. Pure Charity asked me to show everyone what could be done via their partners and gave me a small budget to pick out some items that I would recommend for keeping the whole family entertained on Thanksgiving Day.
Play Classic Board Games- If there is one thing our family loves, it is board games. You will often find our family spending our evenings playing board games together. Thanksgiving is a great time to break out the board games for the young and old alike. Group games like Apples to Apples, Jenga, or an adult round of Taboo can be a great way to keep your family laughing and spending time together. Hungry Hungry Hippos is always a great game to play with the kids and can be a fun way to keep the cousins entertained while the food is being prepared. (Purchased through Target)
Watch A Classic Thanksgiving Movie– Our family’s favorite Thanksgiving movie is, “A Charlie Brown Thanksgiving.” Of course, any movie with Charlie Brown and the gang in it is always a guaranteed winner in our family. (Purchase through Best Buy)

Bring Out Their Inner Artist- If there is one thing my kids go through quickly it is art supplies. Items like colored pencils, construction paper, coloring and doodle books that inspire creativity in my children, and pre-made art kits can all be fun ways to get those creative juices flowing. I was able to find some amazing coloring books like, “The Fashion Coloring Book,” and “The Coloring Book,” that provide great prompts for your child’s imagination. Even better, I was able to find two Kid Made Modern Comic Book Kits so that each of my kids can create their very own comic books. (All Purchased Through Target)

Just Dance It Out- A well-known fact about our family is that the Clark family is basically its own dance crew. If there is one thing we love to do it is to dance our troubles away. Just Dance 4 and Just Dance Disney games are two fun ways to get your kids moving after that big Thanksgiving feast and work off that sluggish, “I ate too much turkey,” feeling in a fun way.
 If your family is anything like ours though, you might not let those kids even get a chance to play any of their own games. You will simply be too busy dance battling each other to give anyone else the opportunity to do anything else (*ahem*). (Purchased through Best Buy).
Play a Round of Thanksgiving Bingo- One thing that I love to do for my kids is to print out a simple Thanksgiving Bingo game to keep them entertained while I am preparing the food. This is a fun and free way to keep them entertained and there are six Bingo cards to print and choose from. Pop a bag of popcorn and let them use the popcorn as their markers to mark their Bingo squares. Once they get tired of that game, print out another round of cards and have them do Thanksgiving Football Bingo instead. (Printable available for free through Spoonful).
After these purchases to entertain the kids on Thanksgiving Day, I was able to bank $5.63 in my Giving Fund for my favorite charities through Pure Charity!
I am working with Pure Charity, and Pure Charity has provided me with compensation for these posts. My participation is voluntary and opinions are always my own.
Creatively Wrapping Gifts With Goodwill Items
Friday, November 16th, 2012

Christmas is quickly approaching and this is the holiday where the crafter in me rejoices not only for the Christmas crafts I get the opportunity to create, but the opportunity to package those gifts beautifully under our tree.
A thrift store can be a great place to check for, not only your gifts, but also items to creatively package those gifts in a unique way.

Yarn Embellishments
It is rare to stop at a thrift store and not see craft supplies that have been donated.
Yarn is one of those inexpensive craft supplies that I love to use when packaging my gifts.
Whether it is a yarn pom pom in lieu of a bow, multiple colors of yarn that have been woven together to create a unique packaging detail, or even knitted or crocheted embellishments can make beautiful gift toppers. (Image Source:Persia Lou)

Gift Card Snow Globes
Gift cards can often feel impersonal, but are often just what the recipient has asked for or needs.
Package those gift cards creatively by hunting for jars that can be used to create your very own gift card snow globes.
Little ones can participate in the fun in creating these adorable craft.
Look for small items to decorate the inside of your snow globe and spray paint those thrift store lids with a festive green or red spray paint to spruce it up. (Source: Hip2Save)

Fabric Flowers
Visit your local thrift on the half-off days or select items that are on sale that week to find material from clothing items that can be used to creatively embellish your gifts.
Cut scraps of fabric to create homespun bows or cut the fabric into easy circles and create a fabric flower that can be personalized with unique buttons or costume jewelry for creatively topping them.
Even items like t-shirts can be used to make elegant flowers for a unique addition to boxes or kraft paper gift bags. (Source: MomAdvice)

Book Page Rosettes
Book pages are the ultimate in frugal craft materials and are a fantastic resource for creating your very own gift toppers.
With a simple pair of scissors and a little glue, you can top your gifts beautifully and inexpensively with rosettes made from book pages. (Source: Under the Table & Dreaming)

Beauty Gift Additions
Gifts of beauty items like sugar scrubs or bath salts can be a fun and thoughtful gift to give and made with materials in your pantry.
I love to add a simple addition of a vintage spoon and package these items in a mason jar.
Find a jar you love, but can’t find a lid?
Simple bands and jar lids can be found at your local discount store and freshen up a jar with a tired lid or be the perfect topper for a jar that might be missing one. (Source: MomAdvice)

Salt & Cinnamon Dough Toppers
Remember making simple salt dough ornaments or cinnamon-filled dough ornaments for the holidays?
These are still a fun way to top gifts and can be made from some simple ingredients in your pantry.
Grab a salt dough recipe here or look for the cinnamon dough recipe over here. Tie these on with scraps of fabric.
The best part about these toppers is that they later can be used as an ornament to adorn your tree. (Source: The Cheese Thief)
What are some creative ways you love to package your gifts? I would love to hear from you!
This post contains affiliate links.
Don’t miss more great ideas from MomAdvice.com:

DIY Mojito Bath Salts

Washi Tape Christmas Tree Card Holder
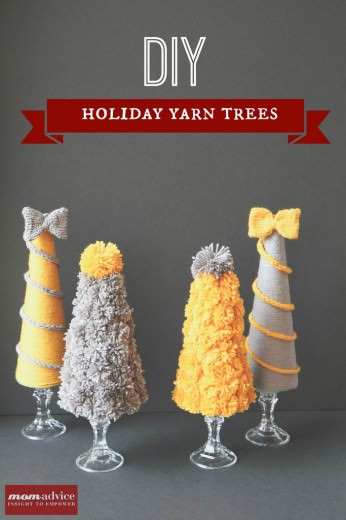 DIY Holiday Yarn Trees

Free Printable Advent Calendar
Sign up for the MomAdvice newsletter
Pin It
Easy DIY Halloween Costumes
Friday, October 19th, 2012

Stumped for Halloween costumes ideas this year?
It’s only a couple of short weeks until Halloween, but if you haven’t found a costume yet, have no fear!
Today I want to showcase eight easy DIY Halloween Costumes you can create using items found at Goodwill.
Last year, Americans spent 7 billion dollars on Halloween related expenses!
What was once a time to grab a sheet and be a ghost or peek around your house for easy costumes made from your mom or dad’s wardrobe has escalated into a spending frenzy of decorating, costuming, and trick-or-treat candy madness.
This list of easy DIY Halloween Costumes will hopefully help you gather some great ideas for throwing together a great last minute costume and save you money in the process.
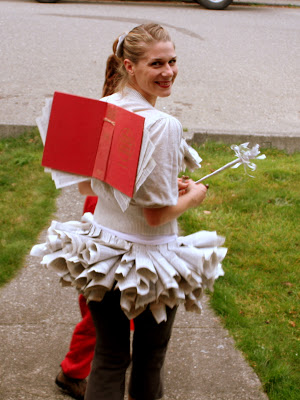
Book Fairy Costume
A couple of hardback books from a local thrift store or garage sale can create a unique and adorable book fairy costume.
Using a hot glue gun, book pages, and the covers of the books to create your fairy wings you can create an entire costume from simply rolling paper for an adorable skirt!
You will love this one (via Lilliedale)
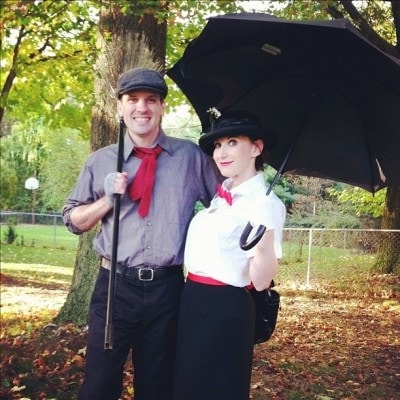
Mary Poppins & Bert Couple Costume
Couple costumes can be challenging, but with few things from your closet, it can be easy to create your look for less.
My husband & I created this costume for less than $20 and absolutely had a blast putting it together. (via MomAdvice)
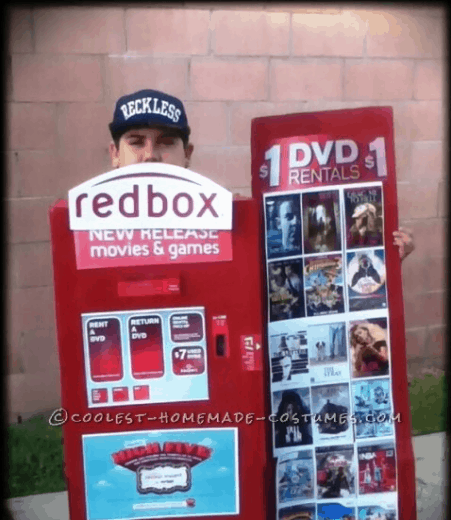
Homemade Redbox Costume
I had to laugh at this adorable Redbox costume that this family created!
The Redbox costume was created using spray paint, a box, and snagging some of the Redbox images from Google.
I absolutely love this idea and it cost the family less than $5 to create.
The best part is that the whole family can jump in on the creating (Coolest Homemade Costumes)
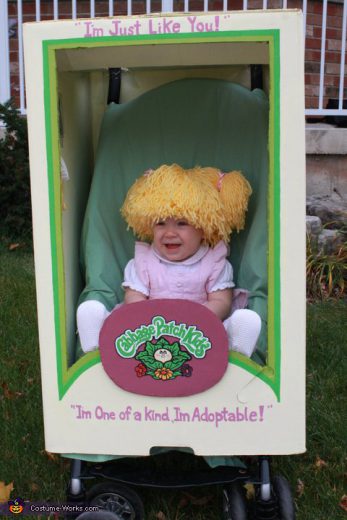
Baby Cabbage Patch Doll
Looking for a costume that can work around pushing your baby in a stroller?
This Cabbage Patch Doll costume is simply genius and wouldn’t cost a lot to create.
Grab a green fitted sheet to cover your stroller, create the Cabbage Patch box, and then cover your baby in yarn pigtails. (Via Costume Works)
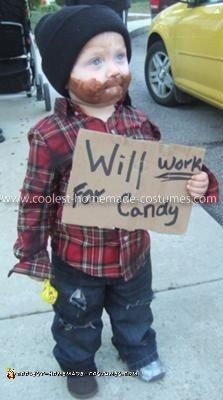
Will Work 4 Candy Costume
The best part about the, “Will Work 4 Candy Costume,” is that you need not buy any supplies at all to create this look.
Paint a beard on your child’s face, dress them in their most tired looking play clothes, mismatch their shoes, and add a cardboard sign from your recycle bin. (via Coolest Homemade Costumes)
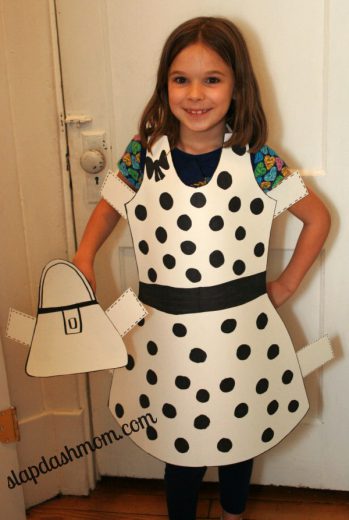
Paper Doll Costume
Short on funds for Halloween costumes this year?
This paper doll costume can be created for about $1 using poster board or foam core.
Add your daughter’s laciest socks and a pair of Mary Jane shoes and you have a real-life paper doll to trick-or-treat with.
What little girl wouldn’t love that? (via slapdashmom)

Baby Aerobics Instructor Costume
Holy cuteness!
This baby aerobics instructor outfit looks like an easy DIY to put together and I promise, it will be a memorable costume.
Create a baby headband from an old t-shirt, cut the bottoms off of a pair of socks to create baby leggings, and use your baby’s onesie and leggings to complete the look.
This mom created an adorable boombox out of felt to complete the look. (via Primary)

Child’s Superman Costume
Leading a double life can be tough, but it doesn’t need to be expensive.
Grab a tie, shirt, and heavy glasses for Clark Kent, and dress him in a Superman shirt underneath.
This costume is adorable and affordable!
What is the best DIY Halloween costume you have created? Feel free to share your links and ideas below!
This post contains affiliate links.
Don’t miss these other great ideas from MomAdvice.com:
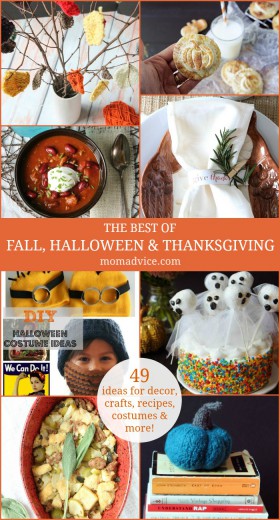
The Best of Fall, Halloween and Thanksgiving
DIY Thumbtack Pumpkins

Delicious Drink Mixes: Hot Cocoa and Vanilla Chai
Sign up for the MomAdvice newsletter
Pin It
Preparing for the Holidays
Thursday, October 18th, 2012

Photo Credit: Nancy Lary Studios
Preparing for the holidays can be a stressful time for families Planning ahead and breaking the preparation down into manageable steps is key to holiday survival.
This year I will be hosting our family’s Thanksgiving, launching a book, celebrating my daughter’s birthday, celebrating Christmas with two sides of the family, and trying to ring in the New Year. Am I scared? You bet! Just the very thought of all this could make me break into a sweat and cause me to want to throw the covers back over my head until this is all over. I am already working on my timeline to still have a wonderful holiday and accomplish all I need to and I wanted to share it with you.

This week I am sharing my timeline for preparing for the holiday season over on the Kenmore blog! I am offering an easy timeline to help you get things done and actually enjoy your holidays this year!
Head on over to check out my ideas for accomplishing that holiday to-do list! I hope you’ll join me over there!
Sponsor Spotlight: Flourish Boutique (Coupon Code)
Tuesday, October 16th, 2012

Today I just wanted to say thank you to one of our advertising sponsors that has been so good to me over the years. Flourish Boutique is known for not only helping women find outfits and accessories to make them feel special, but also for being a unique but affordable places to shop. Most items run from around $30-$100 for their customers.
Boutique shopping may seem out of the budget, but what I think makes Flourish special is their great sales and a Steal of the Day program too; where a new inventory item is guaranteed to be $9.99 or less! If you happen to be a local, they also offer a fun Overstock room upstairs where I have been able to score many great deals for a fraction of the price and an annual sale where you can shop at truly deep discounts.
I get a lot of great compliments on the clothing I wear and it is through my partnership with Flourish that I get to look so great. I like to stand out at conferences and feel confident in the clothing I wear. Here are some examples of beautiful things I have worn this year from our sponsor!


 I love clothing that is very feminine, ladylike, and I love pretty ruffles and embellishments to my outfits. As you can see, the store offers just that with those little details that I love. The only hard thing is that the clothing is so darn memorable that people remember when I wore the outfits last so I have to keep adding to my outfits to switch them up.
I never wear something from the store and not get stopped or complimented. Even when we spent the day in Chicago, people would stop me on the street and ask where I got my necklace or dress. It got to the point that my husband claimed, he was just “an accessory to the Amy show.”
True story!
 The store offers online shopping so if you don’t live around here, you can still partake of all of the amazing deals and steals that the store offers on their website. MomAdvice customers receive a 25% discount code. Just enter WEB25 when you checkout!
Thank you again to Flourish for being a valued supporter of MomAdvice.
My husband thanks you too!
Pin It
How to Make Chalkboard Pumpkins
Monday, October 15th, 2012

If there is one thing you know I love around here it is chalkboard paint. Chalkboard painted pumpkins are a fun way to avoid the pumpkin carving and allow your kids to unleash their inner Picasso. Chalkboard pumpkins are easier to make than you might think and today I wanted to show you how to transform ordinary pumpkins into Chalkboard Pumpkin People that lets your kids be creative while creating a unique accessory to your front step!
Let’s get started with creating your very own Chalkboard Pumpkin People.
 Supplies Needed (all found at Walmart):

1 real pumpkin
1 can of chalkboard paint (over in the hardware department)
Masking or electrical tape (this is optional, I ended up not covering my stem)
Wet wipe
White Chalk
1 Skeleton or Witch Body (these are found in the Halloween supplies by the pumpkin carving tools, $7.97 each)
 How to Create Your Chalkboard Pumpkin

1. Wipe down your pumpkin well with a wet wipe or damp paper towel to remove any dirt or debris.
2. Hold your can 10-14 inches away from your surface and spray in a sweeping motion side to side with a slight overlap around your entire pumpkin. Follow this pattern horizontally and then vertically. Wait fifteen minutes or so and then apply another coat. You need two coats to create your chalkboard surface.
3. Allow your pumpkin to cure. Do not use any chalk on this for 24 hours! The chalkboard paint will need to harden and will not be ready until then. If you try it before it is ready, it will just scratch the paint through, creating marks and exposing the orange on your pumpkin.

 Let your little artists go to work with their chalk. Before giving it to them, make sure to rub down the corners so that they don’t scratch their pumpkin’s surface. I also reminded them to draw gently on these so their paint would remain intact.
Mistakes made? No problem! These can easily be erased and started over again. We had many false starts before deciding on our perfect faces.
 Here are our finished faces that the kids drew (the witch’s creator might have had a little help from her Dad). We really loved these cute little faces and couldn’t wait to put them on the pumpkin bodies.

The best part about these though is that you can erase these and use them over and over again through the Thanksgiving holiday with written notes of thankfulness or a countdown to the holidays.
Of course, if you are more of the carving pumpkin type, Walmart has you covered with loads of great carving tools this year!
Don’t know what to do with the rest of that can of chalkboard paint? How about a DIY Lunchbox Creation Station, Chalkboard Food Label Frames, or Conversation Bubble Cookie Jars…just to name a few!
Pin ItI am a part of the Walmart Moms program, and Walmart has provided me with compensation for these posts. My participation is voluntary and opinions are always my own.