*This post is sponsored by Walmart. Thank you for supporting the companies that support this site!
Easter is one of my favorite holidays and I love crafting, decorating, and especially the eating for this holiday. Longtime readers know that I have a love affair with Peeps that have included a wreath made out of Peeps and I have even found a way to make Peep Martinis that taste divine. Let’s just continue the mad love affair with Peeps and make a hilarious Easter surprise cupcake for your kids!
Supplies:
1 box gluten-free cake yellow cake mix
Water, vegetable oil and eggs called for on cake mix box
1 cup assorted mini candy-coated chocolate candies, jimmies or confetti candy sprinkles
¾ cup sugar
1 teaspoon vanilla extract
¼ cup boiling water
¼ teaspoon cream of tartar
3 unbeaten egg whites
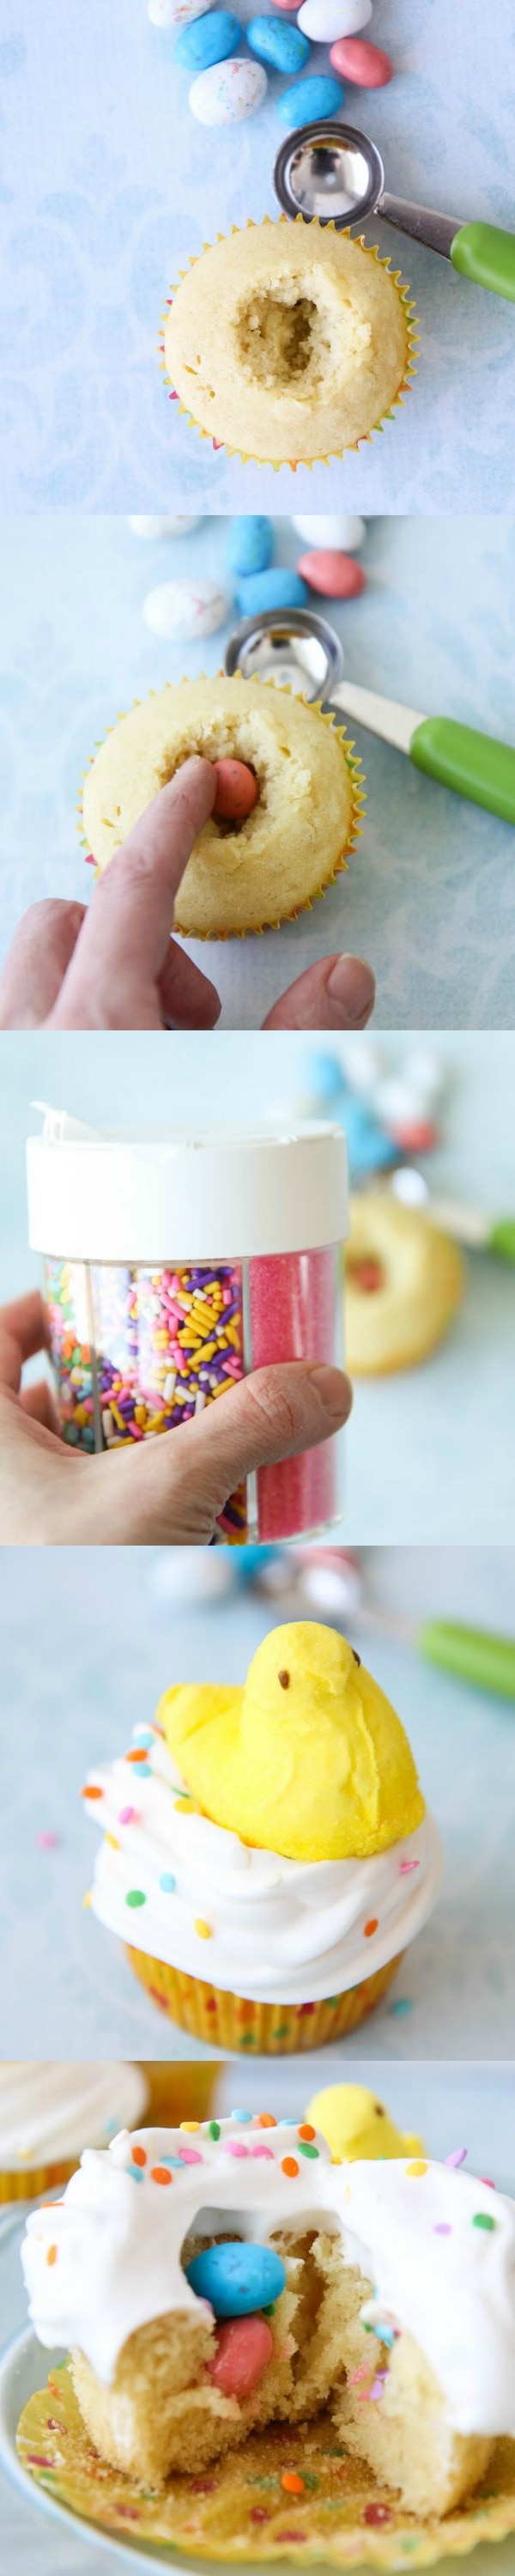
12 Peeps (any color)
Melon Baller
Directions
Heat oven to 350°F (325°F for dark or nonstick pans). Place paper baking cup in each of 12 regular-size muffin tins.
Make cake batter as directed on box. Divide batter evenly among muffin cups (about two-thirds full). Bake as directed on box for cupcakes. Cool in pans 10 minutes; remove from pans to cooling rack. Cool completely, about 30 minutes.
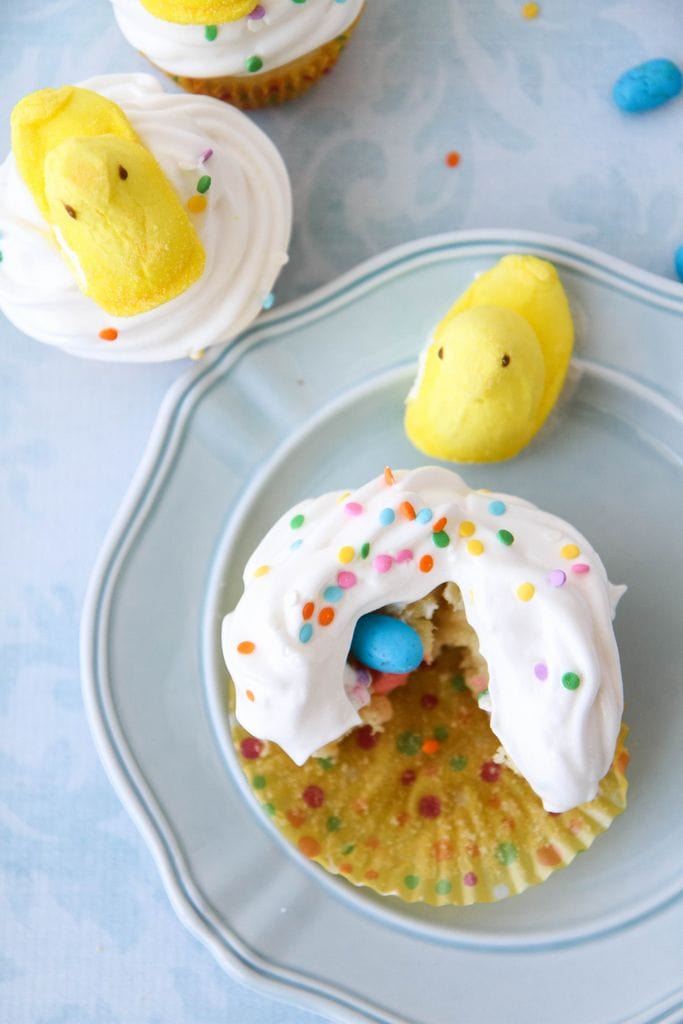
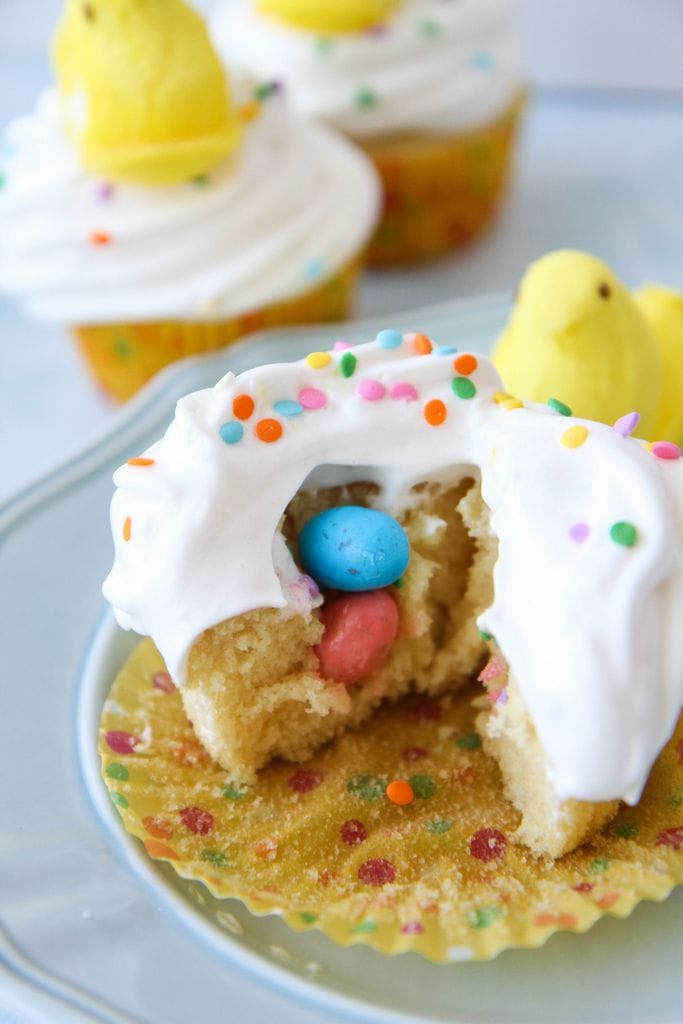
Using melon baller, scoop out center of each cupcake, about 1 inch deep. Fill each with 1 heaping teaspoonful candies.
Mix sugar, cream of tartar, vanilla and egg whites in your stand mixer bowl. Add boiling water. Beat on high until the mixture forms peaks, which should be just about seven minutes. Spoon or pipe frosting on top of the cupcaks and finish with sprinkles and a Peep on top.
Don’t you hate it when your Peeps lay their eggs in your cupcakes? Ha! What a funny surprise for you kids and a fun food craft to do together as a family! I hope you love this idea and remember that you can pick up all the supplies at your local Walmart store! Happy Easter, everyone!
Easter Surprise Peeps Cupcakes
Prep time:
Cook time:
Total time:
Serves: 12
A fun Easter surprise cupcake that you just so happens to be gluten-free. Fill it with your favorite egg candy and top with a marshmallow Peep!
Ingredients
1 box gluten-free cake yellow cake mix
Water, vegetable oil and eggs called for on cake mix box
1 cup assorted mini candy-coated chocolate candies, jimmies or confetti candy sprinkles
¾ cup sugar
1 teaspoon vanilla extract
¼ cup boiling water
¼ teaspoon cream of tartar
3 unbeaten egg whites
12 Peeps (any color)
Melon Baller
Instructions
Heat oven to 350°F (325°F for dark or nonstick pans). Place paper baking cup in each of 12 regular-size muffin tins.
Make cake batter as directed on box. Divide batter evenly among muffin cups (about two-thirds full). Bake as directed on box for cupcakes. Cool in pans 10 minutes; remove from pans to cooling rack. Cool completely, about 30 minutes.
Using melon baller, scoop out center of each cupcake, about 1 inch deep. Fill each with 1 heaping teaspoonful candies.
Mix sugar, cream of tartar, vanilla and egg whites in your stand mixer bowl. Add boiling water. Beat on high until the mixture forms peaks, which should be just about seven minutes. Spoon or pipe frosting on top of the cupcakes and finish with sprinkles and a Peep on top.
This post is sponsored on behalf of BHG at Walmart.
Spring is in the air and with it comes my urge to continue creating a beautiful space in our home that we will love for many years. Today I wanted to show off a space that we recently renovated and how we brought our ideas to life in this space. As part of the BHG Live Better Network, I am partnering with them this month to showcase how you can add a new color into your home utilizing the products from BHG that are available at Walmart. For me, the color that we are working to add into our home happens to be gray and so this month’s feature is all about that beautiful hue and how I was able to accessorize my new space with their help. Before we accessorize though, let’s take a look at some before and after pictures of our space.
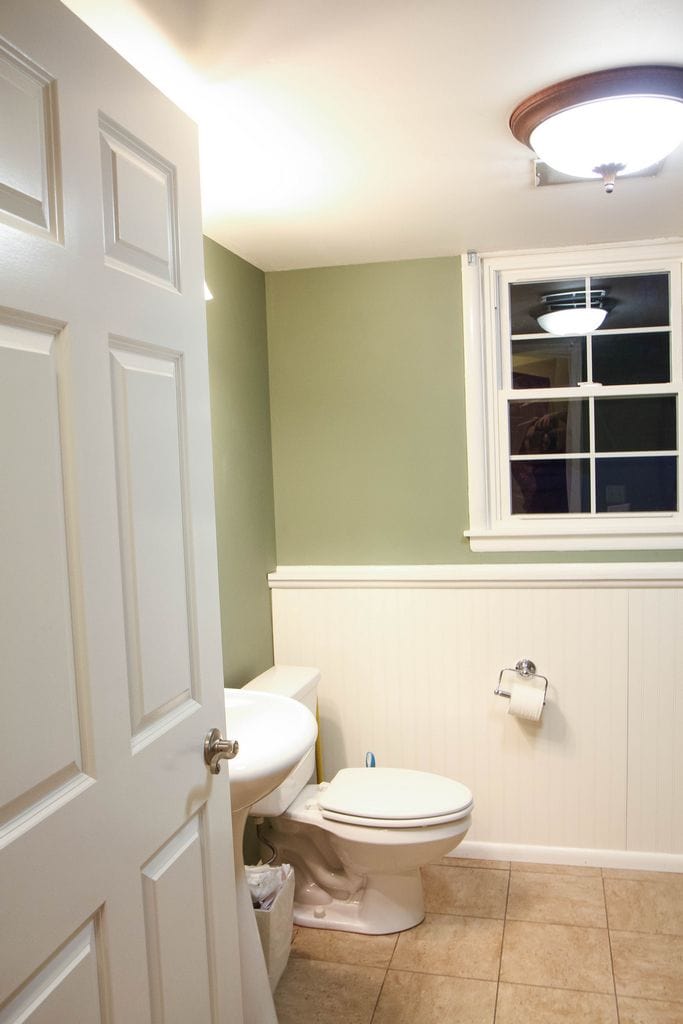
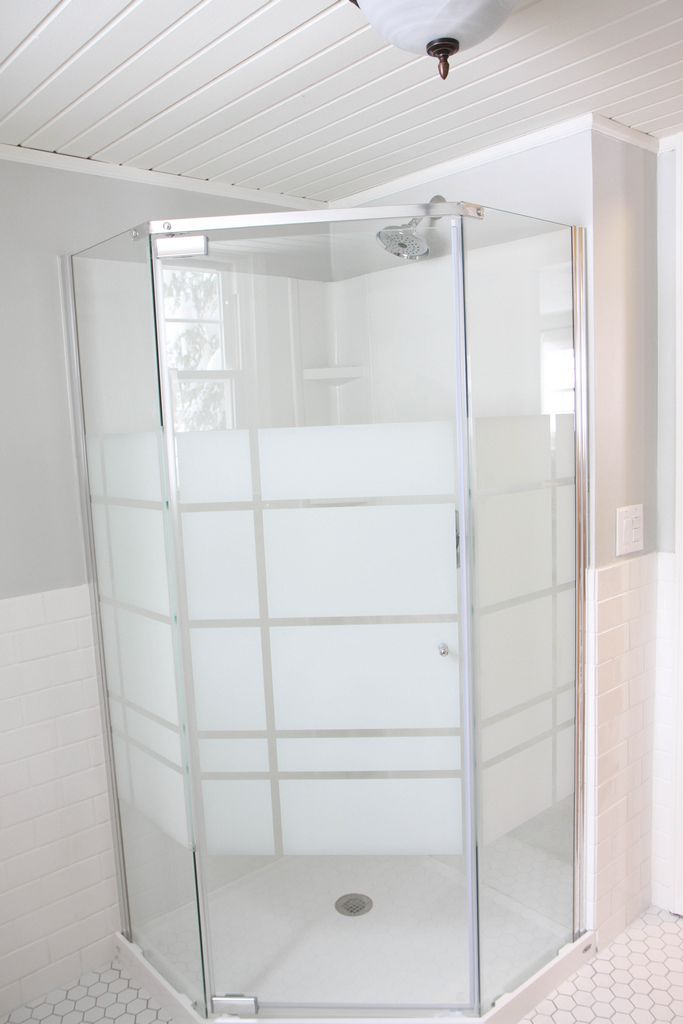
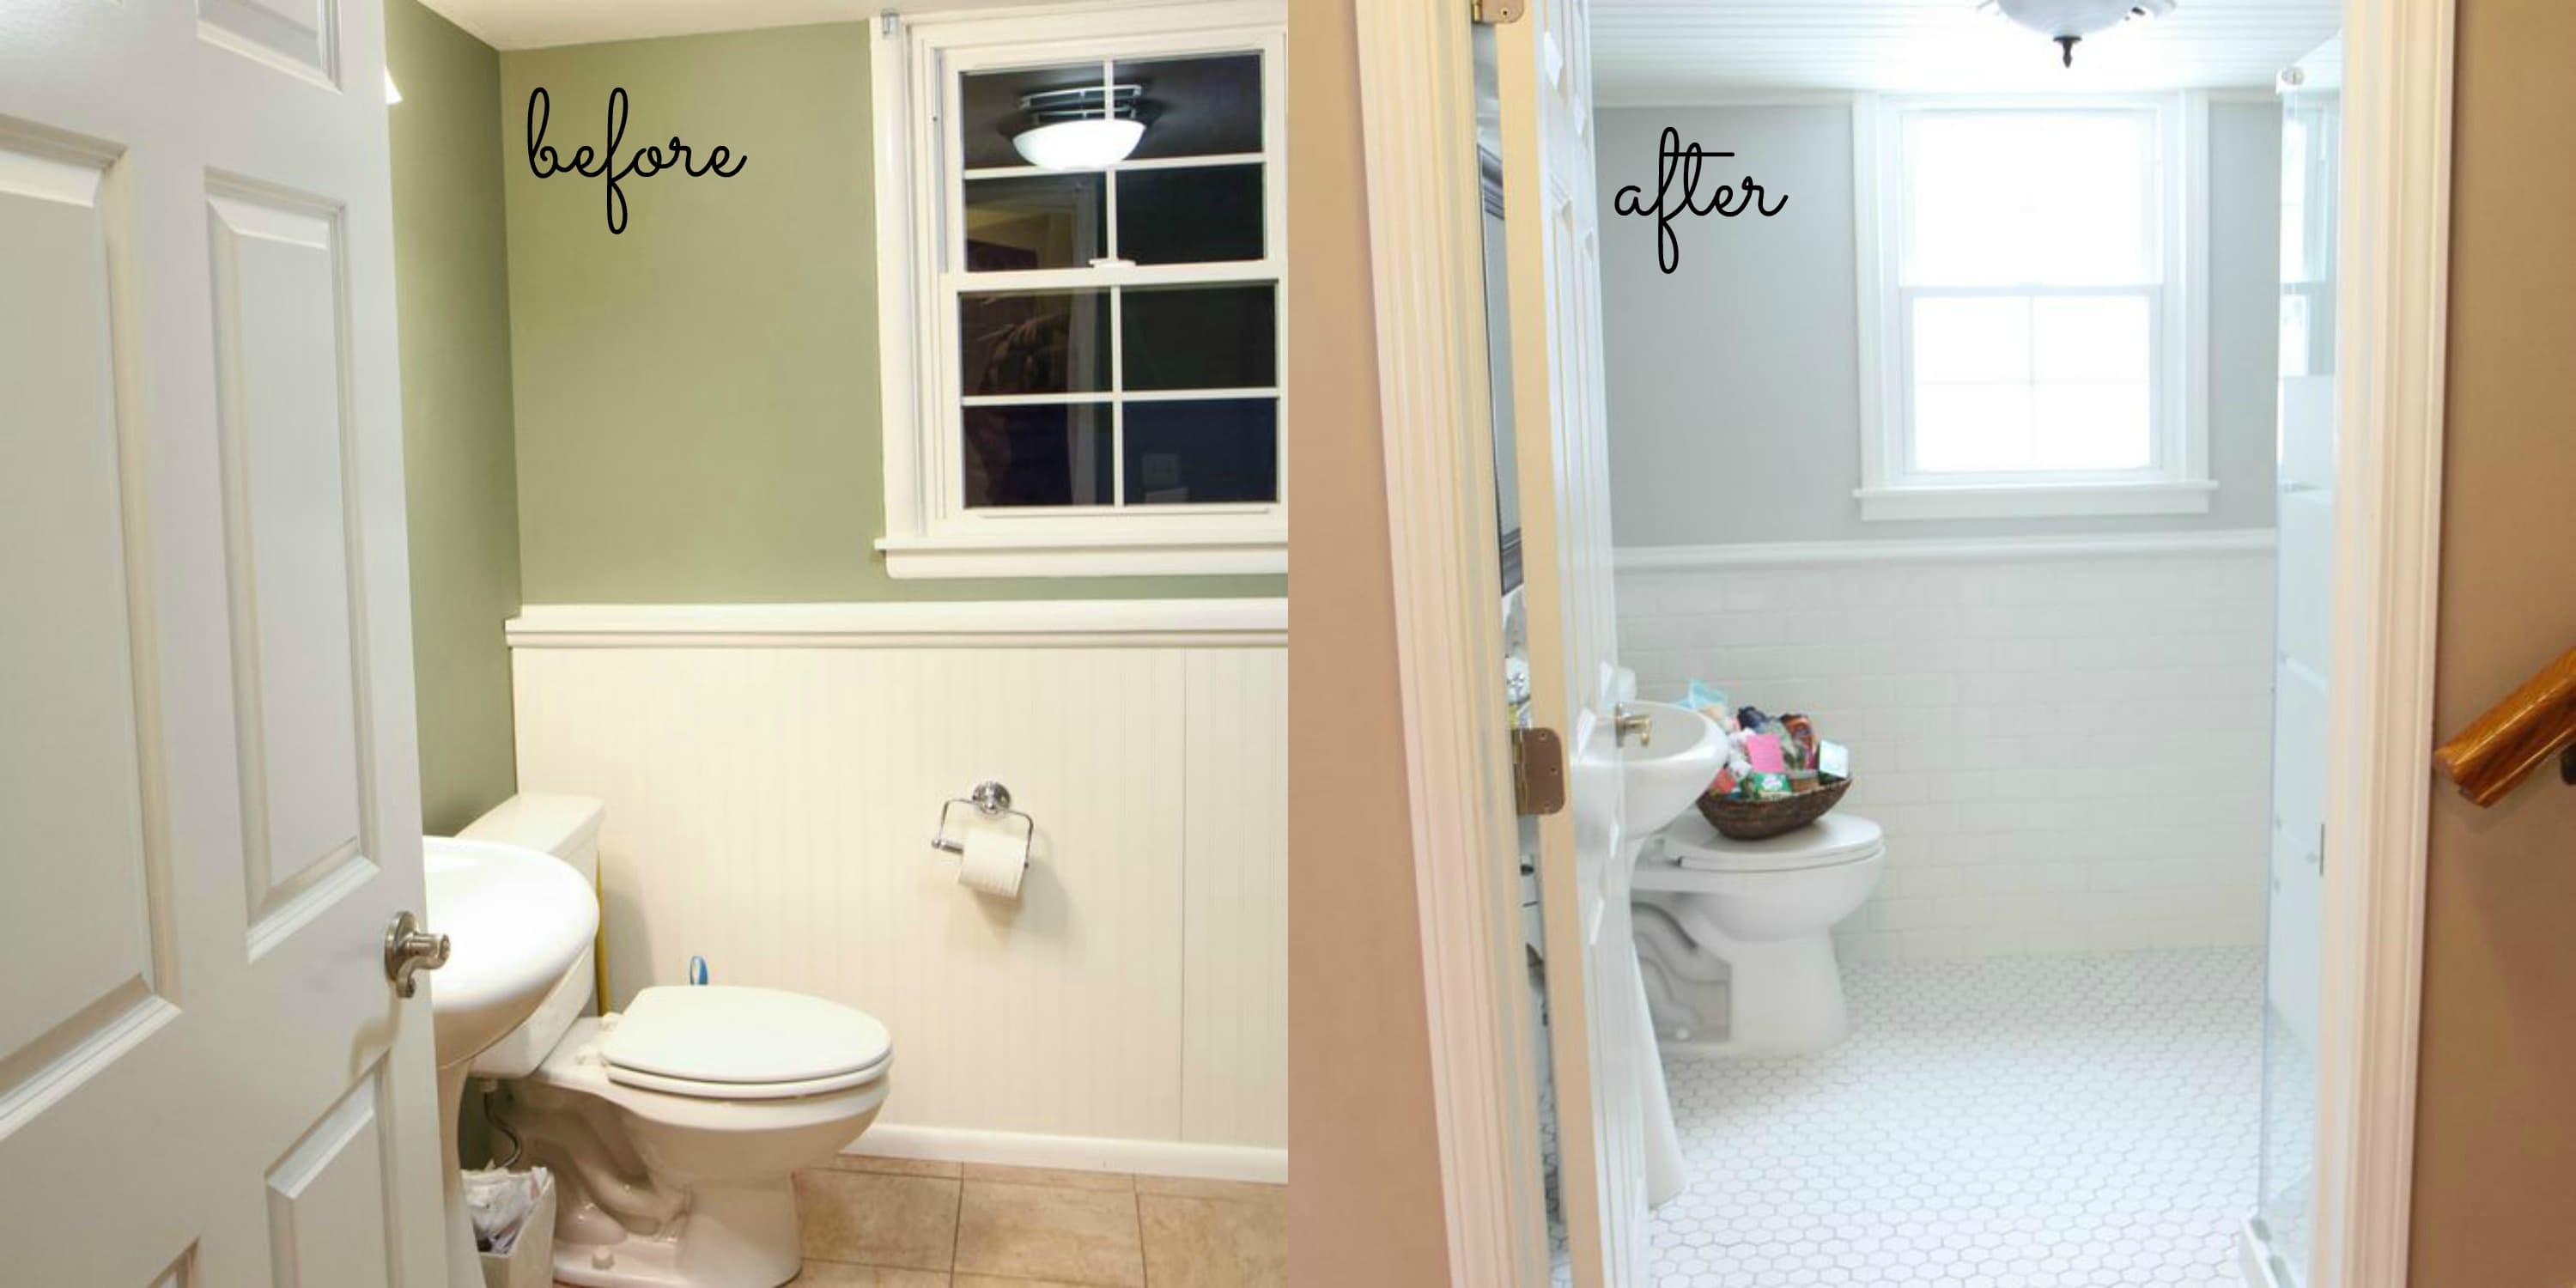
Here are a few before pictures of our basement bathroom that we planned to renovate. This was actually the first room that we did ourselves when we moved into our home eleven years ago. When we purchased the home the original room actually had about four layers of wallpaper on it that we attempted to remove and then discovered mildew had been residing between the layers making all of that drywall unusable. The previous owners had used it as a laundry room, but it lacked the ventilation needed to keep mildew at bay. We had one of my husband’s uncles and his father help us rip all of the walls and put in new ones which was a really big job for these newbie homeowners. We were on a tight budget so we added sticky tile flooring and my husband added this wainscoting detail on the wall with a ledge. With a coat of paint, we were satisfied with this space.
As our kids get older (and the sticky tiles began to shift beneath our feet), I started dreaming about how we could transform this half bath into a full bath so that we could have two showers in our home instead of one. I have never had two showers in one space in my entire existence so entertaining this idea was, seriously, exciting for me. I began to put together my vision boards for this space. After all, if we can turn our old storage shed into the bonus room of my dreams, why couldn’t we do the same in this little space? If there is one thing I have learned about renovating our tri-level home, it is that every corner must be looked at with potential. Why shouldn’t this empty bathroom corner become a fully functional shower for our family?
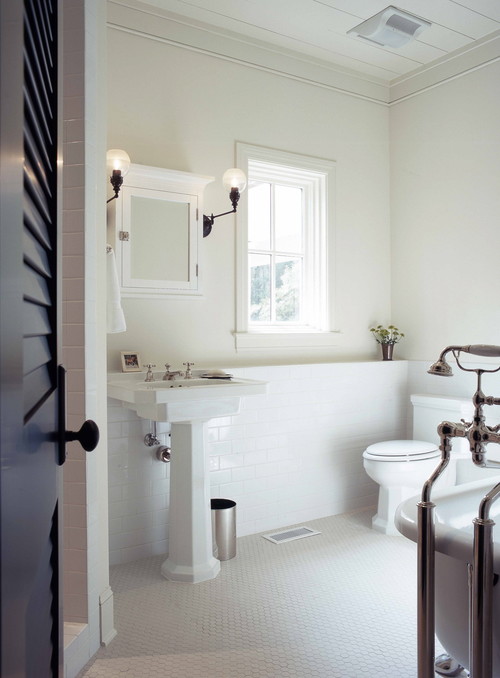
My inspiration came from this photo on Houzz. After putting together a million idea for my husband, we sat down one night and both agreed that this is the style of the bathroom we wanted. The best part was that the Hilton Head Island Architects & Building Designers took the time to answer everyone’s questions about the materials that were used in this room. I jotted down some notes and took these ideas to All Pro Renovations to see if we could make something like this happen in our space.
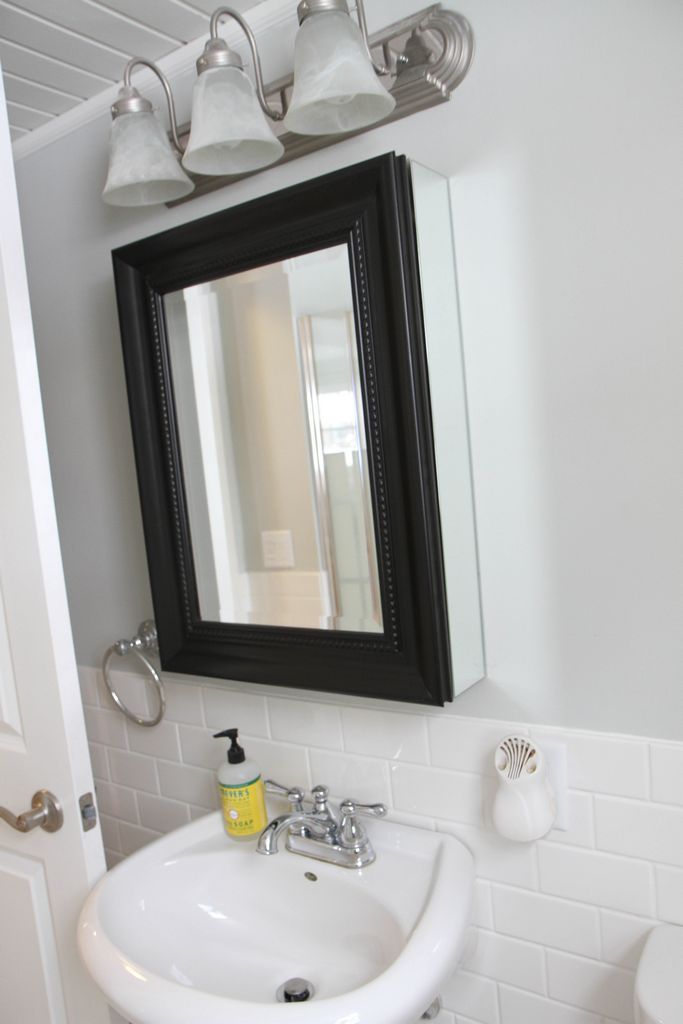
Here were the original ideas that I wanted for this space. You will see that I rethought some of this (even frantic texts as close to midnight on the paint color). The initial ideas though of a ceiling with a 1×8 v-groove pine with fresh trim were painted in Benjamin Moore White Dove, the standard (3×6) subway tile on the walls, additional lighting was added, and the standard hex tile with a gray grout all ended up being implemented in our space.
To save on cost, we ended up just using a shower purchased from our local hardware store, ditched the sconce lighting (since we added additional lighting in our fan), and gave up the idea of raising the ceiling since it was going to be another $1,500 or so just to reroute some of the heating & ventilation that were all funneling through this room.
In an effort to interject a little color, I ended up painting the walls in Benjamin Moore Gray Owl which kept things fresh and modern, without looking unfinished or the fear of a dirty white walls and white flooring/tile.
Can you believe this corner was just sitting there unused and now houses a pretty generous stand-up shower? Although we had talked about making this a custom unit, I am so happy with this unit we purchased that was all ready to go from our hardware store.
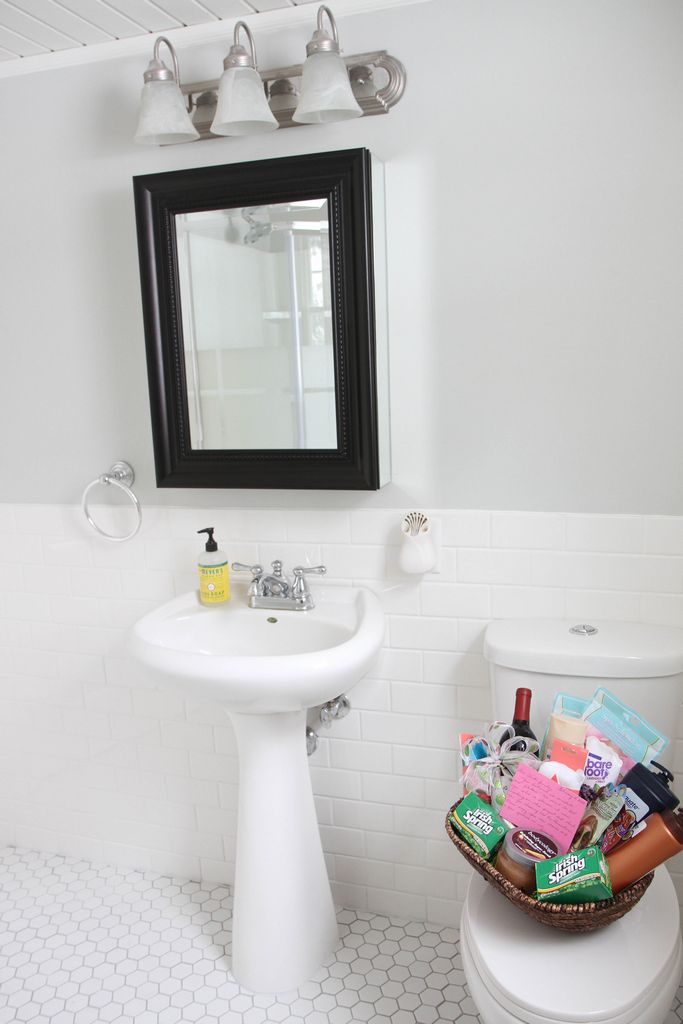
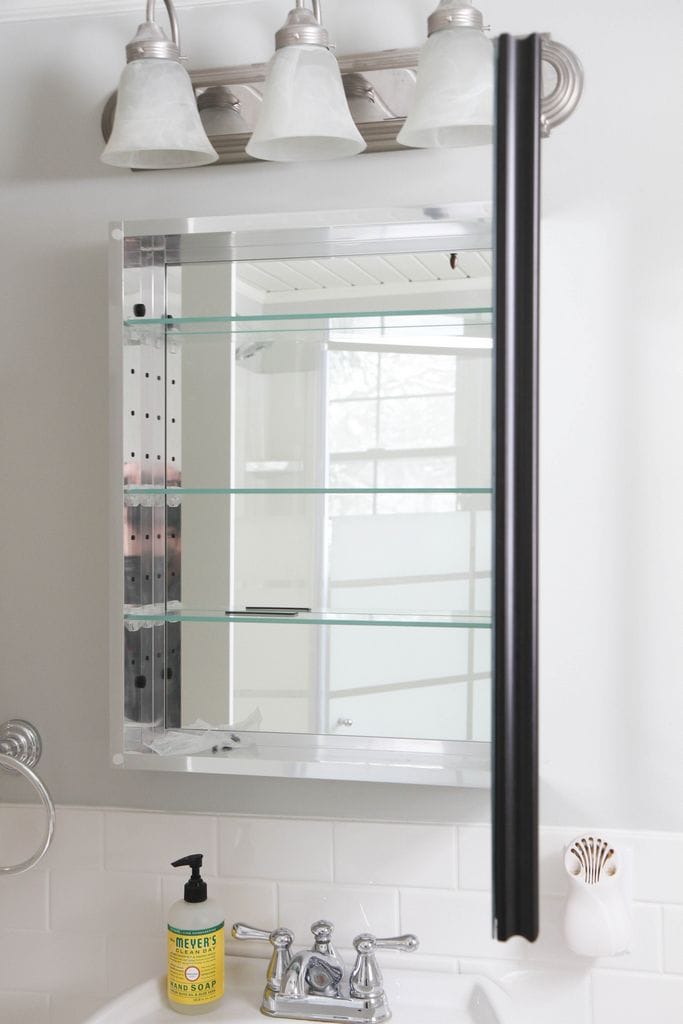
How gorgeous is this new space? Would you ever guess that this is in the lower level of our home? Although the ceiling is slightly lower with the addition of the pine planks, you really don’t feel closed in due to the lines of the boards and the fresh white paint. We left our existing fixtures and lighting in, but did add a light that looked almost identical to our original that added a fan in the space. We had a medicine cabinet installed that helped add additional storage and also provided extra mirrors for getting ready in the morning.
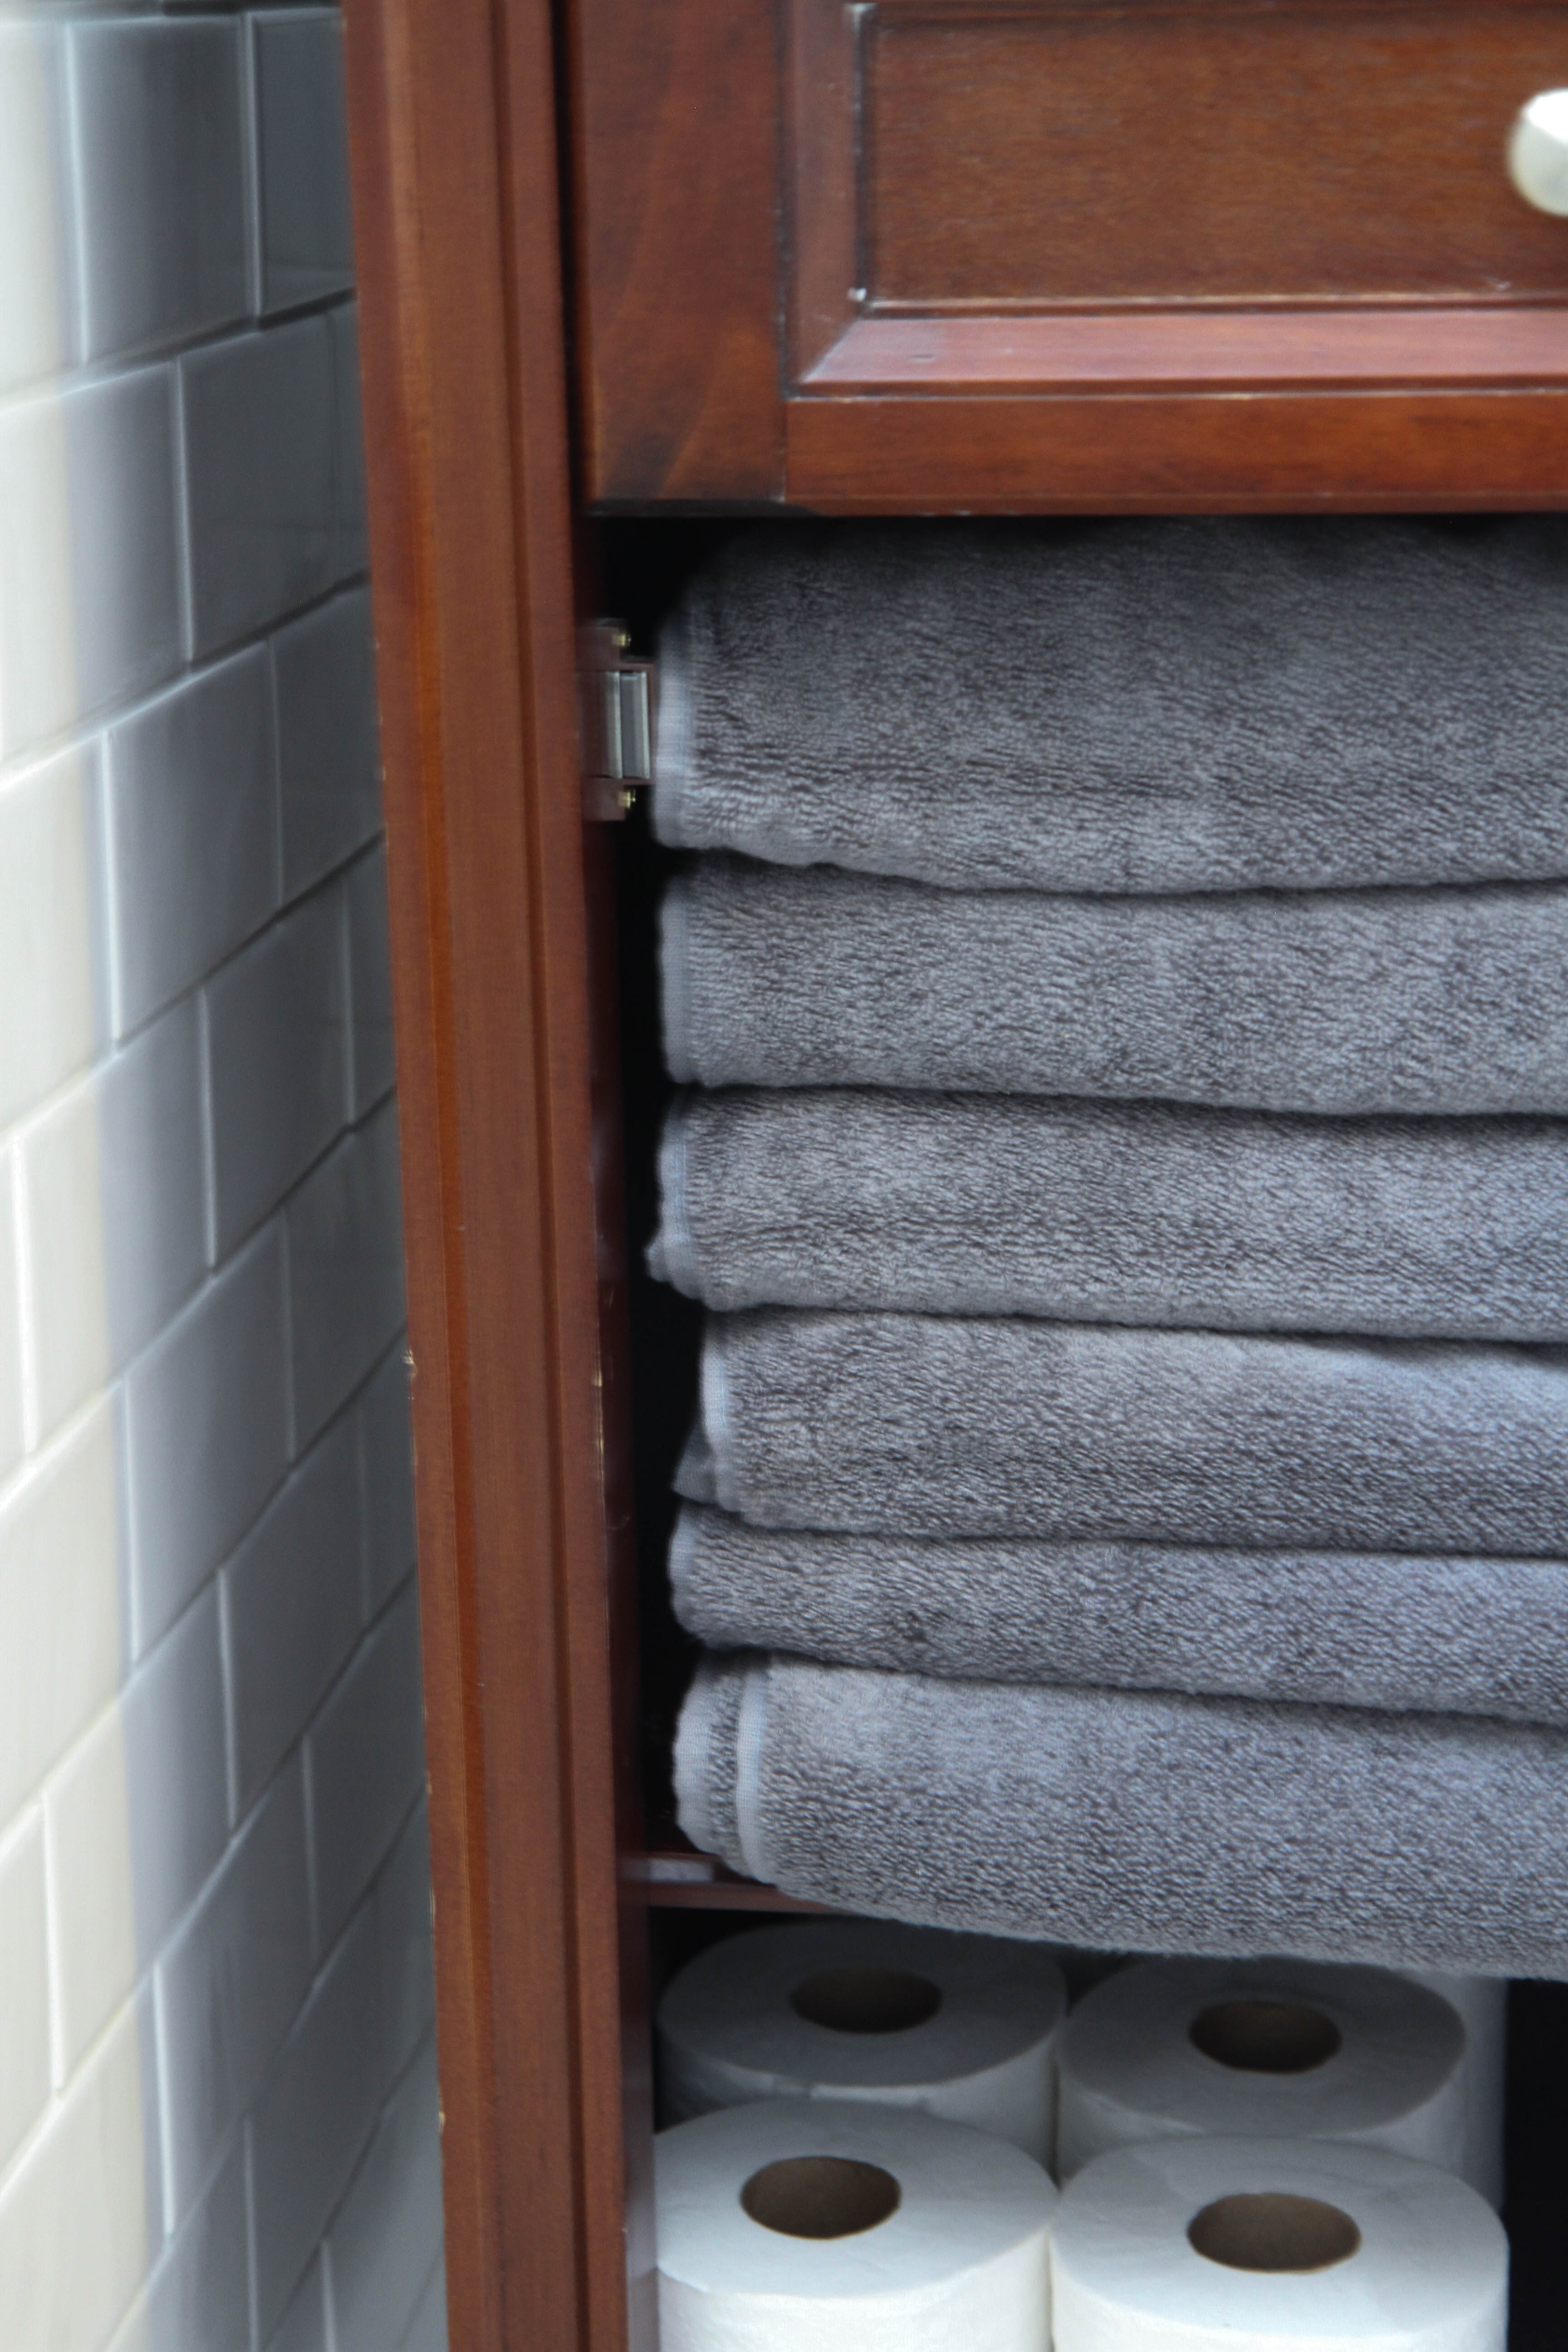
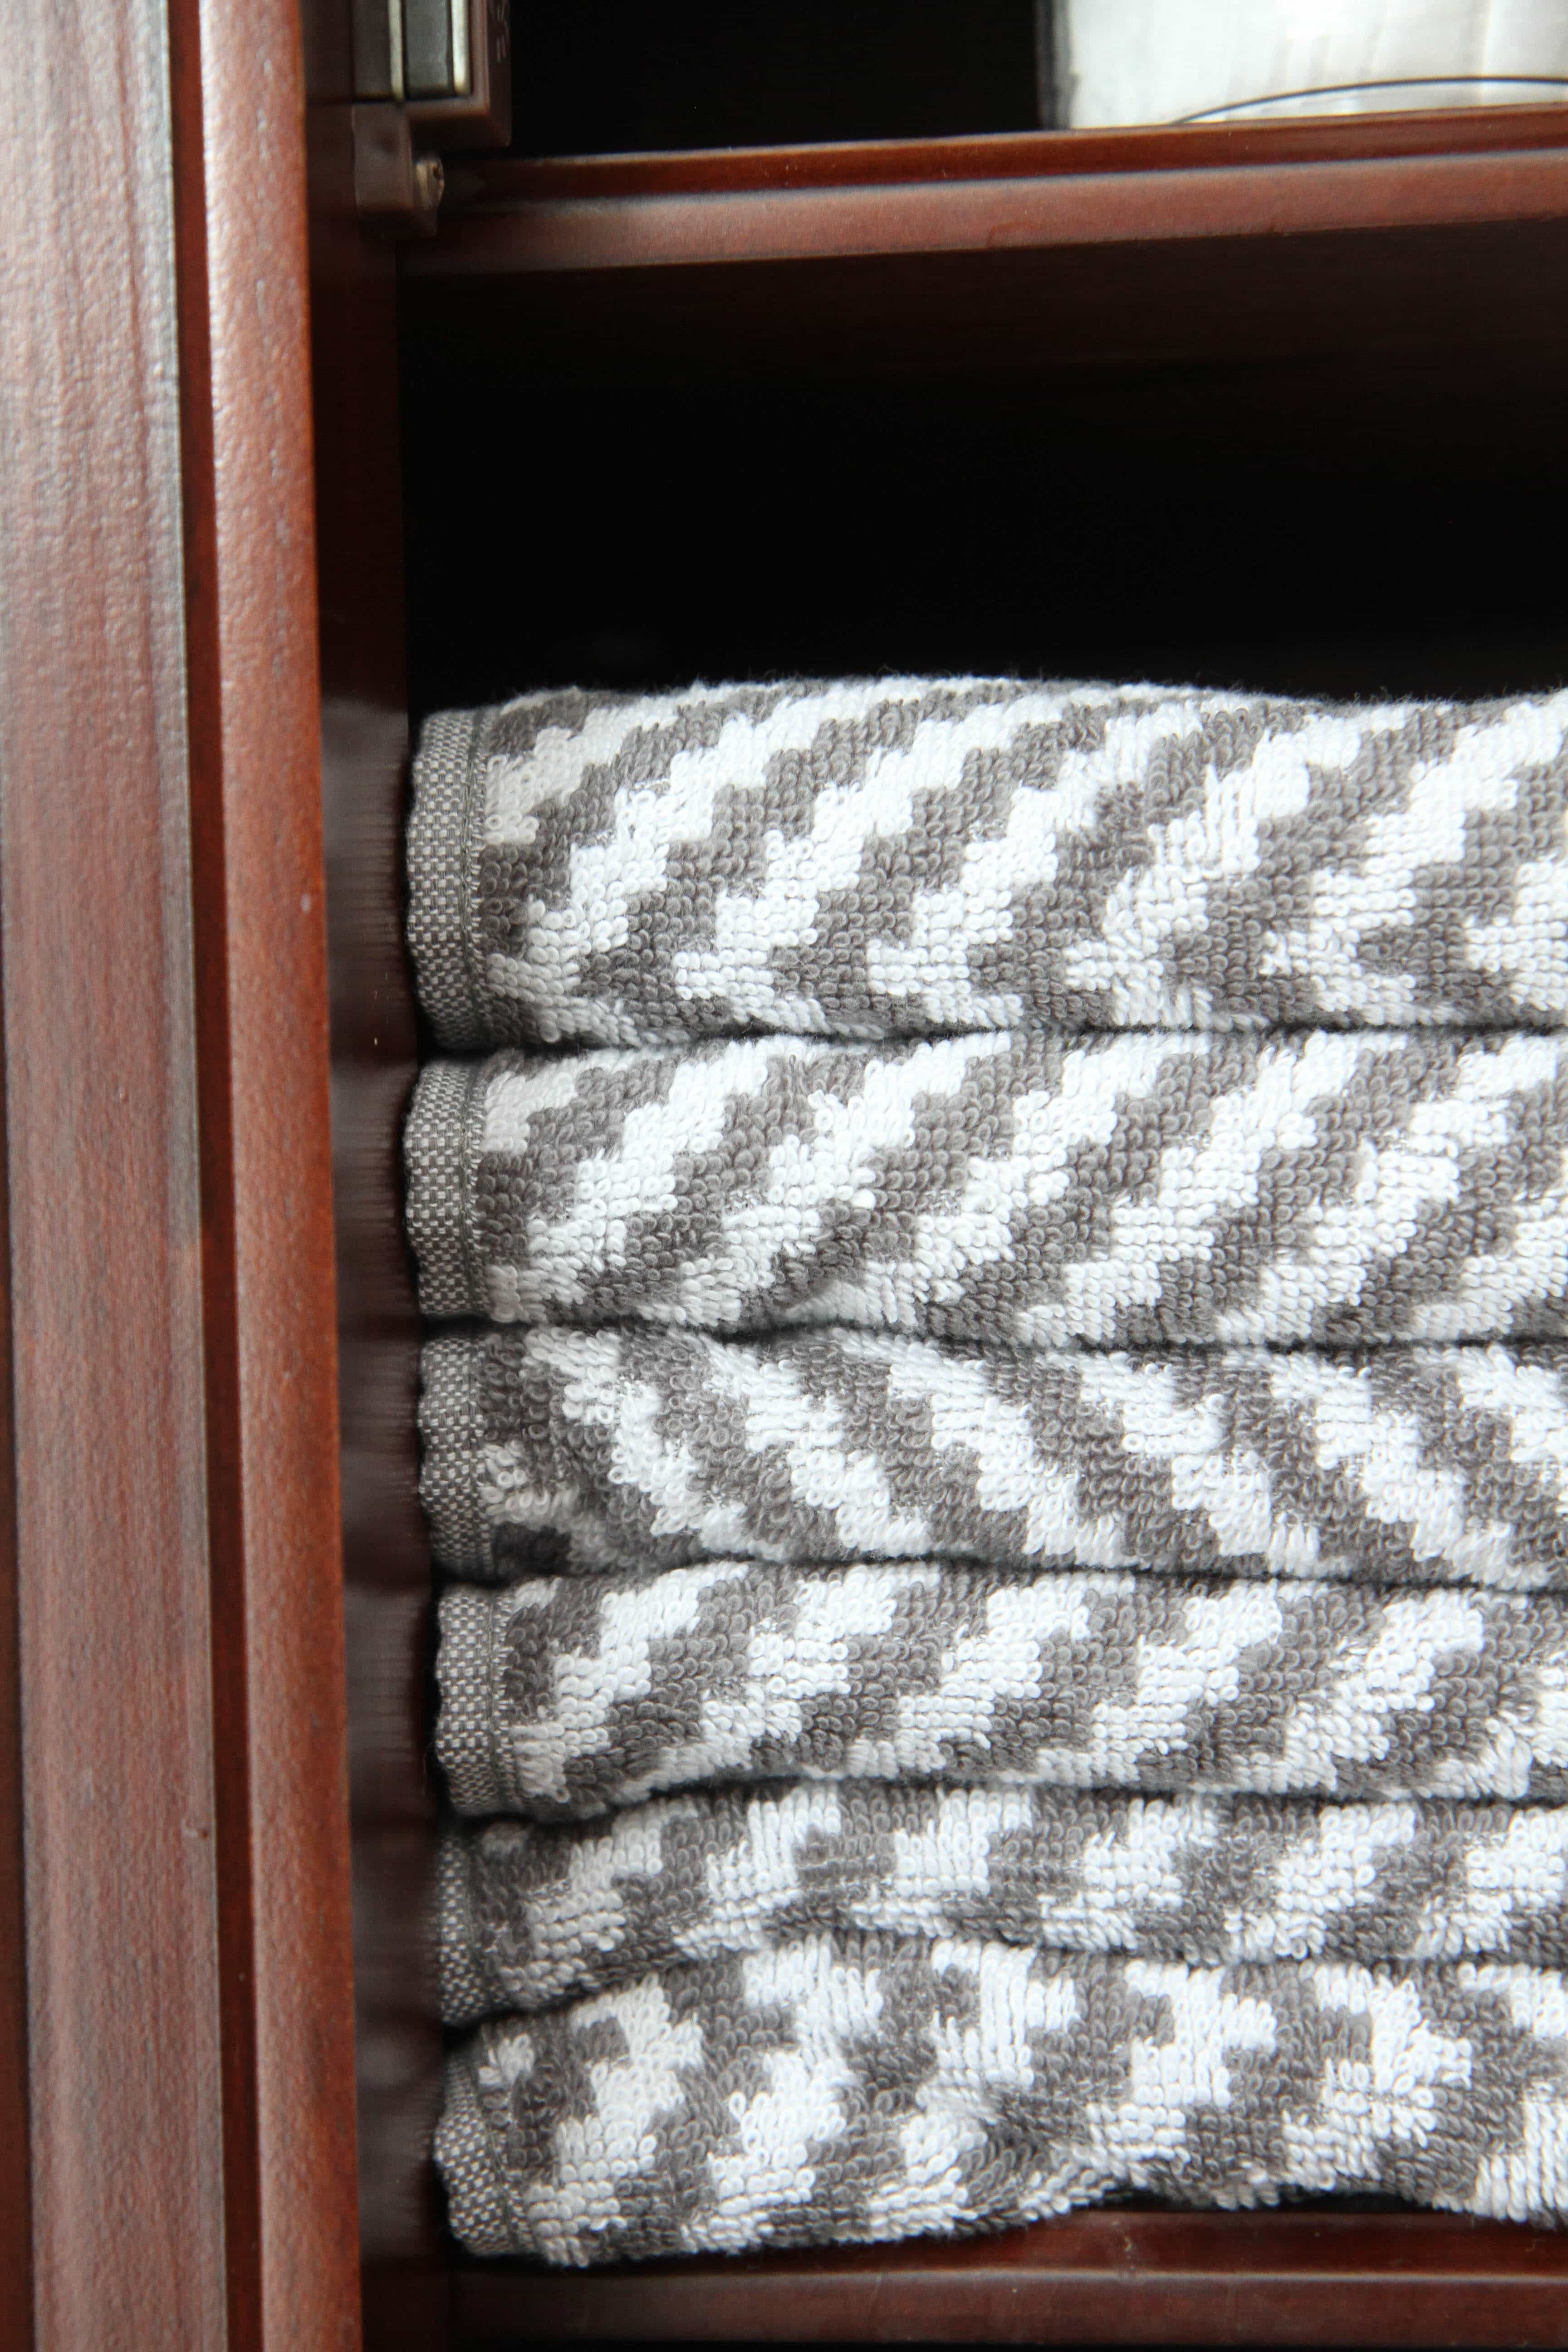
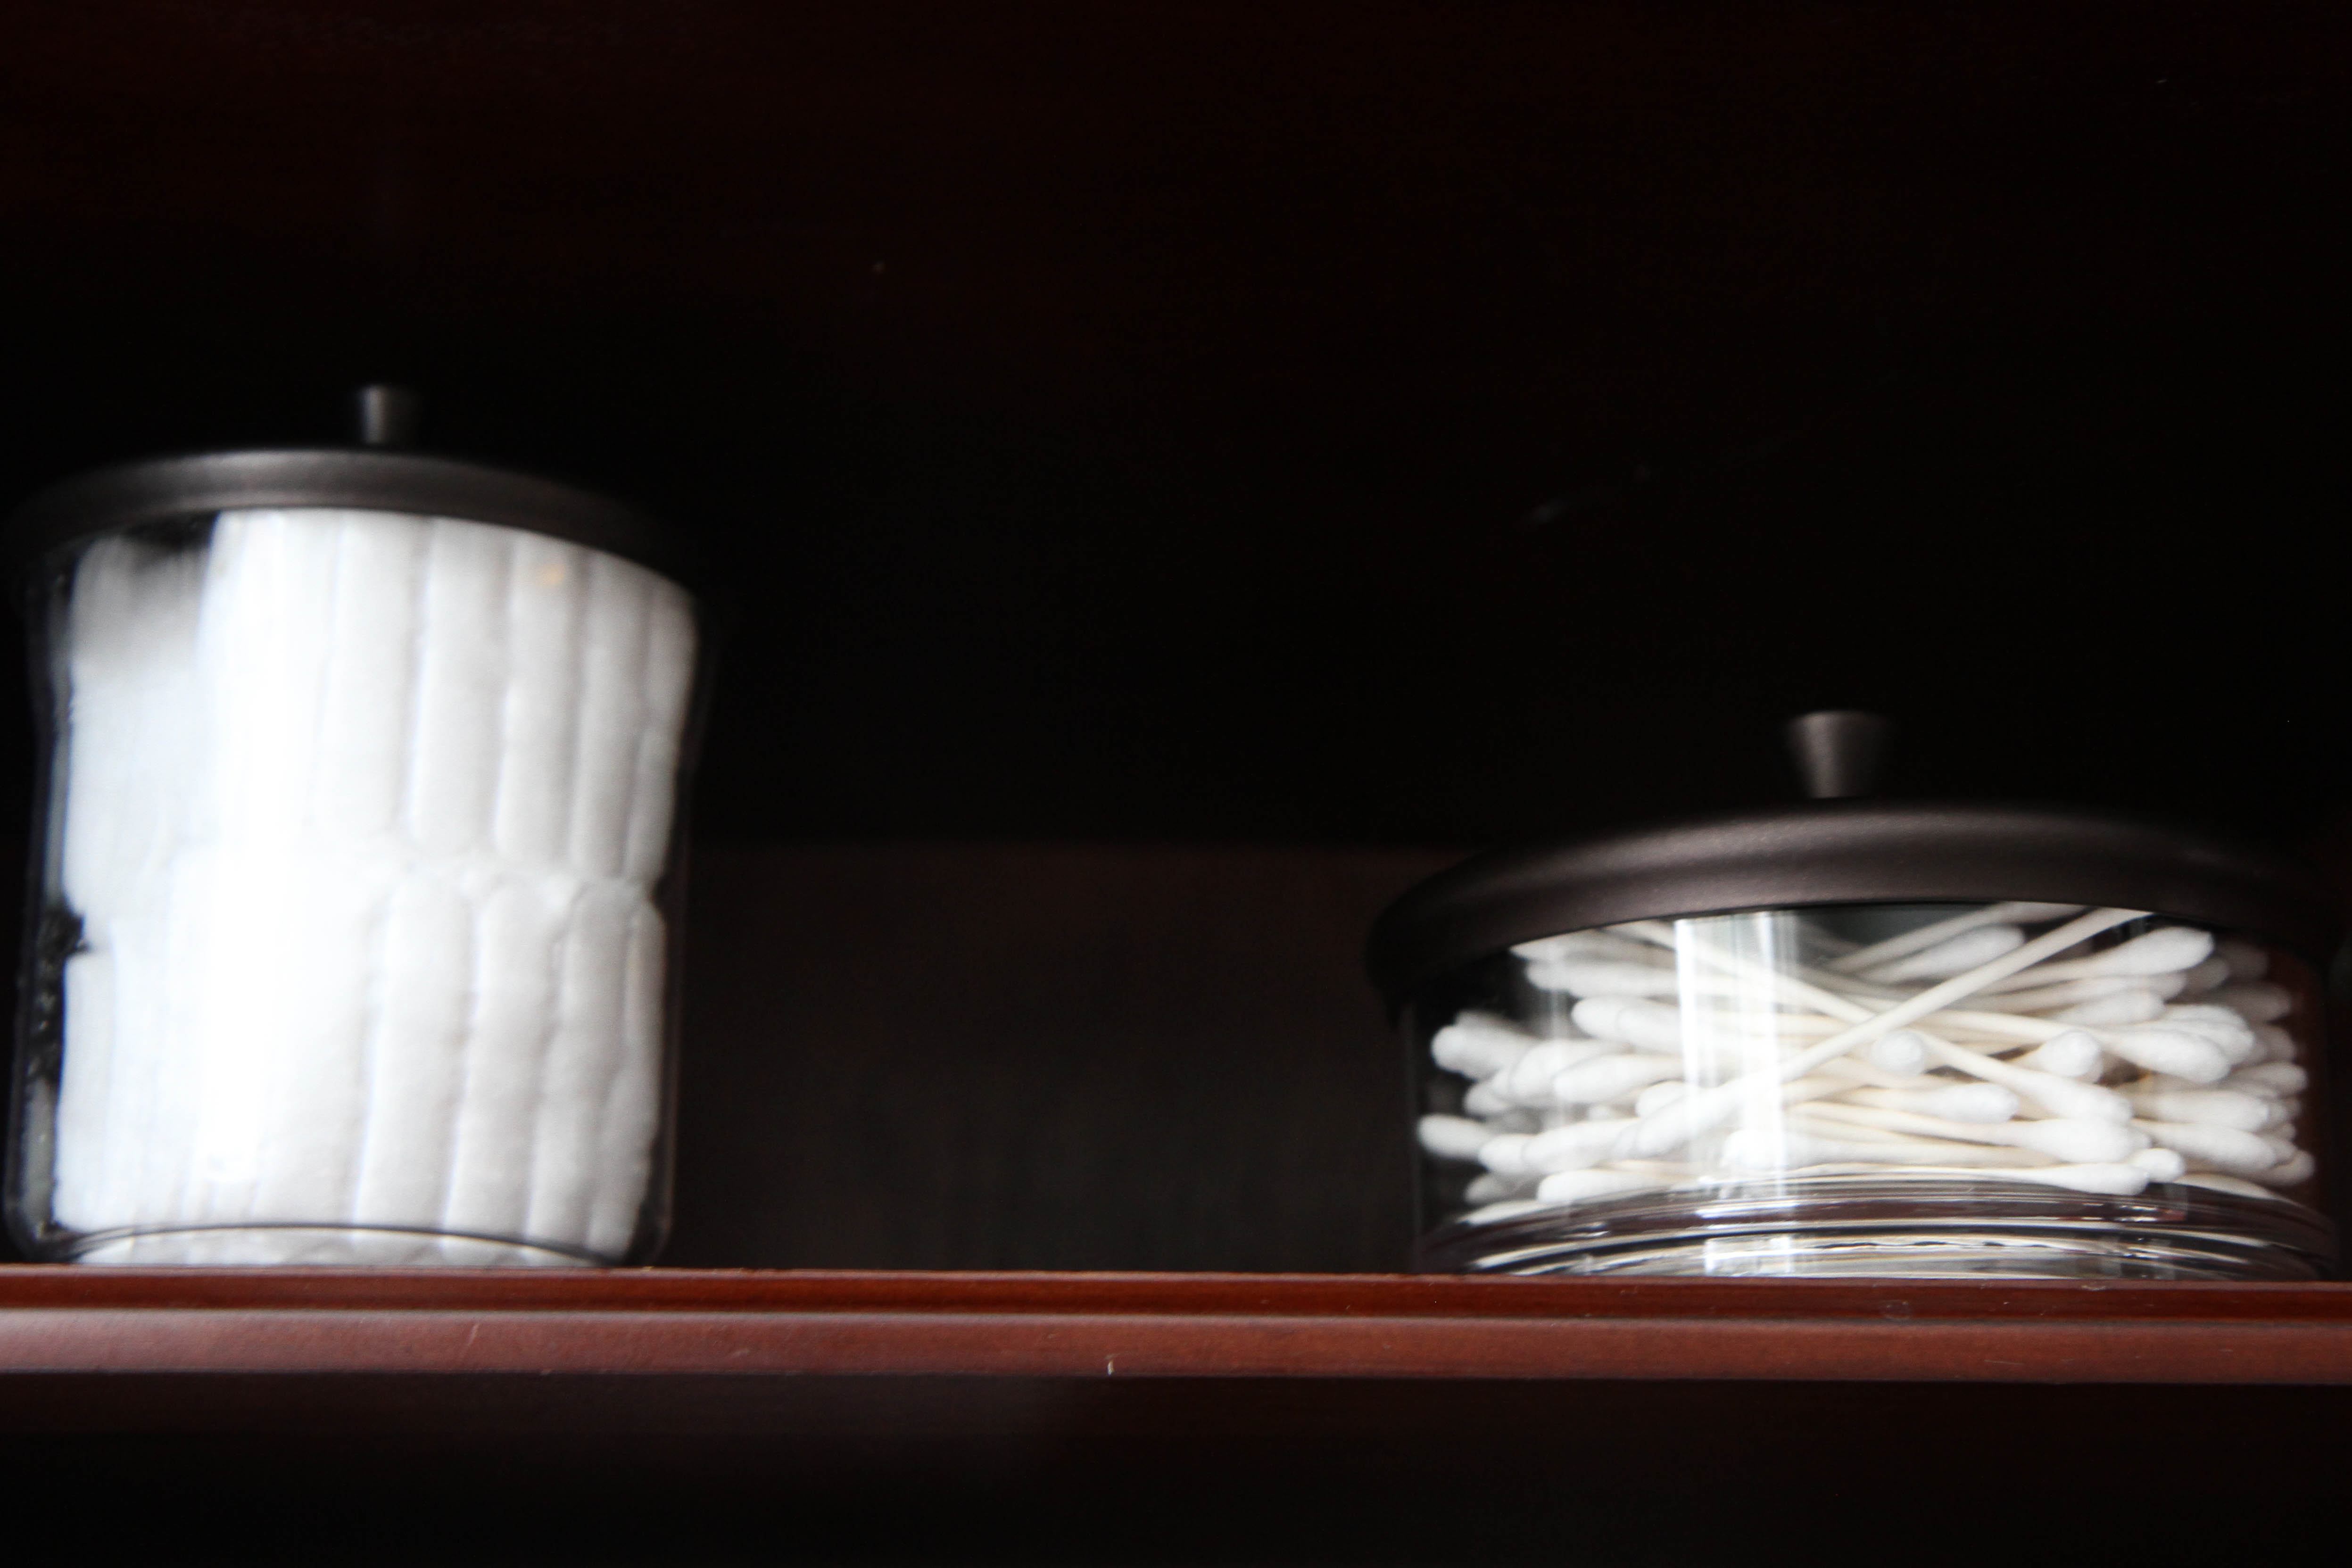
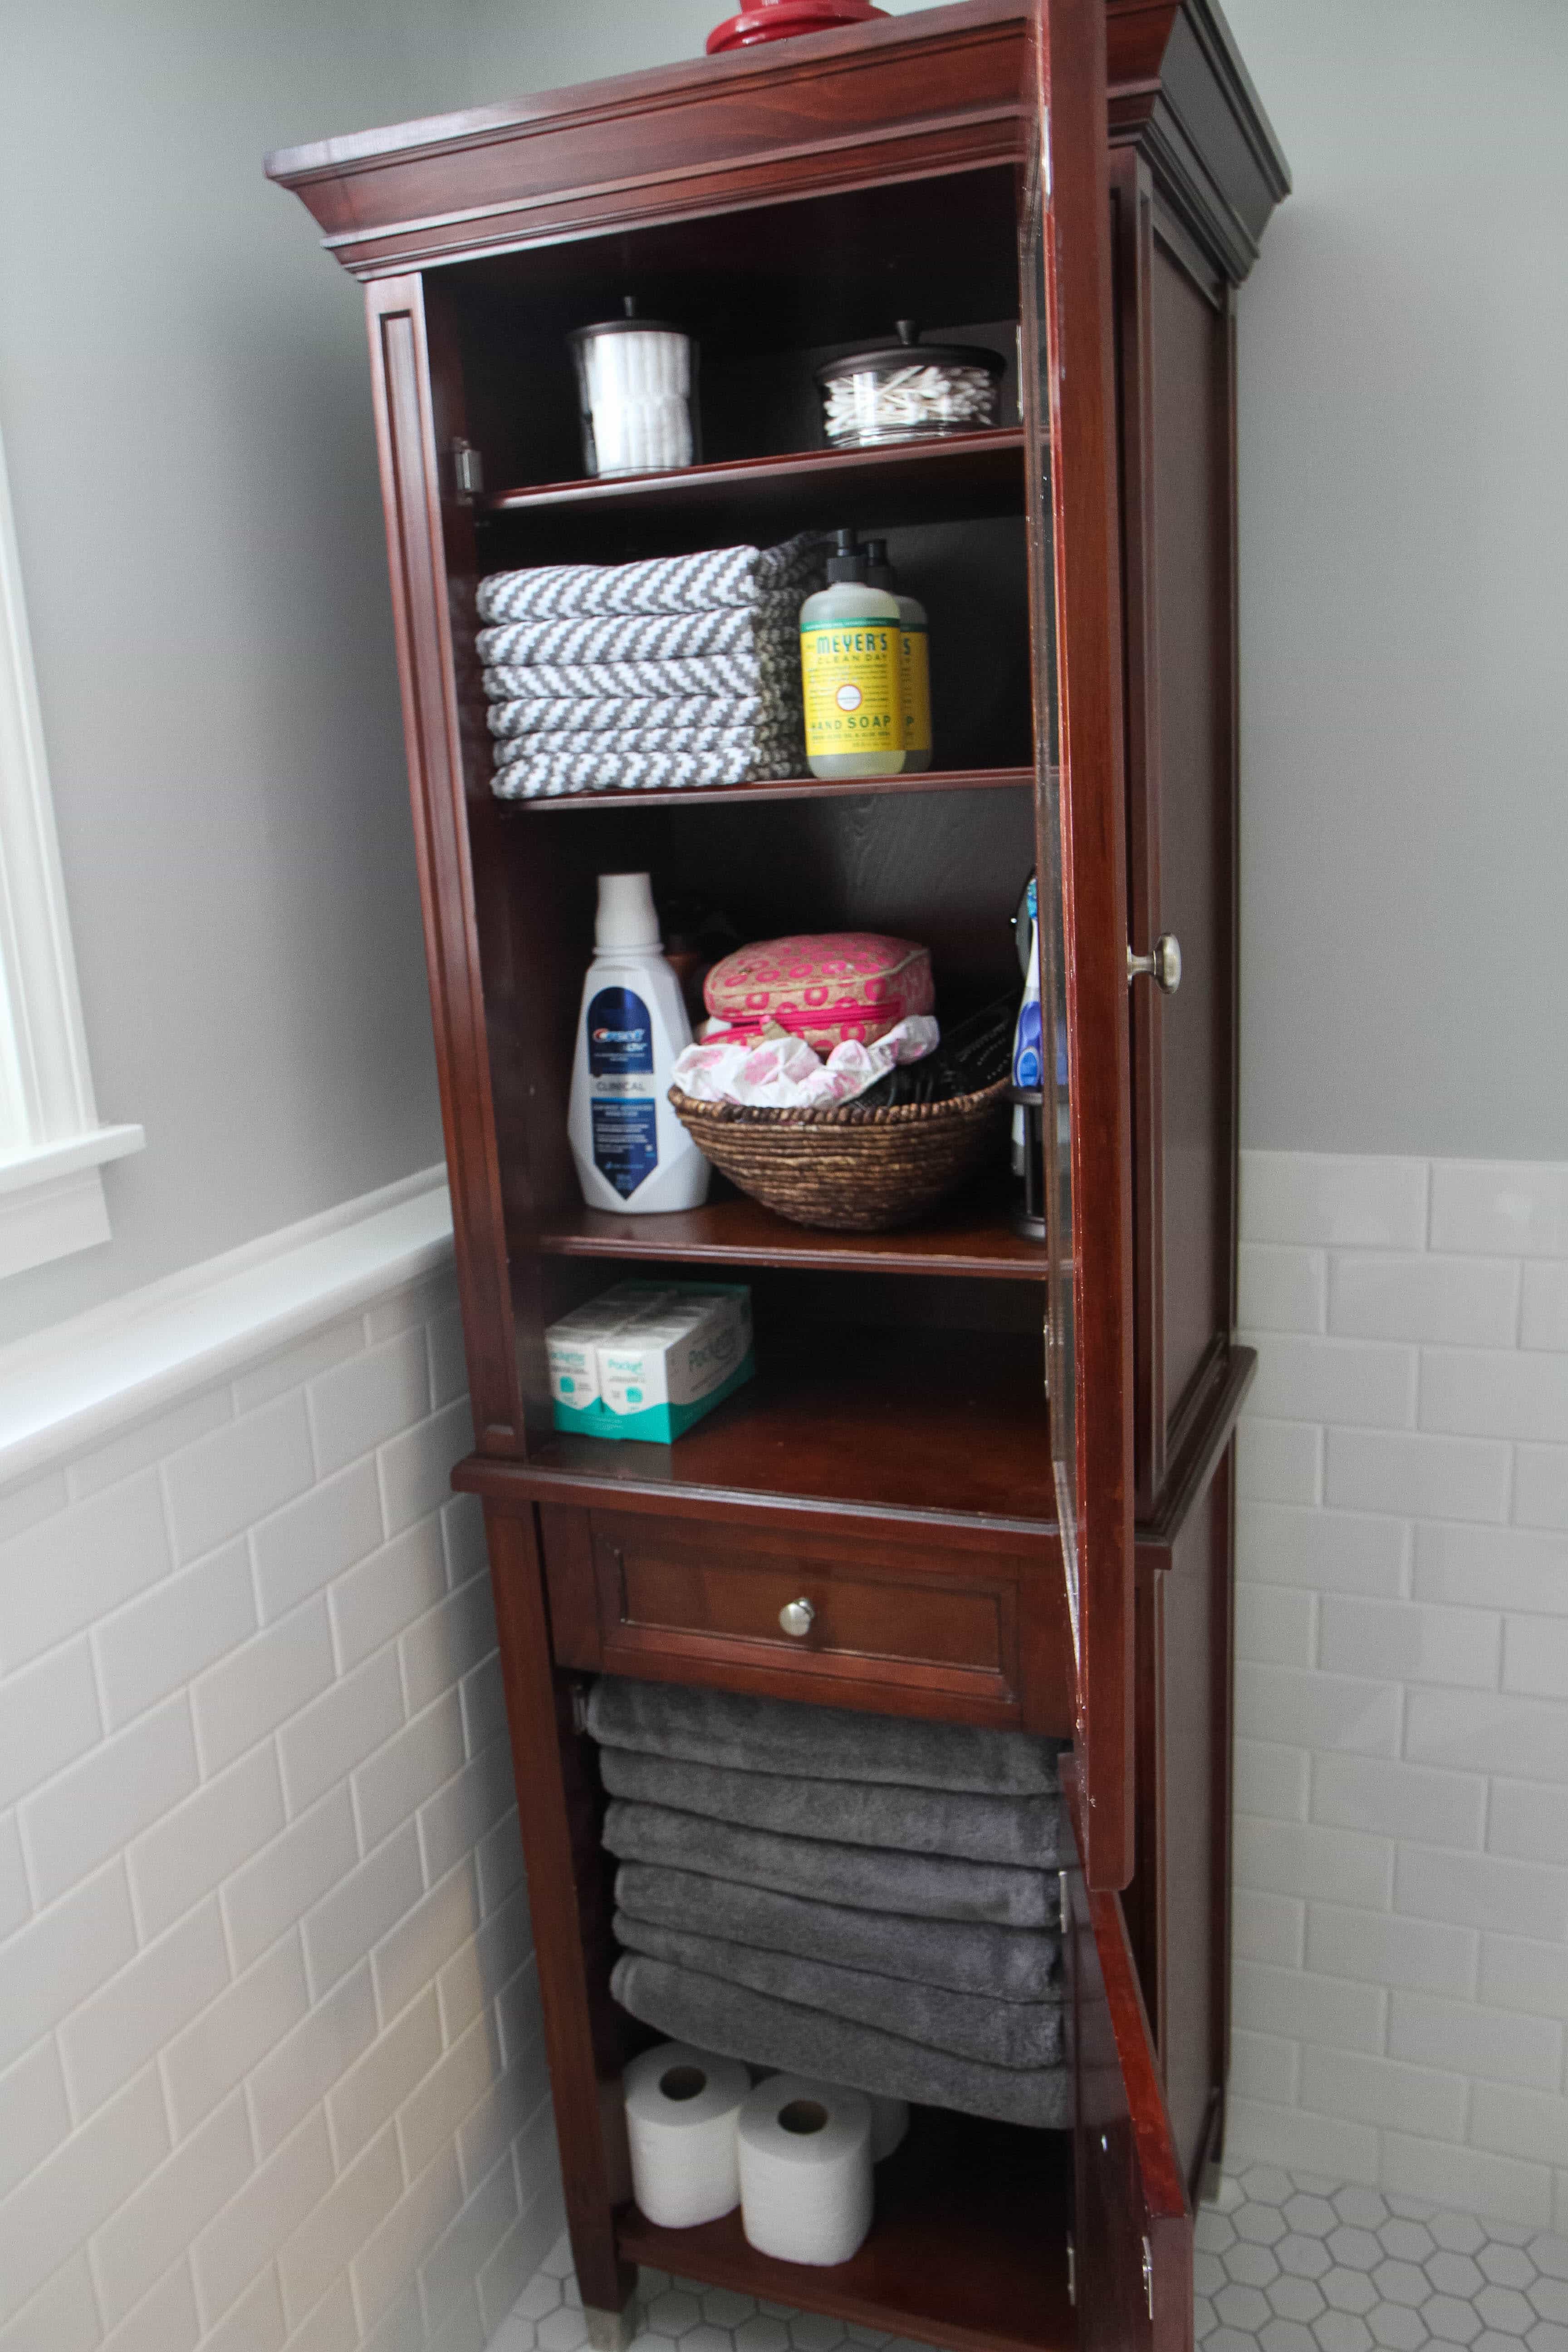
To add more pops of gray and to organize our space, I headed to Walmart to snag some new additions to the space. These included some beautiful plush towels in gray flannel, some modern chevron print towels for our hand towels, new jars to organize the odds & ends in our storage unit, and the perfect cushy chevron bath mat for our feet. This brought more of the gray in and added those modern touches that I wanted for our space.
I’m so proud of our new space and love the fresh new colors that we are bringing in to our home! Thank you to All Pro Renovations for the beautiful workmanship they did in this space!
In accordance with the FTC Guidelines, I am disclosing that I received compensation from BHG at Walmart for my time and participation in the BHG Live Better Network. Although we have material connection to BHG, any publicly stated opinions of BHG and their products remain my own.
This is a sponsored post written by me on behalf of ALDI.
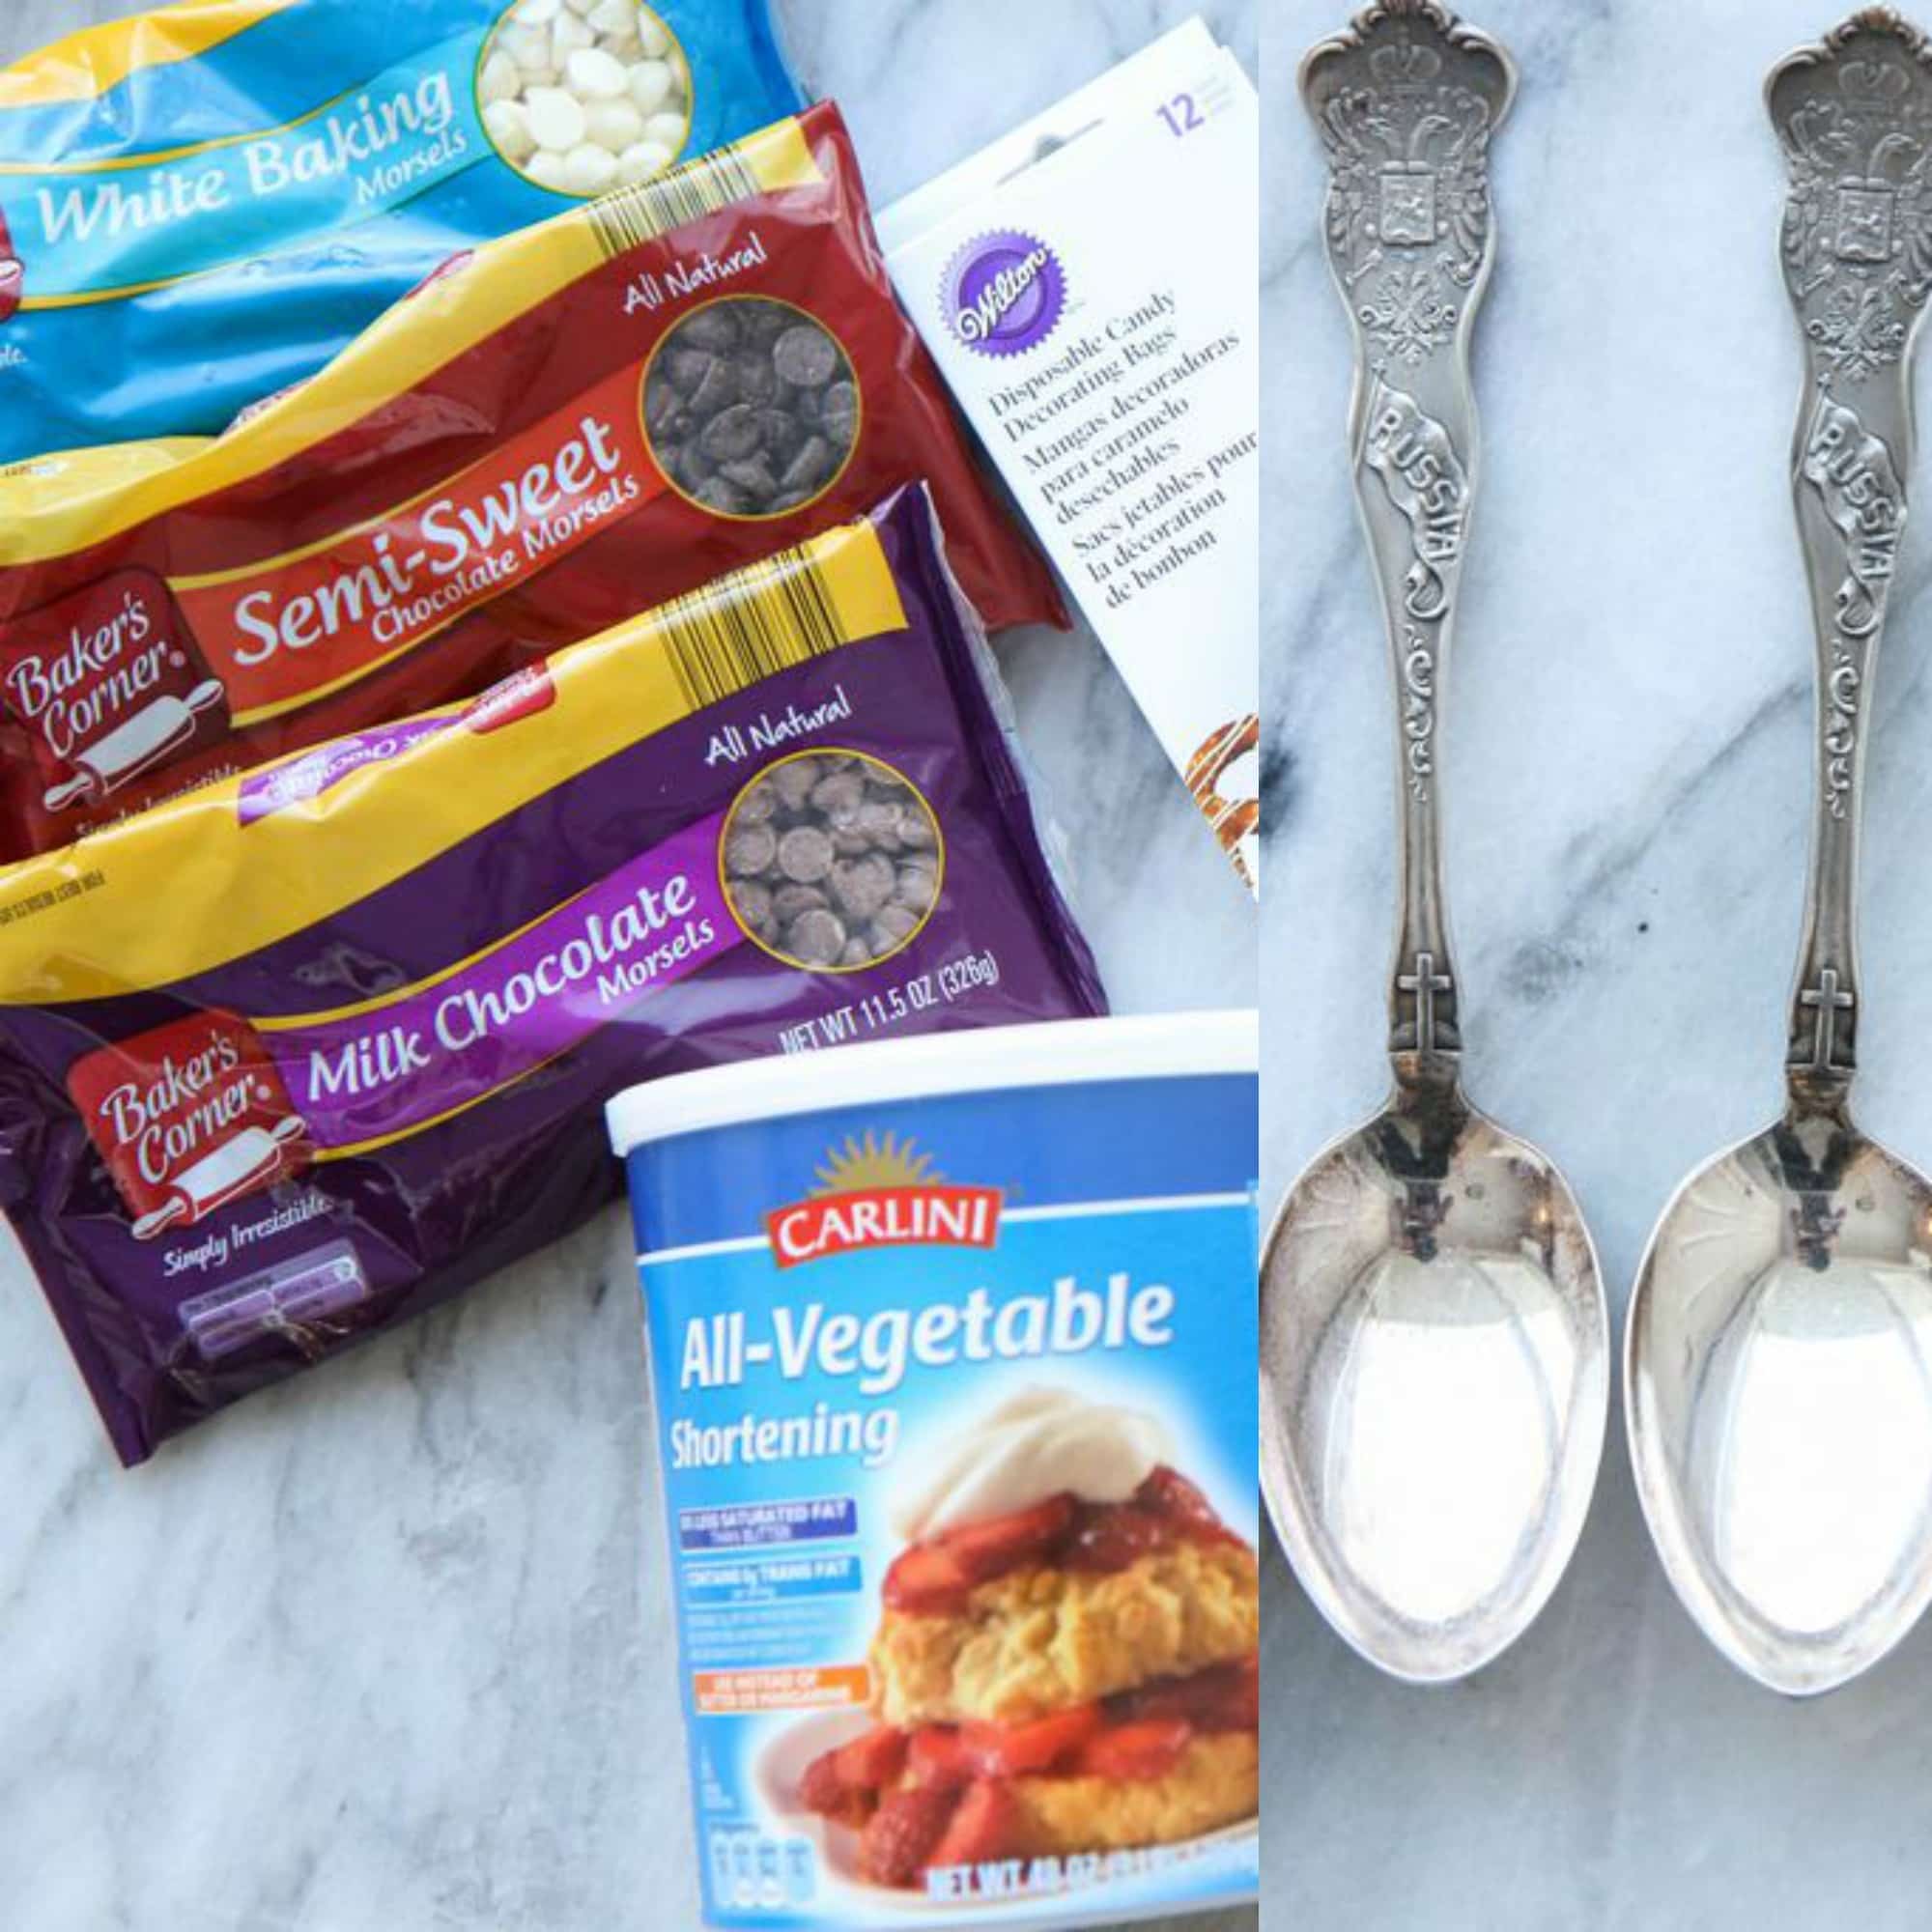
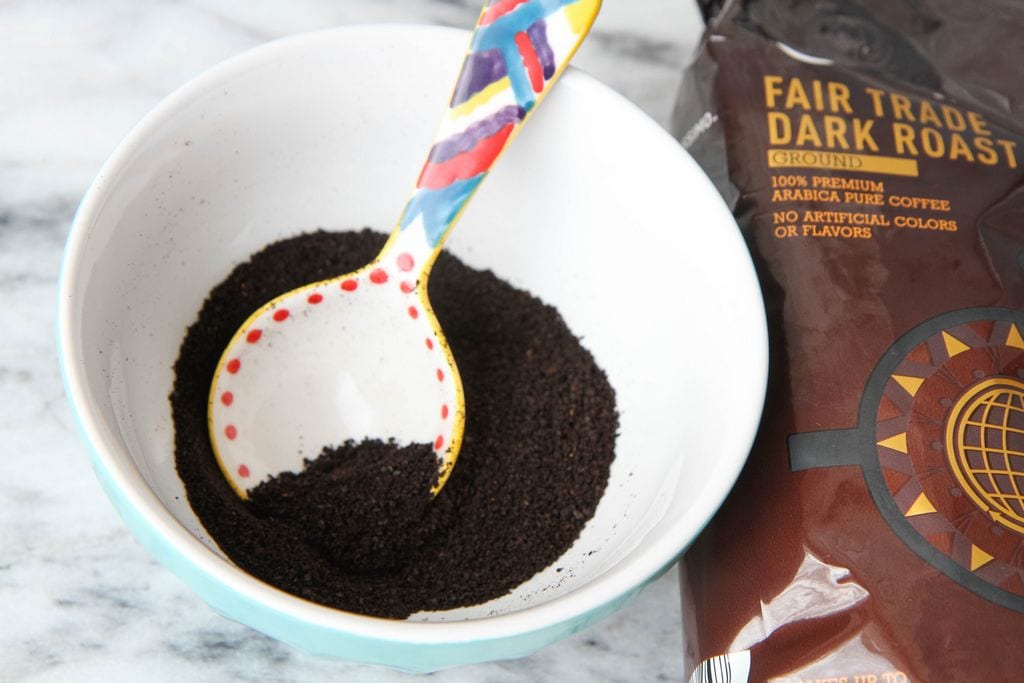
Today I wanted to share an adorable gift idea for someone special in your life. Today’s tutorial is how to make beautiful chocolate coffee spoons that you can pair with a big basket of coffee for gift-giving. This gift is perfect for any occasion and can be made in less than 30 minutes. The inspiration for this project came along with the opportunity to try the new Barissimo line of premium coffee products that are available at your local ALDI store. I’m so excited to be partnering with them again on this project.
In case you missed my Maple Coffee Bacon post from last week, I had the opportunity to try out all of the new coffees from ALDI and create some fun projects using this newly launched line at their store.
This line features nine bagged and single serve coffee items, along with additional seasonal and Special Buy items that will be available for a limited time. Pictured below are a few of the ones that I found on my store shelves this month.
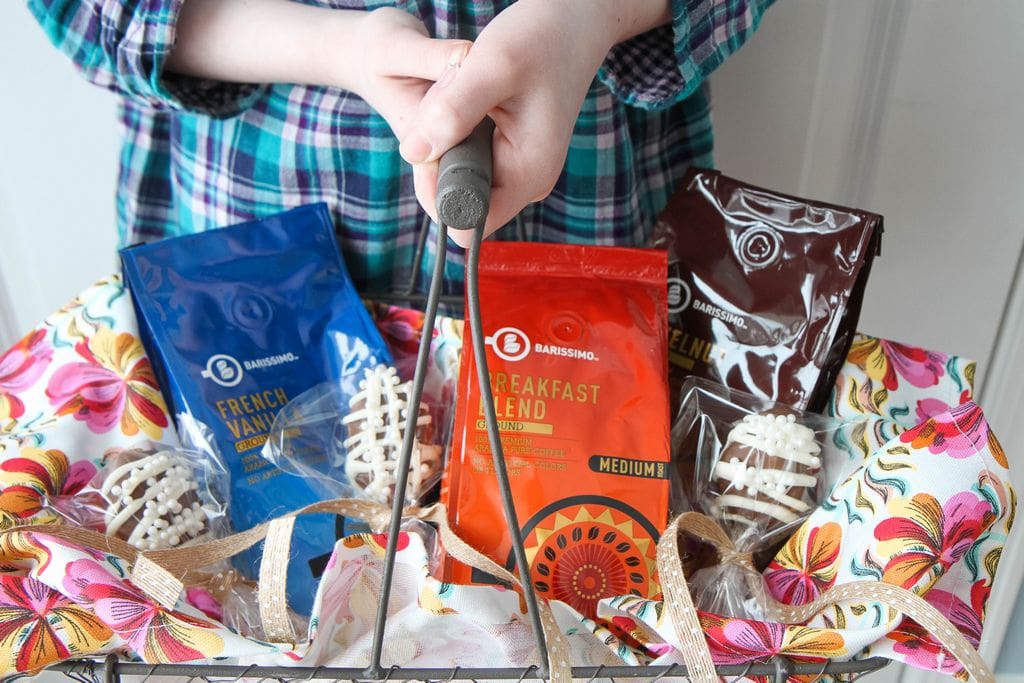
Nothing pictured here is over $5 (even the Fair Trade coffee) which means it is quite the steal. In the past, I have relied on these bags of coffee for easy hostess gifts and breakfast baskets for new homeowners. It is an excellent gift to give especially to a tired new mom or a new college student. I thought it would be fun to dress these baskets up a bit with beautiful chocolate coffee covered spoons that you could package in your basket.
Let’s get started!
Supplies Needed
1 bag Baker’s Corner Real Semi-Sweet Chocolate Baking Morsels
1 bag Baker’s Corner Milk Chocolate Baking Morsels
1 cup Baker’s Corner White Chocolate Baking Morsels
½ teaspoon Carlini Pure Vegetable Shortening (or more, if needed)
Edible sprinkles of your choice
Ribbon
Pastry/candy decorating bags
Candy wrappers
Antique spoons or plastic spoons (I got these six for $5 an antique store)
*Some of these items are Special Buy or Seasonal items that are only in stores for a limited time and may no longer be available.
Directions
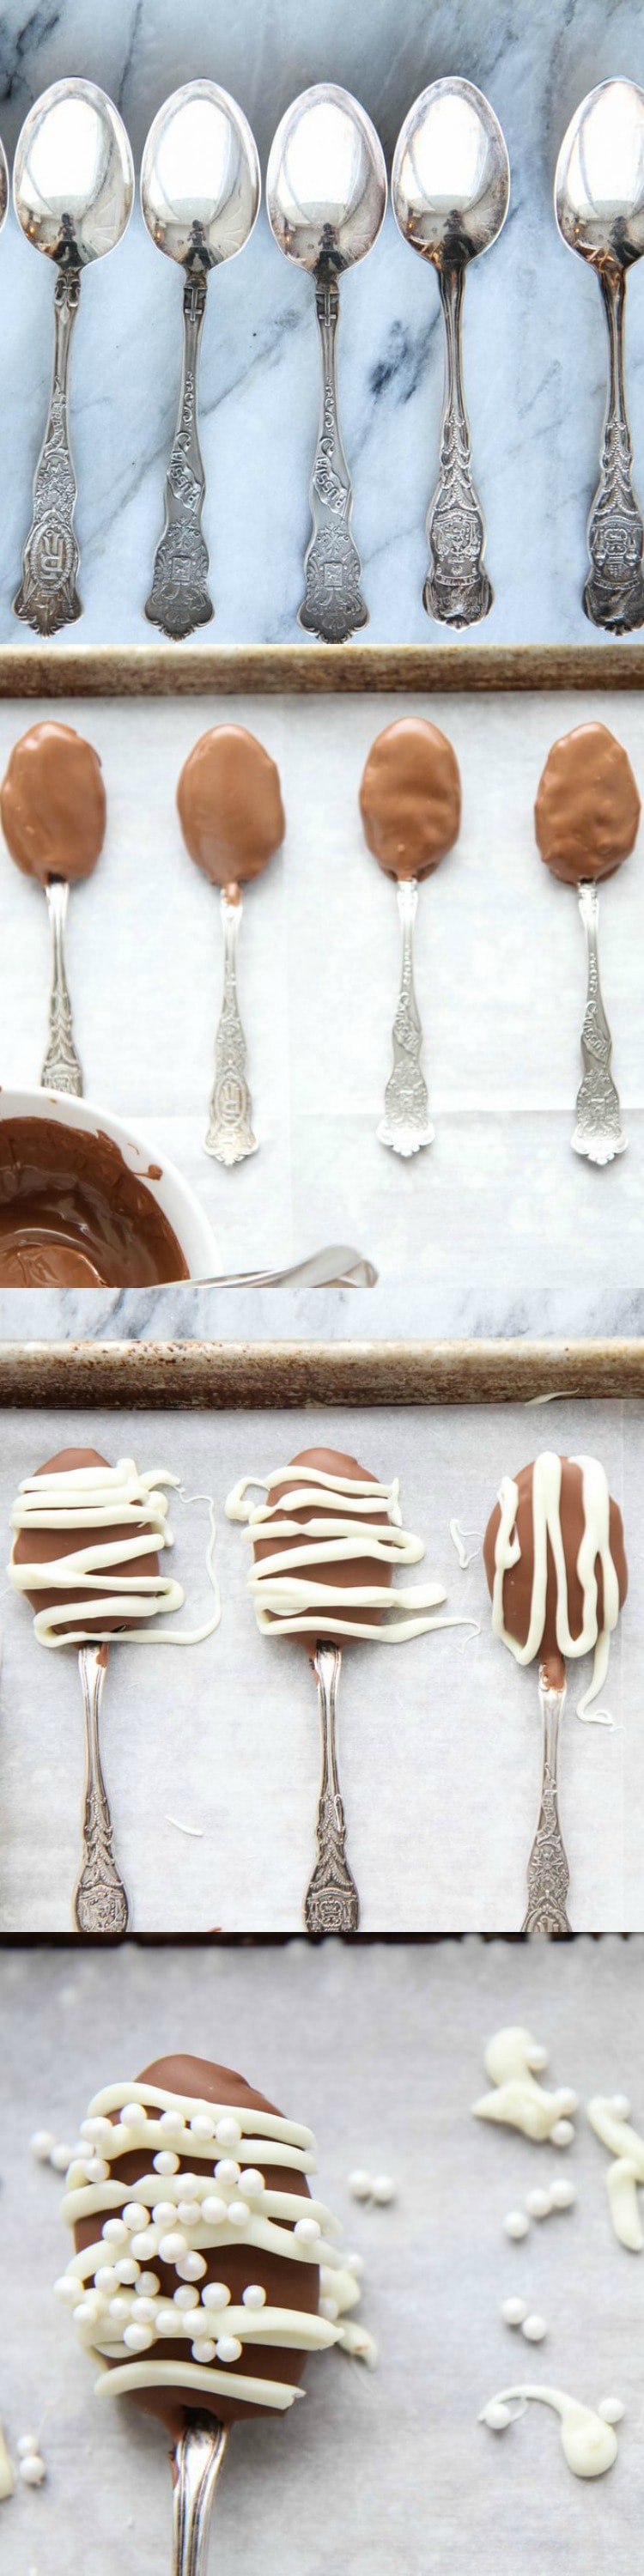
Melt your semi-sweet chocolate chips (the whole bag) over a steam bath or in microwave. Melt chocolate slowing, stirring frequently. If chocolate clumps or doesn’t melt smoothly, add 1/2 teaspoon of shortening to help smooth it out.
Dip your spoons into the chocolate and then rest them on a cookie sheet covered with parchment paper.
3. Decorate with your choice of milk chocolate, white chocolate and/or various garnishes. Drizzle with melted white chocolate (using my pastry bag) and then shake on some edible pearls so they would stick. Let these set completely before placing into decorative bags and tying with beautiful ribbon.
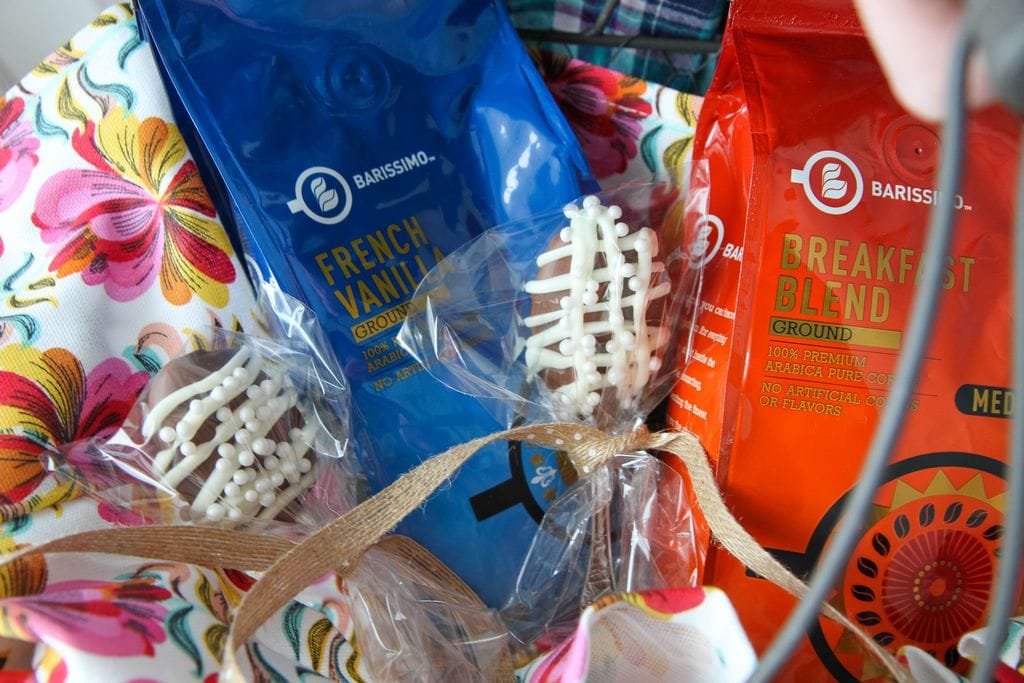
We placed these beauties into a basket with a variety of our favorite Barissimo coffees, exclusively from ALDI. A pretty dishtowel on bottom pulls it all together and acts as bonus gift.
These spoons add another level of richness to your coffee giving you a rich chocolate flavor. These also would make a fun addition to your cocoa.
I hope you enjoyed our fun series with ALDI this month and that these ideas have inspired you to give their new coffee line-up a try! I promise that you won’t be disappointed, not just in the incredible taste, but the incredible amount of savings to be had for your family!
This is a sponsored post written by me on behalf of ALDI.
This is a sponsored post written by me on behalf of ALDI.
If there is one thing I have learned over my years of surfing on Pinterest it’s that anything bacon and anything coffee is always a hit (and not just with me!).
Today I wanted to pair these two flavors together in a Maple Coffee Bacon that your whole family will love. The inspiration for this project came along with the opportunity to try the new Barissimo line of premium coffee products that are available at your local ALDI store.
Since you know I am a regular shopper, I had noticed the new line on the store shelves and was intrigued. The packaging is beautiful and the product feels very high-end, but a whole bag of ground coffee is a mere $3.99. It is, seriously, a steal!
This line features nine bagged and single serve coffee items, along with additional seasonal and Special Buy items that will be available for a limited time. Pictured below are a few of the ones that I found on my store shelves this week.
The Barissimo line, available exclusively at ALDI, includes the following (and here are the prices on these items too) for my fellow frugal shoppers:
Ready-to-drink Iced Coffees (French Vanilla, Mocha and Coffee) – $1.19
Whole Bean Coffee (Morning Roast and Donut Store) – $3.99
Fair Trade Coffee (Medium and Dark Roast) – $3.99
Donut Store Ground Coffee – $3.99
12 oz. Bag Coffee (Breakfast Blend, House Blend, and French Roast) – $3.99
Assorted Flavored Coffee (French Vanilla and Hazelnut) – $4.99
Flavored Coffee Cups (French Vanilla and Hazelnut) – $4.79
Regular Roast Coffee Cups (Breakfast and Donut) – $4.79
Specialty Roast Coffee Cups (Fair Trade Colombian and Dark Roast) – $4.79
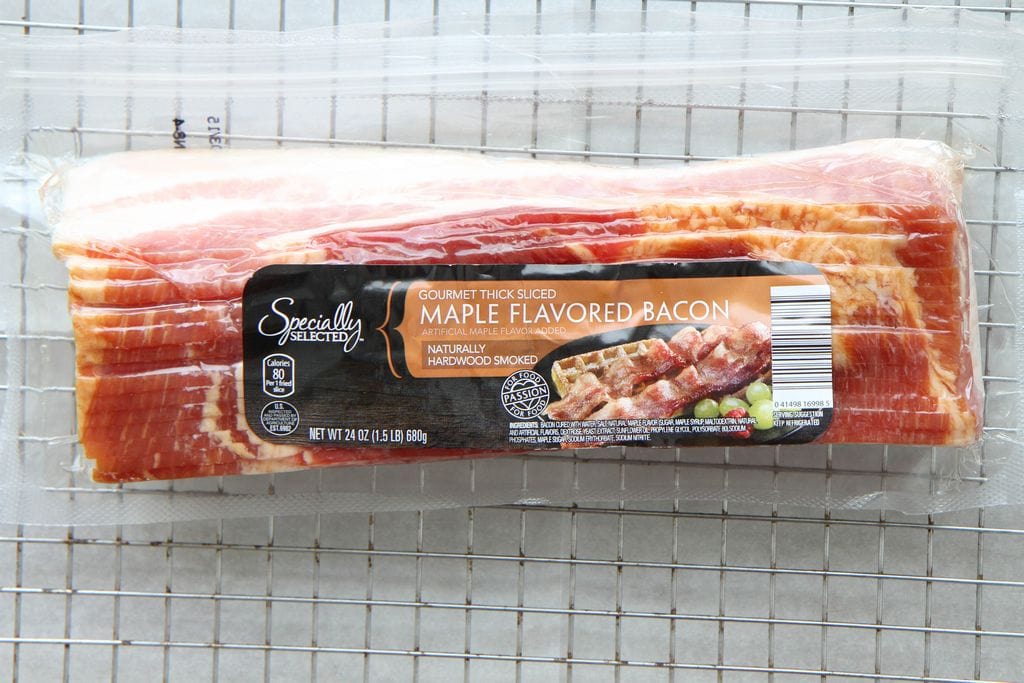
Ever since a trip last year to NOLA, I have been thinking about the embarrassing pile of praline bacon I ate in one of the local restaurants that my brother took me too. Bacon that tastes like candy? How could that be bad?
I loved the candied sweetness of the bacon, but I love to add on to that layer of flavor with something to cut the sweet and I decided the Fair Trade Dark Roast Coffee paired with the thick sliced Maple Flavored Bacon would be a delightful combination.
If you haven’t tried the coffee itself, the dark roast is delightfully full-bodied and strong. It’s the kind of coffee that a mom who has to get her kids on the bus in the morning can really embrace.
As I had suspected, this delicious dark roast coffee was just what this sweet bacon needed to balance it out. The coarseness of the ground coffee adds an element of texture and the brown sugar glaze made from freshly brewed coffee and brown sugar is brushed on to each side of the bacon to create that delightful layering of flavors.
Since this bacon is so sweet, you don’t want to pair this one with another sweet breakfast item. I recommend an easy frittata for balance, a little fresh fruit, and a big mug of coffee (of course!).
Now run over to your local ALDI and snag a bag of this delicious coffee for yourself- at a price like that, you have nothing to lose!
Maple Bacon Coffee
Prep time:
Cook time:
Total time:
Serves: 10 servings
This is a sponsored post written by me on behalf of ALDI.
Ingredients
1 pound Specially Selected Maple Thick Sliced Bacon
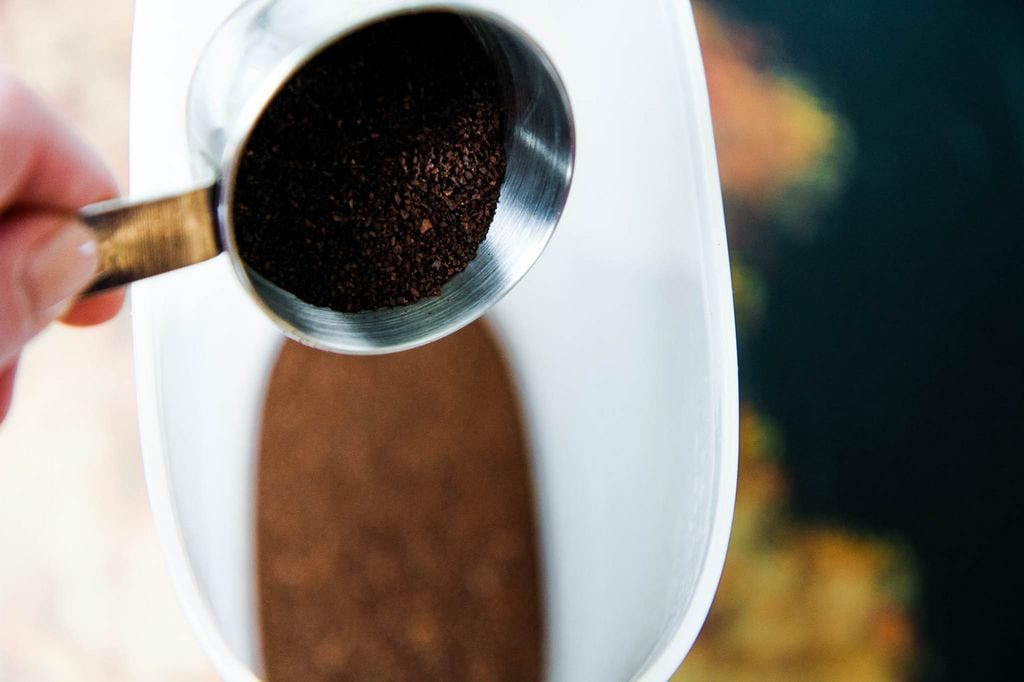
1 tablespoon Barrisimo Fair Trade Dark Roast Ground Coffee
Note- *Some of these items are Special Buy or Seasonal items that are only in stores for a limited time and may no longer be available.
Instructions
Preheat oven to 375°. Line a rimmed baking pan with parchment or waxed paper and set a flat rack on top. Lay bacon strips on rack, overlapping slightly if needed. Sprinkle top of strips evenly with ground coffee. In a small bowl, combine brown sugar and brewed coffee, stirring just to blend to a paste. Brush top of strips with half of sugar mixture. Bake 15 minutes. Turn bacon over and brush with remaining sugar glaze. Bake until crispy, 10-15 minutes more.
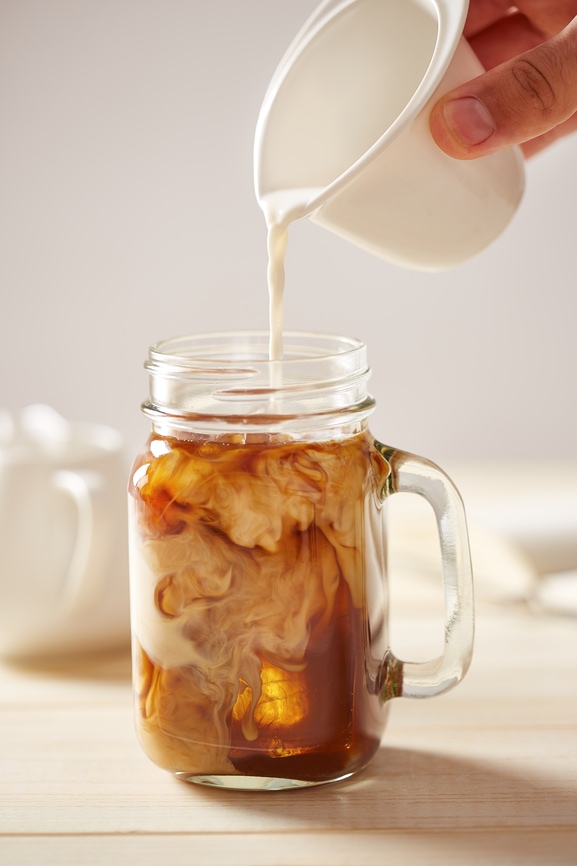
Make your own cold brew concentrate at home with this easy recipe. This coffee recipe is, guaranteed, to save you tons of money. Make a copycat Starbucks cold brew at home.
Are you a year-round iced coffee drinker too? In my house, I try to keep a pitcher of cold brewed coffee in the refrigerator at all times.
To me, there is no season for cold coffee. Cold coffee season is 365 days a week.
Have you tried the cold brew method before?
It couldn’t be easier (or more affordable).
If you have been relying on your drip coffee maker, as a coffee base, you are missing out on the rich flavor of a true cold brew.
My recipe shares the perfect water ratio and can be ready in, as short as, 24 hours. Personally, the stronger the better though so I recommend giving this a full 48 hours to set up.
Today I’m partnering up with Wild Oats Organic to show you just how easy it is to create a batch of cold brewed coffee for all of your summertime coffee needs!
DIY Cold Brew Coffee Recipe
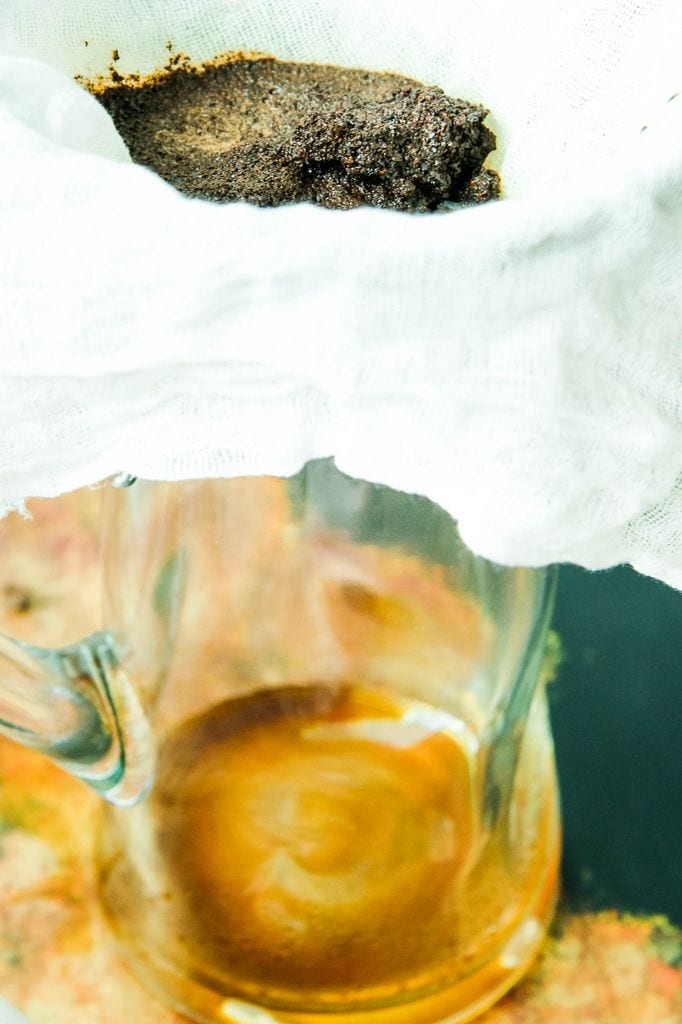
This recipe doesn’t require any special equipment except a pitcher, cheesecloth, and filtered water, and coffee.
If you would prefer to use a cold brew gadget, I’ll share my favorite with you below.
What is Cold Brewed Coffee?
Cold brew, also known as cold press coffee, refers to the process of steeping grounds in room temperature or cold water for an extended period.
Once you strain the coffee grounds, you are left with a coffee concentrate to mix with water or milk. You can also add in flavors or sweeteners (if desired) to create your own perfect cup of coffee.
It’s easy and affordable to make your cold brew coffee at home, but what about the flavor? Cold brewed coffee naturally seems sweeter due to its lower acidity.
The coffee beans in cold-press coffee never come into contact with heated water. This ends up producing a completely different chemical profile from conventional brewing methods.
There is also high levels of caffeine in a cup of cold brewed coffee compared to hot brewed coffee.
More caffeine means it’s far superior to hot coffee too because now you can do ALL THE THINGS.
I consider this my summertime superpower.
As you can see in my picture tutorial this is the easiest method. Best of all, you can make a big or small batch of coffee with this method.
While coarsely ground coffee is ideal, I tend to make things easy on myself and just purchase ground coffee. I usually have pretty good results with it.
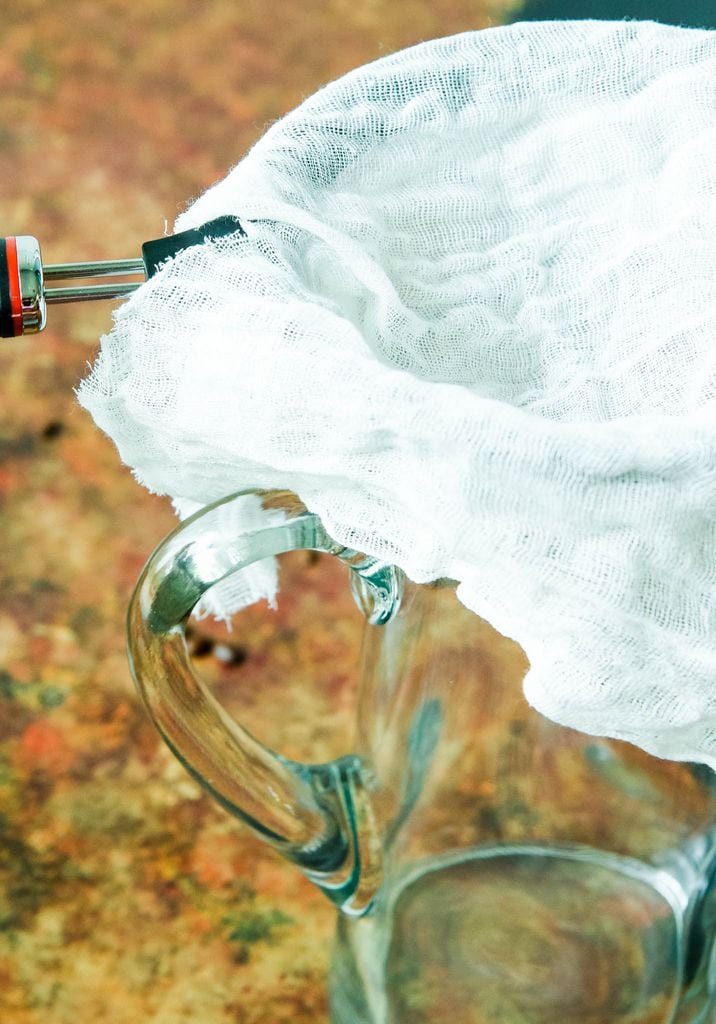
I find that cheesecloth over my mesh strainer helps to keep the grounds out. You definitely want a coffee without the grounds at the bottom.
Here are a few commonly asked questions!
How much milk should I put in my cold brew coffee?
The biggest struggle for me when purchasing my coffee out is the milk substitute offerings.
Almond milk is my favorite addition to iced coffee, but most coffee shops don’t offer this as an option.
Thankfully, I can make my own at home now.
Experiment with different milk types like almond milk, soy milk, coconut milk, half-and-half.
Consider trying a delicious Vietnamese coffee by adding some sweetened condensed milk for a decadent treat.
I prefer a half to half ratio on coffee to milk especially. Remember, the cold brew concentrate is very strong.
What are some ways I can flavor my iced coffee?
Have you ever made your own simple syrups? It really could not be easier. Not only is this concentrate nice to have on hand for your morning coffee, but also for fresh summer cocktails.
The process of creating these is a simple one.
Simply mix equal parts sugar and water in a saucepan.
Heat this liquid until your sugar dissolves. Finish by adding your favorite flavorings to create your syrup.
I store these cooled syrups in my fridge in mason jars for whenever the iced coffee mood strikes me.
diy coffee syrup recipes:
Vanilla Coffee Syrup
1 cup water
1 cup sugar
1 vanilla bean, split lengthwise
1 teaspoon vanilla extract
Combine the sugar and water in a small saucepan.
Scrape the seeds from the vanilla bean into the pan and throw in the pod.
Heat the mixture over medium-high, stirring occasionally, until the sugar has dissolved. Reduce the heat to low and let simmer, about 10-15 minutes.
Remove from the heat, discard the vanilla bean pod and stir in the vanilla extract. Let cool. Store in the refrigerator.
Caramel Syrup
¾ cup sugar
½ cup water
¼ cups caramel sauce
Combine the sugar, water and caramel sauce in a small saucepan. Heat the mixture over medium-high, stirring occasionally, until the sugar has dissolved and the mixture is smooth. Remove from the heat and let cool. Store in the refrigerator.
Peppermint Syrup
1 cup sugar
1 cup water
2 teaspoons peppermint extract
In a small saucepan, bring sugar and water to a boil. Reduce heat to medium and stir constantly until sugar is dissolved. Stir in the peppermint extract. Cool to room temperature and store in a glass jar in the refrigerator.
Don’t Want to Strain Your Coffee? What Are My Other Options?
In the past, I have found that my French Press works great to help strain the grounds.
Speaking of the environment, make sure you are using a reusable straw and mason jar for your coffee.
DIY Cold Brew Coffee Recipe
Recipe Type: Drinks
Prep time:
Cook time:
Total time:
Serves: 2 cups
Make your own cold brew concentrate at home with this easy recipe. This coffee recipe is, guaranteed, to save you tons of money. Make a copycat Starbucks cold brew at home.
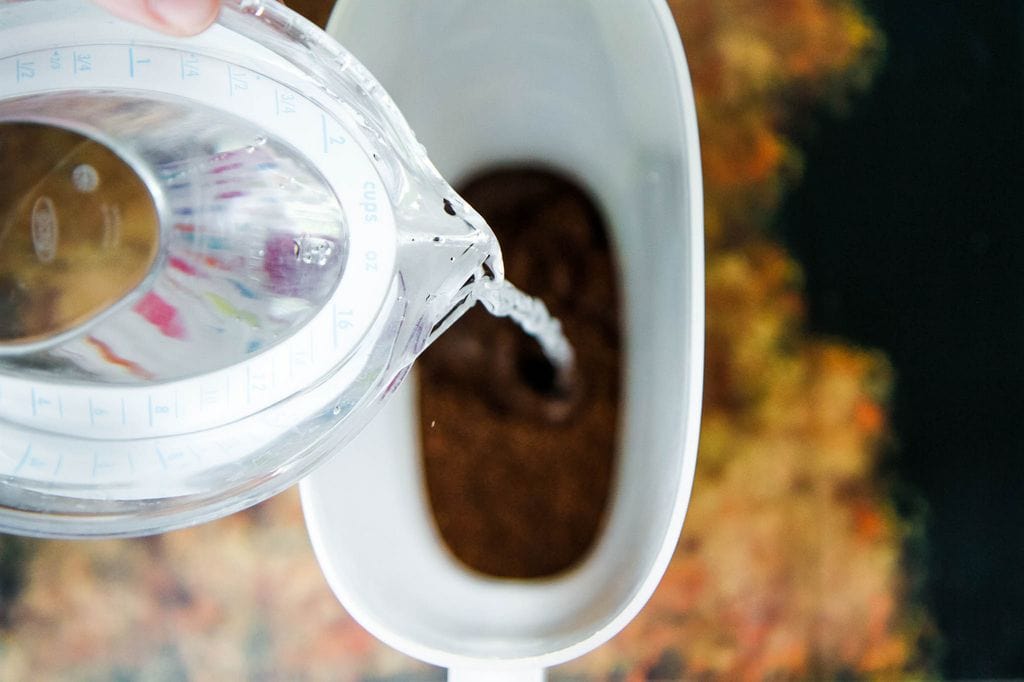
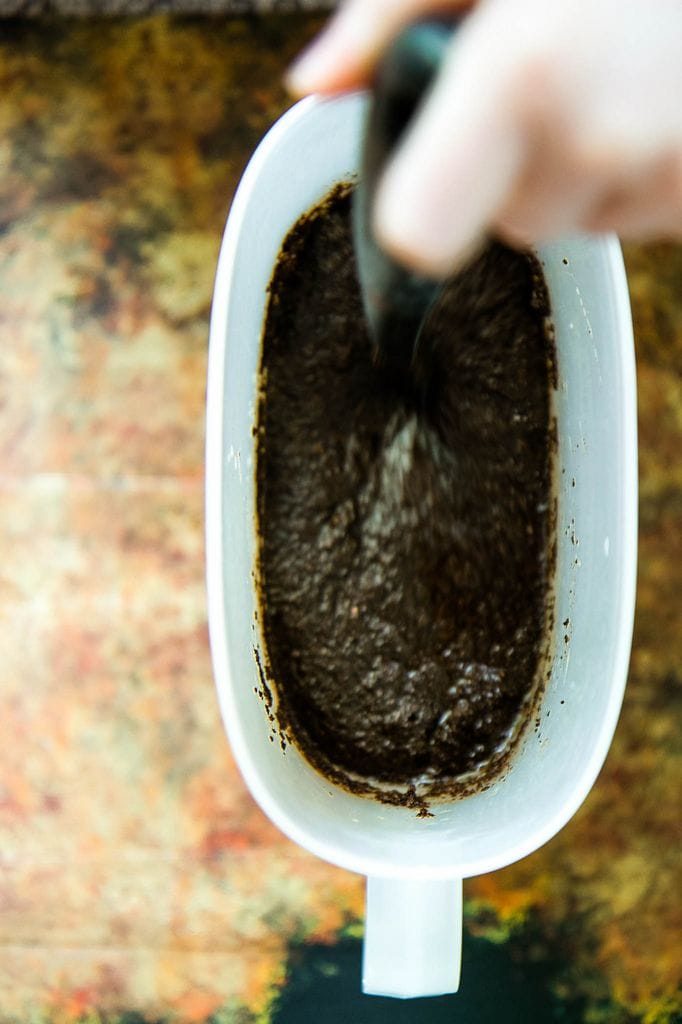
Place the coffee grounds in a 2-quart pitcher, add the water, and stir to combine.
Cover with a lid or plastic wrap and let steep at room temperature. The steeping should be at least 12 hours or up to 1 day.
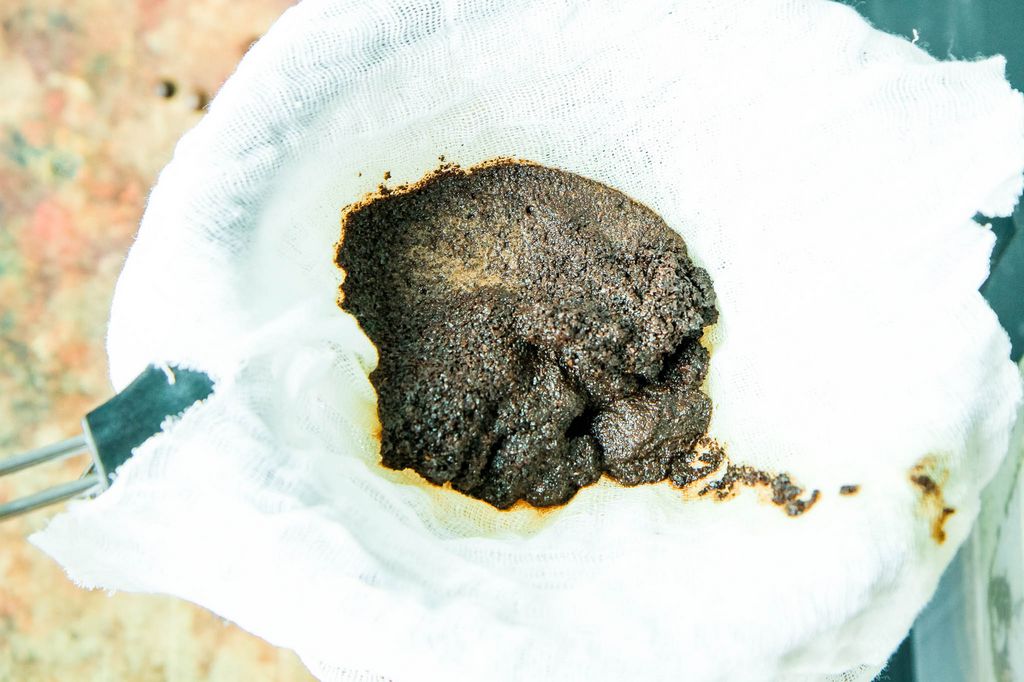
Line a fine-mesh strainer with a standard coffee filter and fit it over a medium bowl. Working in batches, slowly pour the coffee into the filter until all of the liquid has passed through the strainer. Do not rush the process and stop when you reach the solids at the bottom of the pitcher. Do not pour the grounds in.
Discard the grounds and the contents of the strainer.
Transfer the strained coffee into a clean pitcher.
Cover and refrigerate until completely chilled, at least 2 hours or up to 5 days.
For each cup of iced coffee, dilute the concentrate with an equal portion of milk, half-and-half, or water.
Sweeten with simple syrup if desired and top with ice. Finish with a dusting of cinnamon.
3.4.3177
As an Amazon Associate I earn from qualifying purchases.
Love this recipe? Check out these fun coffee drinks on MomAdvice!
Don’t forget to finish your coffee treat with a little Wild Oats Cinnamon for the perfect finishing touch! Do you cold brew coffee? What are your tried and true methods for a great iced coffee? I’d love to hear them!
* This post is sponsored by Wild Oats. Thank you for supporting the companies that support this site!
This year I went on a journey towards being truly serious about decluttering our home of unnecessary items.
I would conservatively say that we have reduced our belongings easily by 50% and I still feel that there is more that we can do this year. Is your dream to declutter your space this year and rid yourself of clutter forever?
It is a common resolution and I am living proof that this is achievable, although I will always be a work in progress.
Today I want to share with you a few resources that have helped our family on the journey towards reclaiming our home – the transformation is so worth it!
Try the 40 Bags in 40 Days Challenge
I attribute the 40 Bags in 40 days Challenge as the kickstart towards decrapifying (that is totally a word!) our life.
Each year White House Black Shutters shares a 40 Bags in 40 Days Challenge that typically runs from March to April. During this challenge, you are encouraged to gather 40 bags of stuff that you don’t need over the course of 40 days.
I never dreamed that I could gather that many belongings from our home, but it started me on a journey towards realizing how much excess we really did have.
Each morning I started my day with a bag and tried to clear one spot in our house to create a more organized space.
I did not typically have a plan, only a desire to remove anything that I saw throughout the day that we didn’t need anymore.
As each bag was unloaded, it made our space a little less cluttered and a little easier to upkeep.
Utilize this list to help you begin tackling different areas in your home and download the free printable to track your progress as you unload the clutter from your home.
This is an example of a space that needed attention in our home that I worked on in the Spring.
With the 40 Bags in 40 Days Challenge encouragement, I was able to free our shed of unnecessary clutter and transformed it into a dreamy bonus room for our family.
Who would have ever thought that this cluttered and embarrassing space could have ever been an oasis right on our own property?
Perhaps there is an area in your own home like this that with a clutter unload could become a cozy space for your family?
Try this easy challenge to successfully achieve that goal!
Try Project 333: Experiments in Living With Less
Feeling inspired by my journey towards living with less, I began to turn my eye to my closet.
In full confession, I had a lot of clothing in my closet and not a lot of closet space to house it.
I started reading about fashion capsules and thought that minimizing my wardrobe while working on selecting key pieces that worked together would be a great way to continue my journey in decluttering our home of unnecessary items.
Have you heard of a capsule wardrobe before?
A capsule wardrobe is a collection of clothing which is designed using only interchangeable items, in order to maximize the number of outfits which can be created.
The aim is to have an outfit suitable for any occasion without owning excessive items of clothing.
This is usually achieved by buying what are considered to be “key” or “staple” items in coordinating colors.
Project 333 is what I am doing right now which is a minimalist approach to fashion that incorporates a 33-piece capsule wardrobe.
Participants can have 33 items in their closet that they wear for three months.
You are allowed to set aside 3 items that you can weave in as long as you weave items out, keeping the item number to just 33.
Although I have found the planning of my capsules to be a little stressful, once I execute them well, I have discovered that I have plenty of options in my closet to wear and actually get more compliments than I did when I had a closet that was overflowing.
You can view my current capsule as an inspiration for creating your own.
My best advice though is to really create your capsule around YOU and not a capsule that is just copying someone else’s style so you feel your best!
Try the A Bag a Day Challenge
You would think that after participating in the 40 Bags in 40 Days that our home would be completely clutter free.
I fully admit, I am a work in progress and that I still have a ways to go.
This year I am participating in the A Bag a Day Challenge from Inspired Room which is a 12-month decluttering plan to help you reclaim your home.
I like that this challenge isn’t focused on organizing, but simply on ridding the excess from your home.
With a beautiful outlined plan in place and the gentle encouragement of the beauty of Melissa’s stunning home, who wouldn’t want to rid their homes of the clutter?
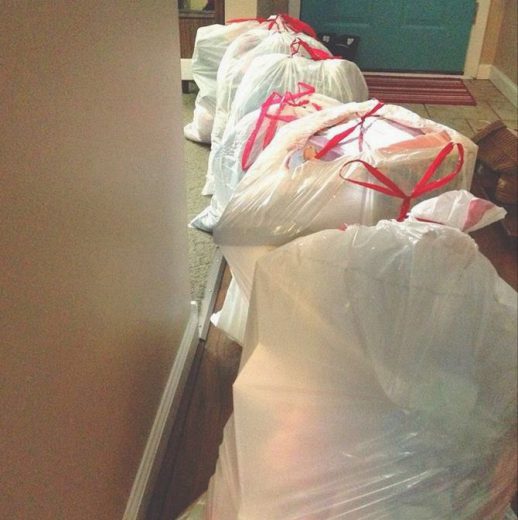
Over the snowy holiday, I got rid of six bags of clutter and four bags of trash in our home.
It was so freeing to let these items go and reclaim corners in our little house. I loaded these up in the car and took them over to the Goodwill donation bin, conveniently just down our road, and knew that these items would be put to good use in their store.
I hope you will find this post encouraging and hearing feedback from family and friends about our clutter-free spaces makes me even more proud of the journey we have taken towards a life with less.
I hope these ideas inspire you to declutter your space and reclaim your home! What are some of your favorite ways to declutter?
Leave your ideas in the comments below!
Don’t miss these other great ideas from MomAdvice.com:
*This post is sponsored by Walmart. Thank you for supporting the companies that support this site!
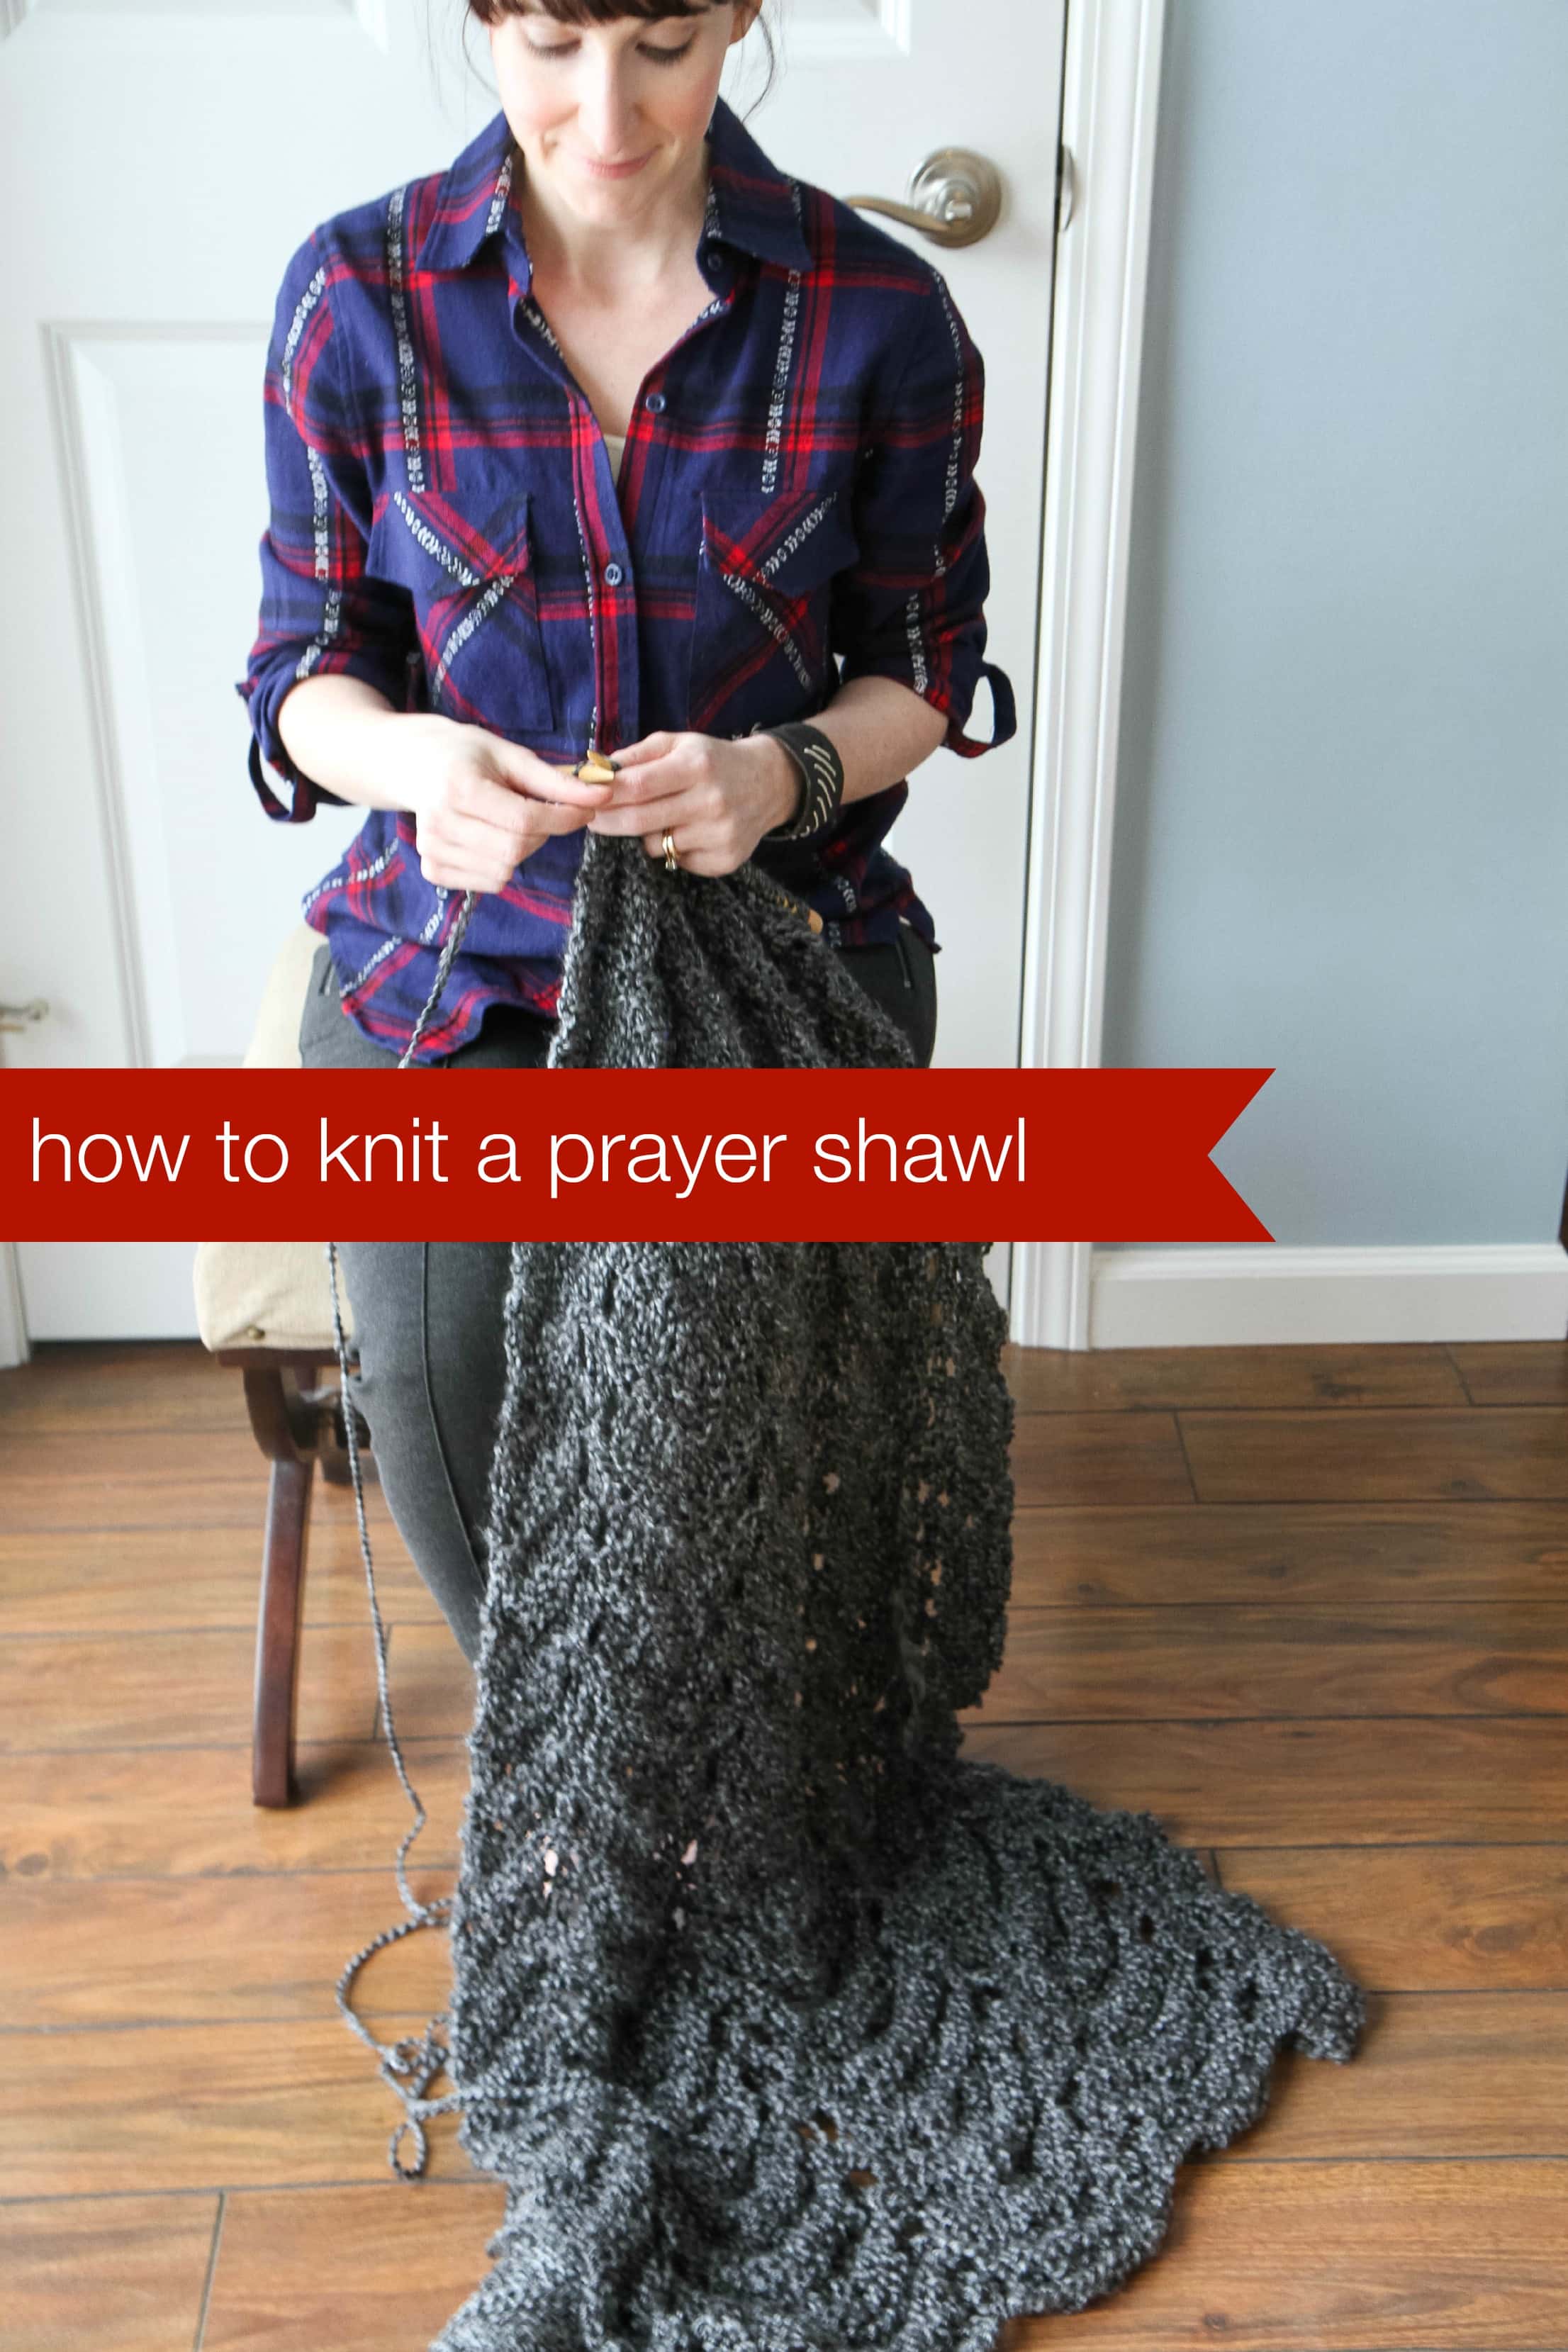
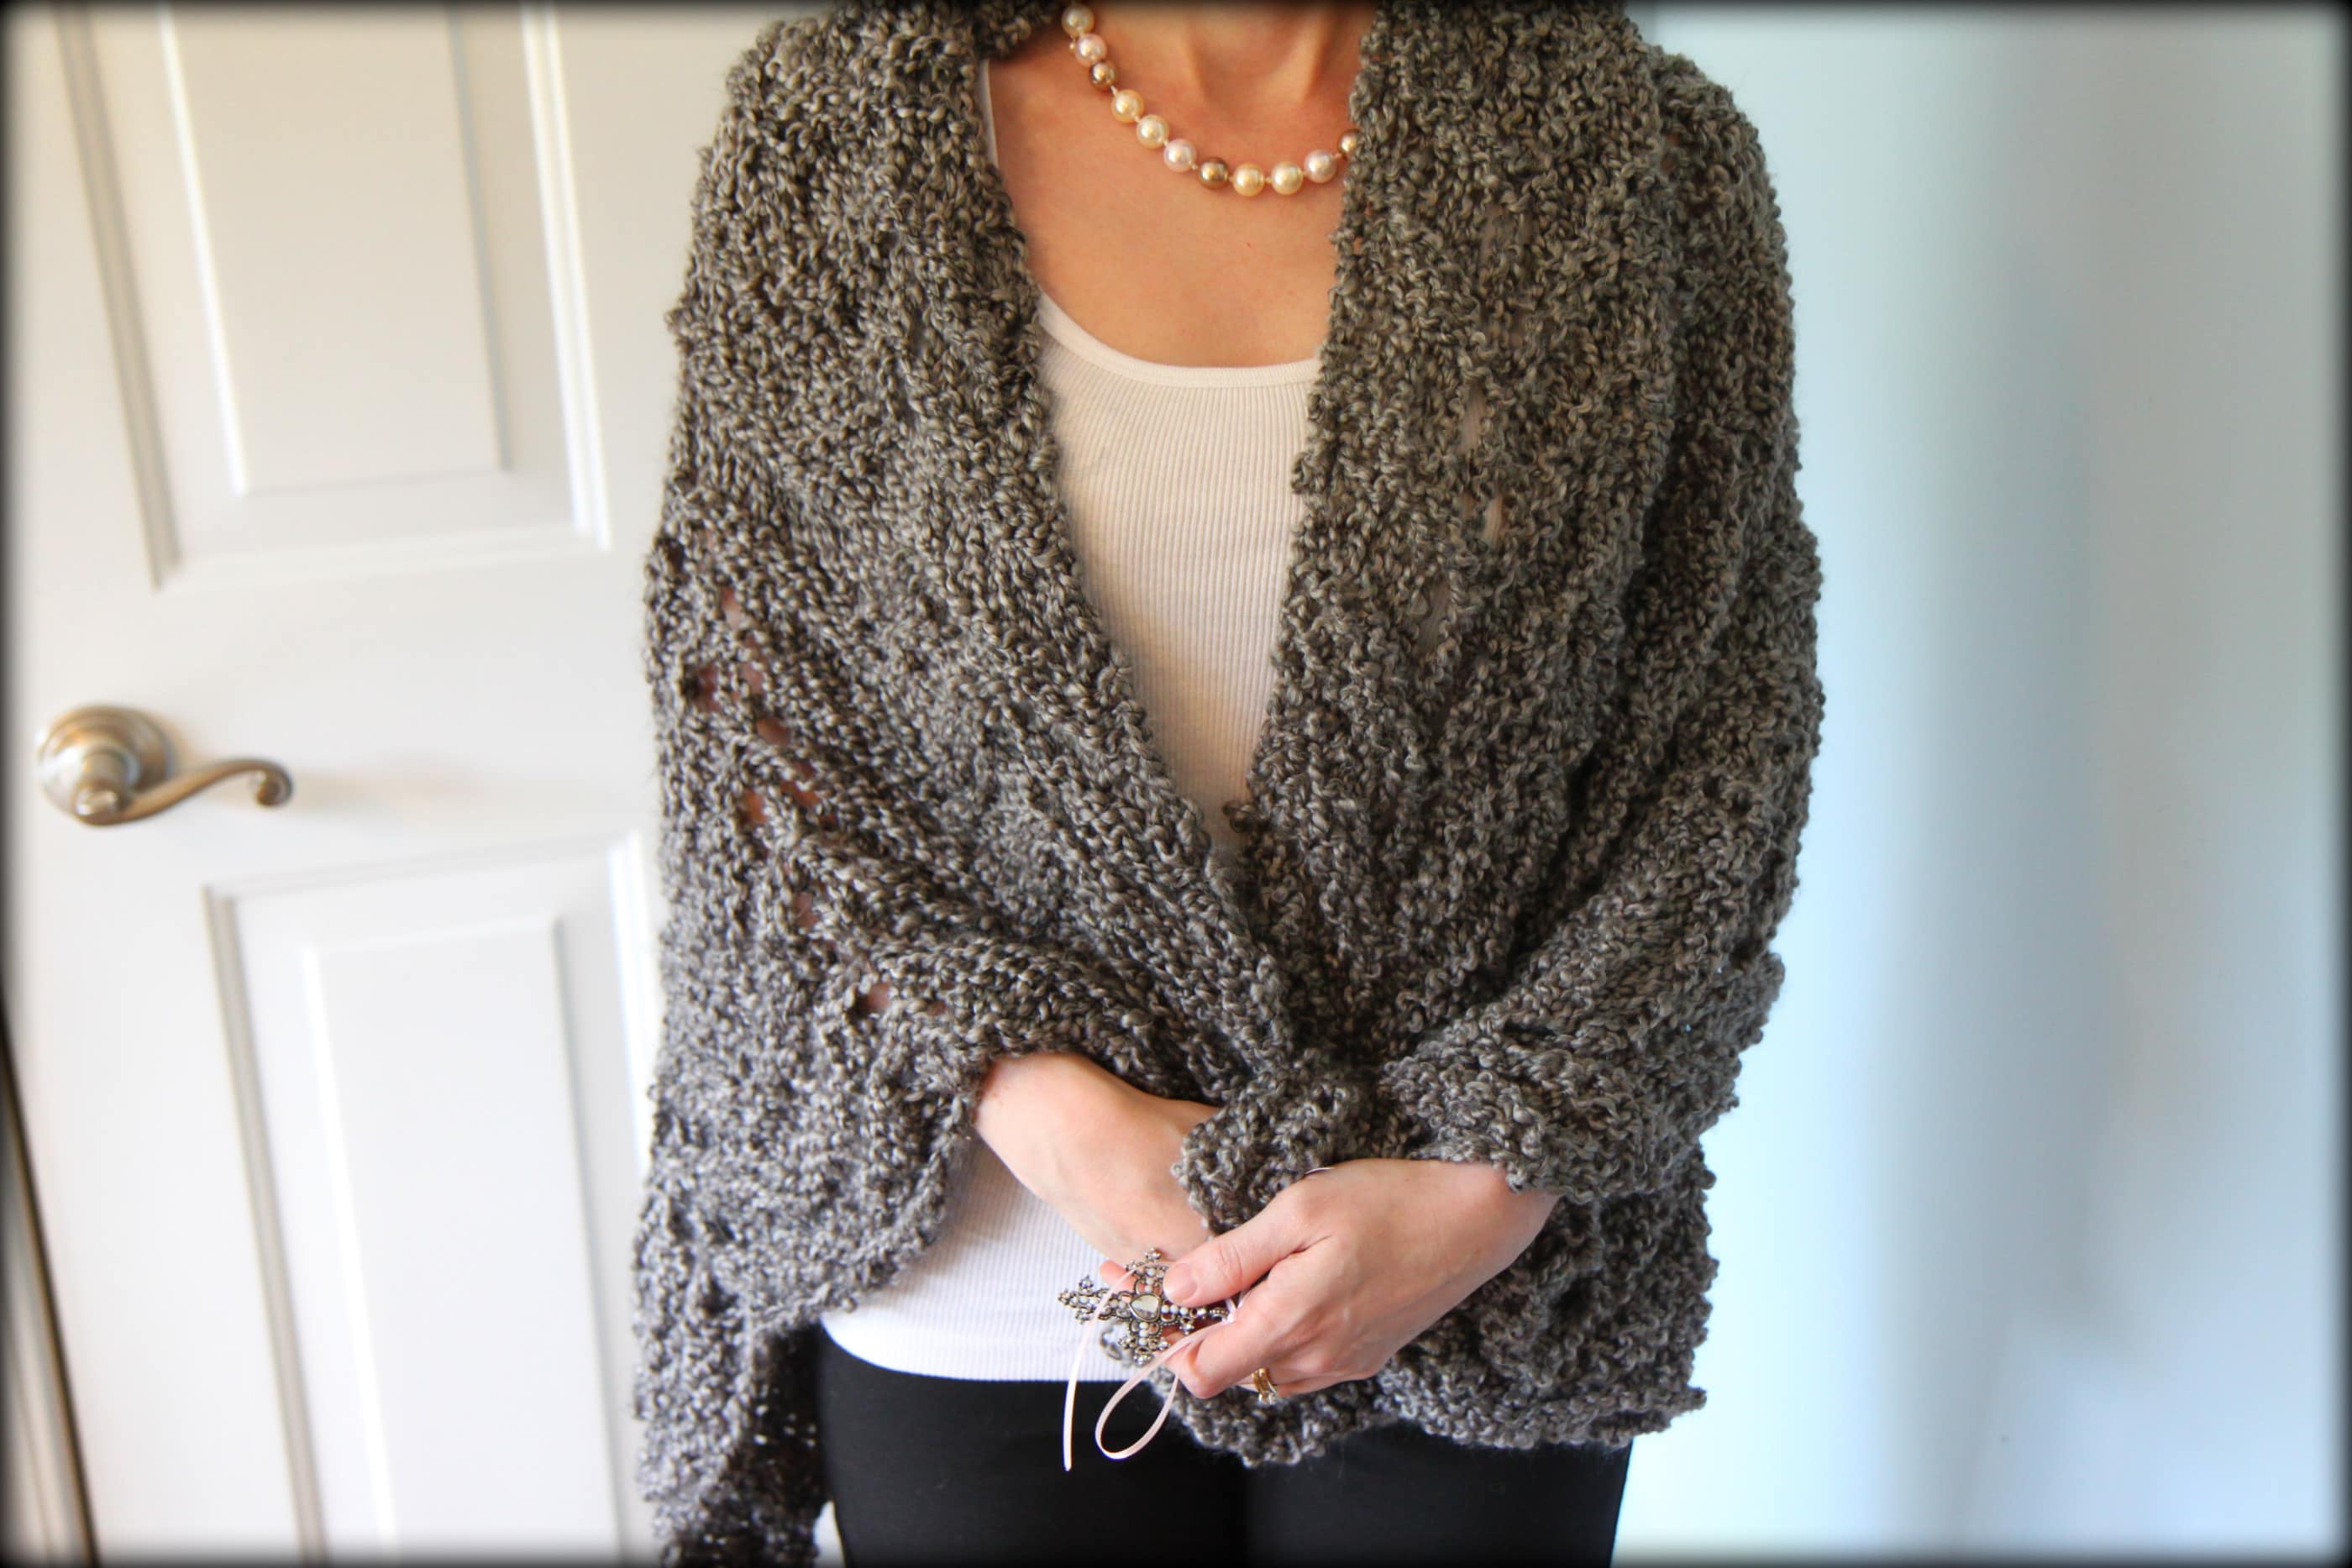
Many times in life I have felt like there is so little I can do when hardships arise for those I love. The gift of learning to knit though has been one of those skills that I have been able to share with others in their time of need and always seems to be appreciated, particularly during those difficult moments in life. Although I have talked often of my chemo caps I have created, one of the gifts I especially love to give is a knitted prayer shawl.
Have you heard of a prayer shawl before? It’s a special gift that you can knit or crochet that can be wrapped around the shoulders of someone who is need of comfort. As you knit or crochet it, you pray for the recipient…thus, its beautiful name.
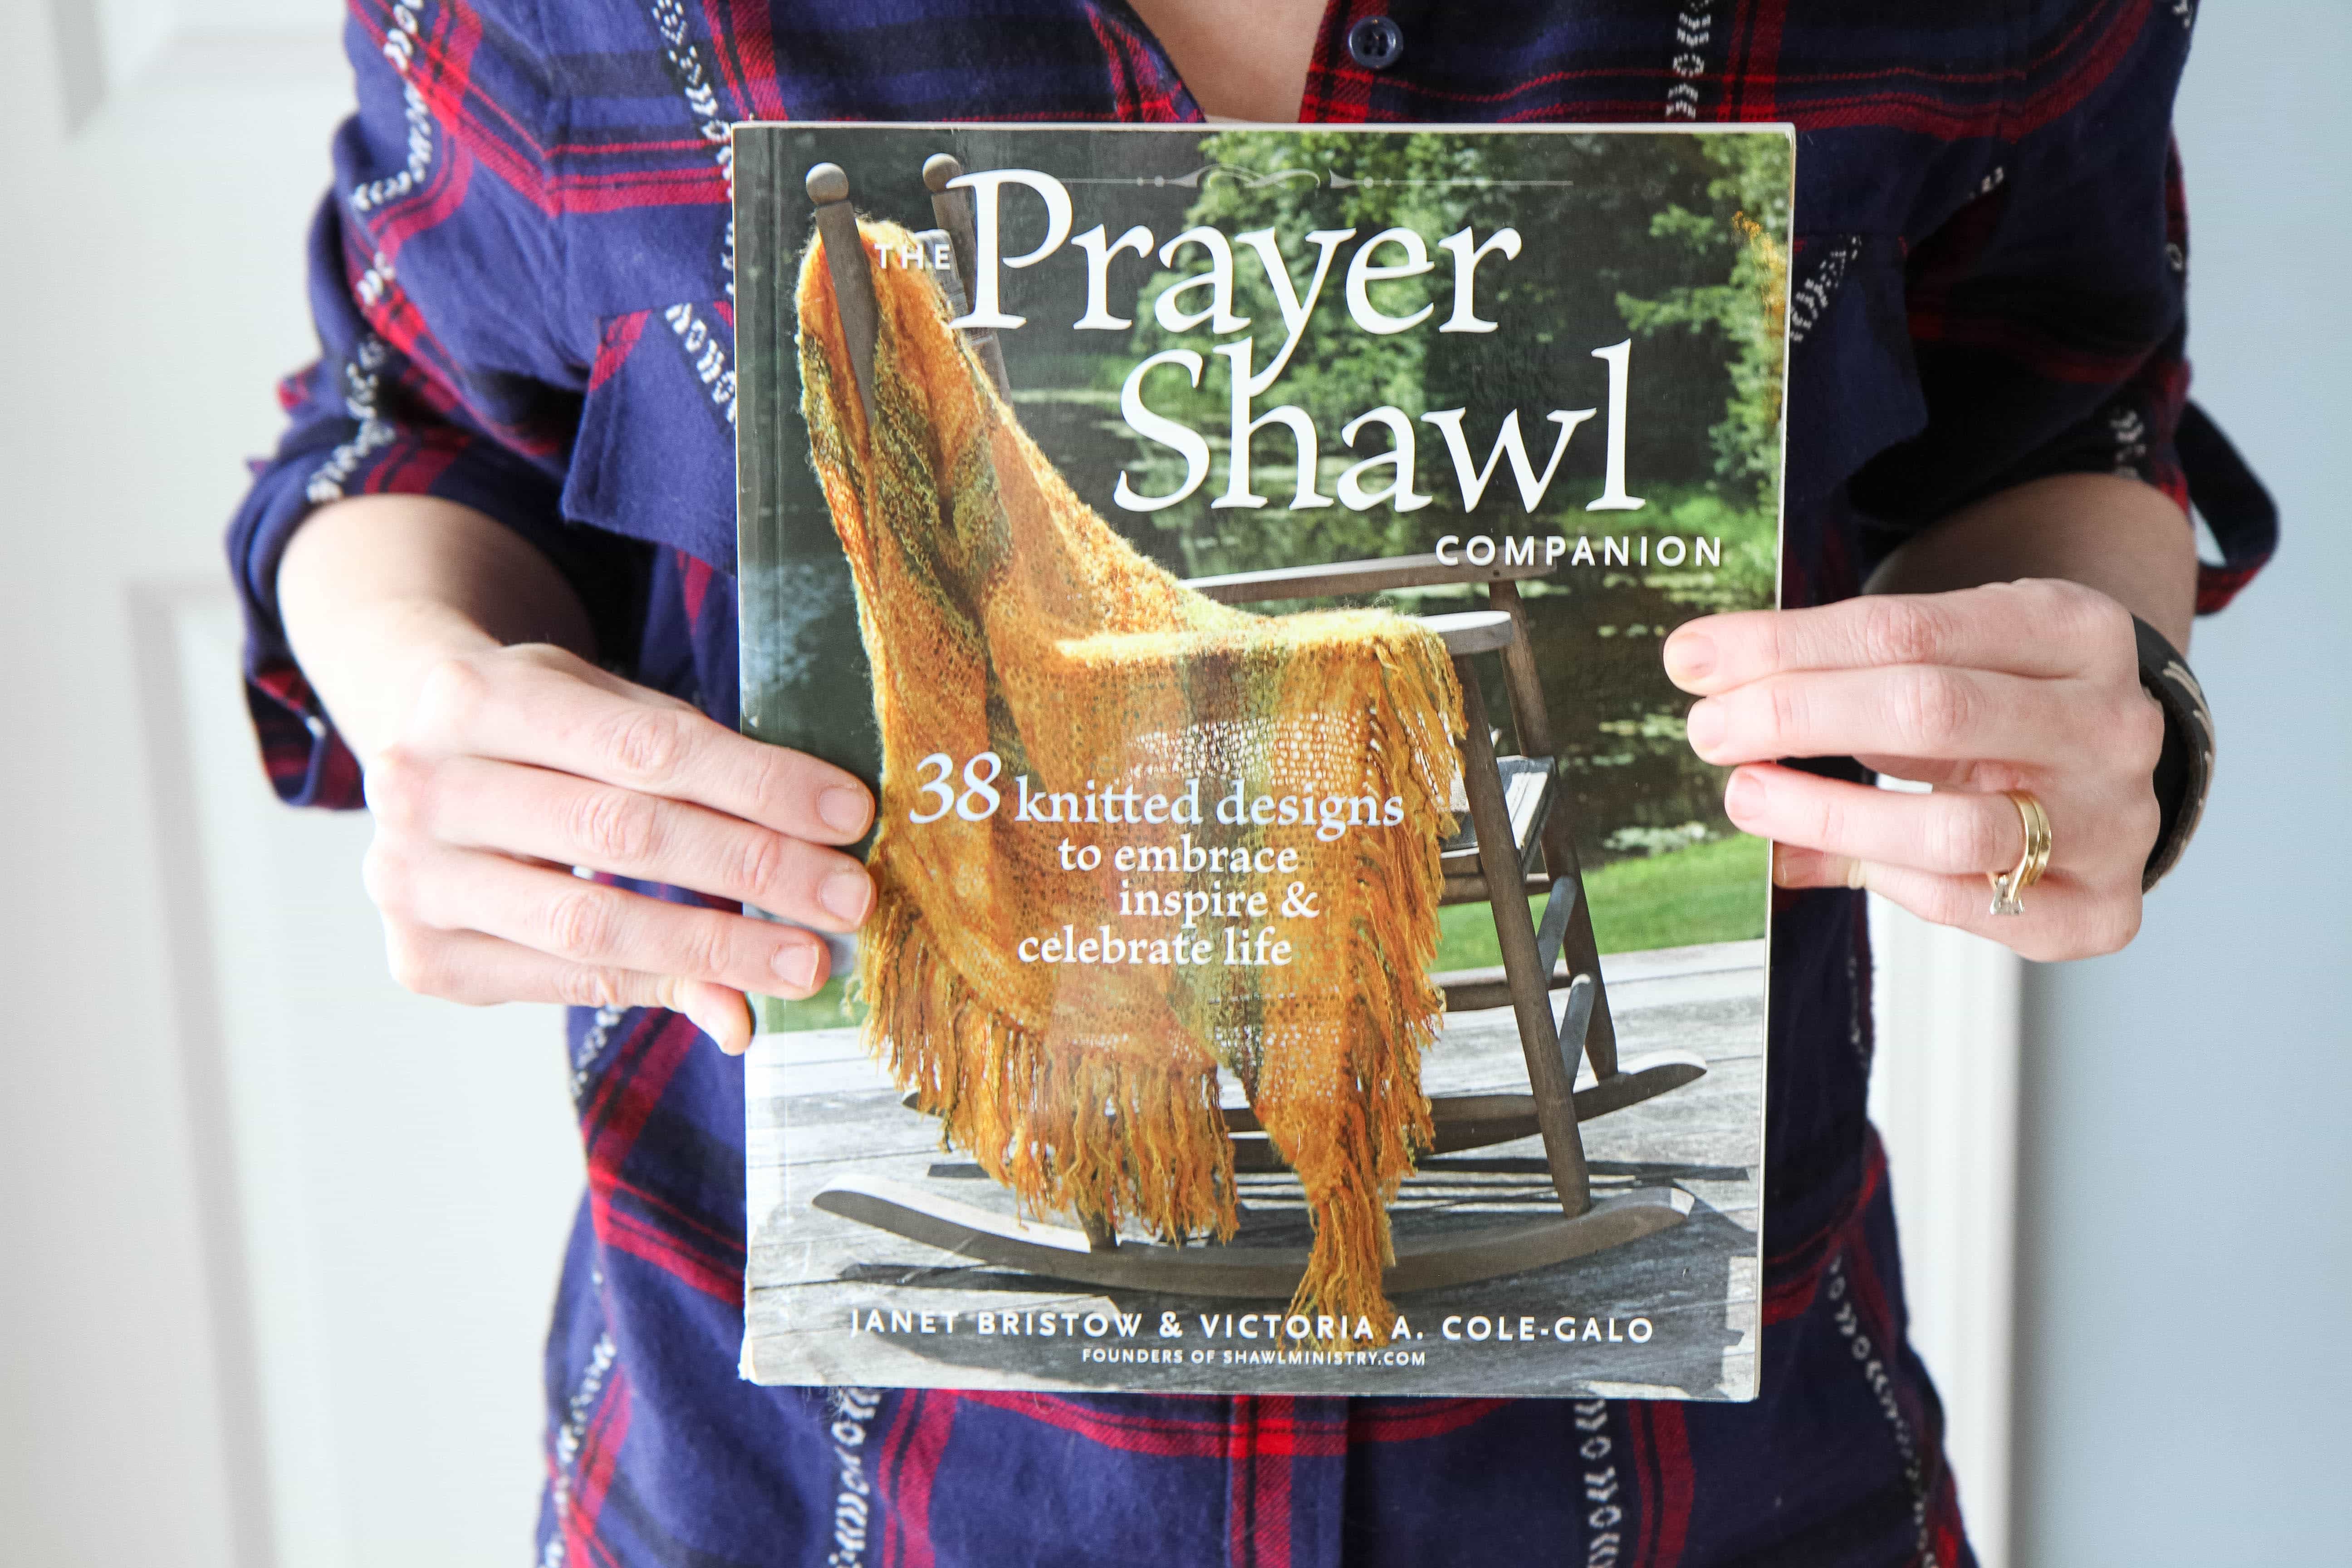
Each shawl I create has a special personal touch for each recipient and I spend a lot of time crafting, knitting, and selecting a prayer to make each of these uniquely special. My patterns have come from an amazing book called THE PRAYER SHAWL COMPANION by Janet Bristow & Victoria A. Cole-Galo, who also happen to be the founders of the Prayer Shawl Ministry. Janet was kind enough to do an interview with me to help inspire you to create a shawl for someone in need.
How did you find your passion in knitting/crocheting prayer shawls?
I started making prayer shawls with Vicky Galo after we graduated from the Women’s Leadership Institute at the Hartford Seminary in 1997. We were challenged to use what we had learned and apply those insights to our everyday lives. We felt that making a shawl for someone through the work of our hands and the thoughts and prayers from our hearts was a loving way to reach out to others in need of comfort.
What types of yarn are your favorite to use in creating your prayer shawls?
I have no favorite yarn and use what appeals to me.
I am sure that all the shawls you have created are so special, but do you have one in particular that you are most proud of creating and who was it for?
Each shawl is special; but the ones I made to send to Newtown, CT to be given to the families of the children that were lost stay in my heart because I knew the comfort they would bring; but I also drew a lot of comfort in making them.
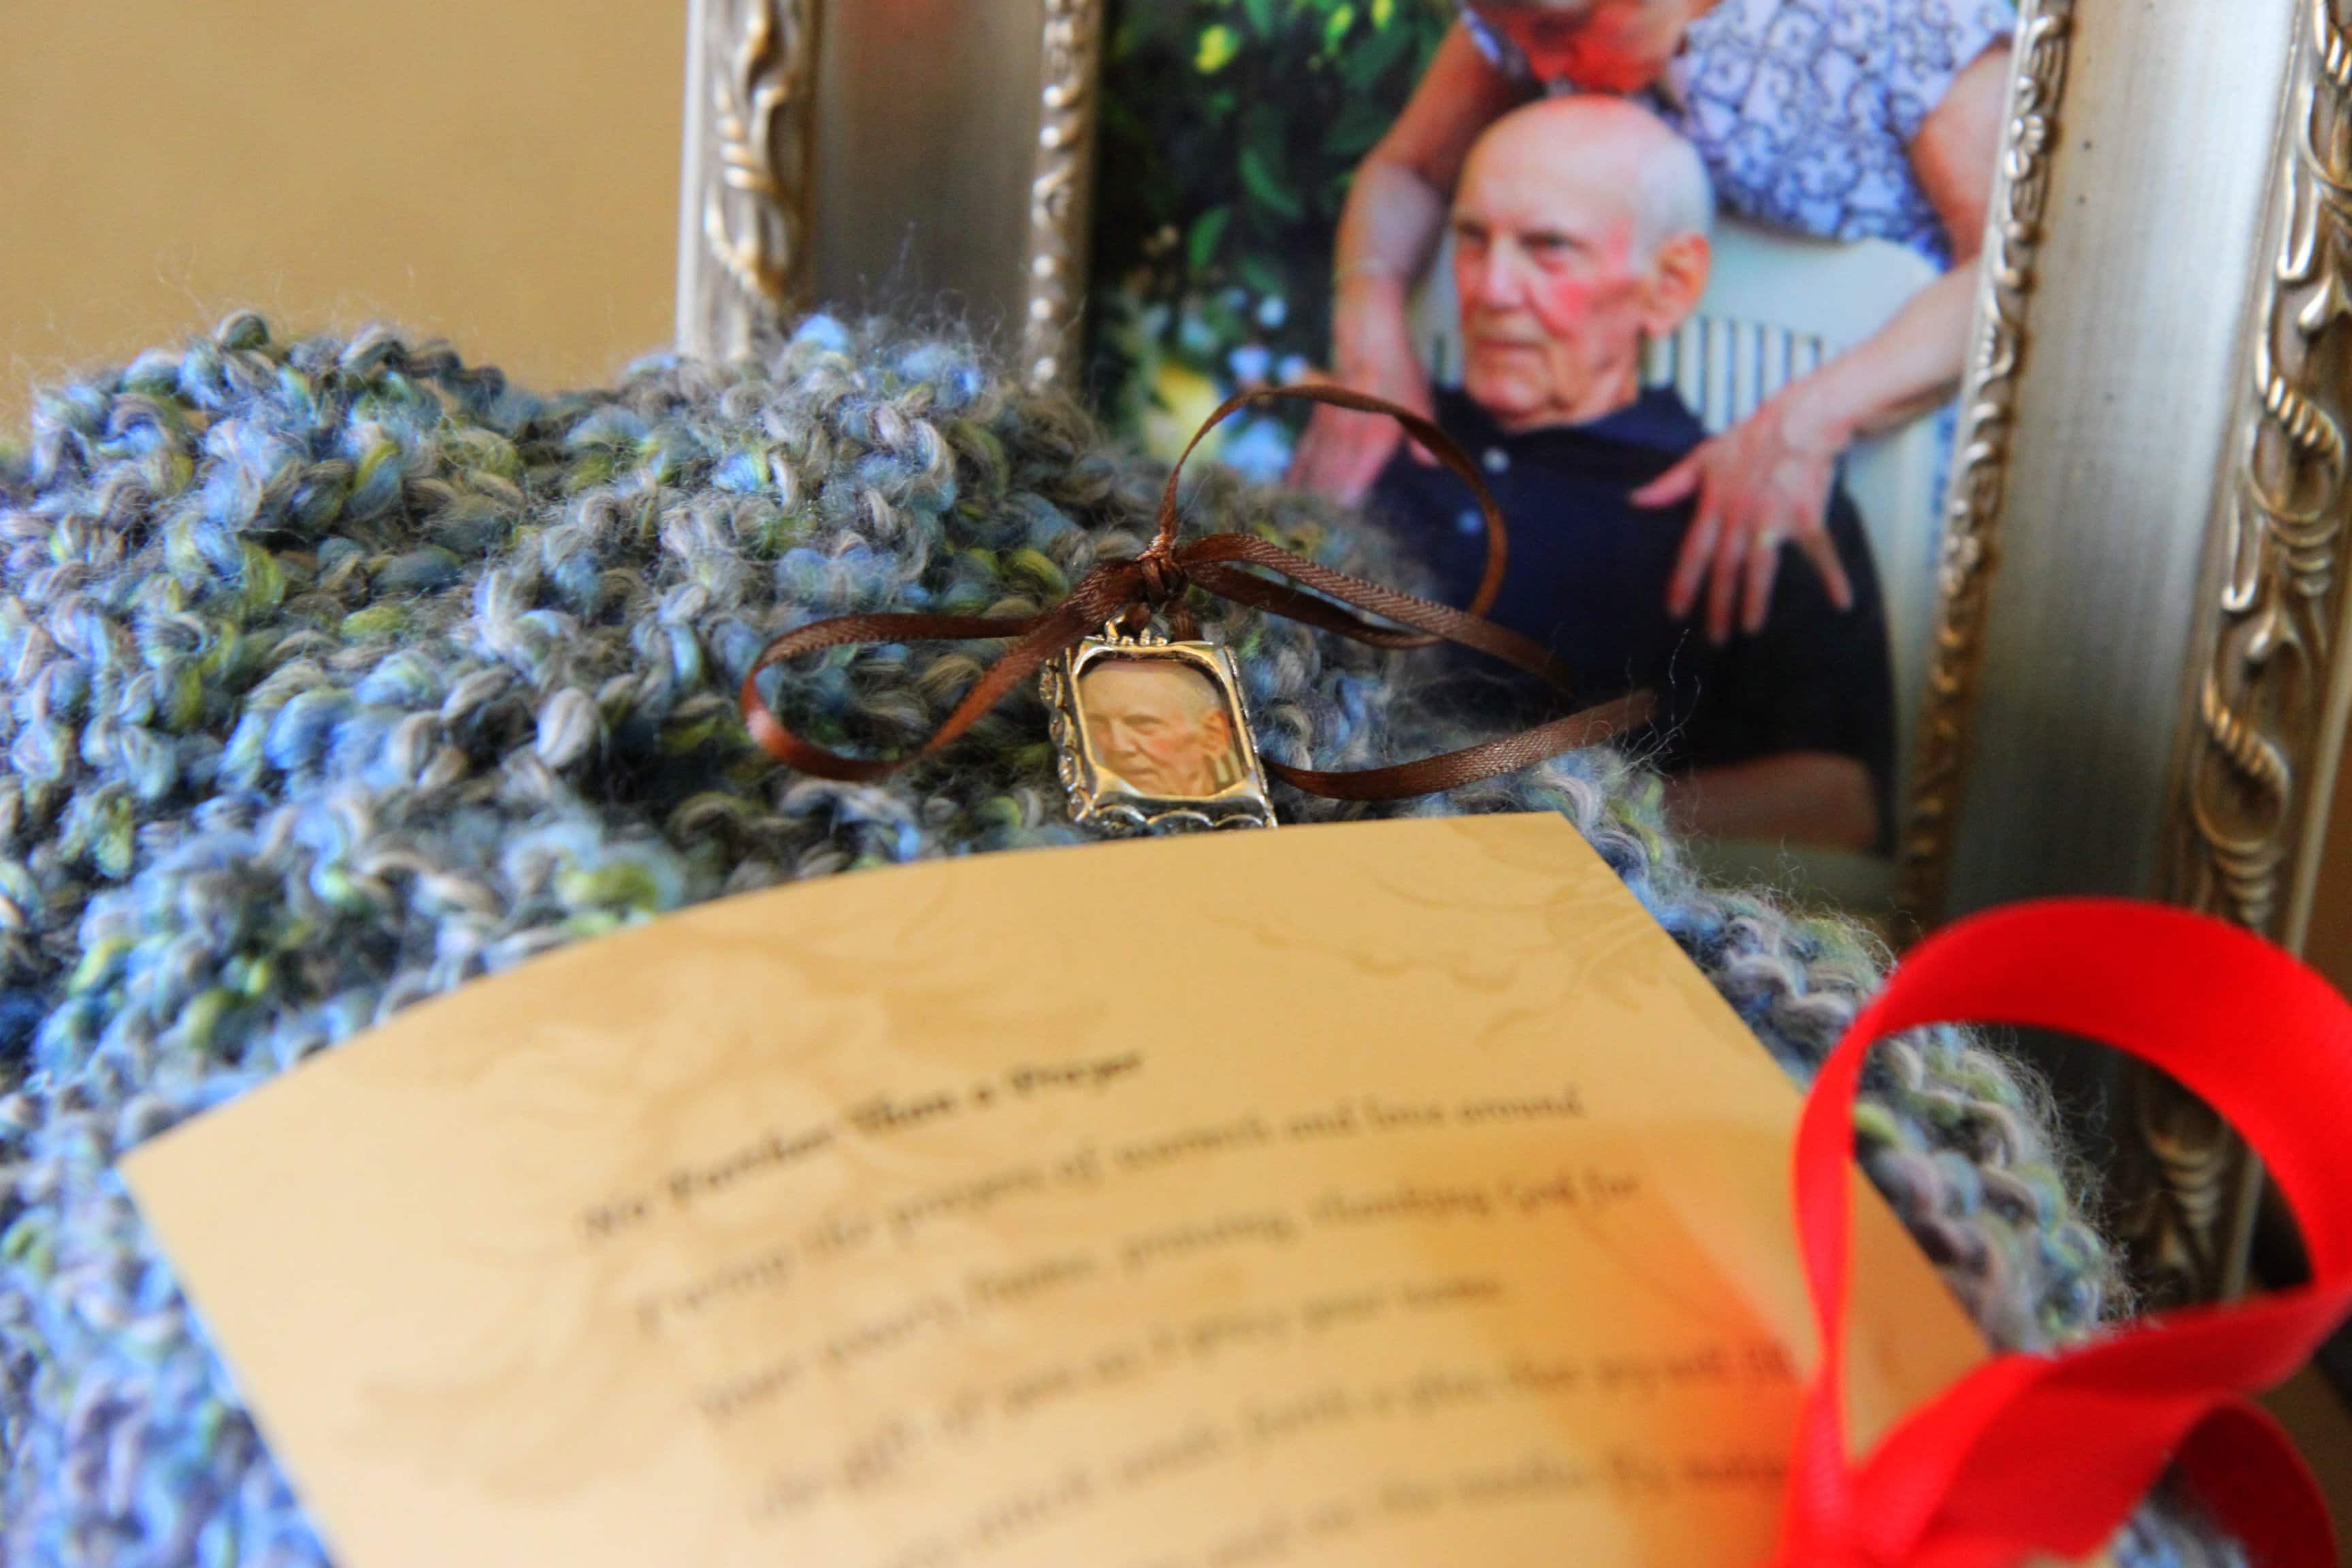
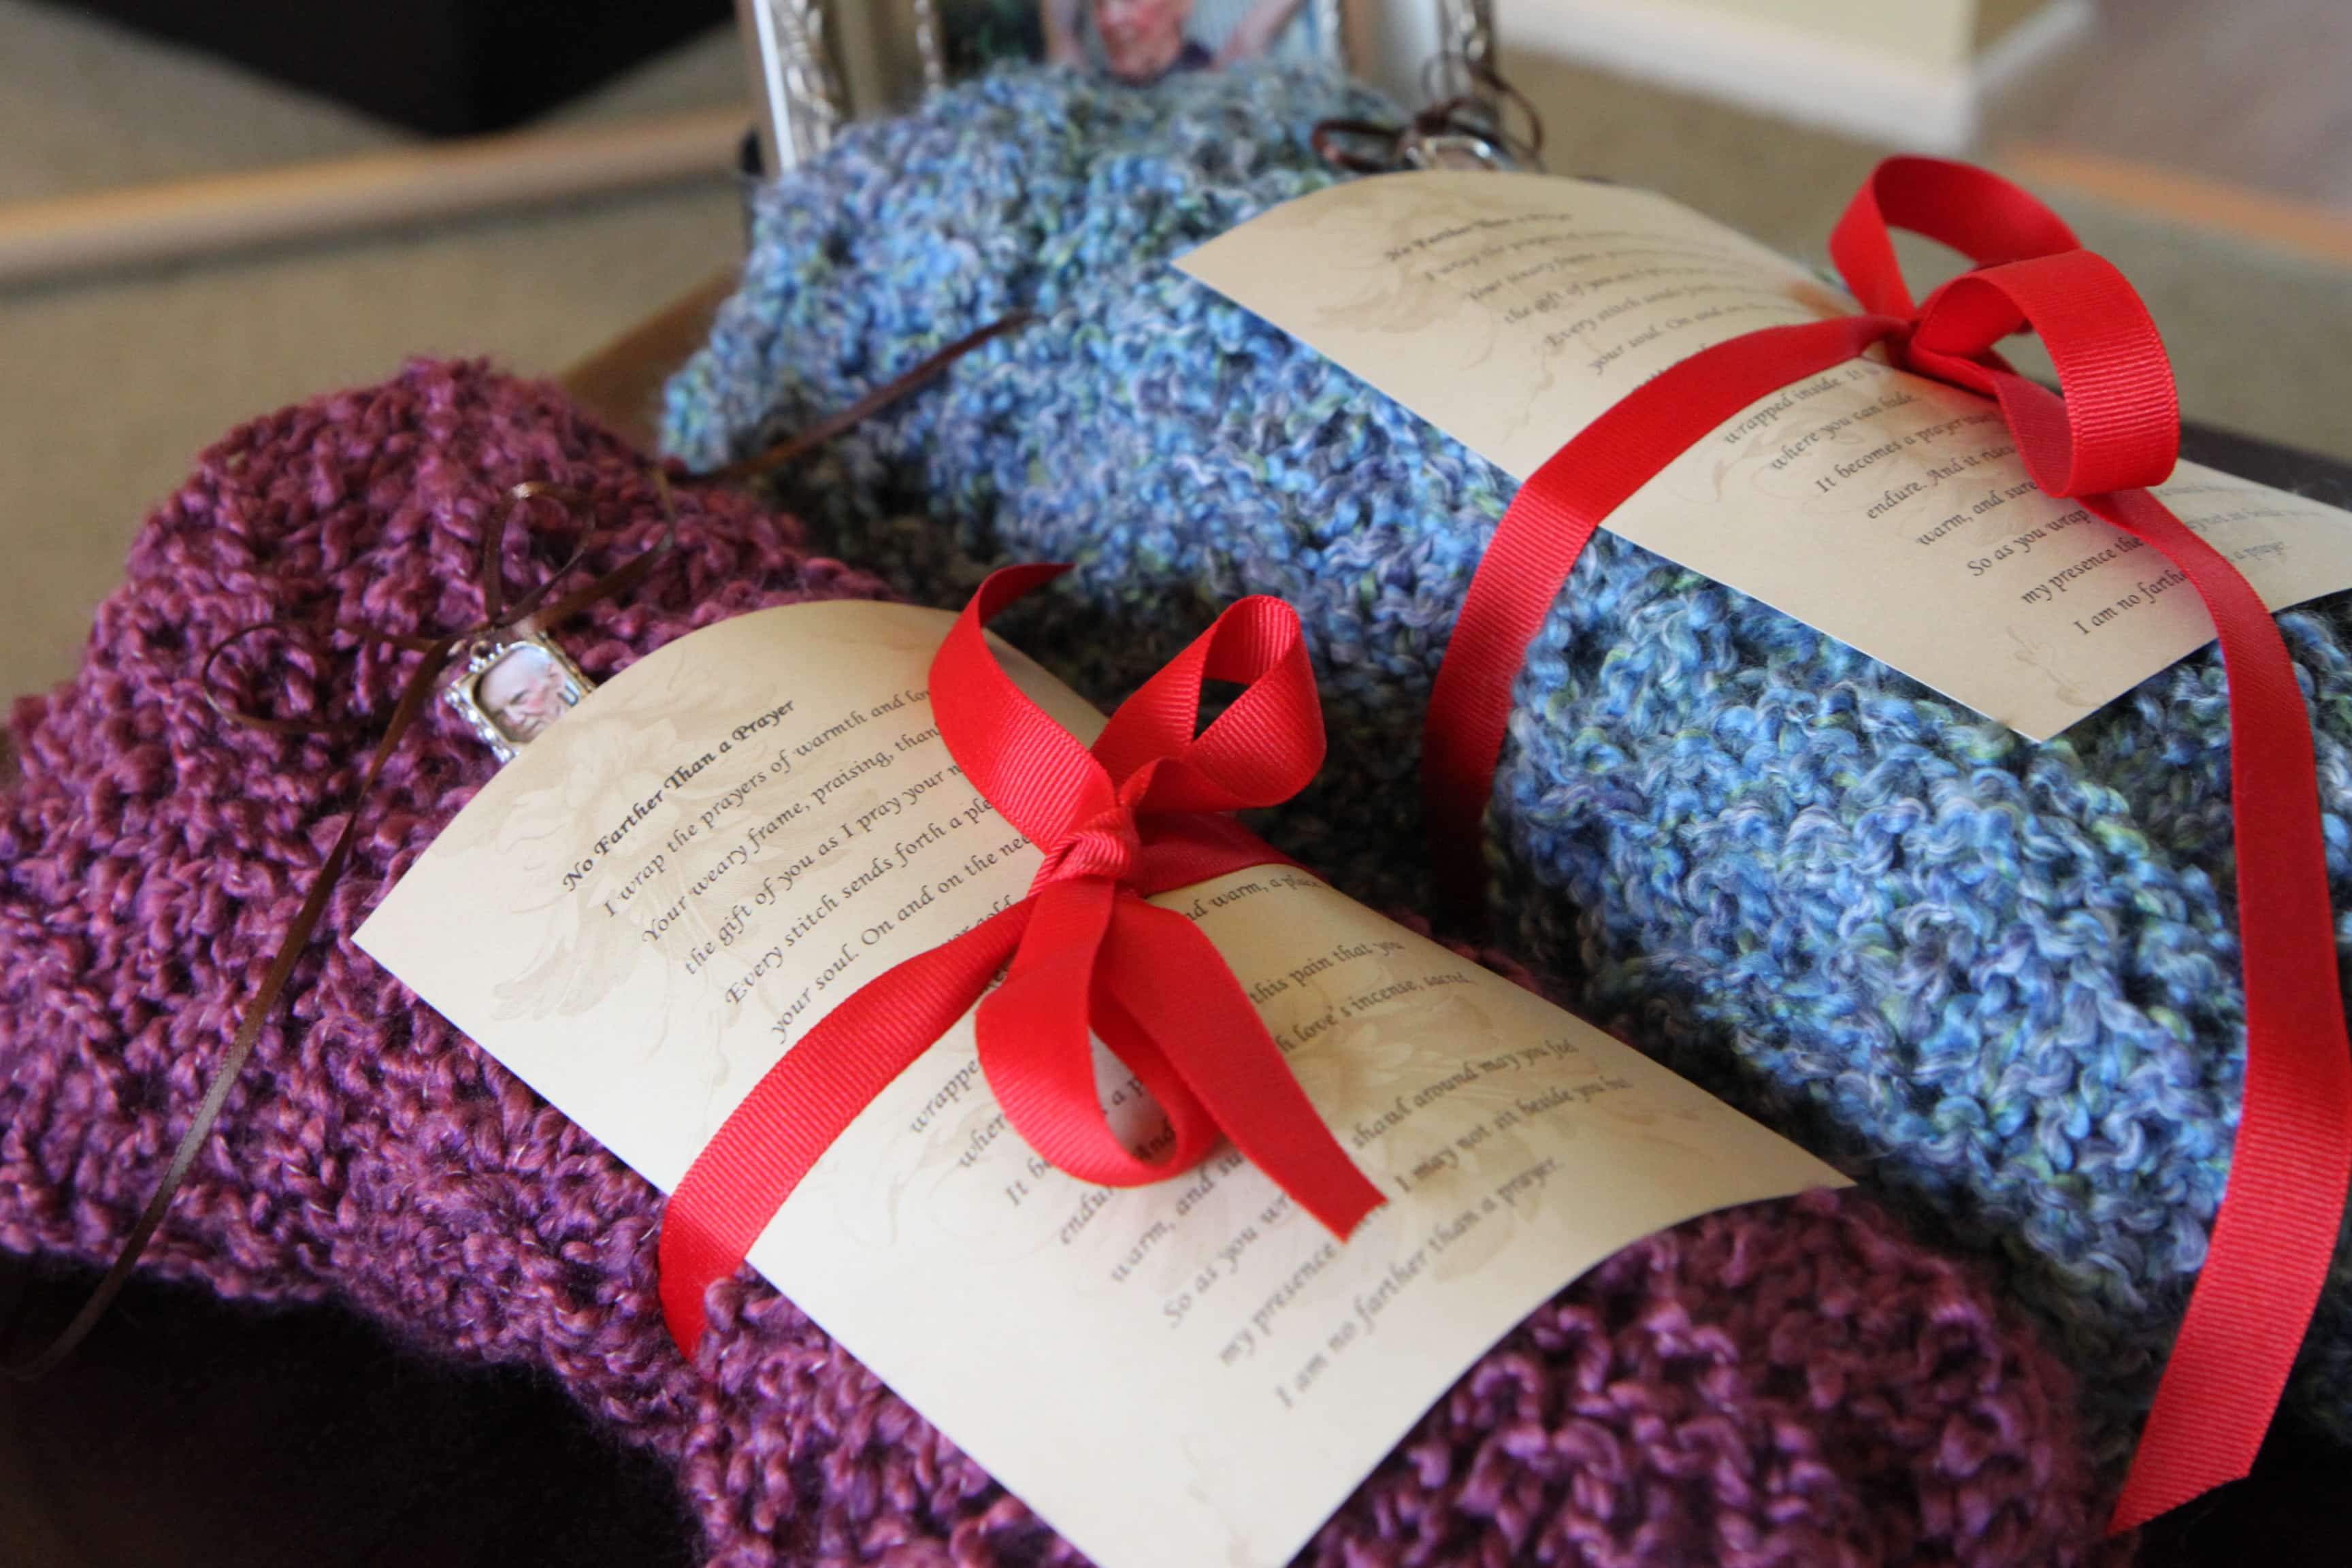
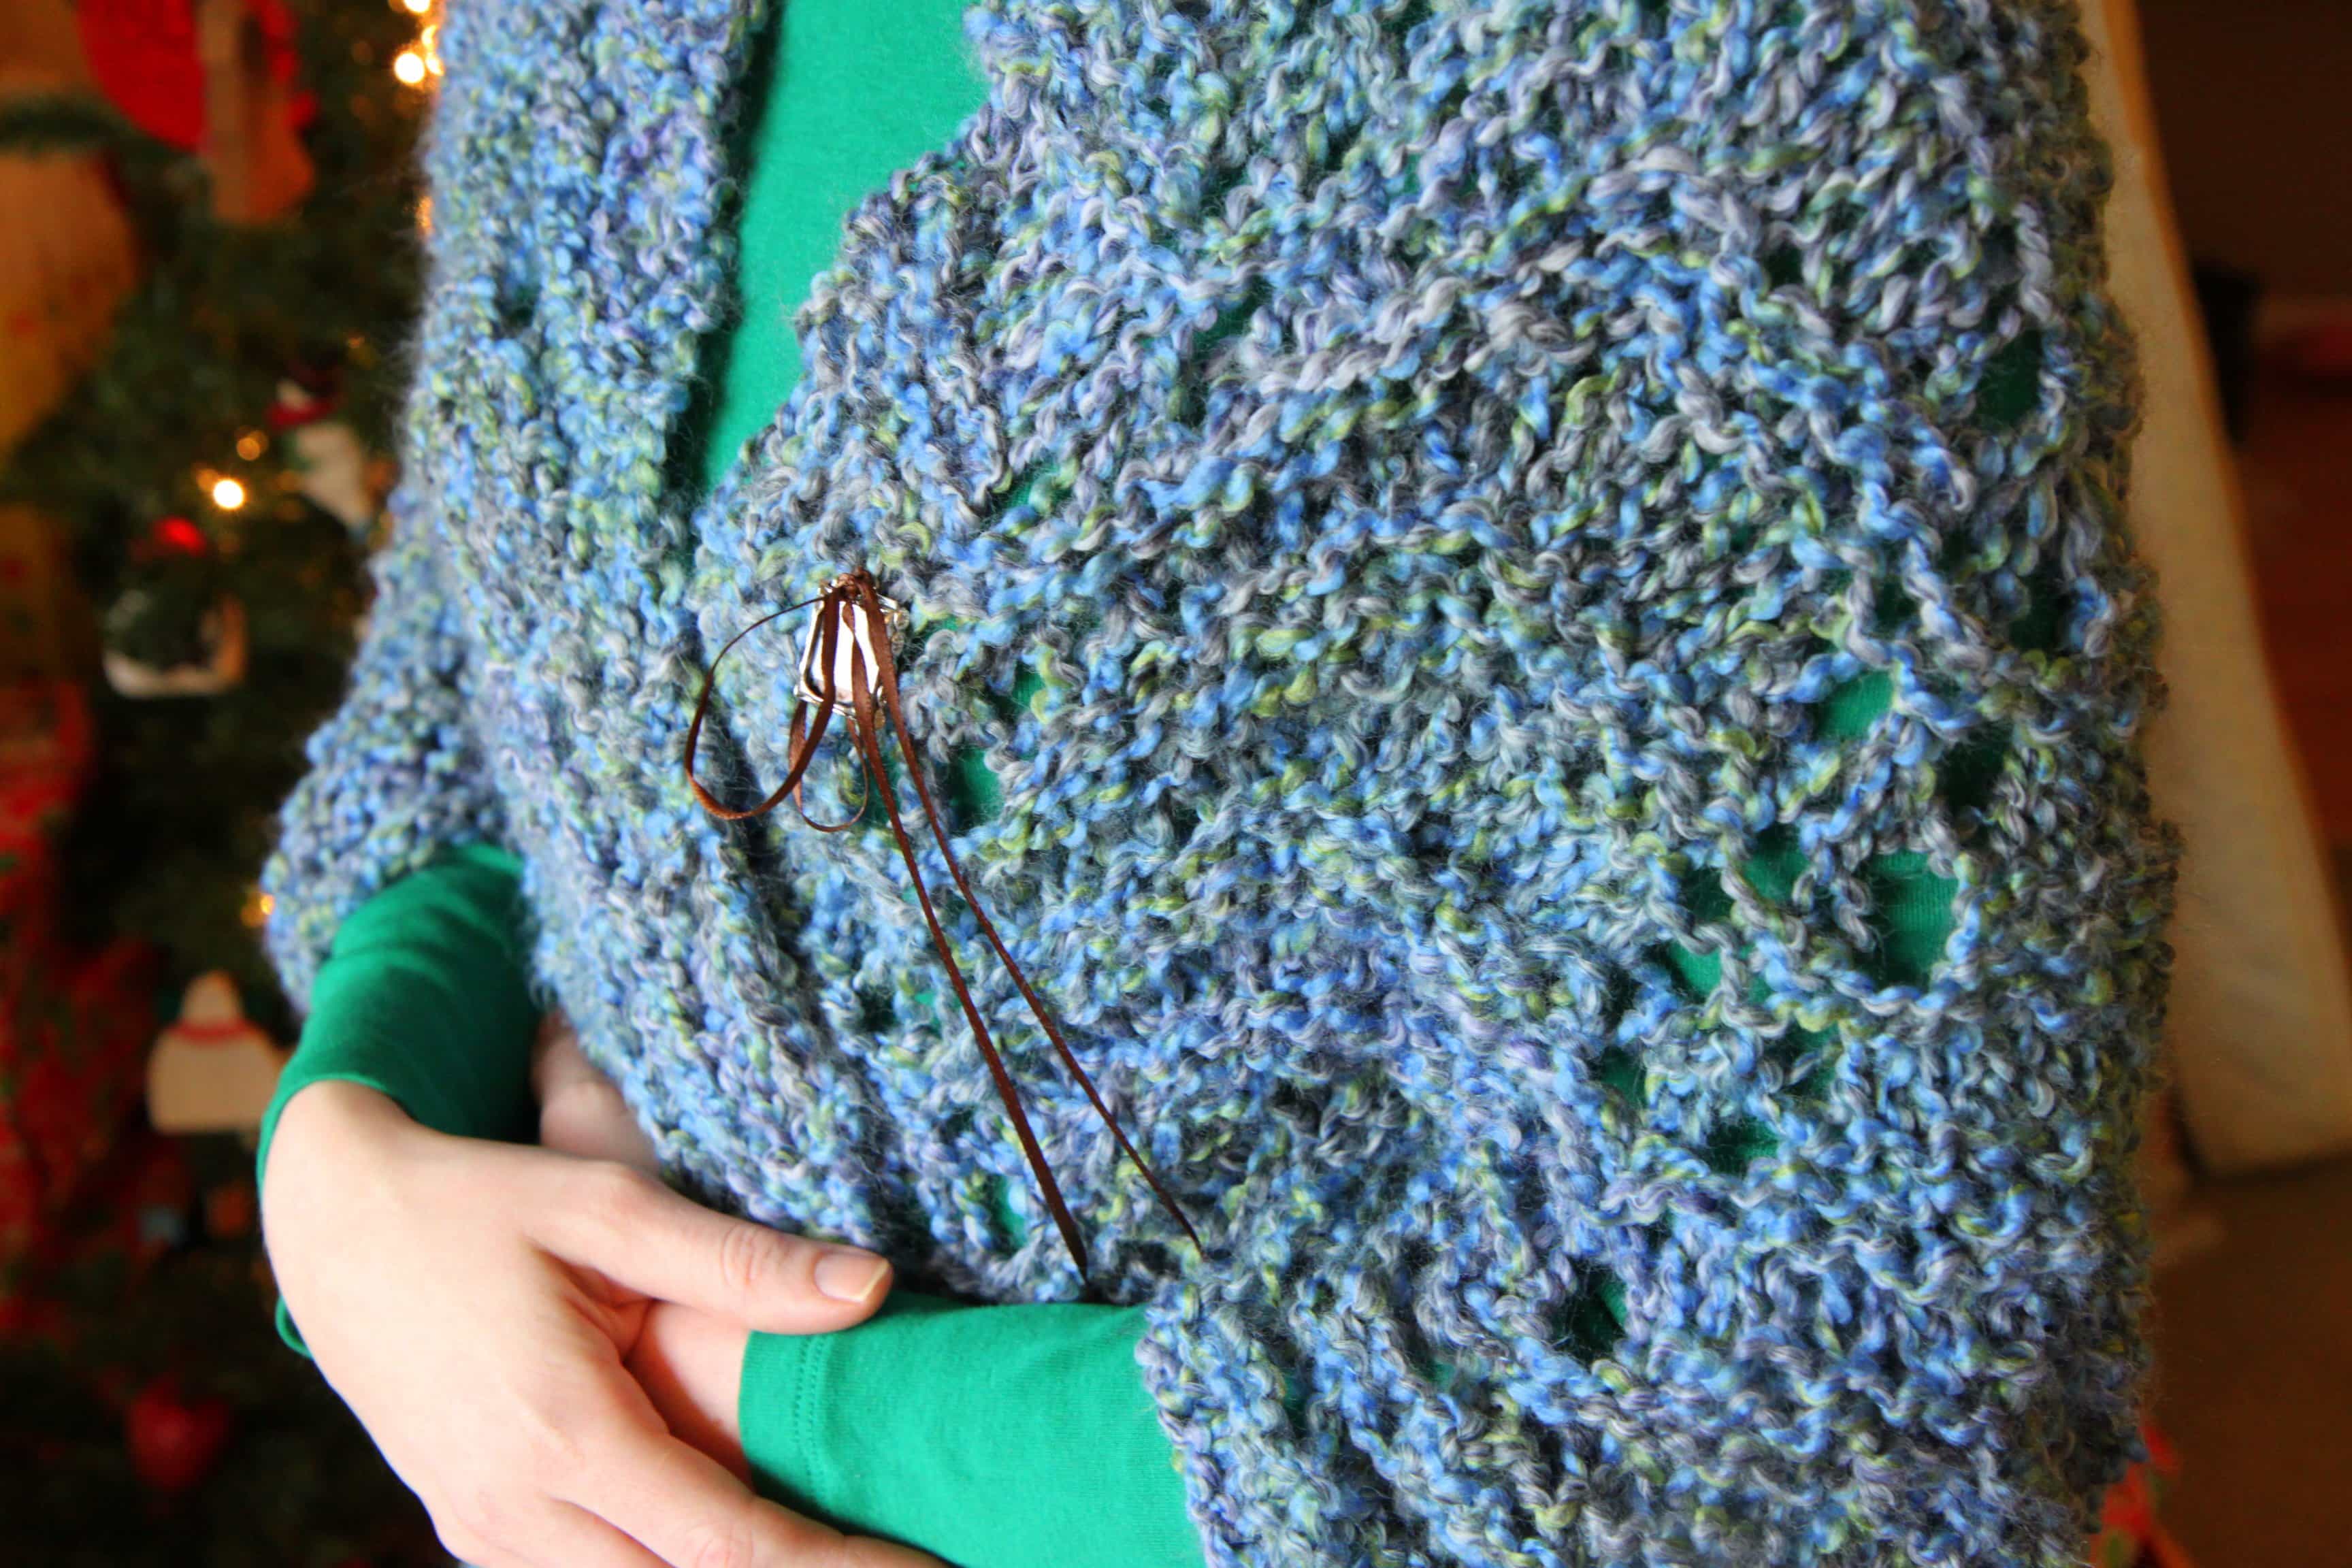
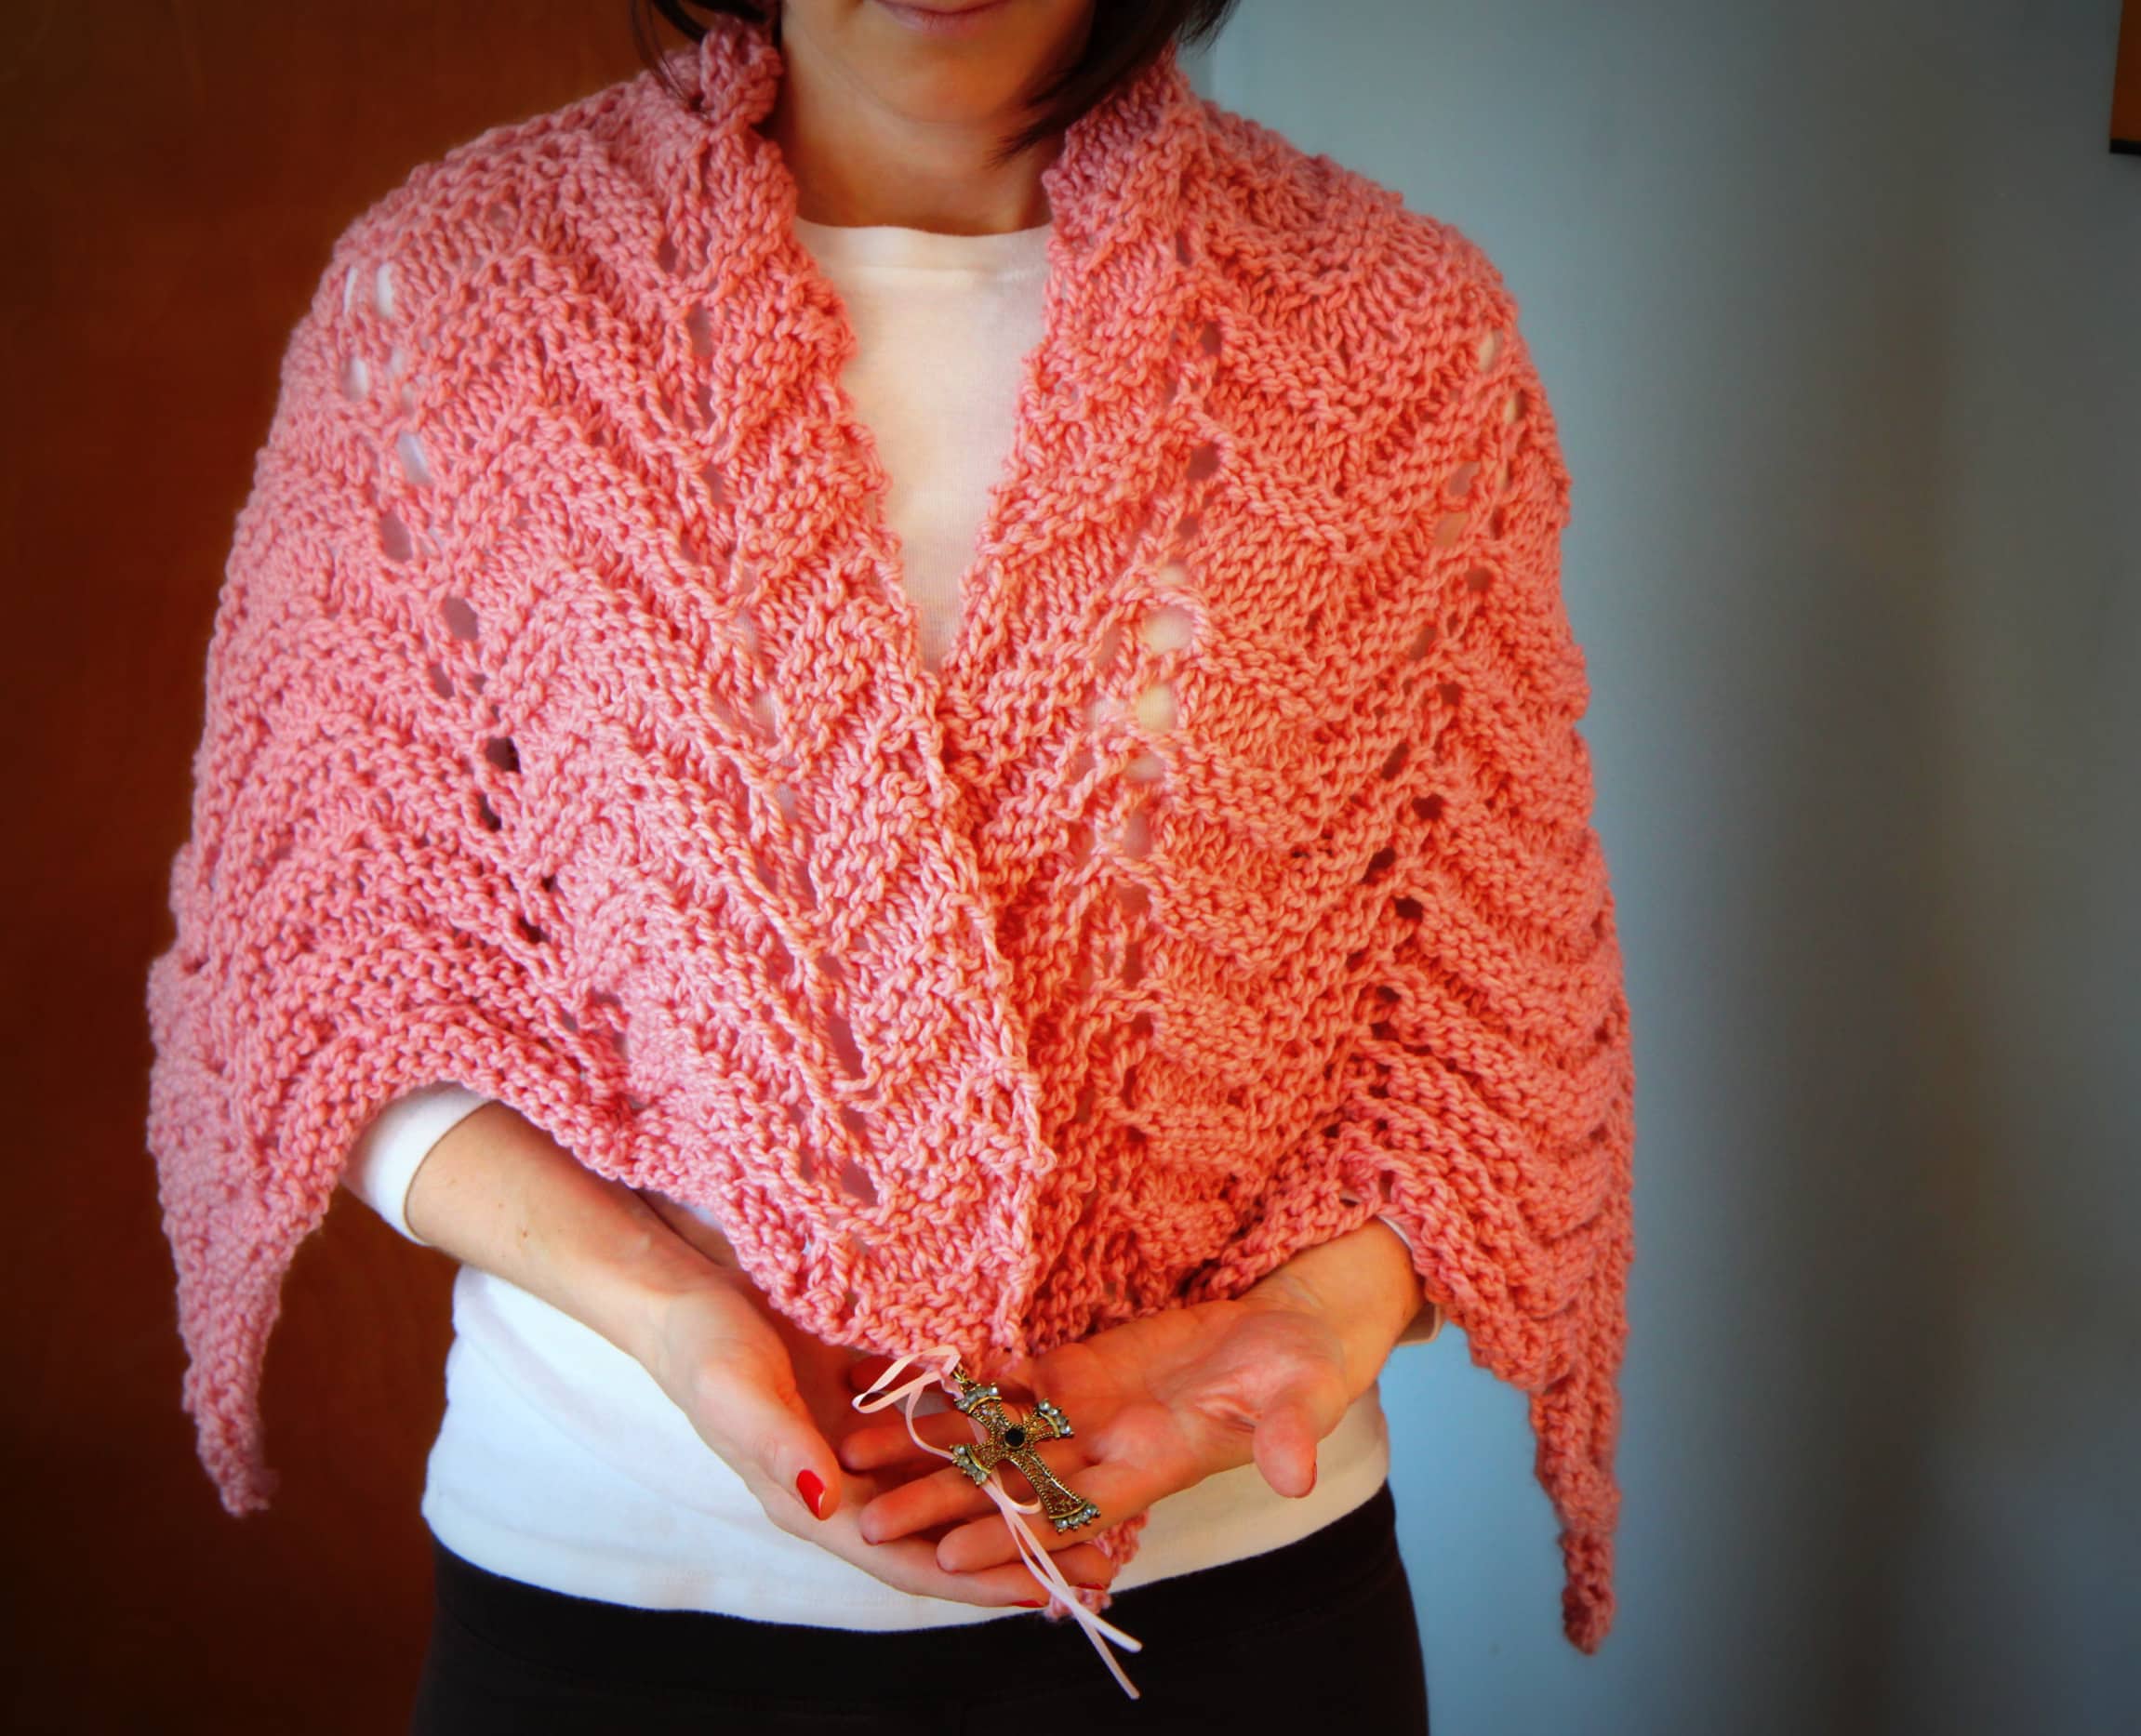
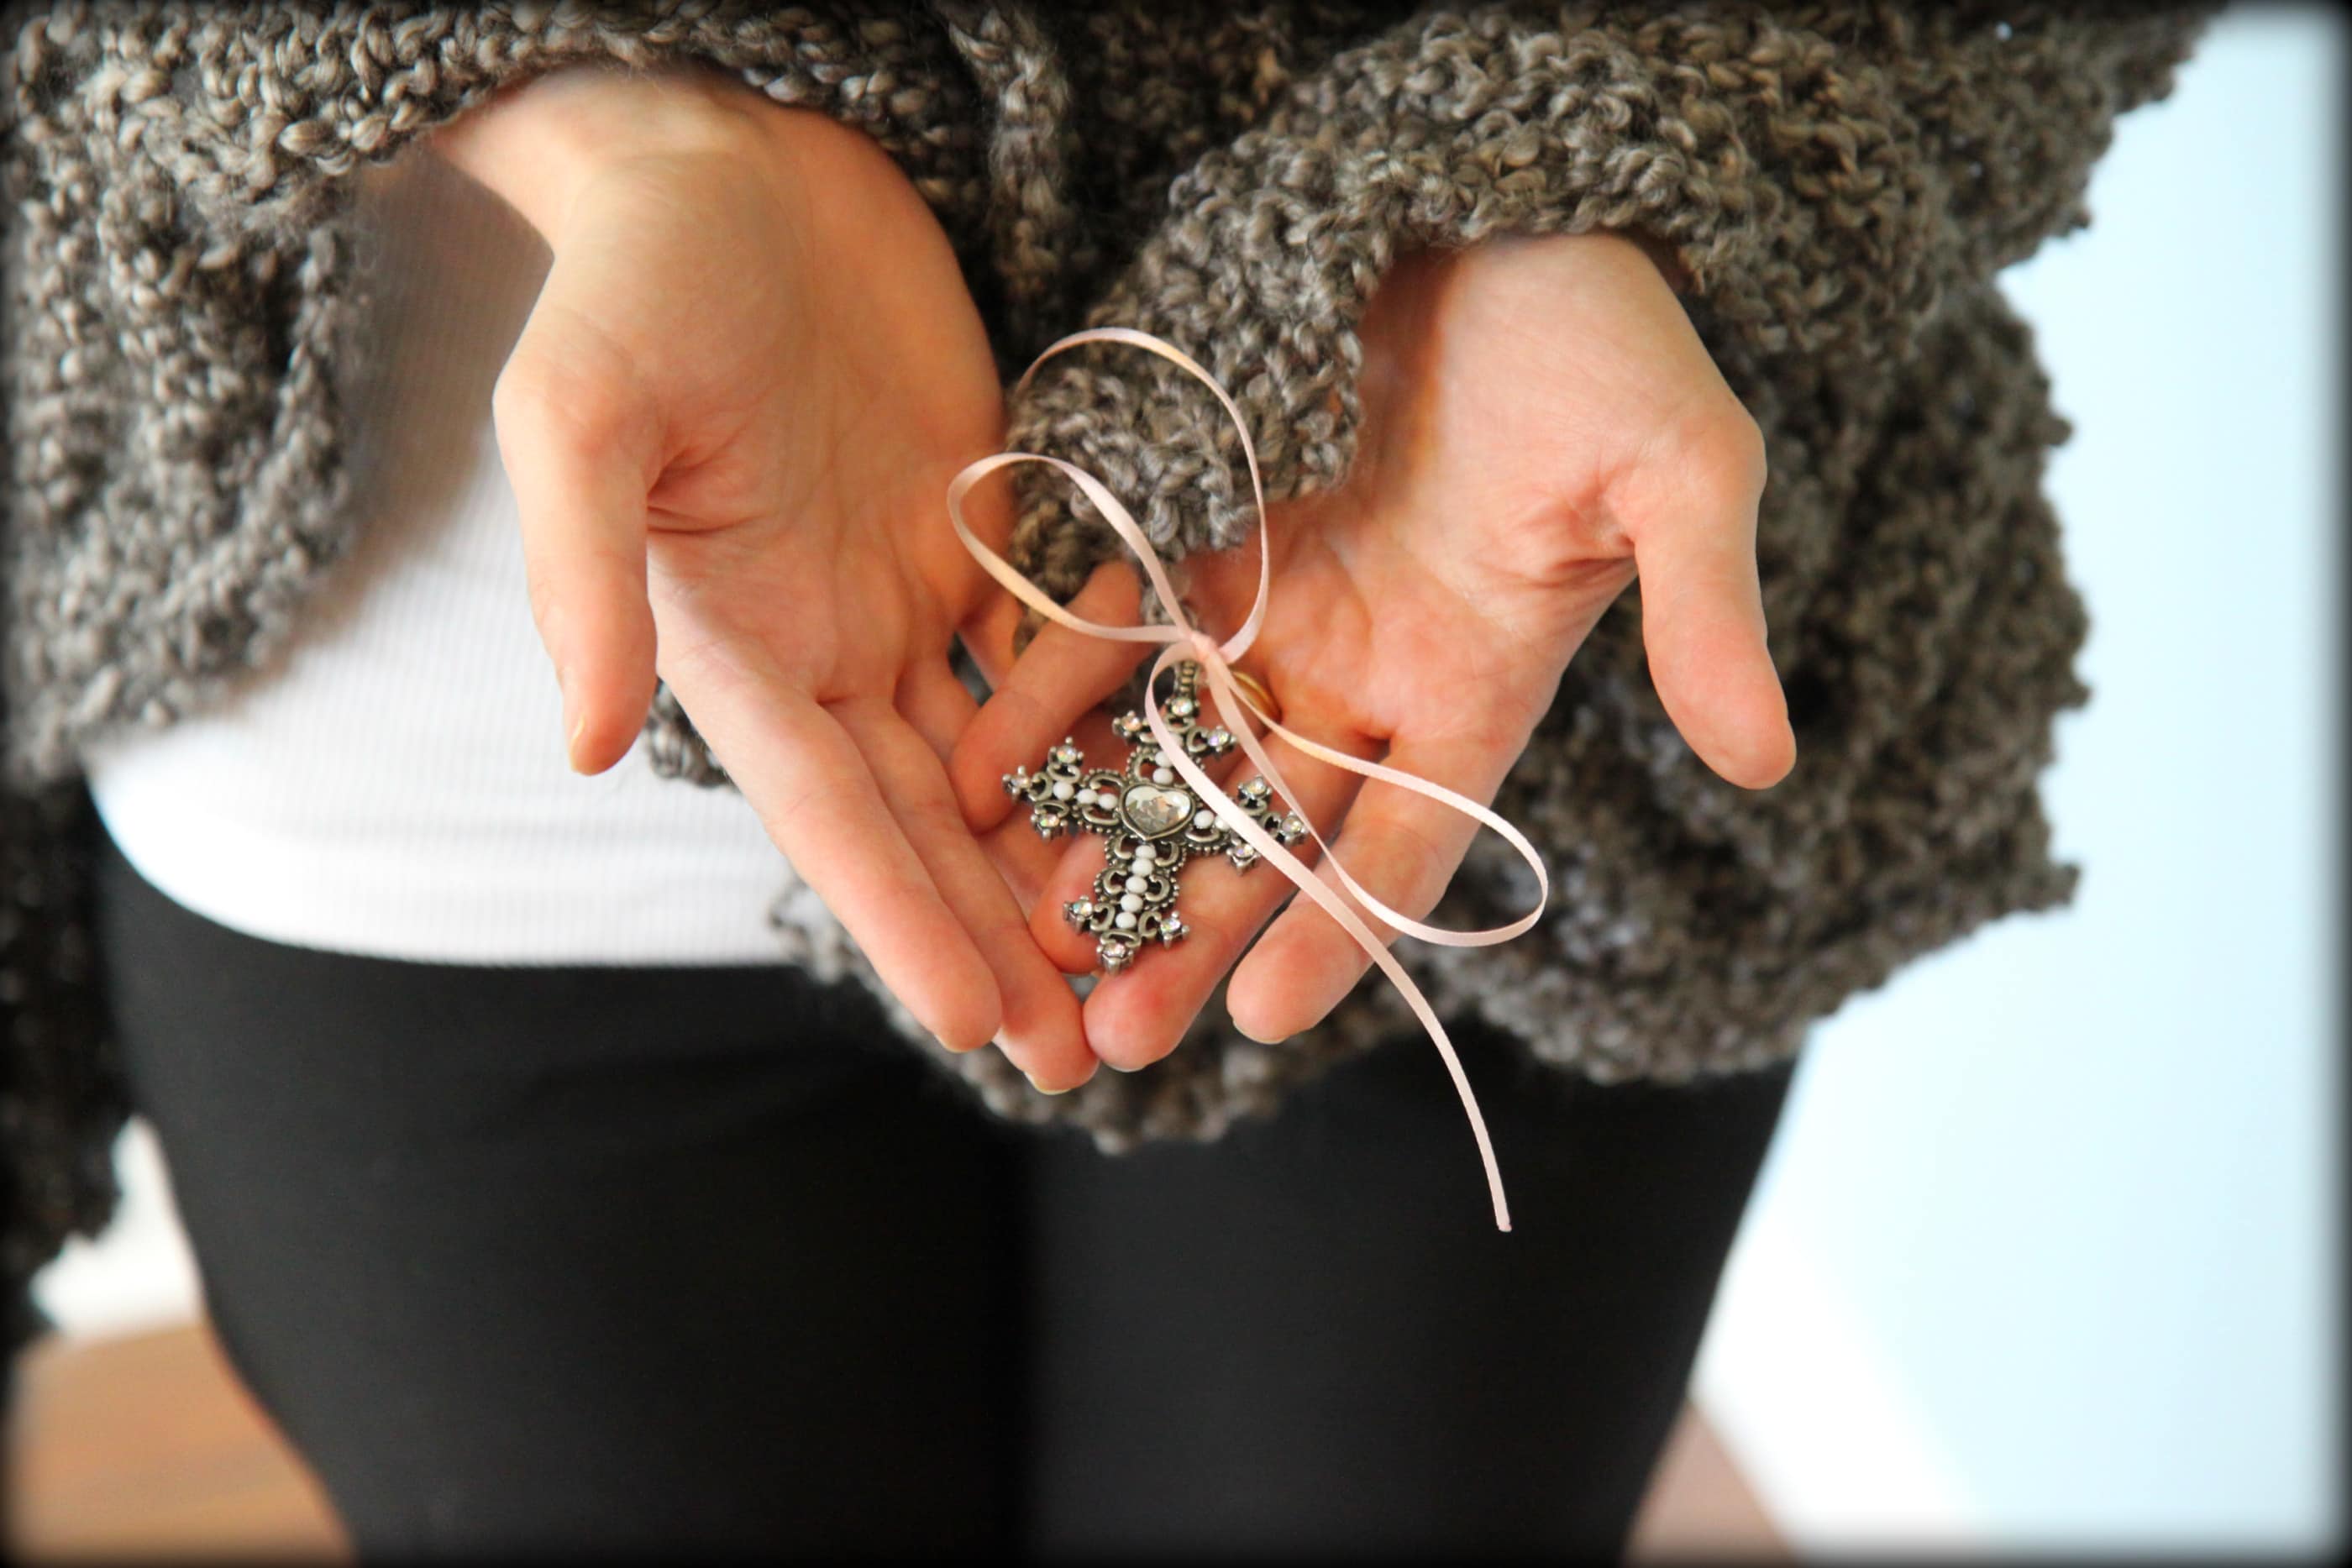
I love to weave in trinkets and charms that people can clutch, like crosses or pictures of their children/grandchildren on the edge of my shawl. What are some unique personal touches that can make a prayer shawl even more special that you like to use?
I always make sure to attach a charm or medal to the fringe and encourage the receiver to do the same and add their own trinkets as a source of inspiration and meditation.
Do you have a favorite prayer that you like to include or say while creating your shawls?
Many times throughout the making of a shawl and upon completion, I say the “Prayer of Blessing” I wrote:
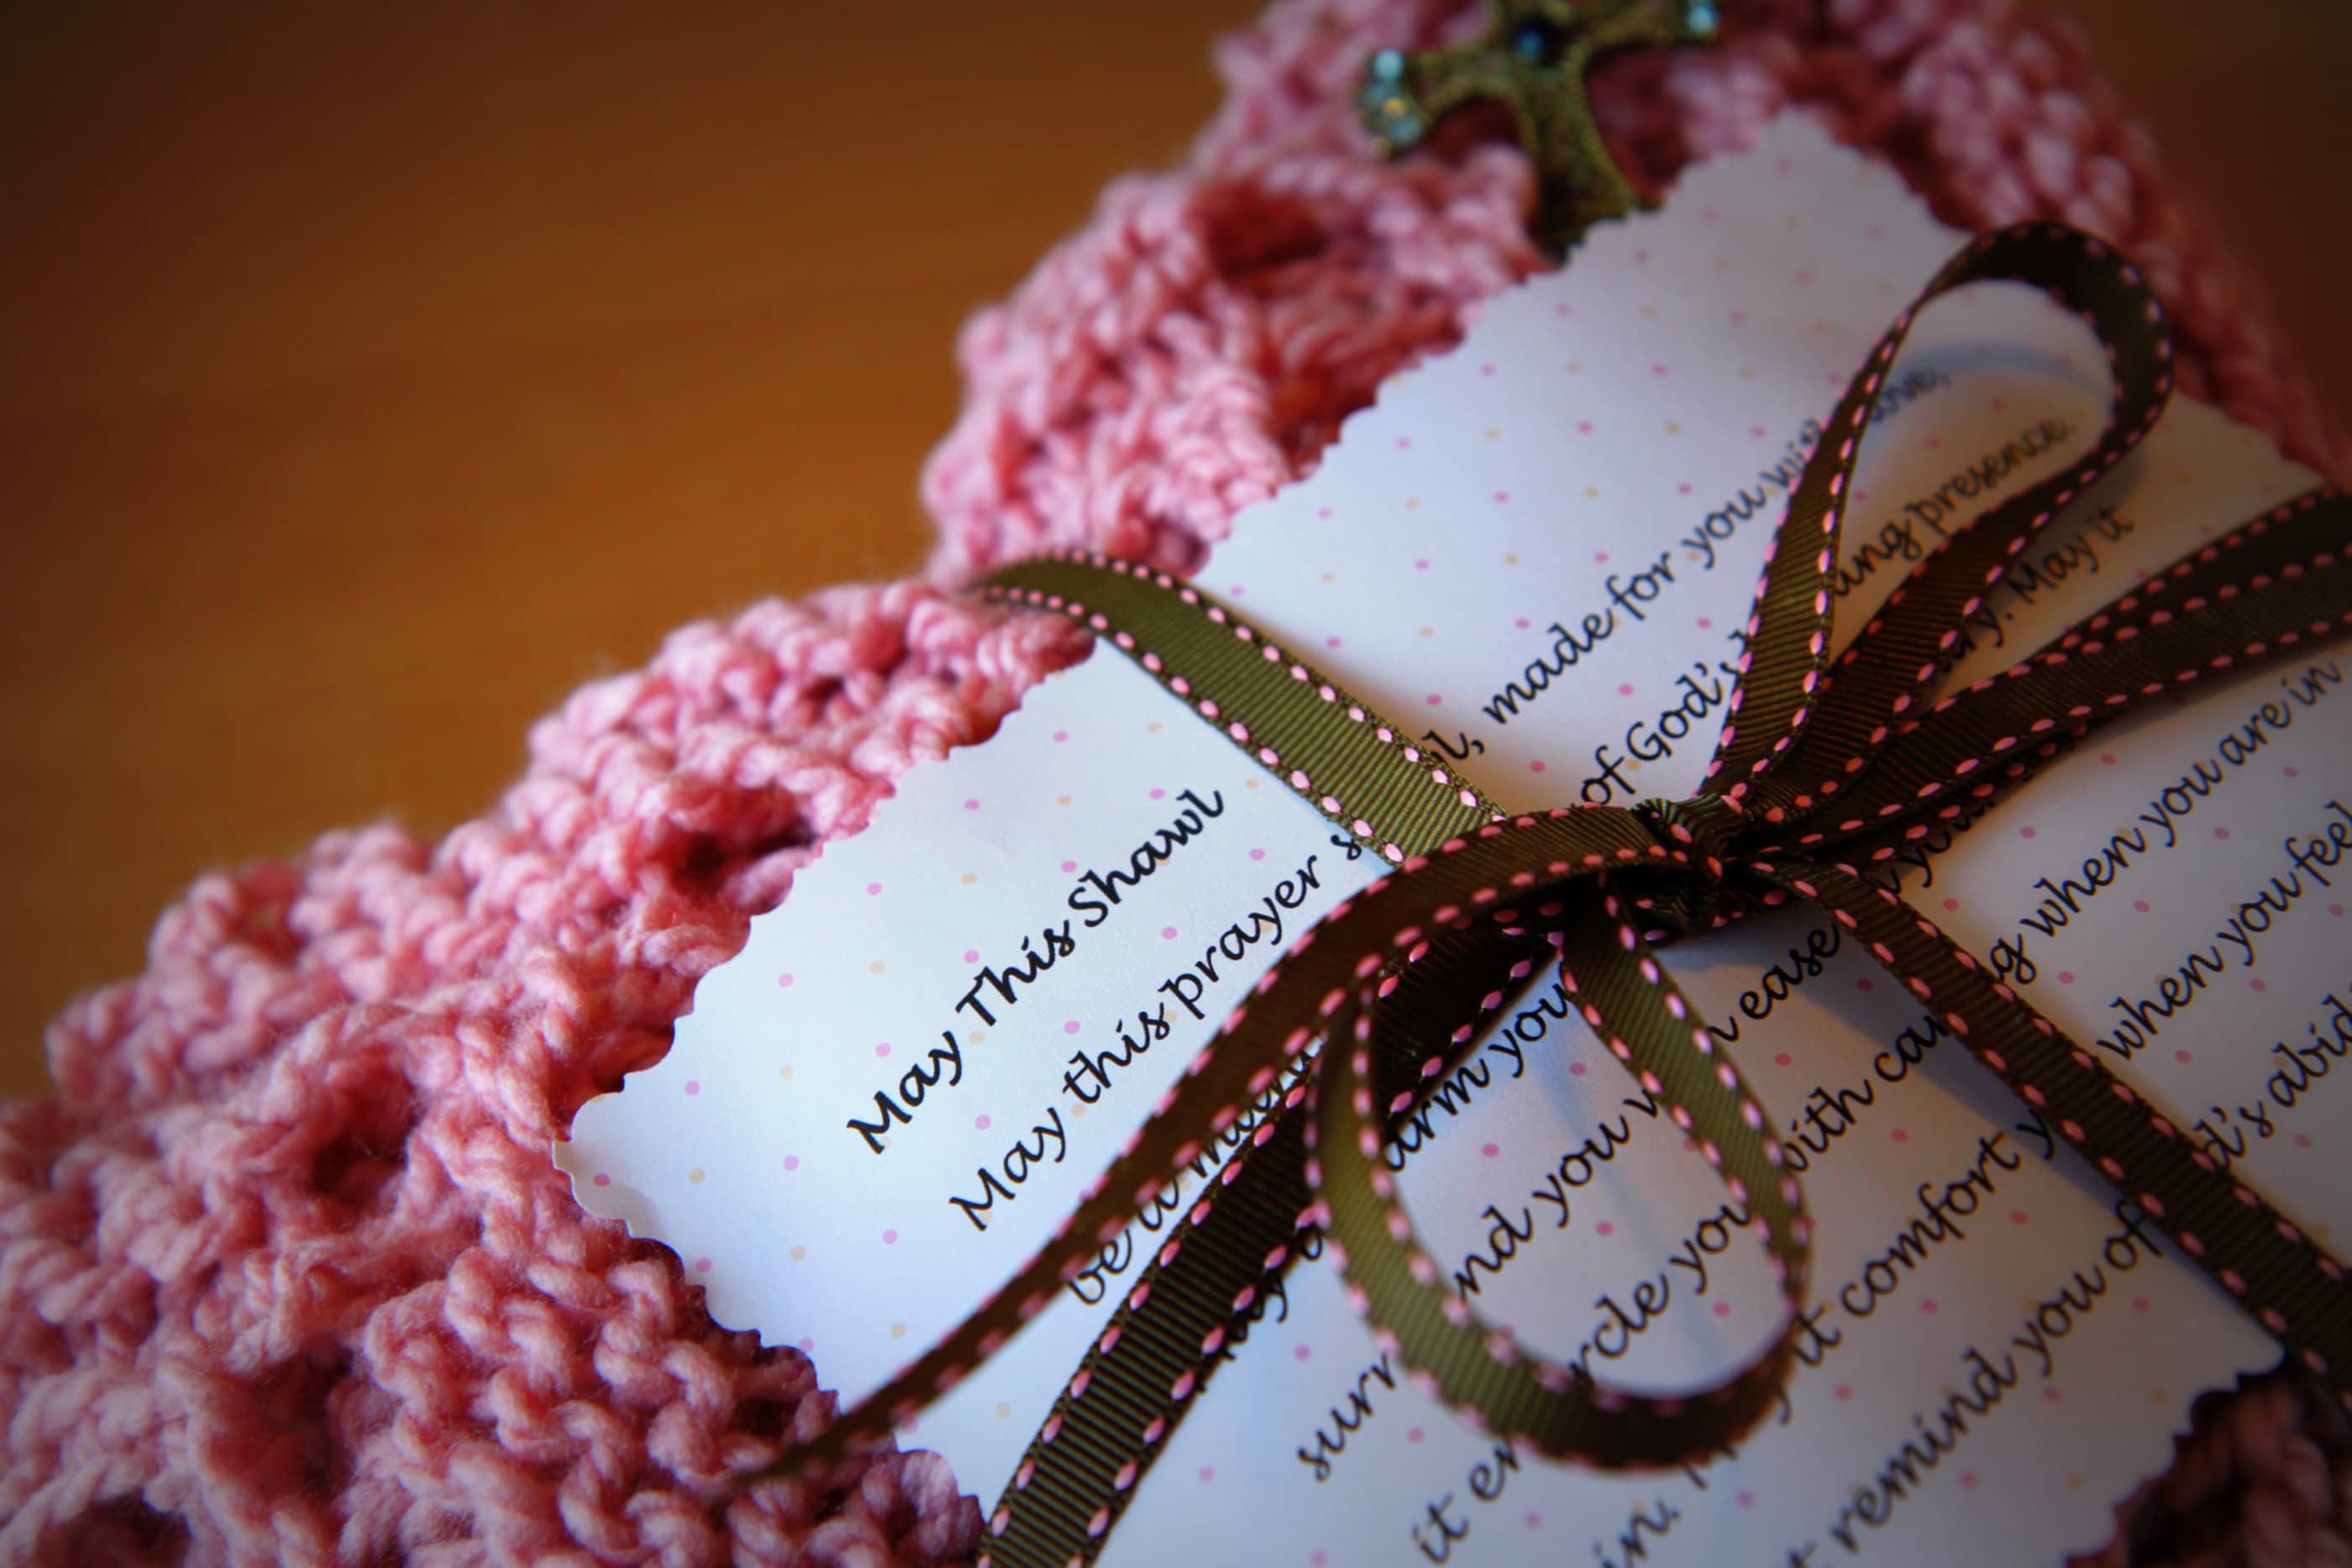
“May God’s grace be upon this shawl, warming, comforting, enfolding, and embracing, May this mantle be a safe haven…a sacred place of security and well being, Sustaining and embracing in good times as well as difficult ones. May the one who receives this shawl be cradled in hope, kept in joy, graced with peace, and wrapped in love.”
0
Like Janet, I have made many prayer shawls over the years and I wanted to share some answers to some questions that I have been asked about my prayer shawls to help you if you might be considering making one of your own.
What is your favorite type of yarn that you use for your shawls?
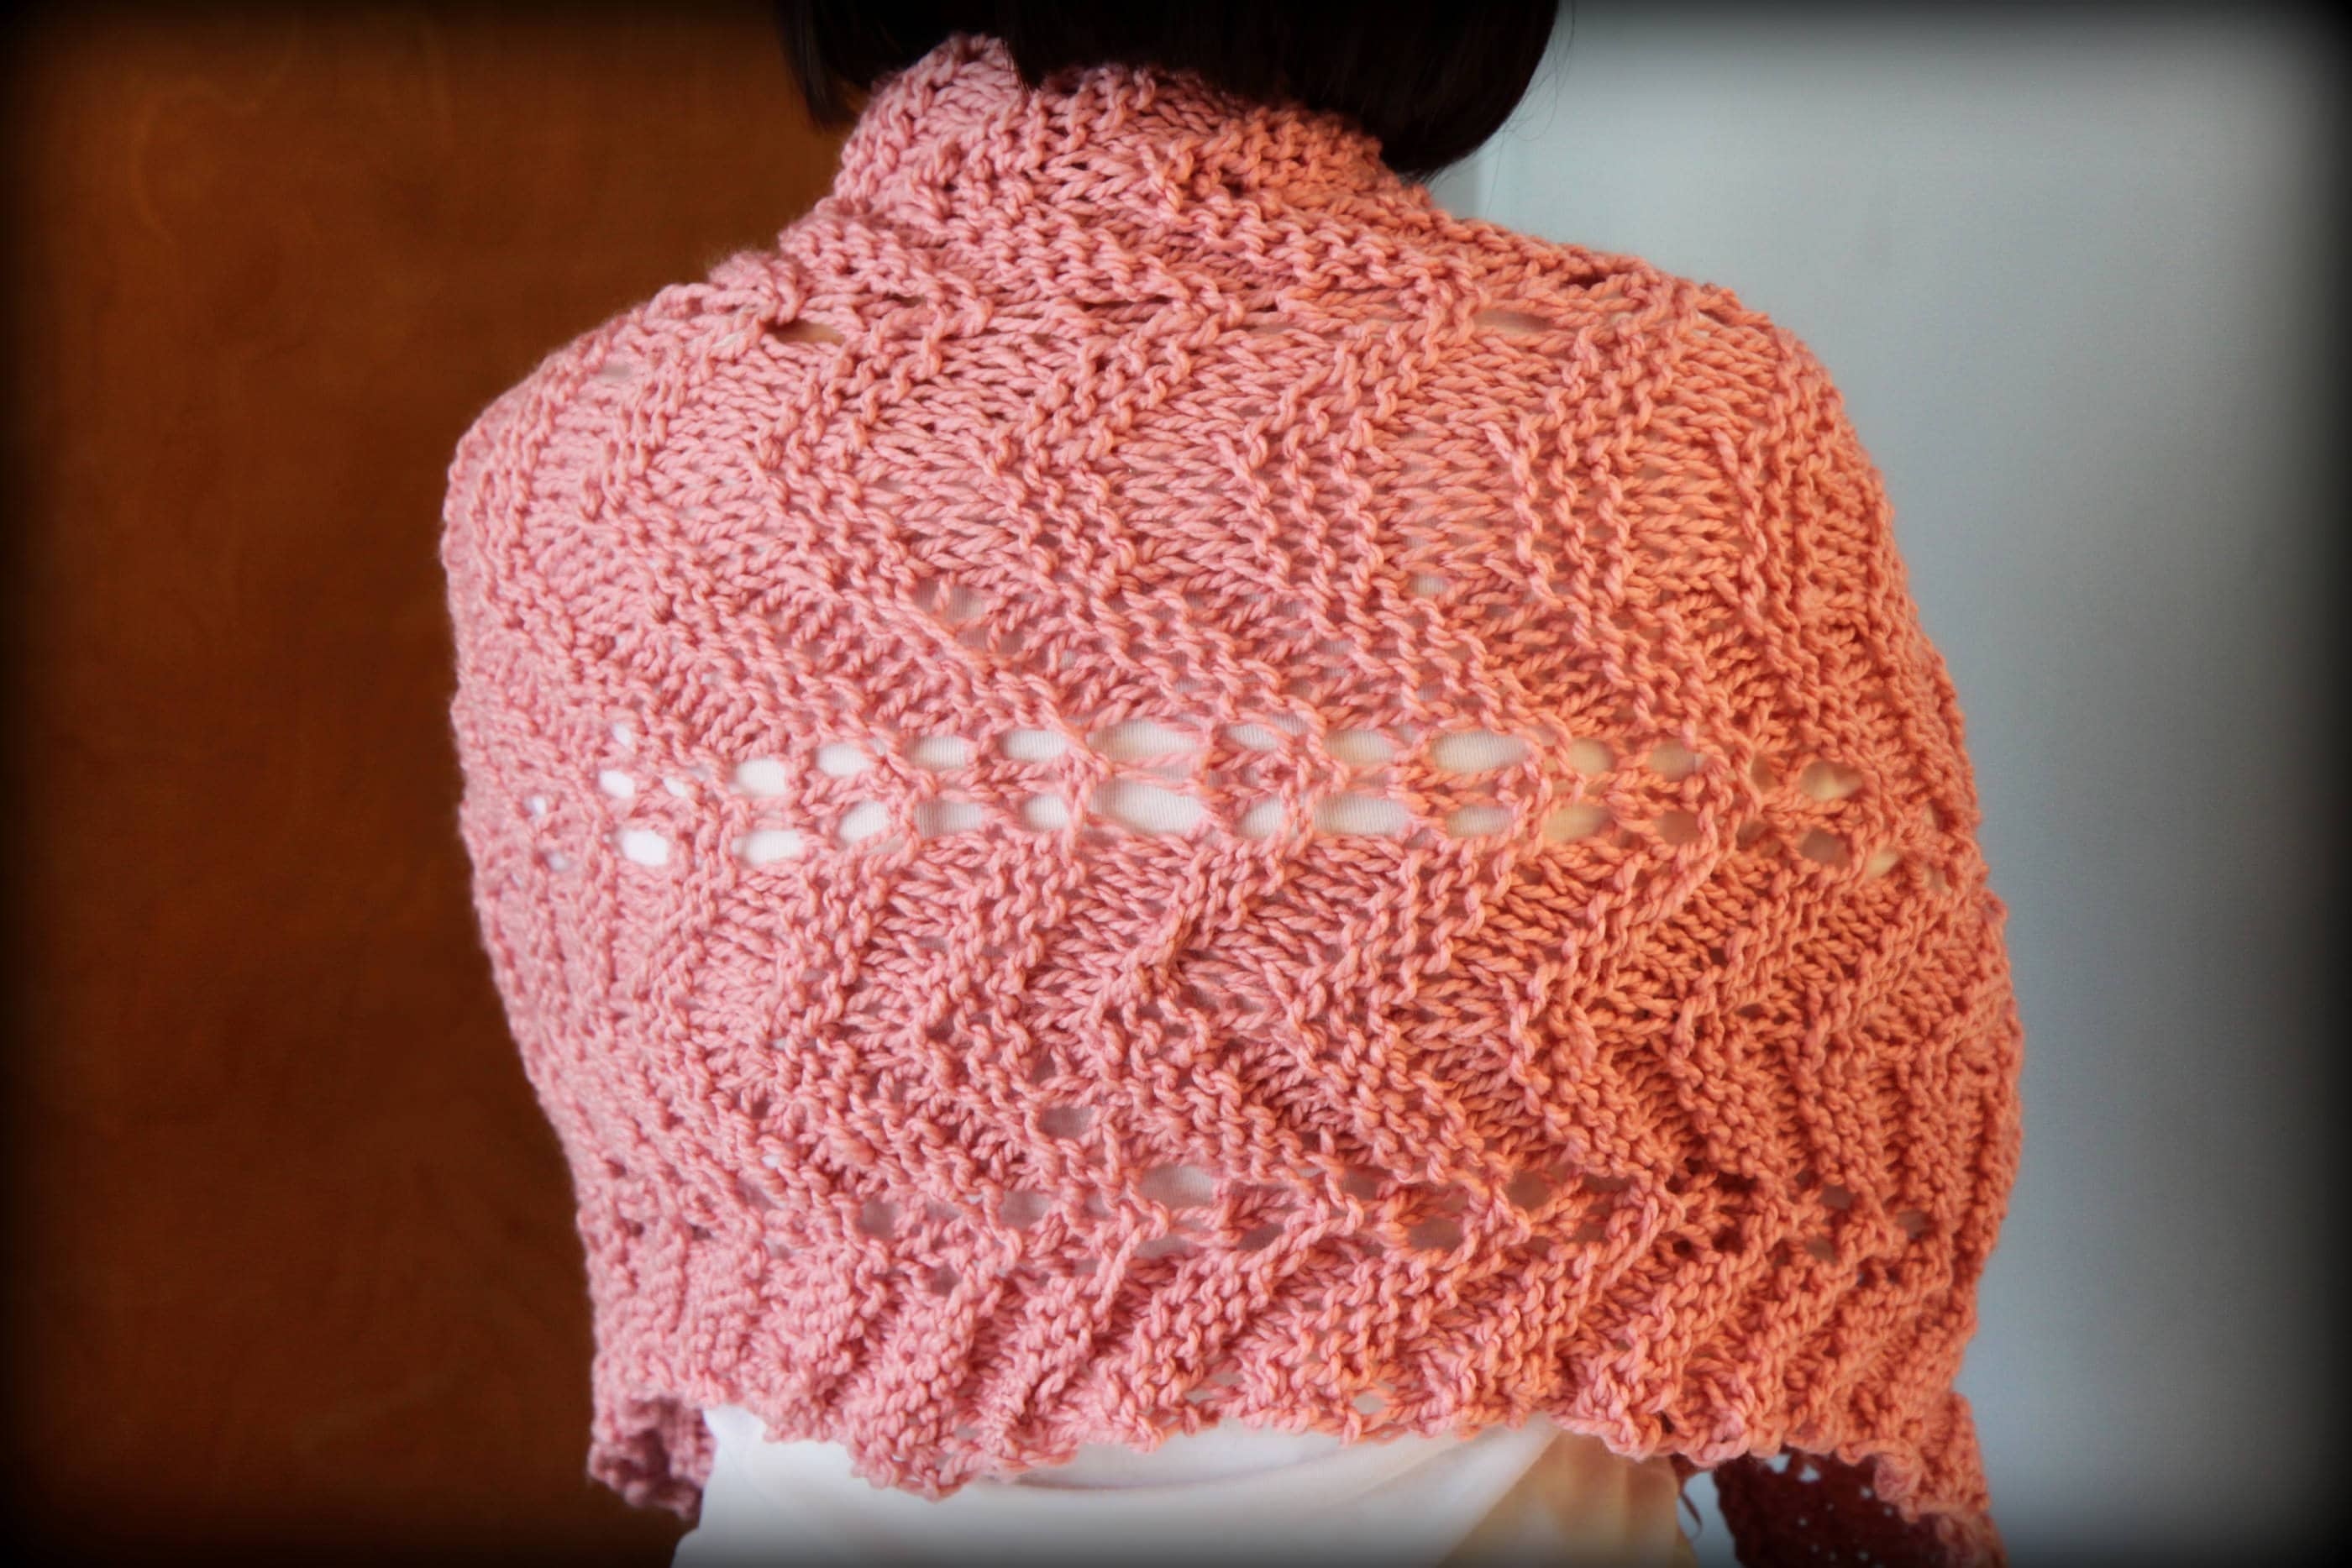
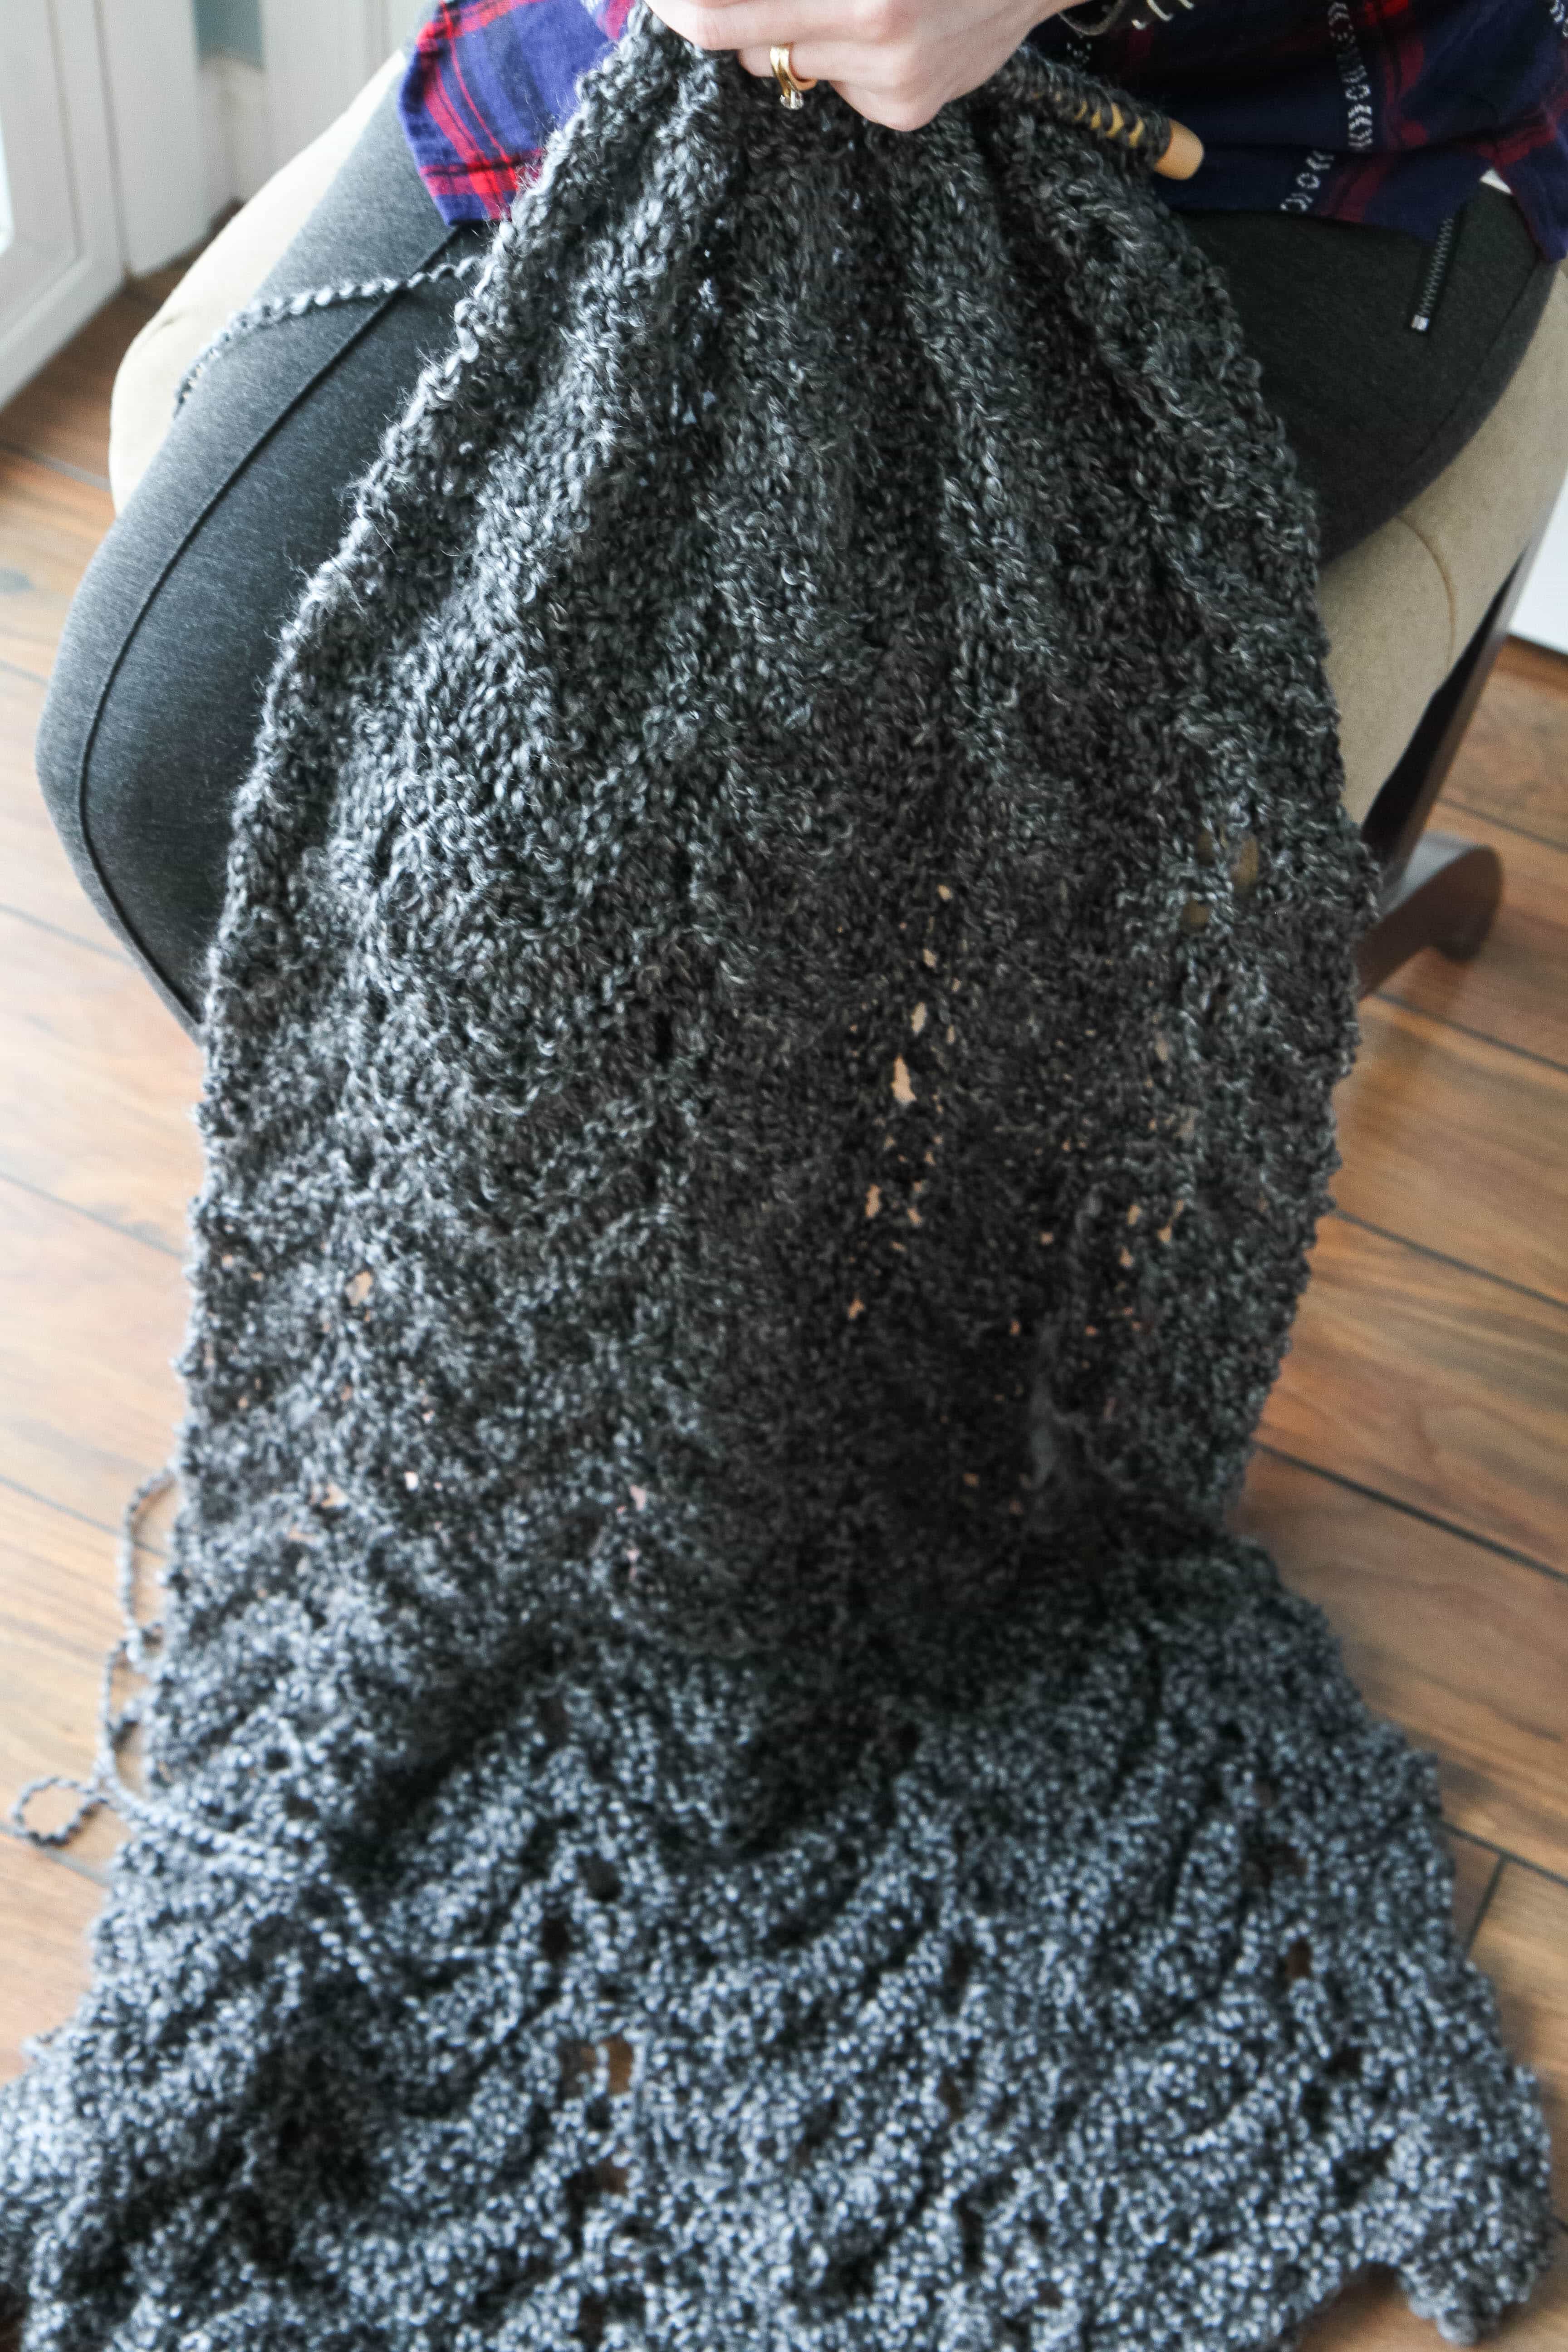
I am a big fan of the Lion Brand Homespun Yarn as my yarn of choice. I like the bulkiness of the yarn and that it has a lot of texture. The yarn is thick so it helps to knit the shawls quickly and I usually knit with size 15 needles so that I knit them quicker.
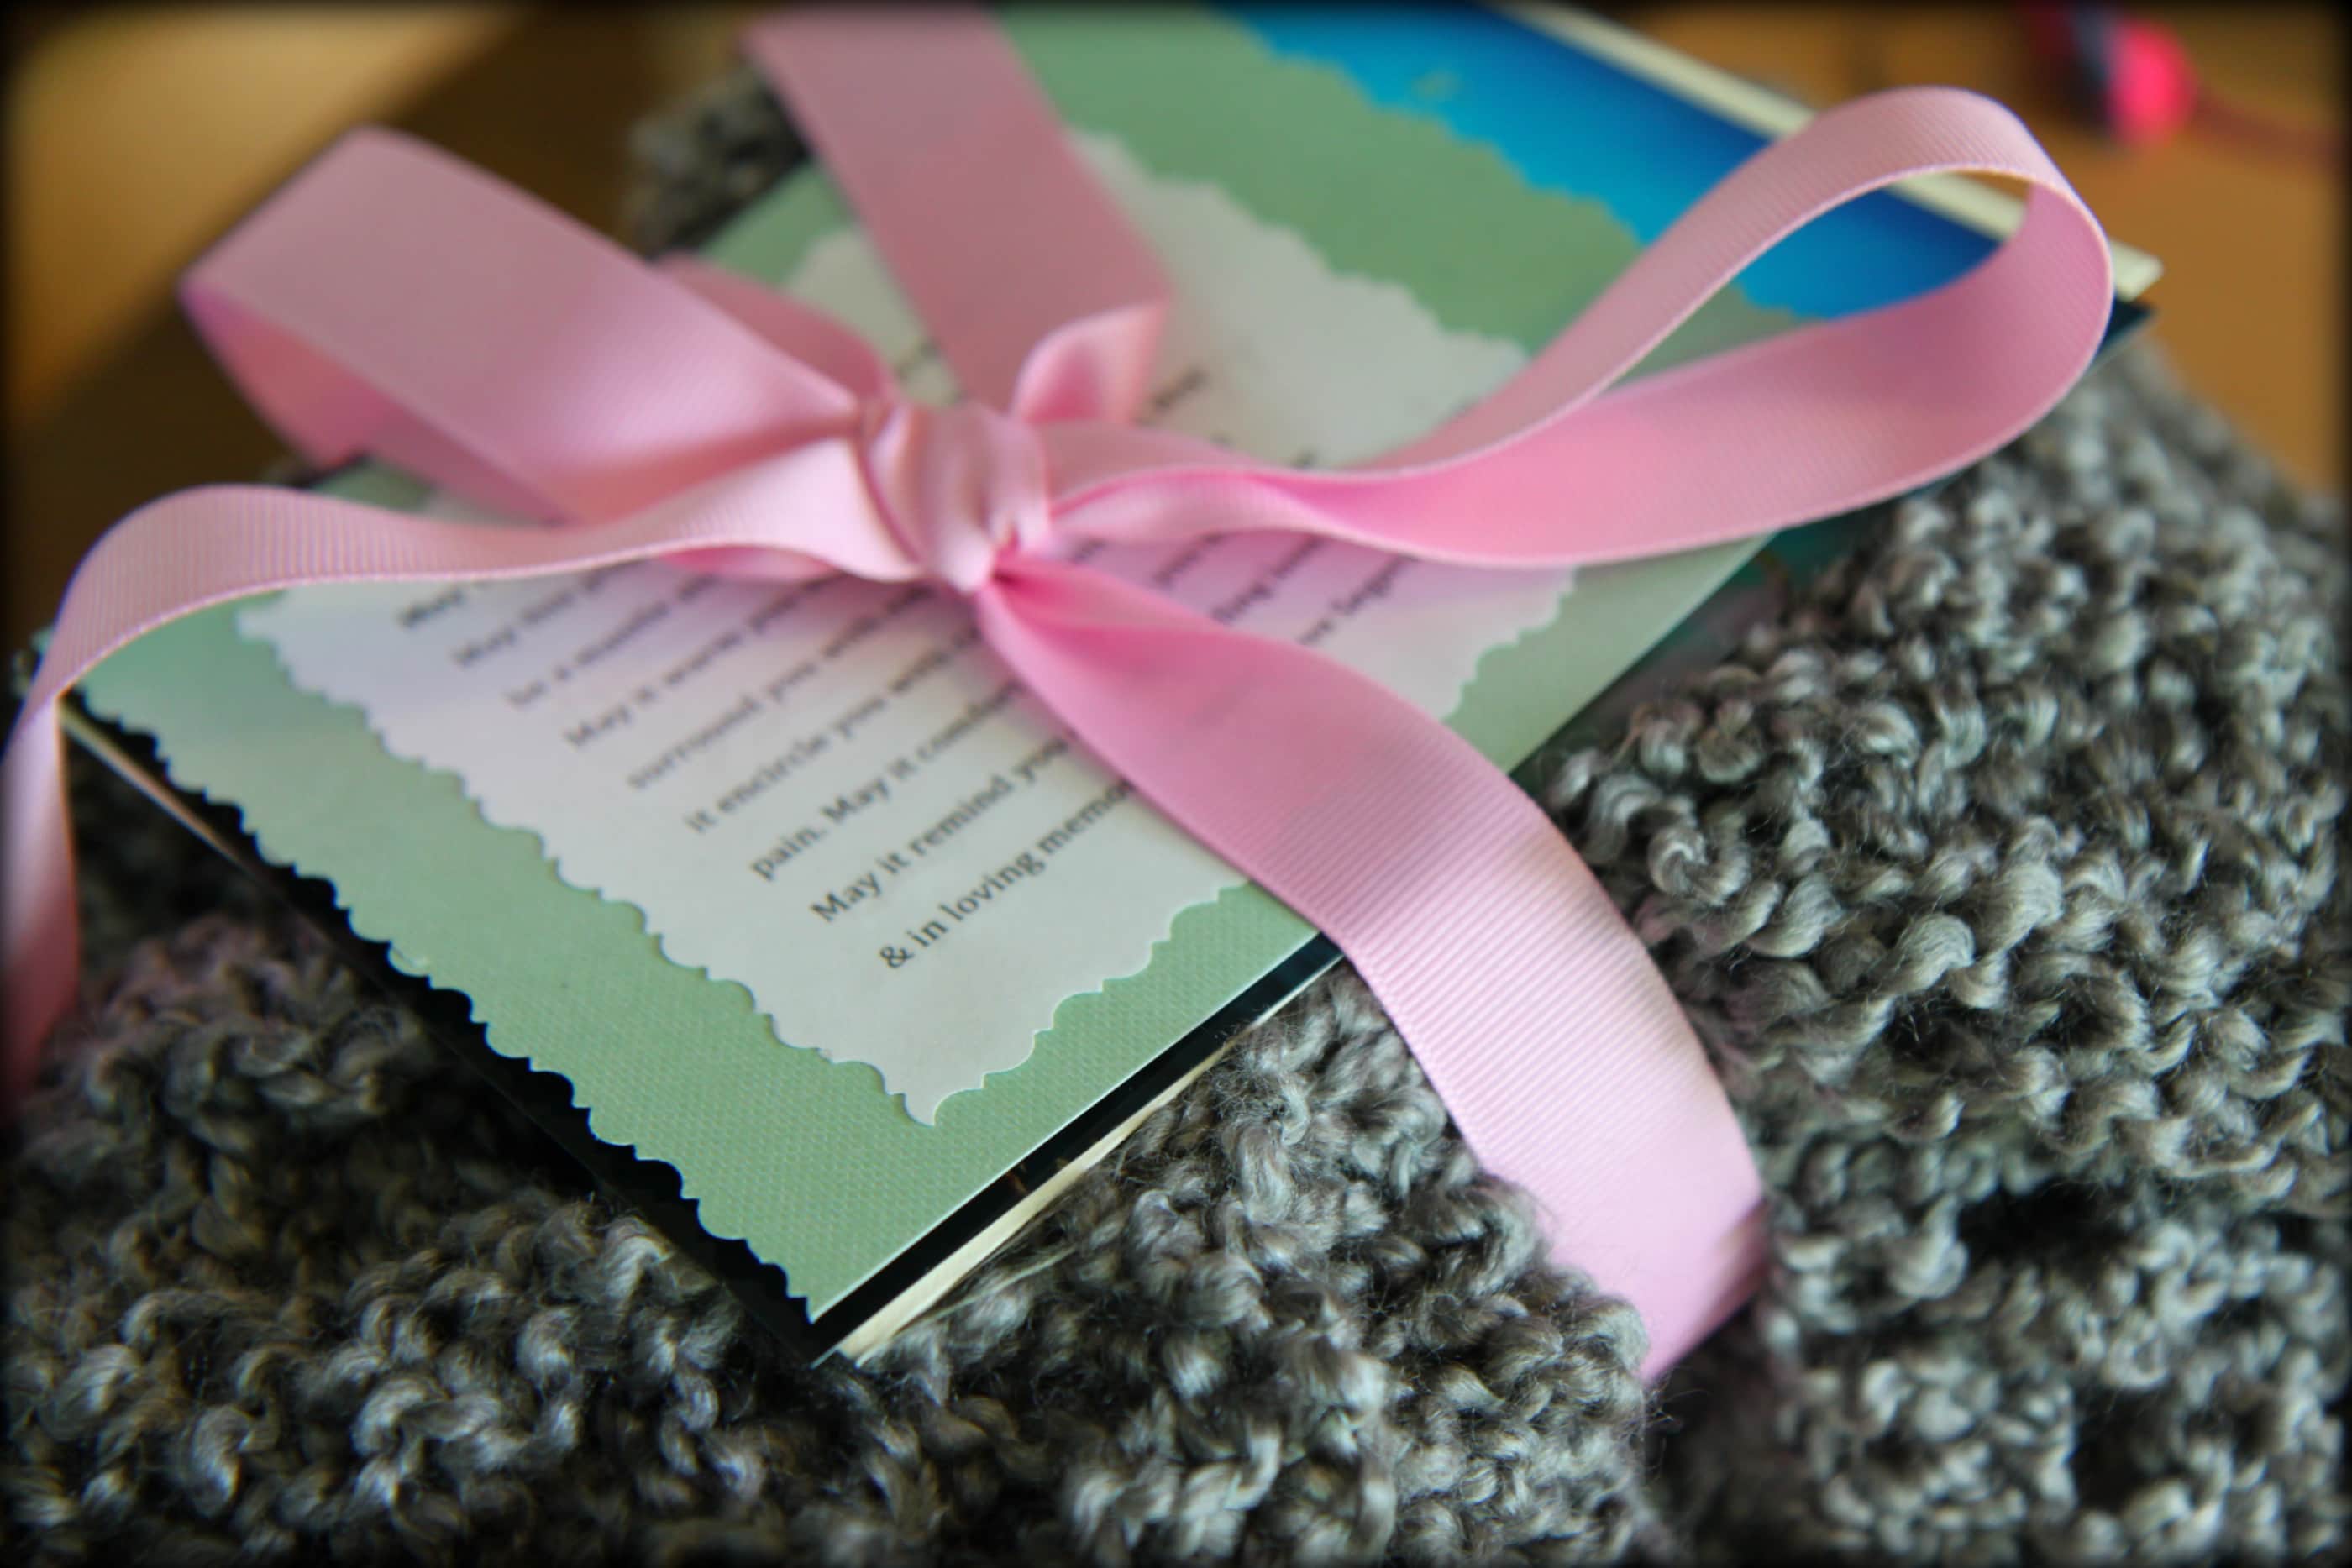
I always try to ask what the recipient’s favorite color is and weave that into the packaging in some way. I love a good neutral shawl that can be worn over everything, but if their favorite colors is purple, for example, I use ribbon to tie in that bolder color to attach my charms on the edge.
What types of charms do you love?
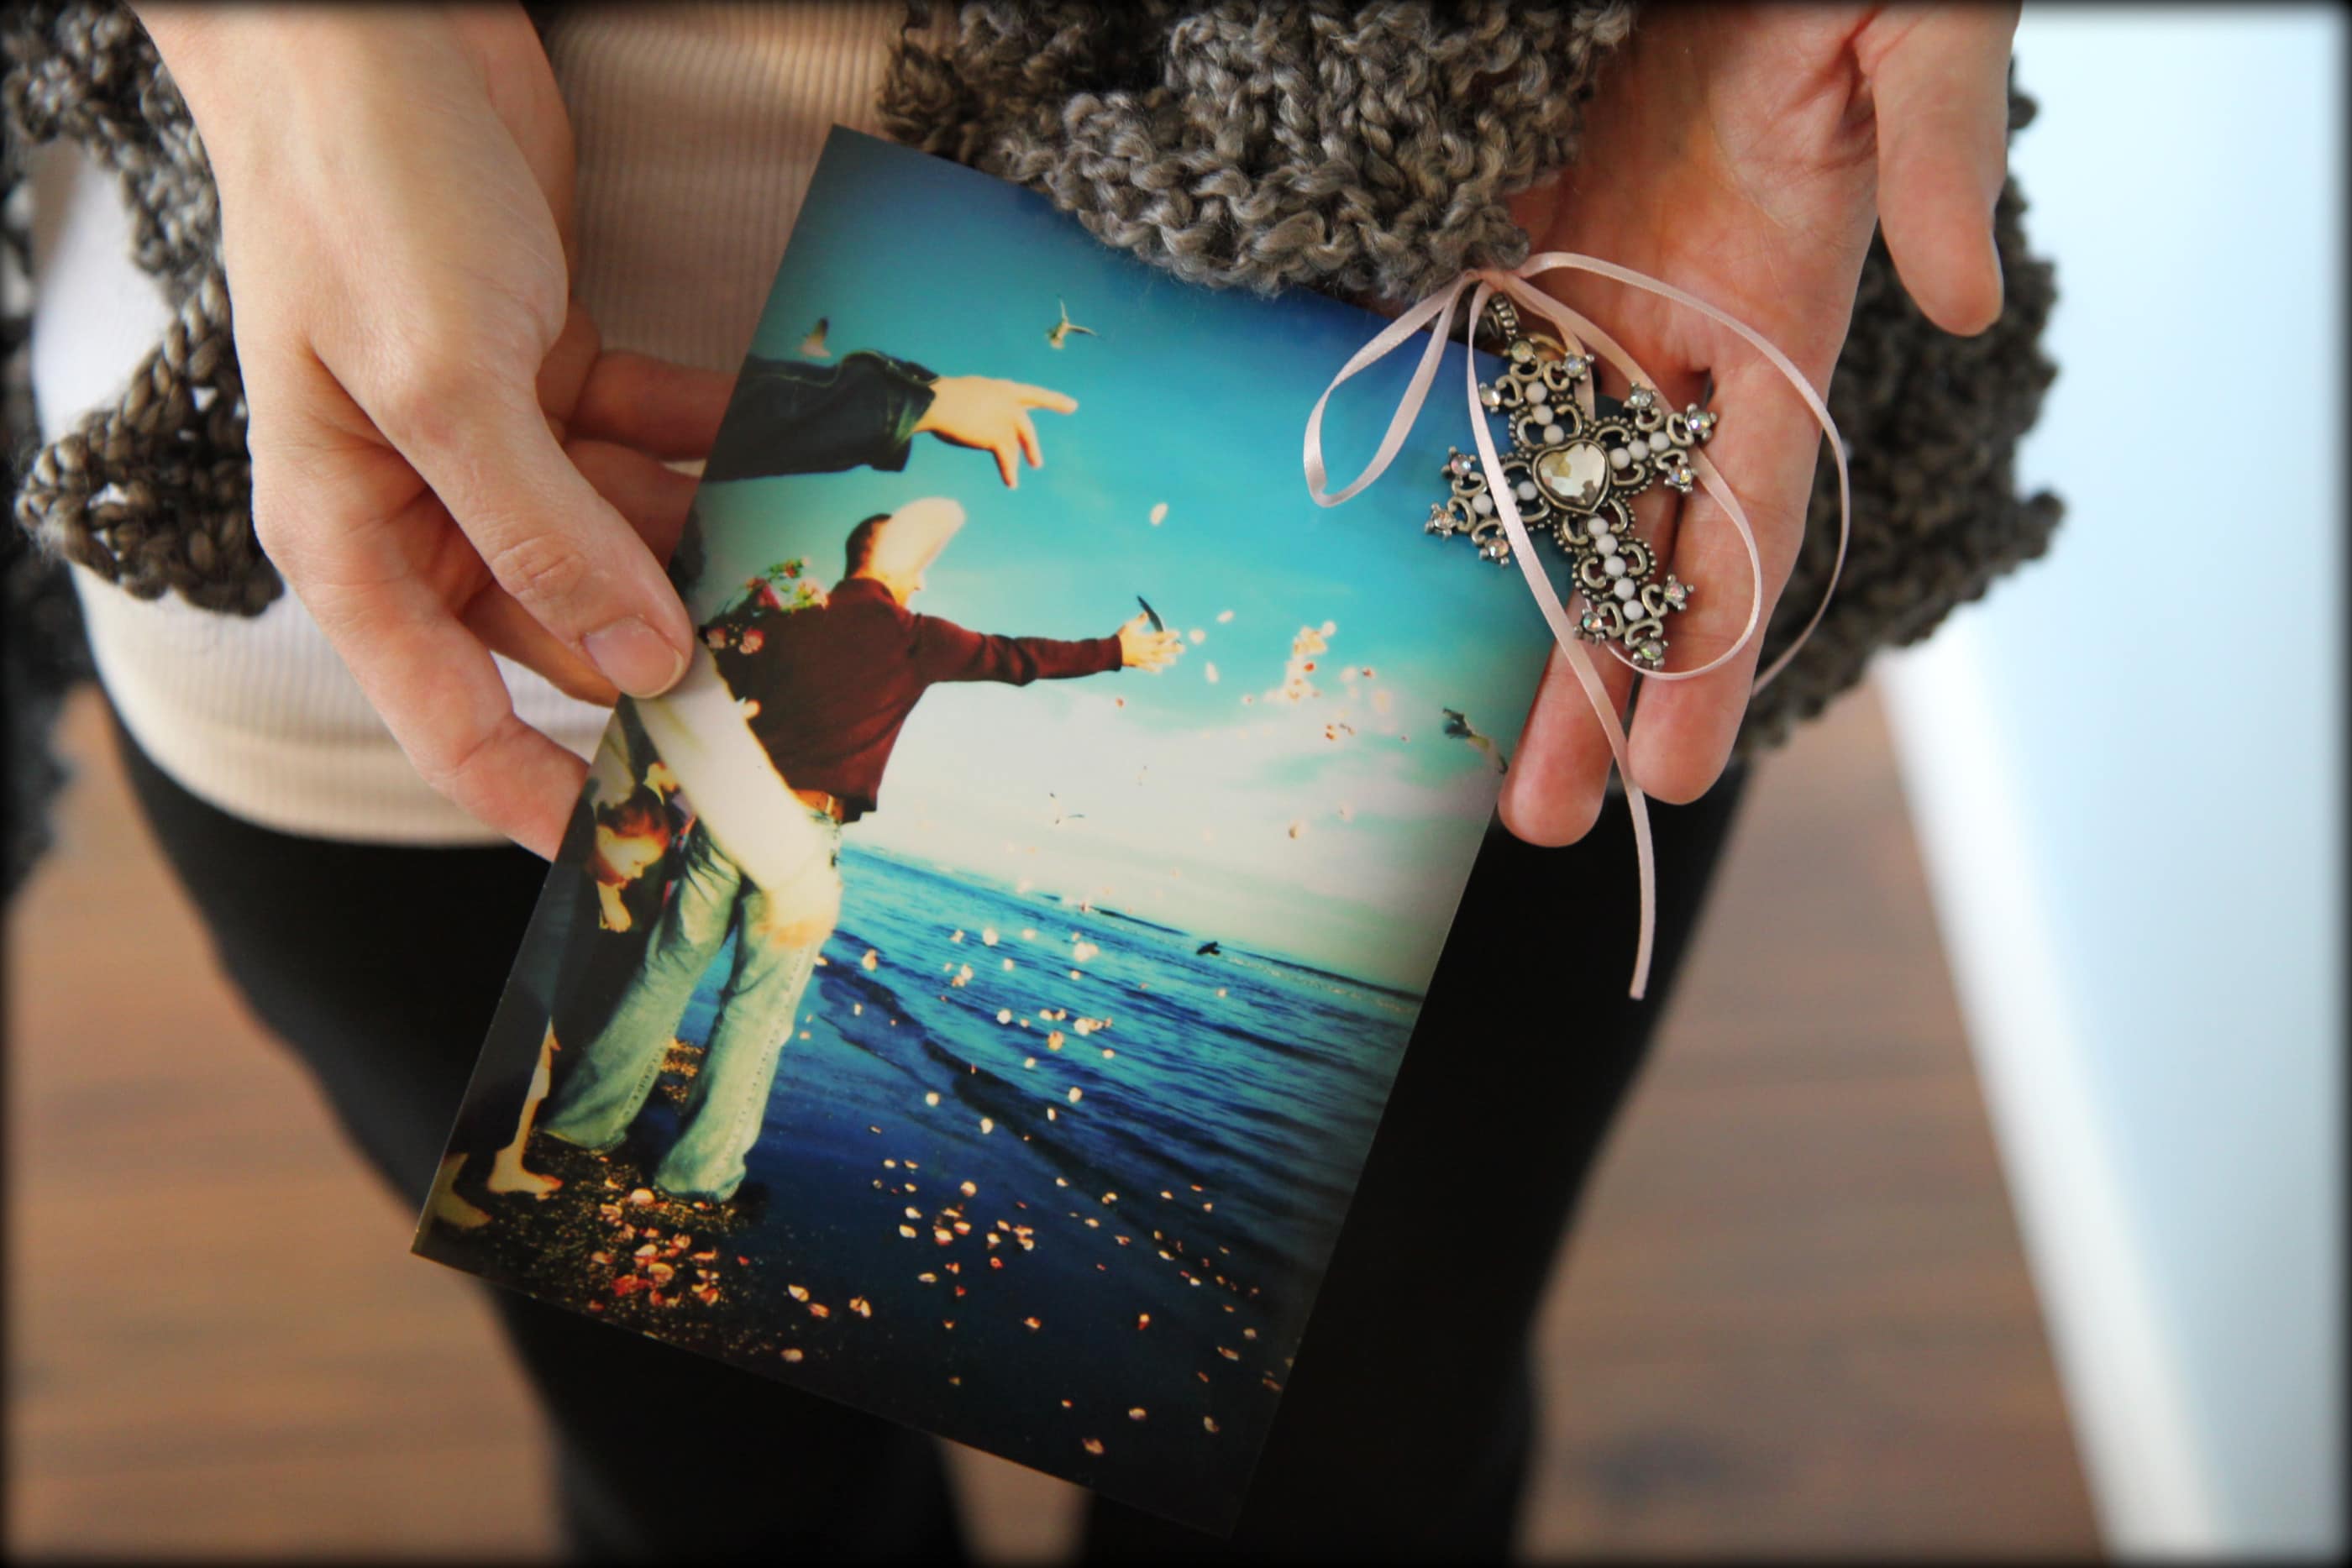
I try to be very personal with my gifts so I like to weave in an element of faith (usually a cross) and then a personal element. The other element I love to do is a photo element because it is a great visual for someone in their time of need. The jewelry section of your craft stores or the craft section of Walmart offer a variety of charms that you can use for photo storage. It depends on the person I am knitting it for though on what I choose to do.
When my grandfather passed away, I had the sweetest picture of him and put this in a charm for my mom & grandma as a gift for the holidays. For those that are fighting a battle of some kind (a miscarriage or cancer), I like to add a photo element that encourages them to keep fighting. Pictures of grandkids or their children offer a gentle reminder of all they have to fight for.
What types of patterns do you recommend for creating a prayer shawl?
I feel like this is really a matter of preference, but since the object is to focus on the person you are creating it for through meditation or prayer, I love simple patterns and not anything too complex. As a busy mom, this is a project you will find me toting around back and forth from piano & dance lessons, so it needs to be one that I can pick up easily and come back to or be able to knit a quick row in the car while waiting for the kid’s bus.
My go-to pattern is in THE PRAYER SHAWL COMPANION and is called Alice’s Lace Shawl. I love it because there is just a single row of stitching (very easy to remember) and then the other two rows are a knitted row and a purl row. If you are a crocheter, THE CROCHETED PRAYER SHAWL COMPANION is a great resource & Janet recently added THE NEW PRAYER SHAWL COMPANION which I can’t wait to check out too!
You can also check Ravelry (you need to get your free membership to view the patterns) for a variety of shawl patterns.
How long does it take to knit a prayer shawl?
To be honest, many of the shawls I knit end up being needed urgently so I try to knit them quickly, often in a matter of three marathon knitting nights. Lately, with our family schedule, it takes me several weeks to get these done. I try to remember that the true purpose of this is to be in prayerfulness and to provide comfort, not be the quickest at knitting. The longer I have it in my possession, the more time I have to think on that person. Provided it isn’t an urgent situation, I can usually get these done in a few weeks!
If you have a special talent for knitting or crocheting, consider donating a little of your time to creating prayer shawls for others. Many of the people I have knitted these for, I have never met, but have discovered their struggles through mutual friends or family. This gift for people I know personally or not… it is just never forgotten. I still have some of the most heartfelt teary-eyed chats with family members or recipients of these shawls years and years after the gift is given.
In a world where we are expected to rush, rush, rush and hurried text messages sometimes replace our real & true presence, a gift like this is impactful in ways you may never realize.
Have you ever received or created a prayer shawl? Feel free to share your experience here! I’d love to hear your stories!
When I look back on my life, I can honestly tell you that never in a million years would I believe that I would be sharing tutorials on craft or DIY. I always had crafty ambitions, but seemed to lack that creative gene and talent to take my projects to the next level. My skill set was minimal, but the desire was always there. When we had to be serious about penny pinching, after the loss of my husband’s job, that is when I knew that I needed to be serious about making the most of our home and to get serious about DIY-ing in our life.
There is nothing like a lack of money that can force you into getting creative.
Each day I am a little prouder of the the things that we have crafted for our home. The comments that I get make me feel so good about the space we have created. My favorite thing people say is, “This house is just so YOU.” Making a house with lots of personality and individuality has always been a big goal of mine and it has been created with an awful lot of crafting over these years. Our house really is just *us* and it was achieved with hot glue, a lot of yarn, plenty of paint, and a strong desire for a house with individuality.
No sewing skills required!
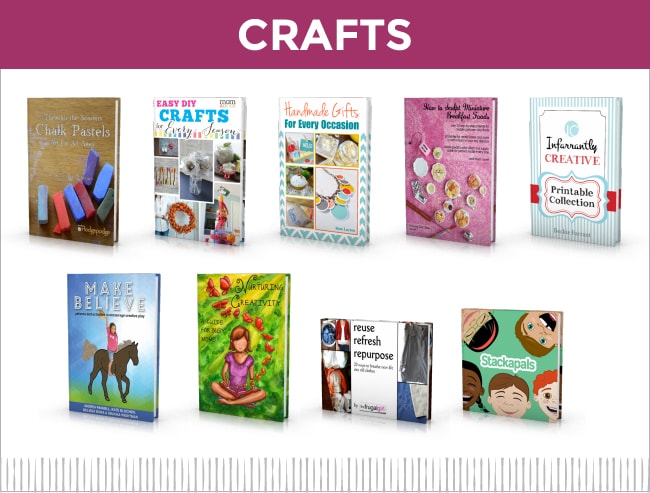
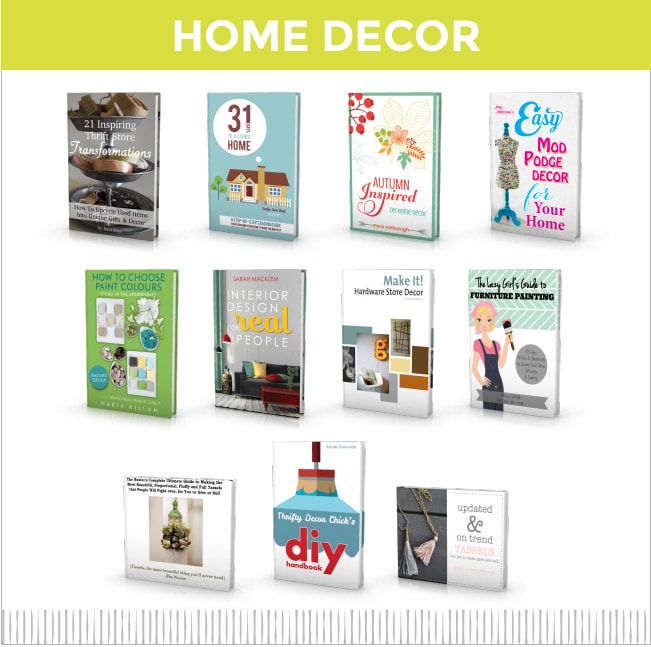
Which is why I am so thrilled to share that I am selling my first eBook called, Easy DIY Crafts for Every Season, in The Ultimate DIY Bundle to help inspire you – from crafting for your home, to creating the perfect hostess gift, to celebrating all of life’s holidays. As someone as un-crafty as I was, this feels like a really big milestone paved with a lot of awful burn marks from poor hot glue planning. 🙂
The resources in this bundle are just the kind of resources that I wished I would have had at my fingertips when I was learning to decorate and craft for my home. It is the kind of resource that would have helped me achieve all that I really wanted to do on my small budget.
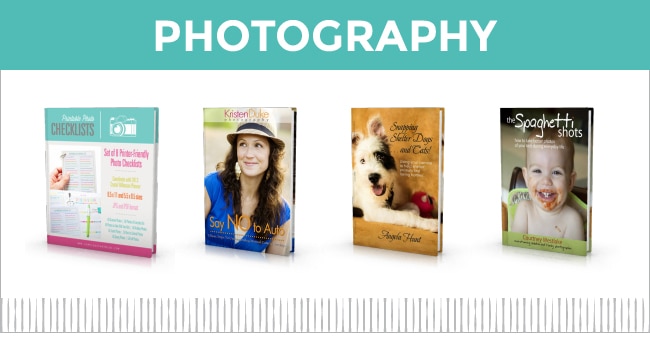
For me, the photography books included really make this bundle special and worth the investment. Kristen Duke is one of my favorite photographers and I have been dying to learn from her. How awesome that Say NO to Auto is included in this bundle so that I can start taking better pictures of my crafts…and my kids?! There is also Birthday Party Printables from Amy Locurto, The Ultimate Tassel Guide by Myquillyn Smith (aka, The Nester), Thrifty Decor Chick’s DIY Handbook by Sarah Saucedo, A Summer of Stories by Tsh Oxenreider, Easy Mod Podge Decor for Your Home by Amy Anderson, Infarrantly Creative Printable Collection by Beckie Farrant and SO much more!
You’ll gain access to a library full of 75+ eBooks and eCourses (like Photography 101 from the guys at Shoot, Fly, Shoot), PLUS free bonuses which include a Craftsy class worth up to $60! So, DIY + Freebies? You can see why I’d be excited to share this with you all, right?
*Sorry, this sale has ended!*
The Ultimate DIY Bundle, is a collection of carefully curated DIY eBooks and eCourses from the world’s leading authors and bloggers in the industry! For just $34.95 you’ll get access to over 75 eBooks and eCourses – and let me reassure you that this really is great value: the Ultimate Bundles team (who produced the resource) has spent MONTHS seeking out the most respected experts in the industry and asking them to contribute their premium-quality eBooks and eCourses. These really are the best of the best when it comes to DIY and crafting advice and information on topics like:
Home decor
Furniture painting
Photography
Chalk pastels
Handmade gifts
Homemade skincare products
Cake decorating
Photography and photo-editing
Paint colors and interior design
There’s no need to worry about information overload though: The Ultimate DIY Bundle comes with a complete guide to getting started, so that you can know exactly which resource to use for your specific crafting or DIY project and jump straight into it with confidence!
This post is sponsored on behalf of BHG at Walmart.
A fresh new year is a great time to not only declutter our homes of unnecessary items, but it is also a great time to stock up on life’s daily essentials. Emergency preparation has been something that has been on my mind these days and with the focus of our site being on health/wellness for the m challenge, I thought this would be a great time to address my poorly stocked First Aid Kit, a unique way to package it for the home, and I would love to give you the chance to win a gift card of $100 to create one yourself out of products from BHG at Walmart. What do I know about First Aid essentials and preparedness. It turns out, not much.
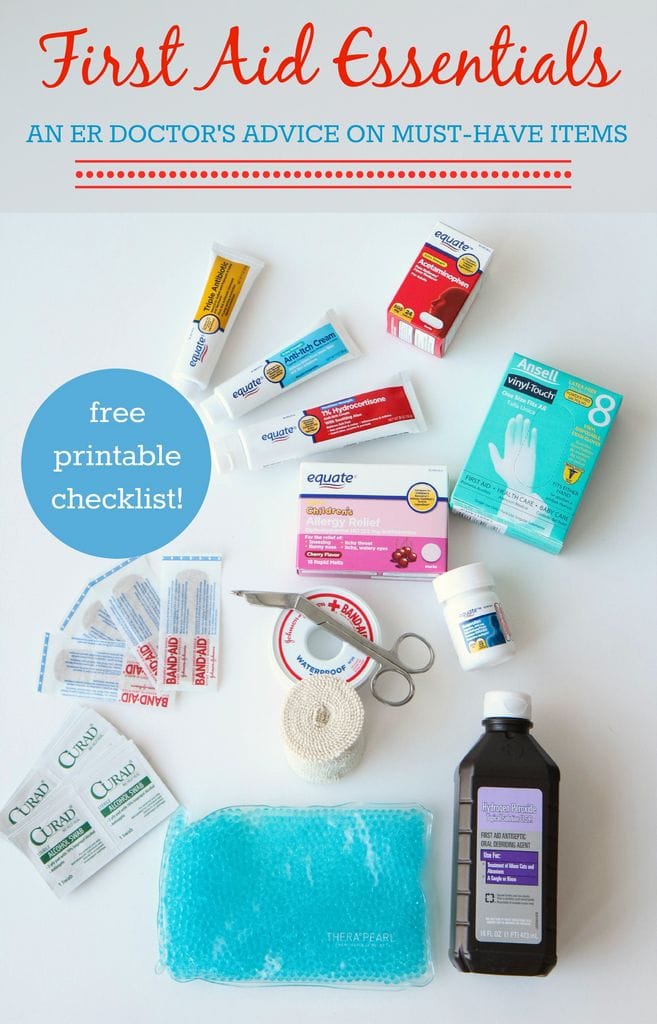
I am not an expert on emergencies and emergency situations, but lucky for me, I actually happen to know an ER doctor in town who has seen his fair share of emergencies at his hospital. Dr. Jamie Shoemaker is an ER Doctor for Elkhart General Hospital and GRACIOUSLY offered his expert opinion on what every mom should have in her First Aid Kit to be prepared for emergency situations.
It should come as no surprise that I barely had the bandages and cream category covered.
Ahem.
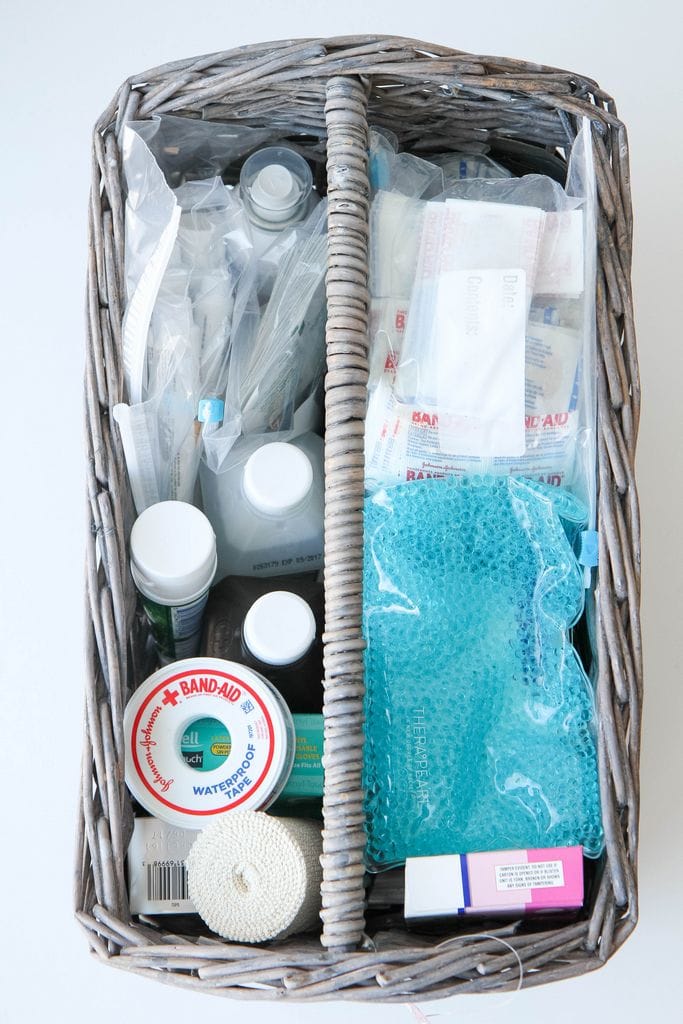
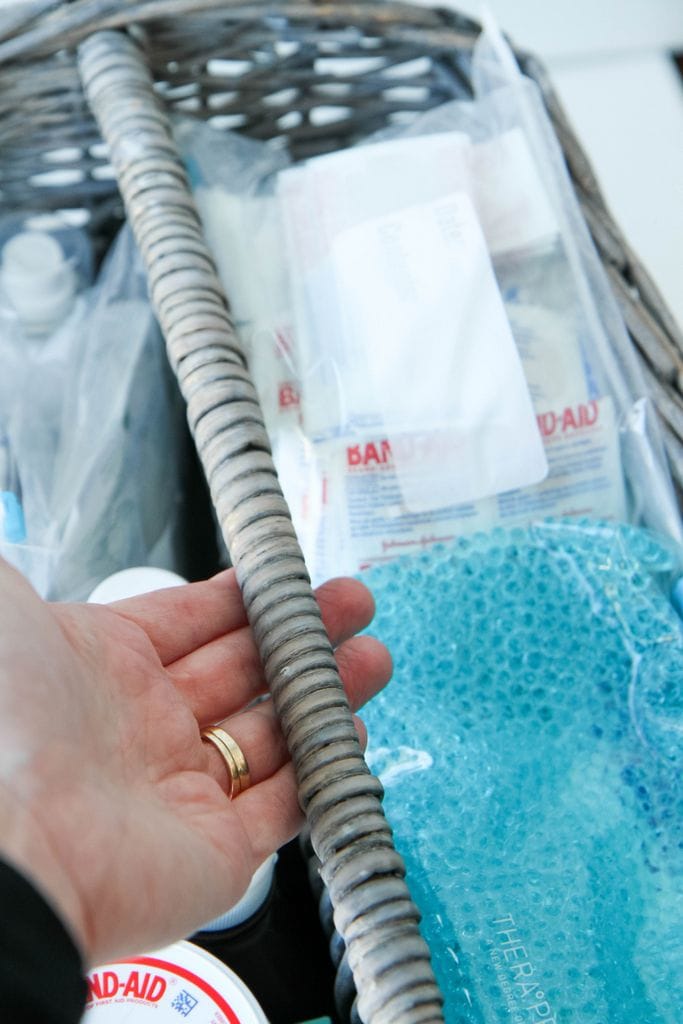
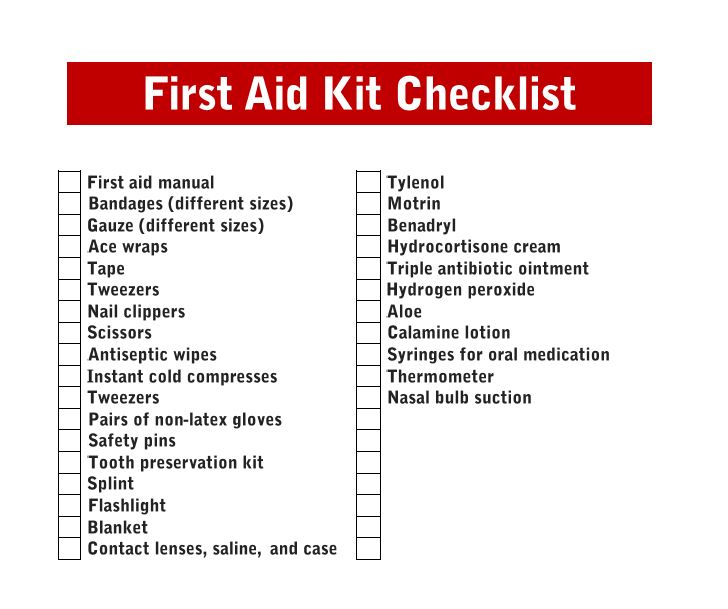
On his list of First Aid essentials, he suggested different size bandages, Tylenol, Motrin, Benadryl, Hydrocortisone creme, Triple antibiotic ointment, hydrogen peroxide, nasal bulbsuction, syringes for oral med admin, tweezers, tape, gauze of varying sizes, Ace wraps, aloe, nail clippers, antiseptic wipes, instant cold compresses, scissors, pairs of non latex gloves, thermometer, splint, safety pins, calamine lotion, flashlight, blanket, tooth preservation
kit, contact lenses saline and case and a first aid manual.
Don’t worry- we have a printable for all of this for you to take when you head to the store.
He also noted that aspirin should be avoided in children due to Reye’s syndrome so he did not include it on this list for moms.
Thank you, Dr. Shoemaker, for helping us get prepared for emergencies in this new year.
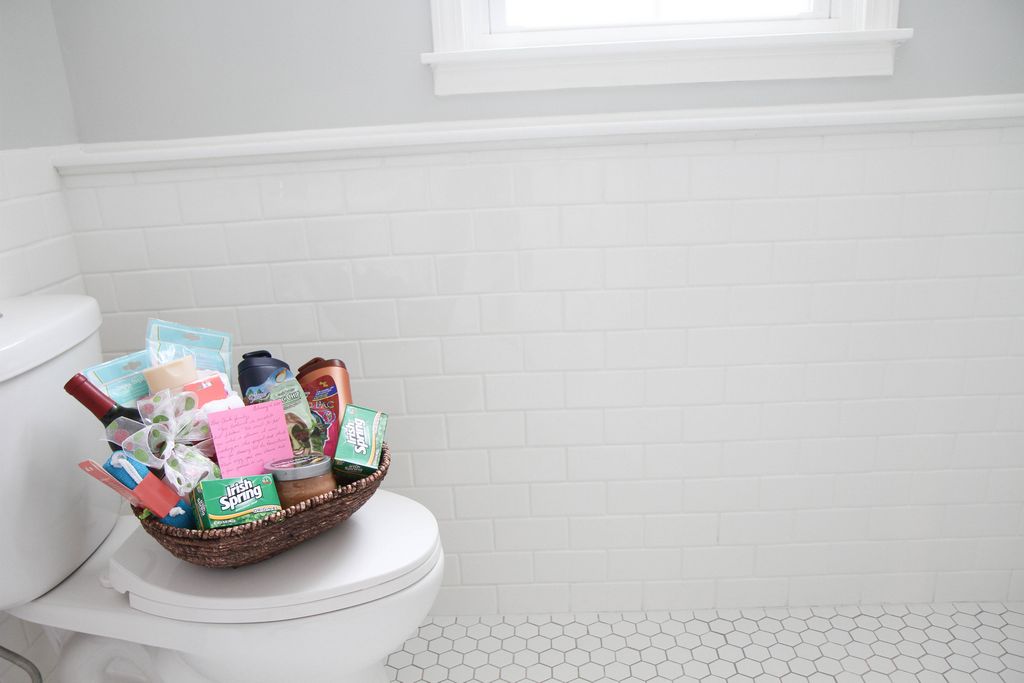
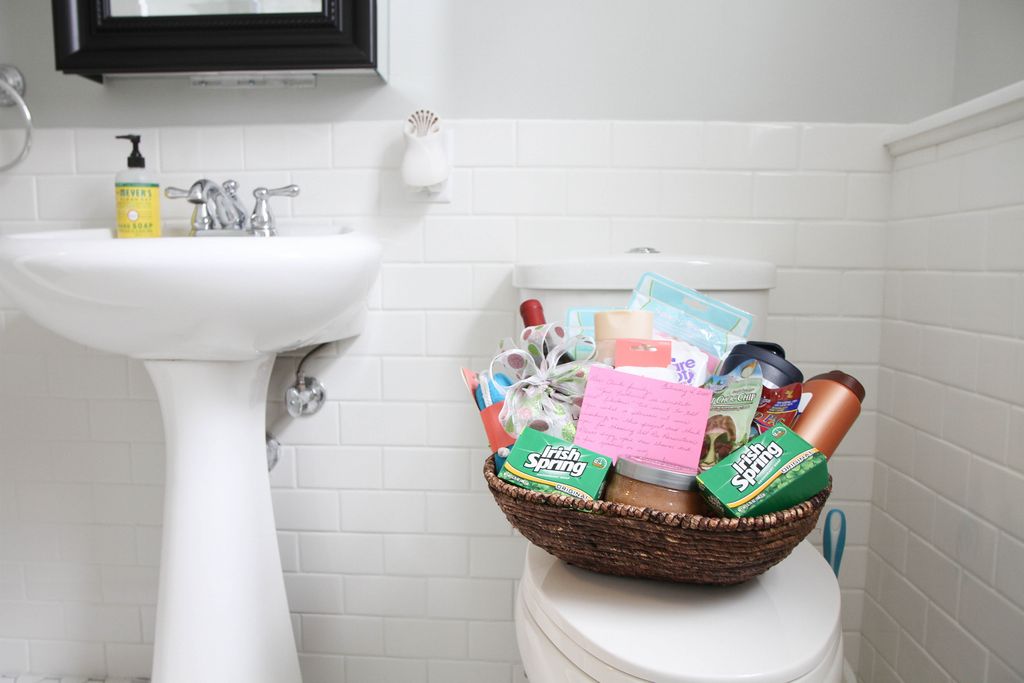
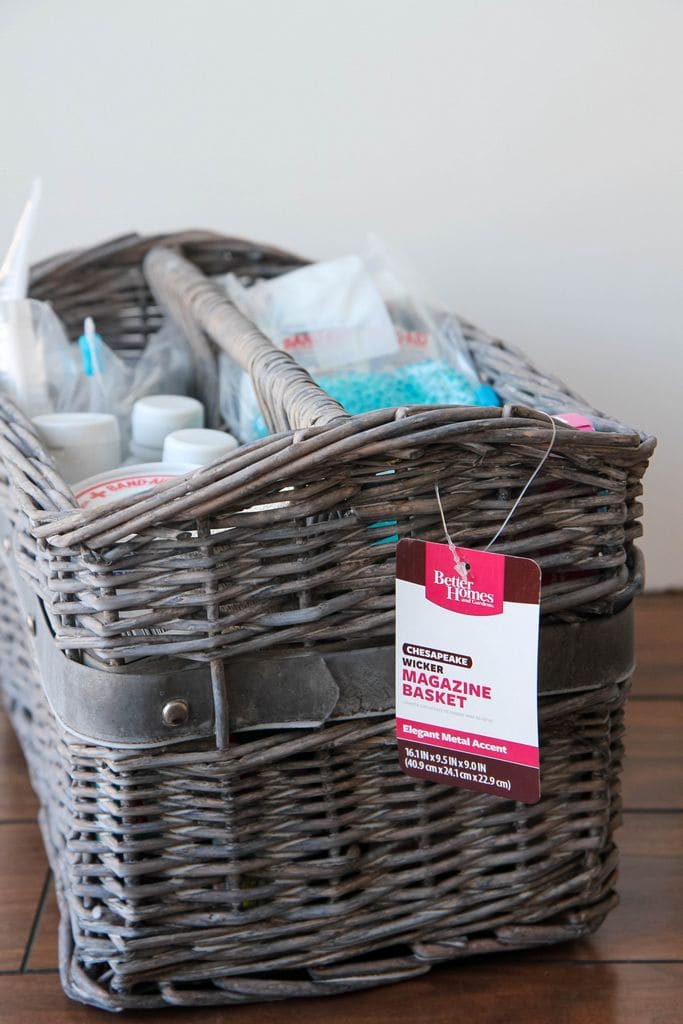
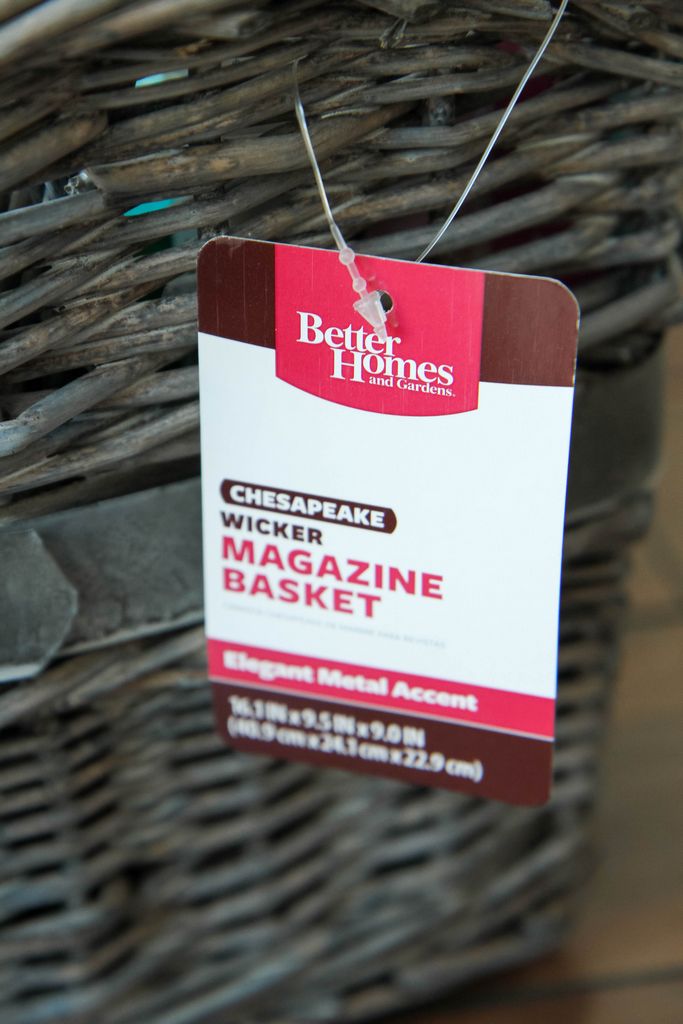
I headed to Walmart with his list and wanted to stock up on every item, but also knew that I had to find a pretty way to package it. Thankfully, the BHG product line at Walmart offer a variety of cute totes, baskets, and other organizer essentials. Since I have nowhere to tuck my First Aid kit, it will rest on top of our little bathroom storage unit, on display for our guests. I wanted something attractive for storage so I settled on this handy Better Homes & Gardens Chesapeake Magazine Basket for under $13 that housed all of these fabulous First Aid essentials with ease and kept them tucked away without anyone knowing what is in there. How perfect is that?
Emergency preparedness is such an essential part of running a household and I know that this is something I should work on in our home. Whether it is being prepared with a bandage and some cream for the neverending injuries in our home or making sure our home is stocked with candles and flashlights for our neverending power outages or even more seriously, the need for disaster preparedness with canned foods and water…
Let’s face it, this stuff tends to fall on the shoulders of many mothers.
I know it falls on mine.
I can admit that I have done a pretty lousy job at stuff like that, but this year I want to do better and I want to encourage you to do better too. This month, the m challenge isn’t just about focusing on our own needs, but also on the needs of those we love. I hope this little push can help you this year to address key needs in your own household.
(just a screenshot- click below for the printable please!)
I have prepared for you a FREE printable list of First Aid Essentials that you can take to the store of all the recommendations Dr. Shoemaker offers for us. There is no need to stress about being prepared this year- we have you covered!
Enter below to win one $100 Walmart Gift Card from BHG at Walmart to stock your First Aid Kit for the new year. One lucky winner will receive this gift card to stock up on all the essentials. This giveaway ends on January 21st! Good luck, everyone!
In accordance with the FTC Guidelines, I am disclosing that I received compensation from BHG at Walmart for my time and participation in the BHG Live Better Network. Although we have material connection to BHG, any publicly stated opinions of BHG and their products remain my own.
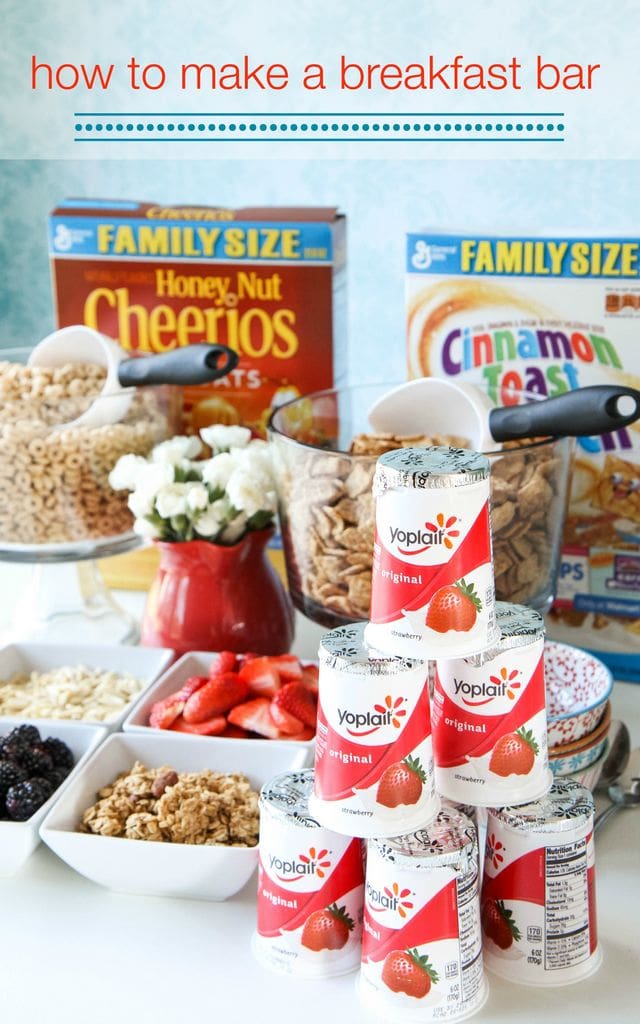
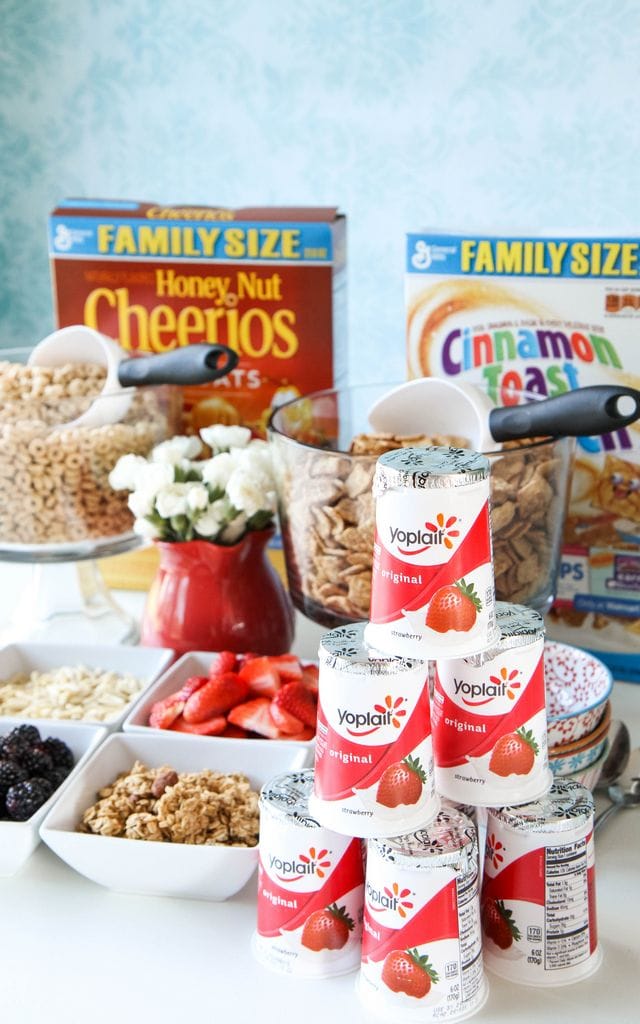
We have come to the age of slumber parties and epic sleepovers in our home. If you were anything like me when I was a child, you just couldn’t wait to wake up and find out what would be for breakfast. Making a breakfast bar can be a fun way to serve a large group whether it is your child’s birthday or simply an easy way to entertain guests for the morning. I am partnering with Walmart today to show off a cute display for creating a breakfast bar in your home.
My favorite sleepover when I was a kid involved a huge display of toppings for our waffles and pancakes. I remember as a child delighting in all of the options and I still have that delight even as an adult. Now as mom, I love creating a self-service bar of choices for our meals where everyone can customize their own meals to their own tastes.
Breakfast, in particular, as a buffet is a great idea so that guests can sleep in and then come and create their breakfast whenever they are ready, eliminating the need for you to all be around the table at the same exact time.
Even on busy school mornings, I find that this option would work beautifully since we all arrive at the table at different times. By prepping the toppings ahead, you can save time in the morning and really enjoy that cup of coffee.
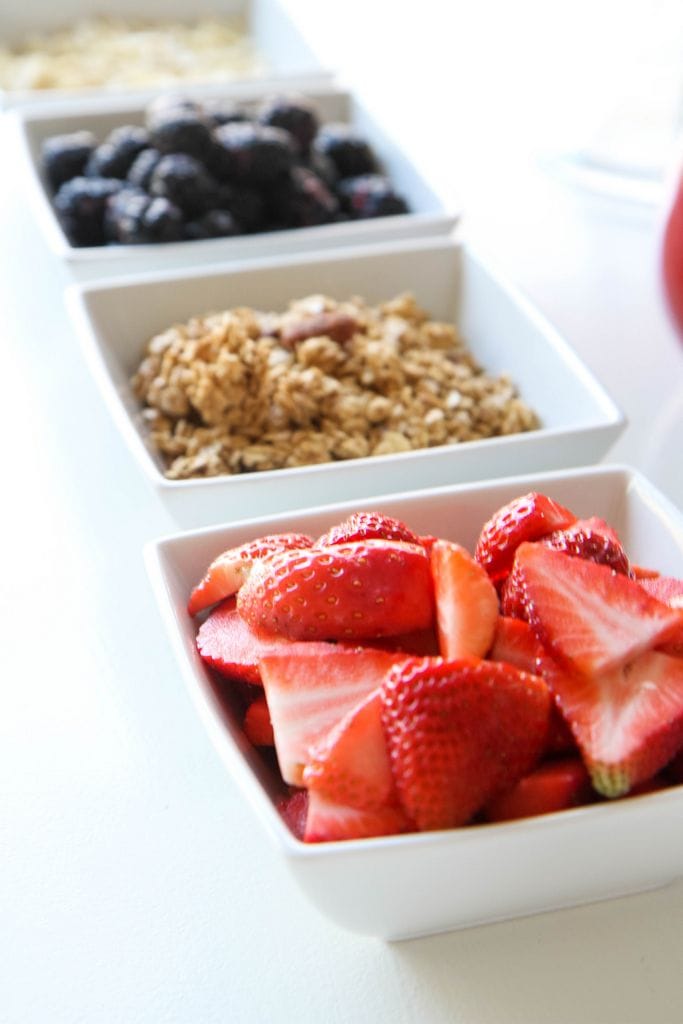
Here are some of my suggestions for creating a beautiful and easy breakfast bar spread!
Make Serving Easy With Scoops & Trifle Bowls
Ditch the cereal boxes for an elegant display utilizing clear glass trifle bowls and an inexpensive all-purpose scoop. Give your guests choices by providing more than one selection of cereal.
Create a Simple Toppings Bar
I love to provide a variety of toppings so everyone can make their bowl their own. Fresh strawberries, blackberries, or blueberries can be a wonderful fresh topper. Dried fruits, slivered almonds, or crunchy walnuts can also add variety to your toppings bar. Make an easy batch of granola (I love this vanilla-scented granola or this easy honey nut granola) and add this to the mix for another crunchy layer. Remember to take advantage of what fruits are in-season to make sure you get the most bang for your buck.
Add a Gluten-Free Option
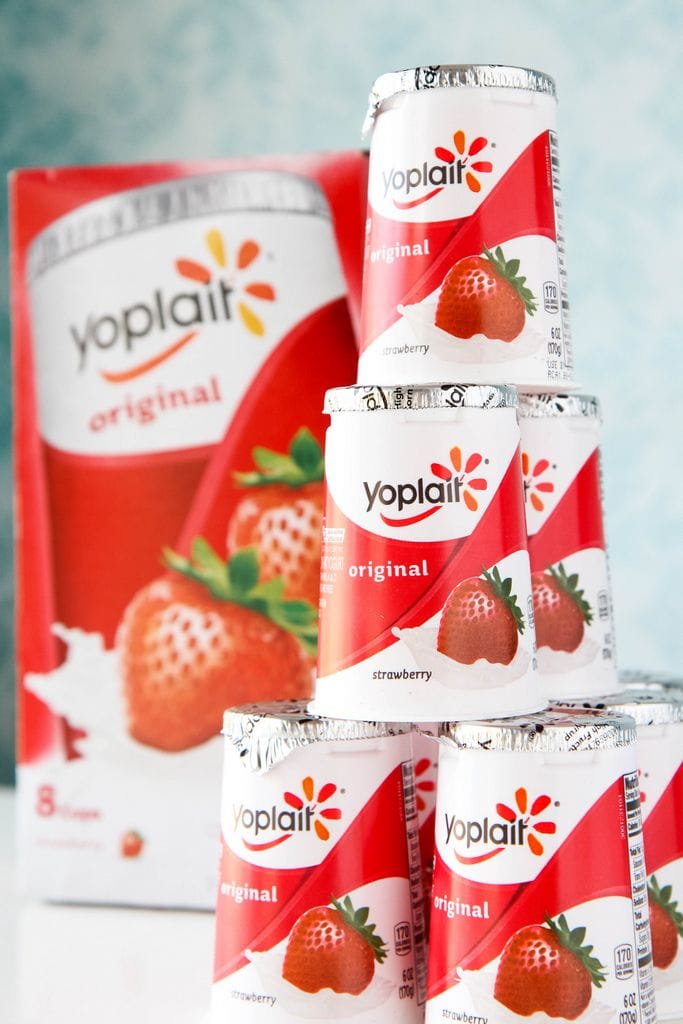
As someone who is gluten-free, I love when there are options for me. Yogurt can be a delicious option and give your guests a chance to also create their own bowl utilizing the delicious toppings you have provided for your breakfast buffet. I like to keep small bowls handy to pour the yogurt out into and giving me room to really layer on the fruit, nut, and granola toppings, just as I would do with cereal. Make sure that you are using gluten-free oats if making your own granola or purchase gluten-free prepared granola if purchasing them.
Make a Pretty Display
If there is one investment that I am glad I have made over the years, it has been in classic white dishes. Display your toppings in pretty bowls and add an inexpensive bouquet of flowers to the center of your breakfast bar. Even if the ingredients are not all homemade, you can still make things feel pretty and upscale with a few inexpensive additions and beautiful plating.
I hope these ideas inspired you for your breakfast. Whether it is a weekday rush or a leisurely morning with out-of-town guests, the breakfast bar can be an easy way to serve a meal!


