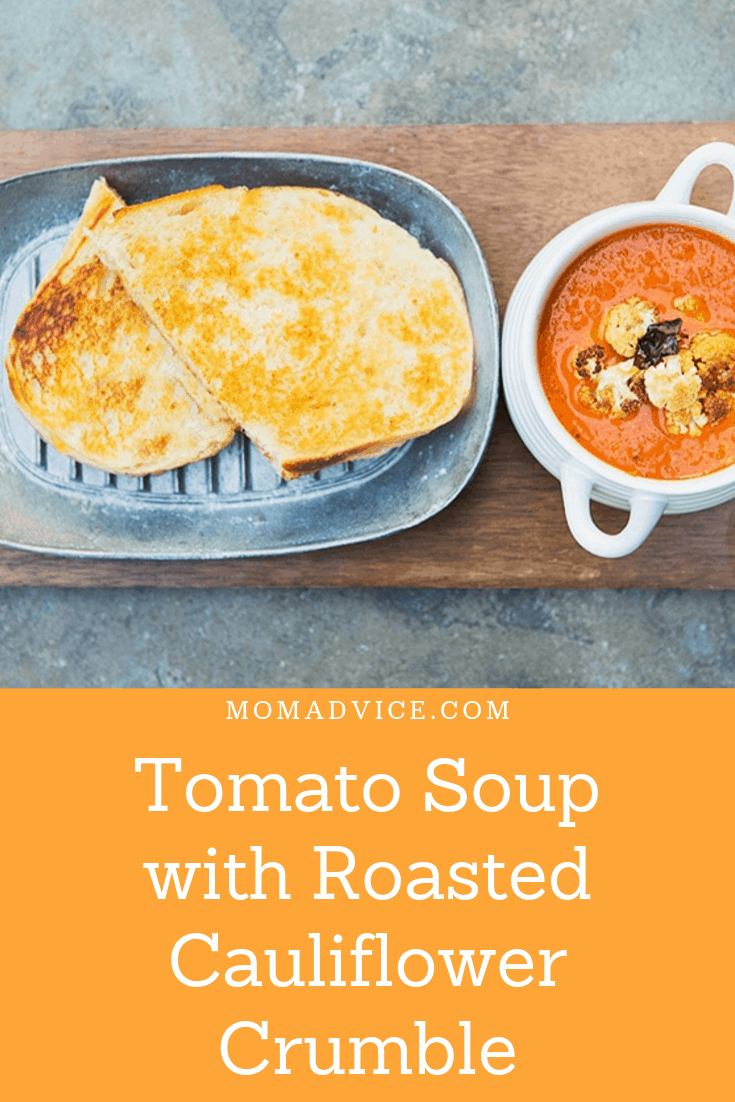
This quick and easy homemade tomato soup and grilled cheese combo gets an update in the form of golden brown roasted cauliflower florets. It’s just the right combination of classic and new just in time for fall.
I’m giving in, but not without a bit of stomping my feet and audible sighing.
Autumn is here, and with it there is a crispness to the air that didn’t accompany my summer evenings.
I find myself continually reaching for my sweaters, and although they’re still kicking out a few tomatoes, the production in my garden is slowing mightily.
I even wore boots last week, pulling them from the closet where they sat all summer as I ran around in sandals and low profile tennis shoes, skipping along the pavement in the sunshine.
I zipped them up over my jeans and stared in the mirror at my sweatered reflection before heading to the market.
There I grabbed as many tomatoes as I could find, hauling them to my car and then home where I rinsed them and diced them and stewed them in a large pot, trying to preserve the flavors of summer for the winter that is just around the corner.
At the end of the session, several pots of tomatoes later, I let the final batch cook down a bit longer, added a sautéed onion and some herbs, and then blended it together as the oven warmed the house right as the sun started to fade.
I suppose fall isn’t so bad when it means the return of oven-warmed rooms and the smells that come with baking and roasting.
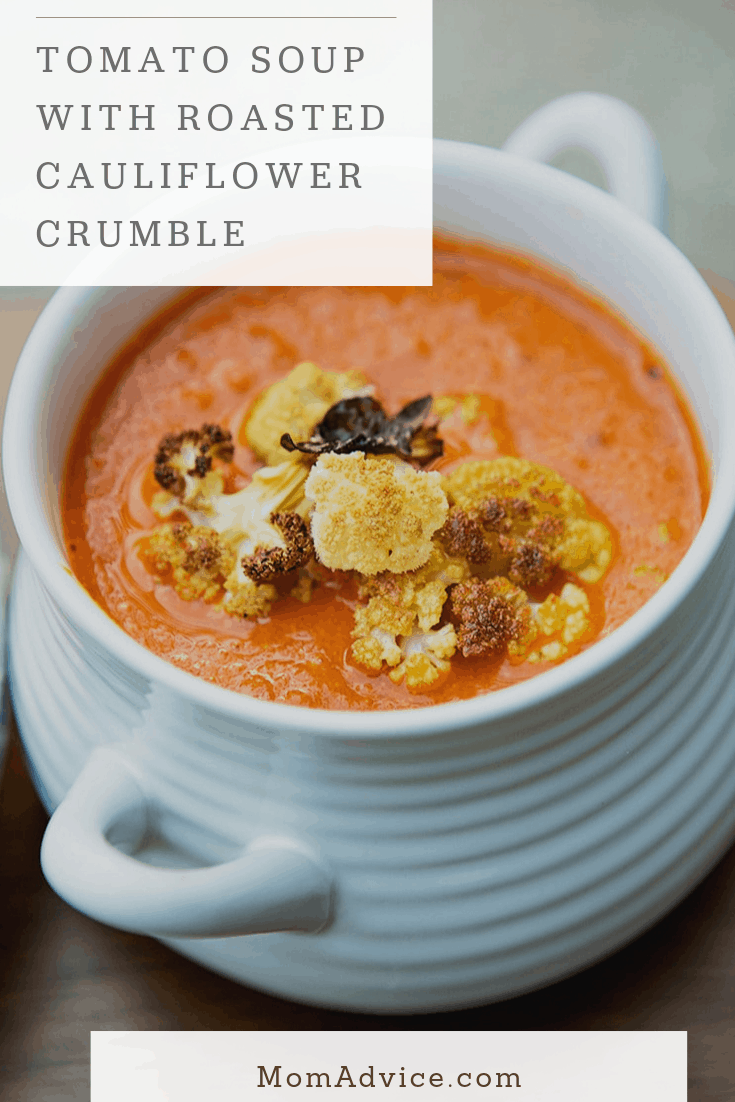
This soup gets a bit of a twist by placing the roasted cauliflower right on top.
Cut your cauliflower into tiny florets so that they can suspend themselves right at the top of the bowl, just getting a bit of a dunk in the thick tomato broth.
In a large pot, heat the oil over medium heat. Add the onion and cook for 5 minutes until translucent. Stir in the garlic.
Add the stewed tomatoes and the water and bring to a boil. Reduce heat and and simmer for 25 minutes.
While the tomatoes are simmering, preheat oven to 425ºF. In a large bowl, toss together the cauliflower, olive oil, oregano, honey, salt, and pepper. Spread on a baking sheet and bake for 30 minutes or until golden brown and cooked through, stirring once.
When the tomatoes have simmered for 25 minutes, remove from heat and blend in a blender until smooth. Pour back into the pot and heat over medium-low heat, stirring in the milk, basil, and salt. Cook until hot, but do not boil.
Serve with cauliflower sprinkled over the tops of the soup bowls.
3.2.2708
Don’t miss these other great posts from MomAdvice.com:
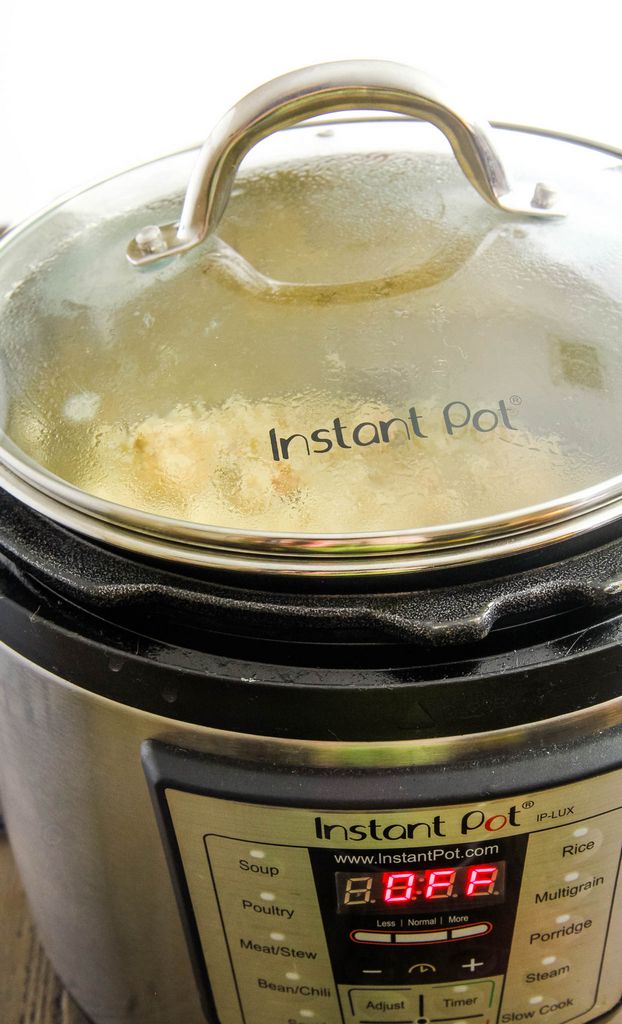
Risotto can be a very labor-intensive dish, but it doesn’t have to be with a pressure cooker. Today I’m sharing my step-by-step tutorial for creamy gluten-free risotto, made in your Instant Pot. Ditch the boxed mac and cheese for this easy weeknight dish.
Have you ever made risotto before? After our trip to Italy, I was so inspired to replicate this dish when we got home. Of course, I had no idea what a gift of love a bowl of risotto is.
One pot holds your warmed broth and the other is where you stand and stir until your arm falls off.
Maybe I’m being dramatic?
It’s not the first time.
This dish really does need a lot of babysitting so that’s why I was thrilled to discover that risotto could be made in your pressure cooker with very little effort and all the reward.
Honestly, I have made this dish almost weekly since we got our pressure cooker. If I am stumped for a good dinner this dish always comes in for the dinner save.
Risotto recipes are a great way to use up produce items, put shellfish to work, add any leftover chicken, or just load it up with parmesan cheese.
After making this for YEARS at our house, it’s time to share my electric pressure cooker secrets.
No more standing over a stove top, friends!
You can present this dish with all the love and almost none of the stirring.
As Ina would say, “How bad could that be?”
Let’s start with a few frequently asked questions on pressure cooking risotto!
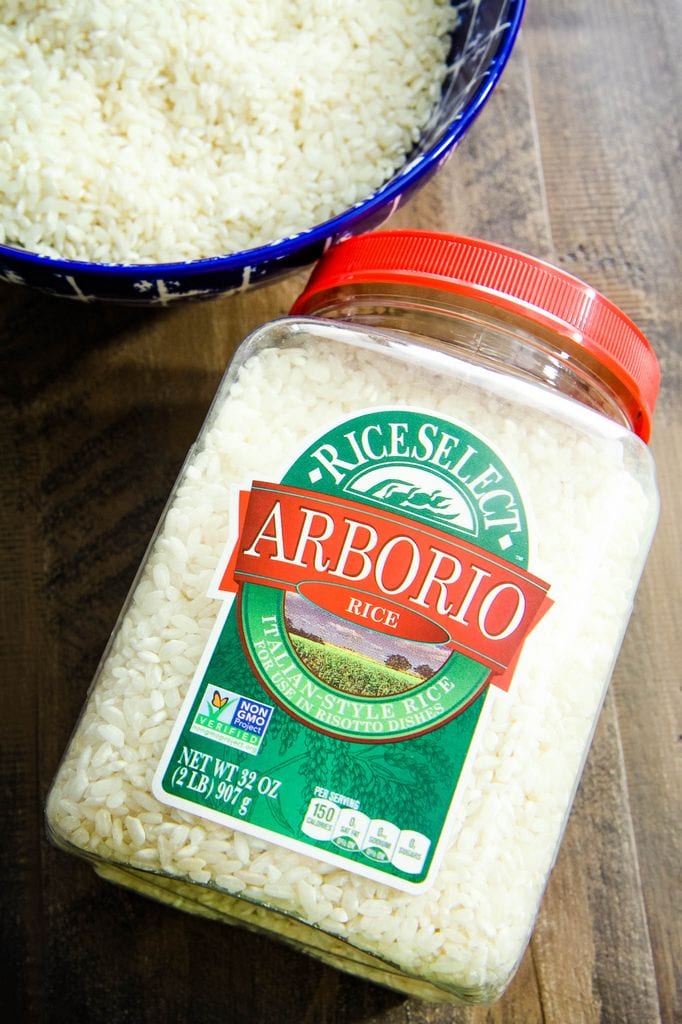
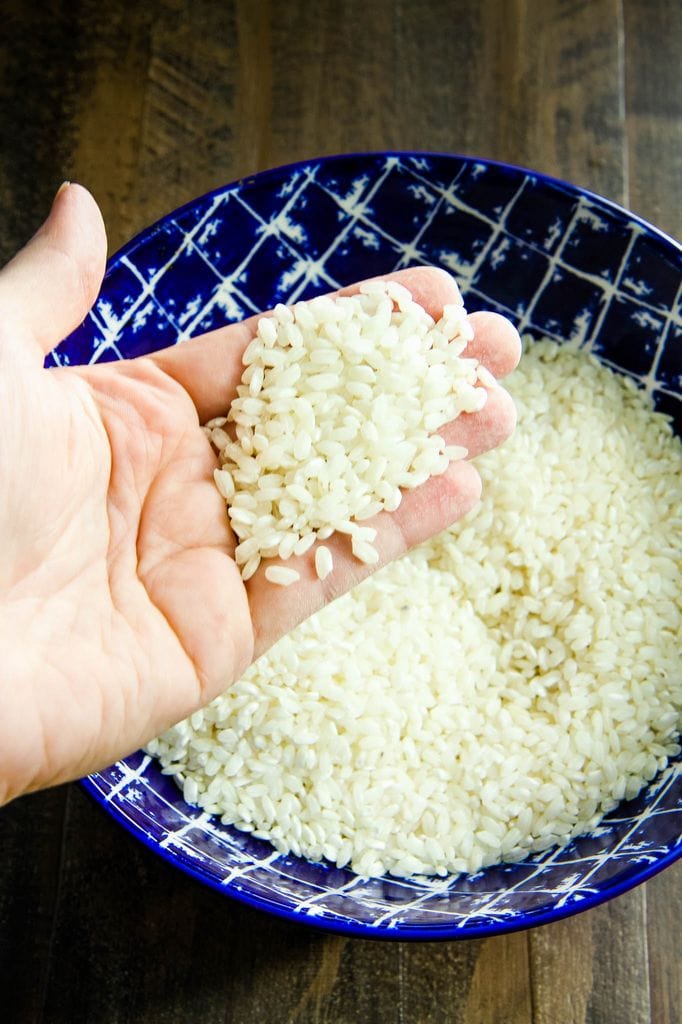
What Type of Rice Is Risotto Rice?
Risotto is made from Arborio rice and can be found, typically, in the same section as the other rice varieties or in the international foods section of your grocery store.
The appearance of arborio is different because it has a shorter, fatter, and more oval-shaped appearance.
Long-grained rice has to go through a lot of milling, but arborio rice isn’t as processed and that’s how it is able to retain its natural starch content.
When this starchy rice is agitated with stirring, it releases those starches and adds to the creamy consistency.
It also draws in liquid, like a sponge, and a pound of this can soak in as much as eight cups of liquid as it is cooking.
Can This Pressure Cooker Risotto Recipe Be Made Without Meat?
Today’s tutorial does have chicken in it, but it is definitely not required.
Personally, I love to roast medium shrimp in my oven (just toss them with a little olive oil, salt, pepper, and Old Bay) and roast them on a baking sheet at 450 for 6-8 minutes. Once they are done, they are perfect for risotto topping.
If you want to keep this dish vegetarian, substitute the chicken stock with vegetable broth and omit the meat.
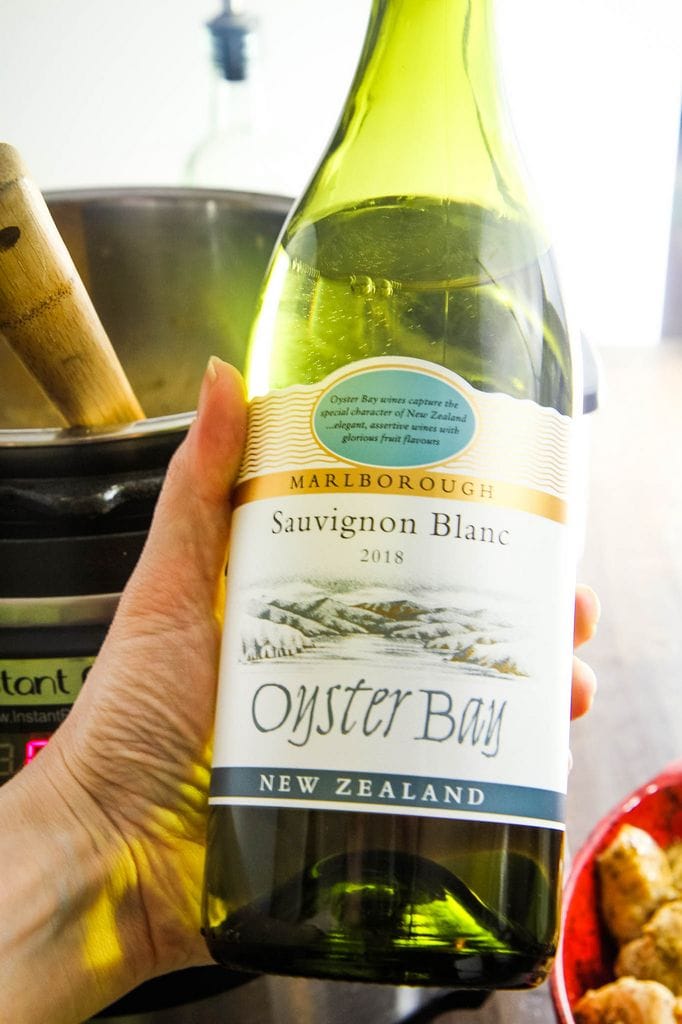
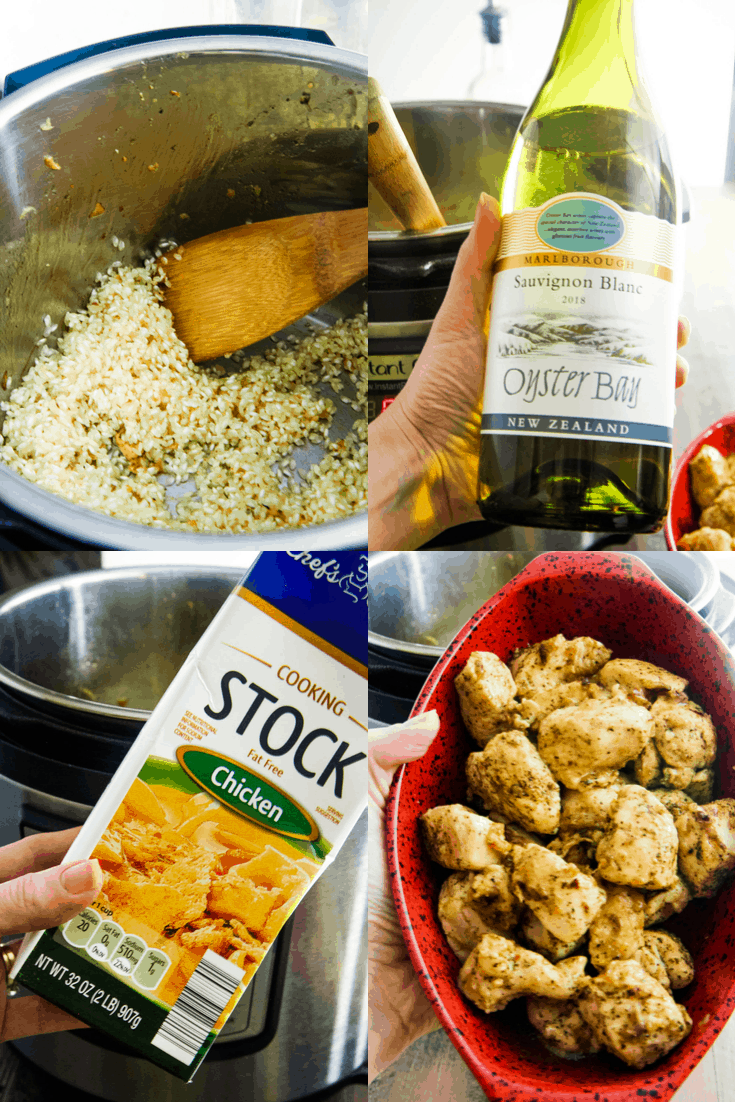
Can I Leave the Wine Out of This Risotto Recipe?
I am loving that they now carry mini bottle or mini boxes of white wine, if you want to save money (and not have to throw out wine).
This has been a great cooking option for a lot of people in my life.
Don’t feel like you have to add this step in, although I do think it makes the flavors more rich and complex.
Personally, if you skip the wine, I would balance it with a little acidity. Hit the broth with a squeeze of lemon or a little red wine vinegar from the pantry.
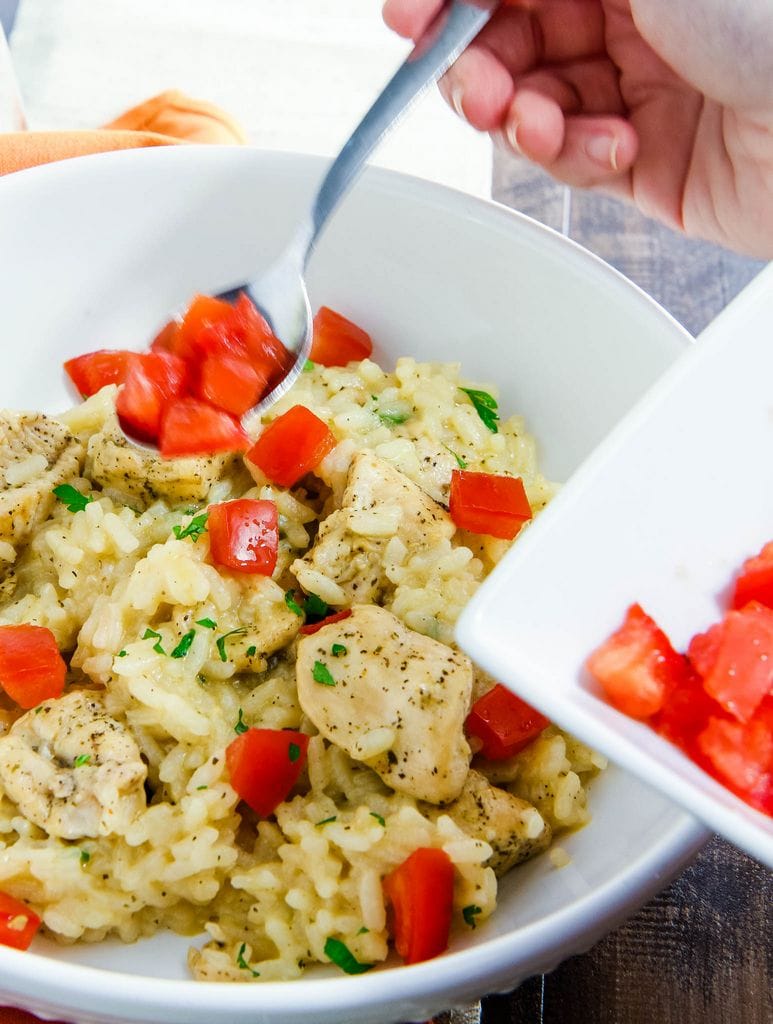
I also love to add an additional acidic component, to my risotto, with a diced tomato finish.
What Kind of Wine Should I Use for My Instant Pot Risotto?
I am not snobby about wine so I usually rely on a very fine box of Black Box Chardonnay. I love a sauvignon blanc, pinot grigio, or chardonnay in my risotto.
Just steer of any wines that are super sweet. You are looking for one with a dry finish.
How Can I Save Money on Wine for My Dishes?
I’m a huge ALDI wine fan so I *do* recommend you check that out. I can usually find some pretty incredible wine for under $10.
Recently, we placed an order with Wine Insider and used the wine from one of their white wine packages. Here’s a $25 off of a $50 wine order coupon if you want to shop there. I found the price to be more than fair for the value.
What if I Don’t Like Onions?
I hate, hate, hate onions so I completely understand. I am showing you how to prepare this dish with shallots, a very mild onion.
Personally, I skip the onions. I just add the rice to the olive oil and move right on to the next step, once the rice is translucent.
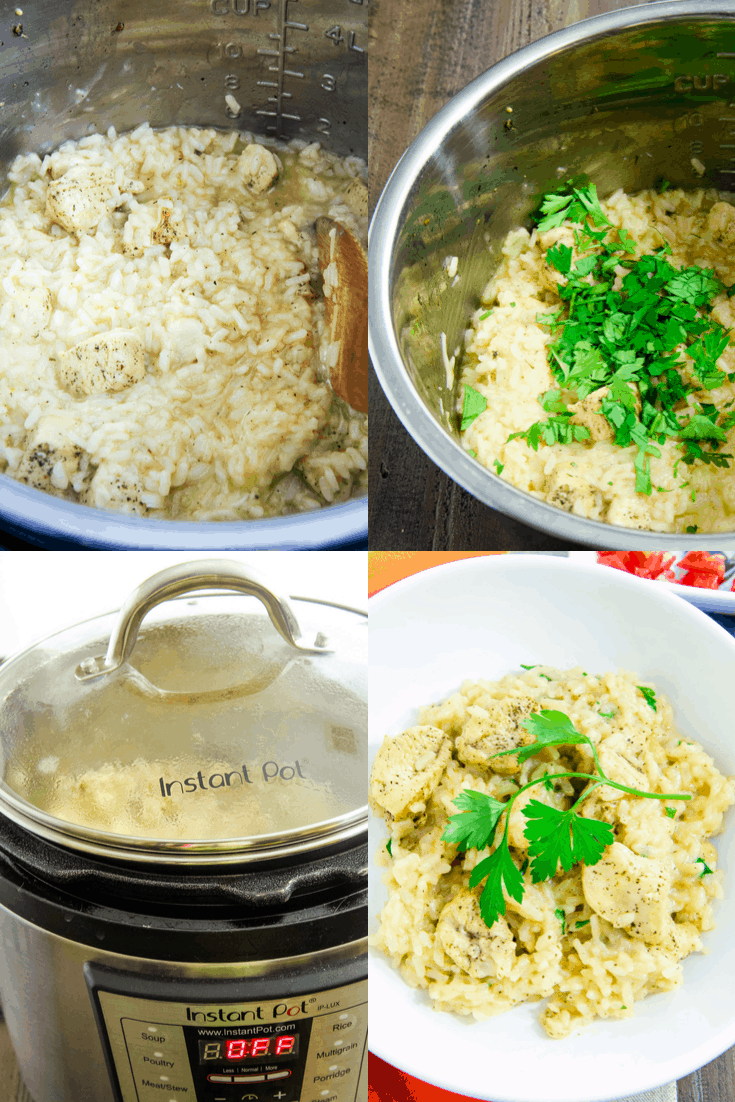
The Best Instant Pot Risotto Tutorial Step-by-Step
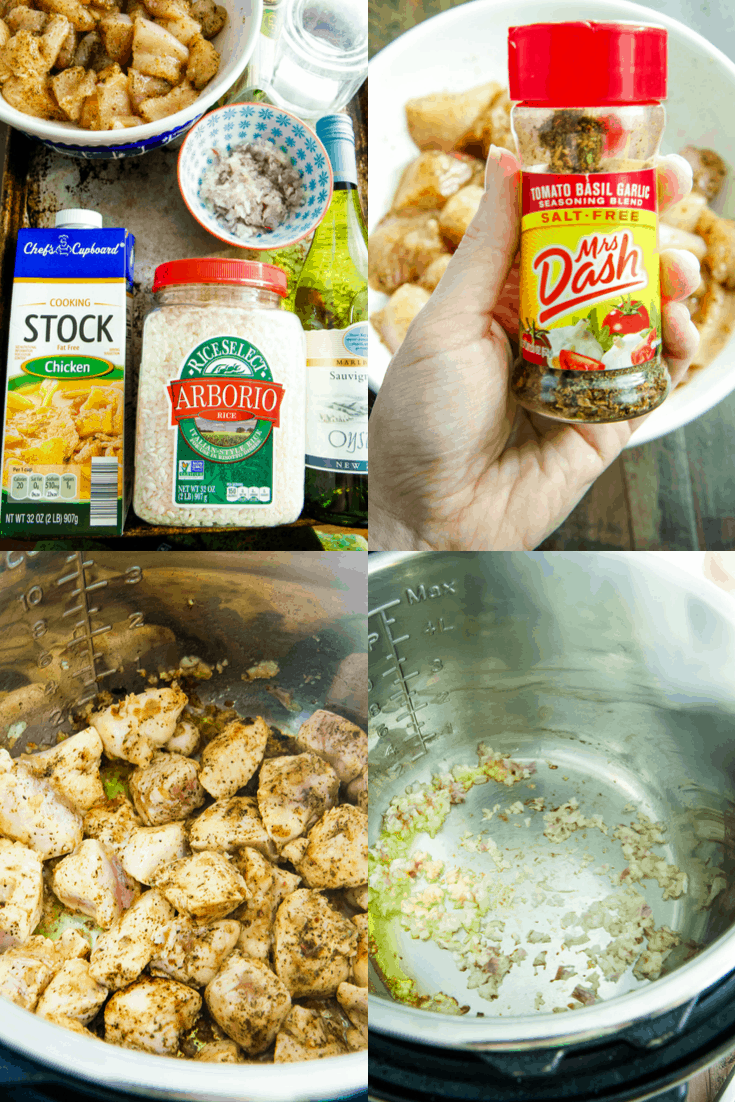
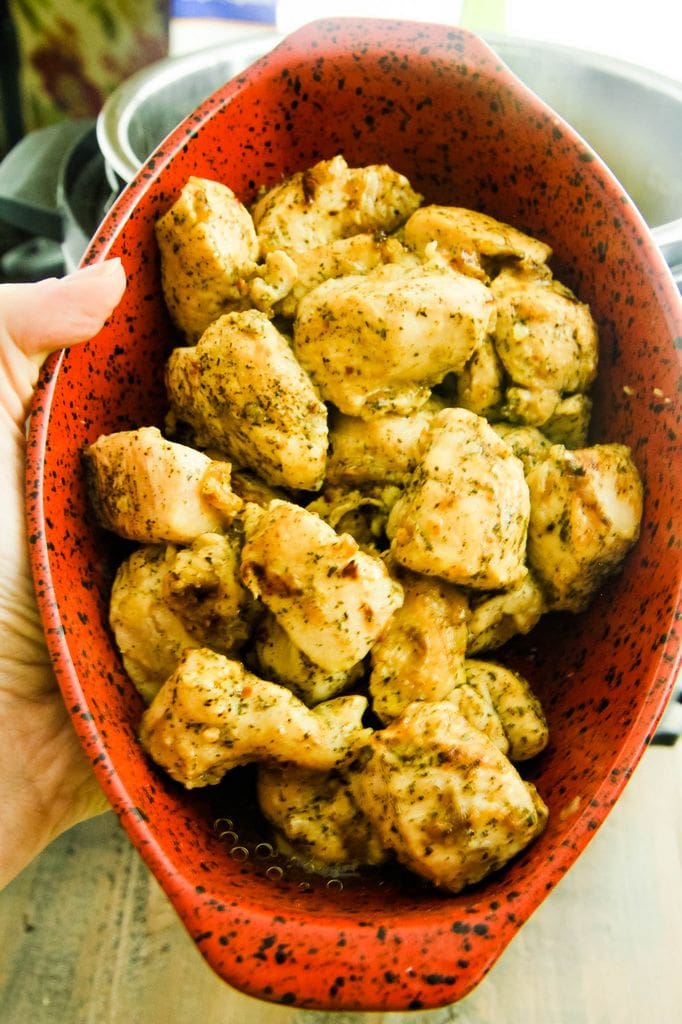
Chop your chicken into bite sized pieces.
Toss with a little olive oil, salt, pepper, and any of your favorite seasonings.
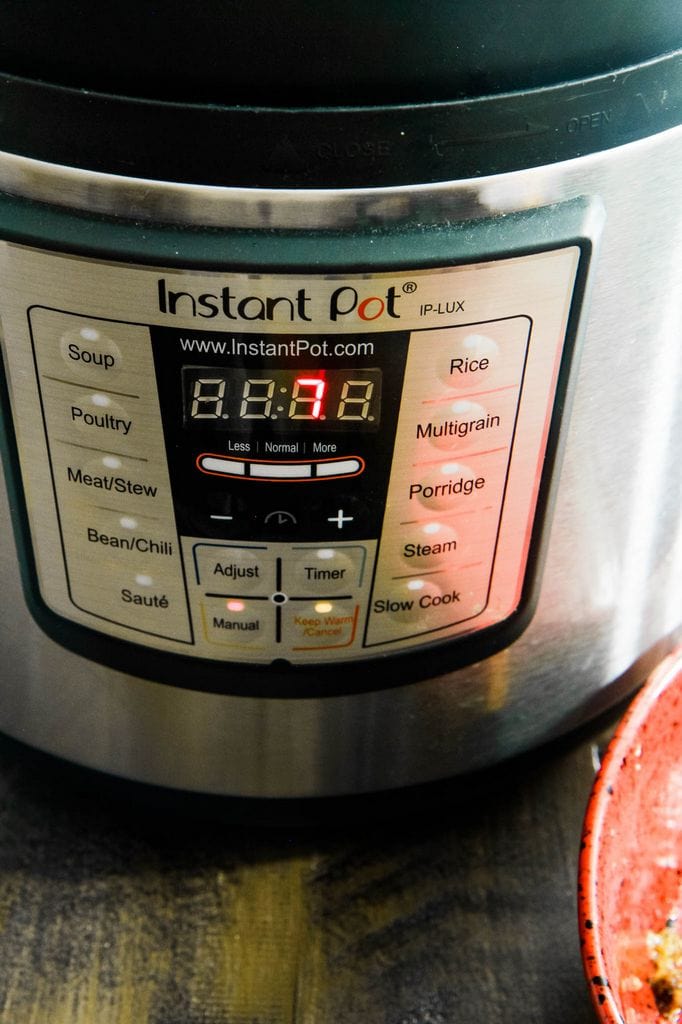
Turn on your pressure cooker and select the SAUTE setting and adjust it to HIGH.
Add your olive oil and brown your chicken on each side (you are not cooking this through). Remove the chicken with a slotted spoon and set it aside.
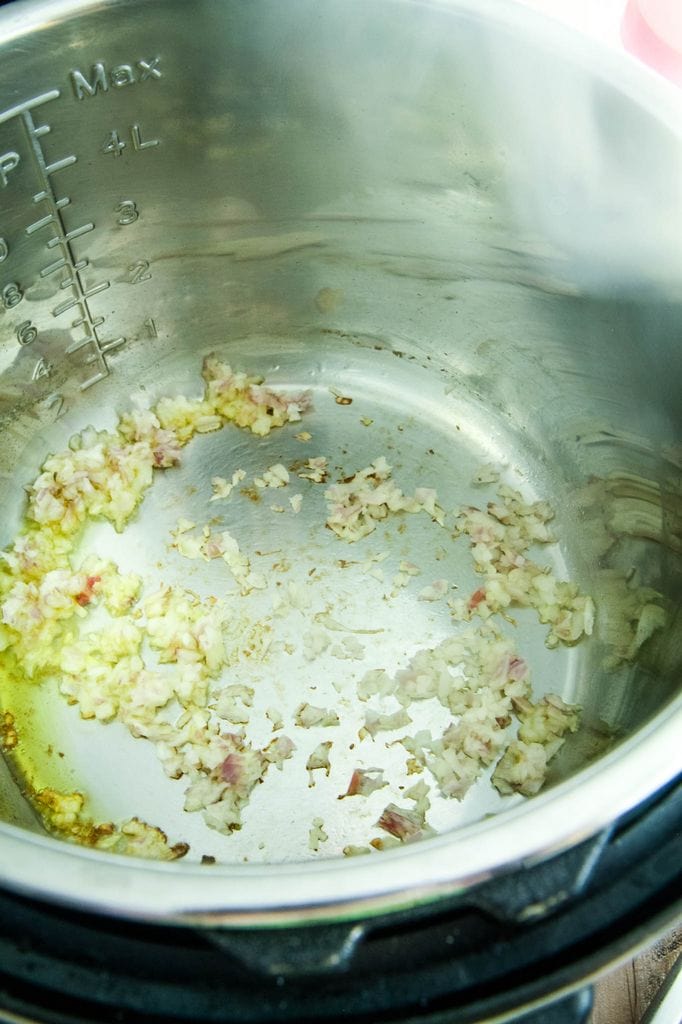
Add a little more oil and saute your onions for a few minutes. Be careful to not let them burn.
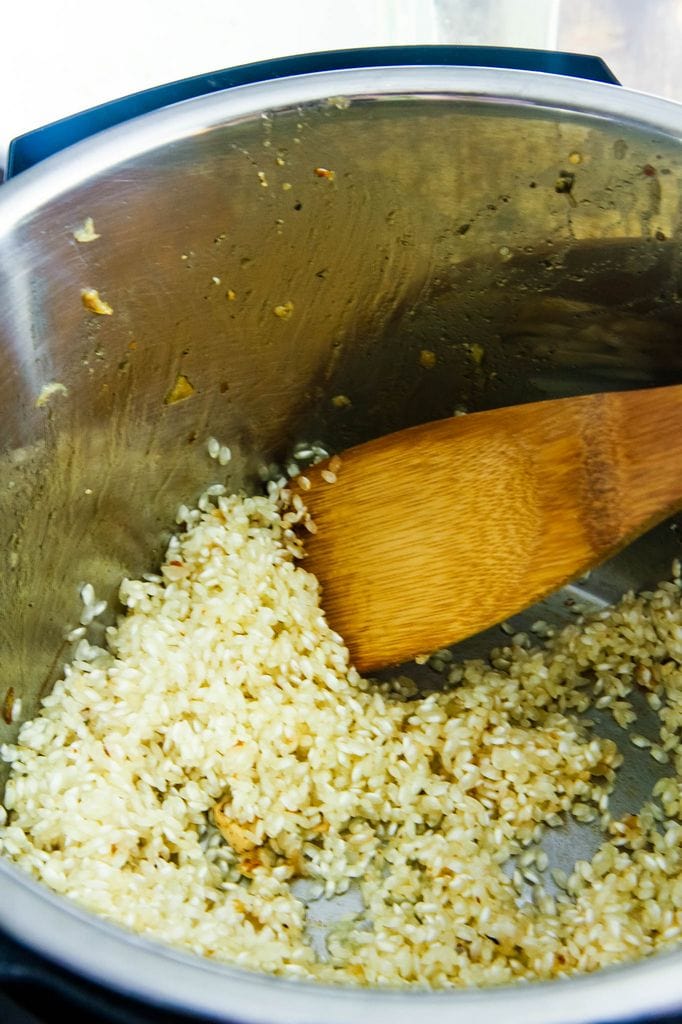
Now, add your rice and stir constantly to help agitate out the starches. It will go from a bright white to a translucent shade. When you see it is starting to look translucent, you can add your wine.
Add the wine and keep stirring like a crazy lady to get it to absorb all of the wine into the rice. Once all of the liquid has been absorbed, turn OFF the pressure cooker.
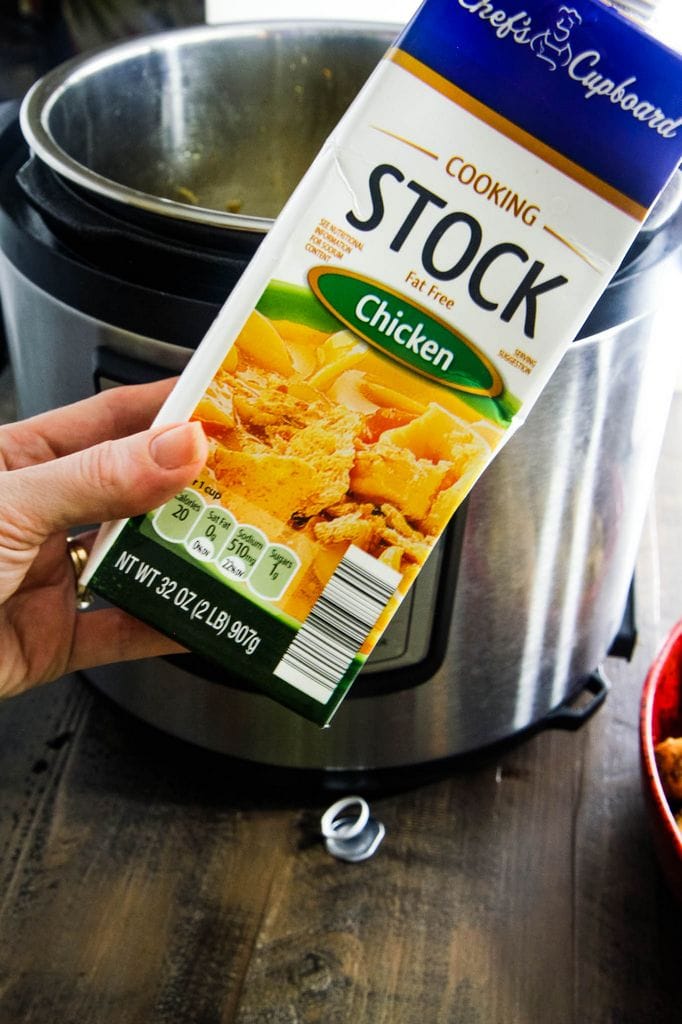
Add four cups of chicken stock, a 1/2 cup of water, salt, and pepper, to the Instant Pot.
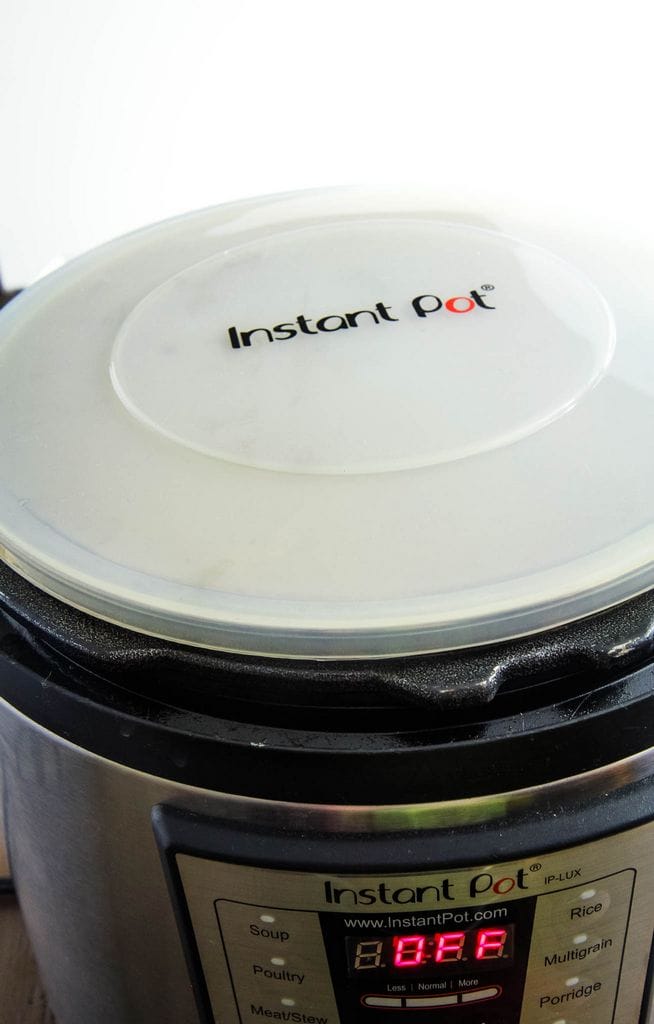
If you have issues with your pressure cooker coming to pressure, this is a must replace item. Also, be sure to check that your vent is in the sealed position before setting it.
Press the MANUAL button and set it to 7 minutes high pressure.
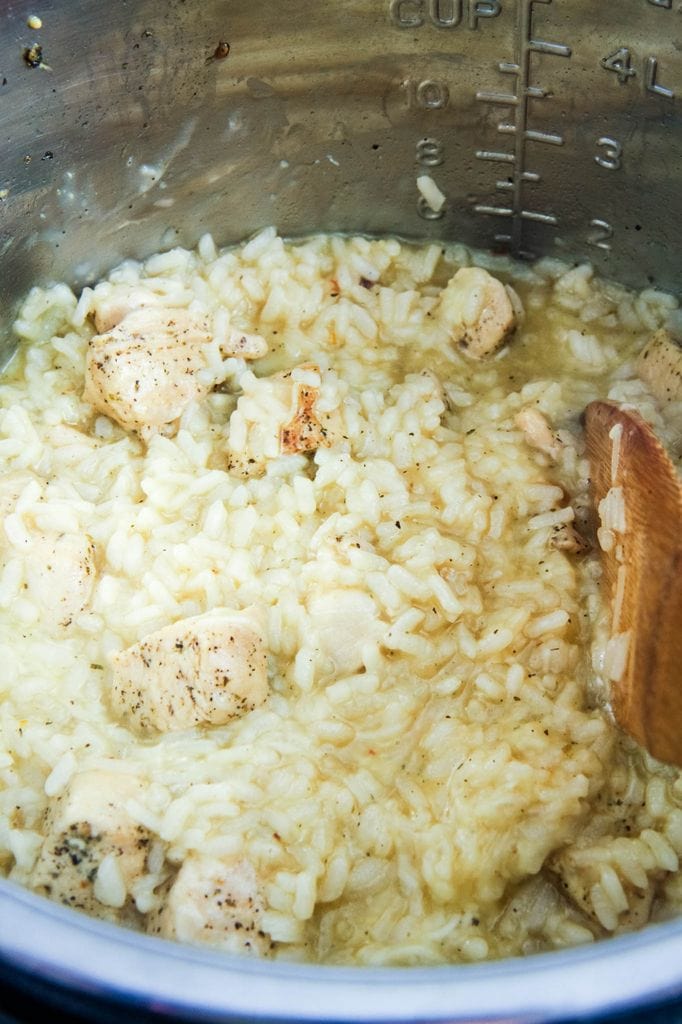
Once it is finished, do a QUICK RELEASE and open the lid. You should see that this is not fully absorbed and will look soupy.
This is good.
I promise.
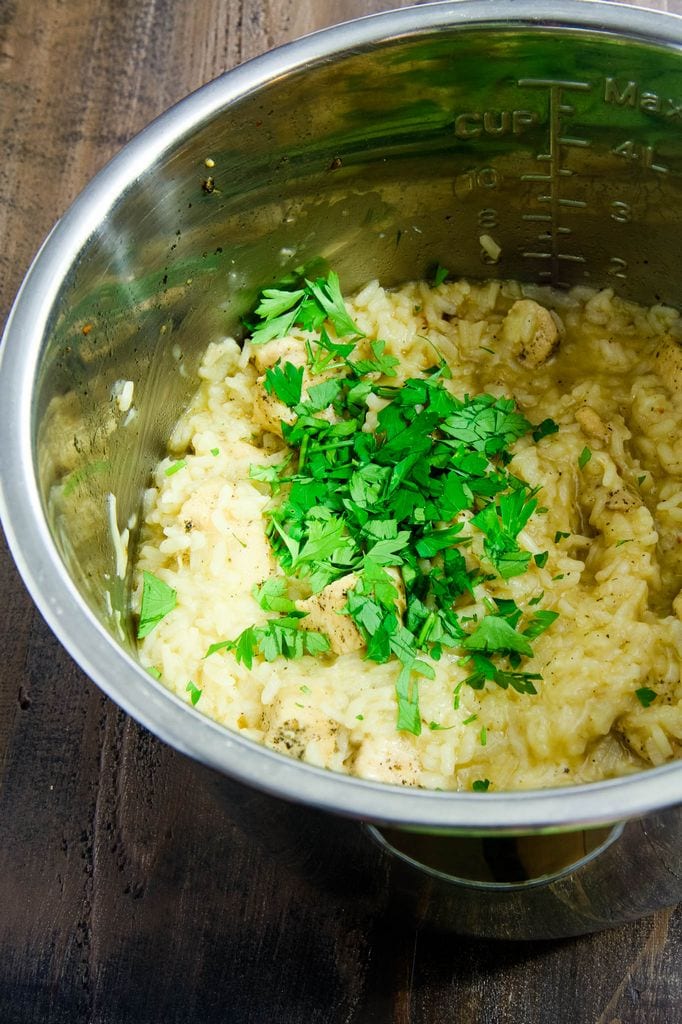
You will just stir in your parmesan cheese and give it a few minutes to set up.
After a few minutes, you should have just the consistency you are after.
Some people love to put a pat of butter in with the cheese.
I haven’t found it to be that necessary after the pressure cooker has done its work.
I hope you love this recipe as much as our family.
Remember, this is just the start of a beautiful risotto relationship.
You can make this your own by switching out the protein, add mushrooms or peas, and try different cheeses.
The Best Instant Pot Risotto (Step By Step)
Recipe Type: Main Dish
Cuisine: Italian
Author: MomAdvice.com
Prep time:
Cook time:
Total time:
Serves: 6 servings
Risotto can be a very labor-intensive dish, but it doesn’t have to be with a pressure cooker. Today I’m sharing my step-by-step tutorial for creamy risotto, made in your Instant Pot. Ditch the boxed mac and cheese for this easy weeknight dish.
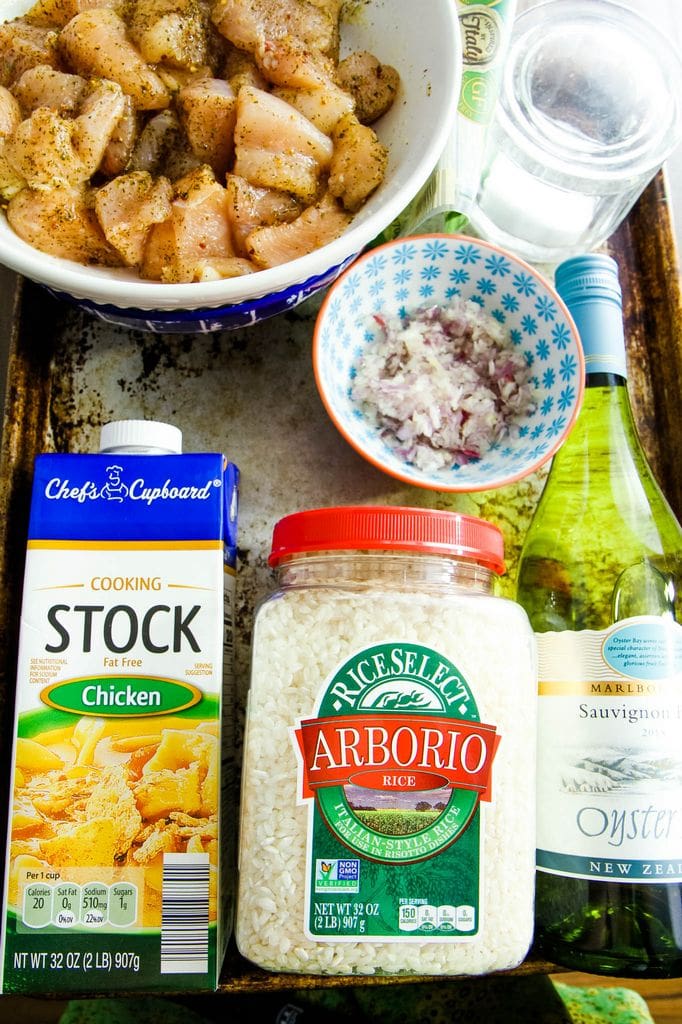
Ingredients
4 tablespoons olive oil (divided)
1/2 cup finely chopped shallots (I omit)
1 pound chicken breast (diced and seasoned)
2 cups risotto rice
1/2 cup dry white wine
4 cups chicken stock
1/2 cup water
1/2 cup grated parmesan cheese
salt and pepper to taste
Parsley & Diced Tomatoes (optional- for topping)
Instructions
Finely chop your shallots.
Dice and season your chicken.
Turn on your Instant Pot to the SAUTE function. Adjust to high.
Add two tablespoons of olive oil to the pot (once it is hot) and brown your chicken (do not cook through). Remove the chicken with a slotted spoon.
Add two more tablespoons olive oil to the pot. Toss in your shallots and let them cook for a couple of minutes.
Add your rice, stirring frequently and letting it cook until it is translucent.
Once the rice is translucent, add your white wine and stir vigorously to agitate the rice. Once the wine is fully absorbed, turn off your pressure cooker.
Add 4 cups chicken broth, 1/2 cup water, salt and pepper to taste (don’t get too aggressive with the salt since we are adding cheese).
Cover with lid and lock into position. Press the MANUAL button and do this high pressure cook for seven minutes.
Once it beeps, do a QUICK RELEASE. Give the rice a stir and add in your cheese. Let the rice set for a few minutes to absorb the liquid.
Serve in bowls and enjoy every dang week.
3.4.3177
Looking for more great pressure cooker recipes? Here are a few of our most popular recipes on the site!
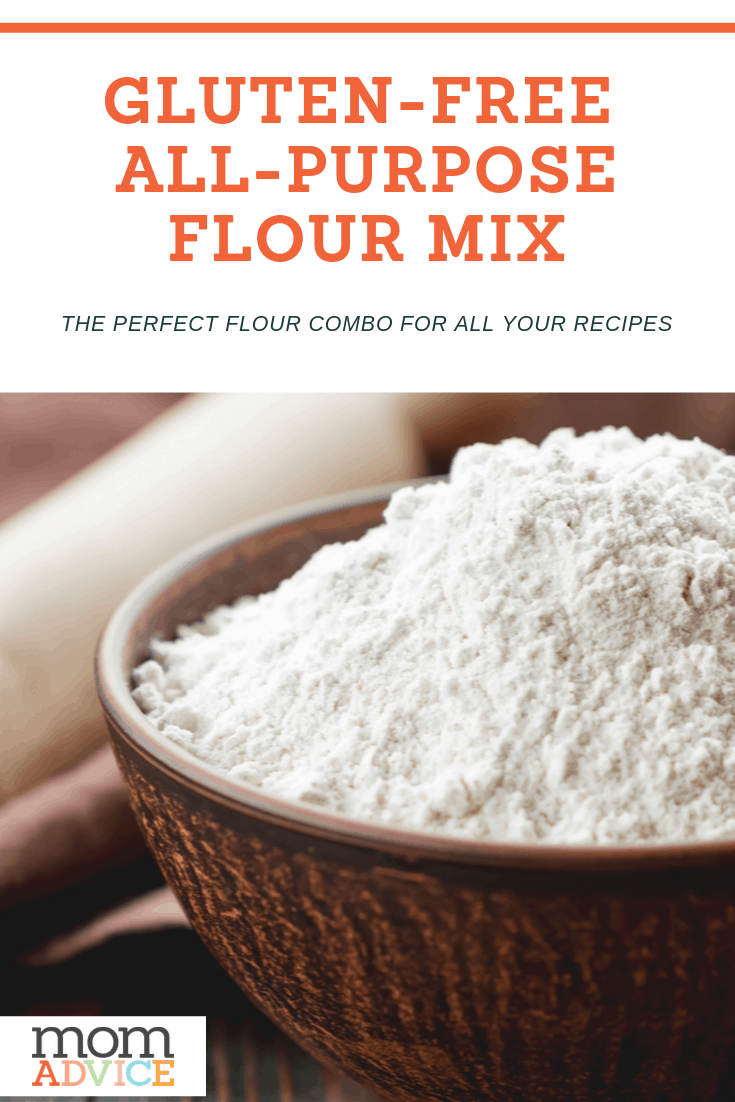
A recipe for homemade gluten-free breakfast rolls with cranberries and an orange-infused sugar swirl with icing that drips between the cracks and glazes deep into the seams.
Last winter my mother-in-law was diagnosed with celiac disease.
As she faced uncertainty in feeding herself after a lifetime of from-scratch baking with wheat flour, I wanted to show her how this wheat-free life could taste delicious, too.
My very first step was to hand off a bucket and dough whisk and a collection of gluten-free recipes.
I talked to my friend, Zoe, who was up to her eyeballs in recipe testing for her new gluten-free cookbook, and I tried as much as I could to encourage my mother-in-law, Kathleen, to get back into the habit of baking with new flours and textures.
When visiting for the holidays, Kathleen always had breakfast breads waiting for us as we tumbled out of bed to the table.
These rolls, filled with a citrus-filled sugar and a bit of spice, are for her this holiday season.
A gluten-free breakfast bread that will warm the house and make your tongue sing.
The book makes a wonderful gift this season for any gluten-free family member or friend looking to reclaim a comforting breakfast bread or just to have a baguette to dip into their soup.
Gluten-Free Cranberry Orange Morning Buns
Yield: 6 servings
Prep Time: 20 minutes
Cook Time: 35 minutes
Additional Time: 5 hours
Total Time: 5 hours55 minutes
Gluten-free breakfast rolls with cranberries and an orange-infused sugar swirl with icing
Ingredients
For the Dough
2 cups Gluten-Free All-purpose Flour Mix
4½ cups cornstarch
2 teaspoons xantham gum or psyllium husk
1 tablespoon granulated yeast
1 tablespoon kosher salt
2¼ cups warm milk (100ºF)
4 large eggs
1 cup honey
1½ cups unsalted butter, melted
1 tablespoon vanilla extract
For the Sugar Swirl and Glaze (triple to use all the dough at once):
½ cup granulated sugar
1 orange, juiced and zested
½ teaspoon cardamom
⅓ cup dried cranberries
⅓ cup confectioners' sugar
Instructions
In a stand mixer, whisk together the flour, cornstach, xantham gum, yeast, and salt. Add in the milk, eggs, honey, melted butter, and the vanilla with the paddle attachment. Allow the dough to rise, lightly covered, for two hours.
Place the risen dough in the refrigerator to chill for at least two hours and up to five days.
When ready to make the rolls, remove the dough from the refrigerator and dust with rice flour. Split into thirds. Take one-third of the dough to make rolls. The remaining dough can be held in the refrigerator or frozen for up to 3 weeks until ready to use (or you could make it all into rolls for a party).
Lightly flour your work surface with rice flour. Press the dough into a ¼" thick rectangle. Mix together the ½ cup granulated sugar, orange zest, and the cardamom. Sprinkle evenly over the dough, sprinkle the cranberries on top of the sugar. Roll the dough into a log, pinching the seam closed.
Cut the log into 2" pieces and arrange in a greased baking dish. (I used a 4-quart baking dish.) Loosely cover with plastic wrap and allow to rest for 1 hour.
Preheat oven to 350ºF. Bake for 30-35 minutes, until rolls are golden brown.
To glaze, mix together the confectioners' sugar and 1-2 tablespoons of orange juice until a smooth consistency is reached. Drizzle over the warm buns.
Notes
Brioche dough and flour from Gluten-Free Artisan Bread in 5 Minutes a Day by Jeff Hertzberg, M.D., and Zoe Francois.
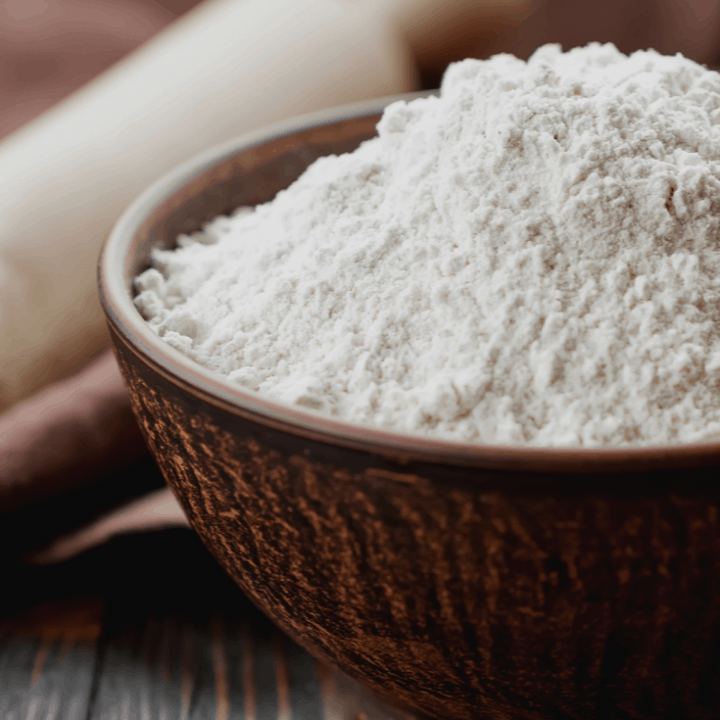
Gluten-Free All-Purpose Flour Mix
Yield: 13.5 cups
Prep Time: 5 minutes
Total Time: 5 minutes
Ingredients
6 cups white rice flour
3¼ cups sorghum flour
1¾ cups tapioca flour or starch
1¼ cups potato starch
¼ cup xantham gum or psyllium husk powder
Instructions
Whisk together all the ingredients until thoroughly combined
Don’t miss these other great ideas from MomAdvice.com:
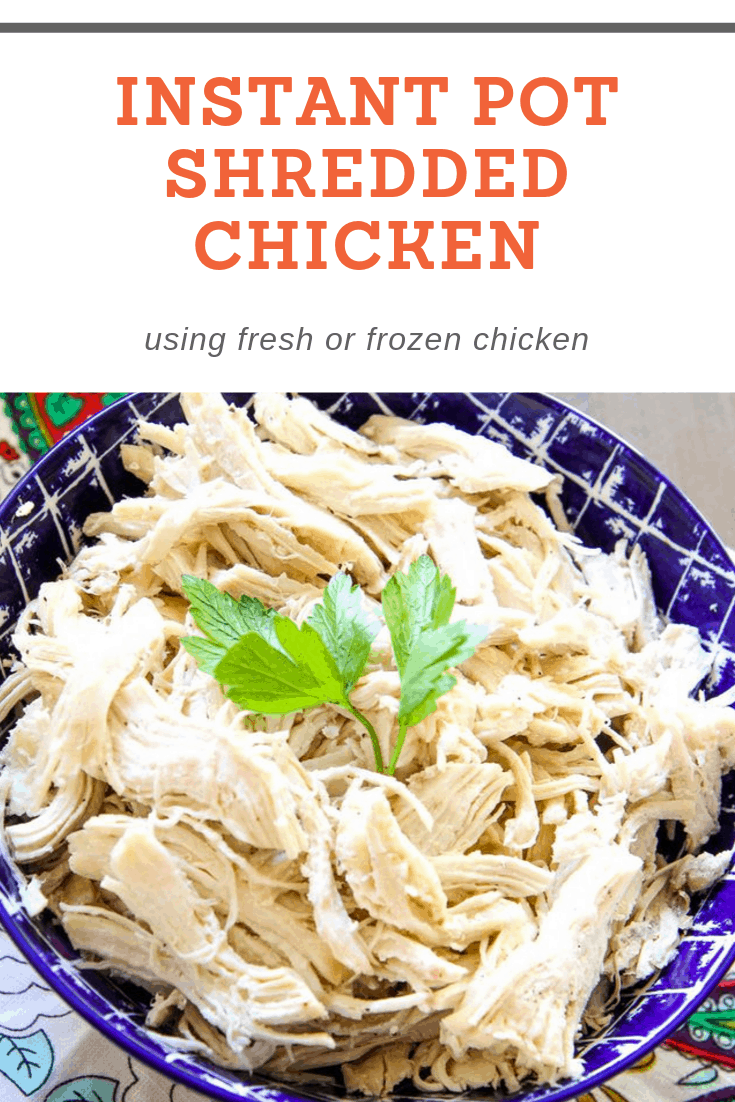
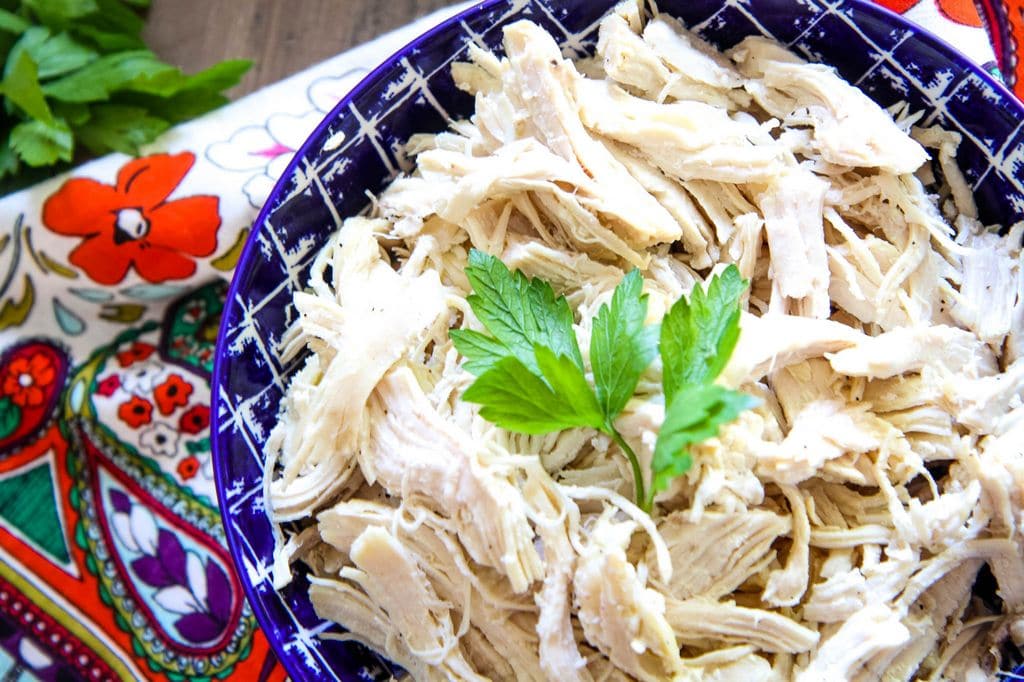
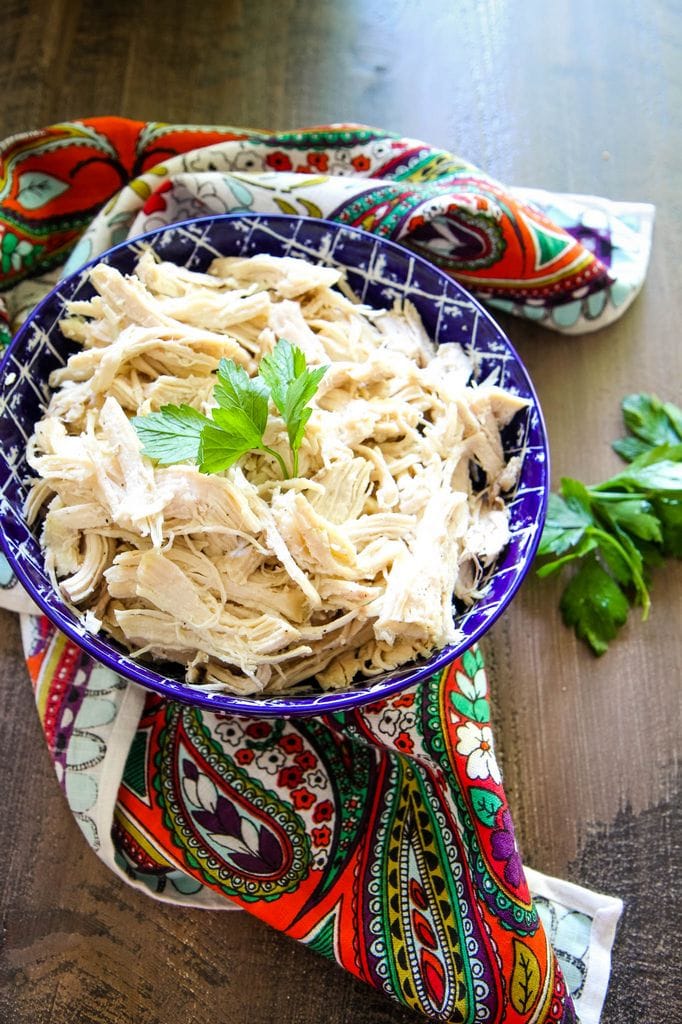
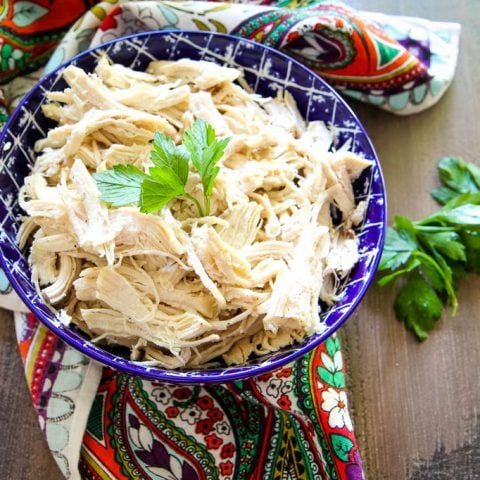
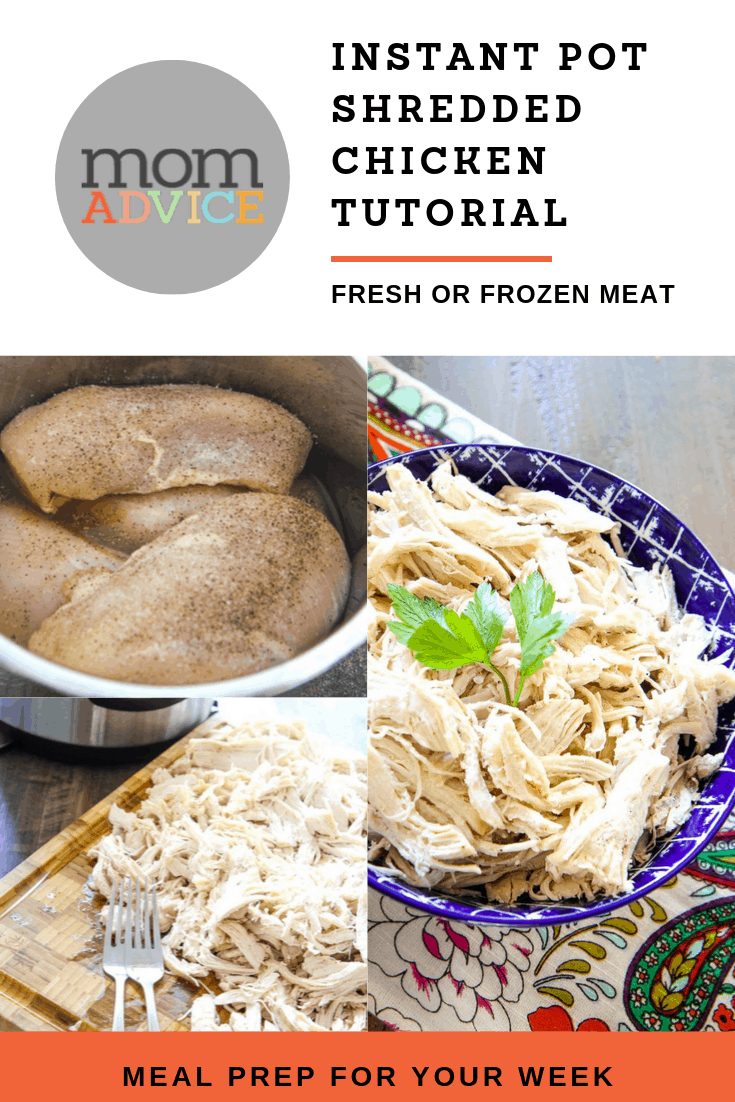
Did you know that you can make enough shredded chicken for a week of recipes with your pressure cooker? This Instant Pot Shredded Chicken recipe can be meal prepped for your week or frozen for future meals. Don’t miss this post filled with ideas for ways to put pressure cooked chicken to work in your kitchen!
I hope you all are as in love with your Instant Pot as much as me. Our pressure cooker continues to be my favorite gadget and I’m excited to share more family recipes with you.
Today I wanted to show you how to meal prep shredded chicken in your Instant Pot.
This technique is super simple and straightforward.
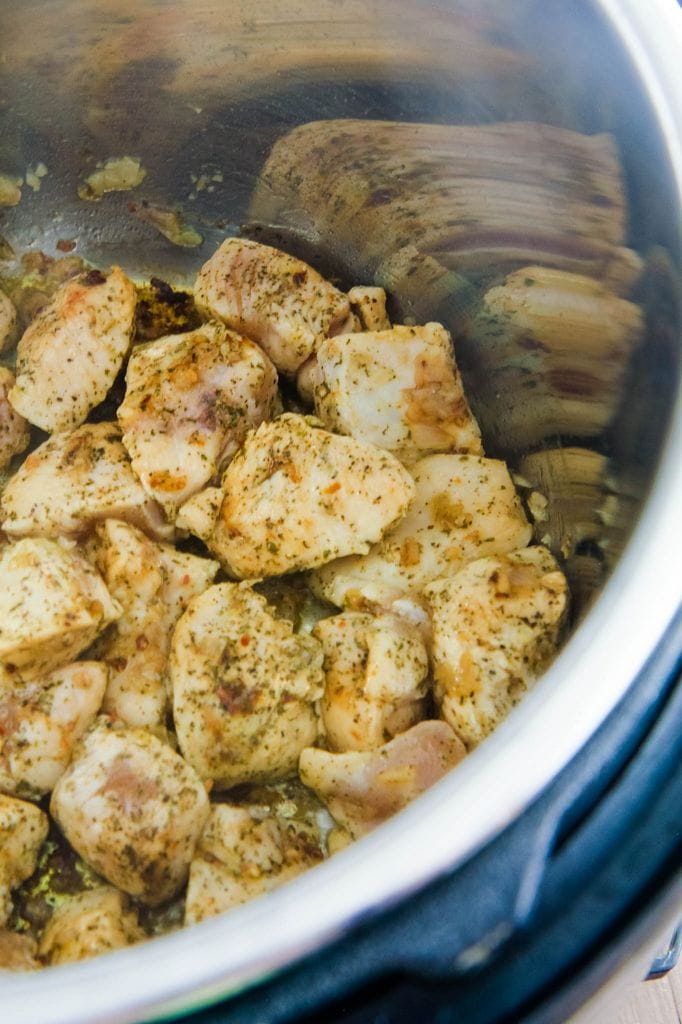
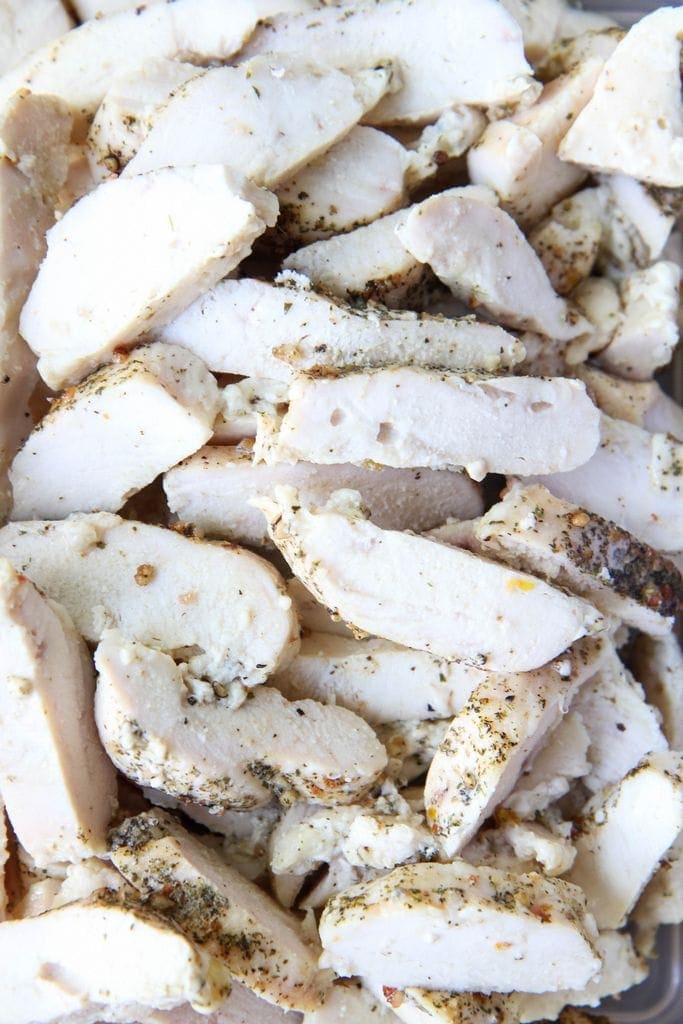
In your pressure cooker, you will add one cup of chicken stock to the bottom of your pressure cooker. Add your chicken breasts and season well with salt and pepper.
Cook your chicken on High Pressure for 10 minutes (for small chicken breasts) or 12 minutes (for large chicken breasts).
These chicken breasts, for example, required fifteen minutes to fully cook.
Allow your pressure to release naturally (instead of quick releasing the valve). A good amount of time is ten minutes!
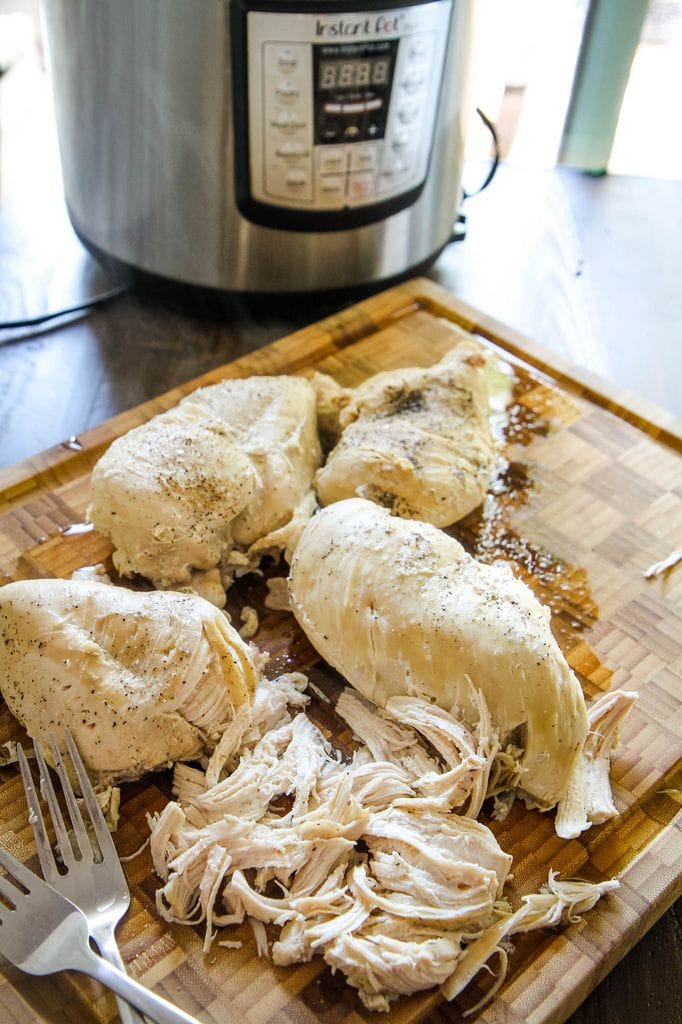
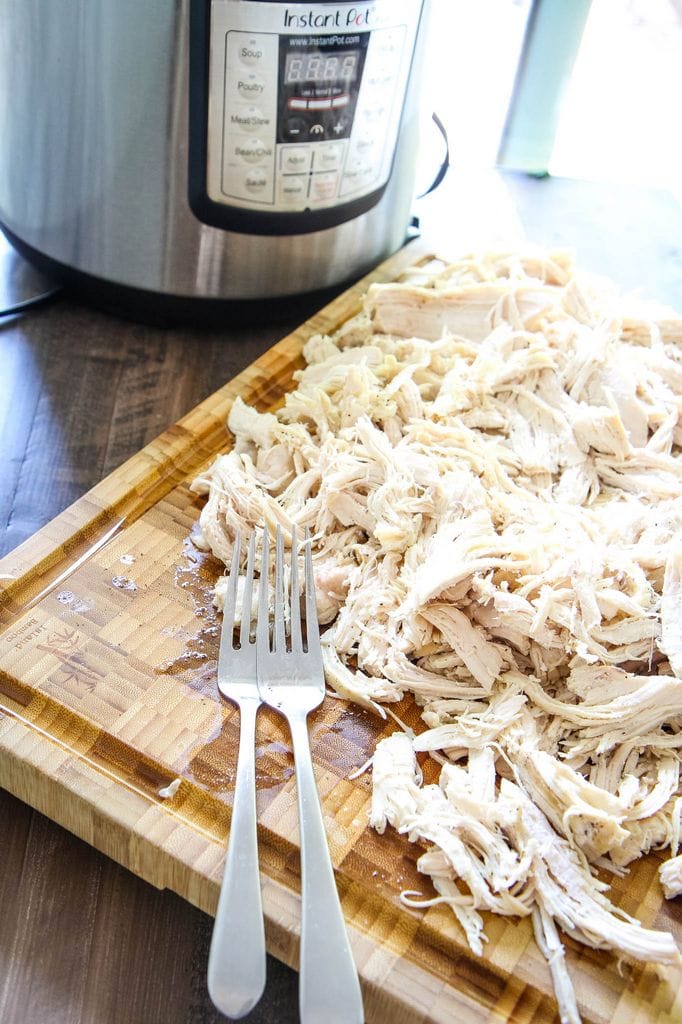
Once the chicken is cooked, you can shred it with two forks. If you are feeling fancy, break out your hand mixer to make quick work of this task.
Reserve half the liquid in the pot for storage and to reduce the chances of your chicken drying out.
I looked up some frequently asked questions, on pressure cooked chicken, and thought I would share more about my technique here.
Do I need to add more chicken broth (or stock) if I decide to cook more than four chicken breasts?
If I’m meal prepping for my family, I always double our recipes. I have doubled this successfully by doubling the chicken stock and keeping everything else, like cooking time, the same. It will take a bit longer to come to pressure, but the duration you set will remain the same.
Can I use this pressure cooker shredded chicken technique with frozen chicken breasts?
Cooking frozen chicken in the Instant Pot can be a real budget-saver and help you avoid ordering takeout.
Once again, cooking time on frozen chicken varies, based on the size of the breast. If the chicken breasts are small, 12 minutes of high pressure works great. Average size chicken breasts will take about 14 minutes. Large pieces are best at 16 minutes.
Can I Use this Shredded Chicken Recipe for Chicken Thighs Instead of Chicken Breasts?
Personally, I prefer thigh meat over chicken breasts because they don’t easily dry out and get overcooked.
I’ve had great success with cooking chicken thighs for 15 minutes on high pressure.
I love to toss my thigh meat with salsa and a little chicken broth for taco night or burrito bowls.
My Shredded Chicken Didn’t Fully Cook, Can I Restart My Instant Pot?
Do you find that your dishes seem inconsistent with cooking times? I discovered a really important solution…getting a new Instant Pot seal. If the seal is stretched out, it will take much longer to come to pressure.
For chicken to be fully cooked, you want to make sure it has come to 165 degrees. Since the size of the breasts is so different, it is hard to always nail the length of time.
If you find that your chicken is not fully cooked, simply cook it for 2 more minutes of High Pressure.
Since the liquid is already hot, it won’t take that long to come to pressure again.
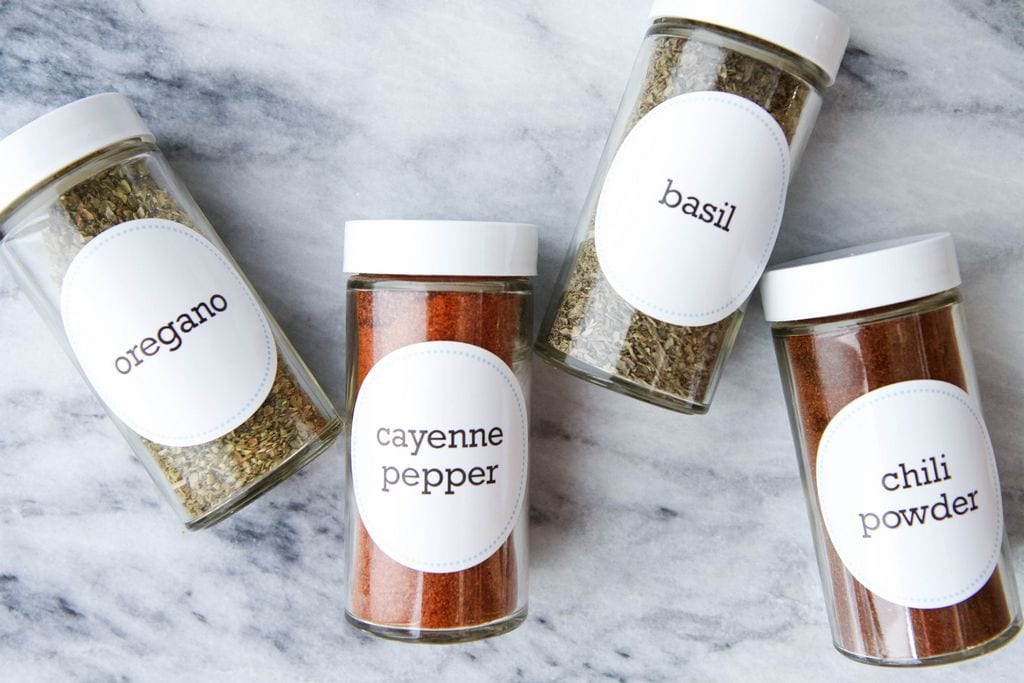
What Other Seasoning Can I Use on My Shredded Chicken?
I try to really map out what I’m making with it before deciding on seasoning. This basic idea of just salt & pepper is always appealing to me though because it can be used in any recipe.
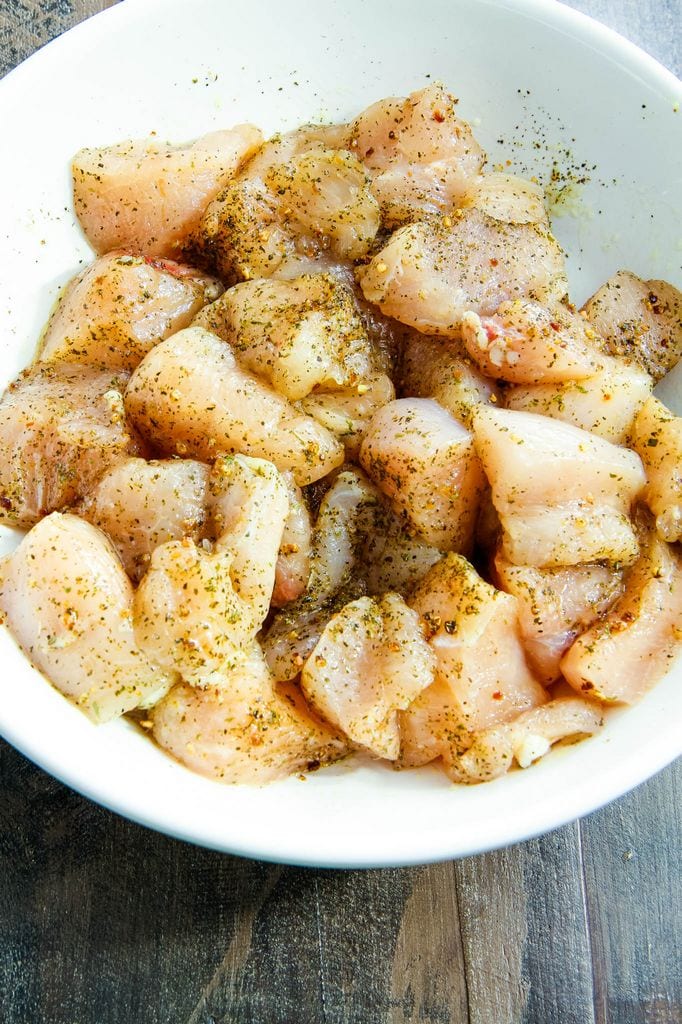
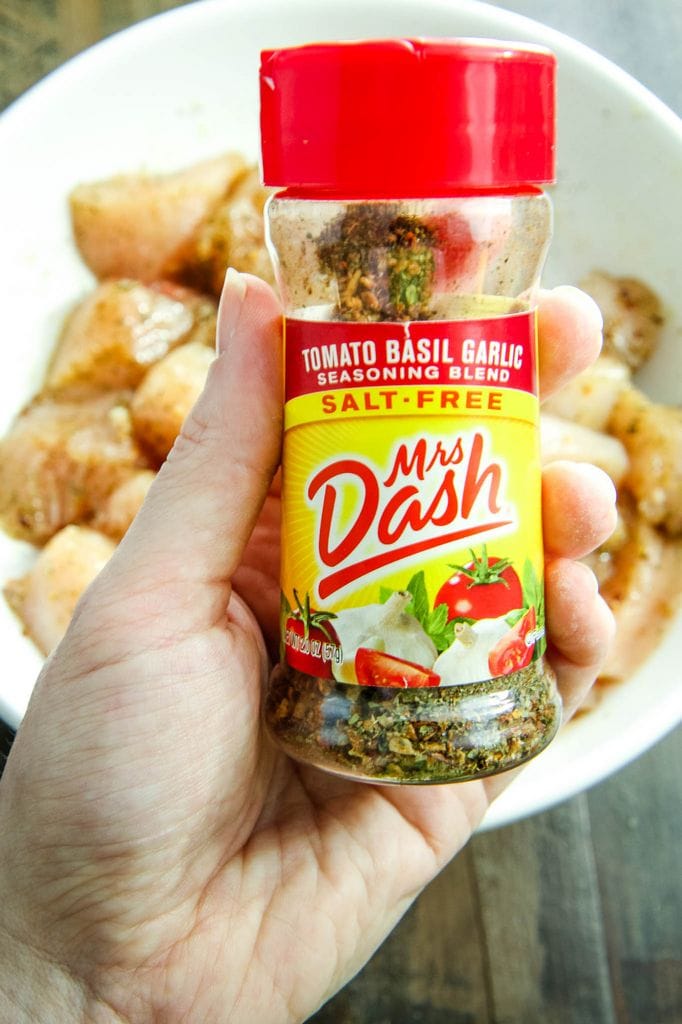
That said, you can always make your own flavor combo! This Mrs. Dash seasoning, for example, is a family favorite. I also love to season my chicken with oregano, garlic powder, onion powder, or dried rosemary.
Feeling inspired to get your pantry organized? Here are some free printable pantry labels to get you started.
I Don’t Have a Pressure Cooker. How Do I Make This Shredded Chicken In My Slow Cooker Instead?
For many years, I just did the shredded chicken in my slow cooker. You will follow the exact same recipe, but you will cook the chicken in your slow cooker for six hours instead.
I hate dry chicken though so I usually do the six hours of cooking time with frozen breasts instead.
I find today’s slow cookers are so much faster than they used to be.
For me, six hours is as long as I’m willing to let my chicken cook in one of those.
If you are on the hunt for a new slow cooker, I can’t recommend this model enough. I use it weekly and love that I can brown our meat before slow cooking it.
Are There Any Other Ways to Prepare Chicken For My Week?
There is SO much you can do with this. Just think of how you can use shredded chicken in your favorite casseroles, pasta dishes, or rice bowls.
What if I Can’t Eat All This Shredded Chicken?
One of the best things about having this prepared is that you can freeze it. Freeze your pressure cooked chicken in freezer bags, with a little of the reserved broth. Make sure to take out as much air as possible and label. This should keep for 3-6 months in your freezer.
Instant Pot Shredded Chicken (meal prep)
Instant Pot Shredded Chicken (meal prep)
Yield: 4-6 servings
Prep Time: 5 minutes
Cook Time: 12 minutes
Additional Time: 10 minutes
Total Time: 27 minutes
Did you know that you can make enough shredded chicken for a week of recipes with your pressure cooker? This Instant Pot Shredded Chicken recipe can be meal prepped for your week or frozen for future meals. Don’t miss this post filled with ideas for ways to put pressure cooked chicken to work in your kitchen!
Ingredients
4 Chicken Breasts
1 cup chicken broth or stock
Salt and pepper
Instructions
Pour one cup of chicken broth or stock in the bottom of your Instant Pot.
Add fresh chicken breasts to Instant Pot, seasoned with salt and pepper.
Put the lid on your Instant Pot and cook your chicken on High Pressure for 10 minutes (for small chicken breasts) or 12 minutes (for large chicken breasts).
Once the Instant Pot beeps, make sure your instant pot turns off (and doesn't start the, "keep warm," setting. Allow it to naturally release for ten minutes.
Remove the chicken from the pressure cooker and shred with two forks or a hand mixer.
Add half the liquid from the pot to your shredded chicken and toss to make sure it is fully incorporated.
Use the chicken right away for your recipes (see post for fun ways to put this to work in your kitchen) or freeze for 3-6 months in an airtight freezer bag with a little additional liquid.
Notes
Doubling the chicken? I have doubled this successfully by doubling the chicken stock and keeping everything else, like cooking time, the same. It will take a bit longer to come to pressure, but the duration you set will remain the same.
Using frozen chicken breasts? Cooking time on frozen chicken varies, based on the size of the breast. If the chicken breasts are small, 12 minutes of high pressure works great. Average size chicken breasts will take about 14 minutes. Large pieces are best at 16 minutes. Still follow the steps above for natural releasing the pressure.
This post contains affiliate links
Love this recipe? Here are three other great pressure cooker recipes to check out!
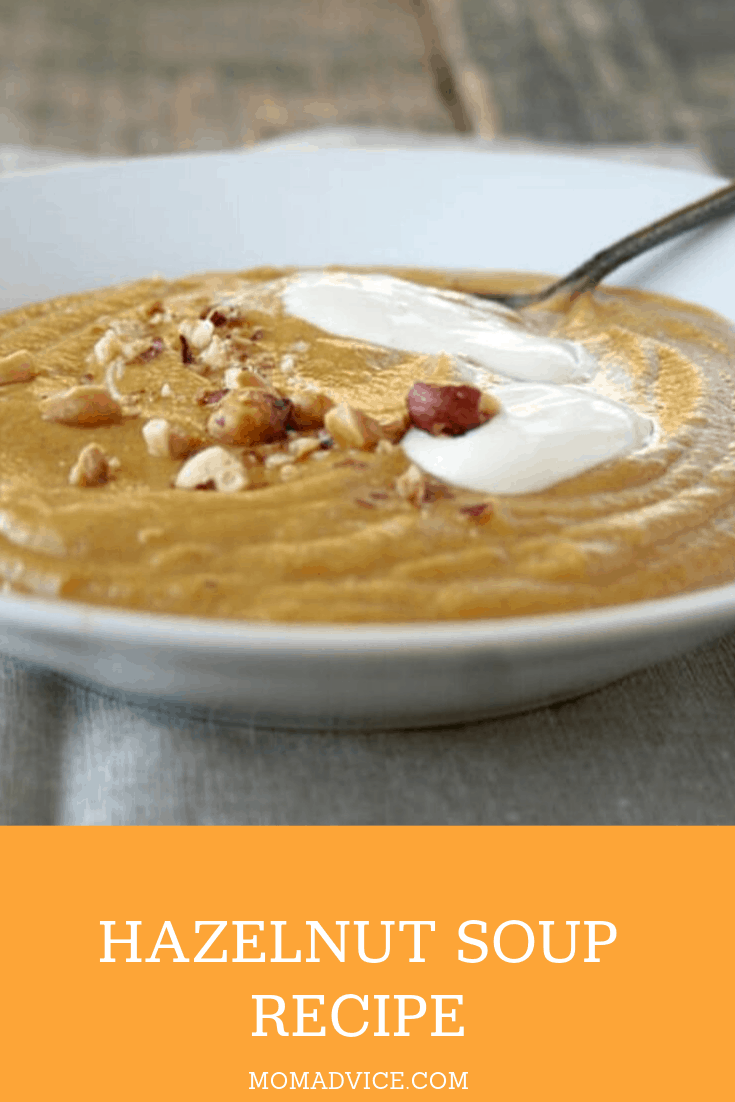
This is a rustic hazelnut soup made with parsnips and roasted hazelnuts. It is a quick weeknight soup and the recipe can easily be made vegetarian. Make a batch today and have a taste of Autumn in a bowl for dinner!
Whenever I think of hazelnut soup, I’m reminded of one of my favorite Disney movies about a beautiful princess and her long silky hair.
Along with a dreamy guy, a cast iron skillet, and parsnips… what’s not to love?
Honestly, the first time I saw this movie I was more intrigued with the mention of hazelnut soup than the rest of the movie.
Rapunzel’s fake mother brought home parsnips after a trip to town in order to make her hazelnut soup.
I happen to love parsnips and hazelnuts so I knew this was a soup I had to recreate… animated or not.
Parsnips are carrot-like root vegetables that contain vitamins, minerals and nutrients, most notably fiber, folate, potassium and vitamin C.
They’re in season during the late fall and winter.
They’re sweet, yet can have a bit of bite to them.
Large parsnips can have a bitter center which is best removed before cooking.
They taste great mixed into stews, soups, and any other way you would normally use a potato or other root vegetable.
I tell you what, when I saw one of my favorite vendors at my farmers market selling freshly harvested parsnips in the fall, I stocked up and purchased about 15lbs of them to carry me through the winter.
They keep wonderfully in the crisper and actually get sweeter over time.
When I purchased them, I knew right away that I was going to be using some of them to make a comforting batch of hazelnut soup.
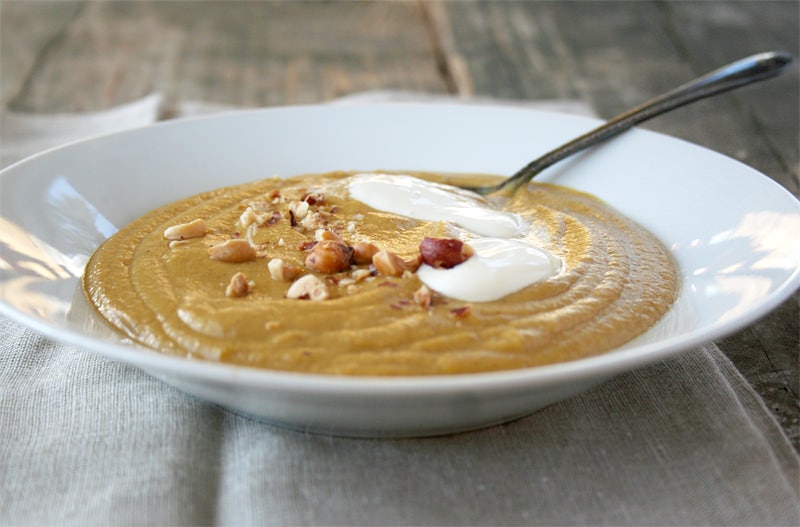
I usually make this rustic hazelnut soup once or twice during the winter season – thick and silky, just the way I like it.
In order to create complexity, I start by sautéing onions in a cast iron dutch oven until they’re caramelized, deep and sweet.
While the onions are caramelized, I roast the hazelnuts to deepen their flavor.
Once the onions are caramelized, I deglaze the pot by adding a bit of homemade beef broth.
To the pot, I then add the parsnips, carrots, a potato, some of the roasted hazelnuts, seasonings, and a fair share of more broth.
If you decide to use store bought organic broth, be aware that it won’t have as much depth and character as one made over a stovetop and simmered for 24 hours.
If something like this intimidates you, I promise, you’ll be surprised at how simple it is to make and the nutrients inside will be unlike anything that can be purchased at a store.
Once the additional broth has been added, the vegetables are covered and simmered until tender.
Once tender, a bit of milk or cream is added to the soup and is then ready to be served with a dollop of sour cream and sprinkled with roasted hazelnuts.
This soup serves beautifully with a green salad and a hunk of crusty bread (or not… if you’re gluten free).
Hazelnut Soup Recipe
Recipe Type: Vegetarian Soup
Author: Diane Bauman
Prep time:
Cook time:
Total time:
Serves: 4-6 servings
This is a rustic hazelnut soup made with parsnips and roasted hazelnuts. It is a quick weeknight soup and the recipe can easily be made vegetarian. Make a batch today and have a taste of Autumn in a bowl for dinner!
In a large pot or dutch oven, over medium heat, melt the 3 tbls butter and add the onions. Stir the onions into the butter and allow to gently cook for 20-25 minutes or until the onions caramelize to a deep golden brown, stirring them along the way.
Once Caramelized add ¼ cup beef broth to deglaze the pan.
Once deglazed, mix in the parsnips, potato, carrots, ¾ cup hazelnuts, the rest of the broth, salt, pepper, and thyme leaves. Bring to a boil, lower the heat, and then cover and simmer for 20-25 minutes or until the vegetables are tender.
Once tender, with an immersion blender or working in batches using a blender, puree the contents of the pot. If using a blender, return the puree to the pot over medium heat.
Add 1 cup milk and stir through. Simmer for an additional 5 minutes.
Serve with a dollop of sour cream and sprinkled with roasted hazelnuts
3.4.3177
Love this recipe? Don’t miss these other great posts from MomAdvice.com:
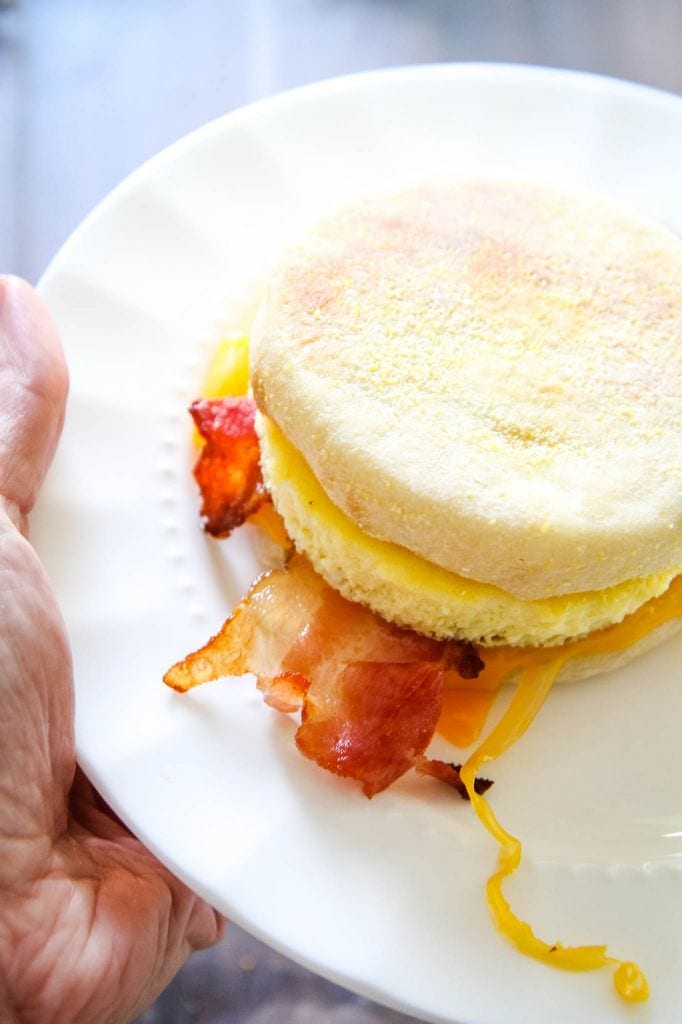
These freezer-friendly sandwiches are the perfect item to keep on hand for busy mornings. Although this recipe contains bacon, this can easily be omitted for a vegetarian freezer dish too. If you ask me, you just can’t go wrong with eggs and cheese on a toasted english muffin. Follow this easy tutorial for a healthy breakfast that is ready in minutes!
I’ll be honest, freezer cooking has saved our family tons of money over the years. The freezer breakfast sandwiches I am sharing today are my new secret weapon for busy mornings (or evenings) at our house.
I started to really become a fan of freezer recipes for breakfast when I put together my favorite make-ahead breakfast burrito recipe. These were filled with scrambled eggs, cheese, and bell pepper and are a cinch to whip up.
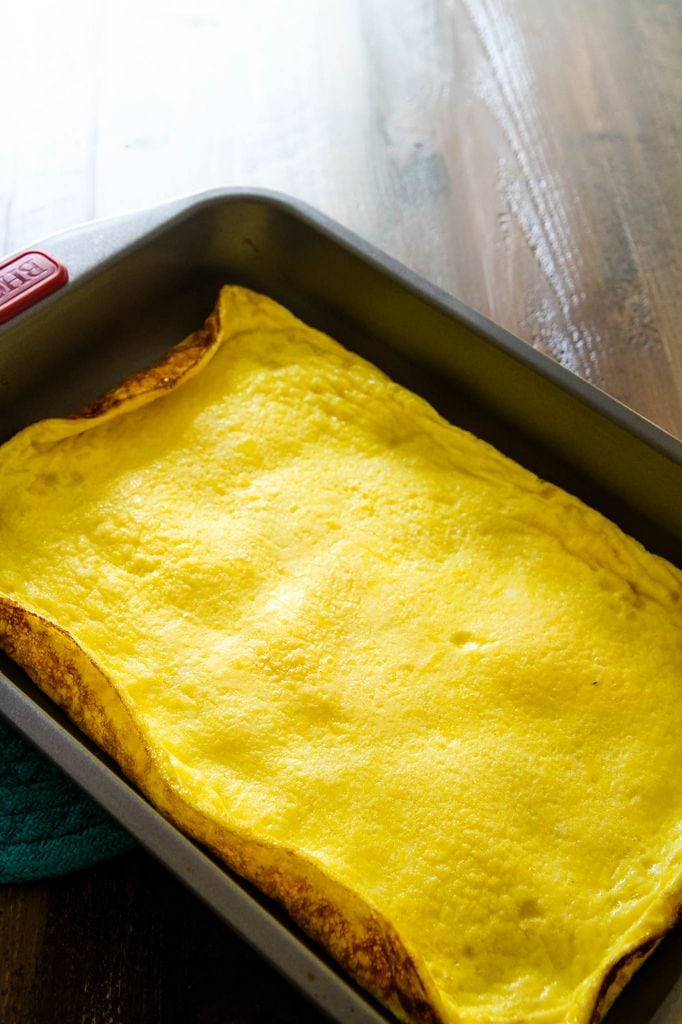
Today’s breakfast sandwich preparation is a little different than the way we prepared our breakfast burritos. Instead of scrambling our eggs, we will be baking a sheet pan of our egg mixture and cutting them into circles for our breakfast sandwiches. With the addition of bacon (totally optional!!) and a slice of cheese you have the PERFECT frugal ingredients for a breakfast that your whole family will love.
How to Make Breakfast Sandwiches
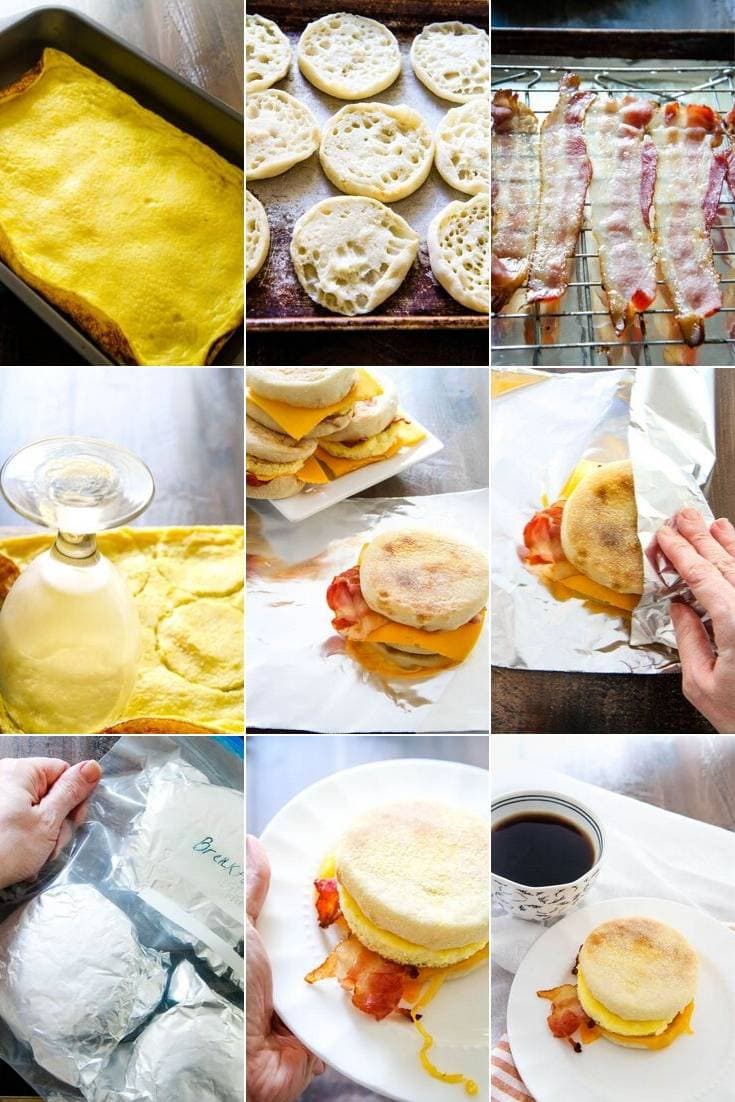
The eggs are scrambled together with milk, salt, and peper and are poured into a prepared pan (sprayed with cooking spray) for baking.
Please don’t think you have to stop at just eggs though. This is a great recipe to add in other ingredients, like spinach or cooked veggies that you might want to put to work.
A good way to think about it is, if you would add it to a frittata, it is probably a delicious addition to these sandwiches.
Whatever combo you pick, just remember that salt and pepper are key to great flavor.
As you can see with my first pan, the darker nonstick yielded a browner crust on the bottom.
If you have a dark nonstick pan too, keep an eye on it. I also adjusted the cooking time and length on my second batch so I could make sure I nailed the right length of time.
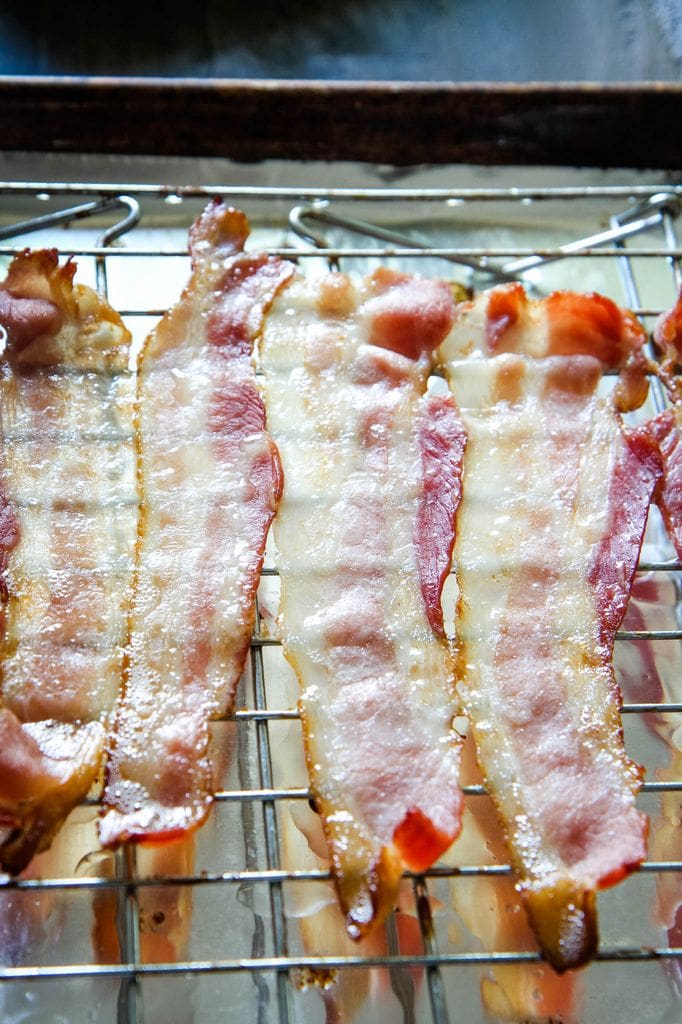
As these eggs are baking, it is time to prepare your bacon for baking.
Have you baked bacon before? Personally, I think it is the only way to go because it cuts down a lot on the mess and cleanup that can be required with stove top preparation.
For this recipe, all you will need to do is to line a cookie sheet with tin foil. On top of your tin foil, you will place your cooling rack. A cooling rack really helps the bacon gets crispy on all sides.
As you know, crispy bacon is just what we are looking for, amiright?
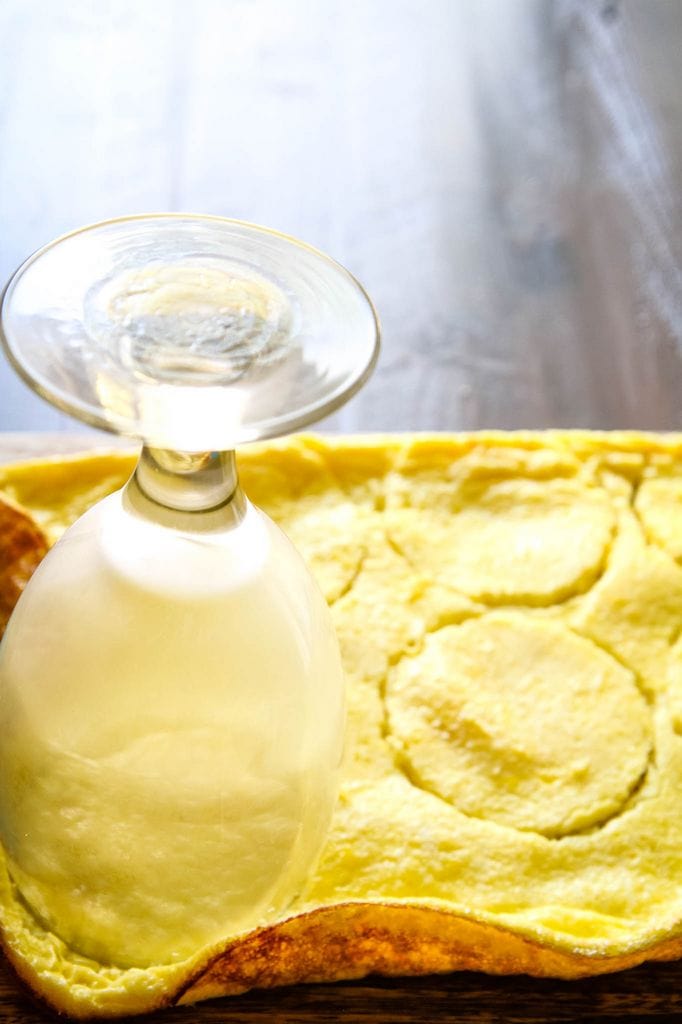
Once the eggs are done cooking, remove them to cool while you slide in your bacon. Once cool enough to handle, cut them into circles for your muffins.
I didn’t have a biscuit cutter, but you don’t need one for this recipe. I found a cup that cut these perfectly for our sandwiches.
Don’t worry, the cup isn’t dusty (well….it *could* be) and is just filled with a little steam from our warm eggs.
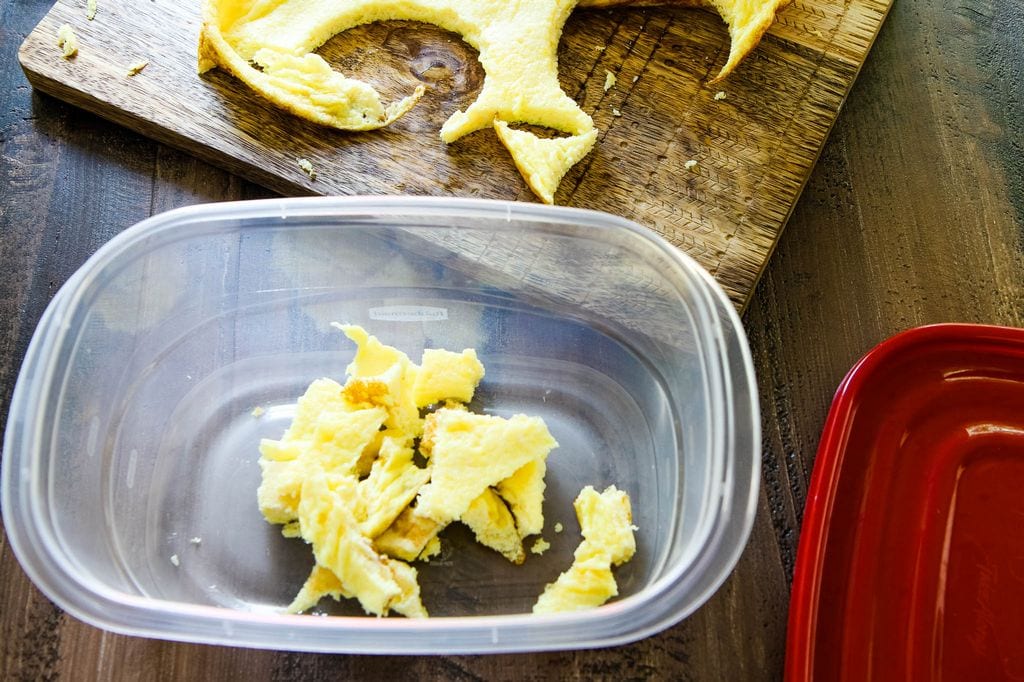
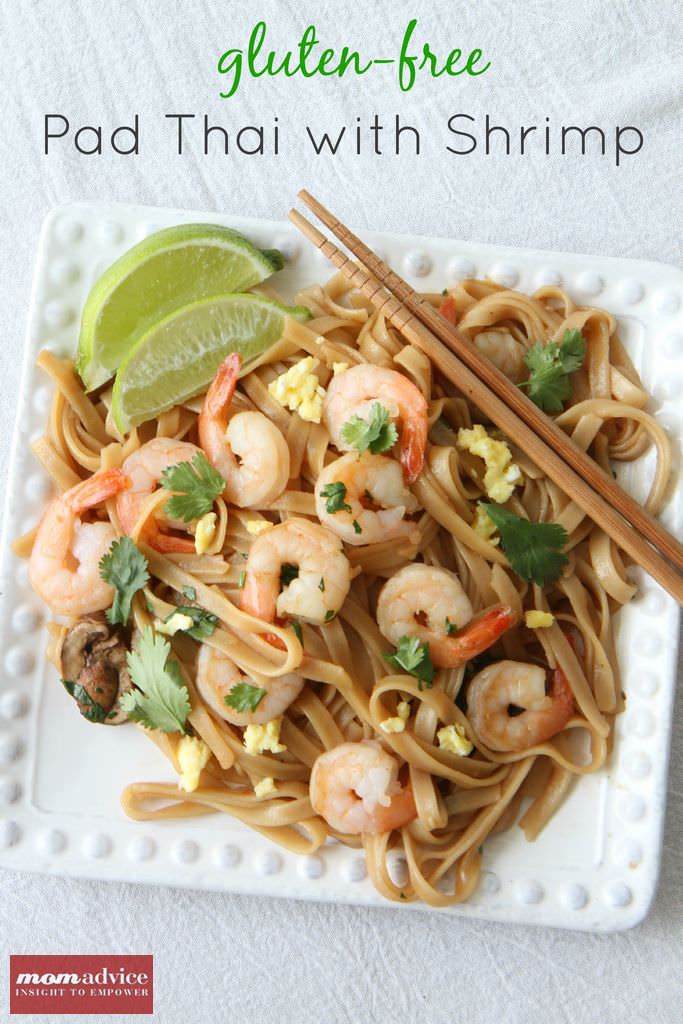
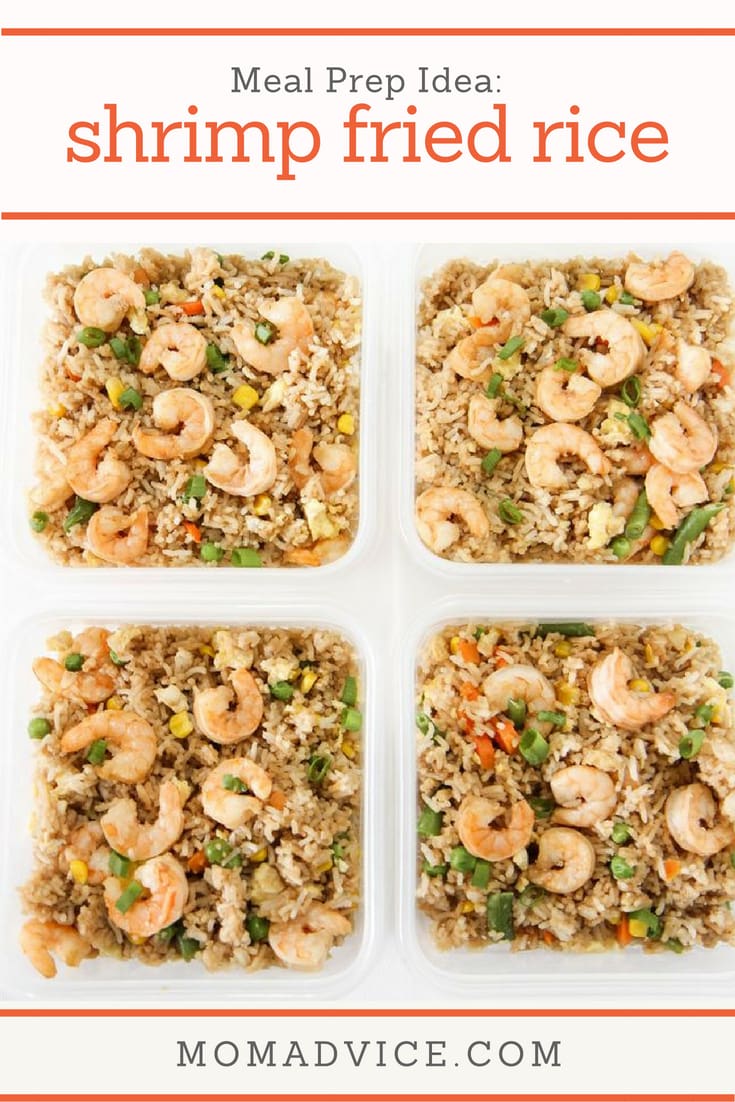
Do you have a lot of egg scraps from your sandwiches? The frugal chef in me encourages you to find a way to repurpose those. For our family, I just plan to mix them into our shrimp fried rice and save a tiny bit of effort on the scrambling.
Once your eggs are cut, split your english muffins for toasting. Toasting insures that they don’t get soggy rolls, especially since we plan to reheat these for another day.
Are you gluten-free? They do make gluten-free English muffins that are available in the freezer section of many stores.
Udi’s and Glutino, for example, are two well-known brands that offer this as an option.
As with all things gluten-free though, these can be quite a bit more expensive.
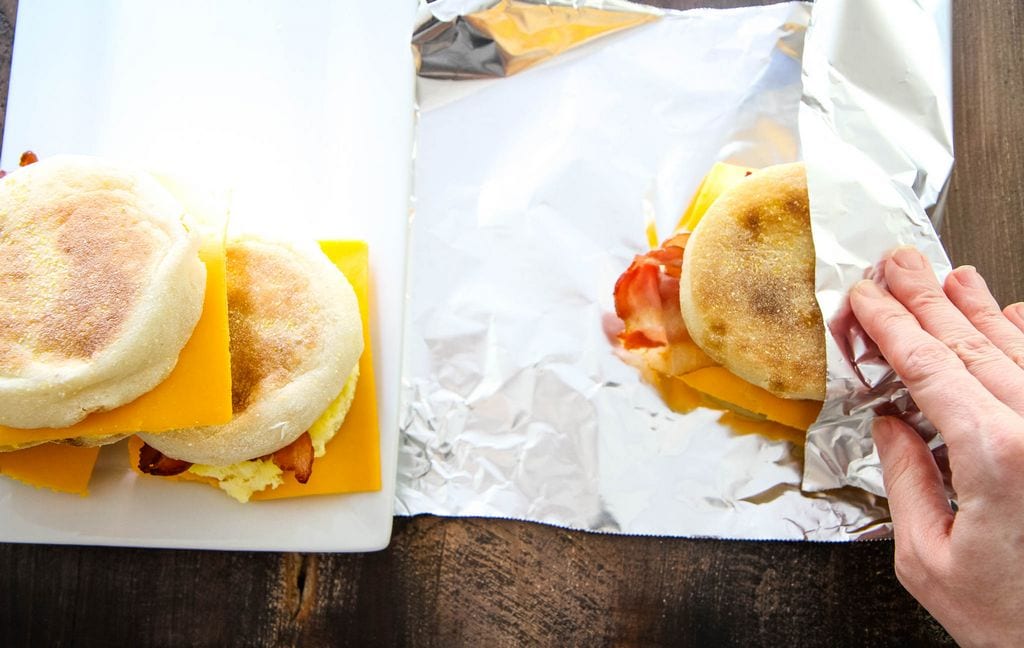
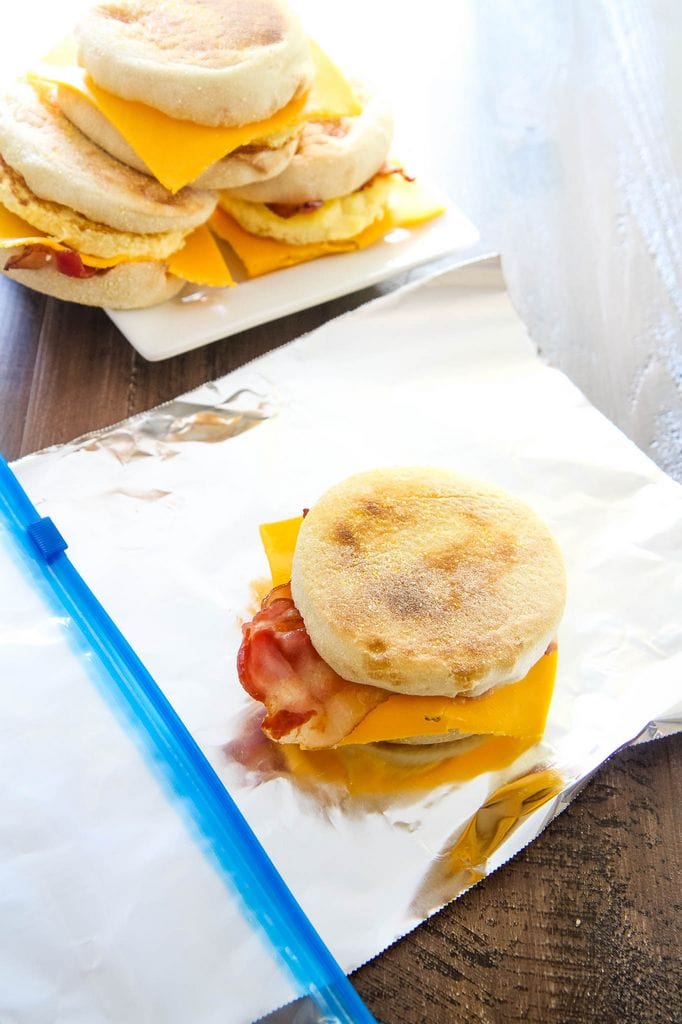
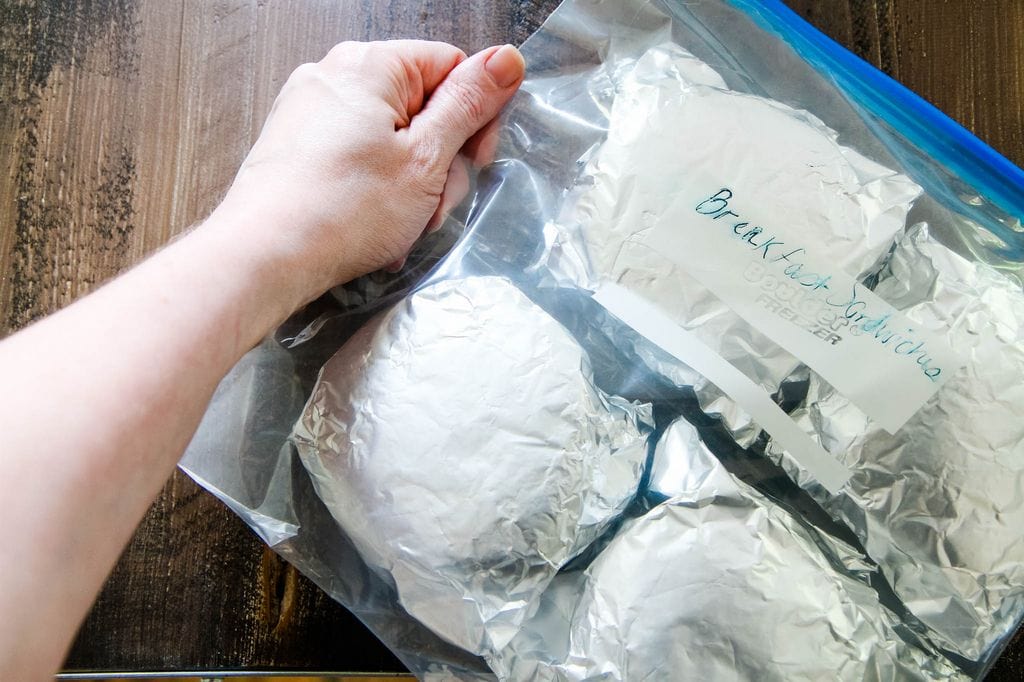
Wrap each breakfast sandwich in a square of tin foil and then place these inside a freezer bag. I don’t add a layer of plastic wrap because they seem to hold up well with just the foil and freezer bag combination.
Now that you have your sandwiches, here are some tips for preparing them.
Bake and Eat Your Breakfast Sandwiches Right Away or Save Them For Up to 5 Days in the Refrigerator
By the way, don’t you think these would make a great breakfast for tailgating?
If you are making and preparing them for a crowd, wrap them in tin foil and cook them at 425 for 8-10 minutes.
I think they are awfully delicious topped with a little pesto or siracha to brighten up those flavors. These can be refrigerated overnight for the morning or even kept in your fridge for up to 5 days.
As fast as these went at my house, I’m not sure freezing them ended up even being worth it!
How to Reheat Your Breakfast Sandwiches In the Microwave Right From the Freezer
If you are planning to reheat right from the freezer, remove the tin foil and microwave for 1 minute and 30 seconds. I do like to flip these halfway through and find that they benefit from being wrapped in a paper towel to help the muffin keep its consistency and absorb the moisture.
How to Reheat Your Breakfast Sandwiches in the Toaster Oven Right From the Freezer
Do you have a toaster oven? This is a wonderful avenue for reheating your sandwiches. Keep your sandwich in the tin foil and toast for 10-15 minutes or until the filling is warm and the cheese is melted.
Meal Prep: Breakfast Sandwiches Recipe
Meal Prep: Breakfast Sandwiches Recipe Recipe Type : Breakfast Author: MomAdvice.com Prep time: 15 mins Cook time: 40 mins Total time: 55 mins Serves: 6 breakfast sandwiches These freezer-friendly sandwiches are the perfect item to keep on hand for busy mornings. Although this recipe contains bacon, this can easily be omitted for a vegetarian freezer dish too. If you ask me, you just can’t go wrong with eggs and cheese on a toasted english muffin (regular or gluten-free). Follow this easy tutorial for a healthy breakfast that is ready in minutes!
Ingredients
10 large eggs
1 cup skim or low-fat milk
1 teaspoon salt
6 slices of bacon (optional)
6 slices of cheese
6 english muffins
sriracha or pesto for topping (optional)
cooking spray
biscuit cutter, glass, or mason jar lid for cutting the egg rounds
9×13 pan
2 cookie sheets
metal cooling rack
mixing bowl & whisk
Instructions
Preheat oven to 350 degrees and prepare your 9×13 with some cooking spray.
In a large bowl, whisk the eggs, milk, salt, and pepper. Pour the egg mixture into the pan and cook for approximately 15 minutes. Be sure to keep your eye on it to make sure the bottom does not get dark.
While the eggs cook, prepare your bacon and english muffins. Split your muffins and place them on a cookie sheet (see picture above). Set aside. Cover the bottom of another cookie sheet with tin foil. Place metal cooling rack on top and spread the bacon, making sure there is space around each piece so the bacon is properly crisp.
Once the eggs are done, remove and set aside to cool. Raise the temperature on the oven to 400 degrees and slide your tray of bacon in. Cook the bacon for 15 minutes. Set aside.
Using a biscuit cutter (or glass), cut out circles of egg. Set aside scraps for another recipe.
Next, slide in your sliced english muffins for toasting for 8-10 minutes.
Make an assembly line and assemble the sandwiches: muffin, egg, bacon, and cheese. Wrap in tin foil and and then store the sandwiches in a freezer bag.
Follow instructions for warming, in the notes section of this recipe card
Notes
Bake and Eat Your Breakfast Sandwiches Right Away or Save Them For Up to 5 Days in the Refrigerator[br]If you are making and preparing them for a crowd, wrap them in tin foil and cook them at 425 for 8-10 minutes. These can be refrigerated overnight for the morning or even kept in your fridge for up to 5 days.[br]How to Reheat Your Breakfast Sandwiches In the Microwave Right From the Freezer[br]If you are planning to reheat right from the freezer, remove the tin foil and microwave for 1 minute and 30 seconds. I do like to flip these halfway through and find that they benefit from being wrapped in a paper towel to help the muffin keep its consistency and absorb the moisture.[br][br]How to Reheat Your Breakfast Sandwiches in the Toaster Oven Right From the Freezer[br]Do you have a toaster oven? This is a wonderful avenue for reheating your sandwiches. Keep your sandwich in the tin foil and toast for 10-15 minutes or until the filling is warm and the cheese is melted.
3.4.3177
Love this breakfast recipe? Here are a few other breakfast dishe we love at our house!
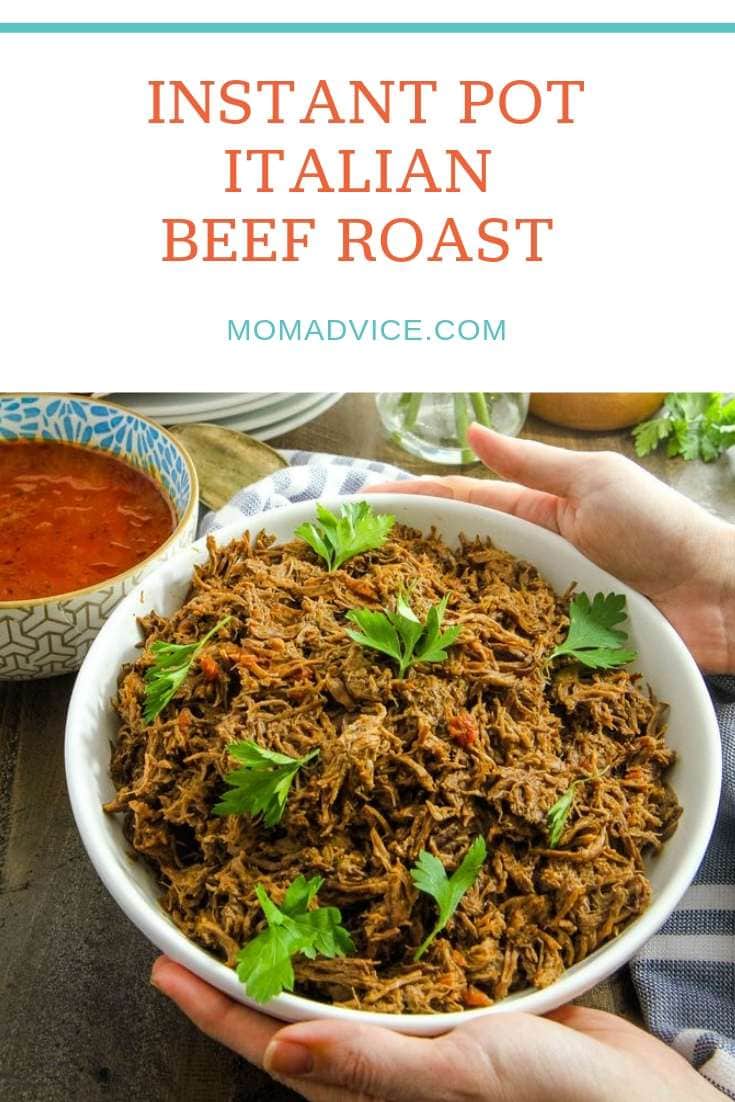
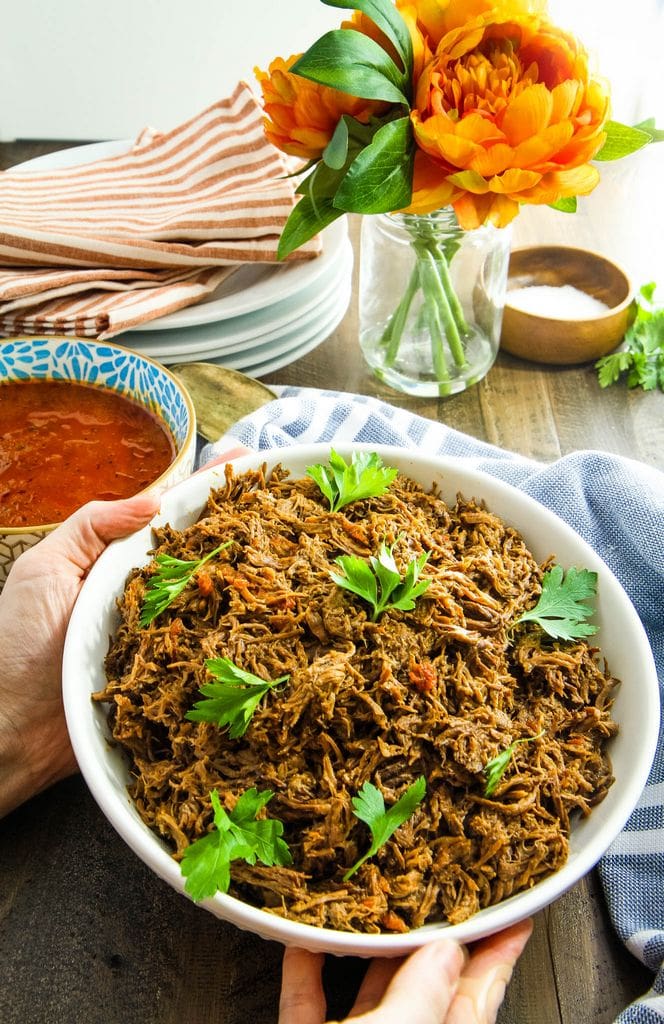
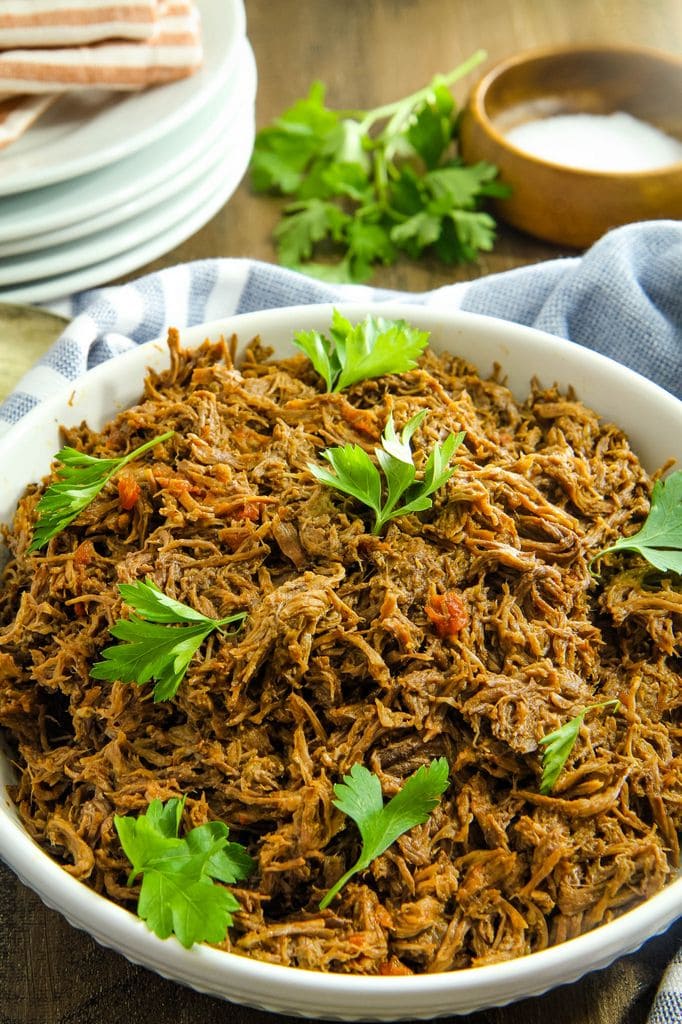
No need to break out your slow cooker for a great chuck roast. This Instant Pot recipe is ready in a fraction of the time, compared to a slow cooker roast. Dressed with a simple marinara sauce, this shredded beef recipe is perfect to serve over pasta or to stuff in a sub bun for an italian beef sandwich. Let me show you how with this pressure cooker recipe.
I am back again with another family meal idea that you can create in your pressure cooker.
Those of you that have my book may recognize this easy recipe that I had originally made for my crock pot. This pot roast recipe was formerly known as my, “Pot Roast Italiano,” and I thought it would be a fun one to adapt for the pressure cooker.
The exciting news is that this recipe DOES NOT DISAPPOINT AT ALL. I have a feeling that this might be in your regular recipe rotation.
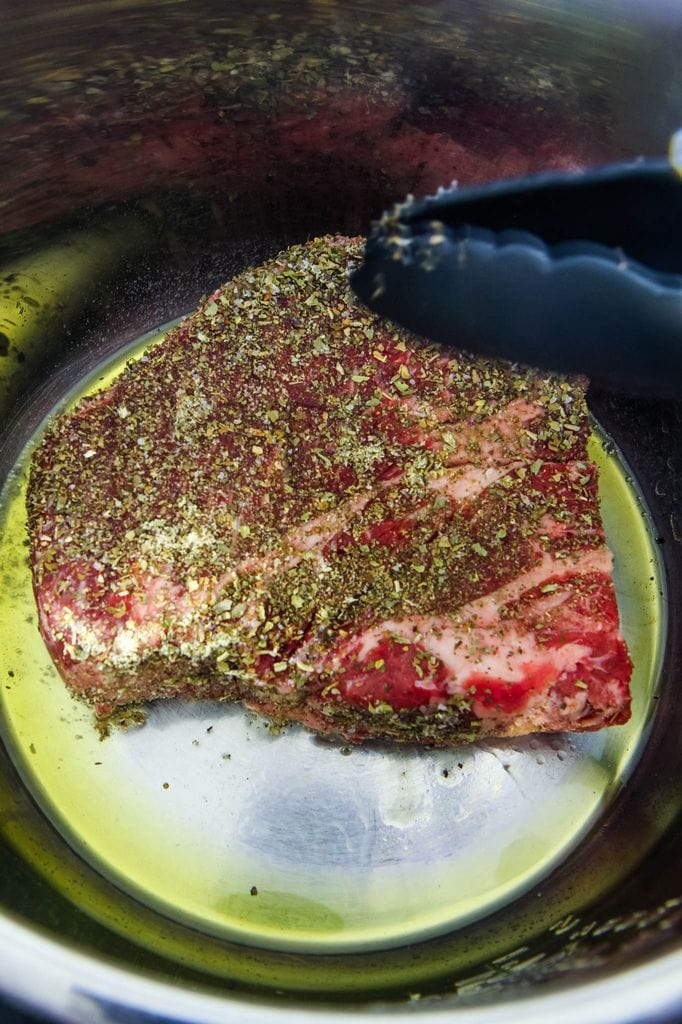
If you haven’t used the sauté function on your pressure cooker, you are going to love the ability to brown your meats before you pressure cook them.
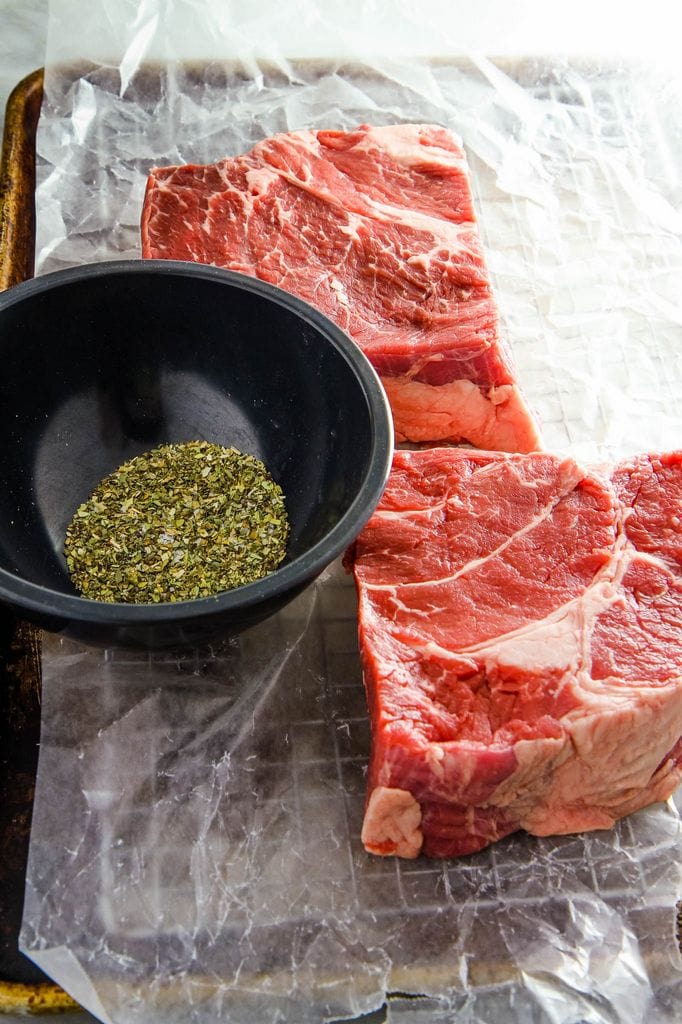
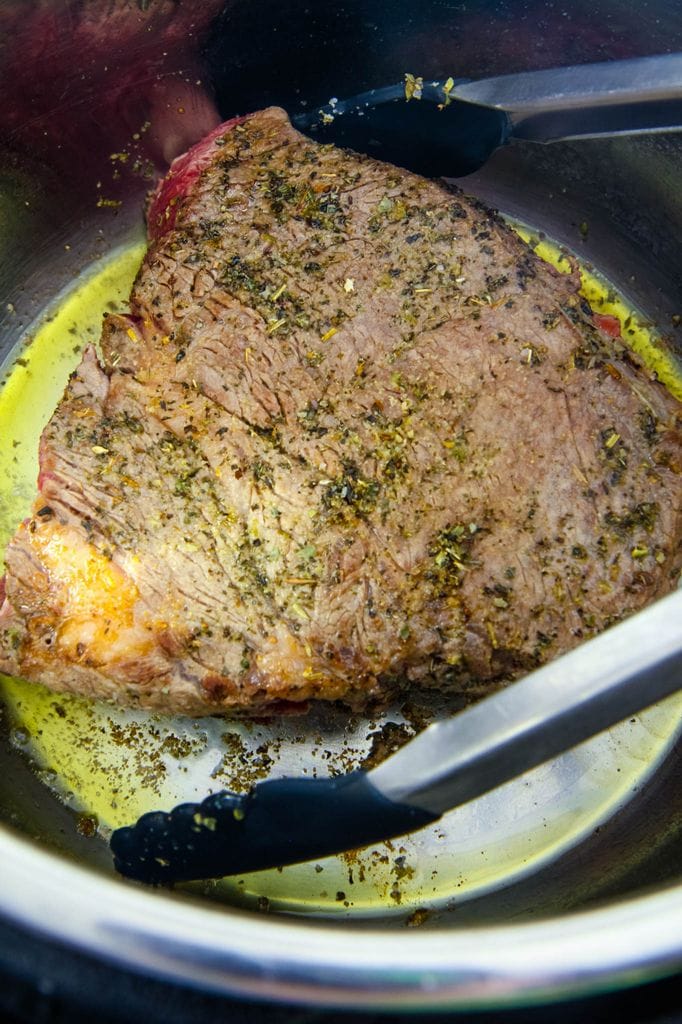
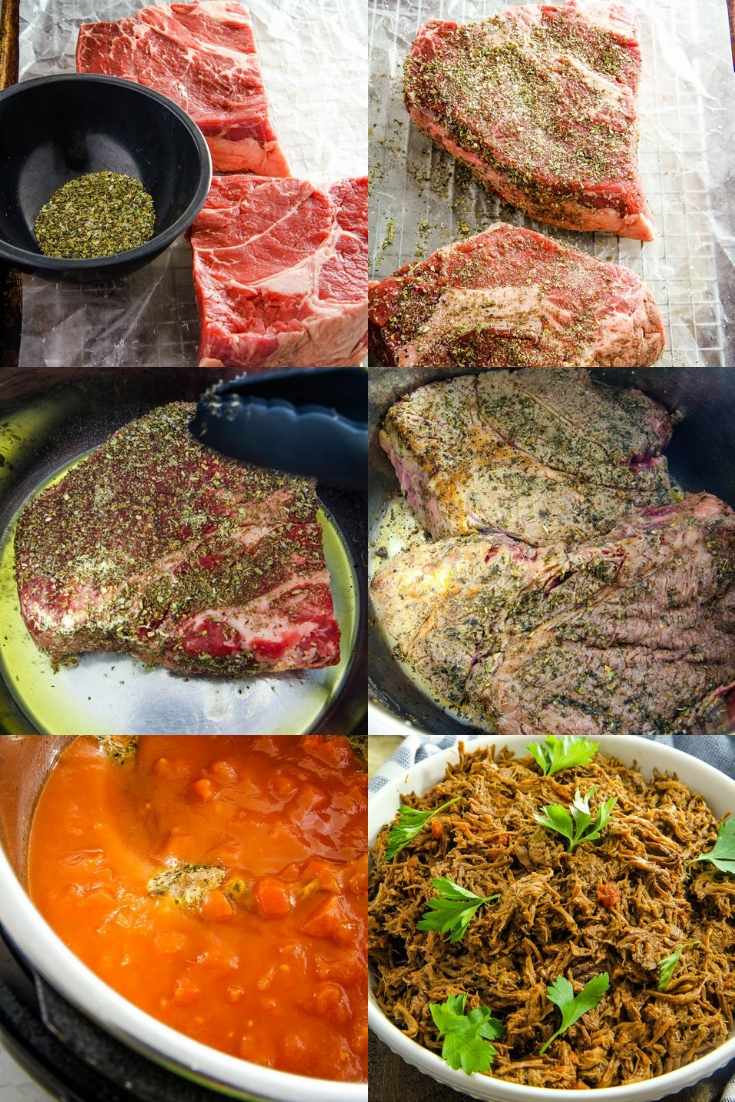
A three pound chuck roast can be difficult to flip so feel free to cut your roast in half, like I have demonstrated in the photo.
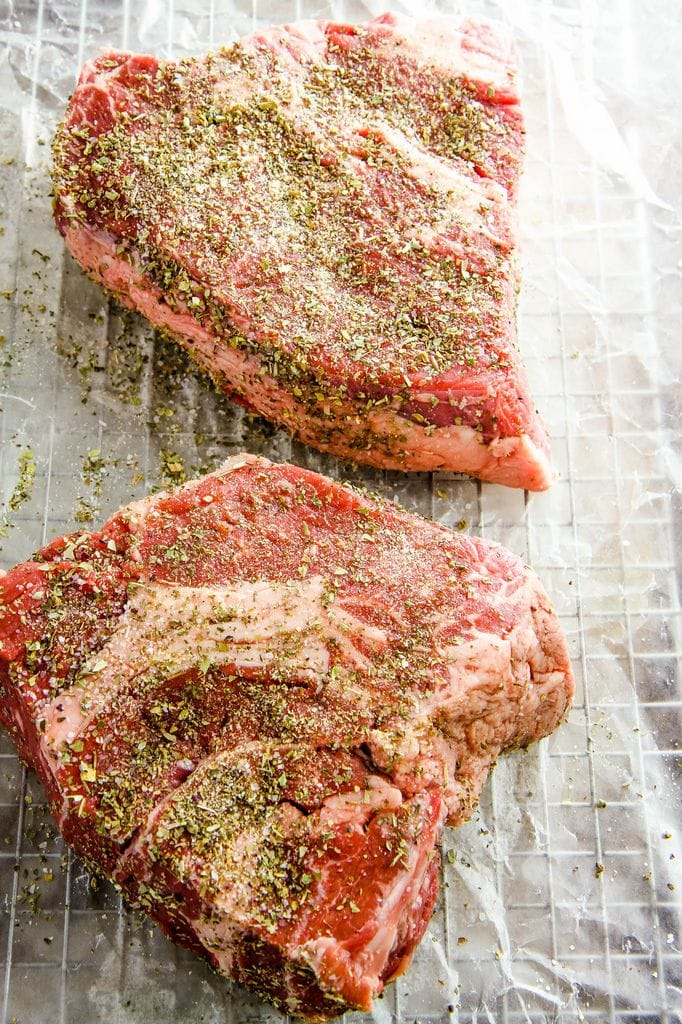
After mixing these seasonings, you can spoon them on and press them into both sides of your roast, while you wait for your Instant Pot to warm up.
Not sure when it is warm? Your Instant Pot will say HOT when it is ready to go and also will sound a little beep so you can get your meat started.
Add olive oil to the bottom of the pan and then brown the roast beef on both sides, approximately 2-3 minutes each.
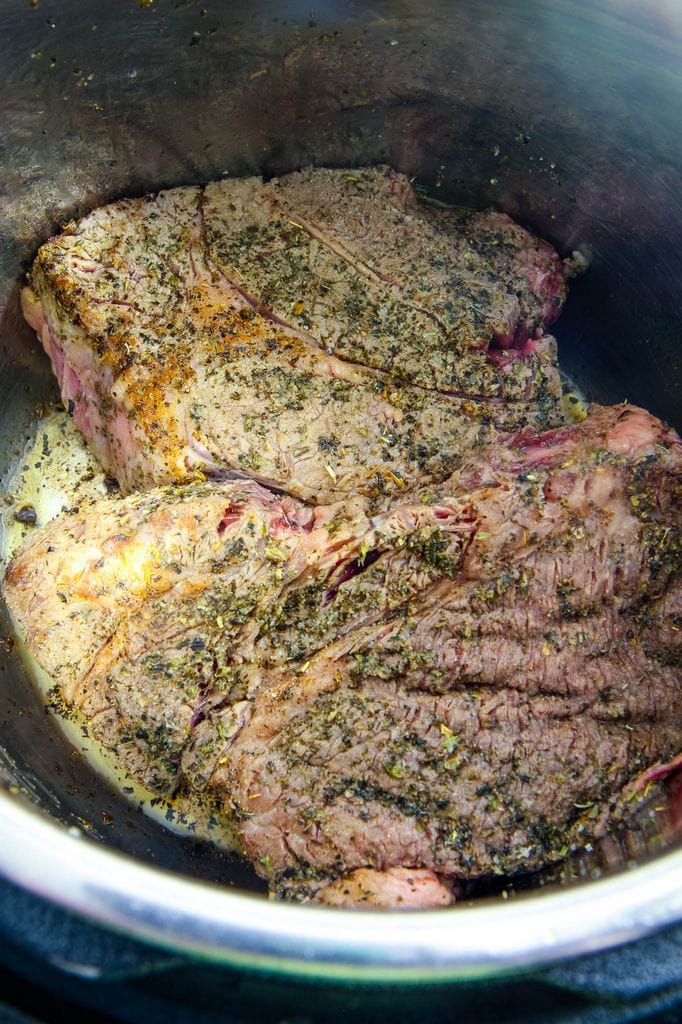
Once you have this done, pull the beef out of the Instant Pot and cancel the sauté function.
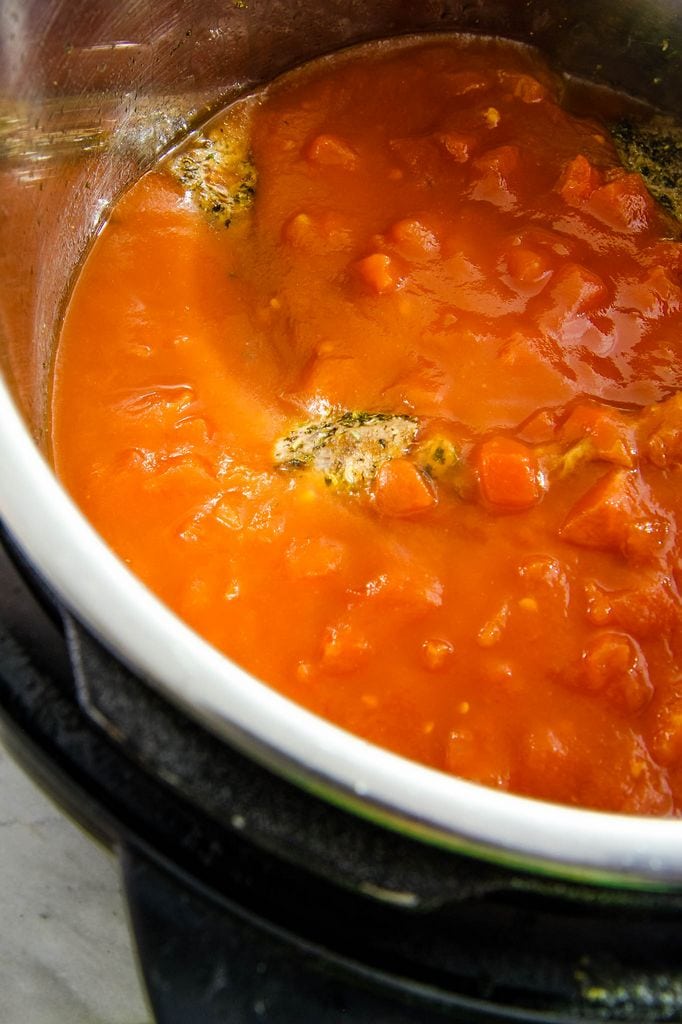
Using a whisk, whisk in your tomatoes, tomato sauce, red wine vinegar, and salt. Don’t put in the tomato paste- we aren’t ready for that thickener just yet.
Be sure to use the whisk to lift up an of those delicious brown bits, that may have been left behind by your roast, and any of those italian seasonings that may be resting on the bottom.
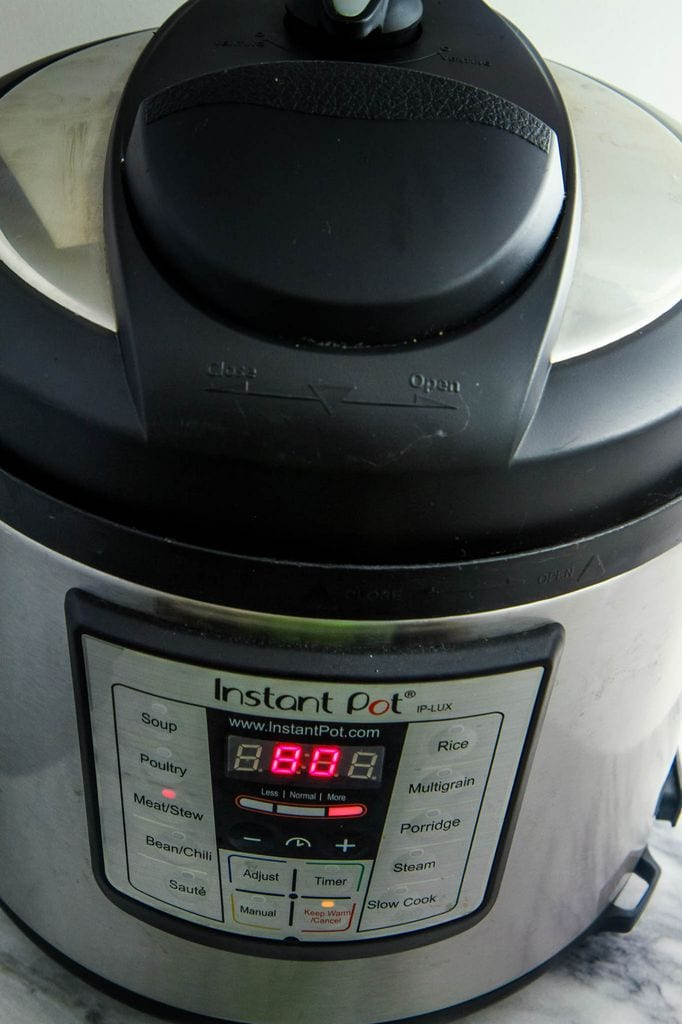
Set your Instant Pot to high pressure and program it for 80 minutes cooking time. I usually just press the meat button on the IP since I have that set to MORE on the settings.
Once it is done, try to give it some time to come to a natural release (maybe ten minutes or so), but if you are in a rush a quick release won’t hurt it either.
After releasing the lid, remove the meat from the pressure cooker and shred the meat. Thanks to the effectiveness of the Instant Pot, this should be an absolute breeze.
Your final step, to complete the accompanying sauce, is to whisk in a can of tomato paste. Be sure to give your sauce a taste and sprinkle in additional salt, onion powder, or garlic powder (as needed).
This meat can be placed into a sub roll with a layer of sauce and melted provolone cheese. If you are wanting a more formal meal, this pairs perfectly with mashed potatoes or spooned over a big pile of pasta and sprinkled with a healthy grate of parmesan cheese.
Unlike the traditional shredded beef recipe with pepperoncini peppers and beef broth, this recipe is always a bit of a surprise to our guests with the uniqueness of the sauce and the delicious Italian flavors.
I can’t wait to hear what you think of this recipe and look forward to sharing even more pressure cooker recipes with you this month.
Pressure Cooker Italian Beef Roast Recipe
Pressure Cooker Italian Beef Roast
Recipe Type: Main
Author: MomAdvice.com
Prep time:
Cook time:
Total time:
Serves: 6 servings
No need to break out your slow cooker for a great chuck roast. This Instant Pot recipe is ready in a fraction of the time, compared to a slow cooker roast. Dressed with a simple marinara sauce, this shredded beef recipe is perfect to serve over pasta or to stuff in a sub bun for an italian beef sandwich. Let me show you how with this pressure cooker recipe.
Ingredients
3 pounds beef chuck roast
2 tablespoons olive oil
1 can petite diced tomatoes (with their juice)
1 can tomato sauce – 16 oz
2 tablespoons red wine vinegar
2 teaspoons oregano
2 teaspoons garlic powder
2 teaspoons onion powder
2 teaspoons basil
6 oz. can tomato paste
Salt and pepper
Grated Cheese (optional)
Instructions
Cut your beef chuck roast into two or three pieces so that it can fit and be flipped in your pressure cooker.
Turn on your pressure cooker and set it to the sauté function on HIGH.
On a piece of wax paper, take a paper towel and dry out the meat on both sides so that you can get a nice sear on your roast.
In a small bowl, mix together salt, pepper, oregano, garlic powder, onion powder, and basil.
Sprinkle the seasoning on both sides of your roast and push the seasoning in with your hands to make sure that it sticks well.
Add your olive oil to the hot pan and then sear the roast on both sides for two to three minutes, until your roast has developed a nice crust. Be sure to do this in batches so you get a nice sear on your roast. Set your roast aside.
Turn off the Instant Pot and then add your diced tomatoes, tomato sauce, red wine vinegar, and more salt & pepper. Whisk this in and use your whisk to loosen any of the browned bits on the bottom into your sauce. Give it a taste and make sure you have the right amount of seasoning.
Lock your lid and set it to HIGH pressure for 80 minutes (you can also use your Meat setting if you just want to press a button).
Once it is done, allow it to come to Natural Release Pressure (or if you are in a hurry, you can just do a Quick Release- it won’t hurt it!)
Transfer your meat to a cutting board to shred.
Meanwhile, whisk tomato paste into your gravy and check your seasonings one more time.
Spoon a bit of the sauce on your roast and mix it well.
Serve the additional sauce in a bowl or gravy boat. Serve the roast with mashed potatoes, pasta, or rice. Leftovers can be packaged and used later in Italian beef sandwiches, toasted with sauce and provolone.
3.4.3177
This post contains affiliate links.
Love this recipe? Here are a few more meal ideas for your Instant Pot!
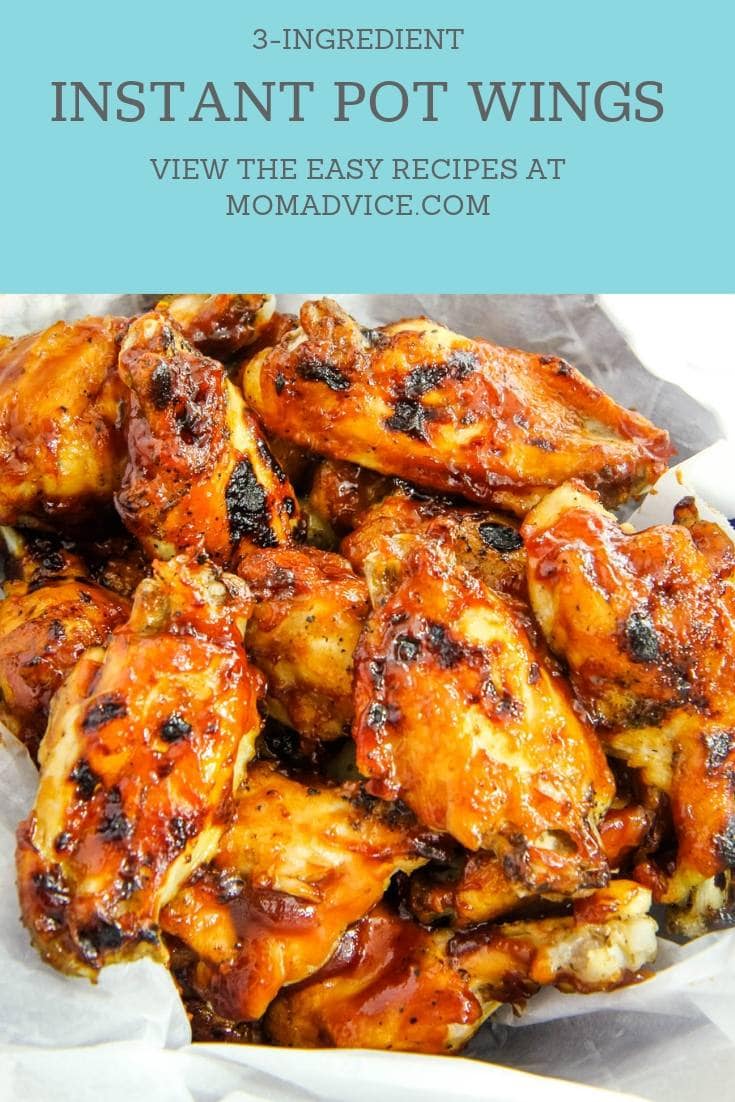
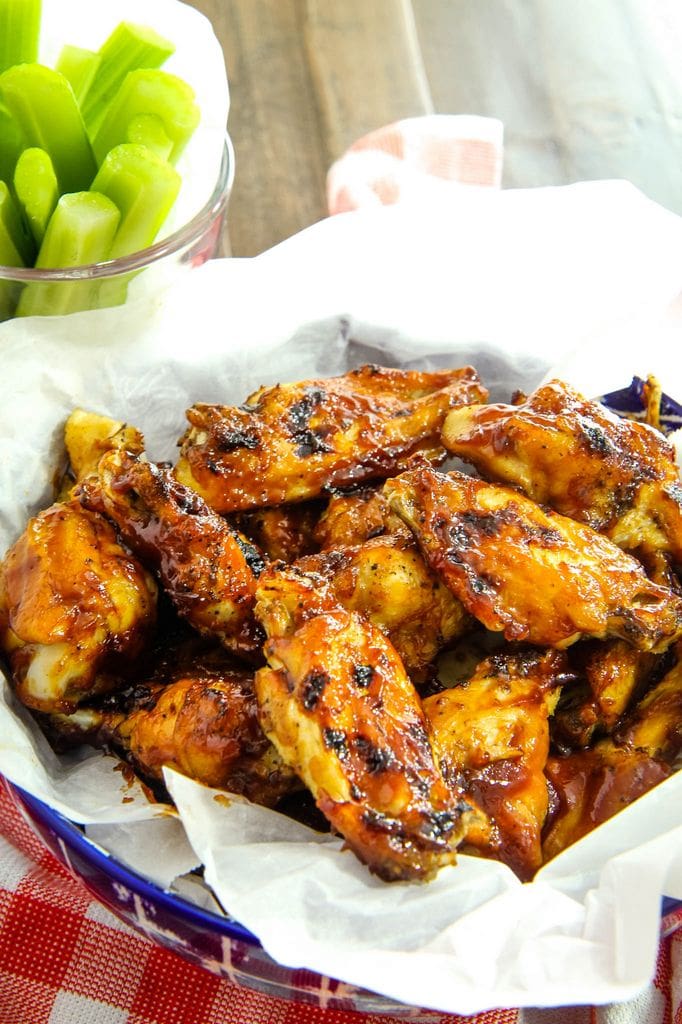
These Instant Pot chicken wings only require three ingredients and five minutes of pressure cooking until they are fall-off-the-bone tender. Try this Instant Pot Recipe today!
I am so excited to start showcasing more recipes on the site and one BIG request I got from readers was for more easy Instant Pot recipes.
It seems I talked many of you into buying one of these appliances on a Black Friday sale and then dropped the ball on giving you ideas for ways to use it.
That’s really nice, huh?
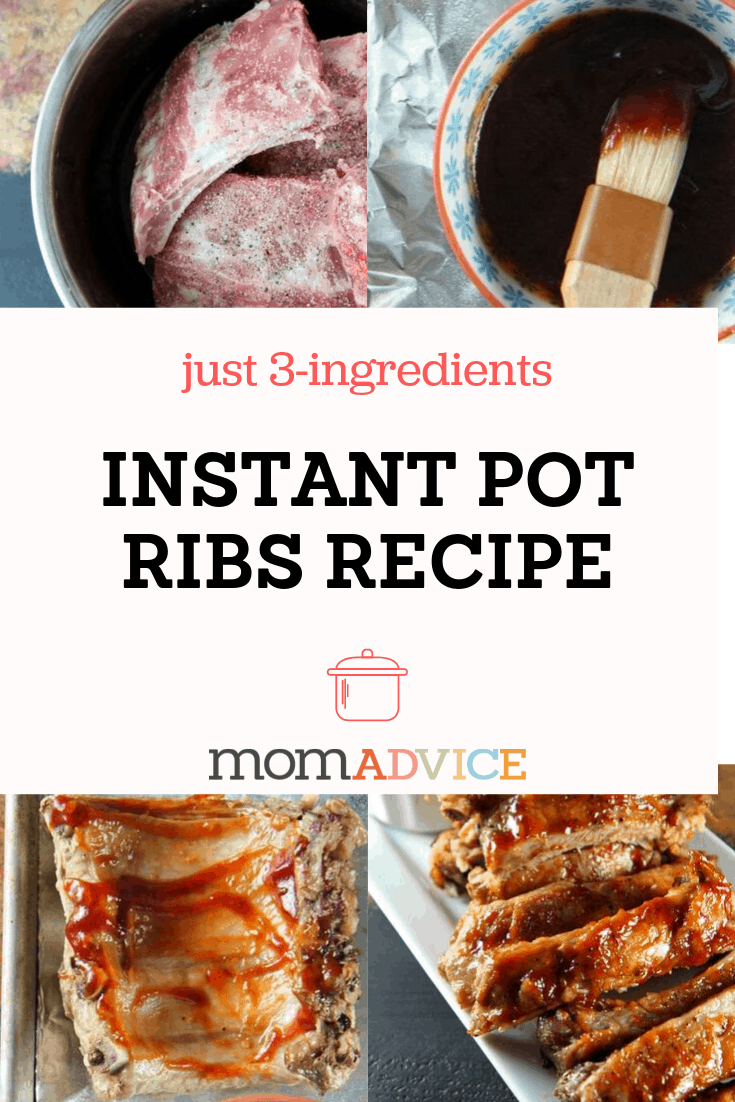
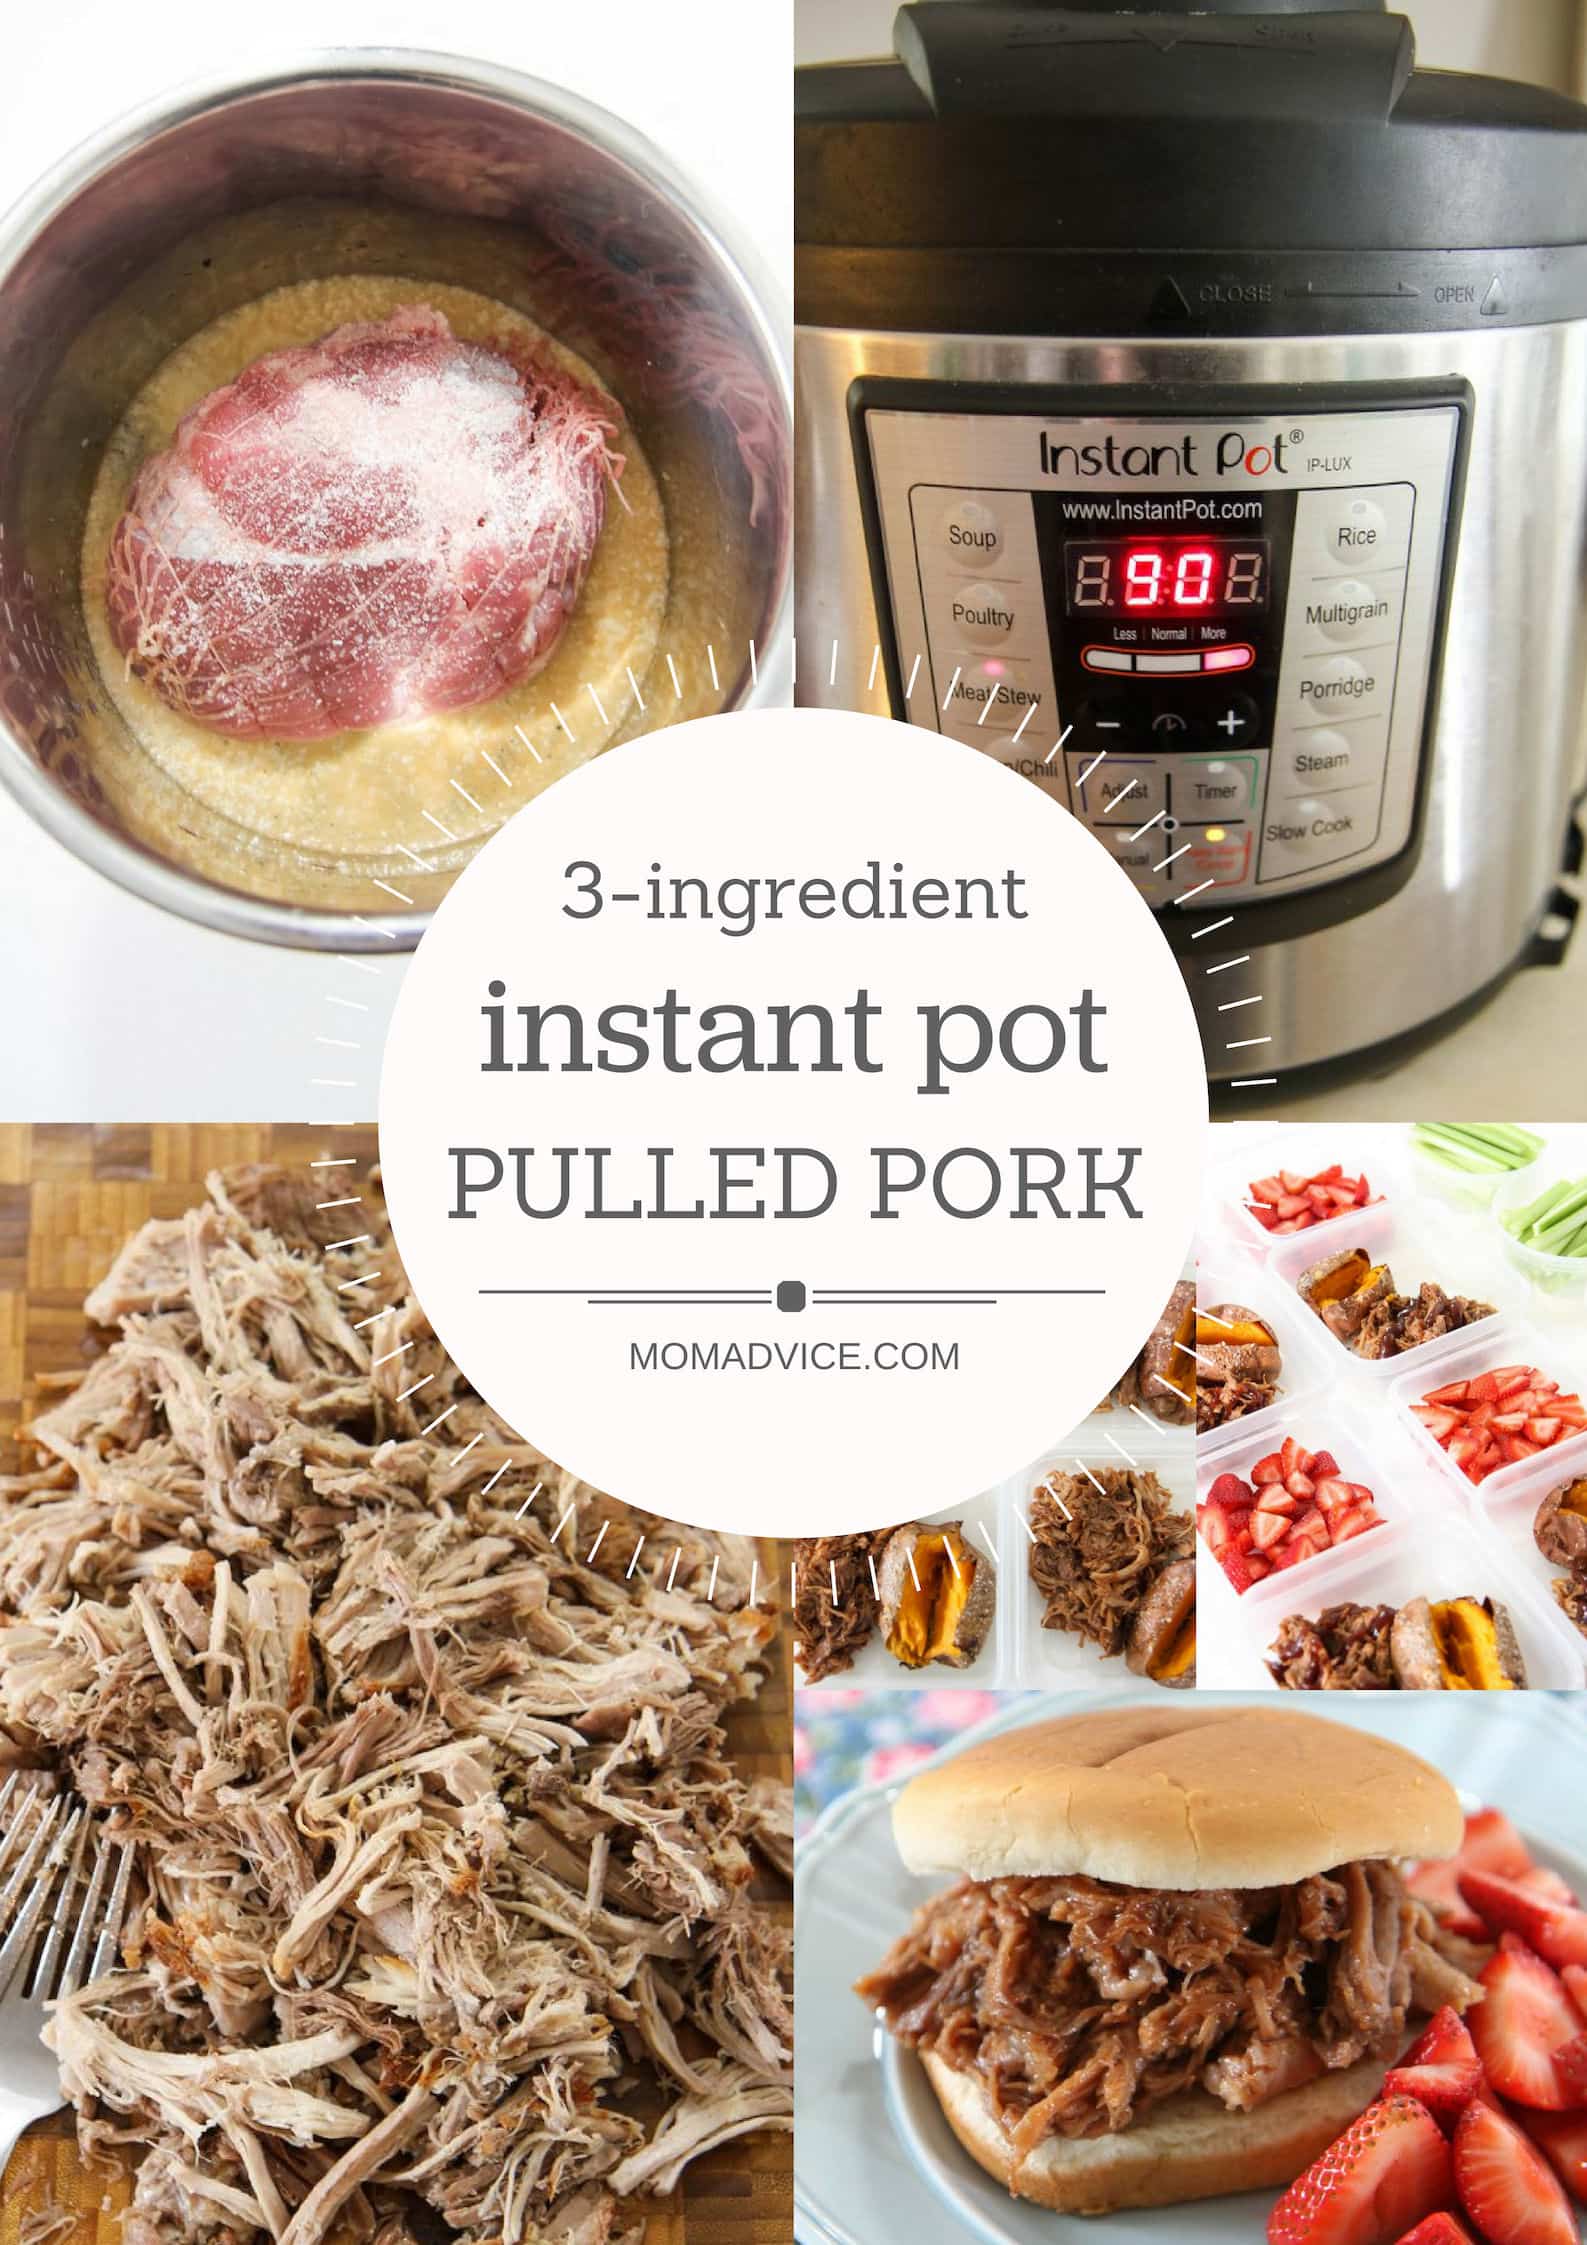
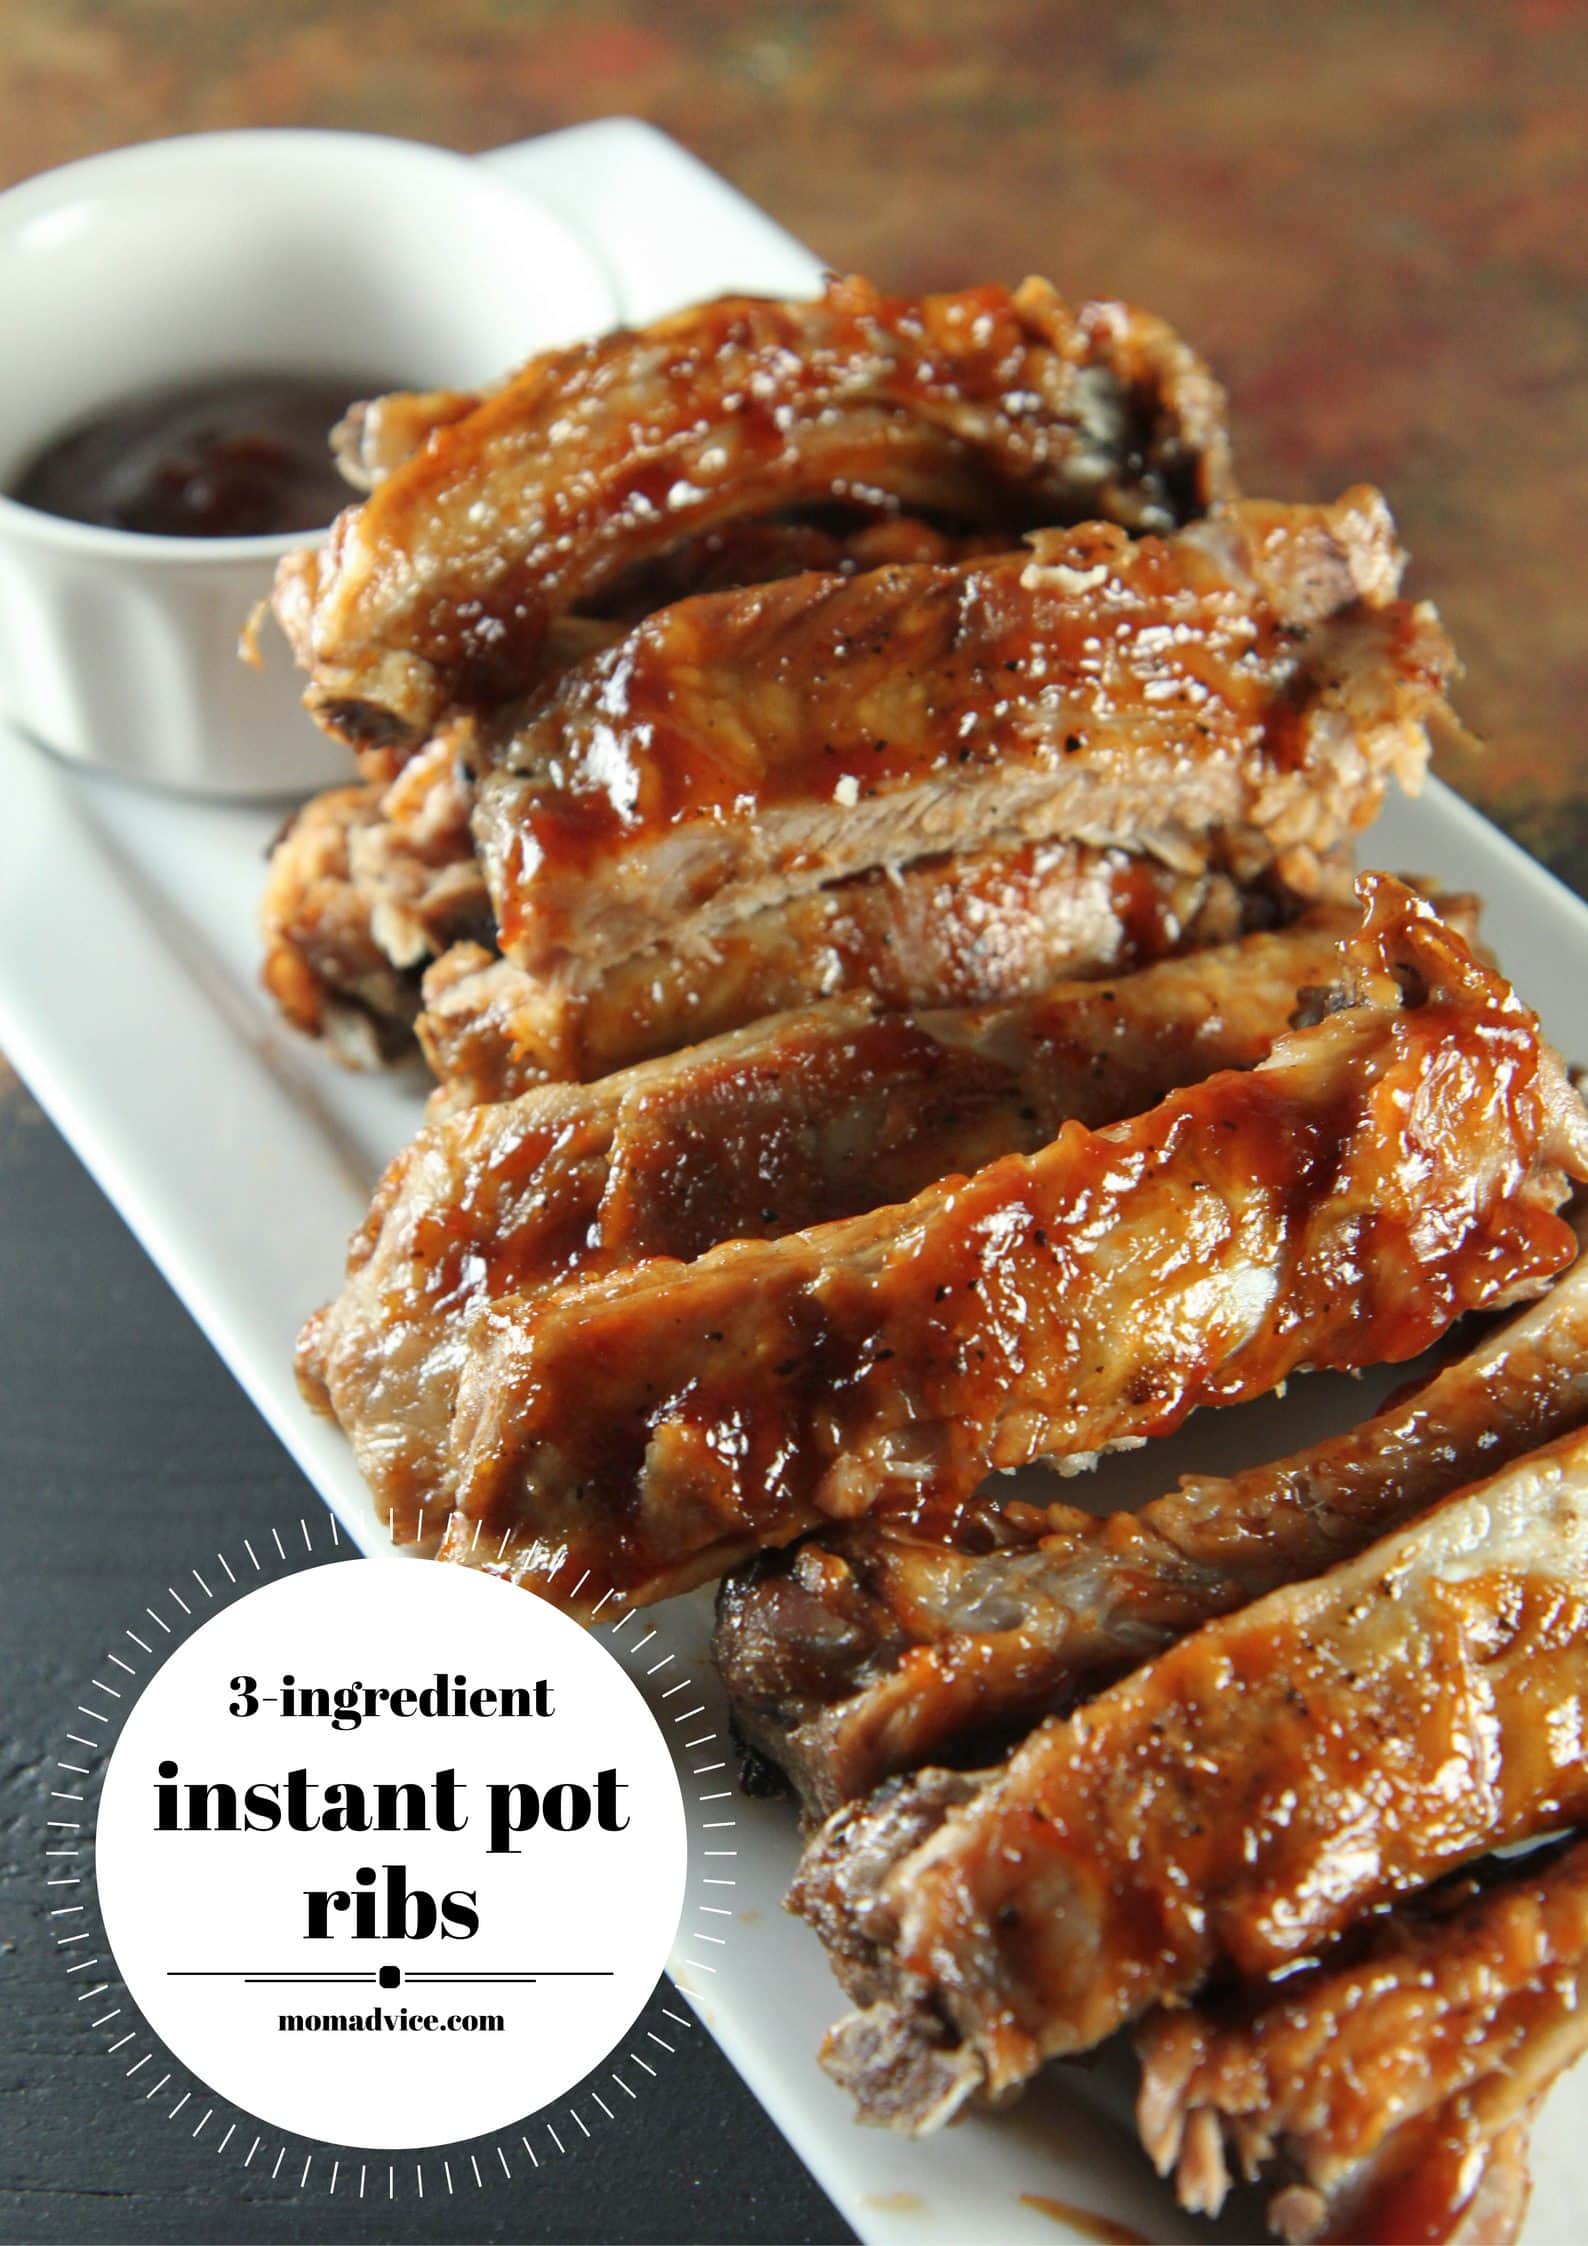
In all honesty, three ingredient recipes have been on repeat in our house especially these easy ribs (one of our most pinned recipes on the site) and these pulled pork sandwiches.
It seems when I get a formula down, with my cooking, I just keep repeating it.
As tailgating season is approaching, I wanted to show how you can cook the chicken wings in your Instant Pot in just about 30 minutes or so.
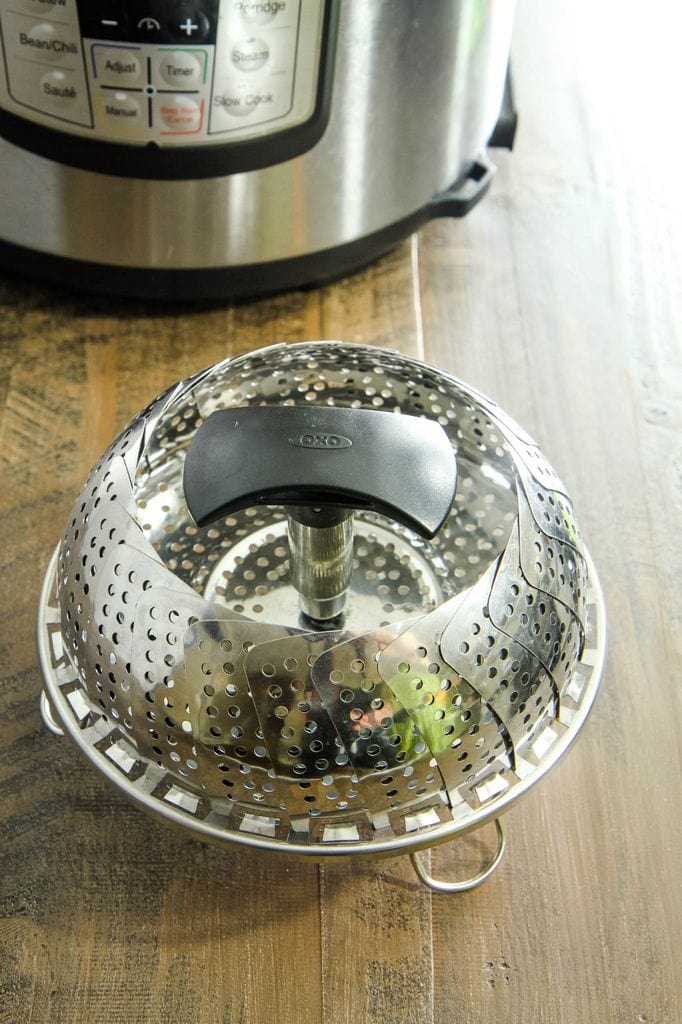
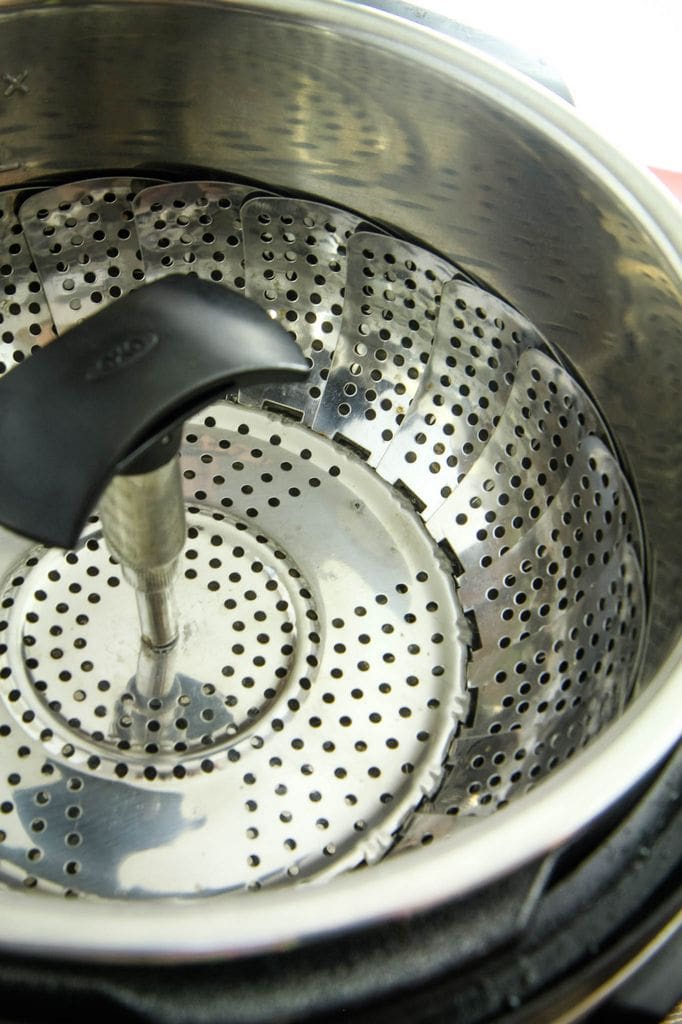
Although I don’t get sucked into the gadget game very often, I have found this steamer basket to be invaluable for cooking both my meat and my eggs. The basket fully holds what is inside and then can be lifted out by the center handle. I use it about once a week so I can confidently recommend this is a great addition to your kitchen arsenal.
When I first started blogging, I created a Honey Bourbon Chicken Wing recipe that I prepared in my slow cooker and I was so proud of my styling.
It was after this photo was posted that someone commented that they were surprised I didn’t, “trim my chicken wings.”
How do I Trim Chicken Wings for My Instant Pot?
Trim the wings?
I had no clue what that even meant.
Wings weren’t something we ate in our house and I’m not the kind of girl who eats wings at a restaurant. It’s because I had no experience eating these that I didn’t know how to trim them for our family or what the wing was supposed to look like.
If you are still learning in the kitchen, I just want you to know that I’ve been learning right along with you. This wasn’t the first time I was wrong about the best way to prepare a dish and I really doubt that it will be the last.
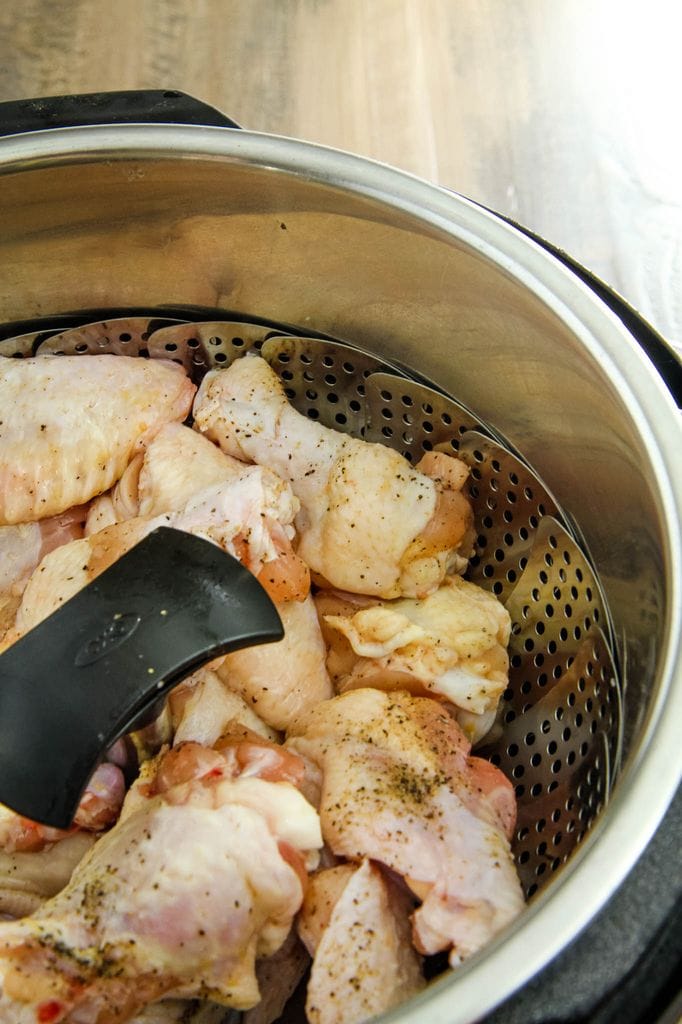
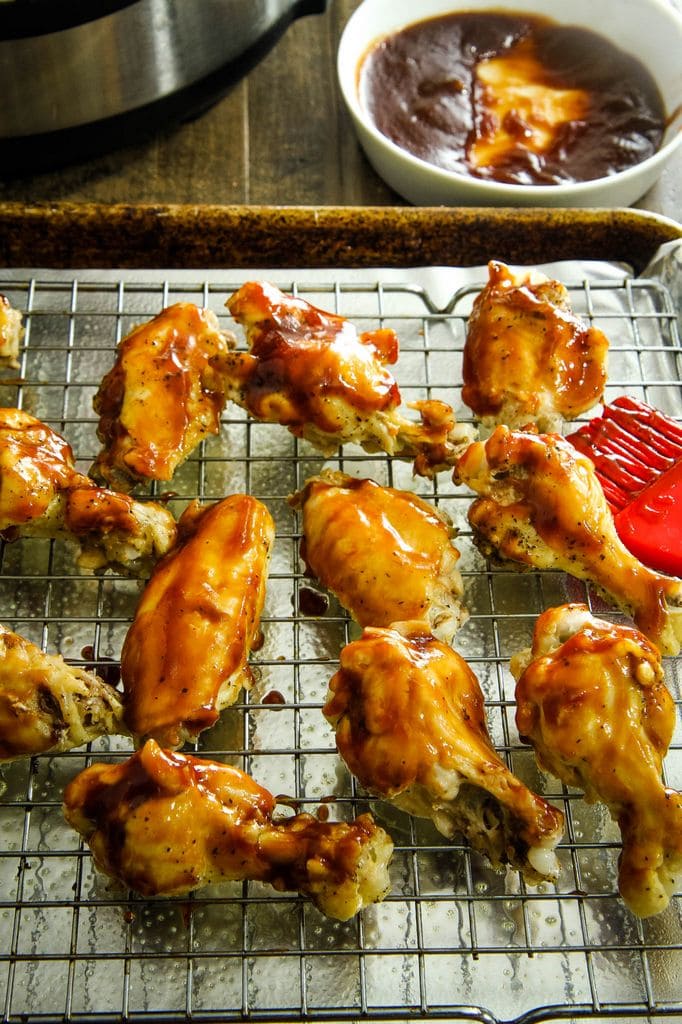
Once you have trimmed your wings, you are ready to toss them with salt and pepper.
Next, you will add one cup of water to the bottom of your Instant Pot and rest your rack on top. Although I used water, I have also used chicken stock that has been leftover in my fridge.
If you don’t have my rack, you can also use the rack that your pressure cooker came with.
Rest the seasoned chicken on top of the rack, seal your Instant Pot, and then set the Instant Pot for High Pressure for 5 minutes. You will allow the Instant Pot to do a Natural Release for 5-10 minutes.
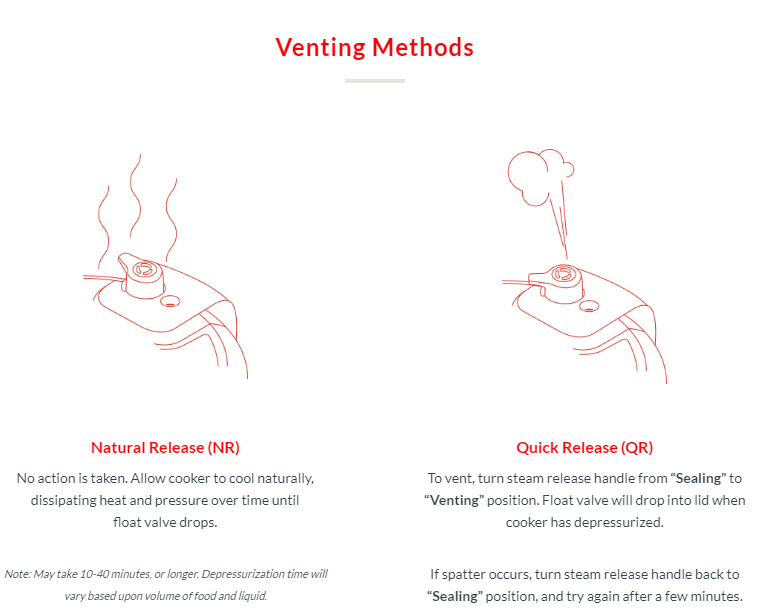
What the Heck is Natural Release?
Not sure what the difference is between Natural Release and Quick Release? That’s okay! This appliance definitely comes with a learning curve.
I found this diagram that should help visually explain the big differences between these two types of venting.
When we are told to Quick Release our pressure cooker, that just means that you are going to turn that steam release handle (located on your lid) to the Vent position on top. This allows all the steam to come out fast and at once.
When we do Natural Release though, we just allow our pot to cool a bit on its own and then after 10 minutes, the steam that is released will be much less and the float valve will drop naturally over time.
Keep in mind, this does not adjust cook times, but only the length of time you are waiting to start working on the next step in the recipe (our broiler finish!).
Remove wings from the pressure cooker and place them on a baking sheet that has been lined with tin foil and has a baking rack on top to allow the circulate underneath.
With a basting brush, you can apply your favorite barbecue sauce or you can really spice them up with buffalo sauce or hot sauce. Since our family is wimpy-wimpy-wimpy, we stick to our Sweet Baby Ray’s.
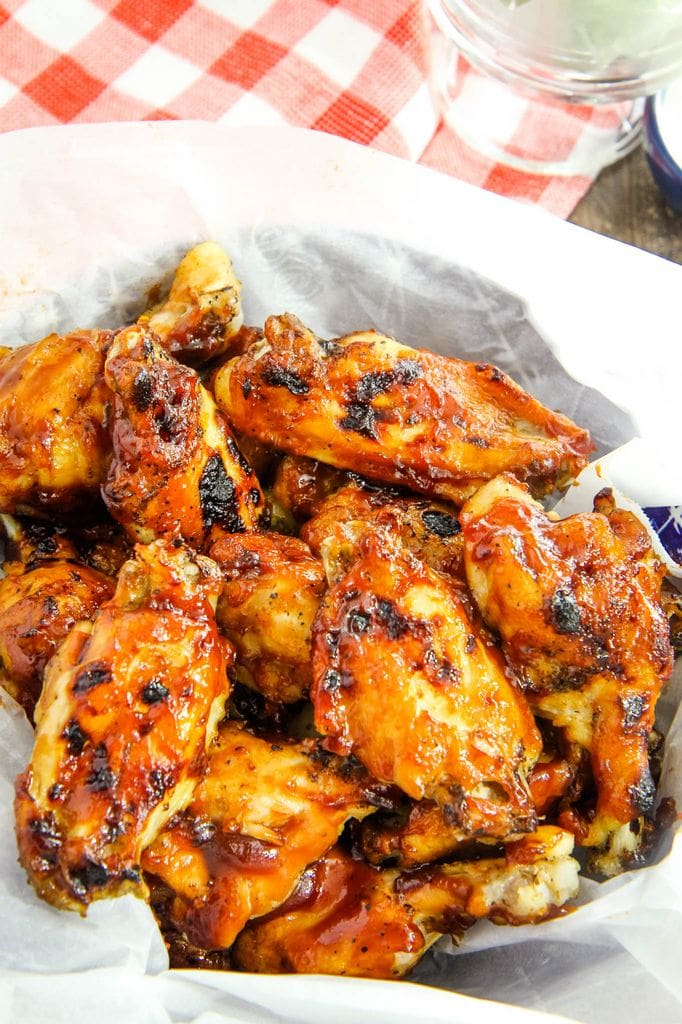
Since the chicken wings are fully cooked, you will not need to bake chicken wings ahead of time. Instead of deep frying these, we rely on the less messy and lower calorie option of just broiling the wings for about five minutes on each side.
I also love any dish that doesn’t require me to shred the chicken for preparation. Once you slide these out of the broiler, you are ready for dipping and eating these.
Please do keep your eyes on the oven though because they can burn on top if they aren’t carefully watched and may need adjusting during the broiling.
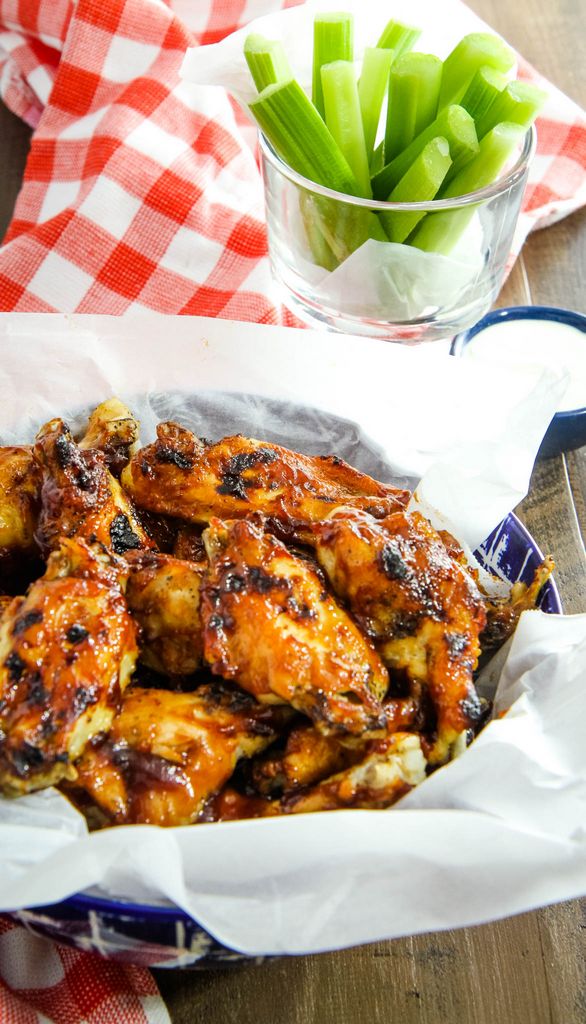
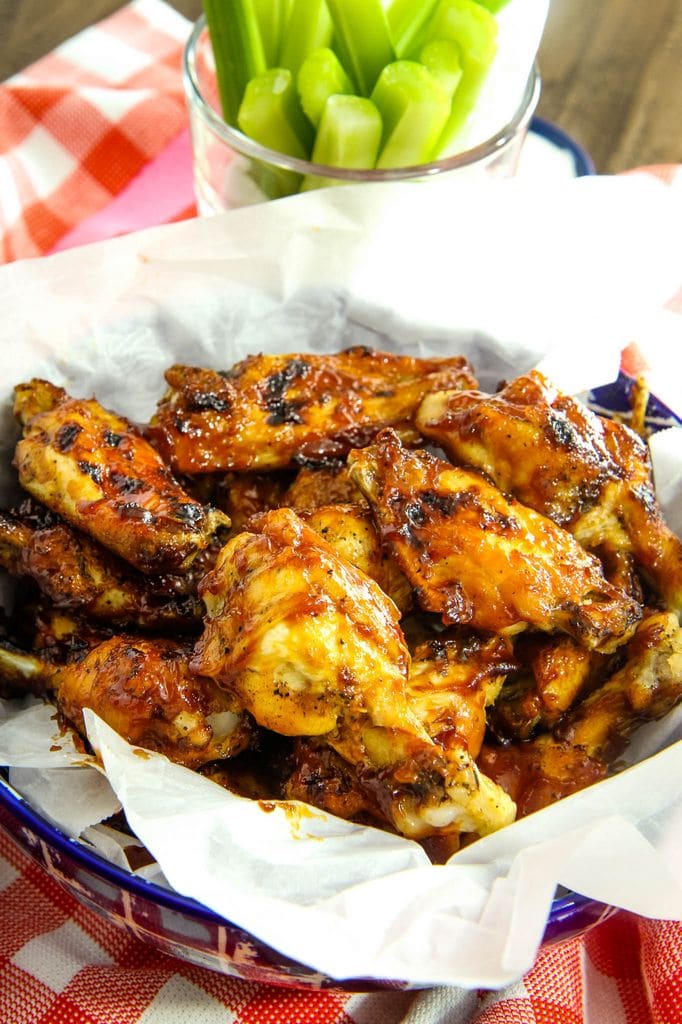
Once these are done, slide them into a serving bowl and pair with your favorite dipping sauce.
I hope you love this recipe as much as I do and I’m thinking it is going to be the perfect recipe to tailgate with. I can imagine preparing a batch of these in my pressure cooker and then throwing them into my slow cooker to keep warm for game days.
This isn’t the only Instant Pot recipe that I’ll be sharing this month though. I’m also looking forward to sharing a pot roast pressure cooker recipe that I perfected that I just know you will want to add it to your menu planner too.
Best Instant Pot Wings Recipe
Best Instant Pot Wings Recipe
Recipe Type: Appetizer
Author: MomAdvice.com
Prep time:
Cook time:
Total time:
Serves: 2 pounds
Ingredients
2 pounds chicken wings
1 cup water (or chicken broth)
Barbecue Sauce
Salt & Pepper
Instructions
Trim your chicken wings by following the instructions that I linked to above. Once trimmed, toss with salt and pepper.
Pour water (or chicken broth) in the bottom, place the steaming rack inside, and finish by putting your chicken wings within the rack.
Lock the lid, select High Pressure and adjust to 5 minutes.
While the wings are cooking, prepare a baking sheet with tin foil and a baking rack that has been sprayed with nonstick spray. Pour your sauce you will be using into a bowl, to baste on your chicken.
Allow the pressure cooker to come to a natural release (I give it about 10 minutes) after the timer beeps, release the steam valve and then place the wings on foil-lined baking sheet.
Broil the wings for 4-5 minutes (watching carefully to prevent charring). Flip the chicken wings over and brush the other side with barbecue sauce. Broil that side again for 3-4 minutes. Place on platter and serve with your favorite dipping sauce or additional barbecue sauce.
3.4.3177
This post contains affiliate links.
Looking for more fun tailgate ideas? Check these posts out!
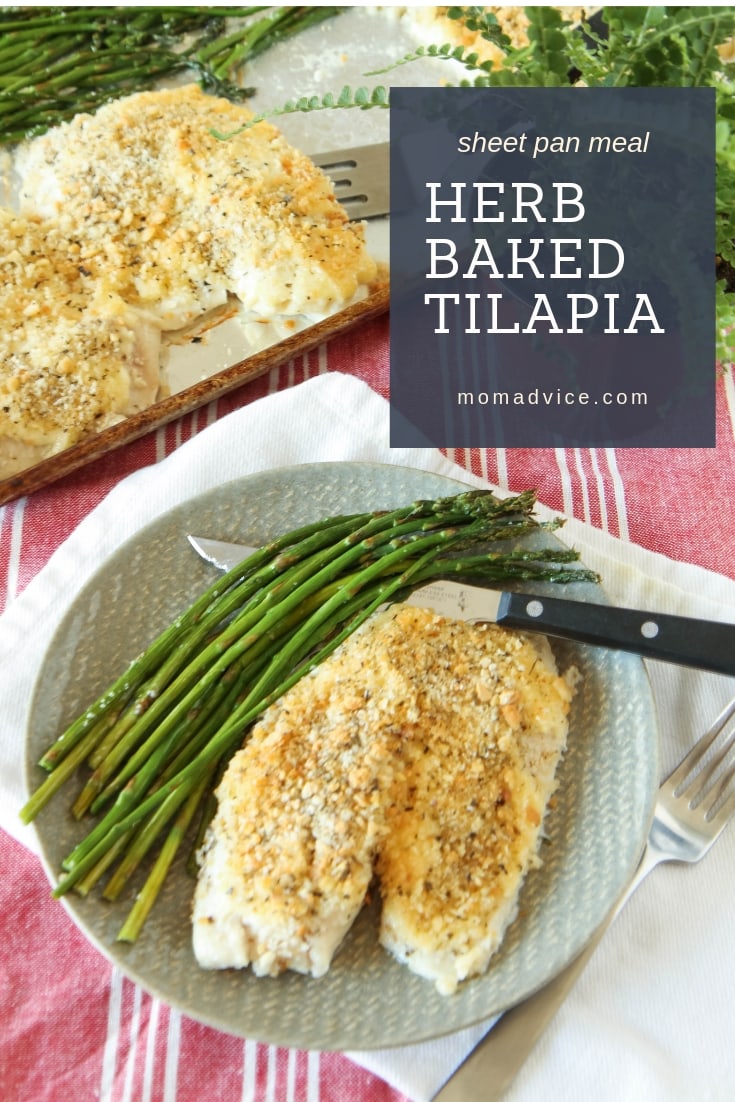
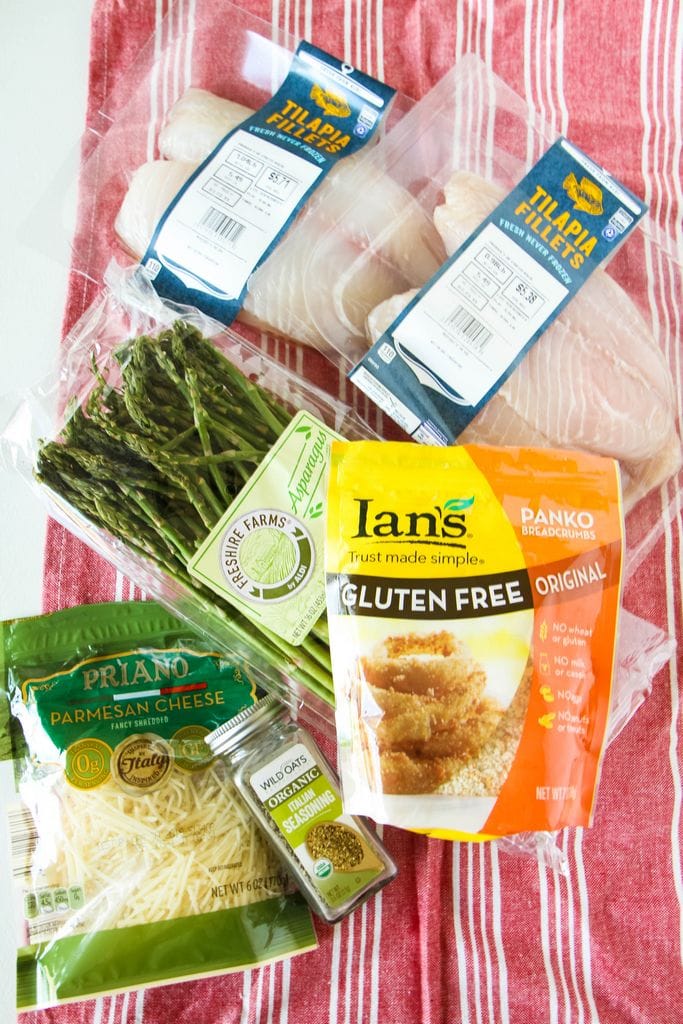
Try this easy sheet pan meal for your next family dinner! This herb baked tilapia & asparagus bakes in under 15 minutes!
I don’t know about you, but I can never get enough sheet pan meal recipes! Today I wanted to share one of our tried-and-true family favorites that I think you will love as much as I do. This herb baked tilapia sheet pan meal is gluten-free and can be prepared with a side of asparagus, all on one pan. This is an affordable meal that can serve a crowd and is simple enough that you could even get your kids in the kitchen to help you assemble these cheesy and crunchy toppings.
The preparation is pretty similar to my 5-Ingredient Salmon Sheet Pan recipe, but this time we will be preparing a crunchy gluten-free topping for the fish instead of a simple seasoning. If you don’t need to watch the gluten, you can substitute this ingredient with your favorite Panko or breadcrumb topping. After trying several brands of crunchy coating, this is my favorite recommendation, if you end up needing the gluten-free version (like me!).
I also recommend splurging for the fresh tilapia, if you can swing it, because the fish is typically thicker than the frozen variety. It helps the fish to retain its moisture, while it is baking, and is also a little more filling.
If you have teenagers, you know that filling these kids up is a full-time job! #mamaisbroke
If you are trying to stay under budget though, the frozen fish does well, but will just cook up a bit quicker in your oven!
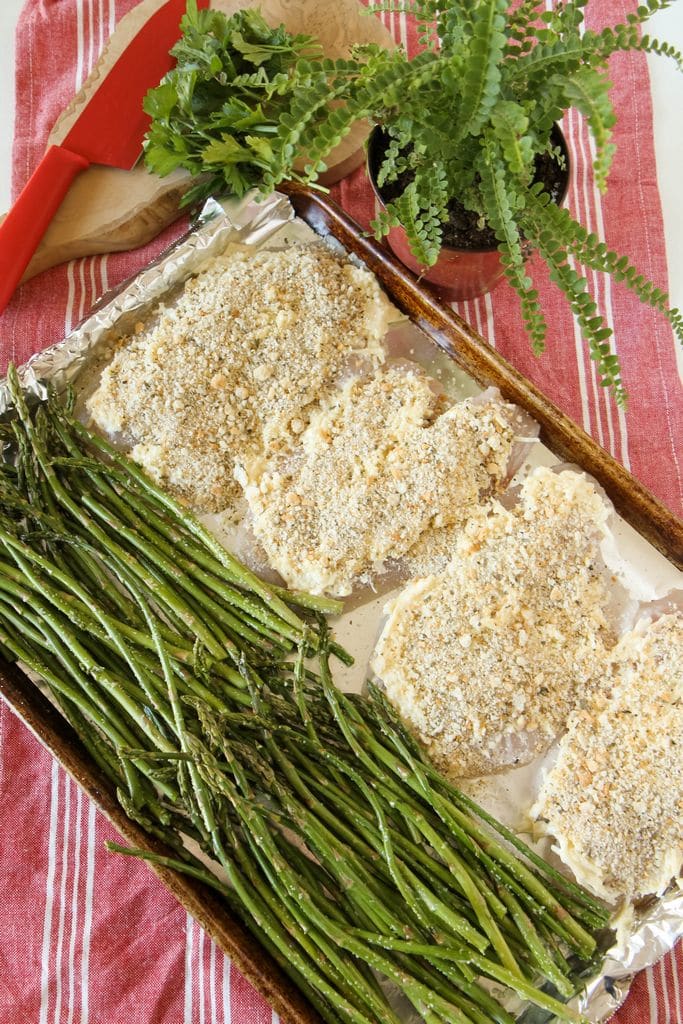
Here is what the dish looks like when it is prepared on the sheet pan. I lined my pan with nonstick foil, to help make clean-up a little easier! Underneath that layer of herbs & panko, you will find a cheesy layer that is prepared with just cheese and mayo.
Have issues with mayo?
I bet you will get over it when you mix that with cheese.
I mean, it is CHEESE!
You can also use your own substitution for mayo that works for your diet plan.
Although, I know you aren’t here for my TED talk on this recipe, I have a pretty funny story about this dish.
When I was working for Kenmore, they asked me to share some of my favorite family recipes and they had them all printed up on gorgeous recipe cards to hand out at the Chicago Baby Show. Not only did they want to hand them out, but they told me that they wanted these dishes prepared for the attendees so people could eat samples as they walked through the different booths.
When I read how many people normally attend the Chicago Baby Show, I started to get spicy armpits.
I pride myself on my ability to feed many people, but what was this going to look like feeding THOUSANDS.
Also, why exactly did that think I was capable to cater this event?
The weeks leading up to the event were agonizing, but I couldn’t tell them that I couldn’t possibly do this. Our family was on the struggle bus financially so I had to do my best with this incredible job that I had been tasked with.
When I showed up, I put on my apron and was ready to go, spicy armpits and all!
That’s when they told me that the food was being prepared by someone else and I was just supposed to hand out my recipe cards.
Moral of the story?
Get the specifics on your jobs before you agree to do them and get ready to fake it until you make it!
I hope you enjoyed my TED talk on this fabulous dish.
In the end, I would prepare it for you, but not for thousands.
I hope you can give this one a spin at your house and can’t wait to hear what you think!
Herb Baked Tilapia Sheet Pan Meal
Recipe Type: Main Course
Author: MomAdvice.com
Prep time:
Cook time:
Total time:
Serves: 4-6 servings
Try this easy sheet pan meal for your next family dinner! This herb baked tilapia & asparagus bakes in under 15 minutes! If you are using a thicker cut of tilapia, you can double the topping for double the crunch!
Ingredients
4 (4 to 6 ounce) tilapia fillets
1/3 cup Parmesan cheese
1/4 cup low-fat mayonnaise
1/4 cup [url href=”https://amzn.to/2Ju9l38″ target=”_blank”]gluten-free panko crumbs[/url]
2 teaspoons Italian seasoning blend
1 pound asparagus
olive oil (for drizzingling on vegetables)
salt & pepper to taste
Fresh parsley, optional
Instructions
Heat oven to 400 degrees. Adjust your oven rack to the second one from the top.
Using a paper towel, blot the tilapia to soak up any moisture. Place tilapia on a sheet pan lined with nonstick foil.
In a small bowl, combine cheese and mayonnaise. Spread evenly over fish.
In another bowl, combine panko, Italian seasoning mix, salt, & pepper. Sprinkle over fish.
Trim the asparagus ends. Drizzle the asparagus with olive oil and season with salt. Arrange the asparagus next to the tilapia.
Bake 12-15 minutes
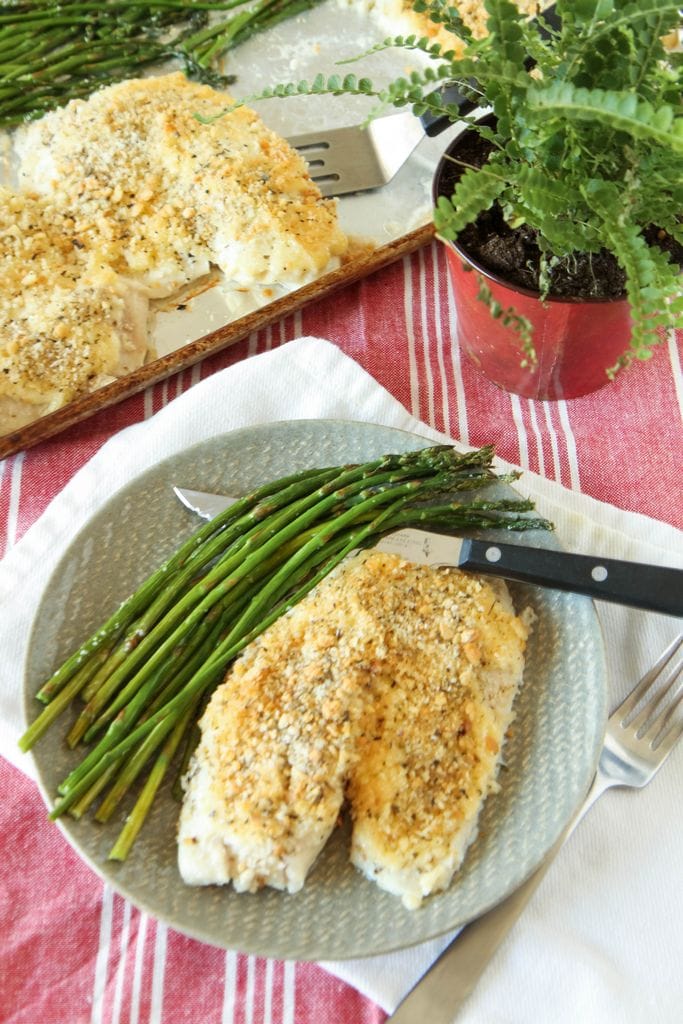
Turn your broiler on high and finish with 2 minutes of broiling to get a pretty golden hue on your fish and to make sure the cheese coating is cooked all the way through. Make sure you keep an eye on it so your topping does not burn.
Serve immediately with a little chopped parsley on top.
3.4.3177
Looking for more easy dinner ideas? Here are a few of our favorites!
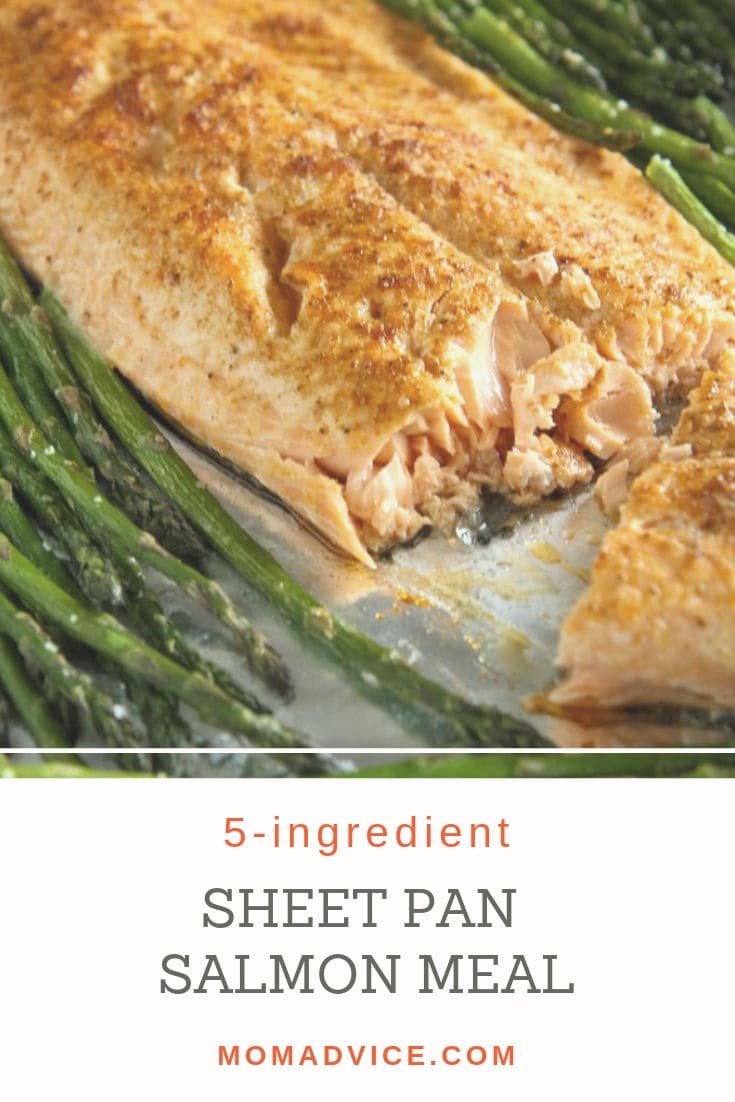
With just 5 ingredients, you have all you need to make this easy sheet pan meal. This recipe takes under 15 minutes to make and you will love these ideas for spice combos to completely change those flavors.
I am at a stage in life where I appreciate simple and straightforward food that doesn’t take a lot of time out of my day to prepare. That is why I have been relying heavily upon this 5-ingredient sheet pan salmon recipe to get us through all of these crazy nights where none of us arrive at the dinner table together.
I thought I’d give you the scoop today on my workhorse recipe that has been saving me a ridiculous amount of cash that would have been spent on takeout instead.
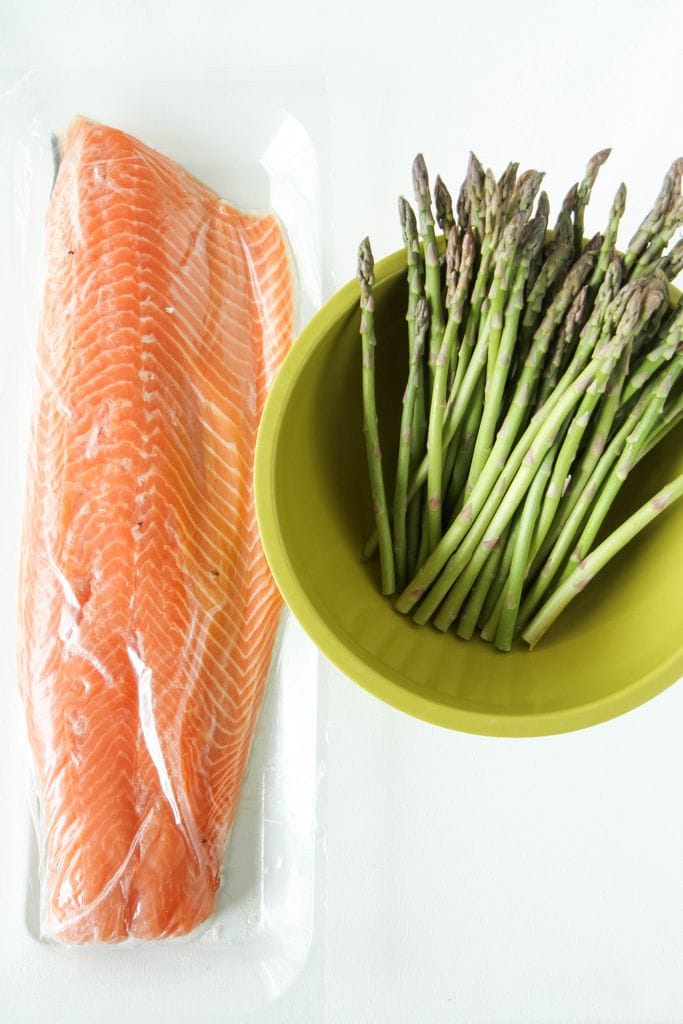
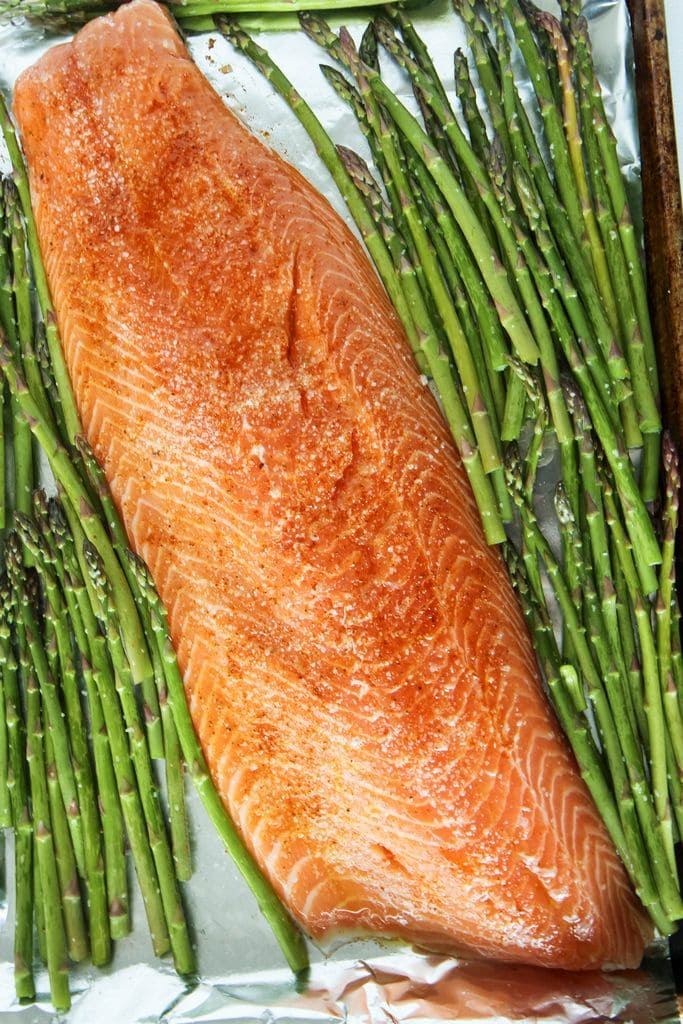
Salmon and asparagus go together like peas and carrots, don’t they? I buy the whole side of salmon at our local ALDI and love the price for this fresh and not frozen fish. ALDI has partnered with Instacart (here’s ten bucks towards your order if you have never tried out this incredible invention!) and I have a note in our shopping list that instructs the shopper to buy enough salmon for a family of four.
Pictured here is what they typically bring and this is usually enough for six to seven meals, depending on our portion sizes.
For a long time I was intimidated by the idea of preparing a big giant piece of salmon like this. I would tell my scared self though that preparing this is incredibly easy. So easy, in fact, that I think even someone who has never cooked before could pull it off.
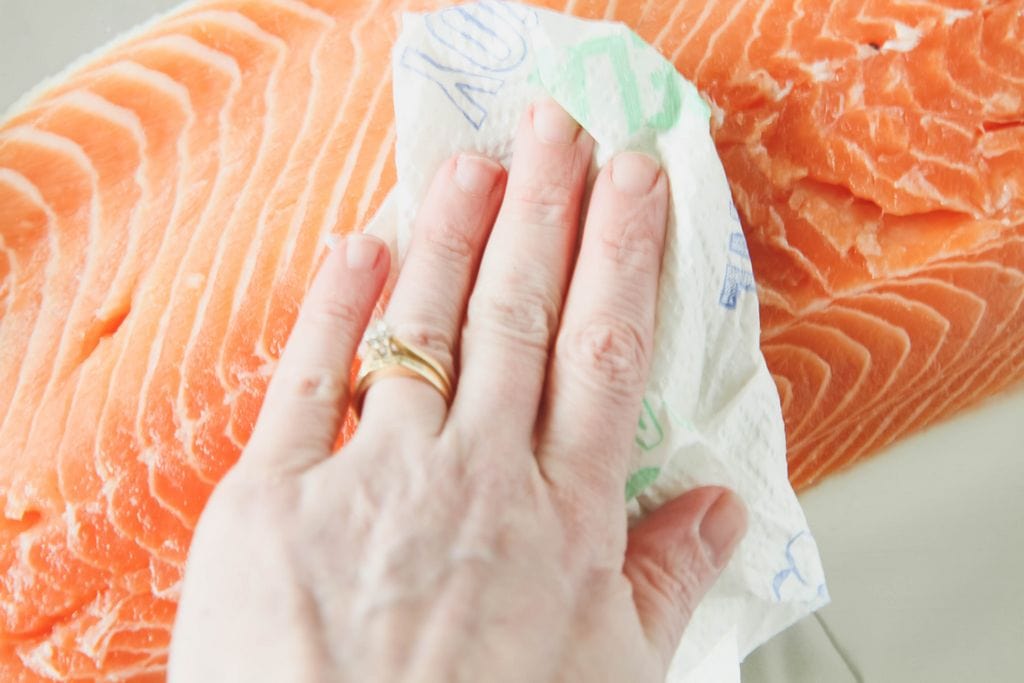
Here’s one quick tip that I would share with you about preparing fish that I didn’t realize in those beginning preparation days…
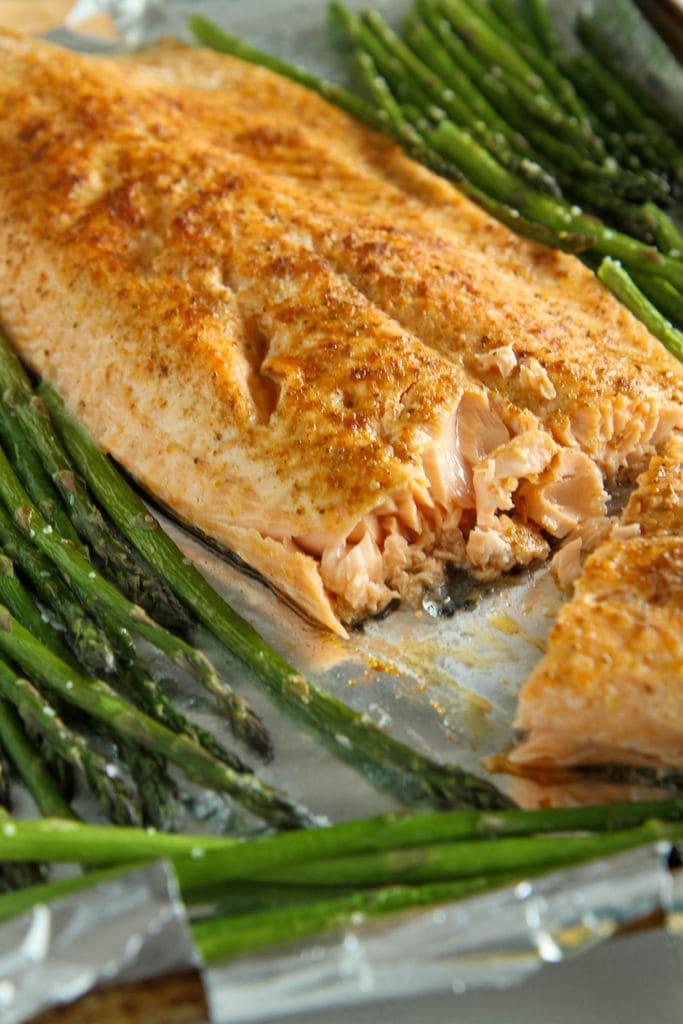
If you want your fish to have a beautiful golden exterior, you must use a paper towel and blot the fish well to remove the excess moisture.
It will make ALL the difference in the world when you broil it.
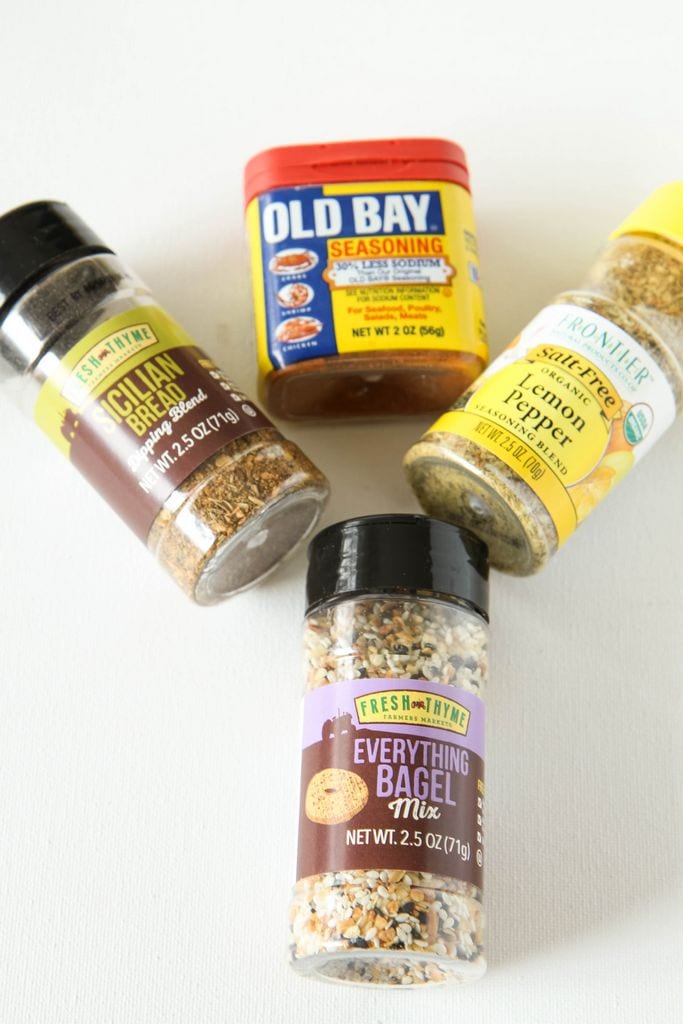
I season our fish with a simple shake of Old Bay Seasoning (you can usually find it over by the fish display at your market) and kosher salt. The first night we eat this, we keep it with this basic set-up and it is delicious.
When I reheat the fish later in the week though, I love to use different spices in my spice cabinet (be sure to snag our FREE printable labels) to make the flavor profile different each day.
The beauty in leaving your canvas blank is that you have the opportunity to switch things up over the course of the week.
Are you drooling too?
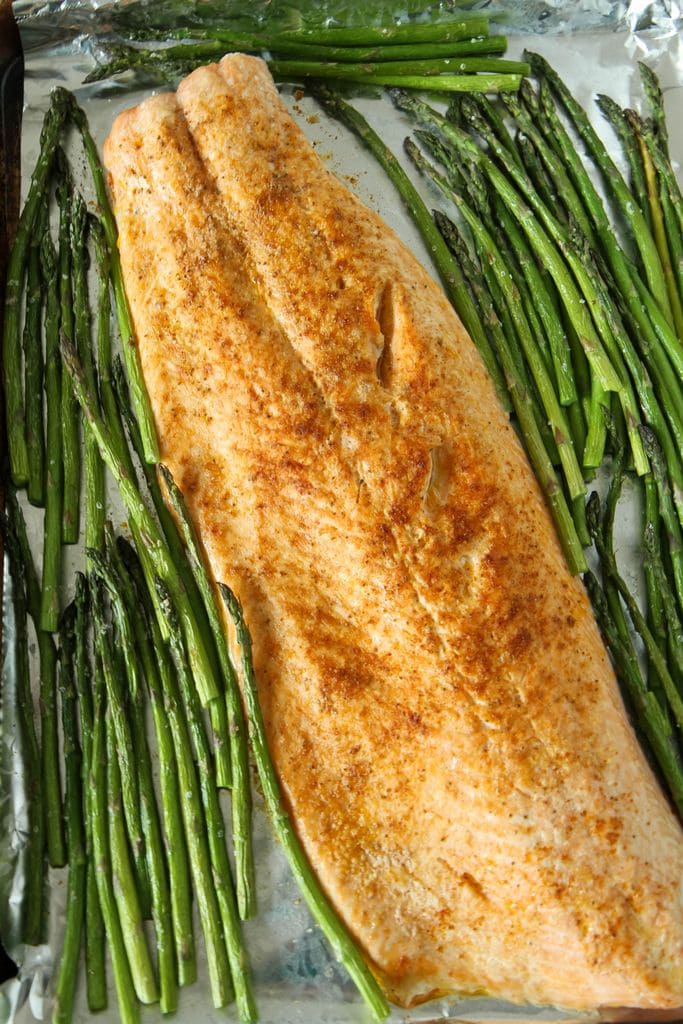
I love how beautifully this all broils up together.
My trick for keeping the asparagus looking great is to not broil it at the tip top of the oven rack, like you usually would. I give it one step down to allow the top of the salmon to still get that golden top, but also allowing enough space to not burn that asparagus.
This is 9 minutes in our oven. Sometimes, with thicker cuts, I have needed 11 minutes, but I prefer to keep it closer to the 9 minute timeline to keep the fish flavorful and not dry.
How pretty is that?
I hope you can add this recipe to your arsenal and that it helps you succeed at saving money on takeout nights too.
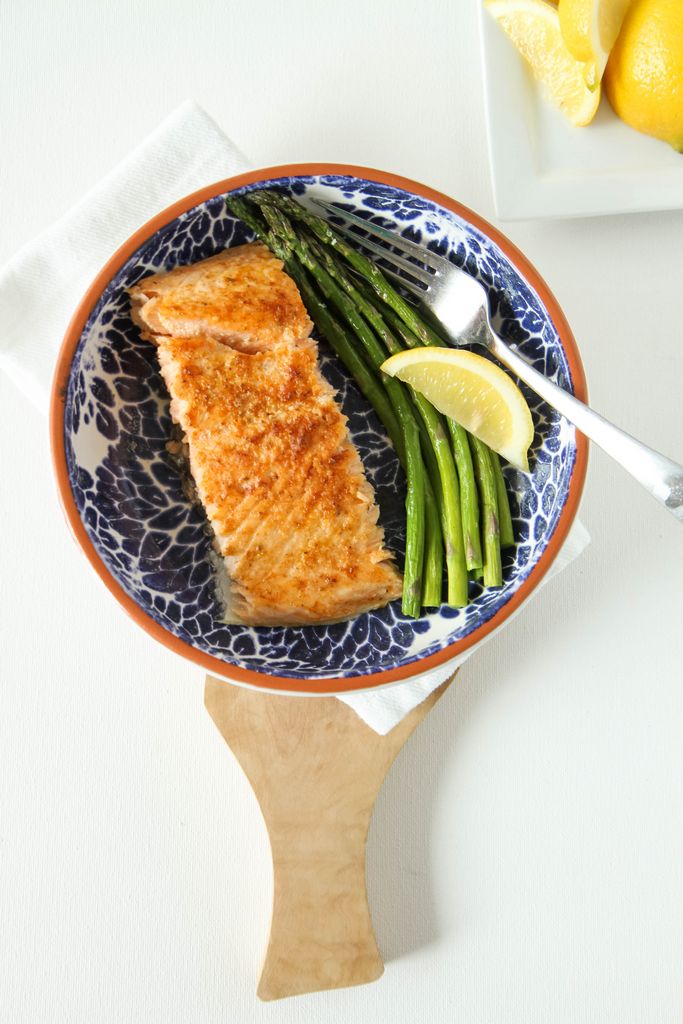
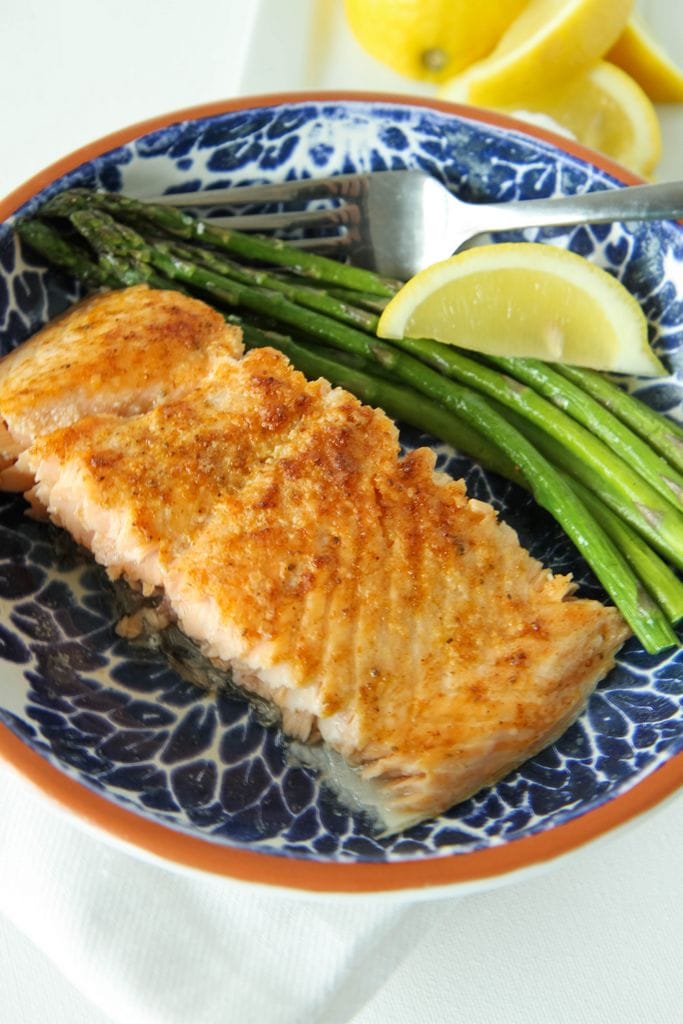
5-Ingredient Salmon Sheet Pan Meal
Recipe Type: Main Dish
Author: MomAdvice.com
Prep time:
Cook time:
Total time:
Serves: 6-7 servings
You only need 5 ingredients to make this salmon sheet pan meal in under 15 minutes. After you try this impressive dish, I bet this recipe will be in constant rotation at your house too. See the post for fun spice combination ideas you can add to your fish to change the flavor profile.
Ingredients
Side of Salmon
Olive Oil
Kosher Salt
Old Bay Seasoning
1 pound asparagus
Instructions
Line your sheet pan with nonstick aluminum foil.
Using a paper towel, blot up any excess moisture on your fish.
Brush your salmon top with olive oil and add a generous amount of kosher salt and Old Bay Seasoning to the top.
Trim the asparagus ends. Drizzle the asparagus with olive oil and season with kosher salt. Arrange the asparagus around the salmon.
Move your oven rack to the second row from the top. Turn your broiler on HIGH and broil the salmon and veggies for 9-11 minutes.


 Hazelnut Soup Recipe
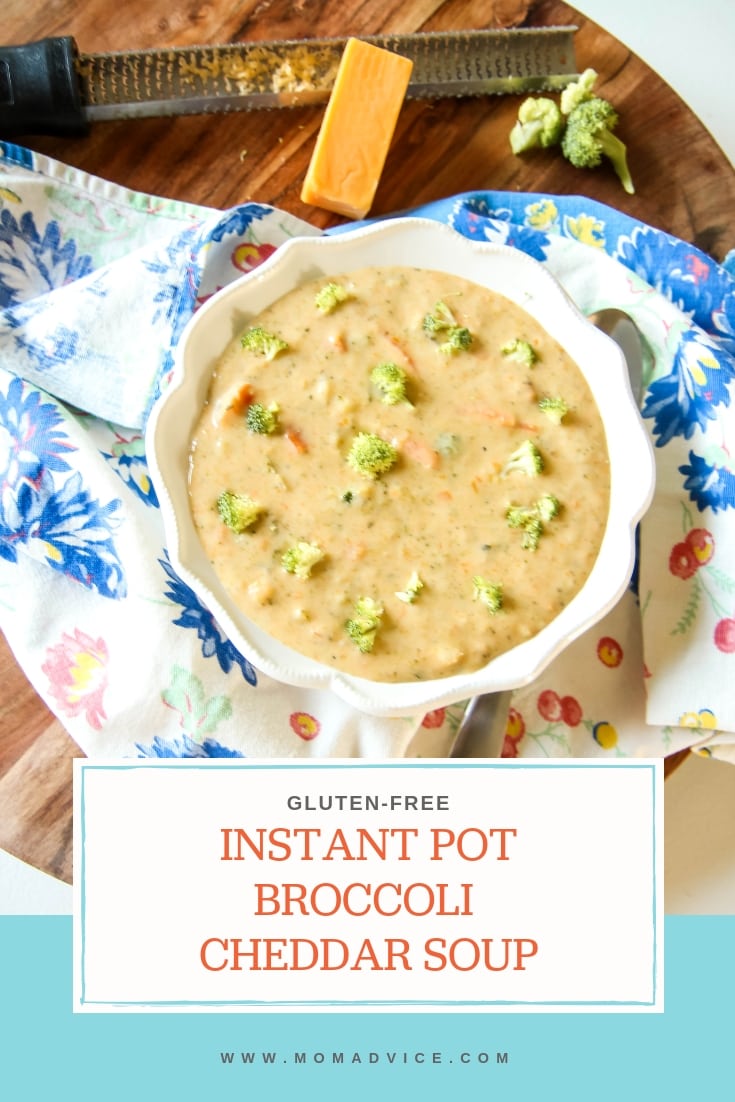
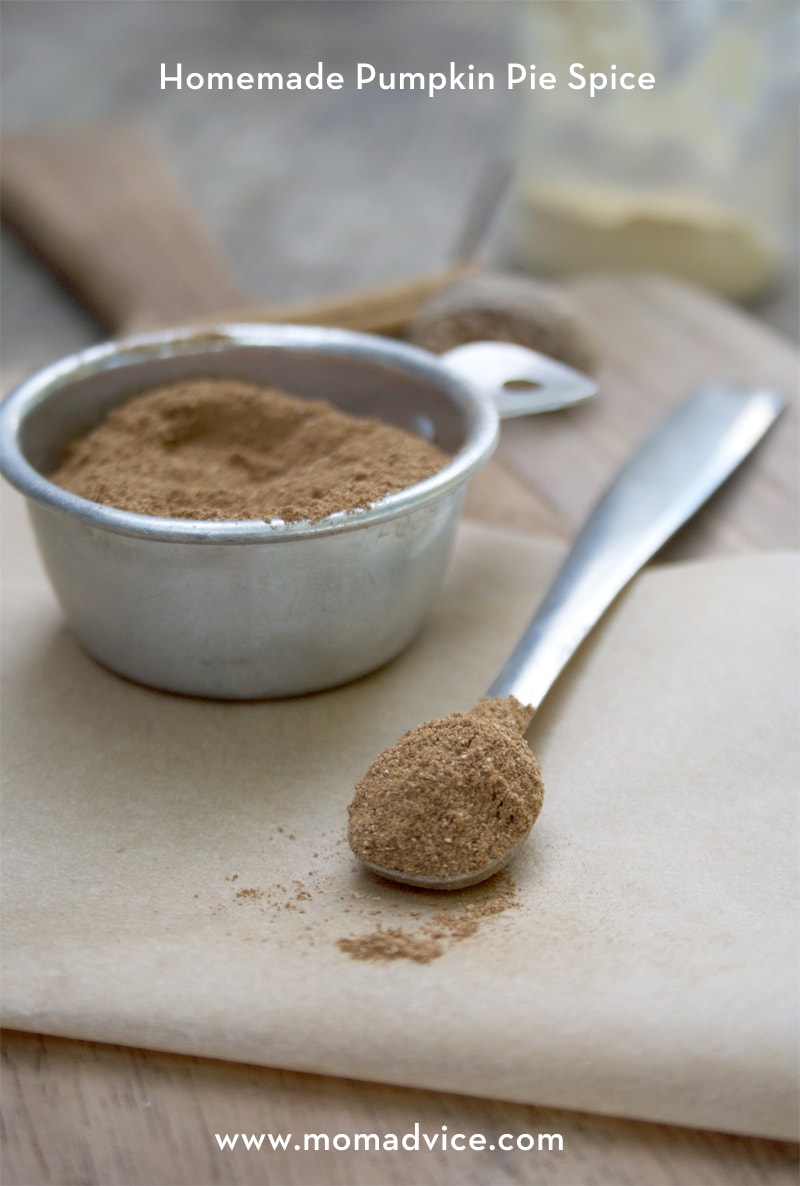
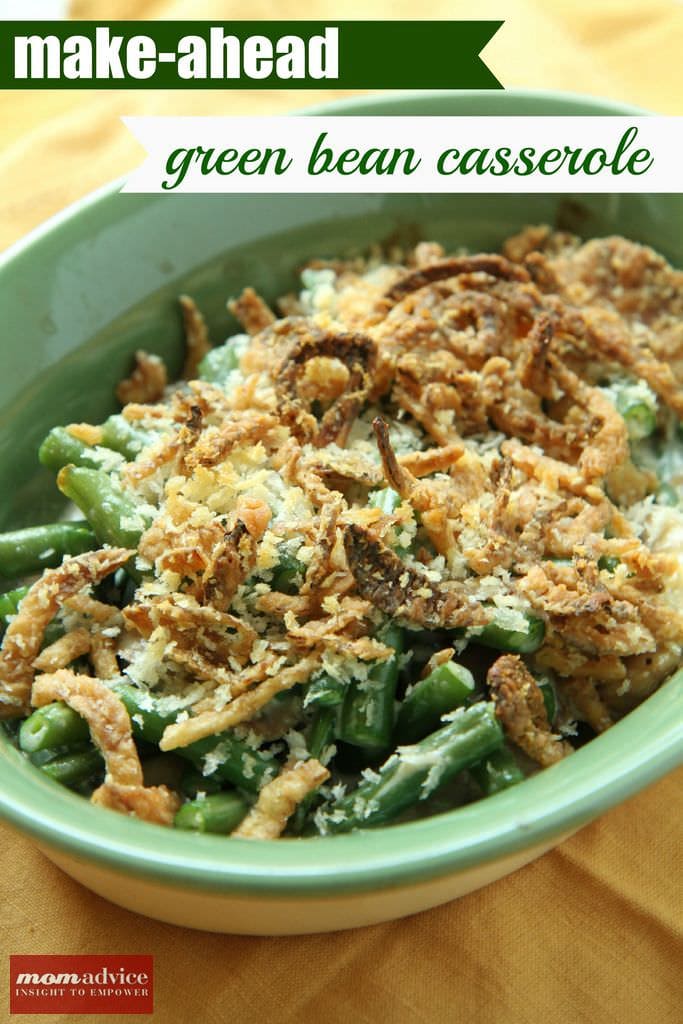 Make Ahead Green Bean Casserole
 How to Make Blanket Scarves
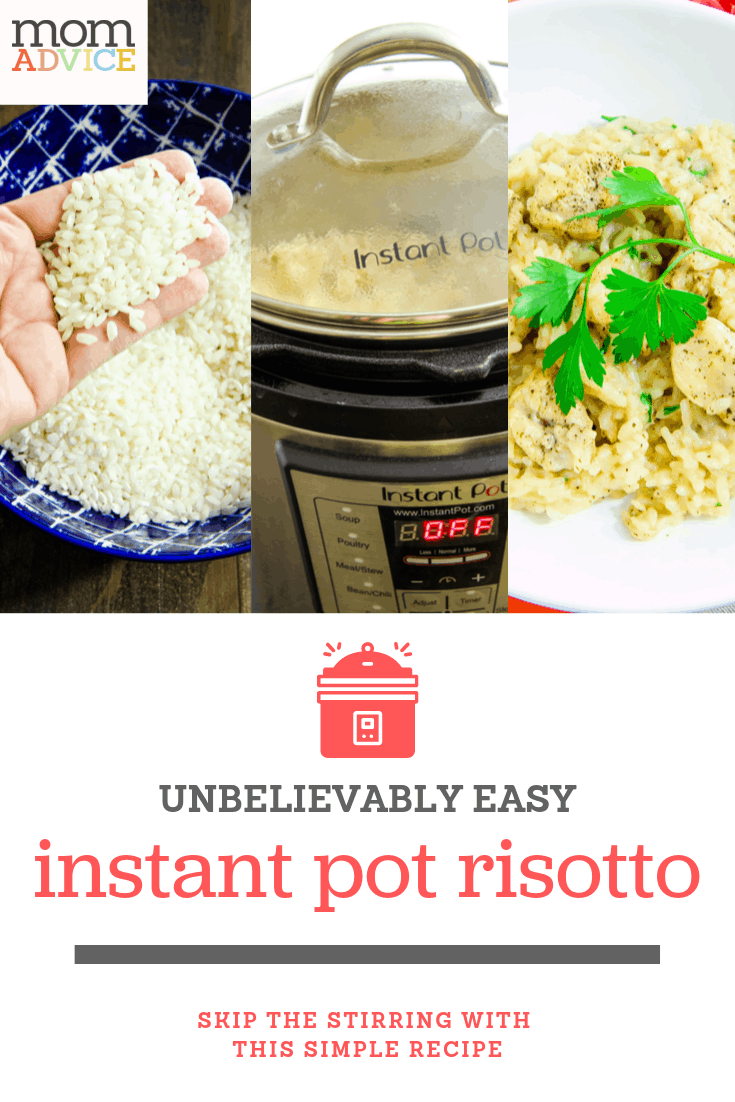


