The Easiest Burlap Wreath You Could Ever Make (VIDEO)

The Easiest Burlap Wreath You Will Ever Make from MomAdvice.com

This no-sew, no-glue, no-cut burlap wreath tutorial is the perfect DIY for decorating your door or gifting to a friend! Today I’m showing you step by step how to make a burlap wreath to add to your home decor. I love this wreath and I know you will too.

Sign up for my free weekly newsletter for loads more ideas!

I am all about beautiful and simple decorations for the holidays. Today’s tutorial is how to make a burlap wreath for the holiday season.

This is a no-sew, no-glue, no-cut project that should be easy to create in about 30 minutes.

Do you know how to DIY a burlap wreath?

I didn’t!

I began searching through blogs for tutorials on how to create my wreath, watched a million YouTube videos, looked at more blogs…and, basically,  my eyes crossed and glazed over.

Everyone does their wreaths differently and there is not one magic tutorial, BUT gathering those ideas, this is my version of the burlap wreath with a little holiday spin for you.

Although this tutorial features a Christmas spin, you can make a burlap wreath work for ANY holiday. 

Burlap ribbon does not only come in brown. There are so many different colors to choose from.

At the end of this post, you can see how I made a beautiful fall wreath in orange burlap.

The Easiest Burlap Wreath You Will Ever Make from MomAdvice.com

The Easiest Burlap Wreath You Will Ever Make from MomAdvice.com


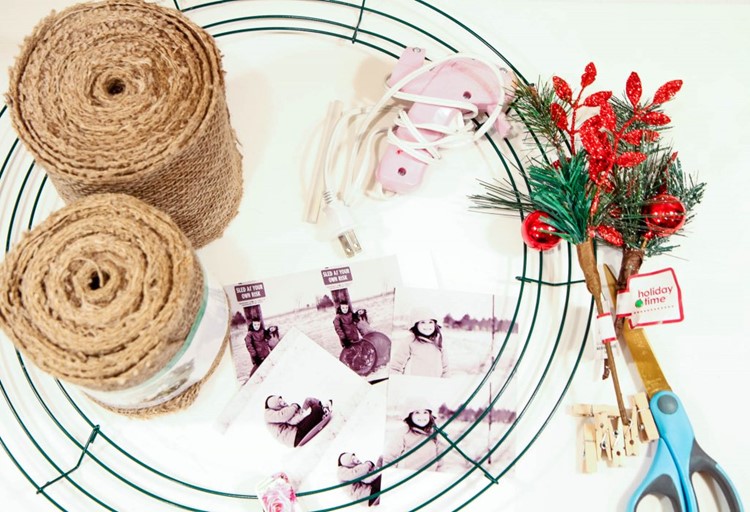
Supplies Needed

Before you visit your craft store, make sure to sign up with Rakuten to make money back on all your craft store purchases.

2 Rolls of Burlap, 5 inches wide & 10 yards long-  do not purchase wired burlap, just the regular kind! (here is a great source and here is a great source)

18″ wire wreath form

1 package of mini-clothespins

2 floral holiday picks (any variety)

3-5 holiday photos printed in wallet-size

Floral wire

Scissors

Easy Burlap Wreath Tutorial


Easy Burlap Wreath Tutorial

The Easiest Burlap Wreath You Will Ever Make (Instructions)

(check out these video instructions or scroll down for written instructions)


1. To begin, select a few of your favorite holiday photos that can be attached to your wreath. The pictures I picked were from our family’s epic sledding adventure that you we do each year. Send these off to the photo lab and have them printed in wallet size.

The Easiest Burlap Wreath You Will Ever Make from MomAdvice.com

2. Now that you have your photos to decorate your wreath, let’s begin weaving the burlap through our wire wreath form.

This is going to take a little time and practice with your first one so don’t get discouraged.

The Easiest Burlap Wreath You Will Ever Make from MomAdvice.com

How Do I Start a Burlap Wreath?

I have no idea why people don’t show you clear pictures on how to start a burlap wreath. 

I decided that would need to change with my tutorial.

I had a good feeling that this would be a popular picture and it REALLY is.  

Just in the last six months, this pinned picture had been viewed over 900,000 times. 

Begin by folding your burlap in half, like I have shown above, and keep wrapping as we go.

Select one section of the wire wreath to start in.
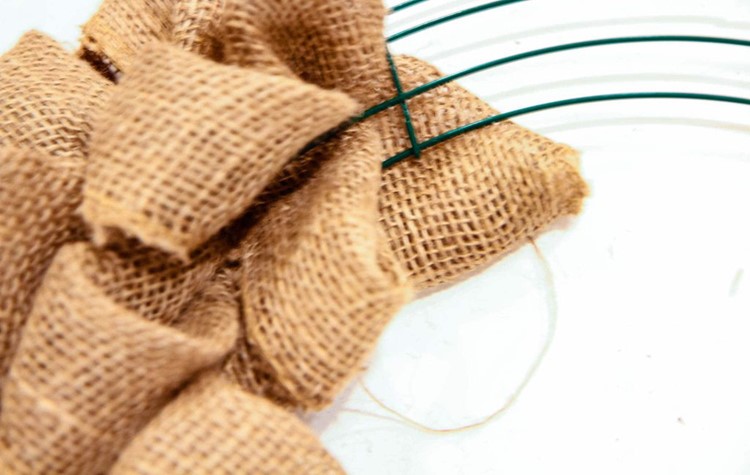
Feed the beginning end through the wreath as shown above.

Over the outer ring, under the next, over the next, and under to finish.

Leave a little loose end to tuck in or you can wire it to the wreath with a little floral wire in the back.
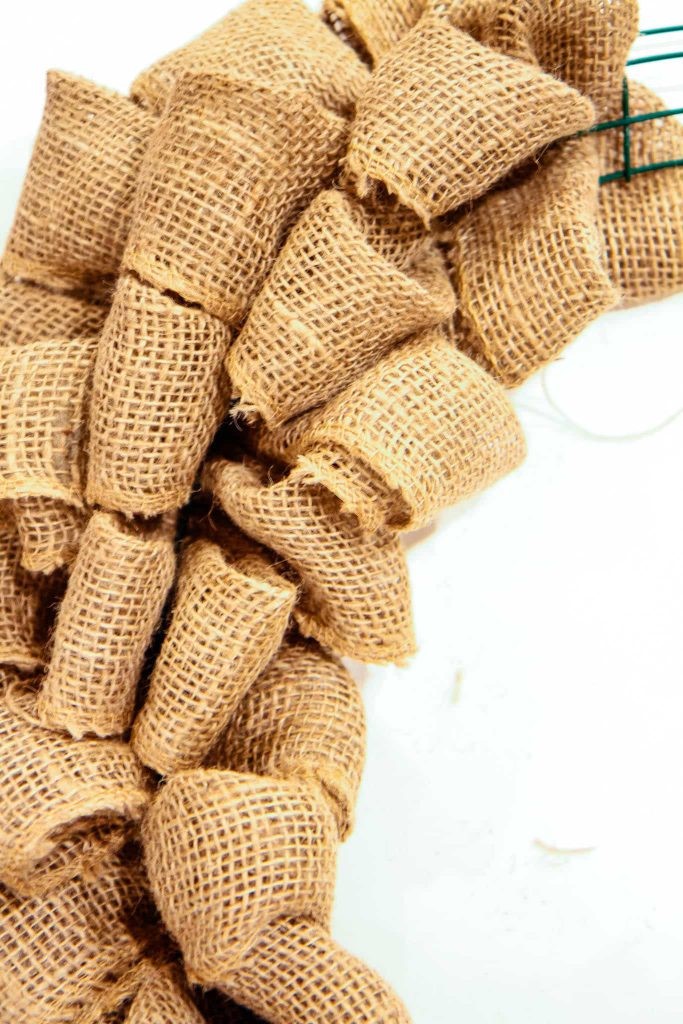
Now you have started your wreath- super easy!

This is the technique we are using throughout.

I am showing it to you tightly so you can see how this will work, when you do this, you will be actually pulling out the burlap a bit to give it to that bubble effect that we are going for. 

3. Using the working end of the burlap, we are going to begin making the bubbled burlap right next to this row, within the same section of that metal wreath, but we will begin weaving in the opposite direction, continuing to pull out and bubble the burlap as we go, moving the working burlap into each section, weaving one direction than weaving the other direction.

4. When you run out of burlap (it should be when you are about halfway through covering the wreath), tuck the end towards the back and pick up where you left off. Again, you can wire these ends with a little floral wire on the back.

The Easiest Burlap Wreath You Will Ever Make from MomAdvice.com

The Easiest Burlap Wreath You Will Ever Make from MomAdvice.com

5. Once the entire wreath is covered, secure the final end with floral wire. Finish, by puffing up some of the folded bubbles (if desired) or you can leave them as is, if you prefer a more ruffled, rather than bubbly effect.

The Easiest Burlap Wreath You Will Ever Make from MomAdvice.com

The Easiest Burlap Wreath You Will Ever Make from MomAdvice.com

6. Finish the wreath by hot gluing OR wiring two floral picks on the wreath.

I just used a little hot glue, not too excessively like I usually do, so that I can remove these and switch my wreath up with the season!

Finish the wreath by attaching a few of your favorite holiday portraits with those mini-clothespins.

The Easiest Burlap Wreath You Will Ever Make from MomAdvice.com

The Easiest Burlap Wreath You Will Ever Make from MomAdvice.com
Once you are done, here is what the back of my wreath looked like.

You can trim any of the pieces down that were wired to help your wreath lay more flush to your door.

The Easiest Burlap Wreath You Will Ever Make from MomAdvice.com

The Easiest Burlap Wreath You Will Ever Make from MomAdvice.com

The Easiest Burlap Wreath You Will Ever Make from MomAdvice.com

Isn’t she lovely? With just  30 minutes of your time, you truly have a beautiful wreath for your front door, to grace your mantle, or to make a wall in your home more festive.

Not to mention, wouldn’t this just make the most fabulous little gift for someone you love for the holidays?

I’m madly in love with it and I hope it inspires you to dress up a door in your home!

this post contains affiliate links

as an amazon associate I earn from qualifying purchases


Looking for more craft ideas? Here are a few of my most visited projects!

Fall Burlap Wreathautumn burlap wreath tutorial

how to make a blanket scarfblanket scarf tutorial

How to Dye Your Jeans from MomAdvice.comhow to dye a faded pair of jeans

how to spray paint furniturespray paint furniture tutorial


Slow Cooker Pumpkin Spice Candlesslow cooker pumpkin spice candles

scrappy fabric treesscrappy fabric trees

diy-no-sew-reversible-chair-cushionsno-sew reversible chair cushions

DIY Slow Cooker Citronella Candles with Printable Tagdiy citronella candles

how-to-make-fabric-wreath-and-garland-headerfabric wreath & garland

Happy crafting, friends!!

This post contains affiliate links

The Easiest Burlap Wreath You Will Ever Make from MomAdvice.com


Pin It

Published November 07, 2013 by:

Amy Allen Clark is the founder of MomAdvice.com. You can read all about her here.

comments powered by Disqus