Experiment: Can I whip up a batch of homemade breadsticks?
Experiment Taken From: Notebook Entry 08.21.08
Materials Needed: Please see Chocolate On My Cranium for the full instructions on ideas for completing this task. I followed her instructions and just used my stand mixer for this project. I also added my own additions of a 1/4 tsp garlic powder, a 1/4 tsp of Italian seasoning mix, and a handful of Parmesan cheese for sprinkling on top. For a fast dipping sauce, I used a jar of Aldi’s spaghetti sauce.
Results: This is the first time that I have ever tried to make homemade breadsticks, but I really needed some type of bread for dinner and this recipe looked fast and easy. I was doubly inspired to try this because Heather, from Freebies 4 Mom, had attempted making these and I read through all of the suggestions on her comment thread before making them.
I added 1/4 cup of extra flour to make sure that the dough was sticky, but not too sticky. I let the stand mixer do all the work for me and plopped all of the ingredients in the mixer after the yeast, sugar, and water had proofed. Within five minutes, the dough was nicely incorporated.
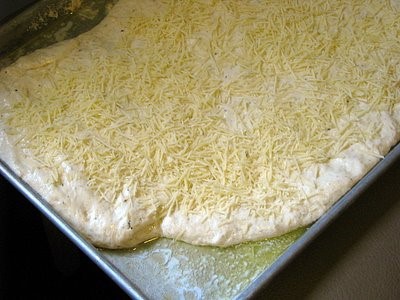
I poured the butter onto a rimmed cookie sheet and then scooped the dough with a spatula onto the sheet. I flipped it, covering both sides in butter and then sprinkled my addition of Parmesan cheese.
I covered the whole cookie sheet with plastic wrap and popped it in my fridge until our dinner hour. About a half hour before our dinner, I pulled it out of the fridge and let it rest on the counter while our oven preheated.
I slid a big tray of my favorite baked ziti into the oven and then popped in the breadsticks for the last twenty minutes at 350 degrees. It needed a few extra minutes more than the required cooking time, but I think that was because they had been refrigerated.
Conclusion: These breadsticks were amazing and a great way to get a large batch of bread on the table while being creative with your pantry ingredients. Next time I will add a little bit more salt to add more flavor, but other than that, I thought they were perfect. I can see us making these over and over again in our house and I want to thank Chocolate On My Cranium for a wonderful new side dish we can add to our table!
********************
 I am so excited to open our Notebook Experiments up to everyone and I hope that you will be able to participate this week or in weeks to come! I will be posting this each Thursday so please mark your calendars if you plan to participate. You can post your entries at any time throughout the week and then leave your entry in the links below.
We have this handy banner that you are more than welcome to use, but it is not a requirement! It is just something you can add to add a little sparkle to your entry.
Rules for Participation:
1. Choose anything from any of our notebook entries (past or present) to do with your family. We have hundreds of bookmarked links of crafts, ways to save money, and organizing ideas.
2. Complete an experiment from the notebook and share about it on your blog or website. We would love to see pictures of what you accomplished or a detailed description of how your projects turned out. Please include a link to this entry, a link to the original posting of the entry (at the original crafster’s blog), and (to help us relocate the project) the date or link of the notebook entry where you found it. You can use the same formatting as our entries or you can just include that information in your post in your own unique way!
3. Post a link below. Please include your name or blog name & a fast description of your project. Example- MomAdvice (WHO bread)
I can’t wait to see what you create and what you find inspiring!