Archive for the ‘Home & Organization’ Category

5 Ways to Save Money When Facing a Chronic Illness

Tuesday, June 25th, 2019

This post is sponsored by RxSaver by RetailMeNot and includes tracking links. For more information about tracking links and how to opt out, please visit All About Do Not Track prior to clicking any links found in this post. All thoughts and opinions are my own! 

If there is one thing I have learned since my Ehlers-Danlos Syndrome diagnosis, it is just how expensive having a chronic illness can be. The daily maintenance of medications, supplements, therapeutic services, doctor visits, medical devices, and dietary requirements can be extremely taxing on our budget. 

That is why I’m excited to partner today with RxSaver by RetailMeNot to share their online tool that helps you find the lowest prescription prices available. You can shop right at your own nearby pharmacy and save tons. 

As a budget-conscious person, I also wanted to share with you some strategies I have been using to save money to help offset some of our medical expenses. While we can’t always do financial planning for a chronic illness, we can learn better strategies for managing your money with your chronic illness.  

Here are 5 easy ways we saved while not compromising on the care I need to treat my condition!

Get Familiar with Your Health Insurance Plan

If you are fortunate enough to have health insurance, it is SO important to read what benefits are covered under your plan. With a brief scan, you may discover potential savings that allow you to explore services you thought you would have to pay out of pocket for. Many plans can offer coverage for items like medical equipment, home health agency services, physical or occupational therapy, and even your chiropractic care. 

Two appointments I have been regularly booking, for example, have been for acupuncture (to help treat my TMJ symptoms) and massage therapy (to also work out issues around my jaw and neck).  

Those typically sound like spa services, don’t they? 

Can you believe they are covered at my chiropractor’s office? I’m able to have these services processed under the umbrella of chiropractic medical care through my health insurance company.  

Isn’t that so great?

If you are unclear if a particular service is covered, contact the number on the back of your insurance card to request an associate look at your policy and help you walk through your benefits.  This is also a great time to ask about potential discounts for healthy and wellness like discounts on a gym membership, nutritional counseling, or mental health services.  

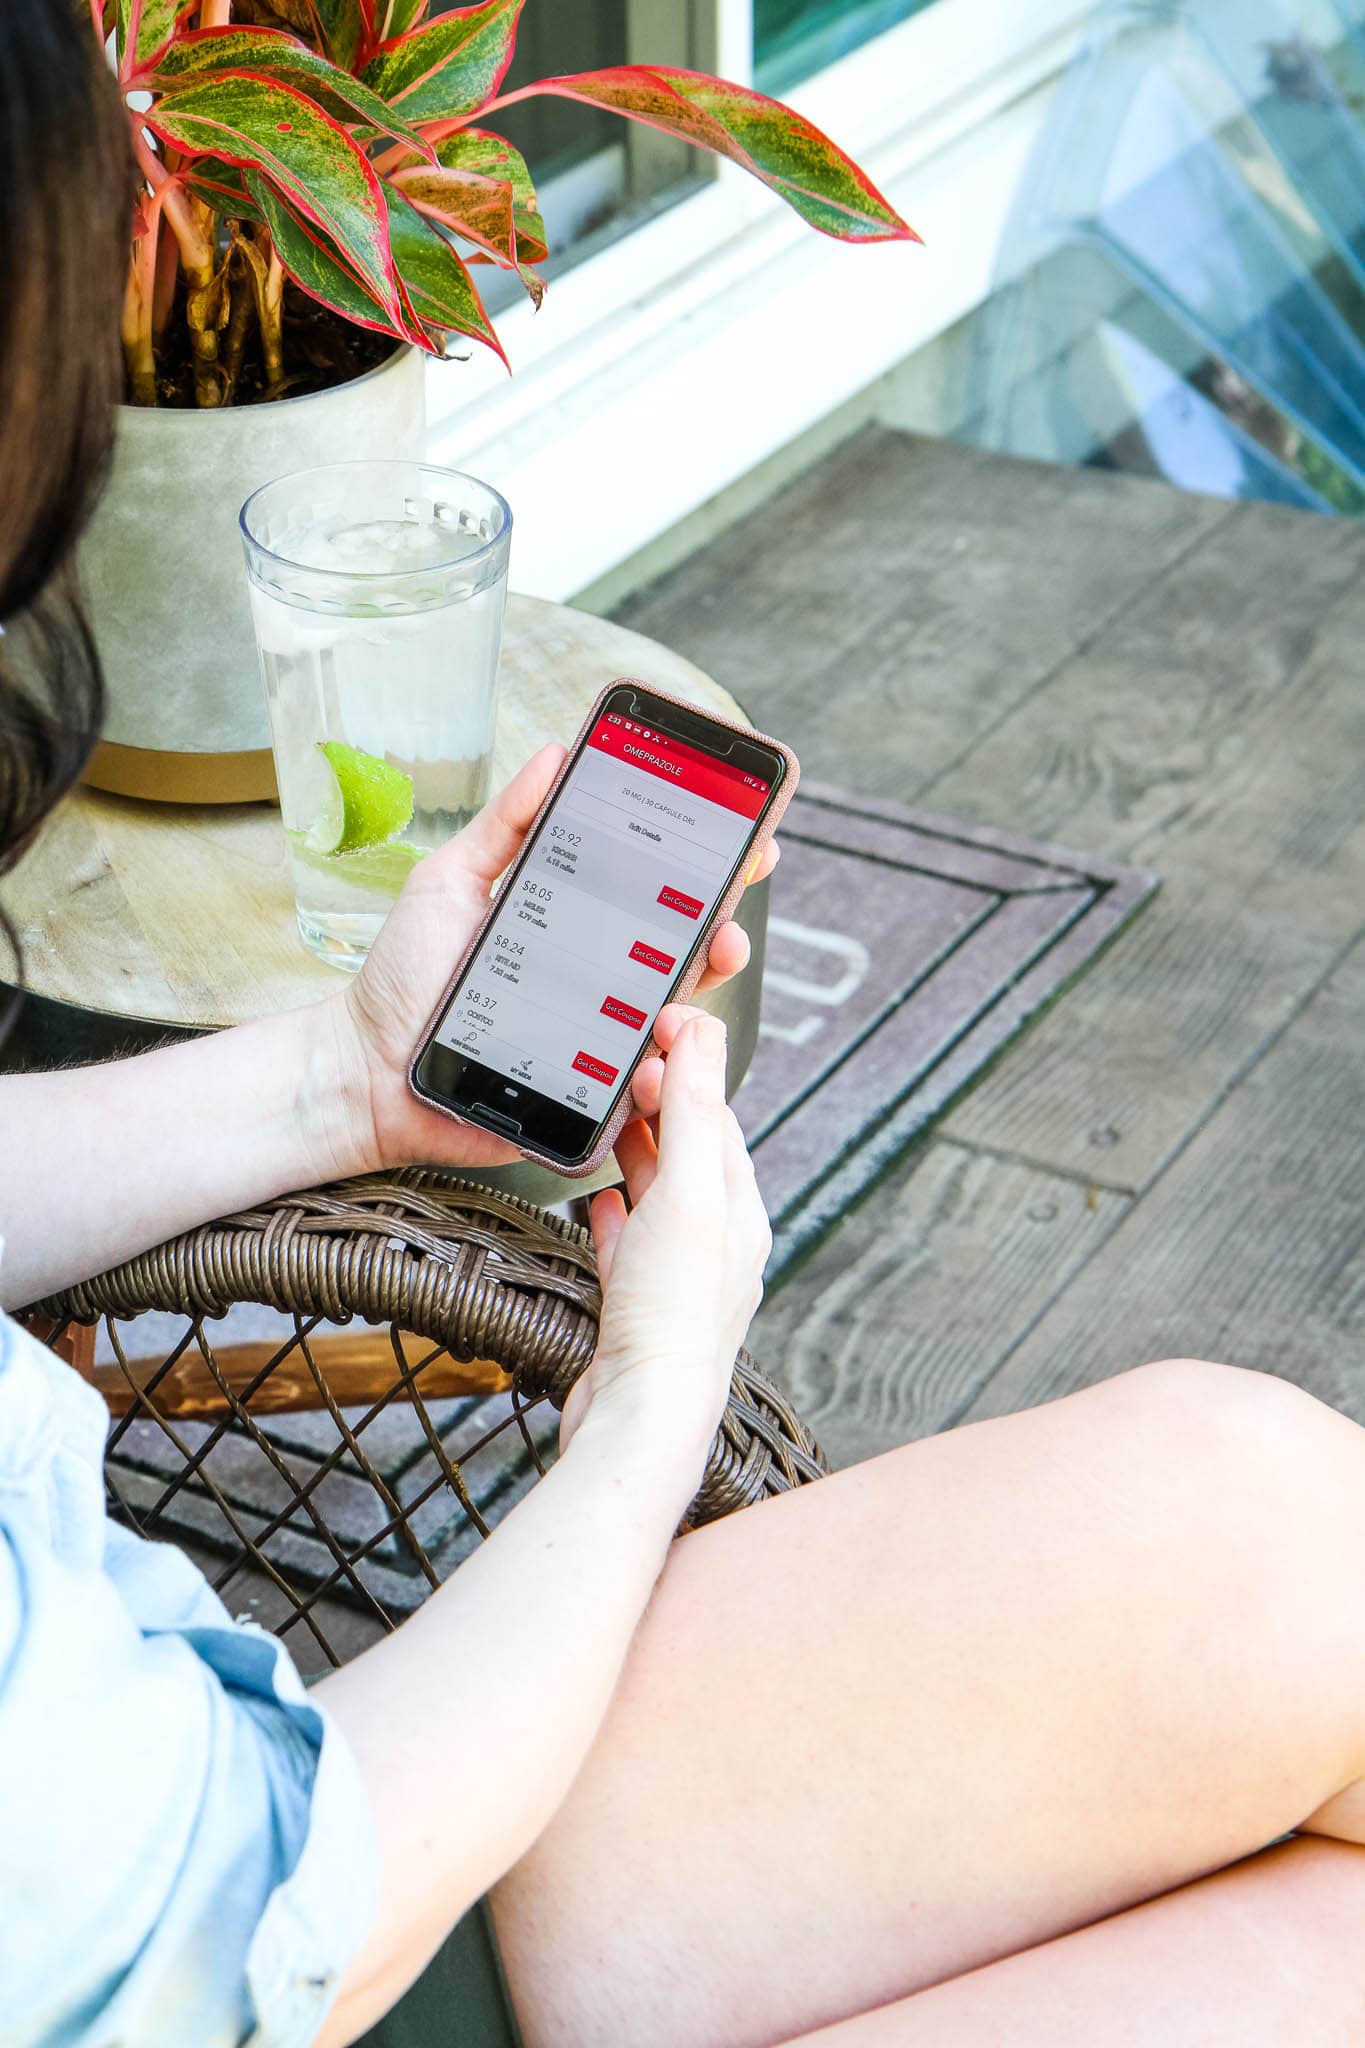
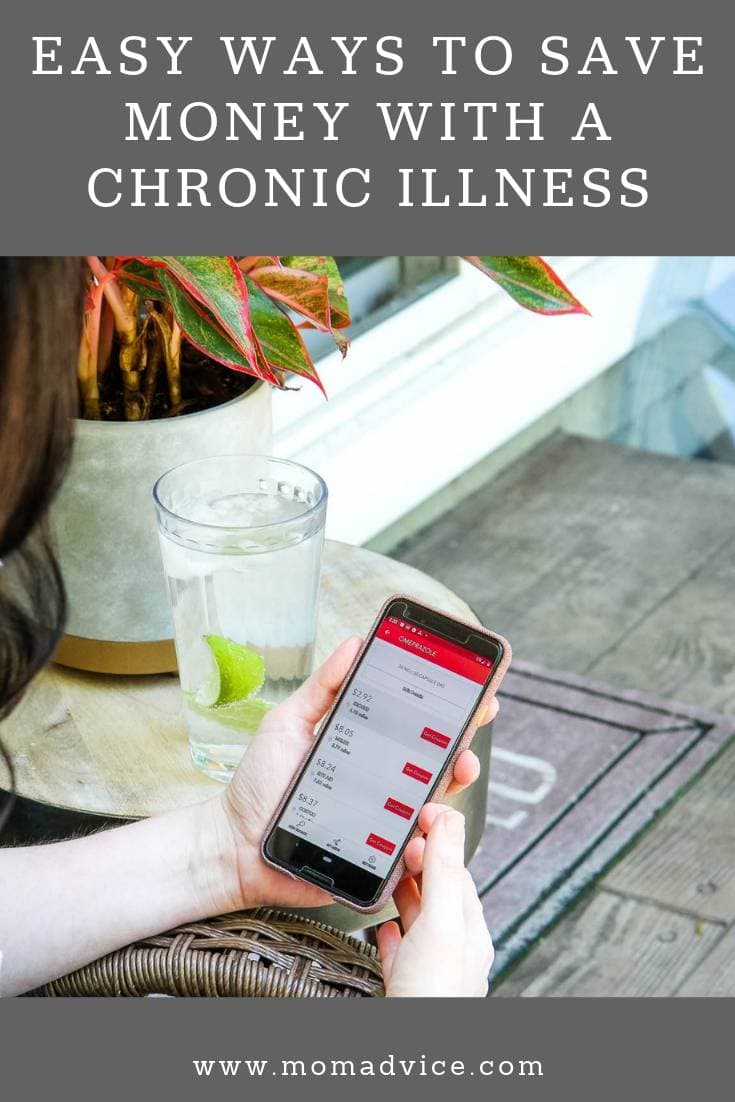
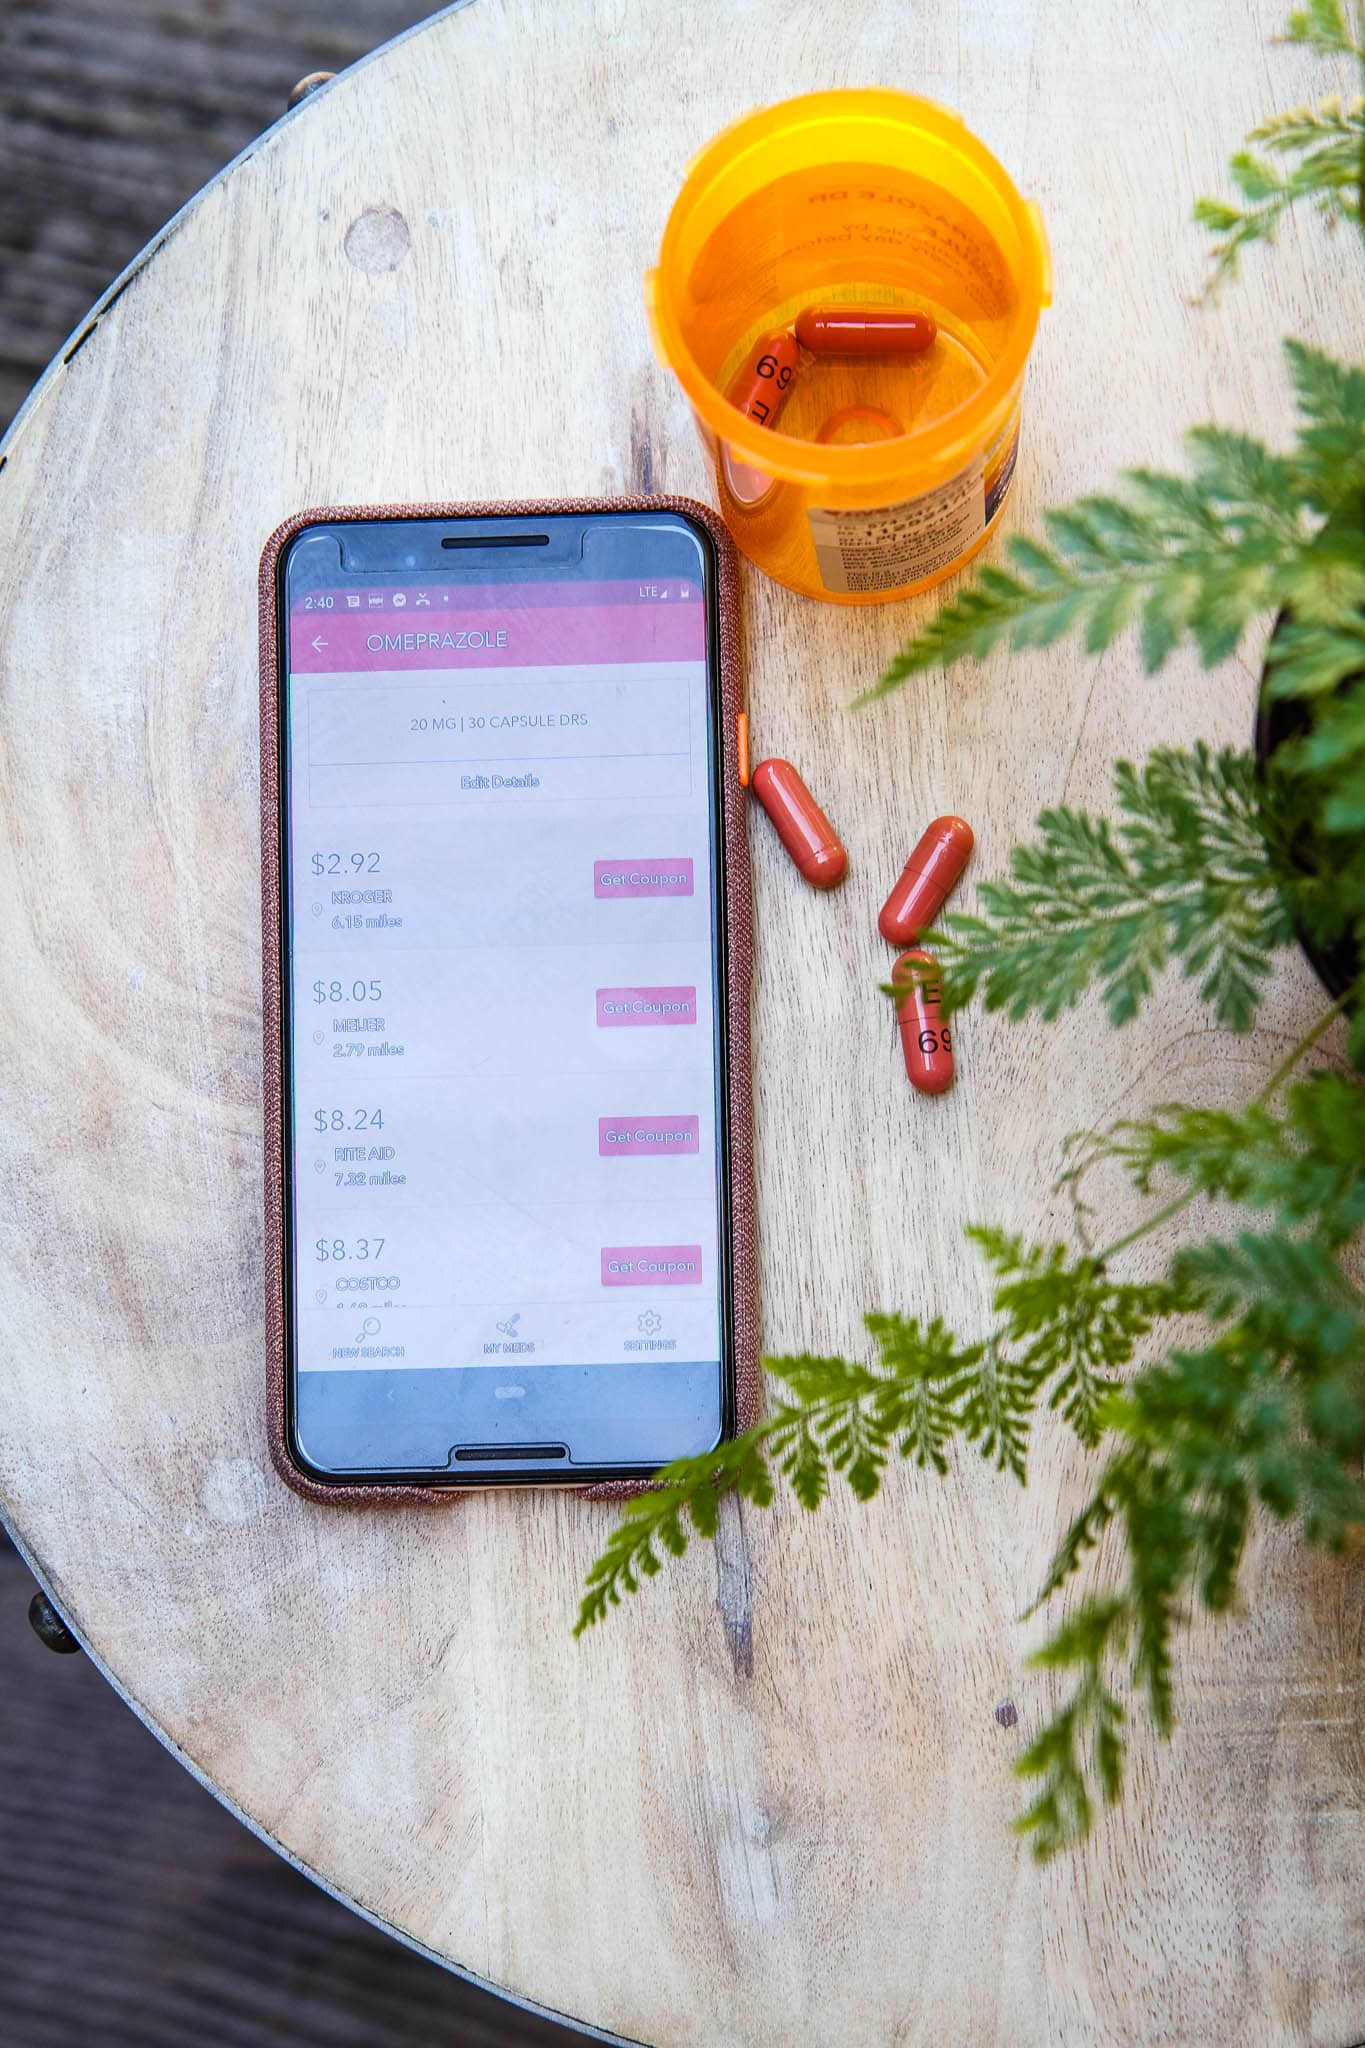
Save Time & Money By Researching Prescription Prices

Did you know there are ways to save on prescription drugs whether you have insurance or not? If you can’t afford your chronic disease medications, you can take advantage of apps that save you money on your prescription needs. 

Simply head to the RxSaver website (or download the app) to comparison shop the pharmacies near you and evaluate which store offers the best deal for your money.

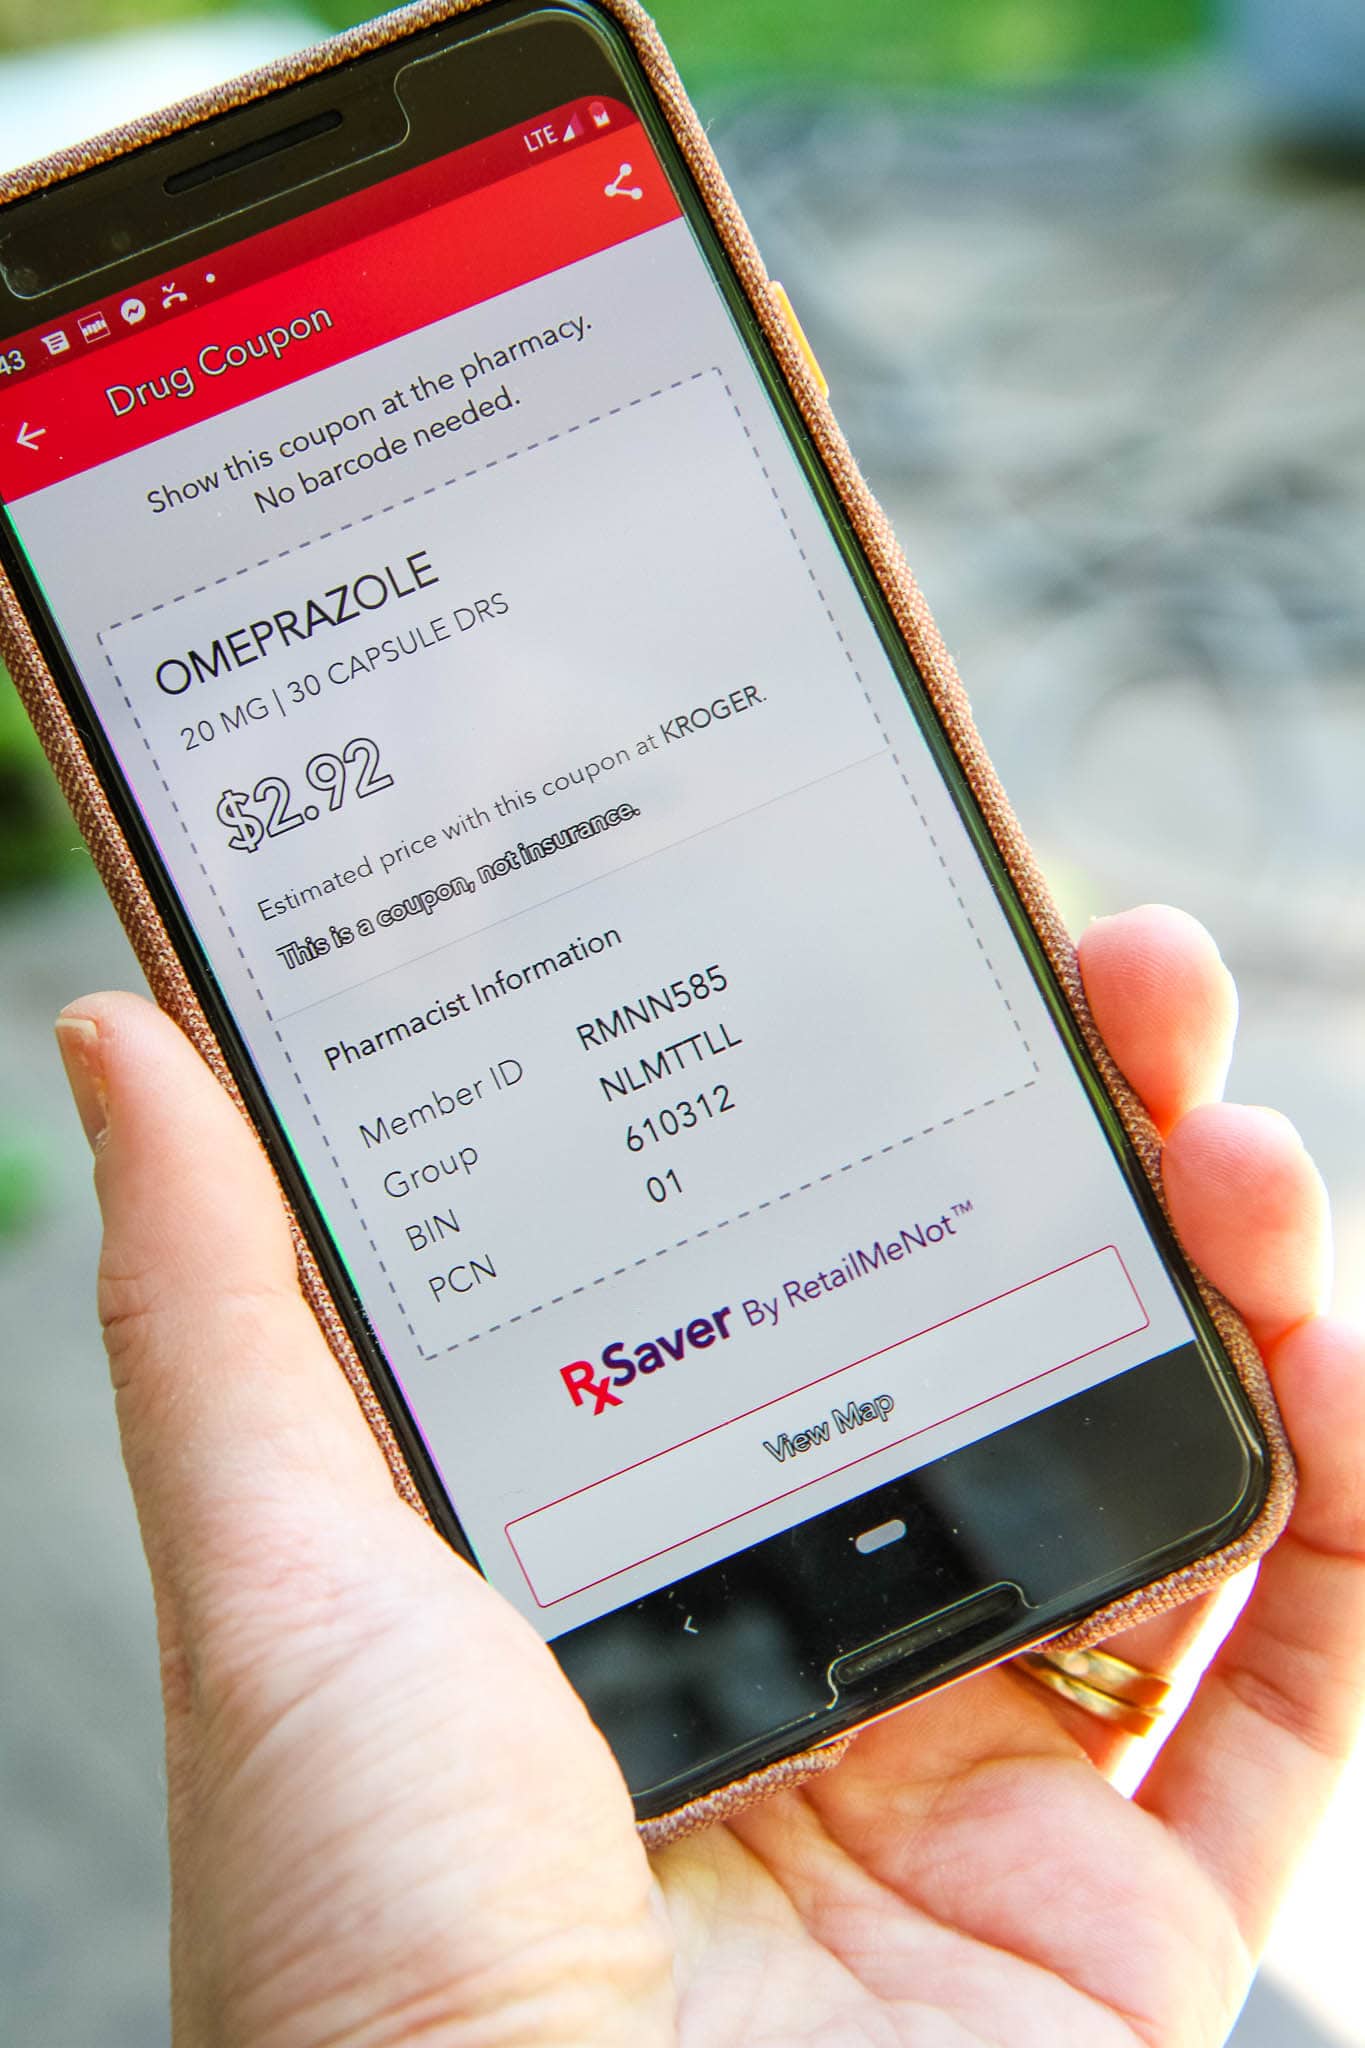
The nice thing about this service is that they don’t require any personal information to use it and you don’t have to have a membership to take advantage of the savings. Simply enter your prescriptions in, compare prices, and choose the best price and location for you.

When I typed in my own medications, for example, I was surprised to find $20-50 savings on one of my medications thanks to this tool finding the lowest prices for me. Check your own prescriptions right over here.

This quick price check can yield your family up to 80% off at pharmacies nationwide!

Find Ways to Earn Money & Trim Your Current Expenses

When you become diagnosed with a chronic condition, you may find that your days look a lot differently than they did. Honestly, I found that my day was really structured around appointments and squeezing in a little rest.

As we all know, when our days look different our spending can also look different.  

This is a great time to reevaluate your monthly subscription services to see if they are being used enough to justify the expense.  If they no longer fit with your new lifestyle, consider reducing or dropping services to save money to pay for your future medical expenses.  

A monthly gym membership, for example, could be reduced down to a class pass instead that can work with your new daily schedule. 

Small switches like this can free up funds for future medical expenses.

Also, consider tweaks that can help you earn money to help offset costs. Moving your savings to a high interest earning online bank, for example, can yield up to twelve times more interest than what you may currently be earning.

As you explore your financial systems, I would also encourage you to get advice from a trusted financial planner to discover ways you can earn more from interest or strategies for investing wisely to help cover any unexpected expenses. 

Discussing what your new normal looks like, with your financial advisor, can impact lots of future decisions. This is a great time to go over things like estate plans, life insurance, and strategies for covering your medical costs.  The more transparent you are with your financial advisor, the better dialogue you will have to prepare for your future.

Take Advantage of Wholesale Club Prices Without the Membership (or Heavy Lifting)

Wholesale club memberships can be expensive up front, but can yield great money-back rebates and savings on items or services needed for your health. Just think of all the potential savings on things like vision, supplements, or medical care equipment needs. 

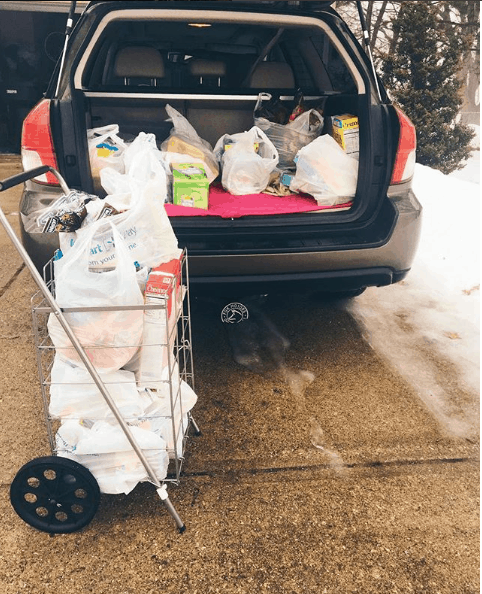
Now that I use Instacart for grocery delivery, I discovered that you don’t need a wholesale club membership card to have a grocery delivery service gather your groceries for you. This workaround on the Costco membership means that I can take advantage of all the store has to offer online and have these heavy items delivered to my door.

If you do have a card, you can input your membership number for them to use, securing more in your future rebates without the hassle of shopping for it all yourself.

Keep in mind that the grocery service does not typically purchase a lot of the over-the-counter medications you need though and that section of the store can save hundreds on your health expenses.

No grocery delivery in your area? 

As a small town girl, I feel your pain!  

You may consider doing a grocery pick-up service and having someone at home to assist you with the heavy lifting. 

Single? 

I have found a rolling shopping cart saves me time and energy on my grocery days.  #stillwinning 

Ask About Patient Assistance Programs

Lastly, if I learned anything from my Dad, it is that it never hurts to ask for a discount!  Many places I visit offer a discount card for repeat visits, a reduction on medical bills if paying out of pocket, or can share samples of prescription medication that can help offset a bit of your day to day expenses. 

I highly recommend asking too if there are discounts for students, seniors, military, long-term disability, or being low income discount. I have often been surprised what discounts I had at my disposal that I would have never known about if I had not asked.

Not only is asking about a patient assistance program at your various appointments beneficial, but it is also something you should look for when shopping for items you may be purchasing online.

In fact, many expensive medical devices or medical supplement sites may have a page dedicated to Assistance Programs, on their website. These programs allow you to apply for a set discount on your purchases that can save you a lot of money or can be covered by your health savings account.

Just like being transparent with your financial advisor, I encourage you to have transparency with your physician about your budget too.  When our son’s medication skyrocketed hundreds, we set up an appointment to discuss alternatives that wouldn’t be as costly. By having this conversation, we were able to switch our son to a higher milligram pill that could be split into two doses, giving us twice the amount of pills for a lot less.

Don’t forget though, you have a patient assistance program right in the palm of your hand. The RxSaver app can help you narrow down who has the cheapest prescriptions in your area and get you back to resting in no time flat.

This post is sponsored by RxSaver by RetailMeNot. All thoughts and opinions are my own! 

Pin It

6 More Ways to Date Your Husband in the Fall

Monday, November 12th, 2018

From our marriage & parenting contributor, Mary Carver.

I met my husband in the fall. We went on our first date later that same fall. And, years later, our first daughter was born in the fall. So when the weather begins to cool down and pumpkin spice everything shows up basically everywhere, I find myself feeling a little more lovey-dovey than usual.

Not that I don’t love him in the spring. Not that we don’t try to plan date nights in the winter. But there’s just something special about the fall!

Unless we’re incredibly intentional about it, though, our autumn date nights look exactly the same as every other date night in any other season. Because unless we are careful to be creative and plan ahead, my husband and I will always default to dinner at a Mexican restaurant chain and a movie.

Not that there’s anything wrong with that! We love tacos! And movies about superheroes or spies!

We do.

And sometimes “the usual” is exactly what we need to give us space to connect and remember how much fun we can have together when we set aside the day-to-day for a while.

But other times?

We need to get out of a rut, and we need to try something different. So while we’re still in the midst of this romantic season, here are a few date night ideas I’ve come up with.

Perhaps you’ll find a new way to date your husband this fall, too!

6 More Ways to Date Your Husband in the Fall


Go back to school

Don’t worry, I’m not talking about pop quizzes or English papers! No, I’m suggesting you take a class with your husband. It’s always fun to learn something new or brush up on rusty skills — and doing it together will give you something fresh to talk about and a brand-new bond as you find hidden skills or even fail miserably together! Often, you can find classes open to the community through your local college or community college. Or just search online for classes. Depending on your interests (and level of adventure!), you could take a class in cooking, self defense, dance, woodworking, wine tasting, or even massage.

Think outside the box

Don’t tell my husband, but one thing I’m giving him for Christmas is a list of adventurous, totally new-to-us date ideas for next year. I’m hoping to get gift cards or make reservations to go along with the list, so we’ll actually have to stick to outside-the-box dates! I’m planning a taking a barbecue tour around our city, finally trying our skills in an escape room, going rock climbing, visiting a shooting range, and putting a lock on a “lovers’ bridge” in a nearby town. What new, exciting, just plain different activities does your town offer?


Try new restaurants

I’ve mentioned our tendency to eat at the same chain restaurant every time we go out. We know what to expect; we know the wait won’t be long. But we also know we won’t be surprised. So I’ve done a little research and looked up lists of the best local restaurants in our community. Some are new, some are just new to us. Some offer the type of food we always eat; some will stretch our palates a bit!


I actually made the list a couple years ago and we’re very slowly trying a new place every few months. And the last time we did? We had so much to talk about! Did we like it? What was our favorite part? What was different than we expected? Do we want to go back? I can’t wait to try another new restaurant this fall.

Ditch the kids

I know, I know, you love your kids. They’re wonderful! Your heart, walking around in the world. I know! Mine, too. However, sometimes it’s fun to do kid stuff…without the kids. Every time my husband and I take our girls to a fall festival, parade, pumpkin patch, or corn maze, I find myself thinking how lovely it would be if we could come back the next day, just the two of us. So this fall, I’m going to plan ahead and make sure we have a family day AND a date day at the fun farm.

Change up the time of your date

Dating your husband doesn’t have to happen in the evening. And since fall seems to be one of the busiest seasons our families have, a night-time date might not even be possible. Why not meet for pumpkin donuts and coffee one morning? Or sneak outside for hot chocolate under the stars once the kids are in bed? You could also go to lunch at a food truck park, a chili contest, or your favorite picnic bench. The point is that you don’t have to wait for a free Friday night. Fit in date nights whenever you can, even if it’s at 8:00 in the morning!

Get physical

Hey now, not like that! I’m talking about doing something active together, like taking a hike, going for a bike ride, or participating in a fundraising walk. Take advantage of the gorgeous fall weather, and train for a 5K together (or just take your time walking through a flea market or art show). And who knows…this fall date might shake things up in more way than one!


Need more ideas? Don’t miss 5 Ways to Date Your Husband This Fall! What’s your favorite fall date night plan?

Pin It

Simplifying Your Holiday Gatherings

Thursday, November 1st, 2018

You will love these strategies for hosting memorable gatherings without the stress.

I’ve got everything from cooking shortcuts to decorations that transition through the seasons to your perfect playlist! 

This post is sponsored by Honeysuckle White. All thoughts and opinions are my own! 

Now that Halloween is behind us, it is time to start thinking about all of those upcoming holiday gatherings. Hostess duties can often feel stressful and overwhelming, don’t they? That is why I’m excited to be partnering today with Honeysuckle White to share some fresh ideas for hosting your next gathering without the stress.

I learned that if I wanted to connect with my friends and family that I often had to be the one to step up to bat and offer to host. I have discovered, over the years, that so many people feel intimidated by hosting and are often self-conscious of things like undone house projects, their limited cooking abilities, or not feeling like they have that perfectly sized space for the ideal gathering.

The thing is, our own intimidations rob us of precious moments with those we love and the people that REALLY and GENUINELY love us will always, always be thankful to you for creating space in your home and day for them.

That is, truly, why I am excited to share that Honeysuckle White recognizes how precious our time is and wanted to take out that intimidation factor by providing a brilliantly easy turkey product that will make gatherings so much easier on busy moms.

Even better?

You can order it right through Amazon.

And, ladies, I KNOW we all have Amazon ordering down pat! (*ahem*)

Say hello to the world’s easiest holiday dish, the NEWS Honeysuckle White Bacon Wrapped Turkey Breast “Turketta”, inspired by the flavor profile of porchetta!

I gave ordering one of these a spin and really was surprised how well-seasoned and easy this was to execute for my Friendsgiving gathering this week.

In your package (that arrives right on your doorstep!)  you will get one of these beautiful roasts that serve approximately 4-6 people.  The packages arrive frozen and you can thaw it for an ASAP gathering or you can tuck this in the freezer for a future meal.

The bird is perfectly seasoned, boneless (no carving- woot, woot!), and requires just a simple quick sear on the bottom and baking.

This isn’t the only option you can have delivered. They also are offering Hickory Smoked Turkey Breast, a Honeysuckle White Fresh Traceable Whole Bird Turkey, & the Honest Turkey Whole Turkey.

Even better, for a limited time offer, MomAdvice readers can get 15% off using my coupon code 15MOMADVICE.

I can really get behind this company and the work they do with farmers, especially after having the opportunity to tour one of the farms.

The company is committed to raising their turkeys without growth-promoting antibiotics and no added hormones or steroids.

They also are committed to supporting independent family farmers to provide family farm-raised turkeys.

I don’t know if you know this, but my great-grandpa was a farmer and that is why that commitment and their true love for these families really warms my heart.

Now that you have the turkey covered, here are a few other ideas for a simple gathering of great friends and great food!

Send Out a Small Invite

I have done loads of large gatherings, but I find the best gatherings are often the intimate ones with just a couple of close friends so you can really catch up.

A friendsgiving need not be a large gathering and the invitation does not need to be a formal one.

Text invitations are perfectly acceptable, especially during such a busy season.

Also, allowing mamas to bring kids is a blessing to the mom (who won’t have to cook) and to you (to get to love on your friend’s beautiful kiddos especially since your kids are tweens/teens and you now have to FORCE YOUR LOVE on them).


Keep the Sides Simple

Roasted vegetables are an easy side that can be prepared a day in advance.

In fact, storing your carrots and potatoes in water overnight will yield a much crisper roast than if you cut them up immediately.

Toss your prepared vegetables in olive oil, kosher salt, and your favorite dried seasoning (I’m a thyme girl!) and roast them at 450 degrees for 25 minutes.

Love perfectly roasted potatoes?

Cut baby potatoes in half and put the cut side down on a cookie sheet that’s been lined with aluminum foil and is lightly greased. You will get a perfect roast every time AND they are so good that my kids call them mom’s french fries.

It goes without saying, but lining the cookie sheets with tin foil or parchment paper squares is also an excellent way to cut down on dishes!

Skip the Baking

Thankfully, there is no need to bake since we have so many delicious options for desserts that are already made and available for purchase at our local markets.

You can still make these purchased desserts feel really special though with quick homemade touches.

Spicing up your whipped cream, adding crunchy toppings, or adding details with pie cutters or an embossing rolling pin (made from refrigerated pie dough) are all fun ways to make pies feel special and more homemade.

This post offers 5 strategies for making store-bought pies feel special that I think you will find REALLY helpful for the holidays and even an idea for packaging up mini pies as a parting gift at the end of the night.

replicate my table with this easy tutorial

Think Evergreen When It Comes to Home Decorating

In the blog world, evergreen content is king. It means that we really focus on creating timeless pieces that can be shared over and over again and always feel relevant.

This is the SAME WAY we can approach our decorating. Purchase or DIY things that are neutral and can be used over and over again throughout the seasons. A bit of faux greenery, a roll of kraft paper (DO buy this– it’s such a affordable investment for decorating and gift wrapping), white plates, and loads of candles are perfect for ANY occasion.

Adding simple seasonal touches, like the small bundles of sage I gathered with cotton twine feel very Martha-y, but cost only a couple of bucks to pull off.

Stop pulling out and storing seasonal bins and buy a few items that you can use over and over and over again.

You can’t imagine the stress you will relieve yourself of!

Set the Mood

Before I go, I have one more fun fact for you…I used to be a glorified D.J. for my college’s radio station.

Music is essential to me like breathing and food.

Growing up, I played the violin, sang in the choir, did musical theater, and had parents who were crazy about music too.

I am also the one that hogs the microphone if you karaoke with me.

To me, a solid playlist for special occasions is oh-so-necessary.

Don’t have time to make one?

How about if I shared mine with you!

Also, as a thoughtful introvert, I have included three goodbye songs at the end that you can feel free to boot those up after the meal when you just need to retreat to your Snuggie and Netflix.

Hopefully they catch on..I know, “CLOSING TIME,” is a very, very subtle exit song!

I have embedded it here for you so be sure to bookmark this awesome post and give me a follow for more fabulous dinner music.

Now hurry on over to order your turkey and don’t forget to use my coupon code 15MOMADVICE to snag your 15% off!

this post contains affiliate links

This post is sponsored by Honeysuckle White. All thoughts and opinions are my own!

DIY Table Runner for All Seasons

Tuesday, October 30th, 2018

Transform your table with this easy DIY table runner that you can use for any occasion. Who knew cardstock could look so beautiful?

Today’s tutorial is for a diy table runner made from humble cardstock, glue, and twine.  As a minimalist, I’m a big fan of any decorations that can be used for multiple seasons and I fully admit that I am REALLY proud when I craft something that is so very uniquely me.

As you guys know, I have really been on the struggle bus with my hand pain and I started thinking how I might need to start broadening my horizons with my crafting. It has been a dream of mine to own a Cricut so, after doing a ridiculous amount of research and price investigation, I settled on a Cricut Explore Air as the best option for what I needed.

Please note, they do offer a brand new Cricut Explore Air 2, but the price difference is $70 and the only real difference is that it can cut faster.

I can wait a few extra minutes if I can save $70!

Today’s craft is a great way to break in your Cricut since paper crafting is so darn affordable.

Before we begin, I decided to get a Cricut Access membership (I’m on the $7.99 monthly plan) so I could have unlimited access to patterns and get the discounts for the holidays. You can also pay individually for patterns, but so far the cost has been worth it for gift-making.

Do what makes sense for you and your budget though!

How to DIY a Paper Leaf Table Runner

Supplies

12-15 sheets Gray Cardstock (I used 4 different shades of gray)

Hopeless Romantic Garland Pattern– you will need to create a Cricut profile to access this

Hot Glue Gun (this is the one I use and love)

Glue Sticks

Cotton Twine

A pencil, pen, or end of a small paint brush for shaping your petals

Cricut

Cricut 12×12 Standard Grip Adhesive Cutting Mats

Kraft Paper (I bought this roll and use it for wrapping our gifts too)- this is optional, but helps the garland stand out!

Tutorial

Following the pattern listed above, begin by cutting all of the leaves for this project using a different shade of gray each time you load it.

Make sure that the dial on your Cricut is set to CARDSTOCK and make sure that the blade you have loaded is the FINE-POINT BLADE.

If you have not cut cardstock before, here is a tutorial and here is also a tutorial to switching your blade (if you haven’t done that before).

Begin by creating a gathering of four to five leaves that will look good layered together.

To make this look more natural, try to avoid making each of these gatherings identical and make sure to weave in those different subtle hues that you have cut.

Using the end of a pencil, end of a paintbrush, or scissors, gently begin curling these petals to add depth and shape.

If you have not curled paper before, I found this advice very helpful (and her patterns are just gorgeous too!).

Now we can begin gluing our stack together. Keep in mind how you had them originally stacked and replicate that.

You will also want to figure out how you want these to trail and be linked together. Once again, avoid your perfectionistic nature and don’t be afraid to have these going in different directions. If it looks too matchy-matchy, it won’t have a natural feel.

Along the back, you will then add a thin line of hot glue and attach your twine to help hold the garland together and that can also act as a tool for hanging, if you decide this one is better suited to your mantle or bar.

You can see the layer of brown paper has been laid underneath it.  To add a little more dimension to this table, I added two sets of these inexpensive votive candle holder sets (I’m pointing you in the general direction so you can pick out your favorite finish). You can get them in a variety of shades and I love that these sit low so you don’t have to try to talk around a tall arrangement.

Here are just a few other details on this table, in case you were interested in replicating this further.

I tied tiny bundles of sage to nestle on top of our cloth napkins with a little more of the cotton twine. It added a natural element to the tablescape which felt really necessary with the paper display. It also smelled divine which is always a wonderful bonus.

I have had a hard time finding cloth napkins that wash really well, but can’t recommend these beauties enough. I picked a dark gray to eliminate needing to bleach out stains, but they come in a zillion colors that can match your own table runner.

The dishes were such a steal and came with such thoughtful storage racks. I am in love with how everything nests together so well especially these bowls which are the perfect size.

I found the glasses on clearance and can’t tell you how beautiful they are. I have been dying to have some ornate glasses for our fancier occasions. Of course, these already sold out (boooo!!!), but here and here and here are a few gorgeous options.

Once again, thankful for this smart tool I bought for our water bottles because it gets things clean, but doesn’t scratch the pattern or gold rim on these.

I hope this spread inspires you to embrace decorations you can use for all the seasons.

I’m also excited to share with you about the Friendsgiving gathering I had to make use of this lovely display. Stay tuned for all the details on that!

Looking for some more great craft ideas? Check these out!

How to make a Yarn Pom Pom Wreath how to make a yarn pom-pom wreath

how to make a yarn pom-pom garland

how to make an autumn burlap wreath

easy burlap wreath tutorial

how to diy a no-sew blanket scarf

Happy crafting, friends!

This post contains affiliate links.

DIY Game Day Bar Cart

Tuesday, September 18th, 2018

Entertaining is my thing. There’s nothing I love more than getting friends and family together for a great time.

And with a certain important game day party coming up, I knew just what I wanted to assemble to show off for my guests — a game day bar cart!

My favorite bar cart in our home is actually a tool cart transformed into this super functional and fun bar cart, so you can make your own too!

For my cart design, I decided to keep parts of the original surface paired with a metallic shade, but you can personalize this to your own taste and color scheme.

Just follow along with step two on the inside of your bar cart and apply your choice of paint if you so choose.

DIY Bar Cart Made from a Tool Cart Tutorial


Supplies Needed

Metal Tool Cart (check here or here or here to pick your favorite)
2 cans Krylon Colormaster in Metallic Gold (indoor) Spray Paint
1 can Rust-Oleum Hammered Brown Spray Paint
1 Spray Paint Trigger (should be in the same aisle as the spray paint)
Sandpaper
Painter’s Tape (to tape off your wheels)
Gloves

Directions

1. Begin by removing all of the parts and lining them up on cardboard or a drop cloth for painting. You will want the trays on this piece to be upside down since we are only spray painting the exterior of the tray. This will not only save you time spray painting, but the cart already has a nice finish on it that is easy to wipe and clean.

2. Rough up the exterior with medium-grit sandpaper. This will help our gold paint adhere to this smooth surface better.

3. Apply the trigger handle to your spray paint can. If you haven’t used one of these before it is a life-changing spray painting tool that offers even coverage and saves your poor trigger finger for long projects.

Begin by shaking your can for 1-2 minutes and periodically during use. Hold the can 10” – 12” from your surface, and spray in sweeping motions from side to side with a slight overlap.

Apply multiple thin coats, wait one minute between each.

You can add a top coat, if you like, with a clear topcoat, but it does dull the metallic sheen from this paint.

I chose to leave it without the clear coat, because I like the roughness and loveliness of the sheen of this paint.

I did find that this does adhere a bit unevenly to the surface, but creates more of the hammered metal look that I was going for.

4. Remove the trigger handle and now place it on your hammered metal spray paint that we are using for the handles and wheels on our bar cart.

Using the same technique, hold the can 10” – 12” from your surface, and spray in sweeping motions from side to side with a slight overlap.

Allow these to dry fully and then flip to the other side to spray paint the flip-side of these.

5. Tape off your wheels as best as you can and spray paint these with the same spray paint.

Allow them to dry and then flip to the other side and spray paint the flip-side.

When you remove the tape, if any of the paint has gotten on the wheel, just use your sandpaper to rough up the wheel to remove the paint.

6. Assemble after your cart, and all of its parts, are fully dry.

Keep your spray paint handy for final touch-ups and use a piece of cardboard to block and protect the areas around where you need to touch-up.

Allow this to fully dry before loading it with your drinks.

DIY Game Day Bar Cart from MomAdvice.com

DIY Game Day Bar Cart from MomAdvice.com

Once everything is assembled and dried, you can add your beverages of choice!

I decided to add my favorite beers to the top shelf for easy access, along with garnishes and drink tools.

On the bottom shelf I have glasses and liquors that can be wheeled around as needed.

Feel free to add any additional decorations like small treats, a chalkboard sign to message for guests or paper creations sporting the colors of your favorite team. Most of all, have fun!

Need More Game Day Party Tips?

Keep decorations simple for your game day party

Faux grass can act as a tablecloth for your table and a simple pennant banner can be created with your team’s favorite colors.

Add some fun football trophies to decorate around the food to pull your table theme together.

Have guests make their own food

Make creating your own food fun for your guests by creating a sub or Panini sandwich station from an assortment breads, cheeses, cold cuts, and a variety of toppings for your guests.

Each person can customize their own sandwich with their favorite additions.

Don’t forget to add a few gourmet flavors like pesto, Gouda cheese, apple slices, smoked bacon or prosciutto, & brie to your toppings bar.

These gourmet toppings will take your ordinary sandwiches into extraordinary ones and each guest can create their own unique combination.

The same idea can be applied to a fun slider bar, soup topping bar, hot dog bar, or baked potato bar.

snag my slow cooker pumpkin chili recipe

Host a soup cookoff

Have guests bring a pot of their favorite soup to share for a soup cook-off.

Have guests place votes on their favorite and present the winner with one of your fun football trophies from your table display to take home as the champion.

Not only will this be a fun way to sample some new soup recipes, but it will also relieve you of having to create as many dishes for your big game day party.

Round out the meal

Round out your soup & sandwich menu with an easy cheese platter, dips, a vegetable tray, and a fruit tray. Make the easy dips to go with your favorite crackers, but save some time in the kitchen and visit the deli in your store to pick up a simple fruit or vegetable platter to add on the side to save time spent chopping in the kitchen.

Invest in some inexpensive plastic containers for game day leftovers and send goodie bags home with your guests so they can enjoy the leftovers all weekend long.

Don’t forget to give the guests that stick around to help clean up afterwards a Most Valuable Player award for their assistance with the kitchen clean-up.

Love this DIY project? Here are a few others I think you will enjoy!

rosé strawberry wine pops recipe

slow cooker pumpkin candles

diy thumbtack pumpkins

diy ottoman serving tray

fall burlap wreath

painting pumpkins with acrylic paints

How do you celebrate game days at your house? I’d love to hear your tips for entertaining!

Pin It

Back-to-School Meal Prep Ideas

Tuesday, August 14th, 2018

Back to School Meal Prep Ideas from MomAdvice.com

It’s time to bring on those meal prep ideas for packing lunches for back-to-school. I’m sharing 7 tips to nail your meal prep game for your kids and YOU. I’m excited to be partnering again with the Florida Department of Citrus for the back-to-school season and showing you some fun new strategies for lunch preparation.

It seems surreal to me that we are already talking about back-to-school, but we are just one week away from sending our kids off to school again. It is with this big occasion in mind that I look forward to getting back into our healthy eating routines and finding new ways to minimize stress during our busy weeks.

One of the ways I do that is through our meal prep routines.

back-to-school lunch meal prep ideas from momadvice.com

back-to-school lunch meal prep ideas from momadvice.com

Let’s talk about 5 really great strategies for meal prepping that can help you this year.

back-to-school lunch prep ideas from momadvice.com

back-to-school lunch prep ideas from momadvice.com


back-to-school lunch prep ideas from momadvice.com

Find New Ways to Use Up What’s Already in Your Fridge

Meal planning can save you tons of money at the grocery store, but I have the tendency to get excited about new meals without using up what we already have in our fridge.

Make a plan, but acknowledge ways that you can use up items that may be nearing their expiration date. I love frittatas, for example, because they can be whipped up from whatever you have lurking in your crisper drawer and from your weeknight meal leftovers. Today’s frittata, for example, was made from cherry tomatoes, spinach, mushrooms, and feta…all items leftover our salad nights this week. Ask your kids to help you come up with combos and give them the opportunity to brunch it up at school.

If you are looking for a great recipe, check out my Chicken Pesto Frittata or my Dairy-Free Sausage & Vegetable Frittata for two great options. Either of these can omit the meat for a fun vegetarian option too.

I paired this frittata with orange juice to round out the meal. Keep in mind that the recommended daily intake of Florida OJ is eight ounces for adults and four to six ounces for kids! The best part is that every glass of Florida Orange Juice provides the amazing 5. In fact, you have taste, vitamin C, folate, potassium and no added sugar in just one glass.

back-to-school meal prep ideas from momadvice.com

back-to-school lunch prep ideas from momadvice.com Consider the Snack Pack Trend

We caught a commercial for, “protein packs,” that you could purchase for your lunches that had meat, cheese, and nuts in them.  Even though my husband can’t cook, even he was laughing at how ridiculous it was that people couldn’t put these together themselves.

Snacks packs aren’t a new concept, but they ARE a perfect concept if you have a kid that is a snacker or if you happen to be a snacker yourself.

Utilizing toothpicks, stack a slice of lunch meat, a grape tomato, and a cube of cheese for a delicious bite that is easy enough that your kids can do it (and make their own dang lunch!)

I paired these with fresh veggies, a little ranch, and roasted salted almonds.

Want to add some fruit? Consider an apple! Using an apple slicer like this, slice the apples and then pull them back together in their original shape around the core with a rubber band.

Did you know that for additional insurance you can brush the apple with some orange juice to really help your apple retain its crisp appearance and cut down on browning? Now that’s a #lunchhack

prep peanut butter & jelly

Kids Keeping it Basic? Prep That Too!

I had one child who refused to eat anything except a good old-fashioned PB&J. I admired that she knew what she liked and that she kept it simple for her mom. That said, even those simple tasks rob us of precious time to get ready in the morning so I started meal prepping even these simple sandwiches.

If your child’s favorite is this sandwich too, simply spread peanut butter on both slices of bread to create a wall to prevent the jelly from making your bread soggy. Smear your jelly on in the center of one slice of bread and then put the two slices together. By creating an assembly line of sandwiches for your week you only dirty up the kitchen once and get back a little more time to enjoy your morning cup of coffee.

back to school meal prep ideas from momadvice.com


orange chicken meatballs recipe from momadvice.com

Plan Around Your Own Guilty Pleasures

Have you thought about packing yourself a lunch? I have the tendency to get out of the habit of caring for myself when the back-to-school rush happens and find myself grabbing takeout or “forgetting to eat,” when I don’t have something convenient to grab.

Jot down what your takeout weaknesses are and start searching Pinterest for some great alternatives for your meal prep day.

For me, Chinese is my weakness so these Make-Ahead Baked Orange Chicken Meatballs were just the ticket for my meal prep day. The sauce, of course, gets all of its orange goodness from a little Florida OJ!

Don’t Have Time To Make Separate Lunches? Double Up on Those Dinners!

Life gets chaotic this time of year so if you can’t devote a day to making lunches, consider doubling up on dinner ideas instead. For some great cold options, here are a few of my own recommendations!

Quinoa-Salad-In-A-Jar-7 quinoa salad in a jar with spinach & tomatoes

chicken caesar pasta salad chicken caesar pasta salad

Berry Pecan Salad

berry & candied pecan salad with a homemade raspberry vinaigrette (make with or without chicken)

Caprese Pasta Salad #recipe via MomAdvice.com caprese pasta salad

Roast Frozen Chicken in Bulk roasted chicken (perfect for salads & wraps)

Don’t forget those sides!

make-ahead hard boiled eggs make-ahead baked hard boiled eggs

Smoothie Bowl Recipe smoothie bowl recipes

roasted garlic hummus roasted garlic hummus

No-Bake Gluten-Free Granola Bars no-bake gluten-free granola bars

  trail mix energy bites trail mix energy bites

I hope that today’s ideas inspire you to try something new this year with your meal prep. Self-care is just as important so be sure to take some time out for YOU too with a few of my favorite self-care tips. Thank you to the Florida Department of Citrus for letting me share about these tips with you! Be sure to make Florida OJ a part of your daily routines to help boost your immune system during this challenging mom season.

This blog was sponsored by Florida Department of Citrus. Thank you for supporting the companies that support our site!


Pin It

7 Tips for Hosting a Successful Book Club

Tuesday, June 19th, 2018

7 tips for a Successful Book Club from MomAdvice.com Thanks to my sponsor St Martin’s Press, I’m sharing about Kristin Hannah’s newest page-turner!

I joined my first book club when my children were small and I remember both how rewarding it felt to use my brain again and the challenges of carving time out to read. The beauty in being a part of that group though was that it pushed me to read books that were outside of my typical genre.

Historical fiction, for example, had never been on my radar until I joined a club.

Ironically, it is now my favorite genre.

Have you thought about hosting a book club? I have had the pleasure of hosting a local group and an online group and today I wanted to share 7 tips and strategies I’ve found for hosting a successful book club.

7 Tips for Hosting a Successful Book Club

1. Create Your Book Club Circle

Book clubs can be an opportunity to cultivate existing friendships or an opportunity to widen your net. If you don’t have an existing set of close friends, this can be a great way to get to know people from other contexts of your life.  Consider starting a group through your church, with your neighborhood friends, a mom’s group, with your coworkers,  your gym buddies, or as a way to get to know other moms at your child’s school.

Keep in mind, this club does not need to be just women either because men can add another dynamic to your book club discussions. If you have couples that you love to spend time with, for example, consider asking if they might like to meet up monthly for dinner and a book chat. I know that some of my best book discussions have happened when enjoying an evening with friends.

2.  Have an Organized Kickoff Meeting

The quickest way for a book club to fizzle out is to not have a plan and get your members involved.  With everyone’s busy schedules, it can be difficult to get a committed group and keep them committed for an entire year (or more).

In the past, our mimosa kickoff usually starts in September, once the kids have headed back to school. With a little more time in our schedules (sort of), it gives us a chance to regroup and make book selections. I ask each member to come with a book in mind and a month that they would like to host our chat. Allowing each person to make a selection and host gives everyone a chance to feel a part of things and allows the group leader to just micromanage the logistics.

7 Tips for Hosting a Success Book Club from MomAdvice.com

7 Tips for Hosting a Success Book Club from MomAdvice.com

3. Pick Books That Can Sustain a Discussion

The best books that we have talked about have meat to them and naturally cultivate an incredible discussion. Books with shallow plots are probably better for your beach bag than your book club discussion.

Stumped for a book selection this year?

Can I make a great recommendation for you?

As I disclosed earlier, I am partnering with St. Martin’s Press to share about Kristin Hannah’s latest novel and I TRULY believe this is a perfect pick for your book club reading.

I , honestly, would read anything Kristin Hannah writes, but her last few books have been among my favorite. The Great Alone is a contemporary coming-of-age story that is set in the seventies in rural Alaska.  In this story, a former POW father comes home from the Vietnam War completely mentally changed from his experiences there. His behavior and decision-making is wildly erratic and when a property becomes available in rural Alaska, he decides that they should seize the opportunity to live off the grid and make a different life for themselves.

Braving harrowing and life-threatening conditions is what it is all about and thirteen-year-old Leni is caught in the middle of it all as they attempt to carve a new life in the wild frontier.

Living off the grid is not all it is cracked up to be and neither is surviving the difficult Alaska winters.  Hannah writes so eloquently about this impossible marriage and the honest struggle of a Vietnam veteran.

As you can see, from my description alone, this has so many elements for discussion. The plot brings on the challenges of PTSD in veterans, what it is like to live with a mentally ill family member, homesteading (and if YOU could survive it), and if you would stay with your partner if they were putting your family through a potentially life-threatening lifestyle.

When I say that books have to have meat for discussion, you can be assured that there would be MUCH to talk about with, The Great Alone.

Look for books like these where the description alone showcases what kinds of ideas you could discuss in your book chats.

4. Don’t Be Afraid of Controversial Plots

One thing I have worried about is picking books that have controversial plots that might make people feel uncomfortable. What has surprised me though is that these are usually our very best discussions and that it is, truly, okay to have different viewpoints.

The way I lead these discussions though is that I ask that things are said with kindness and love, even if you don’t necessarily agree with one another. In an online discussion, I can swiftly delete comments that aren’t said with kindness, but that is a bit more tricky in an in-person book club.

Even in these tricky moments though, leading by asking everyone to be kind has always been a successful way to start a thoughtful conversation and I have never had any issues after stressing this importance.

It can be scary leading a controversial discussion, but I was surprised how it changed people’s viewpoints or hearing about someone’s personal story and why it made them feel differently than me. A recent discussion of a story on immigration, for example, lead to people sharing how it completely changed their viewpoint on the deportation process.

It makes me wish we had more kind and honest talks and how they could bring compassion to our discussions.

5. Prepare For Your Discussion

Discussion questions are so helpful to have, especially when first beginning your chats. I have found that selecting books with discussion questions already in place can be extremely helpful and relieve a lot of stress on leading a talk. The Great Alone, for example, already has a great discussion outlined for you.

I try to not limit our discussions to just outlined questions though. If it is a historical fiction book, for example, it helps to look up the true stories and images from that time in history. Reading or finding author interviews that explain why the author decided to write a book can also add a lot to a discussion.

6.  Have Each Host/Hostess Decide How They Want to Host

7 Tips for a Successful Book Club from MomAdvice.com

7 Tips for a Successful Book Club from MomAdvice.com

7 Tips for a Successful Book Club from MomAdvice.com

7 Tips for a Successful Book Club from MomAdvice.com

I am happiest when I am entertaining our friends and family. It brings me great joy to share my table with them and feed them my food. Since this book is set mostly outdoors, I set up our outdoor table for a discussion.

It doesn’t have to be complicated though. This meat and cheese board, for example, is a fun way to share food with your book club friends without even cooking.

Sharing book club in the morning? Change the charcuterie board to a bagel board and load it with bagels and toppings.

The truth is, most people don’t love entertaining. It may bring them great stress, they may hate cooking, or they may be juggling a huge plate of craziness and can’t possibly add one more thing to their plates.

I GET IT.

Let each host/hostess decide how, where, and when works for them.

Food is not required to have a gathering.

Cooking is not required to have a gathering.

Opening YOUR home up is not required to have a gathering.

Allow each person to choose their style of hosting however or wherever they want to do it.

Book club should be fun and not stressful!

7. It’s All Too Much? Try an Online Club!

Painfully introverted? Haven’t found your people? Working full-time? New to town? Homeschooling? Single mom? Full plate?

Adding one more thing to your agenda can be an impossible task when you already have so much going on. Online book clubs can be an incredible option for someone that desires a book club, but just can’t make that happen in their day-to-day life.

You can join the free MomAdvice Book Club and be a part of a monthly discussion all year long!

The Great Alone by Kristin Hannah

The Great Alone is available in stores now and is highly recommended for your next book club chat!

To learn more:

Visit Macmillan.com

Like Kristin Hannah on Facebook

Follow St. Martin’s Press on TwitterFacebook, and Instagram

Do you have a tip for hosting a successful book club? Let me know in the comments below!

Thanks to my sponsor St Martin’s Press. All thoughts and opinions are my own.

Pin It

DIY Reusable Floor Pads For Your Swiffer Mop

Monday, April 23rd, 2018

DIY Wet and Dry Swiffer Pads Tutorial from MomAdvice.com

This Indiana girl could not be happier to know that Spring has finally sprung! I am so excited to throw open those windows and to get my home ready for this warmer season. In honor of all the Spring cleaning today I wanted to share with you an easy 5-minute craft to create wet and dry Swiffer pads for your mop. This idea couldn’t be easier and will cost you less than $20 in supplies that you can use over and over again.

If you visit our house, you will find a Swiffer behind almost every door in our rooms. I find that these are such a great way to tidy up quickly before guests arrive or to swipe a room after getting ready in the morning. Pairing these with these DIY Swiffer Pads make this an environmentally-friendly investment that you can use over and over again in your home.

Let’s get started by first making our DIY Wet Swiffer Pads with this easy tutorial.

DIY Wet Swiffer Pads from MomAdvice.com

How to Make DIY Wet Swiffer Pads

DIY Wet Swiffer Pads from MomAdvice.com

DIY Wet Swiffer Pads from MomAdvice.com

Supplies Needed for the Wet Swiffer Pads

4 cups of vinegar

6 cups water

1 tablespoon dish soap (I chose a Mrs. Meyers in a fresh lemon scent)- PSST- Use this coupon from Grove for a Mrs. Meyer’s five-piece set for FREE with your first purchase.

1 gallon size freezer bag

11×11 utility dishcloths (This is the EXACT match to what I purchased- as you can see in the picture below, these are ALMOST the same exact size as our purchased pads, but you won’t have to do any sewing to achieve it!

Measuring cup & spoon

Swiffer mop

Directions

DIY Wet Swiffer Pads from MomAdvice.com

In a gallon size freezer bag, mix together your vinegar, water, and dish soap. I used a measuring cup to help hold the bag in place as I filled it and then sealed and swished the bag to mix the ingredients. DIY Wet Swiffer Pads from MomAdvice.com
Insert your utility cloths into the solution until they are submerged. DIY Wet Swiffer Pads from MomAdvice.com

When you are ready to use them, simply wring out a little of the solution and then place on your Swiffer as you would the purchased pads. Clean your floors and then shake any debris into the trash can and throw them in the wash when you are done. DIY Wet Swiffer Pads from MomAdvice.com

As you can see, these do a great job of gathering crumbs from our floor.  These would also be great for wiping down surfaces in lieu of those throw away wipes that you might be using to clean your home.  The best part though is that these do not streak my laminate flooring like the purchased pads did. My floors have no residue and the vinegar smell dissipates quickly, leaving a clean and natural shine.

Now that we have made our DIY Wet Swiffer Pads, let’s start whipping up our Dry Swiffer Pads for our rooms. Again, this tutorial couldn’t be easier!

DIY Wet Swiffer Pads from MomAdvice.com

How to Make DIY Dry Swiffer Pads

DIY Dry Swiffer Pads from MomAdvice.com

Supplies Needed for the Dry Swiffer Pads

1 yard of fleece (this site has very affordable prices)

Scissors

A dry Swiffer Pad to use as a template or you can use the 11×11 utility dishcloths for a template for your pads

Swiffer mop

Directions

DIY Dry Swiffer Pads from MomAdvice.com

Using a dry Swiffer pad or your 11×11 dishcloth as a template, cut your fleece to the same size. Repeat, making as many as you like. DIY Dry Swiffer Pads from MomAdvice.com

Place on your Swiffer just as you would do with your purchased pads. Do a dry dusting of your floors with your reusable pads to gather dust, debris, and hair. Shake off any loose debris in the trash when you are done. Wash and reuse. DIY Dry Swiffer Pads from MomAdvice.com

As you can see, these also do a great job of gathering hair and dust.  I love to use these in my bathroom where it can be difficult to trap the dust and hair.

I love my shiny floors and look forward to replacing all of those pads with these easy DIY alternatives. Since these just take about 5-minutes to create, you have no time to lose and will have a beautiful home in no time flat!

  DIY Wet Swiffer Pads from MomAdvice.com

I hope you found today’s project inspiring! Have you ever created your own DIY Swiffer Pads? Feel free to leave your ideas below!

Pin It

Trends You Really CAN Do at the 2018 HGTV Smart Home (With SimpliSafe)

Monday, April 9th, 2018

Affordable Spring Decorating Ideas from MomAdvice.com

I had the opportunity to head to Palmetto Bluff, South Carolina to tour the 2018 HGTV Smart Home last month. It has been one of those bucket list items that I have always wanted to do so when SimpliSafe asked if I would like to go, I couldn’t have been more excited.

Today I wanted to share with you the 2018 home decorating ideas that I spotted at the HGTV Smart Home and share a little bit about what SimpliSafe is all about.

SimpliSafe

If you haven’t heard of SimpliSafe before, you aren’t alone! It was, actually, new to me too. This is a smartly designed security system that is meant to integrate seamlessly in your home and offer smart technology protection to keep your home and family safe. It is so seamless, in fact, that SimpliSafe was integrated through the entire Smart Home to showcase just how seamless in design it could be.

Before accepting the trip offer,  I went through the materials about their security system and just knew that I would need to pass on the opportunity to come to this event. I do my best to only feature budget-friendly buys here so when I finally dove into the prices on their units, I was surprised to discover they were incredibly affordable and a perfect fit for a MomAdvice reader. Even as they continued to make improvements to the designs, the costs have remained low for their customers.

In fact, the security subscription service is half of their competitors and they pride themselves on keeping the costs for these home security systems low!

Since we live in a small home, I love the options that are available to customize these to your own space and your own personal needs. Many packages are hard to match with our square footage and what we REALLY need so I loved the build-your-own option choices. Of course, they have conveniently bundled a great starter pack (priced as low as $229) or you have the option to choose your own security adventure and build a package that fits your needs.

2018 HGTV Smart Home

Often when I think of security, I am only thinking about keeping the doors locked and watching for intruders. Security systems are about so much more than that though and one item, in particular, caught my eye. We have had issues with water in our basement, after a few brutal storms, and this very unobtrusive water sensor on the floor, would be an incredible investment for our family. They also offer a Freeze Sensor that can alert you when temperatures drop below 41 degrees to protect your pipes from bursting.

Yeah, that never happens in Indiana.

Cassie and Amy

I can’t rave enough about these smart products and the amazing team that introduced me to them (you can see one of my favorite team members, Cassie, above)! Who knew all of this could be so affordable? Definitely, check them out!

Speaking of affordable, let’s take a tour of some of the other affordable trends that I spotted while touring the 2018 HGTV Smart Home.

2018 HGTV Smart Home

2018 HGTV Smart Home

2018-hgtv-smart-home (3 of 28)

I thought we could start with the exterior of the home. I loved the simplicity of the window box in the front and the beautiful greenery in the beds.

Around the back of the home is an absolutely stunning patio. These tall plant stands with ferns were such a beautiful addition without taking up as much space as flower pots would on the floor and added a little color to this area.

I am a big fan of these statement chairs that have been placed at the end of the table,  paired with the simplicity of these wooden folding chairs. While I don’t know the price tag on these statement chairs, I did spy some beautiful ones over here that I have my eye on that could replicate a more affordable look. We also, typically, have bought our dining chairs from this affordable shop, but now you can find gorgeous chairs just about anywhere and add two beautiful chairs at the end to have that mismatched look for less!

The styling with brown paper covered books and candle lanterns are beautiful (and also so doable!)

2018 HGTV Smart Home Tour

2018-hgtv-smart-home (33 of 7)

2018 HGTV Smart Home Tour

2018-hgtv-smart-home (34 of 7)

This house was filled to the brim with greenery. Plants, plants, plants EVERYWHERE. It was absolutely dreamy. Houseplants can be pricey, but I try to justify it by reminding myself how long a bouquet of flowers last. Even with my black thumb, I can usually get more longevity out of a plant than a bouquet and greenery makes such a beautiful statement in a home.

The mix and match of greenery in this house really caught my eye in every room. If you can believe it, all the greenery (in the vases),  had been purchased from a local Kroger (!!!) so this look is definitely on a budget. I will be referencing these pictures for a great how-to on beautiful mixing because I think that was key with these green displays.

Again, a pair of chairs adds visual interest and I loved the matching blanket and velvet pillow combo that adorned both of them.
2018 HGTV Smart Home Tour

2018 HGTV Smart Home Tour

2018 HGTV Smart Home Tour

2018 HGTV Smart Home Tour

These industrial shelves framed the kitchen sink and I loved the styling they did with them.  I, genuinely, have a hard time styling shelves so I wanted to be sure to snap pictures in here too. Jars of dried beans and colored rice make a lovely display (that can be eaten) and books really made the house.

OF COURSE.

BOOKS ARE AWESOME.

I did find it interesting that this heavy shelving was built in front of the windows.

Once again, they are KILLING IT with their greenery. This big glass vase was a beautiful statement piece on the kitchen island.

2018 HGTV Smart Home Tour

2018 HGTV Smart Home Tour

2018 HGTV Smart Home Tour

2018 HGTV Smart Home Tour

2018 HGTV Smart Home Tour

2018 HGTV Smart Home Tour

2018 HGTV Smart Home Tour

2018 HGTV Smart Home Tour

Here are a few of the details that I loved in the bedrooms.

Suitcases for Storage- This would be such a smart place to tuck an extra set of sheets or blankets for guests.

Floor to Ceiling Curtains- We raised our curtains in our bedroom, but not as high as this. Moving them up to the tippy top made the room feel dramatically bigger and taller.

Wooden Beads- Must invest in millions of strands of wooden beads for decorating. They add such beautiful natural tones and they added these in almost every room.

More Books- Wrapping them in paper is such a beautiful touch and I loved how they are paired with a colored glass vase for a simple pop of color.

Styling Around a Wall-Mounted Television- I loved that the frames were incorporated around this television so it made it blend in more and made the framing of the television more natural.

Smart Touches Above the Beds- In particular, the use of two frames and then the cow OVER the frames made for beautiful visual interest without looking cluttered.

Candlestick Holders- A collection of three was perfect for an ottoman display and added a touch of metal to the room.

2018 HGTV Smart Home Tour

2018 HGTV Smart Home Tour

Heading into the bathroom… This was a SMART home so you can see that the mirrors are also allowing you to surf the web or watch the news while you get ready. You could swipe on them to browse just like you would your phone.

If you have the space, this was such an adorable display for a robe. Also, that painting in the corner is adorable and I loved that it was on an easel display to add some interest around the tub.

2018 HGTV Smart Home Tour

2018 HGTV Smart Home Tour

2018 HGTV Smart Home Tour

Gallery walls make me so happy and I loved the use of mismatched frames and different styles of artwork that helped to achieve this stunning wall. As a perfectionist, I get hung up on the placement and the matchy-matching, but this shows you that they don’t need to match and staggering them adds more beauty to this wall.

2018 HGTV Smart Home Tour

2018 HGTV Smart Home Tour

2018 HGTV Smart Home Tour

2018 HGTV Smart Home Tour

I love when a home uses every nook and cranny and I do think this house did that. This little room has a bookcase with a hidden gaming room tucked behind for the kiddos. A window seat adds a little perch for reading books too.

Once again, I’m in awe of the gorgeous styling on these shelves. The use of just one color of book throughout the bookcase is just stunning.

2018 HGTV Smart Home Tour

2018 HGTV Smart Home Tour

Truly, no corner went to waste in this beautiful space, even in the trickier corners. I loved every inch of this space!

Me


Group Shot

Group Shot 2 Mom Trends * Family Focus Blog * Well-Connected Mom * Christine Koh

The bonus to this beautiful weekend was getting to spend time with some really wonderful friends.

Another huge thank you to SimpliSafe for giving me the opportunity to sneak peek the HGTV Smart Home. It was, truly, a dream come true.

I was provided travel accommodations to attend this event by SimpliSafe

Pin It

DIY No-Sew Reversible Cloth Napkins

Tuesday, March 20th, 2018

DIY No-Sew Reversible Cloth Napkins from MomAdvice.com

The queen of no-sew projects is back and I’m excited to share this EASY DIY No-Sew Reversible Cloth Napkin tutorial with you today.

That’s right, even if you can’t sew, it’s no biggie!

Can’t cut a straight line?

Me either!

No need to even have a skill in that!

Each diy no-sew napkin should take a mere ten minutes to make and can be used for many a dinner with your family and friends. Not to mention, these would make a gorgeous gift for a newlywed or the holidays.

DIY No-Sew Reversible Cloth Napkins from MomAdvice.com

I had a set of cloth napkins that got a lot of love in our house because of their easy-to-wash material and their perfect size. I was never a fan of the colors though and so I measured my current set and headed to the fabric store where I discovered (GLORY BE!) that the fabric bundles, at our local fabric shop, just so happened to be the EXACT same size.

What luck for someone who can’t cut a straight line.

I have always loved the beauty of these color-coordinating fabric bundles (just so perfect for quilters) and thanks to their prepackaged coordination, it makes creating a reversible set of napkins oh-so-easy for those of us born without the gift of pattern-matching.

Here’s my quick tutorial AND scroll down for my system for washing and storing these beauties!

DIY No-Sew Reversible Cloth Napkins Tutorial

DIY No-Sew Reversible Cloth Napkins

diy-no-sew-reversible-cloth-napkins (2 of 23)


Supplies

18×21 inch fabric bundle in coordinating colors- I LOVE these options or you can check here too for a more affordable option (the bundle I purchased had 5 pieces so to create an even number of cloth napkins you will need to purchase two bundles. You will need 2 pieces for each napkin you would like to make). I chose Cotton & Flannel materials for my napkins.

Stitch Witchery or similar fusible bonding web (I swear by Stitch Witchery for the majority of my no-sew projects- it really washes well!)

Chopstick or pointy object to push out your corners

Iron & ironing board

Scissors

DIY No-Sew Reversible Cloth Napkins from MomAdvice.com

Directions

1. Select two coordinating colors and place the first one with the pattern up, facing you, and then flip the other one with the wrong side of the fabric out. Basically, you want the two patterns to be BFF’s and be facing each other.

DIY No-Sew Reversible Cloth Napkins from MomAdvice.com

2. Going all the way across the fabric, lay down your Stitch Witchery all the way across, leaving a little room on each side of the edges, as pictured.

DIY No-Sew Reversible Cloth Napkins from MomAdvice.com

3. Grab you iron (I crank mine to the highest setting on that dial) and iron over the tape until the two fabrics are fused together. This will take several passes and you can additionally spray the fabric with a little water to produce steam and help the tape bond to each side of the fabric. Repeat this process on two more sides.

Leave one side without tape and follow the next steps to finish the cloth napkin.

DIY No-Sew Reversible Cloth Napkins from MomAdvice.com

4. On the final side, we are going to run the tape along like the other sides, but stop to leave a pocket so we can turn this napkin right side out.

DIY No-Sew Reversible Cloth Napkins from MomAdvice.com

DIY No-Sew Reversible Cloth Napkins from MomAdvice.com

DIY No-Sew Reversible Cloth Napkins from MomAdvice.com

5. Using your scissors, cut all four corners so we don’t have excess fabric in the corners. CAREFULLY, turn the napkin right side out and use your chopstick to CAREFULLY poke out those corners. If the tape comes loose while turning this right side out, don’t worry! You can easily reseal that tape again when finishing that edge!

DIY No-Sew Reversible Cloth Napkins from MomAdvice.com

DIY No-Sew Reversible Cloth Napkins from MomAdvice.com

DIY No-Sew Reversible Cloth Napkins from MomAdvice.com

6. Tuck the last of the ends under, to match the rest of the side that has been fused.  Finish with another round of Stitch Witchery and a final press. Once the ends are all sealed, finish with a spray of water to take out any final wrinkles and to give it a good press on all four sides to make sure they are secure.

TA-DA!  That’s it, folks!

DIY No-Sew Reversible Cloth Napkins from MomAdvice.com

DIY No-Sew Reversible Cloth Napkins from MomAdvice.com

DIY No-Sew Reversible Cloth Napkins from MomAdvice.com

I had already received some questions, when I posted these beauties on IG, on how I planned to implement these in our home. I got a container for these and have them on our hutch, next to our silverware. Underneath the sink is a container for tossing the dirty napkins.

I got a small napkin holder that perfectly holds four of these (something like this) for the tabletop and each person gets one napkin per day.

I did request darker colors for messier meals and lighter colors for meals that less messy.

Each person is responsible for tossing their napkin in at the end of the day.

All of this feels REALLY doable to me.

DIY No-Sew Reversible Cloth Napkins from MomAdvice.com

DIY No-Sew Reversible Cloth Napkins from MomAdvice.com

DIY No-Sew Reversible Cloth Napkins from MomAdvice.com

DIY No-Sew Reversible Cloth Napkins from MomAdvice.com

Obviously, I am IN LOVE with these feminine patterns, but I wanted to make some that were more masculine too.

DIY No-Sew Reversible Cloth Napkins from MomAdvice.com

I found some flannel and did some of our napkins in this fabric too.

The best part was that the print was on both sides so the warmer side of the flannel would be perfect for the winter months while the flipside of the flannel was perfect for all seasons (and, honestly, I had less worries about lint issues). I can picture just how beautiful these would be to dress up the table for the holidays.

The best part?

You can’t buy this at Target. You get to be totally unique.

Go ahead and gloat!

Do you love NO-SEW projects? You hit the lottery over here! Check out a few of my favorite no-sew tutorials!

Fabric Flower Wreath Fabric Flower Wreath for Spring

No-Sew Kitchen Cushions DIY No-Sew Reversible Chair Cushions

Fabric Wreath & Garland Fabric Wreath & Matching Garland

Fabric Bulletin Board Fabric Bulletin Board Tutorial

Painted Pumpkins Painting Pumpkins With Acrylic Paints

diy-no-sew-pocket-warmers-10 DIY No-Sew Hand Warmers

Diy Ottoman Serving Tray DIY Ottoman Serving Tray

Scrappy Fabric Trees 15-Minute Scrappy Fabric Trees

DIY Jigsaw Puzzle Mat DIY Roll-Up Jigsaw Puzzle Mat

Told ya, queen of the no-sew life!

DIY No-Sew Reversible Cloth Napkins from MomAdvice.com

Have you made the switch to cloth in your home? I’d love to hear what systems work best for your family?

This post contains affiliate links!


Pin It