Experiment: Can I make yummy homemade bread?
Experiment Taken From: Notebook Entry 04.15.09
Materials Needed: Please see Dine & Dish for the full instructions. I followed the instructions exactly. I did have to add about 1/4 cup extra flour because the dough was a little too sticky.
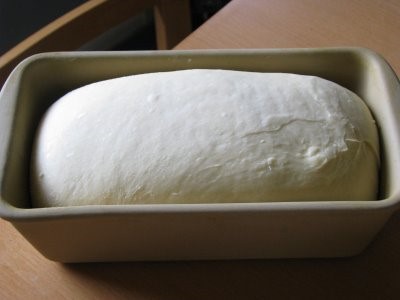
Results: I was excited to try this recipe for “Honey, I’m Home Bread” because it looked so delicious and I could use my bread machine to make it. I layered in all of the ingredients and turned on my bread machine to do the work. When I peeked at the dough, it looked like it needed a little more flour so I worked that into the loaf.
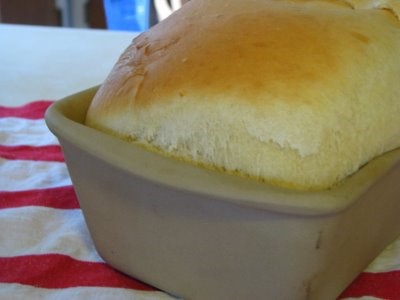
As you can see, the bread rose beautifully. It rose so high, in fact, that when it baked it hit the top of my oven and got a little dip in the center (thus, the off-center pictures here). The bread looked golden and smelled delicious.
Unfortunately, it got very brown on the outside after 35 minutes of baking, but when I cut into it, it was still dough in the center. I am not sure if it was because I use stoneware versus a glass loaf pan, but the inside of the loaf did not come out the way I hoped.
Regardless, I am going to try this recipe again and maybe just cook it in the bread machine instead or try a different loaf pan. We did eat around the dough parts because we can’t let good bread like that go to waste. It was absolutely deliciously sweet from the honey and a perfect balance of flavors.
I refuse to give up though which is why this is not a failed experiment in my book!
Conclusion: Thanks to Dine & Dish for giving me a recipe that I can’t wait to attempt again!
Related Links:
Getting to Know Your Bread Machine
Adventures in Bread Making: Artisan Bread in 5
Storing Homemade Bread & Bread Ingredients
********************
I am so excited to open our Notebook Experiments up to everyone and I hope that you will be able to participate this week or in weeks to come! I will be posting this each Wednesday so please mark your calendars if you plan to participate. You can post your entries at any time throughout the week and then leave your entry in the links below.
We have this handy banner that you are more than welcome to use, but it is not a requirement! It is just something you can add to add a little sparkle to your entry.
Rules for Participation:
1. Choose anything from any of our notebook entries (past or present) to do with your family. We have hundreds of bookmarked links of crafts, ways to save money, and organizing ideas.
2. Complete an experiment from the notebook and share about it on your blog or website. We would love to see pictures of what you accomplished or a detailed description of how your projects turned out. Please include a link to this entry, a link to the original posting of the entry (at the original crafster’s blog), and (to help us relocate the project) the date or link of the notebook entry where you found it. You can use the same formatting as our entries or you can just include that information in your post in your own unique way!
3. Post a link below. Please include your name or blog name & a fast description of your project. Example- MomAdvice (WHO bread)
I can’t wait to see what you create and what you find inspiring!


Hi Amy!
I’ve made bread at home for the last 12 years and I have a few tips and tricks that may help you with your loaf.
First, it’s okay if the dough is a little sticky-spritz some Pam on your hands or rub a little olive oil on them. A wetter dough works better than one that’s too dry.
Let the dough rest for about five minutes after it’s done kneading, and it will be less sticky.
Lower your oven rack. The bread got brown so fast because it was so close to the hottest part of the oven. The walls reflect heat back so the closer you are to one the more brown it will get in that spot. You want the loaf as close to the exact center of the oven as possible.
Try lowering your oven temperature 25 degrees. Most home ovens run a bit hotter than their gauges say they do.
I hope that helps-I’ve worn out two bread machines and am on my third dough hook for my Kitchenaid-you MUST be careful because baking bread can be addictive!
If I might plug a book here, “The Bread Bible” by Rose Levy Berenbaum, is hands down the very best bread book out there. She gets technical but it really does help you understand breadbaking like no other.
[Reply]
Oh my gosh! That bread looks delicious! I still haven’t found a bread machine, but it’s top on my wish list.
Thanks for hosting!
~Liz
[Reply]
Colleen- Thank you so much for the tips. It has been awhile since I have baked bread and those are some wonderful tips that you have offered here. I will definitely be looking for that book at the library! Thank you for the recommendation.
Liz- Thank you so much for participating this week- I really appreciate it!!
[Reply]
Another couple of tips.
Thump the bread – if it sounds hollow it is done. If not, keep cooking. If your bread is nicely browned, but doesn’t sound hollow, cover it with parchment paper and continue to cook. The parchment will help protect from over browning while allowing the insides to continue cooking.
[Reply]
I want to make this! Thanks for posting. We already have an experient for next week, but I will have to put it on a different blog as it really does not fit on my weight loss blog.
[Reply]
I have the exact same stoneware Pampered Chef bread pan and similiar bread recipie. My bread has done this same thing and a trick I’ve tried to help it is: once the top gets brown, I cover it with tin foil (just lay a piece right on top) and let it cook about 10-15 more minutes. Maybe this will help you too.
[Reply]
Amy, my friend…did you post about making homemade bread in the bread machine just for me? I know you did.
Thanks!
[Reply]
Another tip you could try-an instant read thermometer.
I make whole grain bread a lot and would still have this problem, even with thumping it and listening for the hollow sound.
I read about the thermometer trick on the King Arthur website and haven’t had a soggy, hollow loaf since I started using it. I’m not positive, but I think for white bread you want an internal temp of 190ยบ.
[Reply]
This looks really good! I haven’t made bread in a while, but maybe I need to try this one. I’ve found in the past, that any bread recipe that has honey in it, for me in my oven, it browns quickly on the outside – before the inside is done. So, I just cover mine up with a piece of foil once the outside starts to brown, and continue cooking as the recipe calls for. Also, it sounds weird, but I check my bread by using a chopstick – sort of like sticking a toothpick in it to see if it’s done, but the chopstick is longer, LOL! Of course, don’t do this if you don’t want the holes in the middle!
Have a great day!
[Reply]
Thank you ALL so much for all of these great bread tips. I am definitely going to try this one again and use your advice. Thank you so much!
[Reply]
Amy,
Want to let you know that I tried this recipe (to a “T”) yesterday in my bread machine and it was PERFECT! Hubby loved it! Also, made wonderful garlic bread to go with our spaghetti dinner last night. Super yummy – thanks for posting. I’ll use this recipe again!
[Reply]
I found a recipe for no-knead bread and it is fantastic! It is a rustic bread and has such good texture and flavor. I do think I will lower the temperature and bake it a little longer as it was kind of damp on the inside!
PS. I used the liner of my crock pot to bake it! Im going to experiment more with this bread!
[Reply]
Amy Reply:
February 27th, 2010 at 10:20 am
How smart to use your slow cooker liner to bake it. I would have never thought of that, Jan!
[Reply]
Hi, I am looking to purchase a bread machine soon. I do have a small bread machine which makes bread and is ready in 45 minutes, but I am looking for a larger bread machine. Any suggestions to which you are happy with results of machine bread making.
Thank you in advance.
[Reply]