 After our discussion on my old school baking day, I had lots of great ideas for how I could get around actually buying a bread machine. One of our readers, named Noreen, suggested that I check out a book called, “Artisan Bread in Five Minutes a Day” which would help me get around the whole bread machine process and required no kneading.
As soon as I read her comment, I put a hold on it at our library and picked it up the next day. With a cup of iced coffee in hand, I read through the entire process and what I would need to complete it.
For copyright reasons, I will refrain from going into the recipes themselves, but I will explain the process of this method so that you can decide if this something you could/would do to make bread for your family. The master mix recipe I am using is actually located here so you could attempt the first recipe without even getting the book.
There are lots of different recipes in the book and then different ways of shaping the dough recipes. I attempted the master recipe which included just the basics- water, yeast, flour, and salt.
The difference between making this dough and the traditional dough is that you literally dump the ingredients in (no need to even proof the yeast) and use a wooden spoon to just mix everything together. The dough is very wet and easy to stir and you don’t even have to break out the mixer.
You cover the dough and let it rise for two hours and then you stick it in the fridge for a minimum of three hours and up to fourteen days. Yes, that’s right..fourteen days! According to the authors, the dough will taste better and better the longer the dough sits in there and you can even use some of your old dough as a starter for a new dough, much like the process of making a sour dough starter.
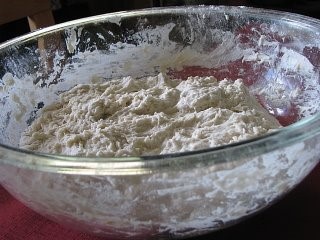
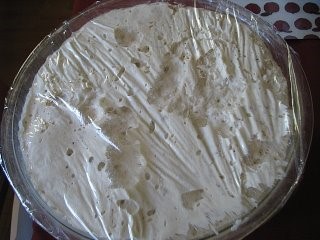 The first picture shows what this dough looks like when it is just incorporated- stringy and yucky looking. This second picture shows what the dough looks like after it rises. This master recipe was enough for four loaves so that is why it looks like there is so much. They have bigger recipes than this, but this is the amount of fridge space I could spare for the week.
I let this dough sit for two days before I made my first loaf. When you make your first loaf, you just “cloak the dough,” (sprinkle the dough on top with some flour) and then cut off a grapefruit section of the dough for your first loaf. Without any kneading or any real handling of the dough, you tuck the corners of the dough underneath and put it on a pizza peel (I used my extra pizza stone) that has been sprinkled with a little cornmeal. Now you let it rise and preheat your oven for 450 degrees. They suggested twenty minutes, comments on Amazon suggested preheating the entire forty minutes that the dough is rising to help achieve the best crust.
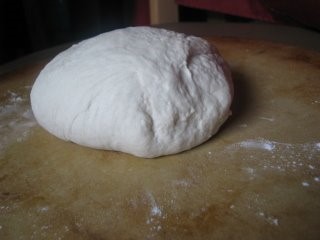 It should look something like the picture above. It is relatively smooth on top, but the corners are all tucked underneath. After you have shaped it like this and let it rise, you can slice the top two or three times.
You now slide the loaf (very awkwardly if you have no pizza peel) and then you fill a boiler tray with one cup of hot water and put it in the oven to help steam the oven up to give you a nice crisp crust. Don’t ever open the door and let it cook for thirty minutes.
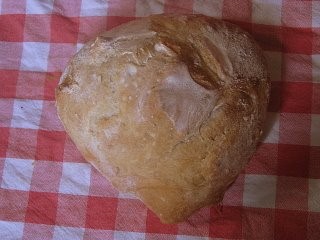 When I took it out, it looked like this. Now remember, this is my first loaf so I am sure I will get better at it, but I am pretty impressed with how this first loaf looks. Next time I will score it a little more and I will probably make more than one loaf at a time. The exterior of this loaf is nice and golden, and it is solid and crusty on the outside. Perfection!
The interior was a bit gummy though so I may cook it for another ten minutes or raise the temperature. This will just require some tweaking on my part, but our family still thought it tasted pretty darn good.
Now that I have made this first loaf, I am so excited to try the other loaves in the book. The entire process took very little of my time and I had very little clean-up (my least favorite part of making bread) so it is a great solution for a busy mom who wants to make homemade bread, but doesn’t have the tools or time to make bread from scratch.
Let’s also talk about the cost savings too. In our town, our local market has artisan breads for sale that cost about $4 a loaf. I buy my ingredients in bulk at Sam’s Club and I am estimating that this loaf of bread costs me about forty cents or less. What a savings and how elegant is this to bring to parties and when entertaining? You just can’t beat it!
A big thank you to Noreen for the suggestion and I hope you can try this recipe and tell me what you think! I have a demonstration from the authors posted below- this might help explain the process further.
Have you experimented with no-knead artisan breads? Do you make your own bread throughout the week? I would love to hear your process for bread making!