 I decided to hit the thrift store this Saturday in search of a china cabinet or unit where I could rest my laptop for our kitchen. I have been hunting for awhile, but just haven’t seen anything with the good bones that I was looking for. I walked around for awhile before I saw IT. You know? The one! The one that I have been hunting for ages looking for? Well, I basically threw my body upon an old eighties cabinet and requested the crew help me load it in my vehicle. The cost was only $99 and the units that I had been looking at in the stores were a minimum of $250 and upwards of $600. This piece looked like it was going to be perfect and I headed over to the hardware store and got all of the supplies to tackle this project.
I was inspired by Meredith’s recent post about a project that was done on Notes from a Cottage Industry. This blogger had painted her unit black and had gotten hers for a mere fifty bucks and made it look like a million.
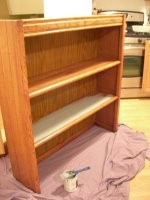
This was my first attempt at refinishing a piece of furniture and I was pretty nervous at first, but my tentative paint strokes turned to fast swipes as I became more confident with what I was doing.
This particular piece was a knotty oak wood and had worn brass handles on it. We prefer a more contemporary look with clean lines and a silver finish to our pieces so that is what I wanted to achieve when I refinished this piece.
I decided to leave the piece with the knots in the wood, opting to skip the
spackling step altogether, and purchased a primer tinted grey to give us a good start on the piece.
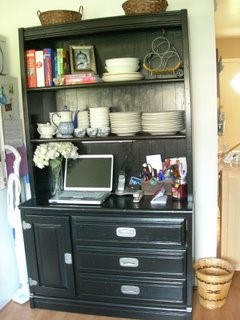
I sprayed the unit with a liquid degreaser to get all of the grime and muck of off the wood. Next I primed it with primer and allowed that to dry for a couple of hours. The next step was to put on the black paint and then another coat. Then another coat. Finally, another coat was applied before I could do the final touch-ups to the wood.
The hardware was the type that had been dropped into the a cut-out in the wood of the piece so there was no way that I could replace it. The worn dingy handles received a face-lift with a coat of stainless steel spray paint that was made especially for metal. Fifteen minutes to dry and only four dollars to redo all of the hardware. We are going to be spraying some other ugly brass fixtures around our house that need a little TLC, rather than purchasing new pieces which would cost us a lot more.
I started the project at six o’clock in the evening and painted until 2:30 in the morning. I collapsed in bed and then picked it back up at nine and had it fully assembled with my dishes and cookbooks on it by six the next evening.
It was a bear of a project, but I can’t stop glowing or patting myself on the back for what I accomplished in a single day. The unit is absolutely enormous and I did all of this by myself with the only help from my husband being the help with moving and reassembling it.
The finished product reminds of something you would get at Pottery Barn or Restoration Hardware and I doubt that it would be only $99!
The history of the piece was as interesting as the furniture was itself. A quick discussion with one of the employees seemed to indicate that it was repossessed. After pulling it all apart we found a very mysterious hole that at been cut out of the bottom. A hole that would have no purpose except to hide something. Weed, perhaps? Who knows!
What has been your biggest accomplishment that you have done in or around your house? Have you ever attempted to refurbish a thrift store or yard sale piece? Any blunders refurnishing anything?
* Originally aired April 2, 2007*