Welcome to a Play It Again, Momma week! This week we will be highlighting some of our favorite entries and today’s entries will be all about crafting. What could be better than that? I hope you will enjoy these and remember, if I can craft it, your kid can craft it!
 If you can believe it, I have been sitting on this blog entry for a year now. I only know this because the cakes that I have pictured were for my nephew and my best friend’s son and they are both celebrating their first birthday!
Even though I haven’t shared about this, my heart swells a little because I was so proud to carry such a pretty gift into the hospital. I felt even more proud when the nurses stopped me and asked me where I bought it. It was one of my proudest Martha moments because I am not very crafty, but I try oh-so-hard to have those impressive moments in my life.
Making a diaper cake is so easy and the results are extremely impressive! I had seen many companies advertising these on their websites, but they were charging fifty dollars (or more!) for these cakes. I ran a search and ran across this great picture tutorial on how to do it, and decided that it was definitely something I could do with just a couple of small purchases.
For my diaper cakes, I needed to establish a base for them so that I could transport them easily. I found a box in our garage and cut a square of cardboard out of it to rest the cake on. I then covered the cardboard with pretty wrapping paper in blues & pinks.
Next I followed the instructions for making the first diaper layer and used a stretchy headband that I had to bring the base diapers all together, making the first layer of the cake. It had suggested using a rubber band, but I didn’t have any that would secure that many diapers together. I then wrapped pretty ribbon around it and tied them together with that, securing them together with white tipped pins, which made it look like part of the ribbon itself. With the next two layers, I was able to use a rubber band to put them together, and then covered the rubber band with the ribbon.
Once you have all of your layers, you can stack them and stick a dowel rod in the center, or anything that is long and will help them stay jointed together.
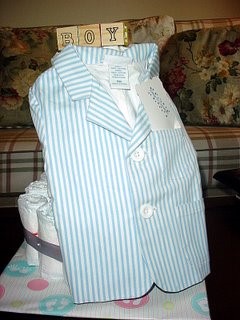
I went to Target and found little man blazers that would be perfect to go with the cake. I pinned these to the back and stuck a little stamped card in the pocket that said, “Congratulations!”
Next I went to the dollar store to buy some shrink wrap and two sets of wooden blocks (over by the baby supplies). I spelled out BOY on each of them and saved the rest of the blocks for our daughter to play with.
Shrink wrapping is very easy! Take the bag and pull it over your item and hold it at the top. Turn your blow dryer on and blast it until the wrapping shrinks tightly to fit your item. Use the bow that is supplied, or tie off with a bow of your own!
Diaper cakes can have small items tucked in the center of them from the mom’s registry or you can go with a themed cake. Remember, the more items you add, the more you add to your cost. If you are trying to keep the cost down, keep it simple.
Here are a few theme ideas:
Bath time Cake- add a baby towel, tuck washcloths in the center and put a Rubber Ducky on top. You can also add small bath toys or bubble bath.
Elegant Cake- Make your diaper cake look like a wedding cake, and surround it with fresh or silk flowers. People will hardly believe their eyes when they see it.
Beach time Cake- This would be for a little later in the baby’s life, but you can fill it up with beachy items. Some suggestions are a shovel, pail, baby sunglasses, a hat and some sunblock.
Night-Night Baby– Include a copy of, “Goodnight, Moon” with this cake. Add a little sleeper set, some calming nighttime lotion, and a compact disc of sweet baby lullabies.
The cost for each of these was:
Diapers– Free! they were given to us as a gift and Emily wore cloth so we never used them!
Diaper Cake Base– Free- made out of an old cardboard box we had!
Ribbon– $1.98
Little Man Blazer– Clearanced out for $2.98 at Target! Gotta love those clearance items!
Shrink Wrap & Baby Blocks– $2
Total Cost= $6.96
Sound Off: Would you guys like to see more, “Eat Your Heart Out, Martha!” moments on here? I have one a year, but I am happy to share the few I do have! I hope this gives you another thrifty gift alternative!