 Today’s Featured Cookbook: The Complete Tightwad Gazette
– it is full of cheap & thrifty recipes that a frugal cook just can’t do without!
Pantry Items of the Day (according to Martha): Here are the canned and bottled items you need for a well-stocked pantry. Italian plum tomatoes, tomato paste, green & black olives, olive paste, anchovies, anchovy paste, capers, chickpeas, black beans, hot sauce,
mustards, Italian oil-packed tuna, low-sodium chicken broth, canned fruits, chutneys, fruit jam. Heed expiration dates; otherwise, most canned and bottled goods, such as preserves, pickles, and relishes can be kept unopened, for up to one year. Once opened, glass bottles should be refrigerated; transfer unused canned goods to airtight containers and refrigerate for three or four days. This is especially important for canned acidic foods such as tomatoes or pineapples; once the interior of the can is exposed to air, the acidity is likely to cause rust. If you do see rust on an opened can of food, the can & food should be discarded.
Welcome to day two of the Iron Chef Moms Challenge. Please be sure to visit
Meredith’s blog where she will be sharing ways that you can stay within your budget just by utilizing the sales flier. Yesterday she shared tips for
cooking with loss leaders and the fabulous
Southern-style birthday dinner she was able to make out of ingredients she purchased on sale. Her total beat me by $1.65! Great job, Meredith!
Meredith has already posted her
day two results, as she has thrown a dinner together in the slow cooker (I love those kind of recipes!) using cabbage that she found on sale at her local supermarket. Her daily total came to $4.55 or $1.13 per person. I am excited to say that my total today was $3.14 or $.79 per person, which seemed more reflective of Meredith’s total yesterday. This puts me at $1.41 ahead today, but still $.24 behind, overall.
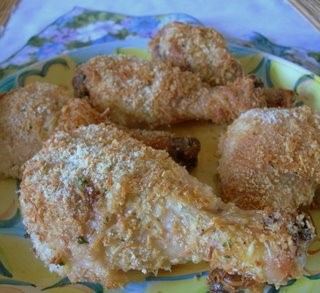
I have a little confession to make that might surprise you…I actually have never in my life cooked chicken drumsticks so last night’s dinner was a bit of an experiment in our house. If I purchase chicken, I
tend to go for the white meat because it is the healthiest option. Unfortunately, it is also the most expensive option so I have been trying other cuts of meat to keep our expenses down.
When I happened upon these two recipes, I was very excited to try something a little different. When I put it together, I realized it will be a perfect meal for us to take on our next picnic and it was a cinch to put together.
Here is a one little tip for today that I would like to share. This might be common knowledge, but it is a little trick that I use when I am cooking chicken with a coating or breading on the outside. I take a jelly roll pan and then rest our cooling rack on top of that and spray it lightly with cooking spray. I then bread the meat and rest it on top of the cooling rack. The reason I do this is because I absolutely hate it when you have a nice crisp side on one side and then a soggy mess on the flip-side. By using the cooling rack, I am able to get the heat to circulate on the bottoms, which help keep that crispy coating on all the sides of the meat.
Although the chicken was divine, I have to admit that I was most surprised by the simple side dish and how tasty it actually turned out to be. Potatoes prepared in the microwave? Covered in only a tablespoon of butter? Could Cooking Light Magazine have been mistaken when putting this dish together? I was wrong though- the amount of butter and the swiftness of the microwave made for some very tasty taters. My husband, who will only eat the fry variety of these, actually gobbled them up and asked if we could have them again.
Best of all, you just can’t beat the price tag on the meal itself!
Parmesan Chicken
4 drumsticks (the Aldi’s bag contains five drumsticks, but there will still be plenty of coating)
3/4 cup Parmesan cheese (in the dairy section, not in the shaker)
1 egg
1/4 cup breadcrumbs (I make my own and store them in the freezer)
In a shallow bowl, mix together cheese and breadcrumbs. In a separate bowl, beat egg until lemon colored. Dip chicken in egg, coating well. Roll in cheese. Bake at 400 degrees for 45-60 minutes.
Amy’s Notes: I removed the skin on the chicken drumsticks. Simply slip your fingers under the skin and pull to remove. I then proceeded with the coating. My drumsticks took 50 minutes to bake.
Microwave Taters
1.5 pounds potatoes- red or Russet. 1.5 pounds of potatoes equals about four cups of diced potatoes
1 tablespoon butter
Any seasoning of your choice- I used a teaspoon of Italian seasoning & salt and pepper
In a shallow baking dish, place a tablespoon of butter in the dish and microwave for fifteen seconds (or until the butter is melted). Dice the potatoes and put them on top of the butter. Top the potatoes with any seasonings of your choice. With a spoon, lightly toss the potatoes until they are all coated in the butter. Pop the bowl in the microwave and microwave for fifteen minutes. Every five minutes, just give them a little stir to make sure all of the potatoes get heated evenly.
Cost Breakdown:
Chicken Drumsticks- $1.89
¾ cup Parmesan Cheese- $1.89 for the container, $.95 is amount used
1 egg- $.89 for a dozen, $.07 for one egg
1.5 pounds potatoes- $1.49 for 10#, $.23
Total Cost To Feed Four- $3.14
Cost Per Person- $.79
Note: This recipe will be added to “the Aldi Queen” and all ingredients listed will be added to my weekly menu planner. My planners are posted every Friday so you can get a week’s worth of ideas and a grocery list in one stop!